Learn VueJS in simple and easy steps starting from basic to advanced concepts with examples including
Learning a new framework can be a very daunting process for any developer, specially for one that is still learning the base language (in this case JavaScript). This is why I have decided to create this series in which I will attempt to make the learning of Vue.js as easy and digestible as possible 🙂
Im not a fan of making long drawn out introductions, so I will assume that if you’re still reading:
- You have some basic HTML/CSS/JS knowledge. You don’t need to be an experienced front-end developer to take on on Vue as a development framework, but at the very least you need to be able to write your own HTML markup, understand the basic of how CSS works and, yes, how to write javascript. In the end, this is what this is all about.
- That’s it. No, really.
Hands-on Vue.js for Beginners (Part 1)
Vue as a library
There are several ways in which you can incorporate Vue into your web project. Let’s start with the simplest one (which you will probably not end up using a lot).
Most tutorials/articles will assume that you have understanding of how to set up a development environment in which you will use things like npm, webpack to set up your project - and while this is ideal because of what you get out of the box - we can start with a much simpler beginner-friendly approach. The reliable old <script> tag.
Go ahead and fire up your favorite code editor, and create a new file called index.html. (If you don’t have one yet, VS Code is a popular free choice.
<html>
  <head>
    <title>Vue 101</title>
  </head>

  <body>
    <h1>Hello!</h1>
    <div id="app"></div>
  </body>
</html>
Nothing fancy, we’re just setting the bones for a simple website. Now let’s get the Vue library in there. Paste this script tag before your closing </body>.
[...]
  <script src="https://cdn.jsdelivr.net/npm/vue/dist/vue.js"></script>
</body>
Now that Vue is being loaded into our page, we can start using it.
Let’s go ahead and create a new Vue instance, by newing it up inside a <script> tag. We will give it a selector by passing #app to the el property of the options object, and that way Vue will know where our app should be rendered. (Remember that empty <div> with an ID of app?)
Place this code after our last script tag.
<script>
    const app = new Vue({
        el: '#app', // 1
        data: { // 2
            myLocalProperty: 'Im a local property value' // 3
        }
    });
</script>
So whats happening here?
We created our new Vue instance, and pass it a configuration object. See the {} as a parameter?
- You have some basic HTML/CSS/JS knowledge. You don’t need to be an experienced front-end developer to take on on Vue as a development framework, but at the very least you need to be able to write your own HTML markup, understand the basic of how CSS works and, yes, how to write javascript. In the end, this is what this is all about.
- That’s it. No, really.
Displaying properties on our app
Right now if you open up index.html in your browser, not much is happening.

Let’s add some code to display our property inside the HTML. Your file should look like this:
<html>
    <head>
        <title>Vue 101</title>
    </head>

    <body>
        <h1>Hello!</h1>
        <div id="app">
          <p>My local property: {{ myLocalProperty }}</p>
        </div>

        <script src="https://cdn.jsdelivr.net/npm/vue/dist/vue.js"></script>

        <script>
          const app = new Vue({
            el: '#app',
            data: {
              myLocalProperty: 'Im a local property value'
            }
          });
        </script>
    </body>
</html>
Pay close attention to this line:
<p>My local property: {{ myLocalProperty }}</p>
What’s happening here is called variable interpolation, which is a fancy term for "i’m going to display the content of my myLocalProperty variable in this placeholder where my {{ }} are now.
Reload the page, and you will now see the string updates to reflect our variable.
Go ahead and try to change the string inside myLocalProperty to some other text and reload the page, you should see the text update accordingly.
Reactivity
Finally for this lesson, let’s talk about reactivity. You may have heard that Vue is a reactive framework. But what exactly does this mean? Open up your console in the chrome developer tools, and with your index.html loaded type:
app.myLocalProperty = 'Vue is reactive';
You will see the page react to this variable change!
Hands-on Vue.js for Beginners (Part 2)
In part 1 we figured out how to add Vue to our index.html with a regular <script> tag, and we managed to add our very first reactive property to the page. Today, let’s learn how we can change this property with user input.
Our code so far looks like this:
<html>
    <head>
        <title>Vue 101</title>
    </head>

    <body>
        <h1>Hello!</h1>
        <div id="app">
          <p>My local property: {{ myLocalProperty }}</p>
        </div>

        <script src="https://cdn.jsdelivr.net/npm/vue/dist/vue.js"></script>

        <script>
          const app = new Vue({
            el: '#app',
            data: {
              myLocalProperty: 'Im a local property value'
            }
          });
        </script>
    </body>
</html>
Listening to user events
In order to better showcase the reactivity of Vue, and to learn how to react to user events we are going to add a button to our app that will change the value of our myLocalProperty prop.
Go ahead and first add a new button to our <div id="app">.
<div id="app">
  <p>My local property: {{ myLocalProperty }}</p>
  <hr>
  <button>Click me</button>
</div>
Now, how do we react to this button getting clicked?
If you come from a jQuery background your instinct may be to try to do something like this: $('button').click();, however there’s a golden rule in Vue. NEVER manipulate the DOM (elements in the page’s HTML) directly.
Without going into super intricate details, Vue keeps a virtual “copy” of your HTML (in this case our div with the “app” ID) and automagically 🧙♀️ 🧙♂️ figures out where and how to update it when properties change.
If you make changes to the DOM directly with JavaScript, you risk losing these changes and unexpected behavior whenever Vue re-renders the content, because it will not be aware of these changes.
Enough theory though, let’s move on with the clicking. Add this event handler to our button:
<button v-on:click="myLocalProperty = 'The button has been clicked'">
  Click me
</button>
A couple things are happening here.
v-on:click="" In Vue we have these “directives” that we can add to our HTML content.
A directive simply put is an HTML parameter that Vue can understand.
In this particular case, we are telling Vue: Vue (v-), on the user’s click do this: "myLocalProperty = 'The button has been clicked'", which is simply an inline declaration to change the value of our property.
If you go ahead and open your index.html file now in the browser and click the button, you will see the string that we interpolated earlier inside the {{ }} in our code will react to our button modifying the property.
Alternate syntax
In most places you will most likely not find events being set on the HTML with v-on:[eventname] as we have in this example, because in Vue we have a very handy shorthand for this type of thing. @[eventname].
Let’s change our <button> click even to to use this shorthand:
<button @click="myLocalProperty = 'The button has been clicked'">Click me</button>
Methods
In most cases, when a user event like the click of a button is fired, you will need to do a lot more than changing the value of a variable. So let’s learn about methods (aka, functions).
To continue with our example, let’s make the button call a function that will do something really simple, it’ll change the value of myLocalProperty by appending a random number to a string.
Delete our previous implementation of @click and replace it with this:
<button @click="buttonClicked">Click me</button>
Notice that we’re not adding a () after "buttonClicked". We can omit these when we are not passing any arguments to our function. For example, @click="changeName('Marina')". (More on this later when we look at conditional rendering 🙂)
Now that we have our button ready to execute buttonClicked on clicks, we need to actually write this function.
Vue has a special place to write functions that our Vue instance can use. This place is inside the { } we passed to our new Vue({}) line before.
We will create a methods: {} property that will hold an object filled with our functions.
<script>
  const app = new Vue({
    el: '#app',
    data: {
      myLocalProperty: 'Im a local property value'
    },
    methods: { // 1
      buttonClicked() { // 2
        const newText = 'The new value is: ' + Math.floor( Math.random() * 100); // 3

        this.myLocalProperty = newText; // 4
      }
    }
  });
</script>
Let’s dissect this:
- You have some basic HTML/CSS/JS knowledge. You don’t need to be an experienced front-end developer to take on on Vue as a development framework, but at the very least you need to be able to write your own HTML markup, understand the basic of how CSS works and, yes, how to write javascript. In the end, this is what this is all about.
- That’s it. No, really.
In the context of a method the keyword this refers to the Vue instance. Vue will perform some magic behind the scenes so that you can read/write to your properties inside data by doing this.property = value.
Now that we have everything set up, reload your index.html file and click on your button. The value of our interpolated {{ }} string on the containing <p> will be updated every time you click the button, for every single time the buttonClicked function is executed. Once again, the magic of Vue’s reactivity is coming into play.
Wrapping up
If at this point you’re thinking, well, this is really easy then you’re on the right track. One of the things I love the most about this framework is its clear syntax and simplicity. It just works. But this should not be confused with thinking that Vue is not powerful.
We’re merely scratching the surface of what we can do with Vue so far, but you’ll see as we progress through these articles that these tiny building blocks put together will soon make the core of your amazing next app.
Hands-on Vue.js for Beginners (Part 3)
A simple if-else
One of the most important tools under the belt of any programmer regardless of framework is conditional rendering. The ability to show or hide parts of your app depending on a condition or value is a great place to start learning about this, and also about Vue directives.
We will continue building upon our previous example. In case you lost it or are just catching up, here’s what we have so far:
<html>
    <head>
        <title>Vue 101</title>
    </head>

    <body>
        <h1>Hello!</h1>
        <div id="app">
          <p>My local property: {{ myLocalProperty }}</p>
          <hr>
          <button @click="buttonClicked">Click me</button>
        </div>

        <script src="https://cdn.jsdelivr.net/npm/vue/dist/vue.js"></script>

        <script>
          const app = new Vue({
            el: '#app',
            data: {
              myLocalProperty: 'Im a local property value'
            },
            methods: {
              buttonClicked() {
                const newText = 'The new value is: ' + Math.floor( Math.random() * 100 );

                this.myLocalProperty = newText;
              }
            }
          });
        </script>
    </body>
</html>
So far we’ve managed to output our local properties into our app, and also listen to the clicks of a user on a simple button.
Let’s take it a step further and learn about our conditional rendering.
Let’s change our button clicks so that they generate a random number just as we have been doing, but instead of outputting a concatenated string, we will toggle the display of a couple of <p> elements with the results.
This will require some refactoring, so first let’s change our buttonClicked method to only calculate this new number, and we will store it on a new property called randomNumber.
<script>
  const app = new Vue({
    el: '#app',
    data: {
      myLocalProperty: 'Im a local property value',
      randomNumber: 0 // 1
    },
    methods: {
      buttonClicked() {
        this.randomNumber = Math.floor(Math.random() * 100); // 2
      }
    }
  });
</script>
Let’s take a quick look.
- You have some basic HTML/CSS/JS knowledge. You don’t need to be an experienced front-end developer to take on on Vue as a development framework, but at the very least you need to be able to write your own HTML markup, understand the basic of how CSS works and, yes, how to write javascript. In the end, this is what this is all about.
- That’s it. No, really.
We want to show/hide content depending on the result of our randomNumber calculation, so let’s have two new <p> elements. One will show only when randomNumber is greater or equal to 50. The other will show if it is less than 50.
<div id="app">
  <p>My local property: {{ myLocalProperty }}</p>
  <hr>
  <button @click="buttonClicked">Click me</button>
  <hr>
  <!-- 1 -->
  <p v-if="randomNumber >= 50">randomNumber is >= 50!</p>

  <!-- 2 -->
  <p v-else>Sorry, randomNumber is only <b>{{ randomNumber }}</b></p>
</div>
We’ve added a <hr> for clary and separation, and then our two <p> elements.
Let’s look at each in detail.
First, v-if="randomNumber >= 50". So, v-if is a Vue directive. Don’t get too caught on the definition of the term, it only means that it is a “special” value that we can place inside HTML elements that Vue will know how read and interpret. In fact, you’ve already used directives before. Remember v-on:click and @click? Those are directives too!
Theory aside, v-if tells Vue to only show this element if the condition we declare inside of it is true. In this case, “Vue: only show this <p> element IF and only IF randomNumber is greater than or equal that 50”.
Second, whenever you have a v-if directive, you can have an else case. But heads up, v-else ONLY works on an element that directly follows the one that holds the v-if (or a third option v-else-if). As you’d expect from any if - else statement, the element with v-else will get rendered on any other case that is not true for the first. Either/or.
Go ahead and reload your index.html and click the button a few times. You’ll see that the <p> tags get rendered reactively depending on the value of randomNumber.
v-if and v-show
If you’re curious to open your dev tools while you’re click around, you will notice a VERY important thing. v-if is not a display: block/hidden css switch toggle, it actually renders or destroys elements whenever the value of our conditional changes. If you want to have a visibility toggle directive, go ahead and try switching that first v-if for v-show and see what happens!
You may notice is that the block that has the v-else declarative is not showing anymore. This is because v-show is a lone-ranger and will only work by itself. So what is the benefit of using v-show?
There is a performance cost that you may want to consider when using v-if because Vue has to go and re-render the DOM (don’t worry it’s very smart about which parts it needs to add/remove) but this is a more extensive task than applying/removing css display properties.
Bottom line: If you’re going to toggle a small/medium part of the app a few times only, like a menu bar for example, v-if will usually do the trick. But if you’re going to be switching around tabbed screens for example, or huge chunks of your page then v-show may be cheaper in terms of performance because your markup is not getting re-written every time.
(P.S. before we continue, set back the directive to v-if or else you’ll get console errors because of the v-else below it is unpaired.)
Development tools
If you’re wishing you knew a way to figure out which value is getting randomized into randomNumber for our >= 50 condition without having to render it inside the <p> tag with our trusty {{ }} then Vue has a fantastic tool for the job.
Go ahead and install the Chrome Vue Devtools or Firefox Vue Devtools.
Since some of us may be opening the file directly on our browser using the file:// protocol, if you don’t see the extension working for you in chrome. Please first follow these instructions:
"To make it work for pages opened via file:// protocol, you need to check "Allow access to file URLs" for this extension in Chrome's extension management panel."

Right click the Vue icon on the extensions toolbar, click on manage extensions and then toggle the allow access switch.
Once you’ve added them to your favorite flavor of browser, go ahead and open them (Open your dev tools by “inspecting” or through the browser menus, then navigate to the “Vue” tab on the development pane) while you’re on your index.js page and you’ll notice quite a few goodies to play around with.
The screen you should see looks like this:
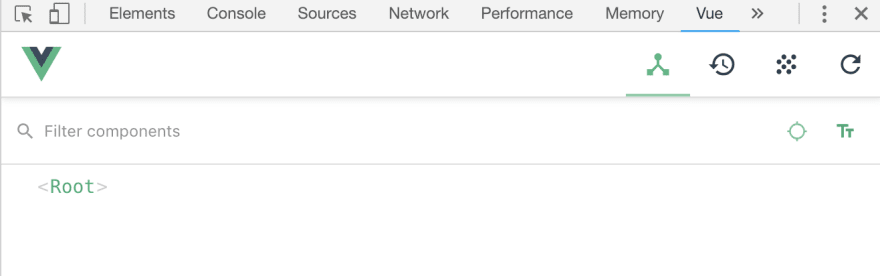
You’ll notice a toolbar with some icons on the top right, those we’re going to look at when we look at Vuex and you can safely ignore them for now.
The important thing in this screen however is the components tree. The dev tools will allow you to inspect every component that you create for a page, its properties (data) and later on when we look at state management how they interact with it. (Don’t worry if this makes no sense right now).
Click on the <Root> component and you will see this:
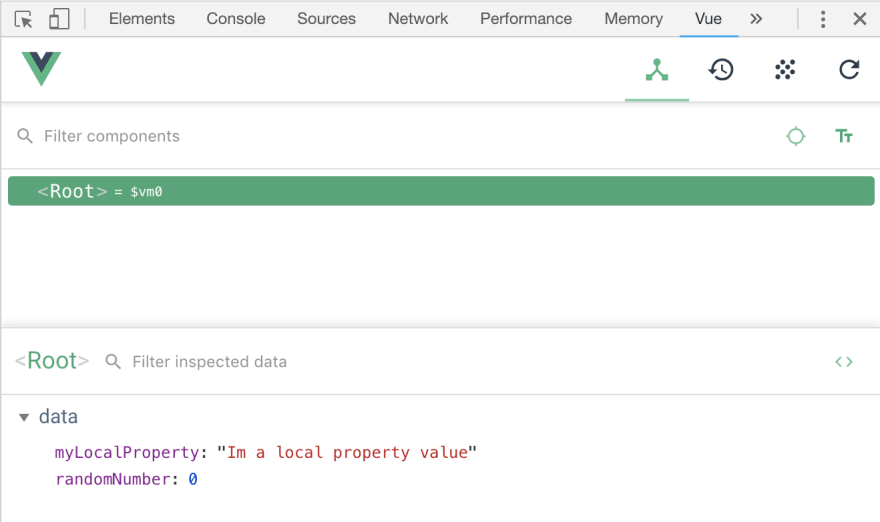
Notice our two local properties, myLocalProperty and randomNumber.
Click on your <button> a few times and see how the developer tools responds by showing you the changes in the randomNumber value.
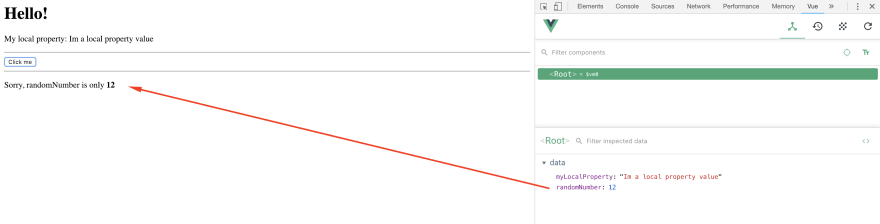
Now this may not seem super impressive right now, but this tool will be your #1 source of information when we start building a real world application, or even in your actual work projects, so definitely spend some time playing with it!
A neat thing for example with local storage, is that you can modify the values manually to test different states of your application. Hover of the property you want to modify and you’ll get an edit button and (in case of numeric properties) a + and - button to increase or decrease the value.

Conclusion
With the fundamentals that we’ve already covered: setup, events, properties and conditional rendering you now have the building blocks to start creating some really fun and reactive applications. However this is just barely scratching the surface of the power of Vue and it only gets more fun and interesting from here.
Hands-on Vue.js for Beginners (Part 4)
Last time we took at conditional rendering with v-if and v-show. This time we will learn how to loop through arrays and objects and create an element for each one of the items in them. We will also apply some of the concepts we have learned before.
v-for
v-for is one of the fundamental directives of Vue.js, and once you understand how it works the extension of what you can build inside your apps will grow exponentially.
v-for is, simply put, a for loop. If you don’t yet know what this means, a for loop is a piece of code that gets executed one time per each element in a group - which in turn is usually an Array or an Object.
We’re going to start with an empty slate today, so that everything we do has a clear purpose. Here’s a copy of our base index.html file for you to copy and paste into your editor.
<html>

<head>
  <title>Vue 101</title>
</head>

<body>
  <div id="app">

  </div>

  <script src="https://cdn.jsdelivr.net/npm/vue/dist/vue.js"></script>

  <script>
    const app = new Vue({
      el: '#app',
      data: {

      },
      methods: {

      }
    });
  </script>
</body>

</html>
Let’s start by creating a simple list, an array, that we can loop to output its content. We will create a property inside our data object, called games. Feel free to change the titles to your own personal favorites 🙃🎮
data: {
  games: [
    'Super Mario 64',
    'The Legend of Zelda Ocarina of Time',
    'Secret of Mana',
    'Super Metroid'
  ]
},
Awesome! Now that we have our array set up, let’s create a sad and simple <ul> element where will display it. For the sake of example, let’s keep it simple for now.
<div id="app">
  <ul>
    <li>Game title here</li>
  </ul>
</div>
Ok, looking good! Now we have to tell Vue that we want to output as many <li> elements inside the <ul> as needed to loop through our whole array.
In other languages, and even in vanilla JavaScript, you may be used to doing something that looks similar to this:
<?php foreach ($game in $games): ?>
  <li><?php echo $game; ?></li>
<?php endforeach; ?>
Where the loop encloses the element(s) it’s going to output or print out.
In Vue we declare our v-for directive on TOP of the element we want to loop. Make these changes to your <li> and we’ll dissect them after.
<ul>
  <li v-for="game in games">{{ game }}</li>
</ul>
Let’s take a look.
- You have some basic HTML/CSS/JS knowledge. You don’t need to be an experienced front-end developer to take on on Vue as a development framework, but at the very least you need to be able to write your own HTML markup, understand the basic of how CSS works and, yes, how to write javascript. In the end, this is what this is all about.
- That’s it. No, really.
Run your app inside the browser, and you should see your list of items being outputted to the screen.
Taking it up a notch
So far, so good? v-for is actually a very simple concept, and this example is super boring. So how about we make things a bit more complicated, by making our array include some objects, and also applying some v-ifs inside our list?
First things first, let’s update our games property with some more interesting data.
data: {
  games: [
    { name: 'Super Mario 64', console: 'Nintendo 64', rating: 4 },
    { name: 'The Legend of Zelda Ocarina of Time', console: 'Nintendo 64', rating: 5 },
    { name: 'Secret of Mana', console: 'Super Nintendo', rating: 4 },
    { name: 'Fallout 76', console: 'Multiple', rating: 1 },
    { name: 'Super Metroid', console: 'Super Nintendo', rating: 6 }
  ]
},
As always feel free to use your own favorite titles. PS. Super Metroid’s rating of 6 is not a typo, it’s just THAT good - and i’m biased. 😬 Also, Bethesda, you should be ashamed. cough Anyways.
If you run your app this point it will not particularly break, but it will just output the objects in a string format, which is not pretty. In fact, we’re going to scratch our <ul> approach completely, and use a <div> to output our information. (Don’t worry, it’ll still be ugly).
Update your whole <div id="app">:
<div id="app">
  <div v-for="game in games">
    <h1>{{ game.name }} - <small>{{ game.console }}</small></h1>

    <span v-for="star in game.rating">❤️</span>

    <div v-if="game.rating > 5">Wow, this game must be <b>REALLY</b> good</div>
  </div>
</div>
WOAH. Ok, maybe not, but don’t worry, you already know everything you need to understand what’s happening here.
- You have some basic HTML/CSS/JS knowledge. You don’t need to be an experienced front-end developer to take on on Vue as a development framework, but at the very least you need to be able to write your own HTML markup, understand the basic of how CSS works and, yes, how to write javascript. In the end, this is what this is all about.
- That’s it. No, really.
Go ahead and run this again in your browser and behold the awesomeness of not bothering with CSS.
What if I don’t need a wrapping DIV?
If at any point you find yourself making a bunch of <div> elements simply to wrap up your v-for loops, theres a special HTML tag you can use to help your case. <template></template>
If you, for example, remove the wrapping <div> and change it for <template> take a look at your developer console and you’ll see that the <h1> and <span> elements are not wrapped by anything.
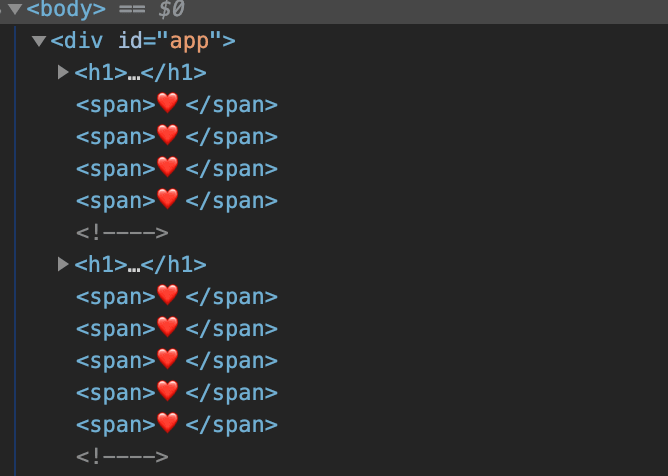
<template> is special, because Vue will treat it as a wrapper element but it won’t be rendered into the HTML when we execute it, so you can safely use it to wrap a bunch of other elements logically for the loop without affecting your markup.
The :key attribute
One final thing that I purposely left for the end. The :key attribute.
When you are looping through elements with v-for Vue.js has NO clue how to track your elements for reactivity, because it can’t “tell apart” one object from the other. What this means for you is that since Vue can’t do this, it will re-render the WHOLE section of the page that is being created by this loop. In our case it’s a very small section and the performance hit would probably be minimal, but it’s something that you should keep in mind - and just do it for best practice.
Now, how do we use it?
:key expects some string it’ll use to “name” or “track” the element, so we need to give it a unique identifier. In the case of our games it’s simple, we can do:
<div v-for="game in games" :key="game.name">
I’m pretty certain that we’re not going to have the same game twice in this list, so this is pretty safe. An id if you have data coming from a database is also ideal to use here.
If you are curious about the intricacies of :key you can always take a look at the documentation. Key’s docs
In fact, now that you have gotten this far I can’t stress enough the importance of getting acquainted with the documentation. Vue.js 's docs are impressively good, and very very clear with code examples, the documentation team does a fantastic job to keep them updated and clear - big shout out to all of them.
Final code
Here’s the final code, just in case.
<html>

<head>
  <title>Vue 101</title>
</head>

<body>
<div id="app">
  <div v-for="game in games" :key="game.name">
    <h1>{{ game.name }} - <small>{{ game.console }}</small></h1>

    <span v-for="star in game.rating">❤️</span>

    <div v-if="game.rating > 5">Wow, this game must be <b>REALLY</b> good</div>
  </div>
</div>

  <script src="https://cdn.jsdelivr.net/npm/vue/dist/vue.js"></script>

  <script>
    const app = new Vue({
      el: '#app',
        data: {
          games: [
            { name: 'Super Mario 64', console: 'Nintendo 64', rating: 4 },
            { name: 'The Legend of Zelda Ocarina of Time', console: 'Nintendo 64', rating: 5 },
            { name: 'Secret of Mana', console: 'Super Nintendo', rating: 4 },
            { name: 'Fallout 76', console: 'Multiple', rating: 1 },
            { name: 'Super Metroid', console: 'Super Nintendo', rating: 6 }
          ]
        }
    });
  </script>
</body>

</html>
Challenge
This time you get a challenge, if you wish to accept it. Add a @click listener to the <span> which outputs the game’s rating, and increase the ranking by 1 with each click for that UNIQUE game. You already know everything you need to achieve this 😉.
Hands-on Vue.js for Beginners (Part 5)
This time around we’re going to look (finally) at components! So get some ☕️ and let’s get started.
Here’s the clean slate for today’s article 😁
<html>

<head>
  <title>Vue 101</title>
</head>

<body>
  <div id="app">

  </div>

  <script src="https://cdn.jsdelivr.net/npm/vue/dist/vue.js"></script>

  <script>
    const app = new Vue({
      el: '#app',
      data: {

      }
    });
  </script>
</body>

</html>
Component Basics
We’re going to nose dive right into component creation, because this is where really fun stuff starts. But rest assured that this is only barely brushing the power of components. Also, we still have yet to learn computed properties and watchers, which will also be a huge aid. But we’ll cover that next time on top of what we learn today.
Components are a core part of the Vue.js framework, they are your Lego blocks for building reactive, rich applications - and luckily for us they are super simple to learn and use!
Think of a component as any element in your webpage/app that you want to use one or several times. It can be as smol as a button, or input, or as a big as your whole menu bar or even the whole page’s view.
The advantage of creating a component, is that you write the logic for how its displayed (HTML/CSS), and how it interacts with the user (JS) once - and then you just use it all over your app.
As usual, we’re going to start with the simplest possible example, a button.
Let’s define first the blueprint or template for this component, we’ll call it awesome-button and it shall be so!
Let’s define a new awesome-button component. Copy this code above your new Vue declaration.
Vue.component('awesome-button', {
  template: `<button @click="clickHandler">Click me for some awesomeness</button>`,
  methods: {
    clickHandler() {
      alert('YAAAS 😎');
    }
  }
});
The Vue object that is made available to us through the Vue.js script tag that we added on day 1 has this component method that we are calling here. It allows us to create a new component, as expected. The first parameter we are setting is a String, which will be the name of our component.
The second parameter is a JavaScript object, which - surprise - is actually the same type of configuration object that we have been using for our main Vue instance! What does this mean for you? That you already know how to assign properties and methods for this new component.
In the example above, you will notice just one difference - the template property. In here we’re declaring a String (note that we’re also using the back-tick character to wrap it so that we can declare multiple lines later on if we need without having to concatenate multiple strings), this String will hold our actual HTML code for this component. In the case of this particular example, just a simple <button> tag will suffice.
If you reload your page right now, nothing will happen. Remember earlier I told you this was only the blueprint/template? It’s time to actually render it on our page.
Head over to the <div id="app"> where we have been placing all our markup, and create a new <awesome-button> element.
Your HTML should now look something like this:
<div id="app">
  <awesome-button></awesome-button>
</div>
Load the page, and now you will actually see the button being rendered on the page. Place a couple, or ten more (reader’s choice) awesome-button tag on the page. Now you start to see the power of components, although at this point I think we can take it up a nudge.
Bonus: If you’re the curious type, take a look at your page source and compare it to the inspect feature with your browser’s developer tools. When the page load, Vue.js is using the <awesome-button> tag as a placeholder to where it should put the parsed content of our template.
Level 2 - Something a little more useful
Let’s revisit our example from last week, and play some more with our games data.
First, let’s re-add this array of games into our data() in the main Vue instance.
const app = new Vue({
  el: '#app',
  data: {
    games: [
      { name: 'Super Mario 64', console: 'Nintendo 64', rating: 4 },
      { name: 'The Legend of Zelda Ocarina of Time', console: 'Nintendo 64', rating: 5 },
      { name: 'Secret of Mana', console: 'Super Nintendo', rating: 4 },
      { name: 'Fallout 76', console: 'Multiple', rating: 1 },
      { name: 'Super Metroid', console: 'Super Nintendo', rating: 6 }
    ]
  }
});
Just as before, feel free to update these with your favorite titles.
This time, however, we are going to create a game-card component, that will make a bit more sense to display our data in.
Ready for this?
Vue.component('game-card', {
  props: ['gameData'],
  template: `
    <div style="border-radius: .25rem; border: 1px solid #ECECEC; width: 400px; margin: 1rem; padding: 1rem;">
      <h2>{{ gameData.name }} - <small>{{ gameData.console }}</small></h2>

      <span v-for="heart in gameData.rating">❤️</span>

      <button @click="increaseRating">Increase Rating</button>
    </div>
  `,
  methods: {
    increaseRating() {
      // this.game.rating++ ?
    }
  }
});
Don’t get overwhelmed, you already know all/most-all of this 😃!
We’re creating a new Vue.component and naming it game-card. Let’s skip props for a second, and look at the template.
Nothing new here, except you may have noticed we’re accessing the properties of a gameData property that is not defined inside data, but inside the props property.
Afterwards, we declare our methods object, with the increaseRating method inside it. I’ve purposely commented out this.game.rating++ which would be how you may want to address this particular function, but it won’t work! Now it’s time to talk about props.
Component Props
One of the reserved properties we can have on our custom components is called props. In its simplest form, it will take an array of Strings that will define variables. In our previous example, we are telling the component blueprint/template that we want it to be aware of a property called game.
Props will allow us to pass information into our components from outside! Let’s view this in action, it’ll be easier to grasp.
First, let’s add a bunch of <game-card> items to our app. We will be using a v-for loop just like we did before, but we’re going to loop on top of our custom components this time!
<div id="app">
  <awesome-button></awesome-button>
  <hr>
  <game-card v-for="game in games" :game-data="game" :key="game.name"></game-card>
</div>
That is quite a bit of game being tossed around, so let’s look at it in detail.
First step, we are creating our <game-card> component, like we discussed earlier.
After, we add the v-for="game in games" loop like we saw last week. This creates a game variable that will hold the current game in the loop, and we can use it right away!
Finally, we assign to the template’s prop, gameData, a value, in this case our game variable from the loop. Notice that instead of camel case, we’re using a hyphen game-data because HTML is case insensitive. If you are having a hard time grasping this, try thinking it in object terms. We are doing something similar to game-card.props.gameData = game
Don’t forget about the :key!
There is a huge gotcha to mention here, we are passing game to our game-data prop, but there is a : behind it. Did you notice?
When we assign a property to a component instance, theres two ways to go about it. Following our example, we could either do it with the : before it (this is a shorthand for v-bind:!). This will make sure the data that we are passing after the ="<here>" is used by JavaScript as a variable, or an actual piece of code.
If you were to type instead gameData="game", then Vue will take this as assigning the gameData prop the String "game". So something like: game-card.props.gameData = "game"!
Go ahead and take a break from theory and actually go and run this in your browser. You will see as expected, that our whole <game-card> component’s template is being rendered for each one of our game’s.
The greatest part about this is that if we were to make a change to our HTML, it will be updated everywhere in our app.
Also, and most importantly, components allow you to contain the logic for that particular component. Let’s revisit that game-card’s increaseRating() method.
Component Data vs. Props
Props for components actually can be a very lengthy subject, but there is a very important rule of thumb that you must always keep in mind. A property should NEVER be modified from inside a component.
In fact, if you try to do this, Vue will throw all sorts of warnings and yell at you in the console - because this WILL lead to unexpected behavior. Here’s the documentation, in case you want to read about it: Mutating props in Vue2 is an anti-pattern.
How then, will we modify the value of rating inside of our component’s storage? The key is in the question itself! We need to make a copy of this prop into our data so that we can actually modify it.
Let’s first add our data to our game-card component, and assign it a new non-conflicting name (props and data props will conflict if named the same), and then pre-fill it with the prop’s value.
data() {
  return {
    game: {...this.gameData}
  }
},
Couple of things to note here, but before that, if you don’t know yet what {...gameData} is doing, it’s a spread operator. I won’t go into full detail here and will try to post a brief article about it soon, but basically were making a copy of the gameData prop, because we don’t ever want to modify that from the child.
The data property’s return:
When we learned about the data property, I told you that it needed to hold an object with all the properties we needed, and this is how we’ve been doing it for our main Vue instance. However for components we actually need to make it a function, by adding (), and second return the actual object.
But WHY?! 😫
Simply put, there can be one or many instances of your component, right?
Each instance will need a unique data object! You don’t want to share a single data object between all of those, or they would all share the same title for example - and the point of this whole app would be lost.
So the whole reason behind making it a function and returning an object, is that Vue can ☎️ call this function every time it creates one of our game-cards. That way each one will get a unique object of data to play with!
Accessing our props:
When we create the game’s data property, we are assigning it this.gameData, so a couple of things to learn here. props can also be accessed within your component scripts via this just as your local state props from data. So here, we are setting game to be equal to the gameData property.
This means now we have to update our HTML, so inside the component switch the gameData reference for game like so:
<div style="border-radius: .25rem; border: 1px solid #ECECEC;">
  <h2>{{ game.name }} - <small>{{ game.console }}</small></h2>

  <span v-for="heart in game.rating">❤️</span>

  <button @click="increaseRating">Increase Rating</button>
</div>
Run this once again in your browser, and you should get the same results.
Finally, we are at the point where we can make our increaseRating method work! Head to the method and replace the comment with the following:
methods: {
  increaseRating() {
    this.game.rating++
  }
}
With every click, we’re going to increment the component’s internal data property which holds the game’s rating, -not- the prop.
There is a lot of theory to be learned about components, i’ve just began to scratch the surface, but hopefully you are starting to have a clearer picture of why frameworks like Vue are so popular, and so much fun to use.
From this point forward we’re going to start looking at what I consider intermediate topics, like computed properties, watchers, events, etc. So hopefully you are excited to get to know the meaty part of Vue soon enough.
In case you need it, here’s the complete code for today, and thanks for reading! 🤗😋
<html>

<head>
  <title>Vue 101</title>
</head>

<body>
  <div id="app">
    <awesome-button></awesome-button>
    <game-card v-for="game in games" :game-data="game" :key="game.name"></game-card>
  </div>

  <script src="https://cdn.jsdelivr.net/npm/vue/dist/vue.js"></script>

  <script>
    Vue.component('awesome-button', {
      template: `<button @click="clickHandler">Click me for some awesomeness</button>`,
      methods: {
        clickHandler() {
          alert('YAS. 😎');
        }
      }
    });

    Vue.component('game-card', {
        props: ['gameData'],
        data() {
          return {
            game: {...this.gameData}
          }
        },
        template: `<div style="border-radius: .25rem; border: 1px solid #ECECEC; width: 400px; margin: 1rem; padding: 1rem;">
          <h2>{{ game.name }} - <small>{{ game.console }}</small></h2>

          <span v-for="heart in game.rating">❤️</span>

          <button @click="increaseRating">Increase Rating</button>
        </div>`,
        methods: {
          increaseRating() {
            this.game.rating++
          }
        }
      });

    const app = new Vue({
      el: '#app',
      data: {
        games: [
          { name: 'Super Mario 64', console: 'Nintendo 64', rating: 4 },
          { name: 'The Legend of Zelda Ocarina of Time', console: 'Nintendo 64', rating: 5 },
          { name: 'Secret of Mana', console: 'Super Nintendo', rating: 4 },
          { name: 'Fallout 76', console: 'Multiple', rating: 1 },
          { name: 'Super Metroid', console: 'Super Nintendo', rating: 6 }
        ]
      }
    });
  </script>
</body>

</html>
Hands-on Vue.js for Beginners (Part 6)
Let’s talk about computed properties.
So far you’ve learned how Vue handles its own local state, the one we put inside data, and how a component can handle its prop properties - the ones that get handed down by the parent.
However, there is a type of properties in Vue which are called Computed Properties. Let’s take a look at these today.
We’re going to use a clean slate today, so that we can build a clear example. Here’s the code.
<html>

<head>
  <title>Vue 101</title>
</head>

<body>
  <div id="app">
    <age-calculator></age-calculator>
  </div>

  <script src="https://cdn.jsdelivr.net/npm/vue/dist/vue.js"></script>

  <script>
    Vue.component('age-calculator', {
      template: `
        <p>
          NAME has been kicking butt for X days!
        </p>
      `
    });

    const app = new Vue({
      el: '#app'
    });
  </script>
</body>

</html>
I’ve gone ahead and added the scaffolding for an age-calculator component, right now it only outputs a <p> tag with an X where we’re going to perform some sort of calculation. I’ve also added the corresponding tags <age-calculator> to the div#app.
If you need a refresher on basic components, take a look at Part V of this series, or better yet, nosedive the official docs!
When a simple prop isn’t enough
Before we write any code, let’s talk about what we’re trying to accomplish.
I want to have a component where I pass it someone’s age, and it will tell us how many days they’ve been around to enjoy avocados. If you don’t like avocados then this is where our relationship ends, have a nice life.
Let’s tackle the easy tasks that we already know how to accomplish, first we need an array of people with ages so that we can loop through it and output a bunch of components. Let’s add the corresponding data.
const app = new Vue({
  el: '#app',
  data: {
    people: [
      { name: 'Mario', age: 38 },
      { name: 'Luigi', age: 38 },
      { name: 'Samus', age: 31 },
      { name: 'Link', age: 20 },
      { name: 'Marina', age: 32 },
      //Add yourself here :)
    ]
  }
});
Now, let’s set up our v-loop to output an age-calculator per each one.
<div id="app">
  <age-calculator v-for="person in people" :key="person.name"></age-calculator>
</div>
Awesome, now let’s allow the age-calculator component to receive a person, remember we do this with a prop. So first, let’s add this new prop to the component.
Vue.component('age-calculator', {
  props: {
    person: {
      type: Object,
      required: true
    }
  },
  template: `
    <p>
      {{ person.name }} has been kicking butt for X days!
    </p>
  `
});
Bonus! Before you learned that to declare the props that a component can receive, you set up an array of strings props: ['person'] and this is fine in most cases. But what happens if we want a bit more control?
You can also, like in this case, set props to be equal to an object. Inside this object, we can create a property per each property we want to declare.
Inside the property declaration, in this case person, we can set some configuration values.
type to declare which (duh) type of data we’re passing, so Object, Array, String, Number for example.
required is a boolean that allows us to mark this property as required for the component to work.
You can also set a default value, but we’re not going to use that here.
Next, look at the template. We are now outputting the person’s name {{ person.name }} onto the <p> tag.
One more thing before we can actually run this in our browser though. Can you tell what we’re missing?
We still need to pass the actual person to the age-calculator component!
Go into the render loop and pass in our variable.
<age-calculator
  v-for="person in people"
  :person="person"
  :key="person.name"></age-calculator>
Go ahead and run this in your browser to check that everything is working. Baby-steps!
Note Before we move on, if you’re curious what setting a prop to required will do for you, try removing this last bit we did when we pass the person to the component and look at your dev tools in the console section.

Handy, ain’t it? 👌
The actual Computed Property
Alright, enough setting up and review.
We still have one more feature to tackle inside our component, we want to calculate the number of days each person has been alive.
Granted, it’s not a very hard calculation, we just have to multiply 365 times the number of years (we’re not going to go hardcore with JS Dates here). And in fact, we could go ugly and direct and put this straight into our template.
template: `
        <p>
          {{ person.name }} has been kicking butt for {{ person.age * 365 }} days!
        </p>
      `
This works, sort of. But what happens when you require more logic? A harder computation, some ifs/ands/ors/whens/beers? Then you’re in a real problem because you can’t really put that much logic inside the template, or it’s going to get unmanageable real quick.
Here’s where computed properties shine. Computed properties are in the end functions, that will execute a bit of code, and return a value. This value is now treated like a property, which means we can straight up use it in our template.
Let’s take a look at how to set it up. First, let’s add the computed wrapper to our component.
Vue.component('age-calculator', {
  props: {
    person: {
      type: Object,
      required: true
    }
  },
  template: `
    <p>
      {{ person.name }} has been kicking butt for {{ person.age * 365 }} days!
    </p>
  `,
  computed: {
    // Computed props go here
  }
});
So far so good, in fact this structure is the exact same one we have been using for methods, remember? (If you’re thinking a method could also solve our problem, you’re on the right track - we’ll talk about this in a minute.)
Let’s create a new computed property called daysAlive, it needs to be a function, and it needs to return something.
computed: {
  daysAlive() { //Remember, computed props are functions in the end
    return this.person.age * 365
  }
}
Take note that just like in methods we need to access the person prop though this, only inside the template we can use it directly! Other than that, nothing too fancy going on.
Now let’s use this new daysAlive prop in our template.
template: `
  <p>
    {{ person.name }} has been kicking butt for {{ daysAlive }} days!
  </p>
`,
Note that we’re outputting the value of the daysAlive –property–, (aha moment here). Vue treats computed props as, well, props - so we can use this here as you would a props prop, or a data prop.
In fact, Vue makes it so that if you would need to use this prop inside a method for example, you would have to access it through this.daysAlive. Neat right? It ACTUALLY becomes a prop. 🤯
YAY, run it in the browser and bask in your awesomeness.

Methods vs Computed Properties
You may have noticed a lot of similarities between methods and computed props, I mean, they’re basically identical at code level. However there is a CORE difference that you need to understand in order to harness them fully.
Computed properties get cached.
What this means is, in the simplest possible way to explain it, that behind the scenes Vue will “read” your code and look for reactive dependencies - so data props and props props. It will watch these properties, and whenever they change, Vue will recalculate the value of your computed property. If they don’t change, it’ll just use a cached/stored value.
Methods, on the other hand, are ran EVERY time - there is no caching, no code reading, no magic. They’re just plain old functions.
Why does this matter? When are these functions called?
Every time your component/app re-renders (so every time a component’s data change, or every time it’s parent’s data changes), Vue will figure out if that data is tied to a computed property, if it’s not - it won’t call this function again. For regular methods however, they will be re-run every time!
For this example, where we’re doing a very simple calculation for these few objects it doesn’t really matter, frankly. But when you start doing some serious code weightlifting on top of a thousand components, then you’re going to want to leverage this caching or your app is going to take a hit on each render cycle.
If you want to read more, here’s a link to the official docs regarding computed properties.
Here’s the complete code for today.
<html>

<head>
  <title>Vue 101</title>
</head>

<body>
  <div id="app">
    <age-calculator
      v-for="person in people"
      :person="person"
      :key="person.name"></age-calculator>
  </div>

  <script src="https://cdn.jsdelivr.net/npm/vue/dist/vue.js"></script>

  <script>
    Vue.component('age-calculator', {
      props: {
        person: {
          type: Object,
          required: true
        }
      },
      template: `
        <p>
          {{ person.name }} has been kicking butt for {{ daysAlive }} days!
        </p>
      `,
      computed: {
        daysAlive() {
          return this.person.age * 365
        }
      }
    });

    const app = new Vue({
      el: '#app',
      data: {
        people: [
          { name: 'Mario', age: 38 },
          { name: 'Luigi', age: 38 },
          { name: 'Samus', age: 31 },
          { name: 'Link', age: 20 }
        ]
      }
    });
  </script>
</body>

</html>
Hands-on Vue.js for Beginners (Part 7)
We are nearing the end of journey, and you are almost ready to graduate from Vue Padawan level. But first watchers, you must learn.
We’re going to tackle two very important concepts today, watchers, as mentioned, and form input bindings.
Let’s get started and we’ll build a super simple form to showcase both these fantastic features.
<html>

<head>
  <title>Vue 101</title>
</head>

<body>
  <div id="app">
    <label>What's your favorite game ever?</label>
    <input type="text" >

    <hr>

    <p>{{ response }}</p>
  </div>

  <script src="https://cdn.jsdelivr.net/npm/vue/dist/vue.js"></script>

  <script>
    const app = new Vue({
      el: '#app',
      data() {
        return {
          favoriteGame: null,
          response: ''
        }
      }
    });
  </script>
</body>

</html>
Let’s take a look at what we’re doing here.
Inside our <div id="app"> we’ve created a label and the most basic form of an <input> tag. After, we’re outputting the result of a response property.
Inside our Vue instance, we’re declaring a local state that includes two properties, favoriteGame and response. Also note, that we’re using the data() as a function with the return syntax this time, if we don’t v-model won’t work.
The idea here, is that we want to first be able to store whatever the user inputs on the <input> field into a variable, that way we can use it later on as we see fit.
In vanilla JS or even jQuery you may be tempted to try to capture the input element with a $('input') or document.querySelector, but in Vue we have a much simpler way to achieve this mundane task.
Introducing v-model.
v-model
As you’ve learned before, everything that starts with a v- is a Vue directive. What v-model in particular translates to, in very simple terms, is:
Vue, I want you to grab this input that i’m putting this v-model directive on, and make a two way relation with it. I’m going to give you a property, and whenever I change this property anywhere in my code - I want you to change it on the input, and likewise, whenever this input changes - I want you to reflect those changes in my prop.
Let’s try to put this in action, go to the <input> declaration, and add the v-model directive to it.
<input type="text" v-model="favoriteGame">
Now go and run this in your browser and type something into your magical input box of goodness. Taaaaa…da?
Ok, even though nothing seems to be happening. Go ahead and open your Vue devtools and inspect the <Root> element’s data. YEAH. Progress!
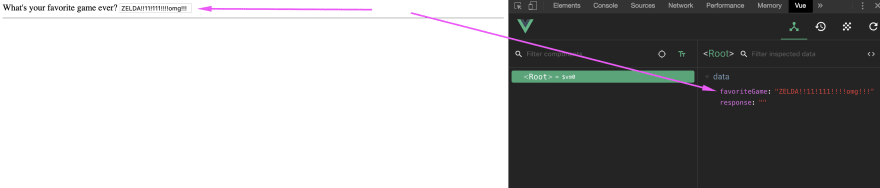
Now go into the dev tools and change the value of favoriteGame into something else (don’t forget the quotes wrapping it, we need a string here). EZ-BINDS-R-US 💪
Vue is VERY smart about how to bind with every type of native HTML form inputs, so really you only need to drop in the v-model bomb and profit, but the power of v-model really shows when you start building your own wrapper components and using it a-la-carte.
Behind the scenes v-model is actually setting up a v-bind:value and a v-on:input even binding, but going in depth on this is a bit out of scope so i’m just going to drop you a link if you’re interested in looking further and look the other way. v-model on Components
Watchers
Now that we have our sweet sweet two-way binding v-model awesomeness in place, let’s actually do something with it.
You’ve already learned that with a state data prop you can put it in your template with {{ favoriteGame }}, so no need to go over that again. You’ve learned how to use it inside a method and computed prop with this.favoriteGame - so no need to redo that. But what happens when you want to “listen” or “react” to this property actually getting modified?
Computed properties are fantastic at recalculating stuff and returning a value, but what if we want to modify another piece of state on our app when this value changes, or maybe even fire an async request of some sort? In these niche cases watchers come and save the day.
Let’s go an add the boilerplate for creating a watched prop.
<script>
  const app = new Vue({
    el: '#app',
    data() {
      return {
        favoriteGame: null,
        response: ''
      }
    },

    // Watchers here
    watch: {
      favoriteGame(newValue, oldValue) {
        console.log('Favorite game was ' + oldValue + ' and now is ' + newValue)
      }
    }
  });
</script>
Watchers are defined inside a watch property in our instance or component, and we pass it an object that will include a property for each one of the props we want to watch.
In simple terms, every data prop or props prop you want to watch/react to needs to go inside this watch: {} with its name. So if your prop is named favoriteGame that’s the name of your function.
Each one of these functions gets two params passed to it, the first one will be the newValue that this prop is getting, and the second one is the oldValue that it used to have before the change.
Check out the console.log statement and refresh your browser window. Try typing something into the <input> and check out your console output. Every time our favoriteGame prop changes in ANY way, this watcher will be fired.
Now let’s actually do something cool with it. Remember our response prop? Let’s put something into it depending on what the user answers, and have some fun with it.
watch: {
  favoriteGame(newValue, oldValue) {
    if (!newValue) return // If its an empty string, pass

    // If the new value contains the keyword metroid
    if (newValue.toLowerCase().indexOf('metroid') !== -1) {
      this.response = 'Ceres station is under attack!'
      return
    }

    // If the new value contains the word zelda
    if (newValue.toLowerCase().indexOf('zelda') !== -1) {
      this.response = 'Its dangerous to go alone, take this 🗡️'
      return
    }

    // If the OLD value was metroid, and user changed it something else
    if (
      oldValue.toLowerCase().indexOf('metroid') !== -1 &&
      newValue.toLowerCase().indexOf('metroid') === -1
    ) {
      this.response = 'GET TO DA CHOPPA NAO'
      return
    }

    // Default response
    this.response = 'Sure, why not?'
  }
}
In case you don’t know, indexOf checks the string and returns -1 in case there was no match, and else it returns the position of the string we’re searching for in the string being searched.
Go ahead and have some fun with this, make some new examples and play with it in your browser.
I hope you can see now the power of watched properties, the way I have found it useful is to think, if my property changes and I need to REACT programmatically to it (with an ajax call, an external function, updating a secondary value, etc), then watchers are usually a good call. For anything else, go with computed properties.
<html>

<head>
  <title>Vue 101</title>
</head>

<body>
  <div id="app">
    <label>What's your favorite game ever?</label>
    <input type="text" v-model="favoriteGame">

    <hr>

    <p>{{ response }}</p>
  </div>

  <script src="https://cdn.jsdelivr.net/npm/vue/dist/vue.js"></script>

  <script>
    const app = new Vue({
      el: '#app',
      data() {
        return {
          favoriteGame: null,
          response: ''
        }
      },
      watch: {
        favoriteGame(newValue, oldValue) {
          if (!newValue) return

          if (newValue.toLowerCase().indexOf('metroid') !== -1) {
            this.response = 'Ceres station is under attack!'
            return
          }

          if (newValue.toLowerCase().indexOf('zelda') !== -1) {
            this.response = 'Its dangerous to go alone, take this 🗡️'
            return
          }

          if (
            oldValue.toLowerCase().indexOf('metroid') !== -1 &&
            newValue.toLowerCase().indexOf('metroid') === -1
          ) {
            this.response = 'Nothing is true , everything is permitted'
            return
          }

          this.response = 'Sure, why not?'
        }
      }
    });
  </script>
</body>

</html>
Conclusion
Congratulations on making it this far!
You now have the basic tools to actually build a really cool and functional application in Vue, I guarantee it. However, there is still a lot to learn and a lot to explore in order for you to squeeze every inch of juice out of this framework.
But don’t worry, i’ve said it before and I stand by it today, one of the key aspects I enjoy most about Vue.js is the documentation.
I remember back when I was starting out with programming I was really afraid of having to dive docs because they were usually really poor explained, and assumed a high level of understanding of the language and the framework/lib that I was trying to use.
Thankfully, the Vue docs team has done a wonderful job of making a complete guide full with examples for every thing that we have covered in this guide plus everything else you need to excel at this framework.
This concludes the Beginner series for Vue (although I will keep making more topic-oriented articles that will follow up on this). It’s been a pleasure, and thanks for reading!
Thanks for reading ❤
If you liked this post, share it with all of your programming buddies!
#vue-js #javascript #web-development
