Build a live chat app with Laravel and Vuejs
Introduction
In this tutorial, we will be looking at how to build a live chat where people can log in and chat with each other. This is a feature we see in applications like YouTube or Facebook during a live event.
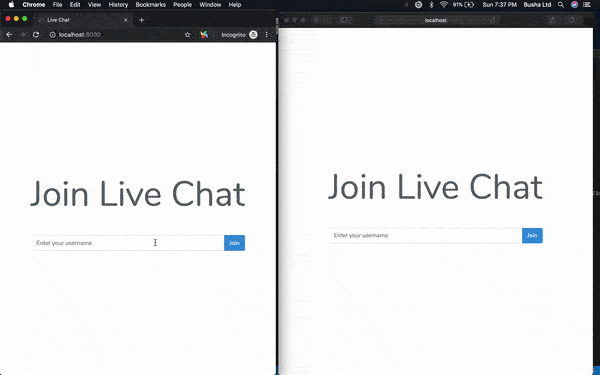
In this article, we’ll be building an app where users can log in with their usernames and then join a live chat. Here is what our app will look like:
Requirements
To follow along with this article, you need the following:
- The latest version of Node.js and NPM installed on your machine.
- The latest version of Laravel CLI installed locally.
- A Chatkit application. Create one here.
- Knowledge of PHP and Laravel.
- Knowledge of JavaScript and Vue.js.
If you have these requirements we can begin.
Creating our Laravel application
We will start by creating a new Laravel application. By now, you should have the Laravel CLI, so you can just run this command to create a new project:
$ laravel new larachat
This will create a new Laravel application in a larachat folder.
Setting up Pusher Chatkit in the app
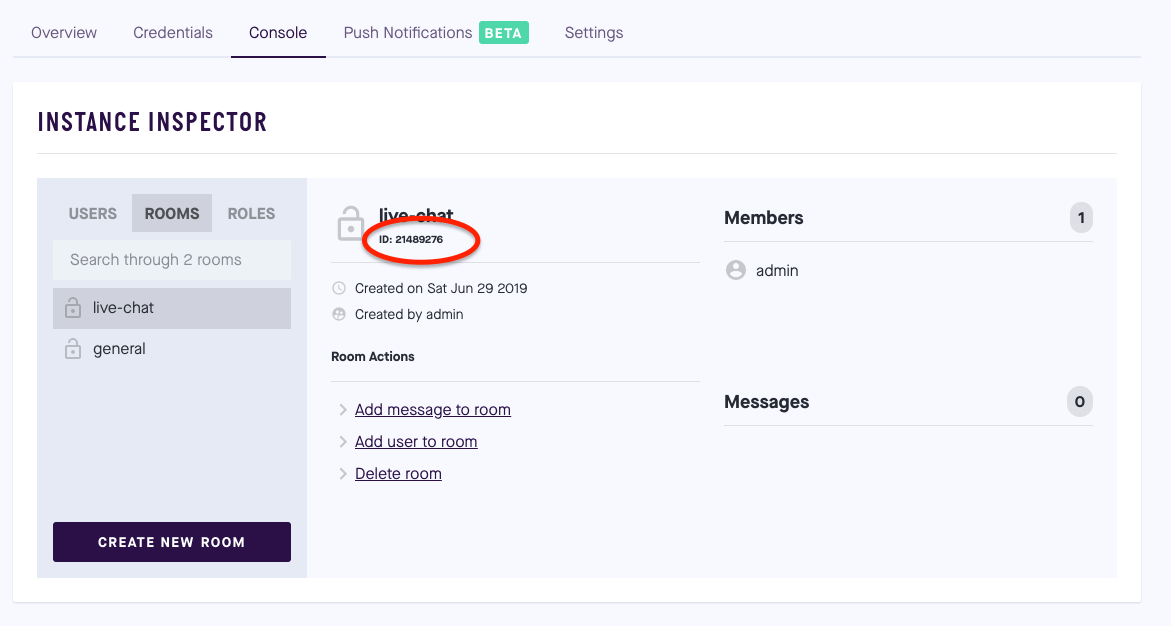
Before we go ahead to enable Chatkit in our app, open the Chatkit app, go to the Console tab and create a new user named admin. Create a new room named live-chat with the admin.
Open the room you have just created and note the room ID. Copy it out as you will soon need it.
To enable Chatkit in our app, we will need to add the keys to our app environment. Add these new properties at the bottom of the .env file found in your project directory:
If you don’t have the
.envfile for some reason, rename the.env.examplefile to.envand run the command:php artisan key:generate
    # File: .env
    # [...]

    CHATKIT_INSTANCE_LOCATOR="INSTANCE_LOCATOR_HERE"
    CHATKIT_SECRET_KEY="SECRET_KEY_HERE"
    CHATKIT_GENERAL_ROOM_ID="GENERAL_ROOM_ID"

    MIX_APP_URL="${APP_URL}"
    MIX_CHATKIT_INSTANCE_LOCATOR="${CHATKIT_INSTANCE_LOCATOR}"
You need to replace the placeholder values with the credentials from your Chatkit app. The
CHATKIT_INSTANCE_LOCATORandCHATKIT_SECRET_KEYcan be gotten from the Credentials tab of the Chatkit instance. ReplaceCHATKIT_GENERAL_ROOM_IDwith the room ID you copied out earlier.MIX_APP_URLandMIX_CHATKIT_INSTANCE_LOCATORreferences theAPP_URLandCHATKIT_INSTANCE_LOCATORrespectively.
Still in the .env file, update the APP_URL like so:
APP_URL=http://localhost:8000
To enable our application can use the environment credentials we added earlier, open the config/services.php file and in there add the snippet below to the array of third-party services:
    // File: config/services.php
    'chatkit' => [
        'secret' => env('CHATKIT_SECRET_KEY'),
        'locator' => env('CHATKIT_INSTANCE_LOCATOR'),
    ],
Next we will need to do is install the Chatkit PHP SDK. Run this command in the root directory of your project to install the Chatkit package:
$ composer require pusher/pusher-chatkit-server
Next, open app/providers/AppServiceProvider.php and add the following code inside the register method:
    // File: app/providers/AppServiceProvider.php
    $this->app->bind('ChatKit', function() {
        return new \Chatkit\Chatkit([
            'instance_locator' => config('services.chatkit.locator'),
            'key' => config('services.chatkit.secret'),
        ]);
    });
The above snippet will bind the Chatkit service within the register method into Laravel’s IoC container. We can now resolve it from anywhere within our app and it will return an instance of the configured Chatkit class.
Building the application logic
Now we have our Laravel application configured and Chatkit SDK setup, let’s write the core functionality of our chat app.
First, we will create and update some controllers. Still in your root directory, run this command to create a new controller:
$ php artisan make:controller ChatkitController
Open the app/Http/Controllers/ChatkitController.php file and replace the contents with this snippet:
    <?php
    // File: app/Http/Controllers/ChatkitController.php

    namespace App\Http\Controllers;

    use Illuminate\Http\Request;

    class ChatkitController extends Controller
    {
        private $chatkit;
        private $roomId;

        public function __construct()
        {
            $this->chatkit = app('ChatKit');
            $this->roomId = env('CHATKIT_GENERAL_ROOM_ID');
        }

        /**
         * Show the welcome page.
         *
         * @return \Illuminate\Contracts\Support\Renderable
         */
        public function index(Request $request)
        {
            $userId = $request->session()->get('chatkit_id')[0];

            if (!is_null($userId)) {
                // Redirect user to Chat Page
                return redirect(route('chat'));
            }

            return view('welcome');
        }

        /**
         * The user joins chat room.
         *
         * @param  \Illuminate\Http\Request $request
         * @return mixed
         */
        public function join(Request $request)
        {
            $chatkit_id = strtolower(str_random(5));

            // Create User account on Chatkit
            $this->chatkit->createUser([
                'id' =>  $chatkit_id,
                'name' => $request->username,
            ]);

            $this->chatkit->addUsersToRoom([
                'room_id' => $this->roomId,
                'user_ids' => [$chatkit_id],
            ]);

            // Add User details to session
            $request->session()->push('chatkit_id', $chatkit_id);

            // Redirect user to Chat Page
            return redirect(route('chat'));
        }

        /**
         * Show the application chat room.
         *
         * @return \Illuminate\Contracts\Support\Renderable
         */
        public function chat(Request $request)
        {
            $roomId = $this->roomId;

            $userId = $request->session()->get('chatkit_id')[0];

            if (is_null($userId)) {
                $request->session()->flash('status', 'Join to access chat room!');
                return redirect(url('/'));
            }

            // Get messages via Chatkit
            $fetchMessages = $this->chatkit->getRoomMessages([
                'room_id' => $roomId,
                'direction' => 'newer',
                'limit' => 100
            ]);

            $messages = collect($fetchMessages['body'])->map(function ($message) {
                return [
                    'id' => $message['id'],
                    'senderId' => $message['user_id'],
                    'text' => $message['text'],
                    'timestamp' => $message['created_at']
                ];
            });

            return view('chat')->with(compact('messages', 'roomId', 'userId'));
        }

        /**
         * Receives a client request and provides a new token.
         *
         * @param  \Illuminate\Http\Request  $request
         * @return mixed
         */
        public function authenticate(Request $request)
        {
            $response = $this->chatkit->authenticate([
                'user_id' => $request->user_id,
            ]);

            return response()
                ->json(
                    $response['body'],
                    $response['status']
                );
        }

         /**
         * Send user message.
         *
         * @param  \Illuminate\Http\Request  $request
         * @return mixed
         */
        public function sendMessage(Request $request)
        {
            $message = $this->chatkit->sendSimpleMessage([
                'sender_id' => $request->user,
                'room_id' => $this->roomId,
                'text' => $request->message
            ]);

            return response($message);
        }

        /**
         * Get all users.
         *
         * @param  \Illuminate\Http\Request  $request
         * @return mixed
         */
        public function getUsers()
        {
            $users = $this->chatkit->getUsers();

            return response($users);
        }

        /**
         * Get all users.
         *
         * @param  \Illuminate\Http\Request  $request
         * @return mixed
         */
        public function logout(Request $request)
        {
            $request->session()->flush();

            return redirect(url('/'));
        }
    }
In the ChatkitController above we have several methods, namely: index, join, chat, authenticate, sendMessage, getUsers and logout.
The index method returns the welcome page if a user ID doesn’t exist in the current session else it redirects to the chat page.
The join method uses the resolved Chatkit SDK instance, creates a new user on Chatkit and add the user to the live-chat room and then save the users Chatkit ID in the current session before redirecting the user to the chat page.
The chat method handles the chat page when loaded on the browser. Inside it, we get the current user Chatkit ID from the session. If a Chatkit ID is not found, we return the user to the welcome page. The Chatkit ID, room ID, and chat room messages properties are then passed to the chat page view.
The authenticate method will act as a token provider server that receives the client’s request and returns a valid JWT to your Chatkit client.
In the sendMessage method, we use the SDK’s sendSimpleMessage method, which accepts the sender_id, room_id and text to send a message to the chat room. The getUsers method returns all the users created on our Chatkit instance. Our logout method flushes the current session and redirects to the welcome page.
Next, we will update the web routes. Open routes/web.php and paste the code below to override the default :
    // File: routes/web.php
    Route::get('/', 'ChatkitController@index');
    Route::post('/', 'ChatkitController@join');
    Route::get('chat', 'ChatkitController@chat')->name('chat');
    Route::post('logout', 'ChatkitController@logout')->name('logout');
Open routes/api.php and add the code below in the file:
    // File: routes/api.php
    Route::post('authenticate','ChatkitController@authenticate');
    Route::get('users', 'ChatkitController@getUsers');
    Route::post('message','ChatkitController@sendMessage');
The newly added routes will provide endpoints to authenticate a client request, show a chat and send a message.
Building the application frontend
First, we will update the welcome page of the app. Open a resources/views/welcome.blade.php file and paste the code below to update the file:
    <!-- File: resources/views/welcome.blade.php -->
    <!DOCTYPE html>
    <html lang="{{ str_replace('_', '-', app()->getLocale()) }}">
    <head>
        <meta charset="utf-8">
        <meta name="viewport" content="width=device-width, initial-scale=1">
        <title>Live Chat</title>
        <!-- Fonts -->
        <link rel="dns-prefetch" href="//fonts.gstatic.com">
        <link href="https://fonts.googleapis.com/css?family=Nunito" rel="stylesheet">
        <!-- Styles -->
        <link href="{{ asset('css/app.css') }}" rel="stylesheet">
        <!-- Styles -->
        <style>
            html,
            body {
                background-color: #fff;
                color: #636b6f;
                font-family: 'Nunito', sans-serif;
                font-weight: 200;
                height: 100vh;
                margin: 0;
            }
            .full-height {
                height: 100vh;
            }
            .flex-center {
                align-items: center;
                display: flex;
                justify-content: center;
            }
            .position-ref {
                position: relative;
            }
            .top-right {
                position: absolute;
                right: 10px;
                top: 18px;
            }
            .content {
                text-align: center;
            }
            .title {
                font-size: 84px;
            }
            .m-b-md {
                margin-bottom: 30px;
            }
        </style>
    </head>
    <body>
        <div class="flex-center position-ref full-height">
            <div class="content">
                <div class="title m-b-md">
                    Join Live Chat
                </div>
                @if(Session::has('status'))
                    <span class="alert alert-info" role="alert">
                        {{ Session::get('status') }}
                    </span>
                @endif
                <div>
                    <form action="{{ url('/') }}" method="post">
                        @csrf
                        <div class="input-group">
                            <input type="text" name="username" class="form-control"
                              placeholder="Enter your username">
                            <div class="input-group-append">
                                <button type="submit" class="btn btn-primary">
                                  Join
                                </button>
                            </div>
                        </div>
                    </form>
                </div>
            </div>
        </div>
    </body>
    </html>
The welcome.blade.php view contains a Join Live Chat title and a simple form that submits the entered username in the input field to join the live chat room.
Next, we will build the chat page to read and send messages. A chatbox component will be created using Vue.js to handle the chat feature.
Open a terminal tab in your project directory and run the command below:
$ npm install
This command installs the required development dependencies in the package.json file. Next, we need to install Chatkit. Run this command to install it:
$ npm install moment @pusher/chatkit-client --save-dev
Now create a ChatBoxComponent.vue file in the resources/js/components/ directory and paste the code snippet below inside the file.
    <!-- resources/js/components/ChatBoxComponent.vue -->
    <template>
      <div class="card-body">
        <div id="chatbox" v-if="users">
            <dl v-for="message in messages" :key="message.id">
                <dt v-if="message.id"><i> ({{ formatTime(message.timestamp) }}) </i> : <strong>{{ findSender(message.senderId).name }}</strong></dt>
                <dd>{{ message.text }}</dd>
            </dl>
        </div>
        <hr>
        <div class="input-group">
            <input type="text" v-model="message" @keyup.enter="sendMessage" class="form-control" placeholder="Type your message..." autofocus>
            <div class="input-group-append">
              <button @click="sendMessage" class="btn btn-primary">Send</button>
            </div>
        </div>
      </div>
    </template>

    <script>
    import axios from 'axios';
    import moment from 'moment';
    import Chatkit from '@pusher/chatkit-client';
    export default {
        props: {
            roomId: String,
            userId: String,
            initialMessages: Array,
        },
        data () {
            return {
                currentUser: null,
                message: '',
                messages: this.initialMessages,
                users: null,
            }
        },
        methods: {
            connectToChatkit() {
                const tokenProvider = new Chatkit.TokenProvider({
                    url: `${process.env.MIX_APP_URL}/api/authenticate`,
                });
                const chatManager = new Chatkit.ChatManager({
                    instanceLocator: process.env.MIX_CHATKIT_INSTANCE_LOCATOR,
                    userId: this.userId,
                    tokenProvider,
                });
                chatManager.connect()
                    .then(user => {
                        this.currentUser = user;
                        this.subscribeToRoom();
                        console.log('Connected Successfully')
                    })
                    .catch(error => {
                            console.log('Error on connection', error)
                    })
            },
            subscribeToRoom() {
                this.currentUser.subscribeToRoomMultipart({
                    roomId: this.roomId,
                    hooks: {
                        onMessage: message => {
                            this.messages.push({
                                id: message.id,
                                senderId: message.senderId,
                                text: message\['parts'\][0]\['payload'\]['content'],
                                timestamp: message.createdAt
                            })
                        },
                        onUserJoined: async user => {
                            await this.getUsers()
                            this.messages.push({
                                text: `${user.name} joined ${this.formatTime(user.created_at)}`
                            })
                        },
                    },
                    messageLimit: 0
                })
            },
            getUsers() {
                axios.get(`${process.env.MIX_APP_URL}/api/users`)
                    .then(res => {
                        this.users = res\['data'\]['body']
                    });
            },
            sendMessage() {
                if (this.message.trim() === '') return;
                axios.post( `${process.env.MIX_APP_URL}/api/message`, {
                    user: this.userId,
                    message: this.message
                })
                .then(message => {
                    this.message = ''
                });
            },
            findSender(senderId){
                const sender = this.users.find(user => senderId == user.id);
                return sender
            },
            formatTime(timestamp) {
               return moment(timestamp).fromNow();
            },
        },
        created () {
            this.getUsers();
            this.connectToChatkit();
        },
    };
    </script>
    <style>
    #chatbox {
        text-align: left;
        max-height: 400px;
        overflow-y: scroll;
    }
    </style>
The ChatBoxComponent.vue single file component is divided into three sections:
templatetag contains ourHTMLsyntax for the chat box providing the information to be shown.scripttag holds the logic that keeps data and methods. It also performs various operations like authentication, sending and receiving messages.styletag provides the simplest option to add CSS to a Vue.js component.
The script tag keeps the logic of our Vue component. Inside this tag, first, we imported the libraries we will make use of. The export default block exports an object literal as our component’s view model and is responsible for the behavior of our component. This block houses other sections.
The props section helps us to pass custom data to the component from its instances. The data section is used to set up the component state. Every property you define in data becomes reactive meaning that if there is a change, it will be reflected in the view.
The method section holds the methods just as the name implies. In our component, we have six methods for various actions.
connectToChatkitmethod handles the connection to Chatkit from the client (browser) interface. It defines aTokenProviderand then theChatManageris created with the token provider, allowing the client to connect to the Chatkit servers. On a successful connection, thecurrentUserdata state is updated and thesubscribeToRoommethod is called.subscribeToRoommethod handles the connection to a particular room and is able to hook in some actions to respond to certain events like when a new message is sent, a user joins the room or leaves the room.getUsermethod fetches all users on the Chatkit instance and updates theusersdata state with the response body gotten.sendMessagemethod gets data from the input field and makes a post request to send the message.findSendermethod accepts asenderIdparameter and uses this to find a user on thethis.usersdata.formatTimemethod using the imported moment library returns a human readable time.
The created section is one of the used life cycle hooks used for initialization. In our case, we called the connectToChatkit and getUsers method there.
Next, open resources/js/app.js and add the Vue instance like so:
    // resources/js/app.js
    Vue.component('chatbox', require('./components/ChatBoxComponent.vue').default);
The above code line registers the ChatBoxComponent.vue using chatbox as its basename. Now, go back to the terminal and run the command below:
$ npm run dev
This command will run a development build process using webpack to compile all resources/js files into the public/js/app.js file.
The command
npm run prodis used in the case you want to it in a production environment
Next, create a resources/views/chat.blade.php file and paste the code below:
    <!-- resources/views/chat.blade.php -->
    <!DOCTYPE html>
    <html lang="{{ str_replace('_', '-', app()->getLocale()) }}">
    <head>
        <meta charset="utf-8">
        <meta name="viewport" content="width=device-width, initial-scale=1">
        <!-- CSRF Token -->
        <meta name="csrf-token" content="{{ csrf_token() }}">
        <title>Live Chat</title>
        <script src="{{ asset('js/app.js') }}" defer></script>
        <!-- Fonts -->
        <link rel="dns-prefetch" href="//fonts.gstatic.com">
        <link href="https://fonts.googleapis.com/css?family=Nunito" rel="stylesheet">
        <!-- Styles -->
        <link href="{{ asset('css/app.css') }}" rel="stylesheet">
        <style>
            html,
            body {
                background-color: #fff;
                color: #636b6f;
                font-family: 'Nunito', sans-serif;
                font-weight: 200;
                height: 100vh;
                margin: 0;
            }
            .full-height {
                height: 100vh;
            }
            .flex-center {
                align-items: center;
                display: flex;
                justify-content: center;
            }
            .position-ref {
                position: relative;
            }
            .top-right {
                position: absolute;
                right: 10px;
                top: 18px;
            }
            .links>a {
                color: #636b6f;
                padding: 0 25px;
                font-size: 13px;
                font-weight: 600;
                letter-spacing: .1rem;
                text-decoration: none;
                text-transform: uppercase;
            }
            .m-b-md {
                margin-bottom: 30px;
            }
        </style>
    </head>
    <body>
        <div id="app" class="flex-center position-ref full-height">
            <div class="top-right links">
                <a class="dropdown-item" href="{{ route('logout') }}" onclick="event.preventDefault();
                document.getElementById('logout-form').submit();">
                    Leave Chat Room
                </a>
                <form id="logout-form" action="{{ route('logout') }}" method="POST" style="display: none;">
                    @csrf
                </form>
            </div>
            <div class="container">
                <div class="row justify-content-center">
                    <div class="col-md-8">
                        <div class="card">
                            <div class="card-header"> Live Chat Room </div>
                            <chatbox user-id='{{ $userId }}' room-id='{{ $roomId }}' :initial-messages='@json($messages)'> </chatbox>
                        </div>
                    </div>
                </div>
            </div>
        </div>
    </body>
    </html>
Inside the chat.blade.php, we added the chatbox tag that renders our ChatBoxComponent we created earlier and above it, we have Leave Chat Room link that logs the user out.
Finally, to test our app run the command below to serve the application:
$ php artisan serve
Now open http://localhost:8000 on two separate browser windows. Register two different accounts and try chatting between the two users. You should have results similar to this:

Conclusion
In this tutorial, we have seen how to add a live chatting experience to our app. The application was created using Laravel and Vue.js. The Chatkit API is very extensible and provides features not covered in this tutorial. You can leverage this knowledge to work with other features Chatkit provides in a Laravel app.
The source code is available on GitHub.
#vuejs #laravel #javascript
