A Dozen Dandy Dockerfile Instructions
“Everything You Need To Know About Docker” is a series of articles (so far 6) that explains different parts of **Docker **in a very simple and straightforward way. Here are the parts so far:
- Docker concepts (Part 1): The Conceptual Landscape (You are here)
- Docker ecosystem (Part 2): A Delicious Dozen Docker Terms You Need to Know
- Dockerfile (Part 3): A Dozen Dandy Dockerfile Instructions
- Slimming down Docker images (Part 4): Learn how to speed up your Docker build cycles and create lightweight images
- Docker commands (Part 5): We’ll look at 15 Docker CLI commands you should know
- Docker data (Part 6): Using data with Docker. In it, we’ll focus on Docker volumes.
This article is all about Dockerfiles. It’s the third installment in a six-part series on Docker. If you haven’t read Part 1, read it first and see Docker container concepts in a whole new light. 💡 Part 2 is a quick run-through of the Docker ecosystem. In future articles, I’ll look at slimming down Docker images, Docker CLI commands, and using data with Docker.
Let’s jump into the dozen Dockerfile instructions to know!
Docker Images
Recall that a Docker container is a Docker image brought to life. It’s a self-contained, minimal operating system with application code.
The Docker image is created at build time and the Docker container is created at run time.
The **Dockerfile **is at the heart of Docker. The *Dockerfile *tells Docker how to build the image that will be used to make containers.
Each Docker image contains a file named *Dockerfile *with no extension. The Dockerfile is assumed to be in the current working directory when docker build is called to create an image. A different location can be specified with the file flag (docker build).
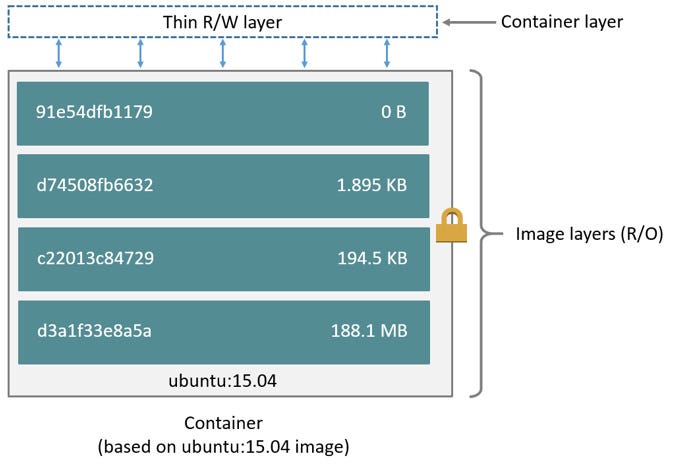
Recall that a container is built from a series of layers. Each layer is read only, except the final container layer that sits on top of the others. The Dockerfile tells Docker which layers to add and in which order to add them.
Each layer is really just a file with the changes since the previous layer. In Unix, pretty much everything is a file.
The base image provides the initial layer(s). A base image is also called a parent image.
When an image is pulled from a remote repository to a local machine only layers that are not already on the local machine are downloaded. Docker is all about saving space and time by reusing existing layers.

A base (jumping) image
A Dockerfile instruction is a capitalized word at the start of a line followed by its arguments. Each line in a *Dockerfile *can contain an instruction. Instructions are processed from top to bottom when an image is built. Instructions look like this:
FROM ubuntu:18.04

COPY . /app
Only the instructions FROM, RUN, COPY, and ADD create layers in the final image. Other instructions configure things, add metadata, or tell Docker to do something at run time, such as expose a port or run a command.
In this article, I’m assuming you are using a Unix-based Docker image. You can also used Windows-based images, but that’s a slower, less-pleasant, less-common process. So use Unix if you can.
Let’s do a quick once-over of the dozen Dockerfile instructions we’ll explore.
A Dozen Dockerfile Instructions
docker build — specifies the base (parent) image.
docker build —provides metadata. Good place to include maintainer info.
docker build — sets a persistent environment variable.
docker build —runs a command and creates an image layer. Used to install packages into containers.
docker build — copies files and directories to the container.
docker build — copies files and directories to the container. Can upack local .tar files.
docker build — provides a command and arguments for an executing container. Parameters can be overridden. There can be only one CMD.
docker build — sets the working directory for the instructions that follow.
docker build — defines a variable to pass to Docker at build-time.
docker build — provides command and arguments for an executing container. Arguments persist.
docker build — exposes a port.
docker build — creates a directory mount point to access and store persistent data.
Let’s get to it!
Instructions and Examples
A **Dockerfile **can be as simple as this single line:
FROM ubuntu:18.04

COPY . /app
FROM
A Dockerfile must start with a FROM instruction or an ARG instruction followed by a FROM instruction.
The FROM* *keyword tells Docker to use a base image that matches the provided repository and tag. A base image is also called a parent image.
In this example, *ubuntu *is the image repository. Ubuntu is the name of an official Docker repository that provides a basic version of the popular Ubuntu version of the Linux operating system.
Notice that this **Dockerfile **includes a tag for the base image: 18.04 . This tag tells Docker which version of the image in the ubuntu repository to pull. If no tag is included, then Docker assumes the *latest tag, *by default. To make your intent clear, it’s good practice to specify a base image tag.
When the **Dockerfile **above is used to build an image locally for the first time, Docker downloads the layers specified in the ubuntu image. The layers can be thought of as stacked upon each other. Each layer is a file with the set of differences from the layer before it.
When you create a container, you add a writable layer on top of the read-only layers.
From the Docker Docs
Docker uses a copy-on-write strategy for efficiency. If a layer exists at a previous level within an image, and another layer needs read access to it, Docker uses the existing file. Nothing needs to be downloaded.
When an image is running, if a layer needs modified by a container, then that file is copied into the top, writeable layer. Check out the Docker docs here to learn more about copy-on-write.
A More Substantive Dockerfile
Although our one-line image is concise, it’s also slow, provides little information, and does nothing at container run time. Let’s look at a longer **Dockerfile **that builds a much smaller size image and executes a script at container run time.
FROM ubuntu:18.04

COPY . /app
Whoa, what’s going on here? Let’s step through it and demystify.
The base image is an official Python image with the tag 3.7.2-alpine3.8. As you can see from its source code, the image includes Linux, Python and not much else. Alpine images are popular because they are small, fast, and secure. However, Alpine images don’t come with many operating system niceties. You must install such packages yourself, should you need them.
The next instruction is LABEL. LABEL adds metadata to the image. In this case, it provides the image maintainer’s contact info. Labels don’t slow down builds or take up space and they do provide useful information about the Docker image, so definitely use them. More about LABEL metadata can be found here.

ENV sets a persistent environment variable that is available at container run time. In the example above, you could use the ADMIN variable when your Docker container is created.
ENV is nice for setting constants. If you use a constant several places in your ***Dockerfile ***and want to change its value at a later time, you can do so in one location.

ENVironment
With *Dockerfiles *there are often multiple ways to accomplish the same thing. The best method for your case is a matter of balancing Docker conventions, transparency, and speed. For example, RUN, CMD, and ENTRYPOINT serve different purposes, and can all be used to execute commands.
RUN creates a layer at build-time. Docker commits the state of the image after each RUN.
RUN is often used to install packages into an image*. In the example above, docker build tells Docker to update the packages from the base image. *docker build tells Docker to install bash into the image.
*apk *stands for Alpine Linux package manager. If you’re using a Linux base image in a flavor other than Alpine, then you’d install packages with RUN apt-get instead of apk. apt stand for advanced package tool. I’ll discuss other ways to install packages in a later example.

RUN
RUN — and its cousins, CMD and ENTRYPOINT — can be used in exec form or shell form. Exec form uses JSON array syntax like so: docker build.
In the example above, we used shell form in the format docker build.
Later in our Dockerfile we used the preferred exec form with docker build to create a directory. Don’t forget to use double quotes for strings with JSON syntax for exec form!
The docker build* *instruction tells Docker to take the files and folders in your local build context and add them to the Docker image’s current working directory. Copy will create the target directory if it doesn’t exist.

COPY
ADD does the same thing as COPY, but has two more use cases. ADD can be used to move files from a remote URL to a container and ADD can extract local TAR files.
I used ADD in the example above to copy a file from a remote url into the container’s my_app_directory. The Docker docs don’t recommend using remote urls in this manner because you can’t delete the files. Extra files increase the final image size.
The Docker docs also suggest using COPY instead of ADD whenever possible for improved clarity. It’s too bad that Docker doesn’t combine ADD and COPY into a single command to reduce the number of **Dockerfile **instructions to keep straight 😃.
Note that the ADD instruction contains the docker build line continuation character. Use it to improve readability by breaking up a long instruction over several lines.
CMD provides Docker a command to run when a container is started. It does not commit the result of the command to the image at build time. In the example above, CMD will have the Docker container run the my_script.py file at run time.

That’s a CMD!
A few other things to know about CMD:
- Only one CMD instruction per Dockerfile. Otherwise all but the final one are ignored.
- CMD can include an executable. If CMD is present without an executable, then an ENTRYPOINT instruction must exist. In that case, both CMD and ENTRYPOINT instructions should be in JSON format.
- Command line arguments to
docker buildoverride arguments provided to CMD in the Dockerfile.
Ready for more?
Let’s introduce a few more instructions in another example Dockerfile.
FROM ubuntu:18.04

COPY . /app
Note that you can use comments in Dockerfiles. Comments start with docker build.
Package installation is a primary job of Dockerfiles. As touched on earlier, there are several ways to install packages with RUN.
You can install a package in an Alpine Docker image with *apk. apk *is like *apt-get *in regular Linux builds. For example, packages in a Dockerfile with a base Ubuntu image can be updated and installed like this: docker build.
In addition to apk and apt-get, Python packages can be installed through pip, wheel, and conda. Other languages can use various installers.
The underlying layers need to provide the install layer with the the relevant package manger. If you’re having an issue with package installation, make sure the package managers are installed before you try to use them. 😃
You can use RUN with pip and list the packages you want installed directly in your Dockerfile. If you do this concatenate your package installs into a single instruction and break it up with line continuation characters (). This method provides clarity and fewer layers than multiple RUN instructions.
Alternatively, you can list your package requirements in a file and RUN a package manager on that file. Folks usually name the file requirements.txt. I’ll share a recommended pattern to take advantage of build time caching with *requirements.txt *in the next article.
WORKDIR changes the working directory in the container for the COPY, ADD, RUN, CMD, and ENTRYPOINT instructions that follow it. A few notes:
- It’s preferable to set an absolute path with WORKDIR rather than navigate through the file system with cd commands in the Dockerfile.
- WORKDIR creates the directory automatically if it doesn’t exist.
- You can use multiple WORKDIR instructions. If relative paths are provided, then each WORKDIR instruction changes the current working directory.
WORKDIRs of some sort
ARG
ARG defines a variable to pass from the command line to the image at build-time. A default value can be supplied for ARG in the Dockerfile, as it is in the example: docker build.
Unlike ENV variables, ARG variables are not available to running containers. However, you can use ARG values to set a default value for an ENV variable from the command line when you build the image. Then, the ENV variable persists through container run time. Learn more about this technique here.
The ENTRYPOINT instruction also allows you provide a default command and arguments when a container starts. It looks similar to CMD, but ENTRYPOINT parameters are not overwritten if a container is run with command line parameters.
Instead, command line arguments passed to docker build are appended to the ENTRYPOINT instruction’s arguments. For example, docker build adds the argument bash to the end of the ENTRYPOINT instruction’s existing arguments.

ENTRYPOINT to somewhere
A Dockerfile should have at least one CMD or ENTRYPOINT instruction.
The Docker docs have a few suggestions for choosing between CMD and ENTRYPOINT for your initial container command:
- Favor ENTRYPOINT when you need to run the same command every time.
- Favor ENTRYPOINT when a container will be used as an executable program.
- Favor CMD when you need to provide extra default arguments that could be overwritten from the command line.
In the example above, ENTRYPOINT [“python”, “my_script.py”, “my_var”] has the container run the the python script *my_script.py *with the argument *my_var when the container starts running. my_var *could then be used by my_script via argparse. Note that my_var has a default value supplied by ARG earlier in the Dockerfile. So if an argument isn’t passed from the command line, then the default argument will be used.
Docker recommends you generally use the exec form of ENTRYPOINT: ENTRYPOINT [“executable”, “param1”, “param2”]. This form is the one with JSON array syntax.
The EXPOSE instruction shows which port is intended to be published to provide access to the running container. EXPOSE does not actually publish the port. Rather, it acts as a documentation between the person who builds the image and the person who runs the container.
EXPOSEd
Use docker build with the docker build flag to publish and map one or more ports at run time. The uppercase docker build flag will publish all exposed ports.
VOLUME specifies where your container will store and/or access persistent data. Volumes are the topic of a forthcoming article in this series, so we’ll investigate them then.

VOLUME
Let’s review the dozen Dockerfile instructions we’ve explored.
Important Dockerfile Instructions
docker build — specifies the base (parent) image.
docker build —provides metadata. Good place to include maintainer info.
docker build — sets a persistent environment variable.
docker build —runs a command and creates an image layer. Used to install packages into containers.
docker build — copies files and directories to the container.
docker build — copies files and directories to the container. Can upack local .tar files.
docker build — provides a command and arguments for an executing container. Parameters can be overridden. There can be only one CMD.
docker build — sets the working directory for the instructions that follow.
docker build — defines a variable to pass to Docker at build-time.
docker build — provides command and arguments for an executing container. Arguments persist.
docker build — exposes a port.
docker build — creates a directory mount point to access and store persistent data.
Now you know a dozen Dockerfile instructions to make yourself useful! Here’s a bonus bagel: a cheat sheet with all the Dockerfile instructions. The five commands we didn’t cover are USER, ONBUILD, STOPSIGNAL, SHELL, and HEALTHCHECK. Now you’ve seen their names if you come across them.

Bonus bagel
Wrap
Dockerfiles are perhaps the key component of Docker to master. I hope this article helped you gain confidence with them.
#docker #devops #kubernetes #machine-learning #data-science