Allow Users to Message you Directly from your Website using React
Have you ever wondered how you can enable users to send you a message directly from your website? It seems a bit complicated, doesn’t it? I am here to tell you that it is truly simple. We just need to put a couple of already existing pieces together and tailor it to our liking.
Objective
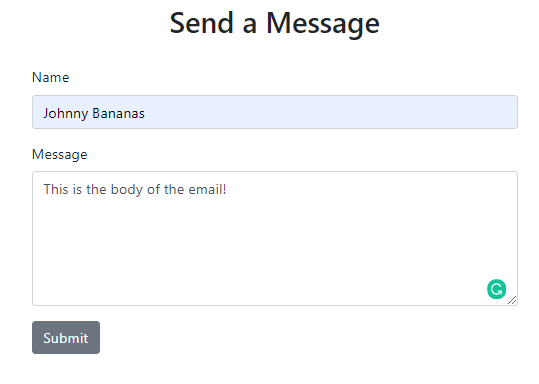
Develop a component that allows users to send an email directly from a form on your site.
The final product is below:

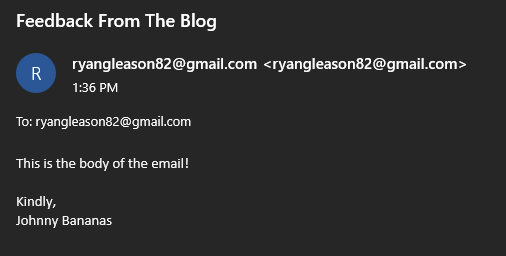
And from the email perspective:

Tools We Will Be Using
- Nodemailer — An npm module we will be using to send emails programmatically.
- Express.js — A web application framework for Node.js. Allows us to get our application up and running very quickly.
- React — The front-end library that we will be using to create the form.
- Bootstrap and reactstrap — UI libraries that help us quickly create beautiful components.
Environment Setup
I have created an accompanying article on how to create a front-end React application and connect it to your back-end Express application.
Getting Started
Let me give a brief overview of how we are going to create this application. If you are confused at any point, I will post a link to the GitHub repo at the bottom of this article so you can see the full repository.
Easy enough, right? Let’s get to it.
Layout Our Directory Structure
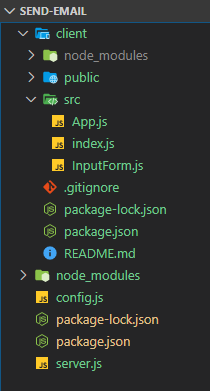
Below is what your directory structure will look like:

You will see that we have server.js for our Express back end and everything in the client directory for our React front end.
In our src folder, we are adding one component: InputForm.js. And as the name implies, it will be our form component.
Create Our Form
Change directories into client and we will create our form.
Run the following command to install reactstrap and bootstrap. These libraries will assist us in making a pretty form component.
npm i --save reactstrap bootstrap
And add the following line to your index.js:
import "bootstrap/dist/css/bootstrap.min.css";
Below is the code we will use for our form in a component called InputForm.js.
import React, { useState } from "react";
import { Row, Col, Form, FormGroup, Label, Input, Button } from "reactstrap";
import Axios from "axios";

export const InputForm = () => {
  const initialInputState = { name: "", message: "" };
  const [newMessage, setNewMessage] = useState(initialInputState);

  const { name, message } = newMessage;

  const handleInputChange = e => {
    setNewMessage({ ...newMessage, [e.target.name]: e.target.value });
  };

  const sendMessage = e => {
    Axios({
      method: "POST",
      url: "http://localhost:5000/send",
      data: { name, message },
      headers: {
        "Content-Type": "application/json"
      }
    }).then(res => {
      if (res.data.msg === "suc") {
        console.log("Email has been sent");
        setNewMessage(initialInputState);
      } else {
        console.log("FAILURE");
      }
    });
  };

  return (
    <div>
      <Row>
        <Col sm="12" md={{ size: 6, offset: 3 }} className="text-center mt-4">
          <h2>Send a Message</h2>
        </Col>
      </Row>
      <Row className="mt-4">
        <Col sm="12" md={{ size: 6, offset: 3 }}>
          <Form>
            <FormGroup>
              <Label for="name">Name</Label>
              <Input
                name="name"
                onChange={handleInputChange}
                value={name}
                placeholder="Enter your name here"
              ></Input>
            </FormGroup>
            <FormGroup>
              <Label for="message">Message</Label>
              <Input
                type="textarea"
                value={message}
                onChange={handleInputChange}
                style={{ height: 150 }}
                name="message"
                placeholder="What's on your mind?"
              ></Input>
            </FormGroup>
            <Button onClick={sendMessage}>Submit</Button>
          </Form>
        </Col>
      </Row>
    </div>
  );
};
InputForm.js
And then for completion’s sake, here is App.js:
import React from "react";
import { InputForm } from "./InputForm";

function App() {
  return (
    <div className="container">
      <InputForm />
    </div>
  );
}

export default App;
App.js
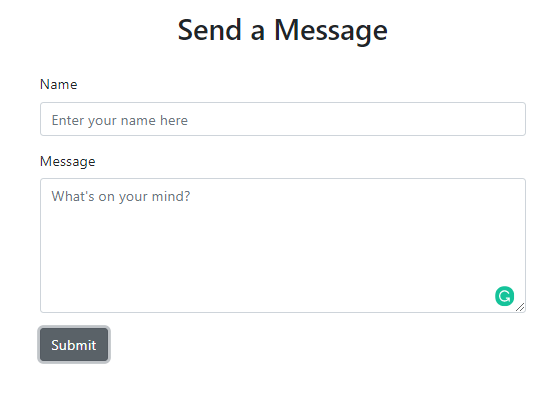
Run npm start and you should see the form below at localhost:3000:

Set Up Our Back End
Change directories back to the parent. Now we will install a couple more libraries to help us.
Install the following modules (for the back end):
npm i --save nodemailer express cors
I will post the code below and then walk you through why each line is necessary.
const express = require("express"),
  app = express(),
  port = process.env.PORT || 5000,
  nodemailer = require("nodemailer"),
  creds = require("./config"),
  cors = require("cors");

app.use(cors());
app.listen(port, () => console.log(`Listening on port ${port}`));
app.use(express.json());

var transporter = nodemailer.createTransport({
  service: "gmail",
  auth: {
    user: creds.USER,
    pass: creds.PASS
  }
});

transporter.verify((err, success) => {
  if (err) {
    console.log(error);
  } else {
    console.log("Successfully signed into Gmail account");
  }
});

app.post("/send", (req, res) => {
  const { name } = req.body;
  const { message } = req.body;

  var mail = {
    from: name,
    to: "Enter your email here",
    subject: "Feedback From The Blog",
    html: `${message}` + "<br><br>Kindly,<br>" + `${name}`
  };

  transporter.sendMail(mail, (err, data) => {
    if (err) {
      res.json({ msg: "err" });
    } else {
      res.json({ msg: "suc" });
    }
  });
});
server.js
- Line 3: We will be hosting our back end on port 5000 and our front end on port 3000 (as this is the default for React).
- Line 5: A config file housing our credentials. A straightforward file called
config.jsat the same level as ourserver.jsfile. It looks like this:
module.exports = {
USER: "enteryouremailaddresshere@gmail.com",
PASS: "enteryourpasswordhere"
};
- Line 6: To allow our two servers to talk to each other, we need to enable a CORS policy.
- Line 8: We are allowing our app to use the CORS policy of all origins. For more information on how to be more selective with the policy you choose, visit the cors documentation on npm.
- Lines 9 and 10: Application setup for Express.
- Lines 12-18:
nodemailerrequires you to create atransportto connect to an SMTP server. It is here we determine which service we will be using (ex: Gmail) and provide our credentials to sign in. - Lines 20-26: We sign in to our account. If you are having trouble signing in (SSL error), you need to enable your Gmail account to send from third-party applications. Click this link and turn it to ON. I recommend turning it off when you’re not using this. Or perhaps create a test email.
- Lines 28-46: Our
POSTroute definition. This code is what happens on the back end when we receive theaxiosrequest from our front end. - You’ll see that in lines 29 and 30, we are taking the parameters from our request.
- Lines 32-36: We are creating our actual email message. You can see how each field here maps to a different part of an email.
- Lines 39-45: Generate the response to send back to our front end. It will determine whether or not the message went through and then on our front end, we can see
if (res.dat.msg === ‘suc’)then log“Email has been sent”, otherwise, returnFAILURE.
Send an Email!
Fill out your form and click submit. You should see this console.log() message

And an email in your inbox that looks similar to this:

And voila! We are now sending emails programmatically using nodemailer.
Review
What exactly did we do?
- Set up a full-stack Node.js application with React on the front end.
- Created a form using React.
- Setup an API route on the back end to handle the request from the front end.
- Sent an email.
And, as promised, here is a link to the GitHub repo.
Thank you very much for reading! If you have any questions, comments, or concerns, feel free to leave a comment.
#react #javascript #node-js #programming #webdev
