Learn to build a Progressive Web Apps (PWAs) in VueJS and combine discoverability& accessibility of a website.In this tutorial, we will implement and discuss the Service Worker, one of the core technologies that adds the astonishing offline-first experience of a native app to a regular web app.
The concept of Progressive Web Apps (PWAs) is a framework agnostic approach which seeks to combine discoverability and accessibility of a website with the functionality of a native app.
Since couple of years I see an increasing interest technologies which bridge the gap between web- and native-apps.
The reason is obvious, plenty of these companies report very promising numbers, mostly as astonishing as the 97 percent of increase in conversions Trivago has seen.
Why should we start developing PWAs now?
In fact, in 2018 also the majority of browser vendors started backing the technology behind PWAs. Microsoft committed to bring PWAs to “more than half a billion devices running Windows 10”. Google even went as far as calling it the future of app development — no surprise that Lighthouse, Google’s tool for improving the quality of web pages, audits ‘PWA’, next to ‘SEO and ‘Accessibility’ of webapps. And even Apple has finally started to support PWAs in 2018, even though, PWAs are a clear threat to Apple’s app store business.
The Tax Calculator App
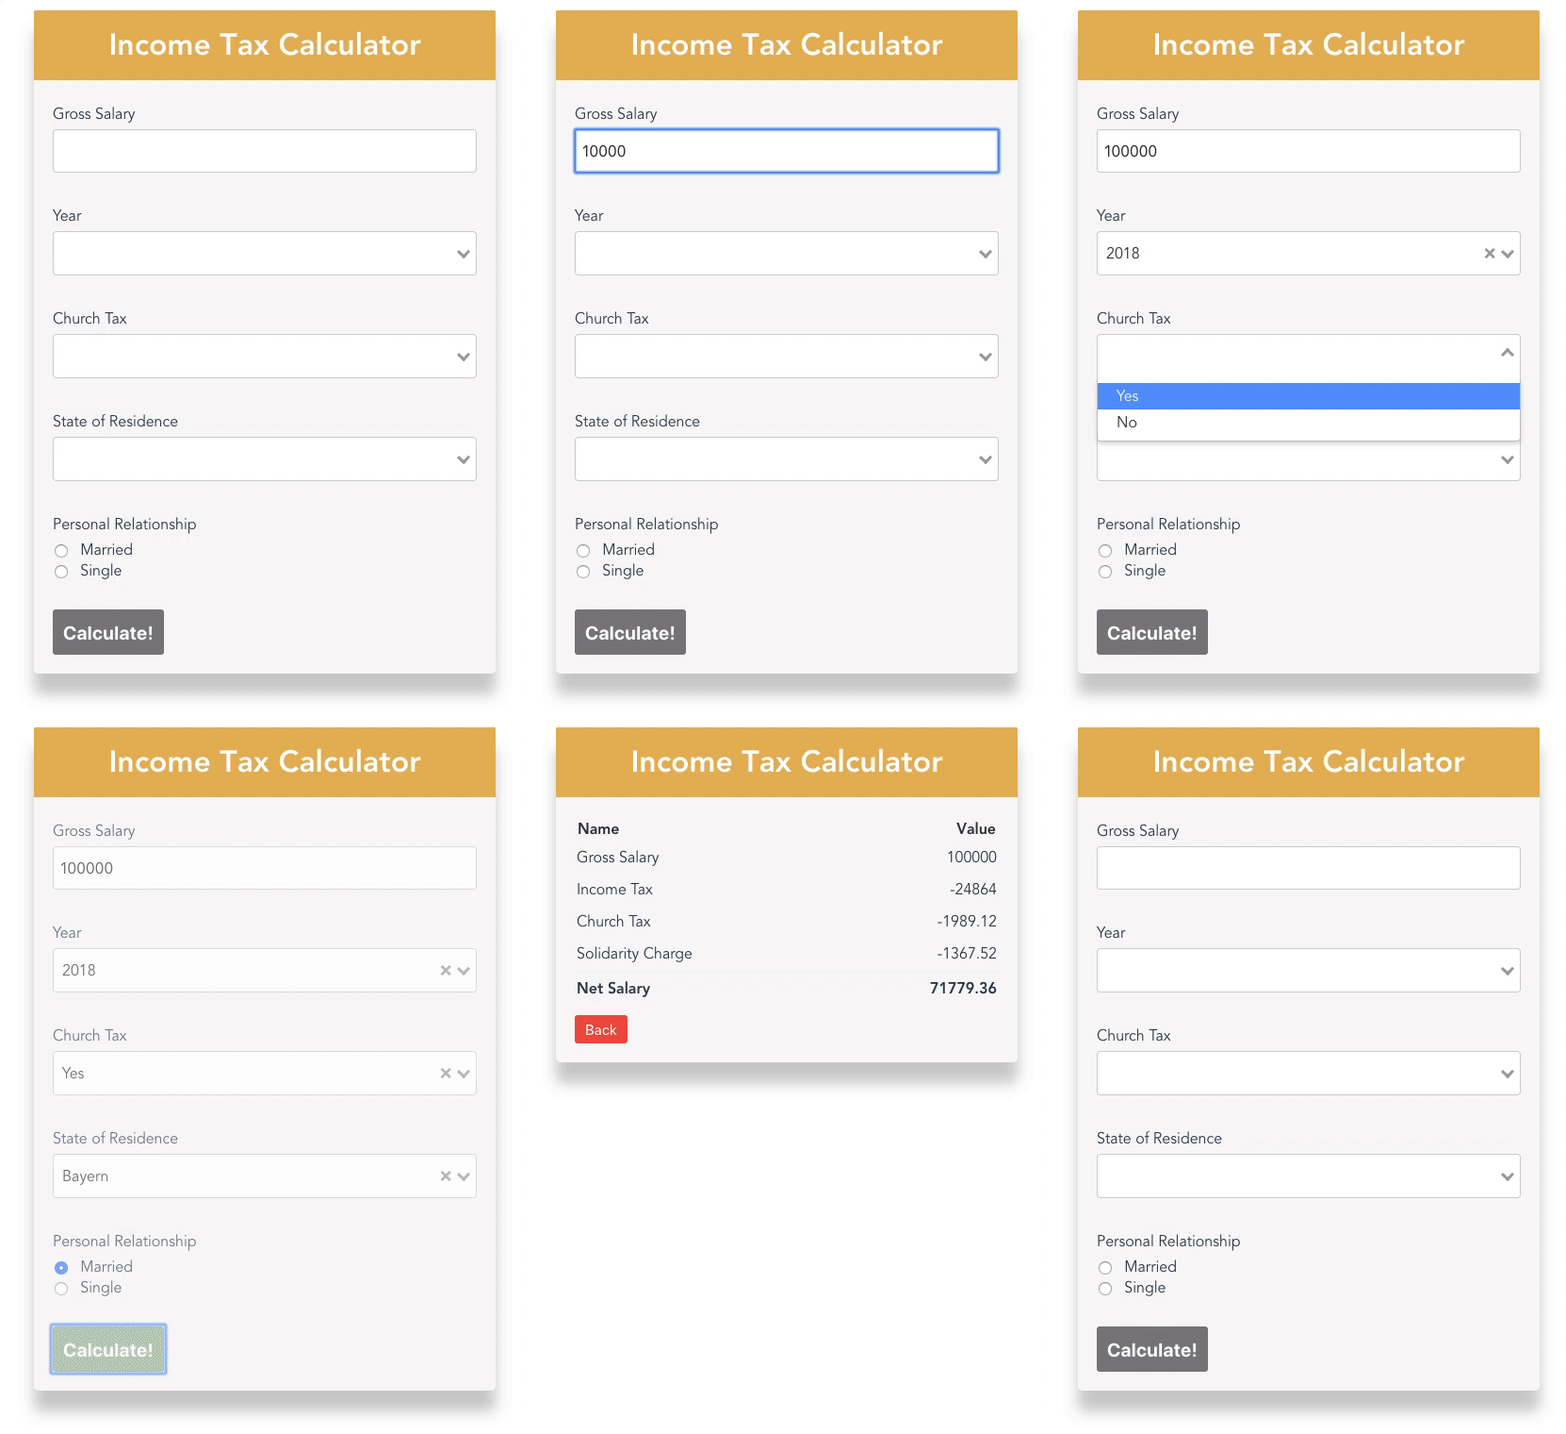
In this tutorial we will build an income tax calculator. Why?
Because calculating income tax (at least in Germany) is complicated and people would love an app that solves that problem for them. Besides that, it’s also a opportunity to explore the impact of the PWA features mentioned above.
We will use VueJS for this tutorial, as it comes with a great template which makes it easy to kick off a PWA project. Another reason is, that VueJS is really easy to learn. No prior experience in any other frontend framework required!
Enough theory for now, it’s time to get our hands dirty!
Let’s create the App’s Skeleton
We start-off with creating the basic setup and the file structure of our app. To speed things up, we will bootstrap the app with vue-cli. First, we need to install the vue CLI tool globally.
yarn global add @vue/cli
Now we can instantiate the template by
vue init pwa vue-calculator-pwa
We will be prompted to pick a preset — I recommend the following configuration:
? Project name vue-calculator-pwa
? Project short name: fewer than 12 characters to not be truncated on homescreens (default: same as name) vue-calculator-pwa
? Project description A simple tax calculator
? Author Fabian Hinsenkamp <fabian.hinsenkamp@online.de>
? Vue build runtime
? Install vue-router? No
? Use ESLint to lint your code? Yes
? Pick an ESLint preset Standard
? Setup unit tests with Karma + Mocha? No
? Setup e2e tests with Nightwatch? No
For the Vue build configuration we can choose the smaller runtime option as we don’t need the compiler as the html we write inside our *.vue files is pre-compiled into JavaScript at build time.
We don’t add tests here for brevity reasons. If we would set up a project for for production definitely add them.
Next, run yarn to install all dependencies. To start the development mode just run yarn start.
Why should we start developing PWAs now?
In the project we will find files with the.vueextension. It indicates that this file is a single-file vue component. It is one of the Vue’s features. Each file consists of three types of blocks:<template>,<script><style>. That way, we can easily divide the project into loosely-coupled components.
Let’s start creating all the *.vue files our app consists off.
App.vue
Create the file src/App.vue. It is our main view and it will contain our different components which make up our calculator.
<template>
  <div id="app">
    <main>
    </main>
  </div>
</template>

<script>
import Panel from "./components/Panel.vue";
import InputForm from "./components/InputForm";
import Result from "./components/Result";
import { calcTaxes } from "./calc.js";
export default {
  name: "app",
  components: {
    Panel,
    InputForm,
    Result
  }
};
</script>

<style lang="scss" src="./assets/styles/App.scss"/>
InputForm.vue
Next let’s create the inputForm file src/components/InputForm.vue. It will handle all user inputs required to calculate the income taxes.
<template>

</template>

<script>
export default {
  name: "InputForm"
};
</script>

<style lang="scss" src="../assets/styles/InputForm.scss"/>
Moreover, we create .vue skeleton files for the following Result, Panel ,Input components including a style sheet named identically to the component it belongs to. All of them belong into the src/components folder.
Result.vue
It will display the results of our calculations.
Panel.vue & Input.vue
The panel is a simple component that wraps the input and result components.
Finally, we should remove the Hello.vue file, that comes with the vue template.
Add Styles & Calculation Logic
Next, we add the following libraries to support sass/scss files.
yarn add node-sass sass-loader -D
For now, the scss files we added are all empty.
Why should we start developing PWAs now?
Hence, you have two options, create your own styles or checkout the following branch of the github project.
git checkout 01_skeletonApp
We also need logic to calculate our income tax. I use the real German income tax formular. To spare the details, I also added it to the branch.
It also contains some css animations for the input validation message. In case you don’t want to use the branch above, you can also add them manually:
yarn add animation.css
Let’s create the Panel Component!
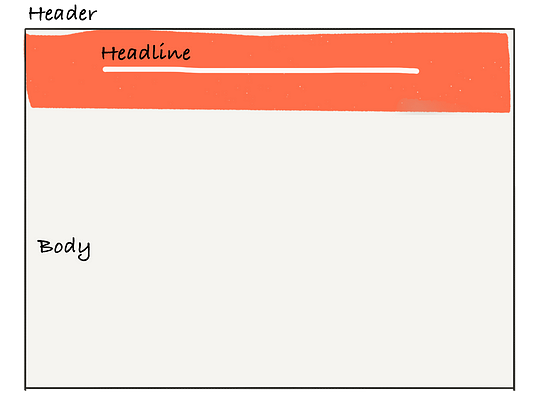
Now we can start coding! To warm you up, we start with building the panel component. It’s good practice to keep such components generic so it can be reused holding any kind of content. That’s why we aim to pass the headline as well as the html for the body to the component.
Let’s add the following code to the template section of the panel.vue file.
<template>
  <div class="panel">
    <div class="header">
      <h2 class="headline">{{ headline }}</h2>
    </div>
    <div class="body">
      <slot />
    </div>
  </div>
</template>
For one-way data binding in VueJS, we can use textinterpolation. That’s exactly what we do to render the headline. Therefore, we simply need to wrap our headline data object in double curly braces. Attention, this “Mustache” syntax interprets data always as plain text, not HTML.
That’s why we also use vue’s slot element, which allows us to render child elements of our panel component within the body element. Now we are done with the html for the panel component, next we define our script logic.
<script>
export default {
  name: "Panel",
  props: {
    headline: String,
  }
};
</script>
First, it’s important to add a name to the component so we can actually register the component and import it later on. As we want to pass the headline to the panel, we should specify it as properties. Properties are custom attributes we can register on a component.
<template>
      <Panel class="calculator-panel" headline="Income Tax Calculator">
        <template>
        <span>content goes here.<span/>
        </template>
      </Panel>
</template>
To see the panel in our app, just add the code above to our app.vue component.
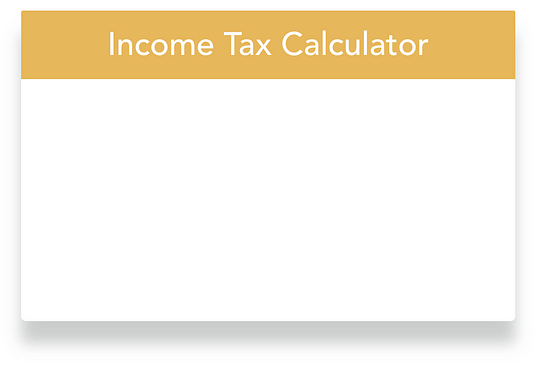
In the script block we already import the component so adding the html is all we need to add our first component to the app!
We should see the panel when we run yarn start.
If we have any problems implementing the panel or want to skip this section check the following branch.
git checkout 02_panel
Let’s create the Input Component!

Next we build our input form with some neat custom input validation.
We have three types of inputs: regular, select and radio.
Except the radio buttons these inputs need input validation and corresponding user feedback. To avoid repeating ourselves, we should build a reusable input component. To build a component which is actually reusable, I advice to build it in a way, that allows to easily extend it without changing the whole architecture.
Defining a clean and thought through component api is a great starting point.
In our case, we always want to control four properties from outside of the component:
- label
- input type
- validation rule
- data-binding
Let’s translate these requirements into code! The input.vue component looks like the following:
<template>
  <div class="input-wrapper">
    <label>{{label}}</label>
    <input
      class="input"
      v-if="type==='input'"
      @input="customInput($event.target.value)"
      autocomplete="off"
      type="text"
    >
</template>
<script>
export default {
  name: "Input",
  props: {
    type: String,
    label: String,
    validation: String,
  }
}
</script>
We add some custom vue-attributes to the native input component. First we add v-if, which allows us to render the input only if we pass the correct type to our component. This is important to add different types of inputs. Next, we bind to the component’s input event with the @-prefix to a method called customInput.
Thats where our custom input validation comes to play. We add a validation library to the project by running
yarn add vee-validate and register the plugin in our main.js file.
import VeeValidate from "vee-validate";

Vue.use(VeeValidate);
Our validation consists in intercepting the native input event and then check if the entered values meet our validation rule. In case it doesn’t we set an error message. Therefore, we add two methods to the input.vue file. The customInput method is triggered when the user enters any input.
<script>
import { Validator } from "vee-validate";
const validator = new Validator();
...
data() {
    return {
      validationError: ""
    };
  },
  methods: {
    validate(value) {
      return validator.verify(value, this.validation, {
        name: this.label
      });
    },
    async customInput(value) {
      const { valid, errors } = await this.validate(value);
      if (valid) {
        this.validationError = "";
        this.$emit("input", value);
      } else {
        this.validationError = errors[0];
        this.$emit("input", "");
      }
    }
  }
  </script>
The validation error message is returned from the v-validate plugin. We only have to add some html to show it to the user:
<template>
...
 <transition name="alert-in"
  enter-active-class="animated flipInX"
  leave-active-class="animated flipOutX">
   <p v-if="validationError" class="alert" >
    {{ validationError }}
   </p>
 </transition>
</template>
I add a transition to the error message. VueJS comes with a transition wrapper, combined with the flip-animation from animate.css and some styles, we can get a nice error message without any hassle.
<template>
  <form>
    <Input
      type="input"
      label="Net Income"
      validation="required|numeric"
      v-model="inputs.incomeValue"
      @input="input"
    />
  </form>
</template>

<script>
import Input from "./Input";
export default {
  name: "InputForm",
  components: {
    Input
  },
  data() {
    return {
      inputs: {
        incomeValue: ""
      }
    };
  }
};
</script>
To add the new input to the app, register the completed Input component to the InputForm.vue. Here we apply two-way-binding through v-model — It automatically picks the correct way to update the element based on the input type. Now, we need to open App.vue , import InputForm as we did with Panel and replace <span> content goes here. </span> with <InputForm/>.
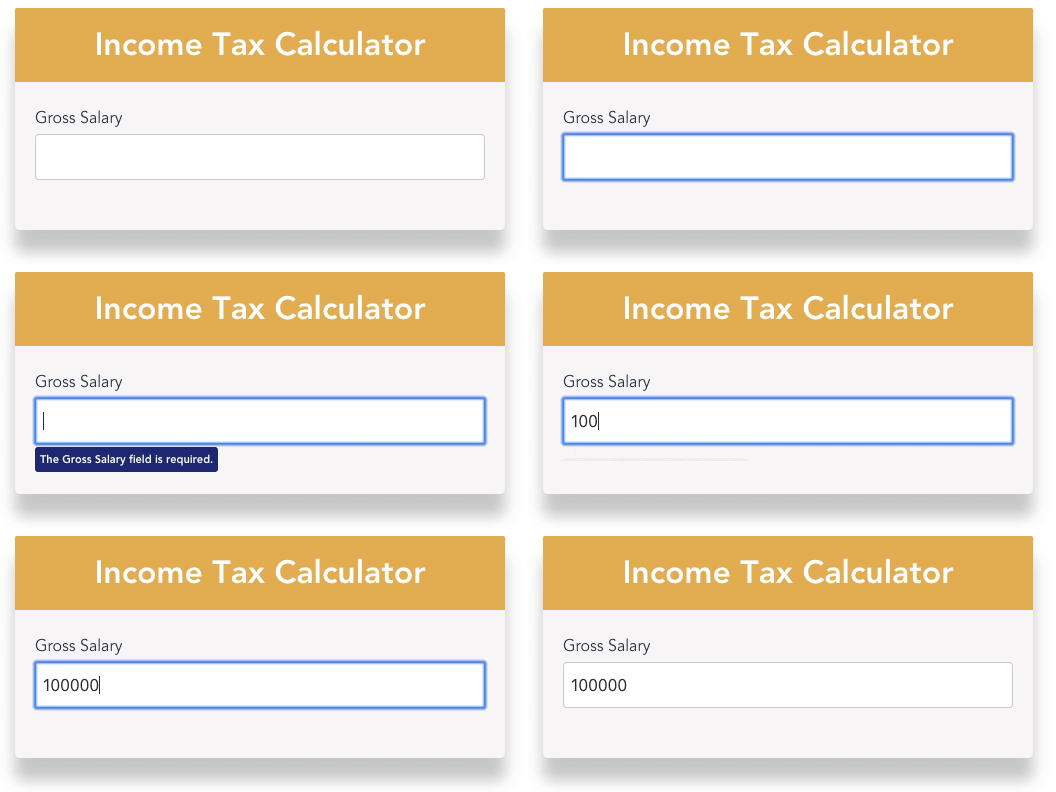
The result should look like what you see here on the left side.
Check the branch for more details!
git checkout 03_basicInput
Add more input types!
Now that we have a basic input with validation in place, it’s easy to extend our input component with the remaining two input types — the select and radio input.
For the select element we use an out-off-the-box component. We simply add it by running:
yarn add vue-select
Before we can use it, it needs to be registered in the main.js file similar to the v-validate plugin before. However, this time we use the Vue.componentmethod.
import vSelect from 'vue-select'
..
Vue.component('v-select', vSelect)
Now simply add the component to our Input.vue file. The options we want to show in the dropdown will be passed to the component as props.
template>
...
 <v-select
      v-if="type ==='dropdown'"
      class="input-dropdown"
      @input="customInput"
      :options="options"
    />
</template>
<script>
...
export default {
...
props {
     ...
     options: Array
}
Now there are only the radio buttons left to add.
// image
We start off with the native html element. Even though we just need two radio buttons atm, I advice to build the component in a way that allows to pass an arbitrary number of inputs. Therefore, we simply use vue’sv-for attribute to loop over the options property and create a radio button for each element of the option array.
<template>
 <div
  v-if="type ==='radio'"
  v-for='option in options'
  :key='option.label'
 >
 <input
  type="radio"
  class="radio"
  :id="option.label"
  :value="option.value"
  :checked="value === option.value"
  @input="customInput($event.target.value)"
  >
   <label :for="option.label">{{option.label}}</label>
  </div>
...
</template>

<script>
...
  props: {
    ...
    value: [String, Object, Boolean]
  }
...
 </script>
Additionally, we need to pass the currently selected value in order to manage the ‘checked’ state of the radio button inputs. In the script block we add an array holding all possible value types.
To test our new input types, we need to actually add them to the submit form and pass options to the select and radio input.
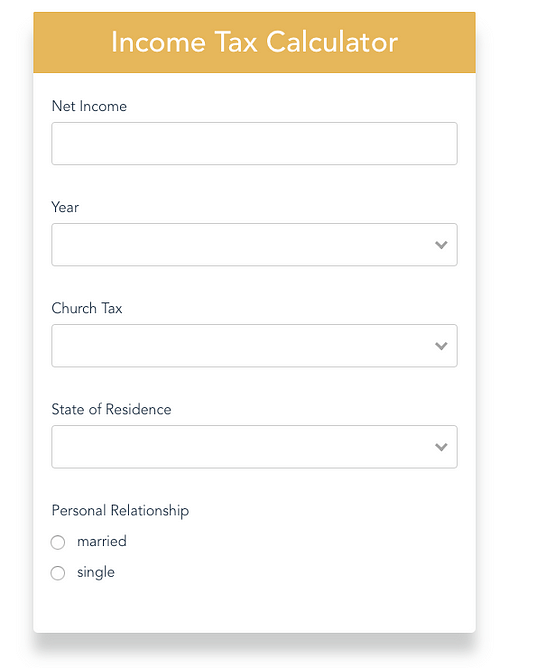
Check out the inputForm.vue file in the following branch to see how the options are passed to the new inputs.
It follows the same pattern we have investigated for the regular input in detail.
Most importantly, keep in mind to always pass an object containing a value and a label.
That’s it! We managed to create a component that allows us to add all the input types we need and validate them without repeating ourselves!
Let’s finalise our input form!
Now we can finalise the input form. The only thing missing is the button to submit the form.
<template>
 <form @submit.prevent="handleSubmit">
  ...
  <button
   class='submit-btn'
   :disabled="!isEnabled"
   type="submit"
  >
   Calculate!
  </button>
 </form>
</template>
<script>
...
  computed: {
      isEnabled: function() {
        return !!Object.values(this.inputs).every(Boolean);
      }
    },
    methods: {
      input: function(input) {
        if (input.type === "input") {
         this.incomeValue = input.value;
        }
      },
      handleSubmit: function() {
        const { isInChurch, stateOfResidence } = this.inputs;
        const inputValues = {
          ...this.inputs,
          yearValue: yearValue.value,
          isInChurch: isInChurch.value,
          stateOfResidence: stateOfResidence.value
        };
        this.$emit("submitted", inputValues);
      }
    }
</script>
We start with preventing the default html form event, and call our custom method handleSubmit instead.
There we clean our input results — Although our dropdown and radio buttons require return objects with label and value, we are only interested in the value to calculate the results.
Finally, we create a custom event which emits only the values of our input options.
We also create a computed property which enables our “calculate” button only after all required data is entered by the user.
You find the completed input form on the branch I mentioned already above.
git checkout 04_completeInputs
Let’s calculate our taxes!
Now we are already able to get the inputs from the user, next we need to actually calculate the resulting income taxes. As I mentioned in the very beginning, I want to spare you the details about how the different types of deductions are calculated. In case you are interested anyhow check out the calc.js file.
<template>
...
  <InputForm @submitted="submitted" />
...
</template>
<script>
...
import { calcTaxes } from "./calc.js";
export default {
...
  data() {
    return {
      calculations: {}
    };
  },
  methods: {
    submitted: function(input) {
      const calcValues = calcTaxes(input);
      this.calculations = {
        grossIncome: { label: "Gross Salary", value: calcValues.incomeValue },
        tax: { label: "Income Tax", value: -calcValues.incomeTax },
        churchTax: { label: "Church Tax", value: -calcValues.churchTax },
        soli: { label: "Solidarity Charge", value: -calcValues.soli },
        netIncome: { label: "Net Salary", value: calcValues.netIncome }
      };
    },
  }
};
</script>
Most importantly, we understand that we use the custom submitted event to pass the inputs back to our app.vue component. Here we also calculate the actual taxes and store the resulting values with labels, and add negative signs to the values we deduced from the gross income.
— Why? It makes displaying the results very simple as we will see in the next section.
Let’s display our Results!
Now we have everything we need to finally show the results of our tax calculations.
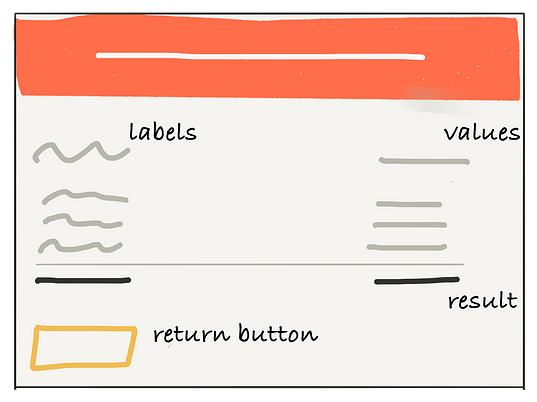
Therefore, we use a native html table to show the label and the corresponding value in a structured manner.
The implementation is quite simple, as we can stick to what we have learned about VueJS already. In fact, we repeat what we have done for the radio input already.
We just pass our calculations as props to the results component and loop over our results object.
<template>
  <div>
    <table>
      <tr class="table-head">
        <th class="name">Name</th>
        <th class="value">Value</th>
      </tr>
      <tr
        v-for='result in results'
        :key="result.label"
      >
        <td>{{result.label}}</td>
        <td class="value">
          {{result.value}}
        </td>
      </tr>
    </table>

    <button
      v-on:click="handleBackClick"
      class="btn-back"
    >
      Back
    </button>
  </div>
</template>

<script>
export default {
  name: "Result",
  props: {
    results: Object
  },
  methods: {
    handleBackClick: function() {
      this.$emit("clearCalculations");
    }
  }
};
</script>
As users probably want to perform multiple calculations without refreshing the page, we add another button, that leads users back to the input form.
Therefore, we simply emit a custom event called clearCalculations to clear our calculations property in the parent component. Finally, we are also tying all our components together and complete our income tax calculator.
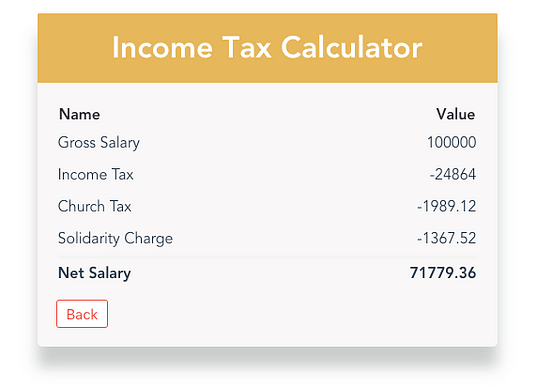
As always, checkout the branch I you want to have a more detailed look at the code.
git checkout 05_result
Let’s finalise our App!
In this last section there is only, two things left to do — complete the data-flow and manage the lifecycle of the input and result component accordingly.
<template>
  <div id="app">
    <main>
      <Panel
        class="calculator-panel"
        headline="Income Tax Calculator"
      >
        <template>
          <transition
            name="alert-in"
            mode="out-in"
            enter-active-class="animated fadeIn"
            leave-active-class="animated fadeOut"
          >
            <InputForm
              v-if="!resultsCalculated"
              @submitted="submitted"
            />
            <Result
              v-if="resultsCalculated"
              @clearCalculations='clearCalculations'
              :results="calculations"
            />
          </transition>
        </template>
      </Panel>
    </main>
  </div>
</template>

<script>
...
export default {
  ...
  data() {
    return {
      calculations: {}
    };
  },
  computed: {
    resultsCalculated: function() {
      return Object.keys(this.calculations).length !== 0;
    }
  },
  methods: {
   ...
   clearCalculations: function() {
    this.calculations = {};
   }
  }
};
</script>
in the Result.vue component we just added a button which emits the clearCalculation event. On the left, we see our main component App.vue. Here we subscribe to the event and reset the calculations object to be empty.
Now, we want to only render the input or the result component.
Therefore, we add another computed boolean property, which checks if we have calculation results or not.
Now, we add v-if attributes to our components based on our resultsCalculated prop.
Try it out! Now we should see the table with the results only after we have successfully entered our inputs.
To make the switch between input and results less harsh we add a transition. As we are replacing the one with the other component here, we use the mode attribute out-in so that, the current element transitions out first, then when complete, the new element transitions in.
We completed the tutorial! Well done! The branch with the finale application code is the following
git checkout 06_complete
In this tutorial, we will implement and discuss the Service Worker, one of the core technologies that adds the astonishing offline-first experience of a native app to a regular web app.
Offline-first Paradigm
On the web of today the majority of websites and web apps simply fail when there is no network connection. This is so common, that users of today don’t even complain about this poor experience.
For Progressive Web Apps it’s different, as these bridge the gap between native and web applications. In contrast to the web, native app users do not simply accept complete crashes due to poor network connectivity.
Thats why building PWAs does not only require new technologies but also a new paradigm to meet these user expectations. This very paradigm is called offline-first! Boiled down to one single sentence:
Why should we start developing PWAs now?
We jump right into learning what offline-first means for app development by checking out the tax calculator app as our starting point.
The Tax Calculator App

That’s the VueJS app we have build in Part I of this tutorial. It helps users to calculate German income tax (it’s really tricky) based on some personal details.
To get started with the already completed app check out the 07_complete branch of this repo.
Let’s make the app work offline!
Let’s start with making our income tax calculator available offline. Typically, all static files (HTML, JS, CSS, images, etc.) are requested again and again with each page refresh. As the tax calculator app does its calculations in the frontend, a server connection is not really required, but for fetching these static files. That means, to make our app available offline we simply need can simply cache them by using a Service Worker!

Sounds not as easy to do, right?
In fact, most of the job is already done. Our app is based on VueJS PWA template that supports pre-caching of static assets out of the box. However, it’s not easy to understand whats going on if you are not familiar with the the concept of Service Workers and the CacheStorage API yet.
That’s why we start with exploring both topics in this section!
What is a Service Worker?

A service worker is a script that your browser runs in the background, separate from a web page. It can neither directly interact with the webpage nor directly access the DOM because he service worker runs on a different thread. This nature of service workers opens the door to features that don’t need a web page or user interaction, e.g the interception and management of network requests and including data caching.
Check it our yourself! Go to webpack.prod.conf file, thats where we configure sw-precache to build a service worker. Look for the SWPrecacheWebpackPlugin constructor and change the minified option to false.
Then, run yarn build. When we now check our /build folder, we find the service-worker.js file there. Service Workers are a production only feature. Imaging, your app would cache all static files in development mode…not a very pleasant dev experience. That’s why we need to serve our production build in order to ensure it is all working correctly.
yarn global add serve
Then run the following command and browse http://localhost:3000
serve dist/
You should see the tax calculator as you know it. Now go to the dev tools, network tab. set the offline tick and refresh the page. The app is still there and fully functional!
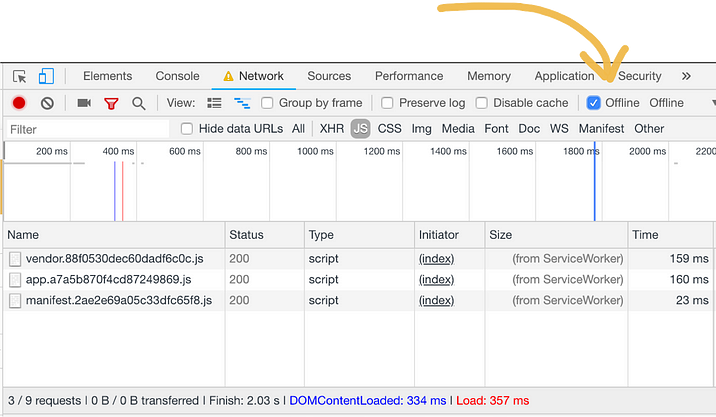
Great, now we know what a service worker is and how [sw-precache]([https://github.com/GoogleChromeLabs/sw-precache)](https://github.com/GoogleChromeLabs/sw-precache) "https://github.com/GoogleChromeLabs/sw-precache)") lets us set it up very conveniently. However, we haven’t explored how the service worker actually caches the static files.
CacheStorage API
First of all, important to understand how caching in general works. Therefore we have a look at the CacheStorage browser API. It’s a fairly new type of caching layer which allows us to explicitly manage the caching of assets. CacheStorage is nothing like AppCache, you might remember. CacheStorage is less opinionated and much more advanced, which gives us a lot more freedom.
CacheStorage is great for our purpose, as it allows us to manage our caching needs on a very granular level. Basically, we can decide individually for each single single how and when to serve it from cache or network. Even though, we can basically come up with very individual cache strategy, there are a few common once, worth knowing.
The most common are cache only, cache falling back to network, network only, network, falling back to cache and generic fallback.
The Cache-first Strategy
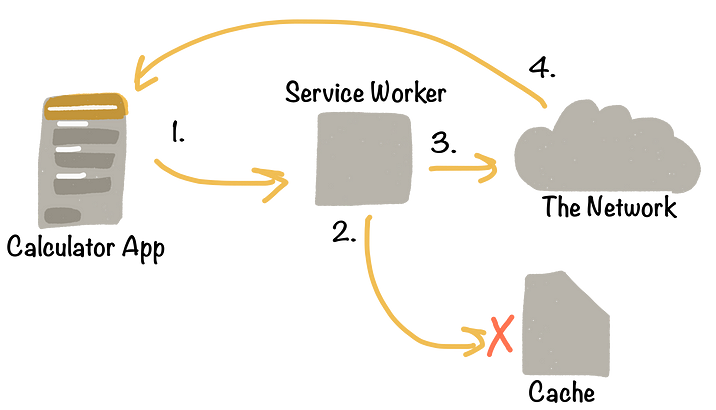
Our sw-precache library comes with a cache-first strategy.
That means, when the app starts to load its static files(1), the service worker intercepts the requests. Next, the service worker tries to serve the static files from the local cache storage(2). Only if not files are available there, it connects to the network to fetch them(3) and completes the app’s request(4).
Generally speaking, cache-first is a good strategy for basic offline-first implementations. However, this strategy comes with some downsides. For example, it prevents that users always see the newest version of the app, as the service worker serves preferably a cached, probably outdated, app version. In the documentation of sw-precache they recommend compensation this by
Why should we start developing PWAs now?
In the case of our tax calculator this isn’t a big problem, otherwise one of the other caching strategies could be a better choice.
The Service Worker LifeCycle
To successfully implement any of the mentioned caching strategy it’s important to be familiar with the life cycle of a service worker. So let’s look at a simplified version of the actual lifecycle for now. We look at the following stages: i_nstalling, activating_ and activated. Each of these stagesmust be completed during the life time of a worker.

When the worker enters one of the stages it emits an event, we can listen to. Now we can checkout how our service worker is actually caching our static files. Don’t let the helper functions confuse you, I highlight for you whats most important.
self.addEventListener("install", function(event) {
  event.waitUntil(
    caches
      .open(cacheName)
      .then(function(cache) {
        return setOfCachedUrls(cache).then(function(cachedUrls) {
          return Promise.all(
            Array.from(urlsToCacheKeys.values()).map(function(cacheKey) {
              ...
              return fetch(request).then(function(response) {
                 ...
                return cleanResponse(response).then(function(responseToCache) {
                  return cache.put(cacheKey, responseToCache);
                });
              });
            })
          );
        });
      })
      .then(function() {
        // Force the SW to transition from installing -> active state
        return self.skipWaiting();
      })
  );
});
Install Event, typically used to cache files which are required to be available, before the service worker is active. For example, requests the service worker relies on to function correctly. If anything goes wrong we simply cancel the installation. Next time the user visits the page, the service worker will try to install again.
If there is new static assets, they are added to the cache by cache.put(cacheKey, resonseToCache) , else the worker transitions to the next stage.event.waitUntil() is heavily used in service workers to extend the current state till the passed chain of callbacks is resolved.
self.addEventListener("activate", function(event) {
  var setOfExpectedUrls = new Set(urlsToCacheKeys.values());

  event.waitUntil(
    caches
      .open(cacheName)
      .then(function(cache) {
        return cache.keys().then(function(existingRequests) {
          return Promise.all(
            existingRequests.map(function(existingRequest) {
              if (!setOfExpectedUrls.has(existingRequest.url)) {
                return cache.delete(existingRequest);
              }
            })
          );
        });
      })
      .then(function() {
        return self.clients.claim();
      })
  );
});
Activate Event, when a service worker is activated, it takes control of our app. A worker needs to be activated before it can intercept fetch requests. When a worker is initially registered, pages won’t use it until they next load. The claim() method forces the service workers to immediately take control of a page. We also can do some more cache management here and delete request from the cache which are not part of our expected URLs anymore.
Fetch Event, The fetch event is the only thing which we haven’t seen is how the service worker actually fetches the cached static files. That happens by listening to fetch events.
self.addEventListener("fetch", function(event) {
  if (event.request.method === "GET") {
    var shouldRespond;
    ...
    if (shouldRespond) {
      event.respondWith(
        caches
          .open(cacheName)
          .then(function(cache) {
            return cache
              .match(urlsToCacheKeys.get(url))
              .then(function(response) {
                  return response;
                  ...
              });
          })
          .catch(function(e) {
            console.warn(
              'Couldn\'t serve response for "%s" from cache: %O',
              event.request.url,
              e
            );
            return fetch(event.request);
          })
      );
    }
  }
});
I skipped how shouldRespond is calculated, it’s more important to understand how we return content from cache to all GET requests. In case we can’t serve from cache, as we might haven’t cached a requested resource, we simply let the request through, fetching the content from the network.
Don’t forget to go back to your webpack.prod.conf file to reset the minified option to true.
Are Service Workers well supported?
You might already wondered about browser and platform support for Service Workers. Long Story short, all major browser vendors and platforms are clearly committed to extend their PWA support.
However, Apple is far behind and it will probably take a long time till they catch up. Just with last year’s iOS 11.3 update Apple started to support the basic features of service workers.
That’s all we need to know about Service Workers and Caching for now. We have covered the essential bits and pieces to make our app a true offline-first experience!
Thanks for reading!
*Originally published by Fabian Hinsenkamp at *https://hackernoon.com
Learn More
☞ Vue JS 2 - The Complete Guide (incl. Vue Router & Vuex)
☞ Nuxt.js - Vue.js on Steroids
☞ The Complete JavaScript Course 2018: Build Real Projects!
☞ Become a JavaScript developer - Learn (React, Node,Angular)
☞ JavaScript: Understanding the Weird Parts
☞ MERN Stack Front To Back: Full Stack React, Redux & Node.js
#javascript #vue-js #web-development
