Pandas is an open source, BSD-licensed library providing high-performance, easy-to-use data structures and data analysis tools for the Python programming …
- Introduction to Pandas
- About the Data
- Setup
- Loading Data
- Basic Operations
- The Dtype
- Cleansing and Transforming Data
- Performing Basic Operations
- Calculations
- Booleans
- Grouping
- Plotting
- Introduction to Pandas
- About the Data
- Setup
- Loading Data
- Basic Operations
- The Dtype
- Cleansing and Transforming Data
- Performing Basic Operations
Introduction to Pandas
So, what is Pandas — practically speaking? In short, it’s the major data analysis library for Python. For scientists, students, and professional developers alike, Pandas represents a central reason for any learning or interaction with Python, as opposed to a statistics-specific language like R, or a proprietary academic package like SPSS or Matlab. (Fun fact — Pandas is named after the term Panel Data, and was originally created for the analysis of financial data tables). I like to think that the final “s” stands for Series or Statistics.
Although there are plenty of ways to explore numerical data with Python out-of-the box, these will universally involve some fairly low-performance results, with a ton of boilerplate. It may sound hard to believe, but Pandas is often recommended as the next stop for Excel users who are ready to take their data analysis to the next level. Nearly any problem that can be solved with a spreadsheet program can be solved in Pandas — without all the graphical cruft.
More importantly, because problems can be solved in Pandas via Python, solutions are already automated, or could be run as a service in the cloud. Further, Pandas makes heavy use of Numpy, relying on its low-level calls to produce linear math results orders of magnitude more quickly than they would be handled by Python alone. These are just a few of the reasons Pandas is recommended as one of the first libraries to learn for all Pythonistas, and remains absolutely critical to Data Scientists.
About the Data
In this post, we’re going to be using a fascinating data set to demonstrate a useful slice of the Pandas library. This data set is particularly interesting as it’s part of a real world example, and we can all imagine people lined up at an airport (a place where things do occasionally go wrong). When looking at the data, I imagine people sitting in those uncomfortable airport seats having just found out that their luggage is missing — not just temporarily, but it’s nowhere to be found in the system! Or, better yet, imagine that a hardworking TSA employee accidentally broke a precious family heirloom.
So it’s time to fill out another form, of course. Now, getting data from forms is an interesting process as far as data gathering is concerned, as we have a set of data that happens at specific times. This actually means we can interpret the entries as a Time Series. Also, because people are submitting the information, we can learn things about a group of people, too.
Back to our example: let’s say we work for the TSA and we’ve been tasked with getting some insights about when these accidents are most likely to happen, and make some recommendations for improving the service.
Pandas, luckily, is a one-stop shop for exploring and analyzing this data set. Feel free to download the excel file into your project folder to get started, or run the curl command below. Yes, pandas can read .xls or .xlsx files with a single call to **pd.read_excel()**! In fact, it’s often helpful for beginners experienced with .csv or excel files to think about how they would solve a problem in excel, and then experience how much easier it can be in Pandas.
So, without further ado, open your terminal, a text editor, or your favorite IDE, and take a look for yourself with the guidance below.
Example data:
Take for example, some claims made against the TSA during a screening process of persons or a passenger’s property due to an injury, loss, or damage. The claims data information includes claim number, incident date, claim type, claim amount, status, and disposition.
Directory: TSA Claims Data
Our Data Download: claims-2014.xls
Setup
To start off, let’s create a clean directory. You can put this wherever you’d like, or create a project folder in an IDE. Use your install method of choice to get Pandas: Pip is probably the easiest.
$ mkdir -p ~/Desktop/pandas-tutorial/data && cd ~/Desktop/pandas-tutorial
Install pandas along with xldr for loading Excel formatted files, matplotlib for plotting graphs, and Numpy for high-level mathematical functions.
$ pip3 install matplotlib numpy pandas xldr
Optional: download the example data with curl:
$ curl -O https://www.dhs.gov/sites/default/files/publications/claims-2014.xls
Launch Python:
$ python3
Python 3.7.1 (default, Nov  6 2018, 18:46:03)
[Clang 10.0.0 (clang-1000.11.45.5)] on darwin
Type "help", "copyright", "credits" or "license" for more information.
>>>
Import packages:
>>> import matplotlib.pyplot as plt
>>> import numpy as np
>>> import pandas as pd
Loading Data
Loading data with Pandas is easy. Pandas can accurately read data from almost any common format including JSON, CSV, and SQL. Data is loaded into Pandas’ “flagship” data structure, the DataFrame.
That’s a term you’ll want to remember. You’ll be hearing a lot about DataFrames. If that term seems confusing — think about a table in a database, or a sheet in Excel. The main point is that there is more than one column: each row or entry has multiple fields which are consistent from one row to the next.
You can load the example data straight from the web:
>>> df = pd.read_excel(io='https://www.dhs.gov/sites/default/files/publications/claims-2014.xls', index_col='Claim Number')
Less cooly, data can be loaded from a file:
$ curl -O https://www.dhs.gov/sites/default/files/publications/claims-2014.xls

>>> df = pd.read_excel(io='claims-2014.xls', index_col='Claim Number')
Basic Operations
Print information about a DataFrame including the index dtype and column dtypes, non-null values, and memory usage. DataFrame.info() is one of the more useful and versatile methods attached to DataFrames (there are nearly 150!).
>>> df.info()
<class 'pandas.core.frame.DataFrame'>
Int64Index: 8855 entries, 2013081805991 to 2015012220083
Data columns (total 10 columns):
Date Received    8855 non-null datetime64[ns]
Incident Date    8855 non-null datetime64[ns]
Airport Code     8855 non-null object
Airport Name     8855 non-null object
Airline Name     8855 non-null object
Claim Type       8855 non-null object
Claim Site       8855 non-null object
Item Category    8855 non-null object
Close Amount     8855 non-null object
Disposition      8855 non-null object
dtypes: datetime64[ns](2), object(8)
memory usage: 761.0+ KB
View the first n rows:
>>> df.info()
<class '>>> df.head(n=3)  # see also df.tail()
    Claim Number Date Received       Incident Date Airport Code       ...              Claim Site                   Item Category Close Amount      Disposition
0  2013081805991    2014-01-13 2012-12-21 00:00:00          HPN       ...         Checked Baggage  Audio/Video; Jewelry & Watches            0             Deny
1  2014080215586    2014-07-17 2014-06-30 18:38:00          MCO       ...         Checked Baggage                               -            0             Deny
2  2014010710583    2014-01-07 2013-12-27 22:00:00          SJU       ...         Checked Baggage                    Food & Drink           50  Approve in Full
[3 rows x 11 columns]
List all the columns in the DataFrame:
df.columns> df.columns> df.columns> df.columns> df.columns
Return a single column (important — also referred to as a Series):
>>> df['Claim Type'].head()
0    Personal Injury
1    Property Damage
2    Property Damage
3    Property Damage
4    Property Damage
Name: Claim Type, dtype: object
Hopefully, you’re starting to get an idea of what claims-2014.xls’s data is all about.
The Dtype
Data types are a fundamental concept that you’ll want to have a solid grasp of in order to avoid frustration later. Pandas adopts the nomenclature of Numpy, referring to a column’s data type as its dtype. Pandas also attempts to infer dtypes upon DataFrame construction (i.e. initialization).
To take advantage of the performance boosts intrinsic to Numpy, we need to become familiar with these types, and learn about how they roughly translate to native Python types.
Look again at df.info() and note the dtype assigned to each column of our DataFrame:
>>> df.info()
<class 'pandas.core.frame.DataFrame'>
RangeIndex: 8855 entries, 0 to 8854
Data columns (total 11 columns):
Date Received    8855 non-null datetime64[ns]
Incident Date    8855 non-null datetime64[ns]
Airport Code     8855 non-null object
Airport Name     8855 non-null object
Airline Name     8855 non-null object
Claim Type       8855 non-null object
Claim Site       8855 non-null object
Item Category    8855 non-null object
Close Amount     8855 non-null object
Disposition      8855 non-null object
dtypes: datetime64[ns](2), object(8)
memory usage: 761.1+ KB
dtypes are analogous to text/number format settings typical of most spreadsheet applications, and Pandas uses dtypes to determine which kind(s) of operations may be performed the data in a specific column. For example, mathematical operations can only be performed on numeric data types such as int64 or float64. Columns containing valid Dates and/or time values are assigned the datetime dtype and text and or binary data is assigned the catchall object dtype.
In short, Pandas attempts to infer dtypes upon DataFrame construction. However, like many data analysis applications, the process isn’t always perfect.
It’s important to note that Pandas dtype inference errs on the side of caution: if a Series appears to contain more than one type of data, it’s assigned a catch-all dtype of ‘object’. This behavior is less flexible than a typical spreadsheet application and is intended to ensure dtypes are not inferred incorrectly but also requires the analyst to ensure the data is “clean” after it’s loaded.
Cleansing and Transforming Data
Data is almost always dirty: it almost always contains some datum with atypical formatting; some artifact unique to its medium of origin. Therefore, cleansing data is crucial to ensuring analysis derived therefrom is sound. The work of cleansing with Pandas primarily involves identifying and re-casting incorrectly inferred dtypes.
>>> df.dtypes
Date Received    datetime64[ns]
Incident Date    datetime64[ns]
Airport Code             object
Airport Name             object
Airline Name             object
Claim Type               object
Claim Site               object
Item Category            object
Close Amount             object
Disposition              object
dtype: object
Looking again at our DataFrame’s dtypes we can see that Pandas correctly inferred the dtypes of Date Received and Incident Date as datetime64 dtypes. Thus, datetime attributes of the column’s data are accessible during operations. For example, to summarize our data by the hour of the day when each incident occurred we can group and summarize our data by the hour element of a datetime64 column to determine which hours of the day certain types of incidents occur.
>>> grp = df.groupby(by=df['Incident Date'].dt.hour)
>>> grp['Item Category'].describe()
              count unique                   top freq
Incident Date
0              3421    146  Baggage/Cases/Purses  489
1                 6      5                 Other    2
2                11      9                     -    2
3                 5      5     Jewelry & Watches    1
4                49     18  Baggage/Cases/Purses    6
5               257     39                     -   33
6               357     54                     -   43
7               343     43              Clothing   41
8               299     47                     -   35
9               305     41                     -   31
10              349     45                 Other   43
11              343     41                     -   45
12              363     51                 Other   41
13              359     55                     -   45
14              386     60  Baggage/Cases/Purses   49
15              376     51                 Other   41
16              351     43  Personal Electronics   35
17              307     52                 Other   34
18              289     43  Baggage/Cases/Purses   37
19              241     46  Baggage/Cases/Purses   26
20              163     31  Baggage/Cases/Purses   23
21              104     32  Baggage/Cases/Purses   20
22              106     33  Baggage/Cases/Purses   19
23               65     25  Baggage/Cases/Purses   14
This works out quite perfectly — however, note that Close Amount was loaded as an ‘object’. Words like “Amount” are a good indicator that a column contains numeric values.
Let’s take a look at the values in Close Amount.
>>> df['Close Amount'].head()
0     0
1     0
2    50
3     0
4     0
Name: Close Amount, dtype: object
Those look like numeric values to me. So let’s take a look at the other end
>>> df['Close Amount'].tail()
8850      0
8851    800
8852      0
8853    256
8854      -
Name: Close Amount, dtype: object
There’s the culprit: index # 8854 is a string value.
If Pandas can’t objectively determine that all of the values contained in a DataFrame column are the same numeric or date/time dtype, it defaults to an object.
Luckily, I know from experience that Excel’s “Accounting” number format typically formats 0.00 as a dash, -.
So how do we fix this? Pandas provides a general method, DataFrame.apply, which can be used to apply any single-argument function to each value of one or more of its columns.
In this case, we’ll use it to simultaneously convert the — to the value it represents in Excel, 0.0 and re-cast the entire column’s initial object dtype to its correct dtype a float64.
First, we’ll define a new function to perform the conversion:
>>> def dash_to_zero(x):
>>>    if '-' in str(x):
>>>        return float() # 0.0
>>>    else:
>>>        return x  # just return the input value as-is
Then, we’ll apply the function to each value of Close Amount:
>>> df['Close Amount'] = df['Close Amount'].apply(dash_to_zero)
>>> df['Close Amount'].dtype
dtype('float64')
These two steps can also be combined into a single-line operation using Python’s lambda:
>>> df['Close Amount'].apply(lambda x: 0. if '-' in str(x) else x)
Performing Basic Analysis
Once you’re confident that your dataset is “clean,” you’re ready for some data analysis! Aggregation is the process of getting summary data that may be more useful than the finely grained values we are given to start with.
Calculations
>>> df.sum()
Close Amount    538739.51
dtype: float64

>>> df.min()
Date Received              2014-01-01 00:00:00
Incident Date              2011-08-24 08:30:00
Airport Code                                 -
Airport Name      Albert J Ellis, Jacksonville
Airline Name                                 -
Claim Type                                   -
Claim Site                                   -
Item Category                                -
Close Amount                                 0
Disposition                                  -

>>> df.max()
Date Received                       2014-12-31 00:00:00
Incident Date                       2014-12-31 00:00:00
Airport Code                                        ZZZ
Airport Name                 Yuma International Airport
Airline Name                                 XL Airways
Claim Type                              Property Damage
Claim Site                                        Other
Item Category    Travel Accessories; Travel Accessories
Close Amount                                    25483.4
Disposition                                      Settle
dtype: object
Booleans
Find all of the rows where ‘Close Amount’ is greater than zero. This is helpful because we’d like to see some patterins where the amount is actually positive, and show how conditional operators work.
>>> df[df['Close Amount'] > 0].describe()
       Close Amount
count   2360.000000
mean     228.279453
std      743.720179
min        1.250000
25%       44.470000
50%      100.000000
75%      240.942500
max    25483.440000
Grouping
In this example, we’ll walk through how to group by a single column’s values.
The Groupby object is an intermediate step that allows us to aggregate on several rows which share something in common — in this case, the disposition value. This is useful because we get a birds-eye view of different categories of data. Ultimately, we use describe() to see several aggregates at once.
>>> grp = df.groupby(by='Disposition')
>>> grp.describe()
                Close Amount
                       count        mean          std   min       25%      50%       75%       max
Disposition
-                     3737.0    0.000000     0.000000  0.00    0.0000    0.000    0.0000      0.00
Approve in Full       1668.0  158.812116   314.532028  1.25   32.9625   79.675  159.3375   6183.36
Deny                  2758.0    0.000000     0.000000  0.00    0.0000    0.000    0.0000      0.00
Settle                 692.0  395.723844  1268.818458  6.00  100.0000  225.000  425.6100  25483.44
Group by multiple columns:
>>> grp = df.groupby(by=['Disposition', 'Claim Site'])
>>> grp.describe()
                                Close Amount
                                       count         mean          std     min       25%       50%        75%       max
Disposition     Claim Site
-               -                       34.0     0.000000     0.000000    0.00    0.0000     0.000     0.0000      0.00
                Bus Station              2.0     0.000000     0.000000    0.00    0.0000     0.000     0.0000      0.00
                Checked Baggage       2759.0     0.000000     0.000000    0.00    0.0000     0.000     0.0000      0.00
                Checkpoint             903.0     0.000000     0.000000    0.00    0.0000     0.000     0.0000      0.00
                Motor Vehicle           28.0     0.000000     0.000000    0.00    0.0000     0.000     0.0000      0.00
                Other                   11.0     0.000000     0.000000    0.00    0.0000     0.000     0.0000      0.00
Approve in Full Checked Baggage       1162.0   113.868072   192.166683    1.25   25.6600    60.075   125.9825   2200.00
                Checkpoint             493.0   236.643367   404.707047    8.95   60.0000   124.000   250.1400   6183.36
                Motor Vehicle            9.0  1591.428889  1459.368190  493.80  630.0000   930.180  1755.9800   5158.05
                Other                    4.0   398.967500   358.710134   61.11  207.2775   317.385   509.0750    899.99
Deny            -                        4.0     0.000000     0.000000    0.00    0.0000     0.000     0.0000      0.00
                Checked Baggage       2333.0     0.000000     0.000000    0.00    0.0000     0.000     0.0000      0.00
                Checkpoint             407.0     0.000000     0.000000    0.00    0.0000     0.000     0.0000      0.00
                Motor Vehicle            1.0     0.000000          NaN    0.00    0.0000     0.000     0.0000      0.00
                Other                   13.0     0.000000     0.000000    0.00    0.0000     0.000     0.0000      0.00
Settle          Checked Baggage        432.0   286.271968   339.487254    7.25   77.0700   179.995   361.5700   2500.00
                Checkpoint             254.0   487.173031  1620.156849    6.00  166.9250   281.000   496.3925  25483.44
                Motor Vehicle            6.0  4404.910000  7680.169379  244.00  841.8125  1581.780  2215.5025  20000.00
Plotting
While aggregates on groups of data is one of the best ways to get insights, visualizing data lets patterns jump out from the page, and is straightforward for those who aren’t as familiar with aggregate values. Properly formatted visualizations are critical to communicating meaning in the data, and it’s nice to see that Pandas has some of these functions out of the box:
>>> df.plot(x='Incident Date', y='Close Amount')
>>> plt.show()
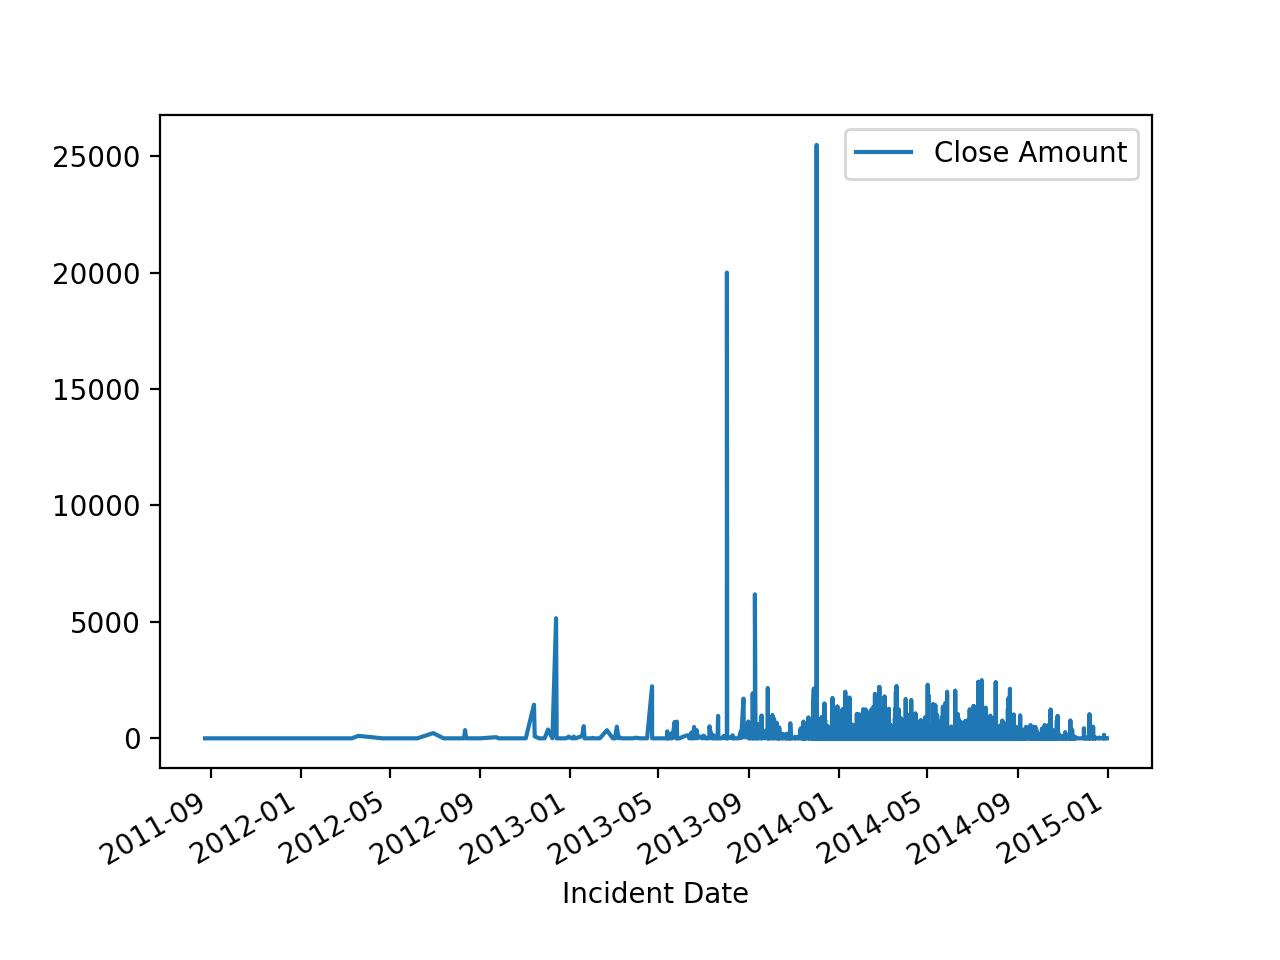
Incident Date by Close Amount
Exporting Transformed Data
Finally, we may need to commit either our original data, or the aggregates as a DataFrame to file format different than the one we started with, as Pandas does not limit you to writing back out to the same file format.
The most common flat file to write to from Pandas will be the .csv. From the visualization, it looks like the cost of TSA claims, while occasionally very high due to some outliers is improving in 2015. We should probably recommend comparing staffing and procedural changes to continue in that direction, and explore in more detail why we have more incidents at certain times of day.
Like loading data, Pandas offers a number of methods for writing your data to file in various formats. Writing back to an Excel file is slightly more involved than the others, so let’s write to an even more portable format: CSV. To write your transformed dataset to a new CSV file:
>>> df.to_csv(path_or_buf='claims-2014.v1.csv')
Final Notes
Here we’ve seen a workflow that is both interesting and powerful. We’ve taken a round-trip all the way from a government excel file, into Python, through some fairly powerful data visualization, and back to a .csv file which could be more universally accessed — all through the power of Pandas. Further, we’ve covered the three central objects in Pandas — DataFrames, Series, and dtypes. Best of all, we have a deeper understanding of an interesting, real-world data set.
These are the core concepts to understand when working with Pandas, and now you can ask intelligent questions (of yourself, or of Google) about these different objects. This TSA data use case has shown us exactly what Pandas is good for: the exploration, analysis, and aggregation of data to draw conclusions.
The analysis and exploration of data is important in practically any field, but it is especially useful to Data Scientists and AI professionals who may need to crunch and clean data in very specific, finely-grained ways, like getting moving averages on stock ticks. Additionally, certain tasks may need to be automated, and this could prove difficult or expensive in sprawling applications like Excel, or Google Sheets, which may not offer all the functionality of Pandas with the full power of Python.
Just imagine telling a business administrator that they may never have to run that broken spreadsheet macro ever again! Once analysis is automated, it can be deployed as a service or applied to hundreds of thousands of records streaming from a database. Alternatively, Pandas could be used to make critical decisions after establishing statistical associations between patterns, as indeed it is every day.
Next, be sure to checkout at Python’s extensive database libraries (e.g. SQLalchemy), or API clients (like the Google Sheets/Slides Python Client or Airtable API to put your results in front of domain experts). The possibilities are endless, and are only enhanced by Python’s mature libraries and active community.
Thanks for reading ❤
If you liked this post, share it with all of your programming buddies!
#python #pandas #data-science