How to build a basic Serverless Application using AWS Lambda
One of the architectural patterns I’ve championed for is Serverless Architecture. In short, a serverless application utilizes an array of cloud applications and services to perform logic that would normally be constrained to a single application hosted on a constantly running server.
Serverless itself has many benefits. It typically has reduced operational cost, as you are only paying for an application to run when it needs to. It also typically has reduced development cost, as many things you’d typically have to worry about with a legacy application, such as OS and System configurations, are handled for you by most cloud providers.
In this post, I’m going to show you how easy it is to build a basic serverless application using a few AWS services.
AWS Lambda
AWS Lambda is a service that allows you to run functions when they need to run, and only pay for them when they do. AWS allows you to upload an executable in a variety of languages, and handles spinning up and tearing down containers for you as it needs them. In this blog, I’ll be using Golang, also called Go, a language built at Google with scalability and concurrency in mind. Some of the other languages supported out of the box by AWS Lambda include Python, Node.js, and Java, to name a few. Some others, such as C++, can be used if you supply a custom runtime.
Building a Lambda Function
Let’s say we want to build a really simple API that returns information about cars. It’s not something that’s going to be used very often, and it doesn’t have to perform any complex logic. It’s just retrieving data and sending it to a client. For brevity, we’re going to avoid having a database of any kind and pretend that we magically have all of this information in memory.
In Go, there are no classes. Instead, objects are represented by structs, similar to C. Let’s build a quick struct to represent a car:
type Car struct {
  Model string `json:"model"`
  Color string `json:"color"`
  Year int `json:"year"`
}
As you can see, we have a Car struct with three fields, Model, Color and Year. The fields are capitalized so that they are exported, which is similar to public fields in some other languages. They are annotated with a json key to instruct the program how to deserialize json into an instance of the struct. More on that later.
Okay, so we have our struct now. Let’s say we want to build an HTTP endpoint that returns one of my favorite cars, a red 1999 Chevrolet Corvette. The response could look something like this:
GET /myfavoritecar
{   "model": "Corvette",   "color": "red",   "year": 1999}
AWS Lambda programs need to conform to a specific format which depends on the language they’re written in. All of them will have a handler function of some kind, which will usually include two parameters: a context and an input, the latter of which is usually some kind of JSON payload. In our example, we’re going to have our lambda function be triggered by requests to an application load balancer, which requires a specific contract be followed. More on that can be read here.
After following the AWS documentation, structs to represent an input to our Lambda function and its output will look something like this:
type LambdaPayload struct {
   RequestContext struct {
      Elb struct {
         TargetGroupArn string `json:"targetGroupArn"`
      } `json:"elb"`
   } `json:"requestContext"`
   HTTPMethod            string            `json:"httpMethod"`
   Path                  string            `json:"path"`
   Headers               map[string]string `json:"headers"`
   QueryStringParameters map[string]string `json:"queryStringParameters"`
   Body                  string            `json:"body"`
   IsBase64Encoded       bool              `json:"isBase64Encoded"`
}


type LambdaResponse struct {
   IsBase64Encoded   bool   `json:"isBase64Encoded"`
   StatusCode        int    `json:"statusCode"`
   StatusDescription string `json:"statusDescription"`
   Headers           struct {
      SetCookie   string `json:"Set-cookie"`
      ContentType string `json:"Content-Type"`
   } `json:"headers"`
   Body string `json:"body"`
}
There are fields that represent some meta info about our requests, such as Request Methods and response codes, as well as fields for request paths (in our case, /myfavoritecar), maps for headers and query parameters, the bodies of the requests and responses, and whether or not either are base 64 encoded. We can assume our lambda will automatically conform to this contract, as AWS will ensure that, and start writing our function!
When all is said and done, our function will look something like this:
func lambda_handler(ctx context.Context, payload LambdaPayload) (LambdaResponse, error) {
  response := &LambdaResponse{}
  response.Headers.ContentType = “text/html”
  response.StatusCode = http.StatusBadRequest
  response.StatusDescription = http.StatusText(http.StatusBadRequest)
  if payload.HTTPMethod == http.MethodGet && payload.Path == “/myfavoritecar” {
    car := &Car{}
    car.Model = “Corvette”
    car.Color = “Red”
    car.Year = 1999
    res, err := json.Marshal(car)
    if err != nil {
      fmt.Println(err)
      response.StatusCode = http.StatusInternalServerError
      response.StatusDescription = http.StatusText(http.StatusInternalServerError)
      return *response, err
    }
    response.Headers.ContentType = “application/json”
    response.Body = string(res)
    response.StatusCode = http.StatusOK
    response.StatusDescription = http.StatusText(http.StatusOK)
    return *response, nil
  } else {
    return *response, nil
  }
}
As you can see, we check that the request is a GET request and that we are looking for my favorite car by checking the path of the request. Otherwise, we return a Bad Request response. If we are serving the right request, we create a Car struct, assign the proper values, and marshal it as JSON (convert the struct to a JSON string) using Golang’s (great) built in JSON library. We create an instance of the Lambda response struct in either case, populate the relevant fields (and the content-type where applicable) and return it. Now, we just need a main function that specifies the above should run and we’re done:
func main(){
  lambda.Start(lambda_handler)
}
That’s it! Now let’s deploy it to AWS and see how it runs.
Deploying the Lambda to AWS
The first thing we need to do is create a function package. This differs from language to language; for Golang it is quite simple. Here’s a sample bash script for doing so:
env GOOS=linux GOARCH=amd64 go build -o /tmp/lambda golang/*.go
zip -j /tmp/lambda /tmp/lambda
aws lambda update-function-code --function-name car-lambda --region us-east-1 --zip-file fileb:///tmp/lambda.zip
As you can see, we use the Golang CLI to build an executable for the amd64 architecture, and Linux as an OS (as go executables differ depending on where they are meant to be run). For AWS lambda, we need to target the above architecture. It looks in a folder golang for any .go files, and compiles them into an executable. Then, we zip it in a location and call the AWS CLI to update the function code of our car-lambda function, which we haven’t created yet. Let’s do that now.
We can create our Lambda by going to the AWS Lambda page in the AWS Console, and clicking Create Function. We can name it car-lambda, and choose Go 1.x as our runtime. For execution role, we can choose the “Create a new role with basic Lambda permissions” option. That’s it! Now, we can run our script (assuming we have the AWS and Go CLI installed) and see output similar to the following:
{
  "FunctionName": "car-lambda",
  "FunctionArn": "arn:aws:lambda:us-east-1: YOUR_ACCOUNT_ID:function:car-lambda",
  "Runtime": "go1.x",
  "Role": "arn:aws:iam::YOUR_ACCOUNT_ID:role/service-role/car-lambda-role-w4cmi5fv",
  "Handler": "hello",
  "CodeSize": 4887939,
  "Description": "",
  "Timeout": 15,
  "MemorySize": 512,
  "LastModified": "2019–09–20T19:46:19.393+0000",
  "CodeSha256": "6h9d94EOfBj6uArZZKkDalbat7+xtlC83rOR+vBEaws=",
  "Version": "$LATEST",
  "TracingConfig": {
    "Mode": "PassThrough"
  },
  "RevisionId": "7d4cbfd8–2174–4a85-a9e0–043016f0a1d0"
}
We’re almost done deploying our lambda! However, you’ll see that the “handler” is set to “hello”. This is an AWS default. We need to change it to “lambda” (as that’s what I called my lambda program). You can do so by going to the Lambda’s page on AWS and scrolling down to the “handler” text field. You can change it to whatever you named your lambda program if you named it something different.
All right. NOW we’re done. Phew.
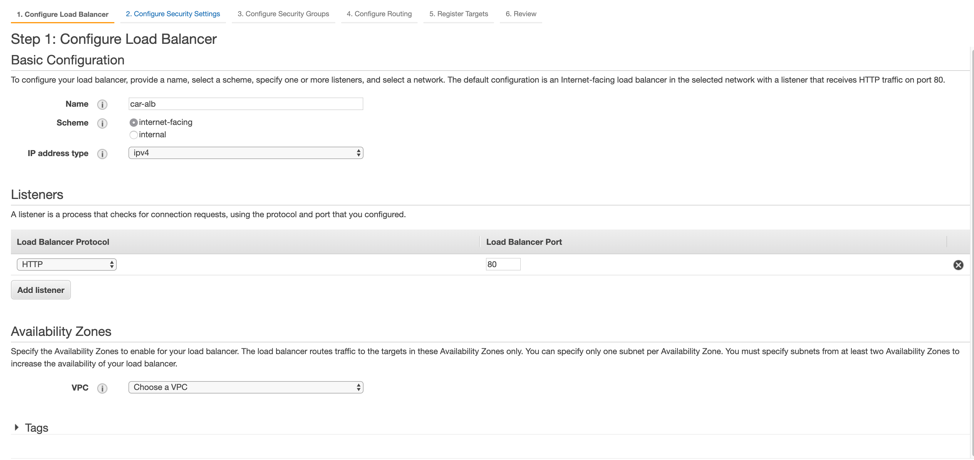
The next thing we need to do on AWS is create an ALB (Application Load Balancer). We can do so on the EC2 page by clicking the Load Balancers link, followed by Create Load Balancer. On the following screen, we click “Create” on the ALB square to be greeted with a page like the following (I’ve gone ahead and filled in the Name field and made it internet-facing):

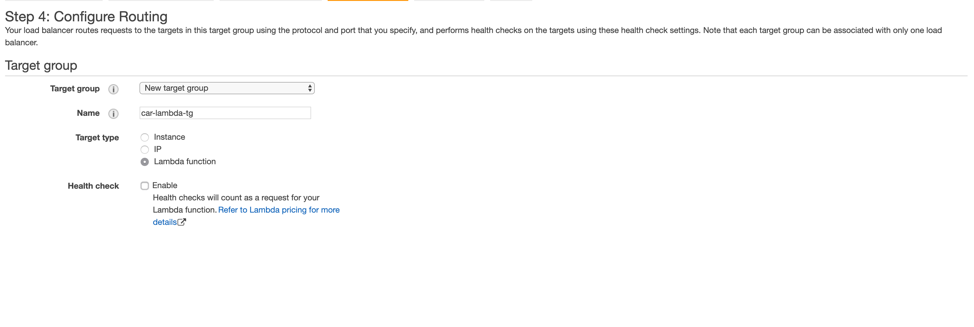
For security purposes, I haven’t selected a VPC in the above image, but you’d want to choose a VPC and public subnets that are relevant to your AWS account. On the following screens, we need to set up a target group that routes traffic from the ALB to our lambda function. Select “New target group” from the dropdown, and “Lambda” as the target type. I named it car-lambda-tg.

For Step 5, choose the lambda we created earlier. When we create it, you’ll see something like this after it’s done provisioning the ALB for you:

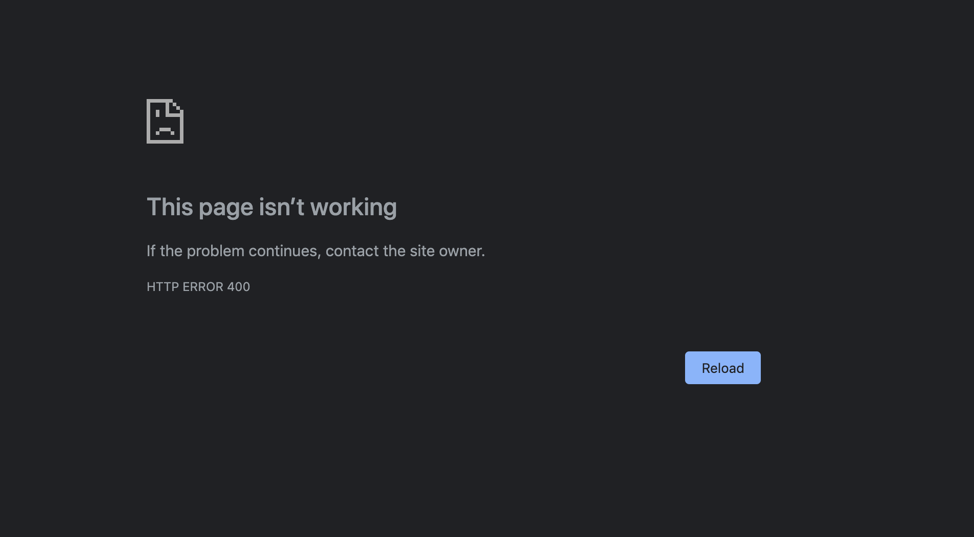
If your ALB is in a VPC, make sure it is reachable from whichever network you’re on. You can do so by configuring it with public subnets and attaching a security group to the ALB (go to the VPC page, and then click Security Groups) that allows traffic from specific (or all) IP addresses. Read more about security groups. Then, when you try to go to the ALB’s DNS in your browser, you will (probably) see something like this:

This is good! We see the Bad Request we programmed earlier. Now, if we go to the /myfavoritecar endpoint….

We did it! Our lambda is now fully up and running on AWS. We have an API that can return responses, and we don’t have to to worry about setting up and paying for an entire server and its pain points. We can now extend it as much as we want through other APIs, endpoints, a database, more lambdas, and more. The possibilities are endless. I hope this blog post was helpful for you. As you can see, it’s super easy to get up and running with a serverless API.
#serverless #aws #cloud #web-service #microservices
