Git is one of the top skills every developer should have. It makes SDLC easier. Learning Git is as easy as any other tool. Git is the most widely used version control system in the world today and is considered the modern standard for software development. This tutorial will help you to understand the basics of git, the most frequently used git commands, and their usages and operations.
What is Git?
Git is a free and open-source version control system(tool). Unlike older centralized version control systems such as SVN and CVS, Git is distributed: every developer has the full history of their code repository locally.
Git also has excellent support for branching, merging, and rewriting repository history, which has lead to many innovative and powerful workflows and tools. Pull requests are one such popular tool that allows teams to collaborate on Git branches and efficiently review each other’s code and deliver code independently.
What is a Git repository?
A Git repository is the directory where all of your project files and the related metadata resides. Git records the current state of the project by creating a tree graph from the index(staging area). It uses a data structure called the Directed Acyclic Graph (DAG) for managing different commits(each commit is a node in this DAG).
What is a Local Git repository?
A local Git repository is a storage of your project files and metadata on your computer’s disk. It allows you to save versions of your code, which you can access whenever needed.
What is a Remote Git repository?
A remote Git repository is a virtual storage of your project on git hosting servers like GitHubor Bitbucket. It has the same copy of your project as you have locally.
To understand this let’s see the diagram below:
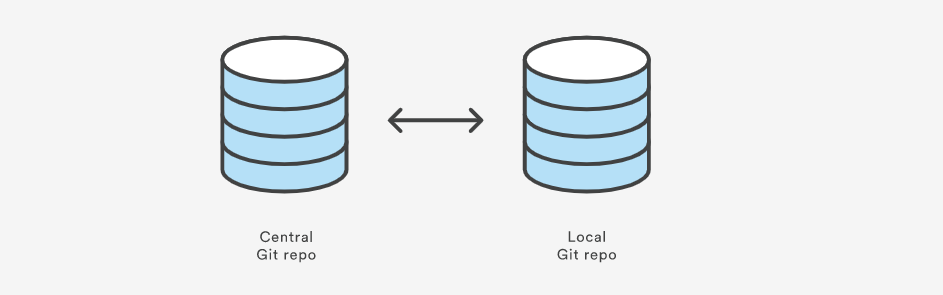
Central(Remote) and Local Repository-Author
Now Let’s Understand the Basic Flow of Commands Between Local and Remote Repositories:
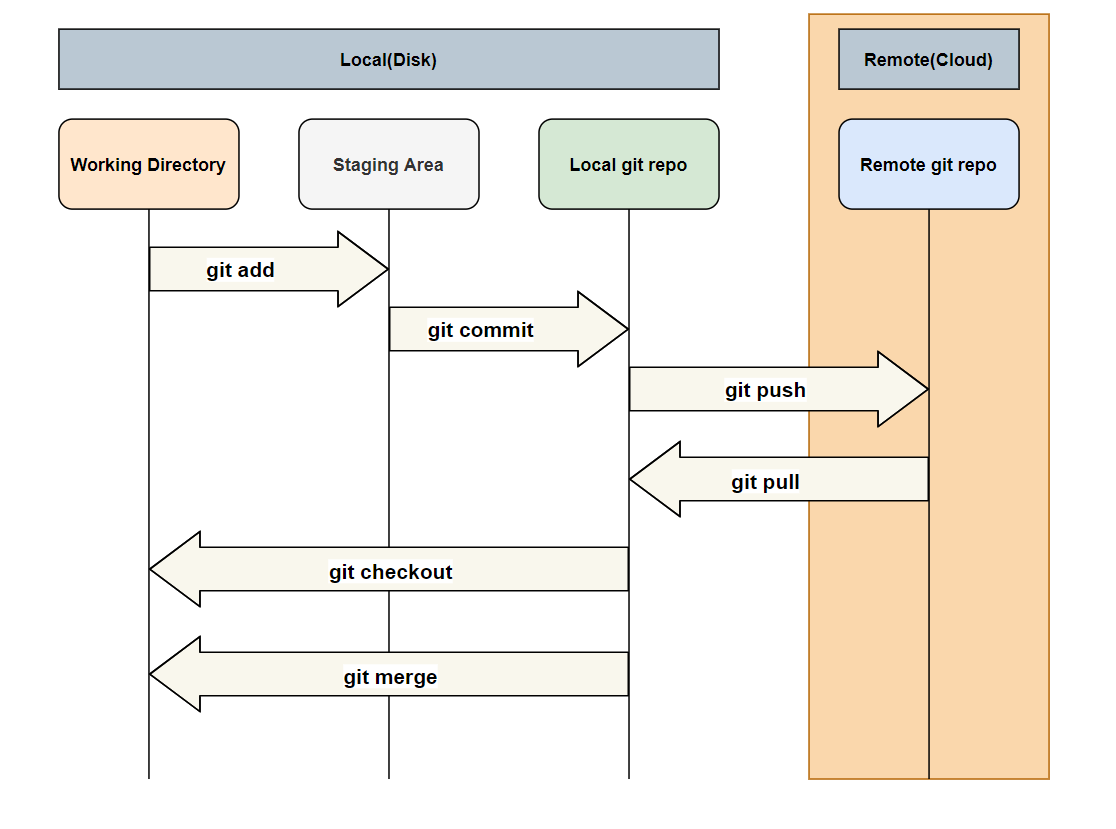
Command flow between local and remote branches/repo-Author
Let’s Start With Git Basic Commands :
I’m going to use a windows machine to demonstrate the commands. So you need to install git on windows if you are going to perform/use the windows machine.
git init <directory>: The command creates empty git repo in the specified<directory>. If you run it with no arguments then it initializes the current directory as a git repository.

git init <directory>
After running this command you will find the .git folder in your directory where you initialized the local repository. This contains all objects/refs/config related to the local repository.
2. git clone <repo>: the command clones repo located at <repo>on the local machine. The original repo can be located on the local filesystem or on a remote machine via HTTP or ssh.

git clone
In the above process, you can see I have cloned ‘myRemoteGitRepo’ remote repo at https://github.com/vikramguptavit/myRemoteGitRepo.gitusing the git clone command into myLocalGitClonedRepo directory.
3. git config user.name <name>: it defines the author’s name to be used for all commits in the current repo. Developers commonly use --globalflag to set config options for the current user.

git config user.name <name>
git add <directory> or <file>: this command stages all the changes in<directory> or <file>into an index(staging area) for the next commit.

git add <directory> or <file>
I have created a file test.txt in my working directory and added a line to this file. Then I used the above command to stage this file from the current working directory to the staging area.
You may use git statusto check the status of the files of the current working directory whether they are tracked(added to staging area) or untracked(not added to staging area)
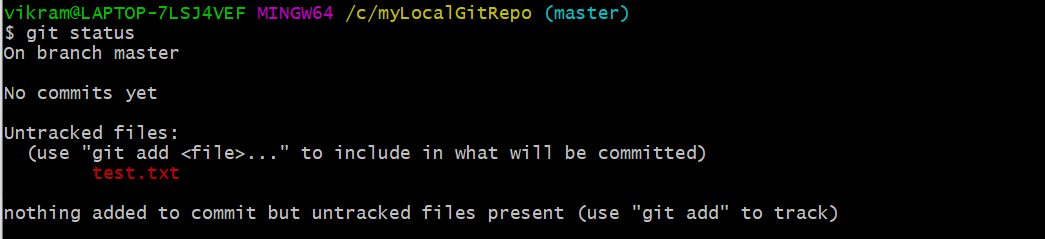
git status before adding the file to the stage area

git status after adding the file to the stage area
git commit -m "<message>": Using this command you can commit the staged snapshot(the files you have added in the staging area). Also instead of launching a text editor, use"<message>"as the commit message.

git commit -m "<message>"
git status: it lists which files are staged, unstaged, and untracked.
git status
git log: This command displays the entire commit history using the default format. You can use this command with the customized options to see different format output.

git log
git diff: Show the difference between your index(staging area) and the working directory.
I had committed a test.txt file which had the following content :
Happy to see you …
Which I later modified to :
Happy to see you …Hey you are back…
staging area and local repo have the same copy of test.txt
Below is the output of the git diff command:
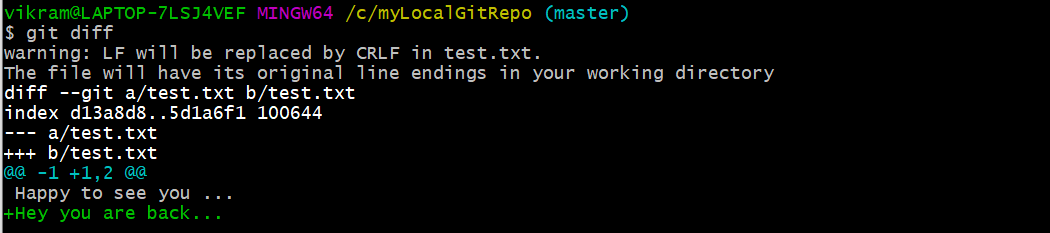
git diff
- git restore — staged : Use this command to unstage changes from the staging area after adding them using the git add command. This command is helpful when you want to change/update a file that you have just staged.
#git #javascript #python #programming #developer