React Hooks Tutorial with Examples
This article was originally published at https://www.blog.duomly.com/react-hooks-tutorial-with-examples/
Usually, most of the front-end frameworks updates don’t bring huge changes, but it was different in February 2019, when Facebook released 16.8 version of React with hooks.
They introduced Hooks API, a functionality which, in my opinion, makes things easier because it allows using of functional components a similar way as we used class components until that time.
As in the beginning, Hooks API was just used by some curious developers to check what’s inside, today it’s officially recommended to use it.
I one of the last projects I’ve been working on, I had a chance to try hooks, and use them across all the application, without almost using class components, and I easily can say that hooks are awesome!
Today, I’d like to explain to you the hooks which we can use in our React.js applications and also show some code examples where hooks can be used instead of the class component!
And of course, like always, if you prefer watching instead of reading, join me at Duomly’s Youtube channel, where I publish videos about almost everything I write here.
Let’s get into hooks!
1. What are React Hooks?
In the beginning, I’d like to answer the most critical question you may ask yourself right now „What are React Hooks?”.Hooks API is a set of built-in functions that allow developers to use the state and lifecycle methods in the functional components. So, with hooks, functional components can handle UI, state, and logic of the component as well.
The good news is that hooks work with the existing code, so you don’t have to rebuild all your application to try hooks, you can do it in the new feature if you wish to try it.
Let’s see why it’s a good idea to use hooks.
2. Why using hooks is a good idea?
There are some common benefits of using React Hooks API, which is often highlighted by frontend programmers. Let me present to you some of them.- First of all, React Hooks allow us to create highly reusable, isolated components and help us to avoid unnecessary logic.
- It’s straightforward to work with and test.
- It provides an improved way to share logic across different components.
- The code written with hooks is very often less complicated and looks cleaner.
- In Javascript, a minified function is less code than a minified class.
3. Rules of hooks
In official React documentation we can find two rules telling us about using hooks:„Only call hooks at the top level”This means that hooks can’t be called inside the loops, nested functions, conditions. They should be used only at the top level of the functions.
„Only call hooks from React functions”Hooks should be called only in React functions, it’s a bad practice to all them from plain Javascript functions. In practice, it means that hooks should be called only in React functional components or inside the custom hooks.
There’s also a piece of good news! React developers prepared a linter plugin to make sure those rules are respected. If you’d like to use it, here’s the link - https://www.npmjs.com/package/eslint-plugin-react-hooks
4. Basic hooks
Now, let’s take a closer look at the actual hooks. There are three basic hooks in React.js documentation, but as I’d like to explain to you the hooks which are the most useful, we are going to take a look at just two of them: useState() and useEffect().useState()
I’d like to start from useState() which is the most basic React hook. It allows using state inside the functional component. Let’s see, what’s the syntax of useState().const [number, setNumber] = useState(initNumber);In the code example below you can see an array, the number is stateful value, setNumber is a function to update it, and initNumber is the initial value. Easy, right?
Now let me show you an example of a form component where we can add personal income or outcome to the list.
* Code in the example is build using Bulma CSS framework.
import React, {useState} from 'react';

const AccountBalance = () => {
  const [balance, setBalance] = useState(1500);
  const [savingBalance, setSavingBalance] = useState(1349);

  const handleSavings = () => {
    setBalance(balance - 100);
    setSavingBalance(savingBalance + 100);
  }

  const handleSpending = () => {
    setBalance(balance + 100);
    setSavingBalance(savingBalance - 100);
  }

  return (
    <div className="columns">
      <div className="column">
        <div className="box">
          <h4 className="title is-4">Your account balance:</h4>
          <div className="amount">{balance}$</div>
          <button
            className="button is-info"
            onClick={() => handleSavings()}
          >
            Send 100$
          </button>
        </div>
      </div>
      <div className="column">
        <div className="box">
          <h4 className="title is-4">Your savings balance:</h4>
          <div className="amount savings">{savingBalance}$</div>
          <button
            className="button is-info"
            onClick={() => handleSpending()}
          >
            Send 100$
          </button>
        </div>
      </div>
    </div>
  )
}

export default AccountBalance;
I also added some CSS to get a pretty result. So, I’ll attach all the CSS code at the end of this article.
And here is the result of the code.

In the code above you can see how useState() allows us to handle stateful values.
useEffect()
The other basic hook in React is useEffect(). It’s kinda like componentDidMount or other componentDidUpdate in the class component.By default, it’s running every re-render but it’s possible to set it to run only once or only if the specified value has changed.
Let’s see the syntax of useEffect() hook.
useEffect(() => {
    // do something
}, [value])
Value passed at the end of useEffect in the array are the ones which will decide about calling the code at each re-render.
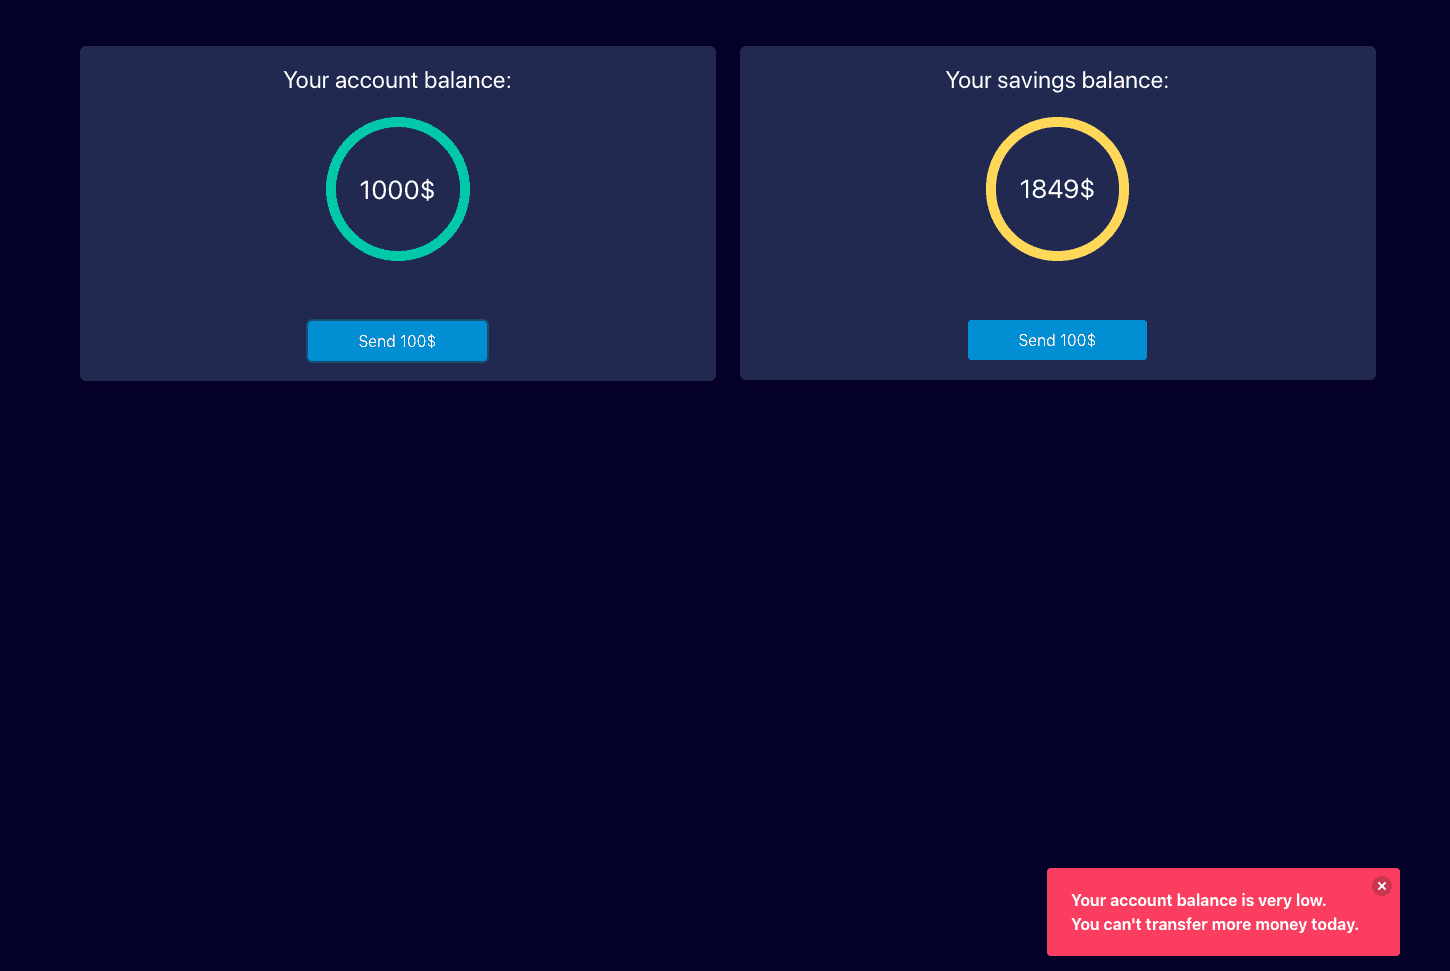
It also may contain a cleanup function, for example, if you are starting a subscription or timer, then it may be useful. Let’s see, how it works on a code example. I’m going to use the previous component and add there a check for value account and notification.
import React, {useState, useEffect} from 'react';

const AccountBalance = () => {
  const [balance, setBalance] = useState(1500);
  const [savingBalance, setSavingBalance] = useState(1349);
  const [notification, setNotification] = useState(false);

  const handleSavings = () => {
    if (balance > 1000) {
      setBalance(balance - 100);
      setSavingBalance(savingBalance + 100);
    }
  }

  const handleSpending = () => {
    setBalance(balance + 100);
    setSavingBalance(savingBalance - 100);
  }

  useEffect(() => {
    if (balance <= 1000) {
      setNotification(true);
    }
  }, [balance]);

  return (
    <div className="columns">
      <div className="column">
        <div className="box">
          <h4 className="title is-4">Your account balance:</h4>
          <div className="amount">{balance}$</div>
          <button
            className="button is-info"
            onClick={() => handleSavings()}
          >
            Send 100$
          </button>
        </div>
      </div>
      <div className="column">
        <div className="box">
          <h4 className="title is-4">Your savings balance:</h4>
          <div className="amount savings">{savingBalance}$</div>
          <button
            className="button is-info"
            onClick={() => handleSpending()}
          >
            Send 100$
          </button>
        </div>
      </div>
      {notification && (
        <div className="notification is-danger">
          <button onClick={() => setNotification(false)} className="delete"></button>
          <p>Your account balance is very low.</p>
          <p>You can't transfer more money today.</p>
        </div>
      )}
    </div>
  )
}

export default AccountBalance;
And here is the visual representation of the code above.
5. Redux hooks
I’d like to write a little bit about handling redux store with hooks because it’s also possible.There are also two important hooks for redux, and they are described pretty well in redux documentation. It’s useSelector() and useDispatch().
useSelector()
The useSelector() hook is used to access data from the redux store. It works like mapStateToProps and should be used instead.This hook is called every time when functional component renders and whenever action is dispatched.
Let’s take a quick look at the simple example of redux useSelector() hook on our component:
import React from 'react'
import { useSelector } from 'react-redux'
const AccountBalance = () => {

const balance = useSelector(state => state.user.accountBlance);

const savingBalance = useSelector(state => state.user.savingBlance);
return (

<div className=“columns”>

<div className=“column”>

<div className=“box”>

<h4 className=“title is-4”>Your account balance:</h4>

<div className=“amount”>{balance}$</div>

</div>

</div>

<div className=“column”>

<div className=“box”>

<h4 className=“title is-4”>Your savings balance:</h4>

<div className=“amount savings”>{savingBalance}$</div>

</div>

</div>

</div>

);

}
export default AccountBalance;
useDispatch()
When you create an action and you want to call it in the component, useDispatch() hook is a great solution. It’s a reference to the dispatch function from the Redux store. Let’s take a look at the syntax of the useDispatch() code example:const dispatch = useDispatch();
dispatch(action(params));
So, first, we create dispatch constant, and then we can use it to dispatch an action from redux. Let’s see how it would work in our example component.
And as I promised here is the CSS code which I added to my app to get the results as on the image:
body {
  background-color: rgb(4, 0, 48);
  height: 100vh;
  position: relative;
}
.container {

height: 100vh;

}
.box {

background-color: #282e5c;

color: white;

text-align: center;

}
.title {

color: white;

}
.amount {

position: relative;

}
.amount {

border: 10px solid hsl(171, 100%, 41%);

display: inline-flex;

align-items: center;

justify-content: center;

color: white;

min-width: 1em;

border-radius: 50%;

vertical-align: middle;

padding: 4%;

font-size: 26px;

font-weight: bold;

}
.amount:before {

content:‘’;

float: left;

width: auto;

padding-bottom: 100%;

}
.savings {

border-color: hsl(48, 100%, 67%);

}
.button {

display: block;

width: 30%;

margin: auto;

margin-top: 10%;

color: white;

}
.notification {

position: absolute;

bottom: 20px;

right: 0px;

font-weight: bold;

}
Conclusion
In this article, I explained to you what are hook, and we went through the most popular ones with examples.I’ve created a functional component (I hope you did as well), where I’m sending money from one to the other account. For UI I used Bulma framework because it’s fast, easy, and simple.
I hope, based on the article I’ve created you can jump into another React.js project and try using hooks by yourself, as it’s a really cool solution.
If you’d like to learn more about React.js, then check out two more articles I’ve created some time ago, What is React.js and why it’s worth to learn? and How to create React app in 5 minutes?.
The second one will definitely help you to set up the React.js project if you can’t do it yet.
Let me know in the comments if you like working with hooks and if you find it useful.
Thank you for reading,
Anna from Duomly
#javascript #reactjs #redux #es6 #web-development