The Complete Guide to Start Learning Django
Today I’m starting a new tutorial series about Django fundamentals. It’s a complete beginner’s guide to start learning Django. The material is divided into seven parts. We’re going to explore all the basic concepts in great detail, from installation, preparation of the development environment, models, views, templates, URLs to more advanced topics such as migrations, testing, and deployment.
Tutorials in the Series
- Part 1 - Getting Started
- Part 2 - Fundamentals
- Part 3 - Advanced Concepts
- Part 4 - Authentication
- Part 5 - Django ORM
- Part 6 - Class-Based Views
- Part 7 - Deployment
1. The Complete Guide to Start Learning Django - Part 1 - Getting Started
Table of Contents
- Introduction
- Why Django?
- Who’s Using Django?
- Installation
- Installing Python 3.6.2
- Installing Virtualenv
- Installing Django 1.11.4
- Starting a New Project
- Django Apps
- Hello, World!
- Conclusions
Introduction

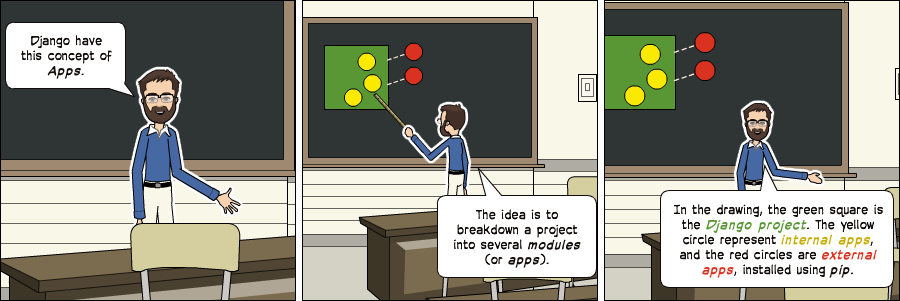
I wanted to do something different. A tutorial that would be easy to follow, informative and fun to read. That was when I came up with the idea to create some comics along the text to illustrate some concepts and scenarios. I hope you enjoy the reading!
But before we start…
Back when I worked as a substitute professor in a university, I used to teach an introduction to web development discipline for the newcomer students in the Computer Science course. And I would always start new classes with this Confucius quote:

So, hands on! Don’t just read the tutorials. Let’s do it together! You will learn much more by doing and practicing.
Why Django?
Django is a Web framework written in Python. A Web framework is a software that supports the development of dynamic Web sites, applications, and services. It provides a set of tools and functionalities that solves many common problems associated with Web development, such as security features, database access, sessions, template processing, URL routing, internationalization, localization, and much more.
Using a Web framework, such as Django, enables us to develop secure and reliable Web applications very quickly in a standardized way, without having to reinvent the wheel.
So, what’s so special about Django? For starters, it’s a Python Web framework, which means you can benefit from wide a range of open source libraries out there. The Python Package Index repository hosts over 116K packages (as per 6 of Sep. 2017). If you need to solve a specific problem, the chances are someone has already implemented a library for it.
Django is one of the most popular Web frameworks written in Python. It’s definitely the most complete, offering a wide range of features out-of-the-box, such as a standalone Web server for development and testing, caching, middleware system, ORM, template engine, form processing, interface with Python’s unit testing tools. Django also comes with battery included, offering built-in applications such as an authentication system, an administrative interface with automatically generated pages for CRUD operations, generation of syndication feeds (RSS/Atom), sitemaps. There’s even a Geographic Information System (GIS) framework built within Django.
The development of Django is supported by the Django Software Foundation, and it’s sponsored by companies like JetBrains and Instagram. Django has also been around for quite some time now. It’s under active development for more than 12 years now, proving to be a mature, reliable and secure Web framework.
Who’s Using Django?
It’s good to know who is using Django out there, so to have an idea what you can do with it. Among the biggest Web sites using Django we have: Instagram, Disqus, Mozilla, Bitbucket, Last.fm, National Geographic.
For more examples you can see the Django Sites database, they offer a list of over 5K Django-powered Web sites.
By the way, last year, in the Django Under The Hood 2016 conference, Carl Meyer, a Django core developer, and Instagram employee, gave a talk on how Instagram use Django at scale and how it supported their growth. It’s a one hour talk, but if you are interested in learning more, it was an entertaining talk.
Installation
The first thing we need to do is install some programs on our machine so to be able to start playing with Django. The basic setup consists of installing Python, Virtualenv, and Django.
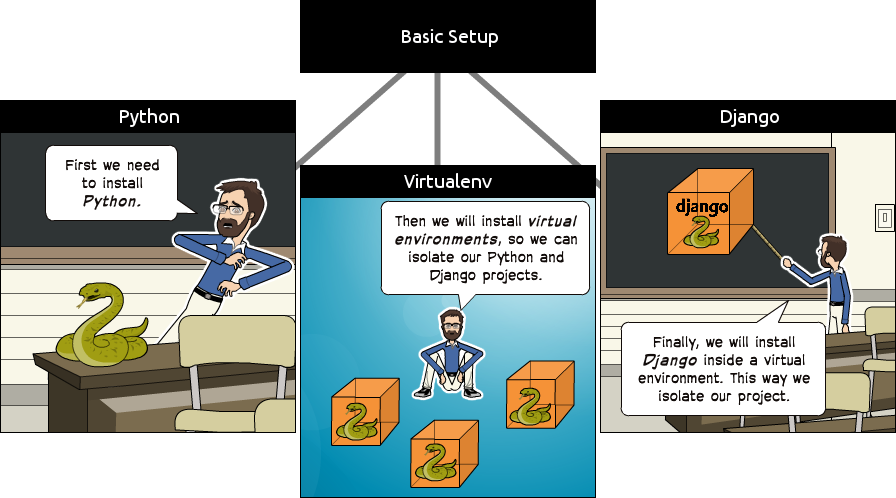
Using virtual environments is not mandatory, but it’s highly recommended. If you are just getting started, it’s better to start with the right foot.
When developing Web sites or Web projects with Django, it’s very common to have to install external libraries to support the development. Using virtual environments, each project you develop will have its isolated environment. So the dependencies won’t clash. It also allows you to maintain in your local machine projects that run on different Django versions.
It’s very straightforward to use it, you will see!
Installing Python 3.6.2
The first thing we want to do is install the latest Python distribution, which is Python 3.6.2. At least it was, by the time I was writing this tutorial. If there’s a newer version out there, go with it. The next steps should remain more or less the same.
We are going to use Python 3 because the most important Python libraries have already been ported to Python 3 and also the next major Django version (2.x) won’t support Python 2 anymore. So Python 3 is the way to go.
The best way to go is with Homebrew. If you don’t have it installed on your Mac yet, run the following command in the Terminal:
/usr/bin/ruby -e "$(curl -fsSL https://raw.githubusercontent.com/Homebrew/install/master/install)"
If you don’t have the Command Line Tools installed, the Homebrew installation might take a little bit longer. But it will take care of everything for you, so no worries. Just sit back and wait until the installation completes.
You will know when the installation completes when you see the following message:
==> Installation successful!

==> Homebrew has enabled anonymous aggregate user behaviour analytics.
Read the analytics documentation (and how to opt-out) here:
  https://docs.brew.sh/Analytics.html

==> Next steps:
- Run `brew help` to get started
- Further documentation:
    https://docs.brew.sh
To install Python 3, run the command below:
brew install python3
Since macOS already ships with Python 2 installed, after you install Python 3, you will have both versions available.
To run Python 2, use the python command in the Terminal. For Python 3, use python3 instead.
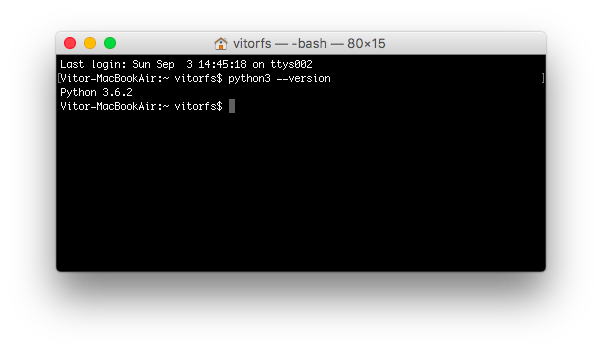
We can test the installation by typing in the Terminal:
python3 --version
Python 3.6.2
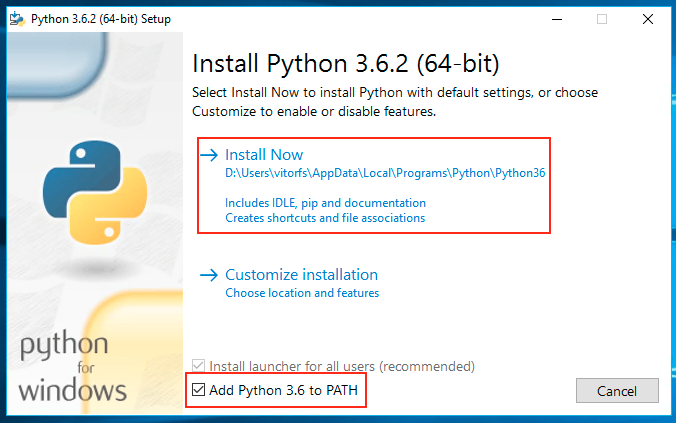
Go to www.python.org click on the Python 3.6.2 download page, scroll down until you see the download files listed below:
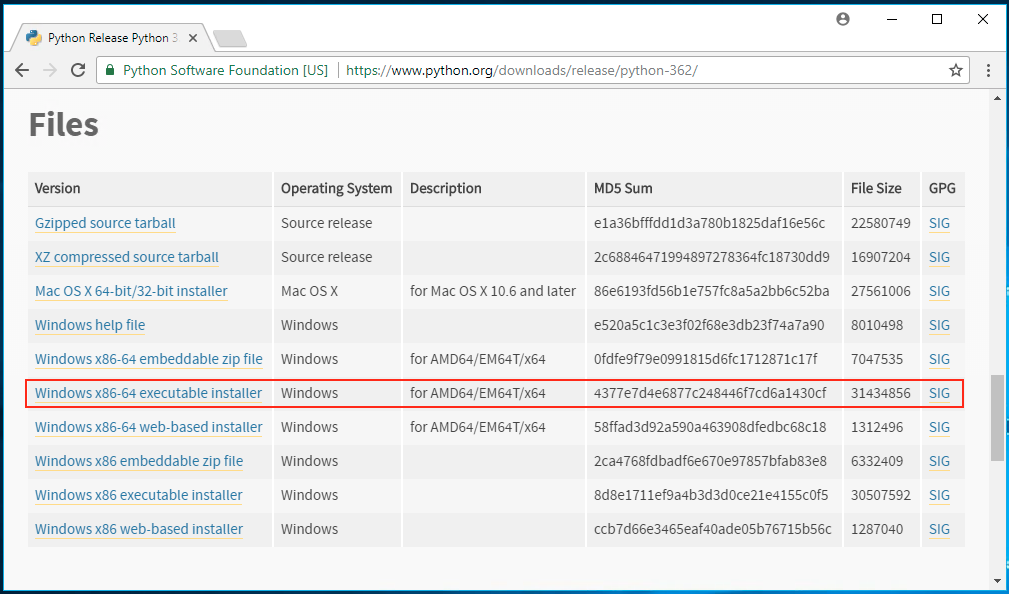
Pick the right version accordingly to your Windows distribution. If you are not sure which one is the right for you, the chances are you want to download the Windows x86-64 executable installer version.
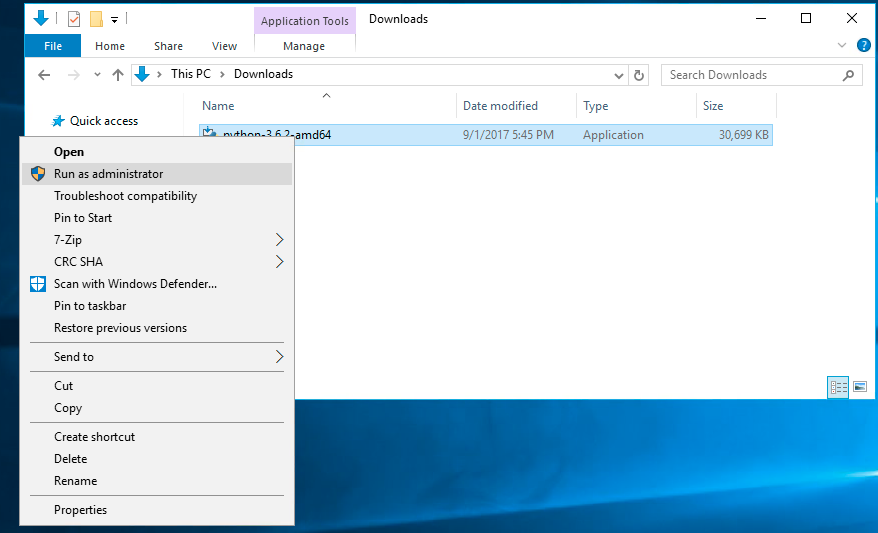
Go to your Downloads directory, right click on the installer and click on Run as administrator.
Make sure you check the option Add Python 3.6 to PATH and click on the Install Now option.
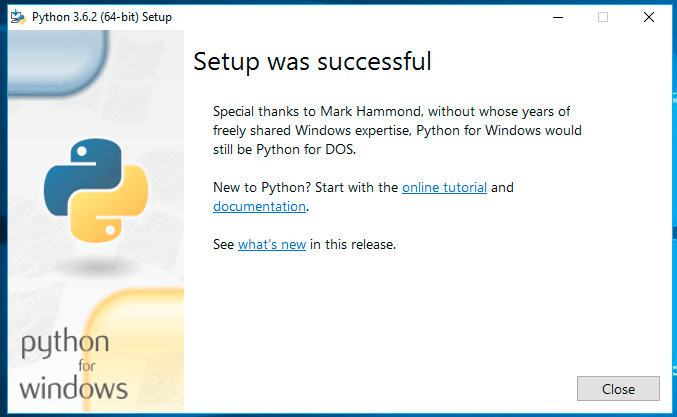
After the installation completes, you should see the following screen:
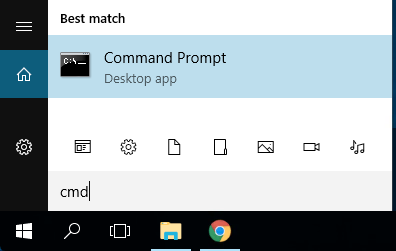
Now search for the Command Prompt program and open it:
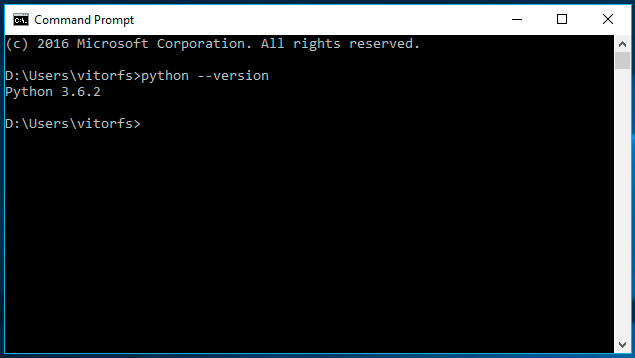
To test if everything is working fine so far, type following command:
python --version
As an output you should see:
Python 3.6.2
For this tutorial, I will be using Ubuntu 16.04 as an example. Ubuntu 16.04 already comes with both Python 2 (available as python), and Python 3 (available as python3) installed. We can test the installation by opening the Terminal and checking the versions:
python --version
Python 2.7.12

python3 --version
Python 3.5.2
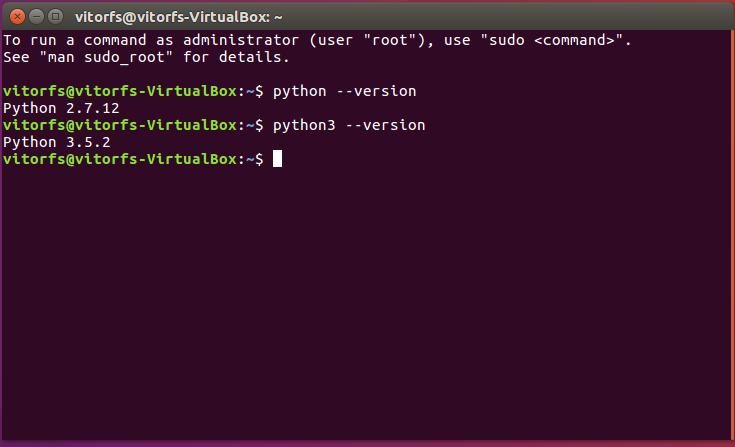
So all we have to do is install a newer Python 3 version. But we don’t want to mess with the current Python 3.5.2, as the OS makes use of it. We’re simply going to install Python 3.6.2 under the name python3.6 and let the older version be.
If you are using Ubuntu 16.04 or an older version, first add the following repository:
sudo add-apt-repository ppa:deadsnakes/ppa
If you are using Ubuntu 16.10, 17.04 or 17.10 you don’t need to perform the step above.
Now everyone executes the following commands to install the latest Python 3 distribution:
sudo apt-get update
sudo apt-get install python3.6
The new installation will be available under python3.6, which is fine:
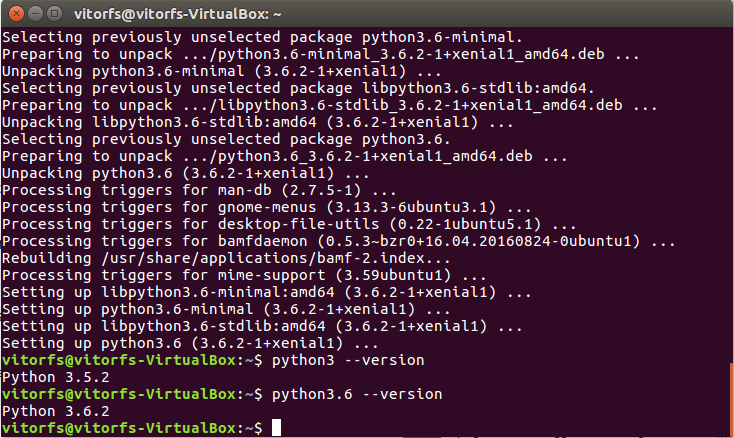
Great, Python is up and running. Next step: Virtual Environments!
Installing Virtualenv
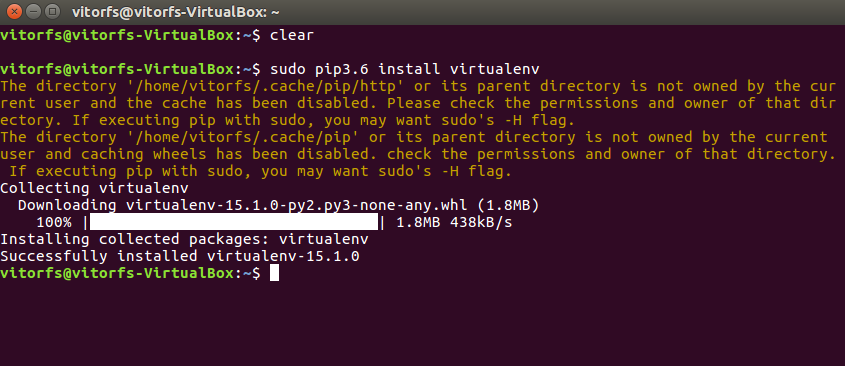
For the next step, we are going to use pip, a tool to manage and install Python packages, to install virtualenv.
Note that Homebrew already installed pip for you under the name pip3 for your Python 3.6.2 installation.
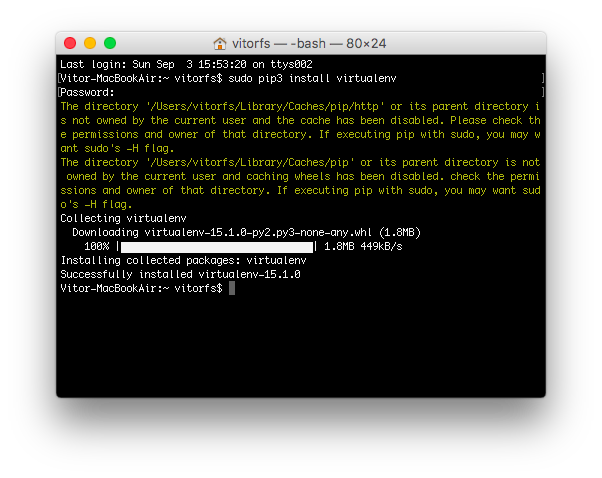
In the Terminal, execute the command below:
sudo pip3 install virtualenv
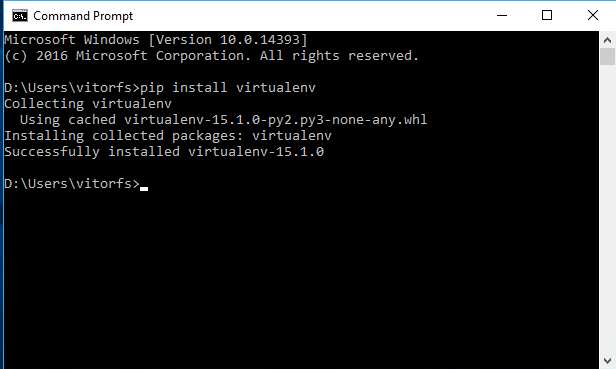
In the Command Prompt, execute the command below:
pip install virtualenv
First let’s install pip for our Python 3.6.2 version:
wget https://bootstrap.pypa.io/get-pip.py
sudo python3.6 get-pip.py
Now we can install virtualenv:
sudo pip3.6 install virtualenv
So far the installations that we performed was system-wide. From now on, everything we install, including Django itself, will be installed inside a Virtual Environment.
Think of it like this: for each Django project you start, you will first create a Virtual Environment for it. It’s like having a sandbox for each Django project. So you can play around, install packages, uninstall packages without breaking anything.
I like to create a folder named Development on my personal computer. Then, I use it to organize all my projects and websites. But you can follow the next steps creating the directories wherever it feels right for you.
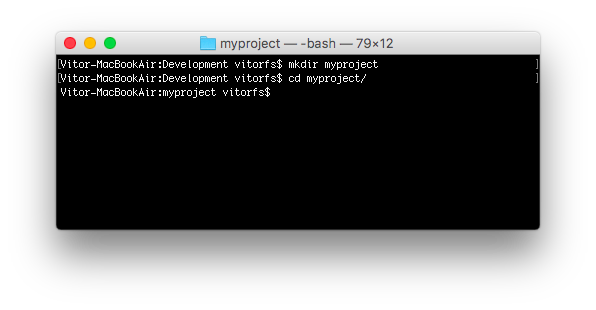
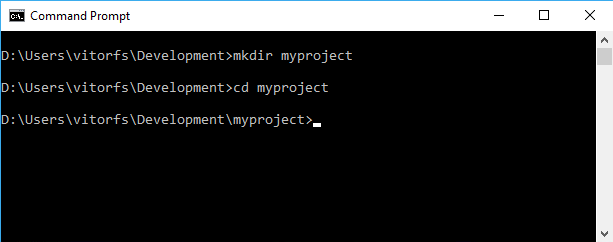
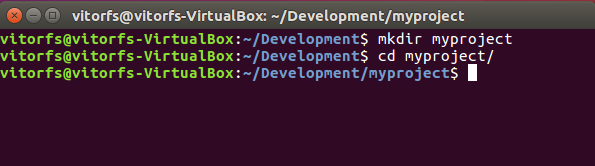
Usually, I start by creating a new folder with the project name inside my Development folder. Since this is going to be our very first project, we don’t need to pick a fancy name or anything. For now, we can call it myproject.
mkdir myproject
cd myproject
This folder is the higher level directory that will store all the files and things related to our Django project, including its virtual environment.
So let’s start by creating our very first virtual environment and installing Django.
Inside the myproject folder:
virtualenv venv -p python3
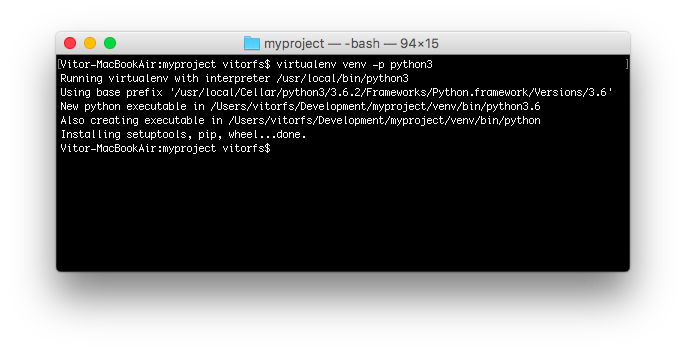
virtualenv venv

virtualenv venv -p python3.6
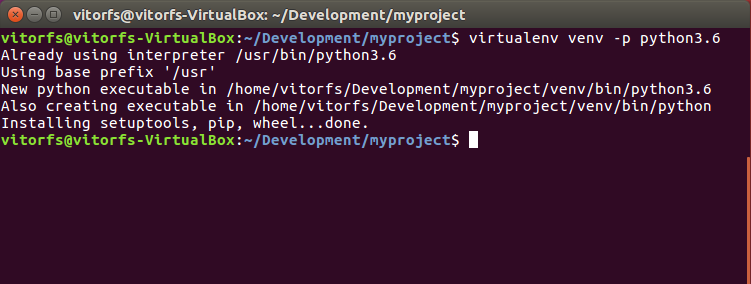
Our virtual environment is created. Now before we start using it, we need to activate:
source venv/bin/activate
venv\Scripts\activate
source venv/bin/activate
You will know it worked if you see (venv) in front of the command line, like this:
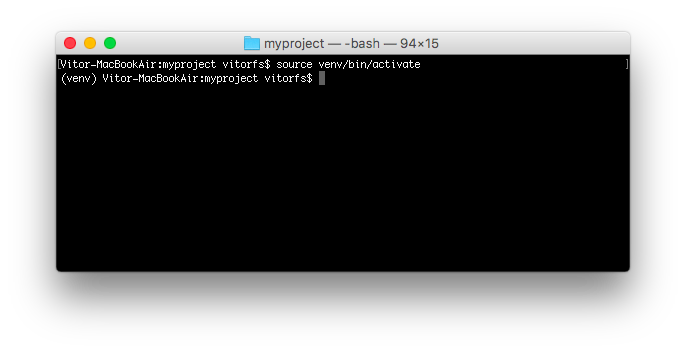
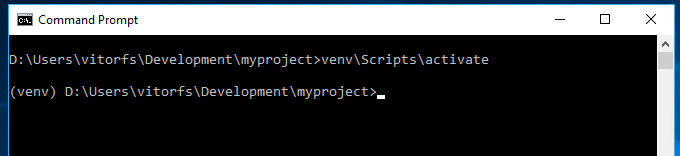

Let’s try to understand what happened here. We created a special folder named venv. It contains a copy of Python inside this folder. After we activated the venv environment, when we run the python command, it will use our local copy, stored inside venv, instead of the other one we installed earlier.
Another important thing is that the pip program is already installed as well, and when we use it to install a Python package, like Django, it will be installed inside the venv environment.
Note that when we have the venv activated, we will use the command python (instead of python3) to refer to Python 3.6.2, and just pip (instead of pip3) to install packages.
Note that when we have the venv activated, we will use the command python (instead of python3.6) to refer to Python 3.6.2, and just pip (instead of pip3.6) to install packages.
By the way, to deactivate the venv run the command below:
deactivate
venv\Scripts\deactivate.bat
deactivate
But let’s keep it activated for the next steps.
Installing Django 1.11.4
It’s very straightforward. Now that we have the venv activated, run the following command to install Django:
pip install django
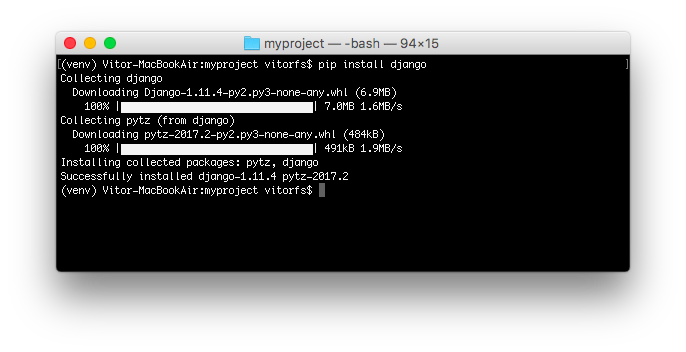
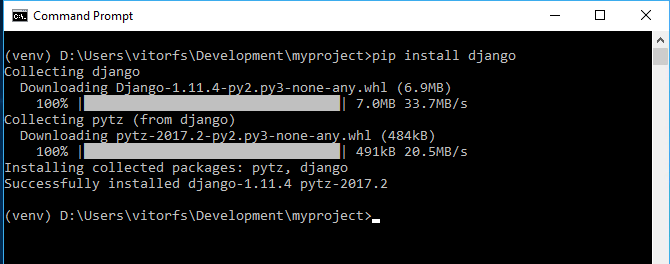

We are all set up now!
Starting a New Project
To start a new Django project, run the command below:
django-admin startproject myproject
The command-line utility django-admin is automatically installed with Django.
After we run the command above, it will generate the base folder structure for a Django project.
Right now, our myproject directory looks like this:
myproject/                  <-- higher level folder
 |-- myproject/             <-- django project folder
 |    |-- myproject/
 |    |    |-- __init__.py
 |    |    |-- settings.py
 |    |    |-- urls.py
 |    |    |-- wsgi.py
 |    +-- manage.py
 +-- venv/                  <-- virtual environment folder
Our initial project structure is composed of five files:
- manage.py: a shortcut to use the django-admin command-line utility. It’s used to run management commands related to our project. We will use it to run the development server, run tests, create migrations and much more.
- init.py: this empty file tells Python that this folder is a Python package.
- settings.py: this file contains all the project’s configuration. We will refer to this file all the time!
- urls.py: this file is responsible for mapping the routes and paths in our project. For example, if you want to show something in the URL
/about/, you have to map it here first. - wsgi.py: this file is a simple gateway interface used for deployment. You don’t have to bother about it. Just let it be for now.
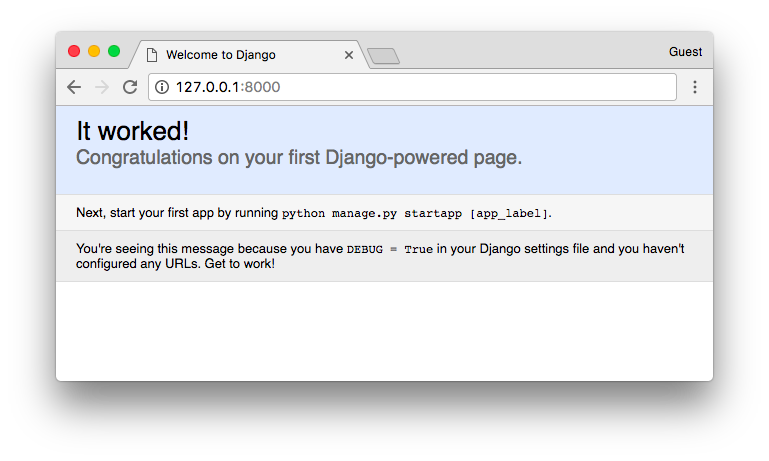
Django comes with a simple web server installed. It’s very convenient during the development, so we don’t have to install anything else to run the project locally. We can test it by executing the command:
python manage.py runserver
For now, you can ignore the migration errors; we will get to that later.
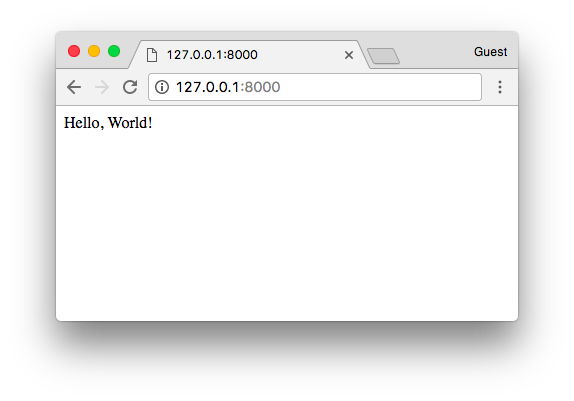
Now open the following URL in a Web browser: http://127.0.0.1:8000 and you should see the following page:
Hit Control + C to stop the development server.
Hit CTRL + BREAK to stop the development server.
Hit Control + C to stop the development server.
Django Apps
In the Django philosophy we have two important concepts:
- app: is a Web application that does something. An app usually is composed of a set of models (database tables), views, templates, tests.
- project: is a collection of configurations and apps. One project can be composed of multiple apps, or a single app.
It’s important to note that you can’t run a Django app without a project. Simple websites like a blog can be written entirely inside a single app, which could be named blog or weblog for example.
It’s a way to organize the source code. In the beginning, it’s not very trivial to determine what is an app or what is not. How to organize the code and so on. But don’t worry much about that right now! Let’s first get comfortable with Django’s API and the fundamentals.
Alright! So, to illustrate let’s create a simple Web Forum or Discussion Board. To create our first app, go to the directory where the manage.py file is and executes the following command:
django-admin startapp boards
Notice that we used the command startapp this time.
This will give us the following directory structure:
myproject/
 |-- myproject/
 |    |-- boards/                <-- our new django app!
 |    |    |-- migrations/
 |    |    |    +-- __init__.py
 |    |    |-- __init__.py
 |    |    |-- admin.py
 |    |    |-- apps.py
 |    |    |-- models.py
 |    |    |-- tests.py
 |    |    +-- views.py
 |    |-- myproject/
 |    |    |-- __init__.py
 |    |    |-- settings.py
 |    |    |-- urls.py
 |    |    |-- wsgi.py
 |    +-- manage.py
 +-- venv/
So, let’s first explore what each file does:
- migrations/: here Django store some files to keep track of the changes you create in the models.py file, so to keep the database and the models.py synchronized.
- admin.py: this is a configuration file for a built-in Django app called Django Admin.
- apps.py: this is a configuration file of the app itself.
- models.py: here is where we define the entities of our Web application. The models are translated automatically by Django into database tables.
- tests.py: this file is used to write unit tests for the app.
- views.py: this is the file where we handle the request/response cycle of our Web application.
Now that we created our first app, let’s configure our project to use it.
To do that, open the settings.py and try to find the INSTALLED_APPS variable:
INSTALLED_APPS = [
    'django.contrib.admin',
    'django.contrib.auth',
    'django.contrib.contenttypes',
    'django.contrib.sessions',
    'django.contrib.messages',
    'django.contrib.staticfiles',
]
As you can see, Django already come with 6 built-in apps installed. They offer common functionalities that most Web applications need, like authentication, sessions, static files management (images, javascripts, css, etc.) and so on.
We will explore those apps as we progress in this tutorial series. But for now, let them be and just add our boards app to the list of INSTALLED_APPS:
INSTALLED_APPS = [
    'django.contrib.admin',
    'django.contrib.auth',
    'django.contrib.contenttypes',
    'django.contrib.sessions',
    'django.contrib.messages',
    'django.contrib.staticfiles',

    'boards',
]
Using the analogy of the square and circles from the previous comic, the yellow circle would be our boards app, and the django.contrib.admin, django.contrib.auth, etc, would be the red circles.
Hello, World!
Let’s write our first view. We will explore it in great detail in the next tutorial. But for now, let’s just experiment how it looks like to create a new page with Django.
Open the views.py file inside the boards app, and add the following code:
from django.http import HttpResponse

def home(request):
    return HttpResponse('Hello, World!')
Views are Python functions that receive an HttpRequest object and returns an HttpResponse object. Receive a request as a parameter and returns a response as a result. That’s the flow you have to keep in mind!
So, here we defined a simple view called home which simply returns a message saying Hello, World!.
Now we have to tell Django when to serve this view. It’s done inside the urls.py file:
from django.conf.urls import url
from django.contrib import admin

from boards import views

urlpatterns = [
    url(r'^/figure>, views.home, name='home'),
    url(r'^admin/', admin.site.urls),
]
If you compare the snippet above with your urls.py file, you will notice I added the following new line: url(r'^/article>, views.home, name='home') and imported the views module from our app boards using from boards import views.
As I mentioned before, we will explore those concepts in great detail later on.
But for now, Django works with regex to match the requested URL. For our home view, I’m using the ^<article regex, which will match an empty path, which is the homepage (this url: **http://127.0.0.1:8000**). If I wanted to match the URL **http://127.0.0.1:8000/homepage/**, my url would be: url(r’^homepage//article>, views.home, name=‘home’)`.
Let’s see what happen:
python manage.py runserver
In a Web browser, open the http://127.0.0.1:8000 URL:
That’s it! You just created your very first view.
Conclusions
That was the first part of this tutorial series. In this tutorial, we learned how to install the latest Python version and how to setup the development environment. We also had an introduction to virtual environments and started our very first Django project and already created our initial app.
Just so we can stay on the same page, I made the source code available on GitHub. The current state of the project can be found under the release tag v0.1-lw. The link below will take you to the right place:
https://github.com/sibtc/django-beginners-guide/tree/v0.1-lw
The Complete Guide to Start Learning Django - Part 2 - Fundamentals
Table of Contents
- Introduction
- Web Board Project
- Use Case Diagram
- Class Diagram
- Wireframes
- Models
- Migrating the Models
- Experimenting with the Models API
- Summary of Model’s Operations
- Views, Templates, and Static Files
- Django Template Engine Setup
- Testing the Homepage
- Static Files Setup
- Introduction to Django Admin
- Conclusions
Introduction
Welcome to the second part of our Django Tutorial! In the previous lesson, we installed everything that we needed. Hopefully, you are all setup with Python 3.6 installed and Django 1.11 running inside a Virtual Environment. We already created the project we are going to play around. In this lesson, we are going to keep writing code in the same project.
In the next section, we are going to talk a little bit about the project we are going to develop, so to give you some context. Then after that, you are going to learn all the Django fundamentals: models, admin, views, templates, and URLs.
Hands on!
Web Board Project
I don’t know about you, but personally, I learn much more by seeing practical examples and code snippets. For me, it’s difficult to process a concept where in the examples you read Class A and Class B, or when I see the classical foo(bar) examples. I don’t want to do that with you.
So, before we get into the fun part, playing with models, views, and everything. Let’s just take a moment and discuss very briefly about this project we are going to develop.
If you already have experience with Web development and feel it’s too much detail, you can just skim through the pictures to have an idea what we are going to build and then jump to the Models section of this tutorial.
But if you are new to Web development, I highly suggest that you keep reading. It will give you some good insights on modeling and design of Web applications. Web development, and software development in general, is not just about coding.

Use Case Diagram
Our project is a discussion board (a forum). The whole idea is to maintain several boards, which will behave like categories. Then, inside a specific board, a user can start a new discussion by creating a new topic. In this topic, other users can engage in the discussion posting replies.
We will need to find a way to differentiate a regular user from an admin user because only the admins are supposed to create new boards. Below, an overview of our main use cases and the role of each type of user:

Class Diagram
From the Use Case Diagram, we can start thinking concerning the entities of our project. The entities are the models we will create, and it’s very closely related to the data our Django app will process.
For us to be able to implement the use cases described in the previous section, we will need to implement at least the following models: Board, Topic, Post, and User.
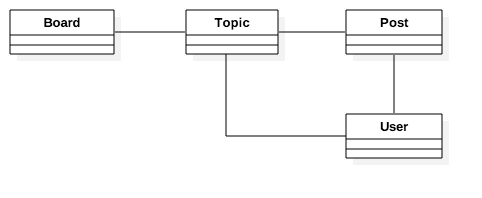
It’s also important to take the time to think about how do models will relate to each other. What the solid lines are telling us is that, in a Topic, we will need to have a field to identify which Board it belongs to. Similarly, the Post will need a field to represent which Topic it belongs so that we can list in the discussions only Posts created within a specific Topic. Finally, we will need fields in both the Topic to know who started the discussion and in the Post so we can identify who is posting the reply.
We could also have an association with the Board and the User model, so we could identify who created a given Board. But this information is not relevant for the application. There are other ways to track this information, you will see later on.
Now that we have the basic class representation, we have to think what kind of information each of those models will carry. This sort of thing can get complicated very easily. So try to focus on the important bits. The information that you need to start the development. Later on, we can improve the model using migrations, which you will see in great detail in the next tutorial.
But for now, this would be a basic representation of our models’ fields:
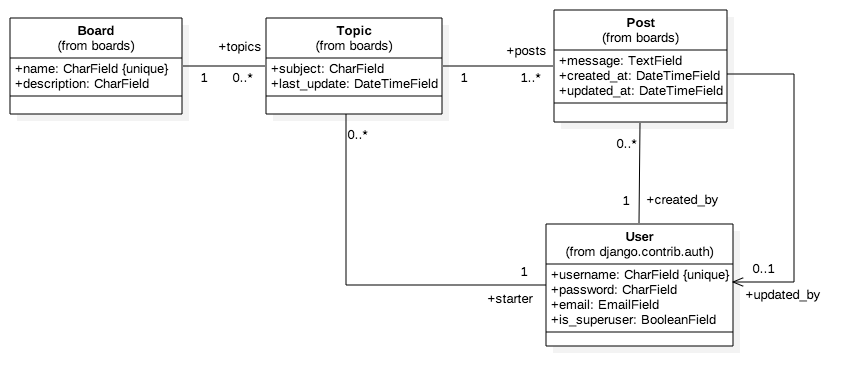
This class diagram has the emphasis on the relationship between the models. Those lines and arrows will eventually be translated into fields later on.
For the Board model, we will start with two fields: name and description. The name field has to be unique, so to avoid duplicated board names. The description is just to give a hint of what the board is all about.
The Topic model will be composed of four fields: subject, last update date which will be used to define the topics ordering, topic starter to identify the User who started the Topic, and a field called board to define which Board a specific Topic belongs to.
The Post model will have a message field, which will be used to store the text of the post replies, a created at date and time field mainly used to order the Posts within a Topic, an updated at date and time field to inform the Users when and if a given Post has been edited. Like the date and time fields, we will also have to reference the User model: created by and updated by.
Finally, the User model. In the class diagram, I only mentioned the fields username, password, email and is superuser flag because that’s pretty much all we are going to use for now. It’s important to note that we won’t need to create a User model because Django already comes with a built-in User model inside the contrib package. We are going to use it.
Regarding the multiplicity in the class diagram (the numbers 1, 0..*, etc.), here’s how you read it:
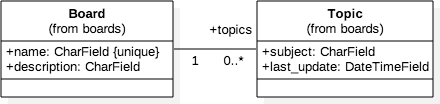
A Topic must be associated with exactly one (1) Board (which means it cannot be null), and a Board may be associated with many Topics or none (0..*). Which means a Board may exist without a single Topic.
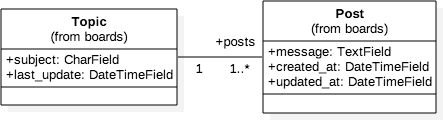
A Topic should have at least one Post (the starter Post), and it may also have many Posts (1..*). A Post must be associated with one, and only one Topic (1).
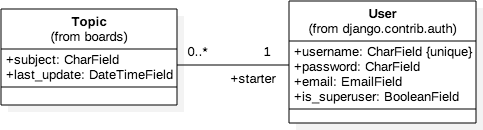
A Topic must have one, and only one User associated with: the topic starter User (1). And a User may have many or none Topics (0..*).
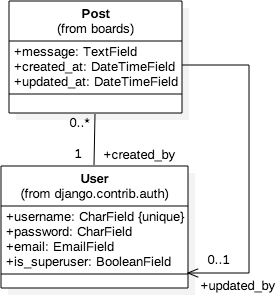
A Post must have one, and only one User associated with: created by (1). A User may have many or none Posts (0..*). The second association between Post and User is a direct association (see the arrow at the end of the line), meaning we are interested only in one side of the relationship which is what User has edited a given Post. It will be translated into the updated by field. The multiplicity says 0..1, meaning the updated by field may be null (the Post wasn’t edited) and at most may be associated with only one User.
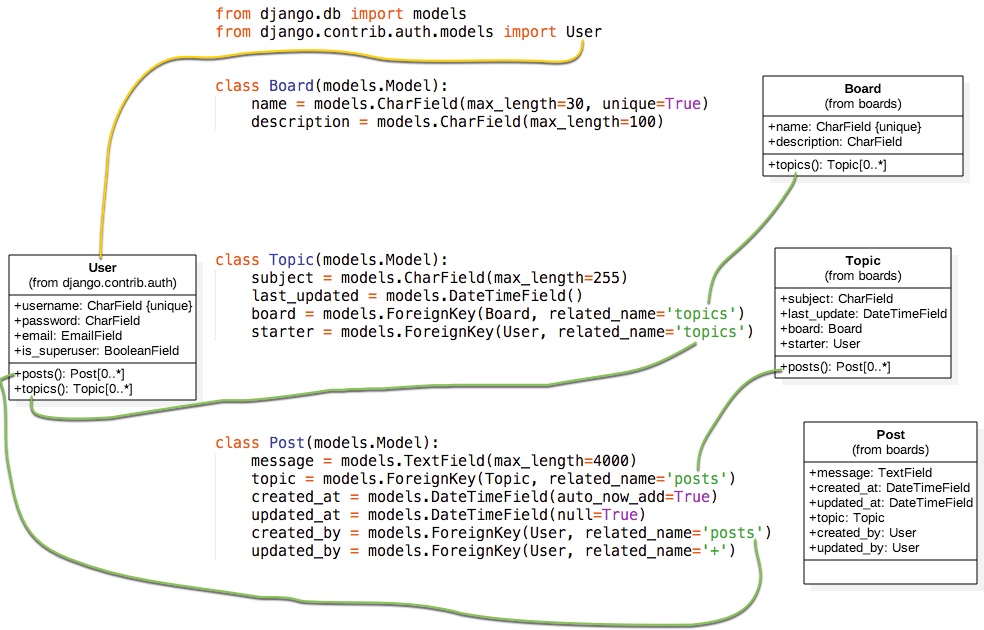
Another way to draw this class diagram is emphasizing the fields rather than in the relationship between the models:
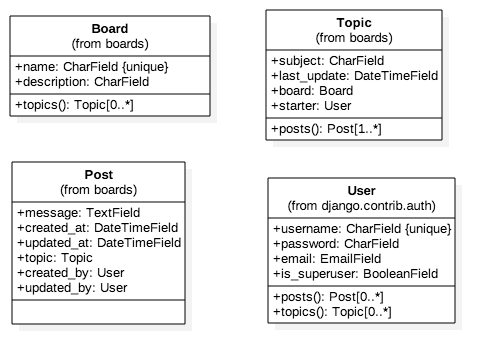
The representation above is equivalent to the previous one, and it’s also closer to what we are going to design using the Django Models API. In this representation, we can see more clearly that in the Post model the associations topic, created by, and updated by became model fields. Another interesting thing to note is that in the Topic model we have now an operation (a class method) named posts(). We are going to achieve this by implementing a reverse relationship, where Django will automatically execute a query in the database to return a list of all the Posts that belongs to a specific Topic.
Alright, enough UML for now! To draw the diagrams presented in this section I used the StarUML tool.
Wireframes
After spending some time designing the application models, I like to create some wireframes to define what needs to be done and also to have a clear picture of where we are going.
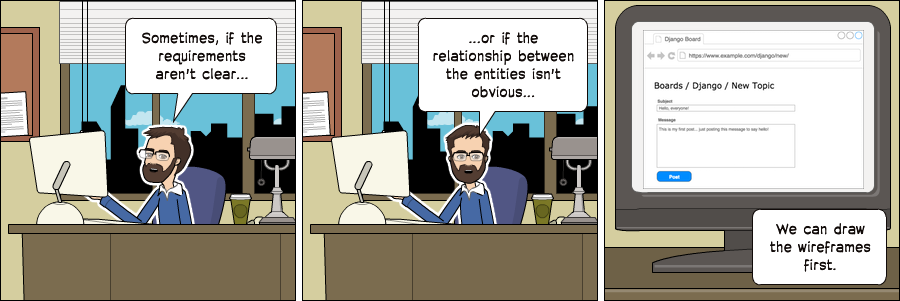
Then based on the wireframes we can gain a deeper understanding of the entities involved in the application.
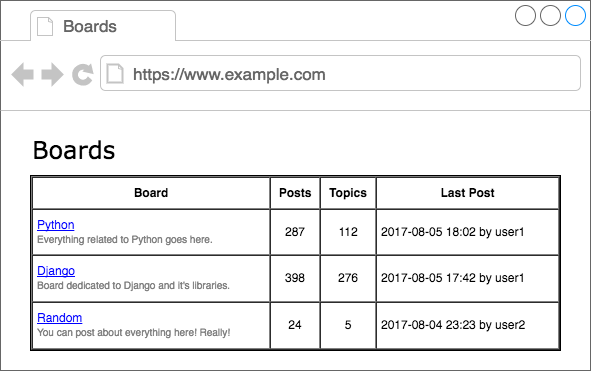
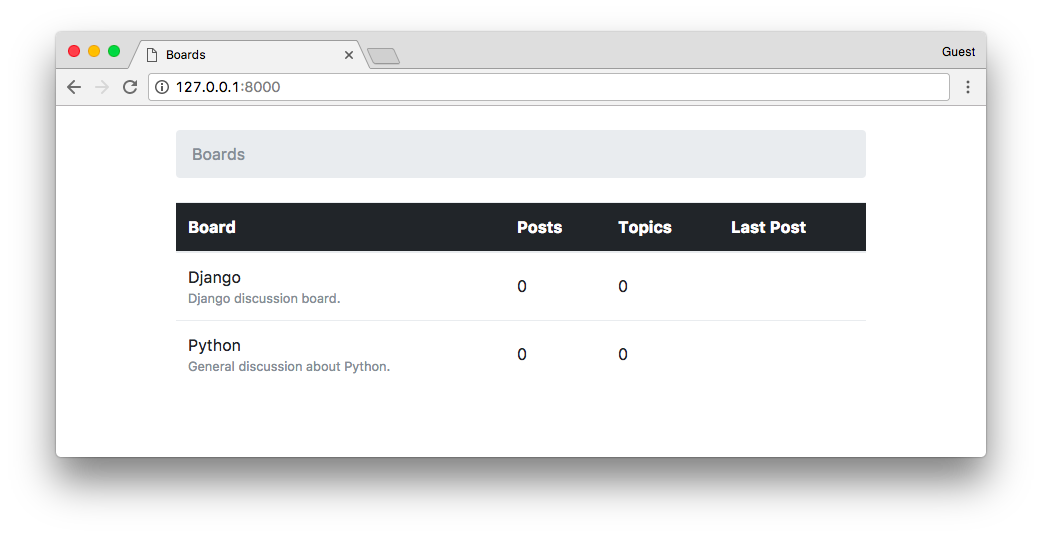
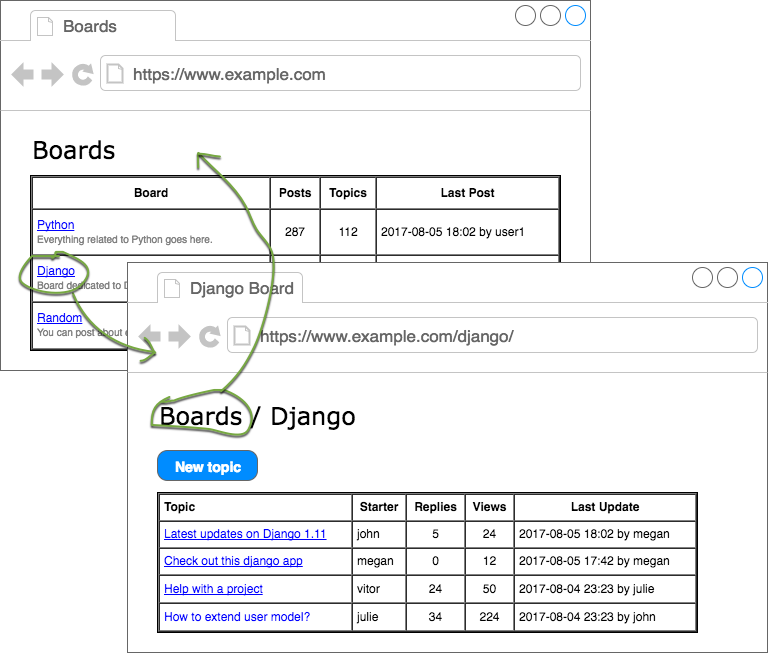
First thing, we need to show all the boards in the homepage:
If the user clicks on a link, say in the Django board, it should list all the topics:
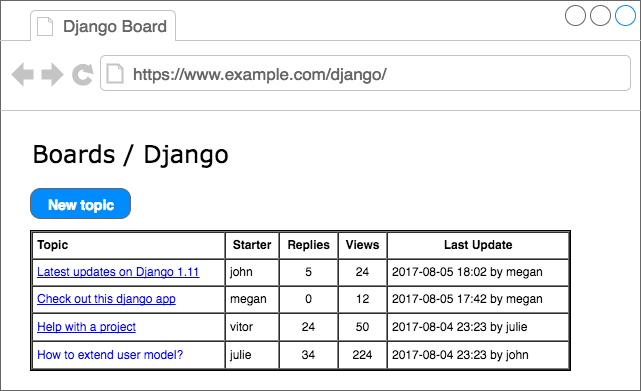
Here we have two main paths: either the user clicks on the “new topic” button to create a new topic, or the user clicks on a topic to see or engage in a discussion.
The “new topic” screen:

Now the topic screen, displaying the posts and discussions:

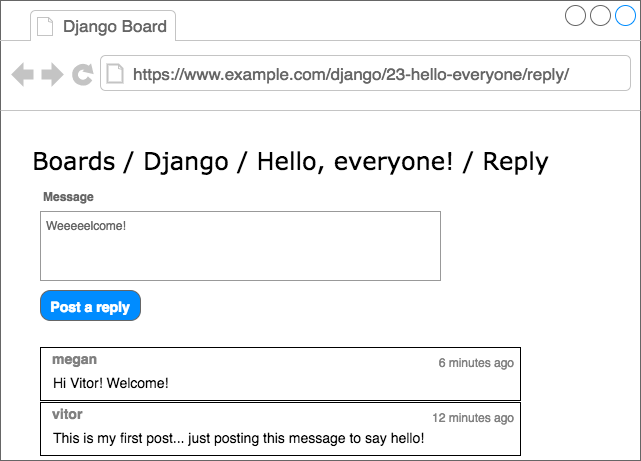
If the user clicks on the reply button, they will see the screen below, with a summary of the posts in reverse order (newest first):
To draw your wireframes you can use the draw.io service, it’s free.
Models
The models are basically a representation of your application’s database layout. What we are going to do in this section is create the Django representation of the classes we modeled in the previous section: Board, Topic, and Post. The User model is already defined inside a built-in app named auth, which is listed in our INSTALLED_APPS configuration under the namespace django.contrib.auth.
We will do all the work inside the boards/models.py file. Here is how we represent our class diagram (see Figure 4). in a Django application:
from django.db import models
from django.contrib.auth.models import User

class Board(models.Model):
    name = models.CharField(max_length=30, unique=True)
    description = models.CharField(max_length=100)

class Topic(models.Model):
    subject = models.CharField(max_length=255)
    last_updated = models.DateTimeField(auto_now_add=True)
    board = models.ForeignKey(Board, related_name='topics')
    starter = models.ForeignKey(User, related_name='topics')

class Post(models.Model):
    message = models.TextField(max_length=4000)
    topic = models.ForeignKey(Topic, related_name='posts')
    created_at = models.DateTimeField(auto_now_add=True)
    updated_at = models.DateTimeField(null=True)
    created_by = models.ForeignKey(User, related_name='posts')
    updated_by = models.ForeignKey(User, null=True, related_name='+')
All models are subclass of the django.db.models.Model class. Each class will be transformed into database tables. Each field is represented by instances of django.db.models.Field subclasses (built-in Django core) and will be translated into database columns.
The fields CharField, DateTimeField, etc., are all subclasses of django.db.models.Field and they come included in the Django core – ready to be used.
Here we are only using CharField, TextField, DateTimeField, and ForeignKey fields to define our models. But Django offers a wide range of options to represent different types of data, such as IntegerField, BooleanField, DecimalField, and many others. We will refer to them as we need.
Some fields have required arguments, such as the CharField. We should always set a max_length. This information will be used to create the database column. Django needs to know how big the database column needs to be. The max_length parameter will also be used by the Django Forms API, to validate user input. More on that later.
In the Board model definition, more specifically in the name field, we are also setting the parameter unique=True, as the name suggests, it will enforce the uniqueness of the field at the database level.
In the Post model, the created_at field has an optional parameter, the auto_now_add set to True. This will instruct Django to set the current date and time when a Post object is created.
One way to create a relationship between the models is by using the ForeignKey field. It will create a link between the models and create a proper relationship at the database level. The ForeignKey field expects a positional parameter with the reference to the model it will relate to.
For example, in the Topic model, the board field is a ForeignKey to the Board model. It is telling Django that a Topic instance relates to only one Board instance. The related_name parameter will be used to create a reverse relationship where the Board instances will have access a list of Topic instances that belong to it.
Django automatically creates this reverse relationship – the related_name is optional. But if we don’t set a name for it, Django will generate it with the name: (class_name)_set. For example, in the Board model, the Topic instances would be available under the topic_set property. Instead, we simply renamed it to topics, to make it feel more natural.
In the Post model, the updated_by field sets the related_name='+'. This instructs Django that we don’t need this reverse relationship, so it will ignore it.
Below you can see the comparison between the class diagram and the source code to generate the models with Django. The green lines represent how we are handling the reverse relationships.
At this point, you may be asking yourself: “what about primary keys/IDs”? If we don’t specify a primary key for a model, Django will automatically generate it for us. So we are good for now. In the next section, you will see better how it works.
Migrating the Models
The next step is to tell Django to create the database so we can start using it.
Open the Command Line Tools, activate the virtual environment, go to the folder where the manage.py file is, and run the commands below:
python manage.py makemigrations
As an output you will get something like this:
Migrations for 'boards':
  boards/migrations/0001_initial.py
    - Create model Board
    - Create model Post
    - Create model Topic
    - Add field topic to post
    - Add field updated_by to post
At this point, Django created a file named 0001_initial.py inside the boards/migrations directory. It represents the current state of our application’s models. In the next step, Django will use this file to create the tables and columns.
The migration files are translated into SQL statements. If you are familiar with SQL, you can run the following command to inspect the SQL instructions that will be executed in the database:
python manage.py sqlmigrate boards 0001
If you’re not familiar with SQL, don’t worry. We won’t be working directly with SQL in this tutorial series. All the work will be done using just the Django ORM, which is an abstraction layer that communicates with the database.
The next step now is to apply the migration we generated to the database:
python manage.py migrate
The output should be something like this:
Operations to perform:
  Apply all migrations: admin, auth, boards, contenttypes, sessions
Running migrations:
  Applying contenttypes.0001_initial... OK
  Applying auth.0001_initial... OK
  Applying admin.0001_initial... OK
  Applying admin.0002_logentry_remove_auto_add... OK
  Applying contenttypes.0002_remove_content_type_name... OK
  Applying auth.0002_alter_permission_name_max_length... OK
  Applying auth.0003_alter_user_email_max_length... OK
  Applying auth.0004_alter_user_username_opts... OK
  Applying auth.0005_alter_user_last_login_null... OK
  Applying auth.0006_require_contenttypes_0002... OK
  Applying auth.0007_alter_validators_add_error_messages... OK
  Applying auth.0008_alter_user_username_max_length... OK
  Applying boards.0001_initial... OK
  Applying sessions.0001_initial... OK
Because this is the first time we are migrating the database, the migrate command also applied the existing migration files from the Django contrib apps, listed in the INSTALLED_APPS. This is expected.
The line Applying boards.0001_initial... OK is the migration we generated in the previous step.
That’s it! Our database is ready to be used.
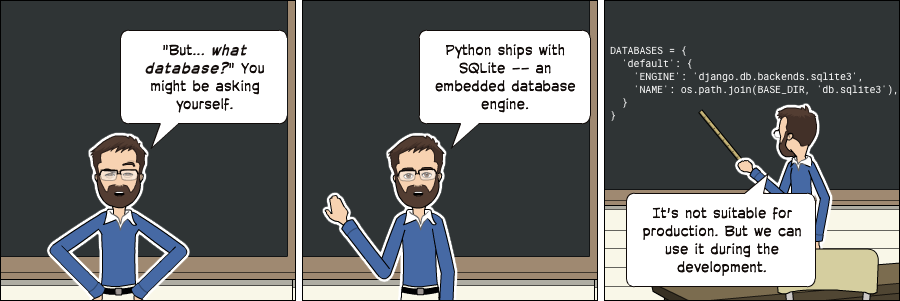
Note: It’s important to note that SQLite is a production-quality database. SQLite is used by many companies across thousands of products, like all Android and iOS devices, all major Web browsers, Windows 10, macOS, etc.
It’s just not suitable for all cases. SQLite doesn’t compare with databases like MySQL, PostgreSQL or Oracle. High-volume websites, write-intensive applications, very large datasets, high concurrency, are some situations that will eventually result in a problem by using SQLite.
We are going to use SQLite during the development of our project because it’s convenient and we won’t need to install anything else. When we deploy our project to production, we will switch to PostgreSQL. For simple websites this work fine. But for complex websites, it’s advisable to use the same database for development and production.
Experimenting with the Models API
One of the great advantages of developing with Python is the interactive shell. I use it all the time. It’s a quick way to try things out and experiment libraries and APIs.
You can start a Python shell with our project loaded using the manage.py utility:
python manage.py shell
Python 3.6.2 (default, Jul 17 2017, 16:44:45)
[GCC 4.2.1 Compatible Apple LLVM 8.1.0 (clang-802.0.42)] on darwin
Type "help", "copyright", "credits" or "license" for more information.
(InteractiveConsole)
>>>
Python 3.6.2 (v3.6.2:5fd33b5, Jul  8 2017, 04:57:36) [MSC v.1900 64 bit (AMD64)] on win32
Type "help", "copyright", "credits" or "license" for more information.
(InteractiveConsole)
>>>
Python 3.6.2 (default, Jul 17 2017, 23:14:31)
[GCC 5.4.0 20160609] on linux
Type "help", "copyright", "credits" or "license" for more information.
(InteractiveConsole)
>>>
This is very similar to calling the interactive console just by typing python, except when we use python manage.py shell, we are adding our project to the sys.path and loading Django. That means we can import our models and any other resource within the project and play with it.
Let’s start by importing the Board class:
from boards.models import Board
To create a new board object, we can do the following:
board = Board(name='Django', description='This is a board about Django.')
To persist this object in the database, we have to call the save method:
board.save()
The save method is used both to create and update objects. Here Django created a new object because the Board instance had no id. After saving it for the first time, Django will set the id automatically:
board.id
1
You can access the rest of the fields as Python attributes:
board.name
'Django'
board.description
'This is a board about Django.'
To update a value we could do:
board.description = 'Django discussion board.'
board.save()
Every Django model comes with a special attribute; we call it a Model Manager. You can access it via the Python attribute objects. It is used mainly to execute queries in the database. For example, we could use it to directly create a new Board object:
board = Board.objects.create(name='Python', description='General discussion about Python.')
board.id
2
board.name
'Python'
So, right now we have two boards. We can use the objects to list all existing boards in the database:
Board.objects.all()
<QuerySet [<Board: Board object>, <Board: Board object>]>
The result was a QuerySet. We will learn more about that later on. Basically, it’s a list of objects from the database. We can see that we have two objects, but we can only read Board object. That’s because we haven’t defined the __str__ method in the Board model.
The __str__ method is a String representation of an object. We can use the board name to represent it.
First, exit the interactive console:
exit()
Now edit the models.py file inside the boards app:
class Board(models.Model):
    name = models.CharField(max_length=30, unique=True)
    description = models.CharField(max_length=100)

    def __str__(self):
        return self.name
Let’s try the query again. Open the interactive console again:
python manage.py shell
from boards.models import Board

Board.objects.all()
<QuerySet [<Board: Django>, <Board: Python>]>
Much better, right?
We can treat this QuerySet like a list. Let’s say we wanted to iterate over it and print the description of each board:
boards_list = Board.objects.all()
for board in boards_list:
    print(board.description)
The result would be:
Django discussion board.
General discussion about Python.
Similarly, we can use the model Manager to query the database and return a single object. For that we use the get method:
django_board = Board.objects.get(id=1)

django_board.name
'Django'
But we have to be careful with this kind of operation. If we try to get an object that doesn’t exist, for example, a board with id=3, it will raise an exception:
board = Board.objects.get(id=3)

boards.models.DoesNotExist: Board matching query does not exist.
We can use the get method with any model field, but preferably use a field that can uniquely identify an object. Otherwise, the query may return more than one object, which will cause an exception.
Board.objects.get(name='Django')
<Board: Django>
Note that the query is case sensitive, a lower case “django” would not match:
Board.objects.get(name='django')
boards.models.DoesNotExist: Board matching query does not exist.
Summary of Model’s Operations
Find below a summary of the methods and operations we learned in this section, using the Board model as a reference. Uppercase Board refers to the class, lowercase board refers to an instance (or object) of the Board model class:

In the next section, we are going to start writing views and displaying our boards in HTML pages.
Views, Templates, and Static Files
At the moment we already have a view named home displaying “Hello, World!” in the homepage of our application.
myproject/urls.py
from django.conf.urls import url
from django.contrib import admin

from boards import views

urlpatterns = [
    url(r'^/figure>, views.home, name='home'),
    url(r'^admin/', admin.site.urls),
]
boards/views.py
from django.http import HttpResponse

def home(request):
    return HttpResponse('Hello, World!')
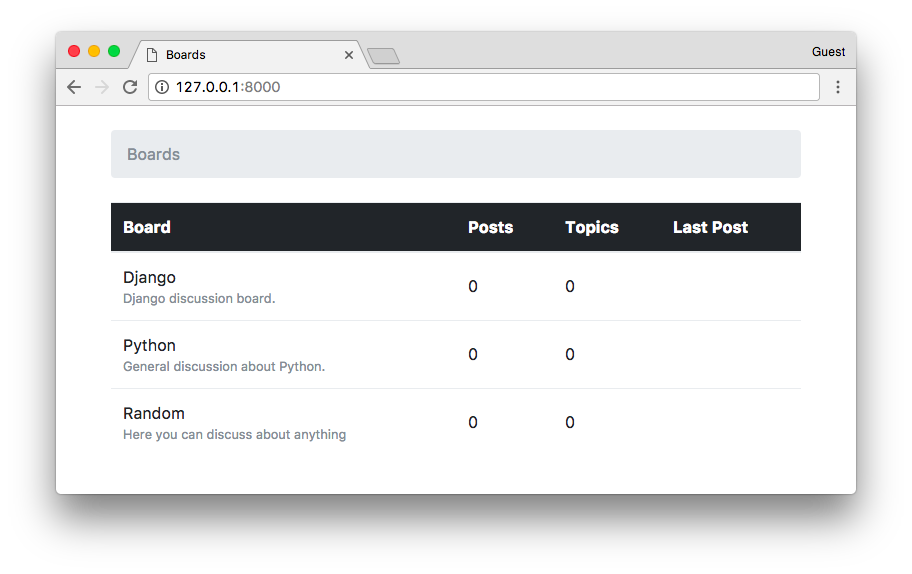
We can use this as our starting point. If you recall our wireframes, the Figure 5 showed how the homepage should look like. What we want to do is display a list of boards in a table alongside with some other information.
The first thing to do is import the Board model and list all the existing boards:
boards/views.py
from django.http import HttpResponse
from .models import Board

def home(request):
    boards = Board.objects.all()
    boards_names = list()

    for board in boards:
        boards_names.append(board.name)

    response_html = '<br>'.join(boards_names)

    return HttpResponse(response_html)
And the result would be this simple HTML page:
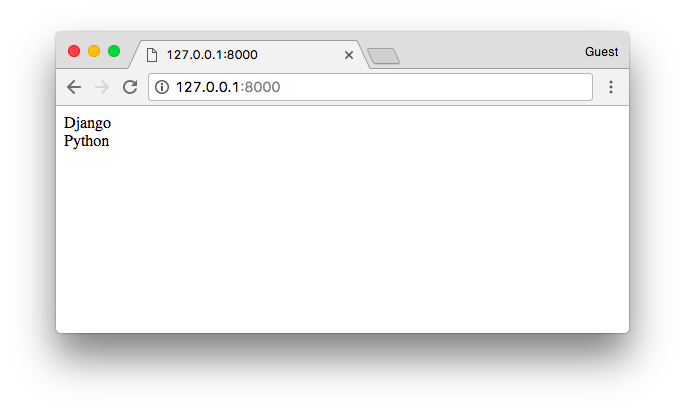
But let’s stop right here. We are not going very far rendering HTML like this. For this simple view, all we need is a list of boards; then the rendering part is a job for the Django Template Engine.
Django Template Engine Setup
Create a new folder named templates alongside with the boards and mysite folders:
myproject/
 |-- myproject/
 |    |-- boards/
 |    |-- myproject/
 |    |-- templates/   <-- here!
 |    +-- manage.py
 +-- venv/
Now within the templates folder, create an HTML file named home.html:
templates/home.html
<!DOCTYPE html>
<html>
  <head>
    <meta charset="utf-8">
    <title>Boards</title>
  </head>
  <body>
    <h1>Boards</h1>

    {% for board in boards %}
      {{ board.name }} <br>
    {% endfor %}

  </body>
</html>
In the example above we are mixing raw HTML with some special tags % for ... in ... %} and {{variable}}</span>. They are part of the Django Template Language. The example above shows how to iterate over a list of objects using a for. The {{ board.name }} renders the name of the board in the HTML template, generating a dynamic HTML document.
Before we can use this HTML page, we have to tell Django where to find our application’s templates.
Open the settings.py inside the myproject directory and search for the TEMPLATES variable and set the DIRS key to os.path.join(BASE_DIR, 'templates'):
TEMPLATES = [
    {
        'BACKEND': 'django.template.backends.django.DjangoTemplates',
        'DIRS': [
            os.path.join(BASE_DIR, 'templates')
        ],
        'APP_DIRS': True,
        'OPTIONS': {
            'context_processors': [
                'django.template.context_processors.debug',
                'django.template.context_processors.request',
                'django.contrib.auth.context_processors.auth',
                'django.contrib.messages.context_processors.messages',
            ],
        },
    },
]
Basically what this line is doing is finding the full path of your project directory and appending “/templates” to it.
We can debug this using the Python shell:
python manage.py shell
from django.conf import settings

settings.BASE_DIR
'/Users/vitorfs/Development/myproject'

import os

os.path.join(settings.BASE_DIR, 'templates')
'/Users/vitorfs/Development/myproject/templates'
See? It’s just pointing to the templates folder we created in the previous steps.
Now we can update our home view:
boards/views.py
from django.shortcuts import render
from .models import Board
def home(request):
boards = Board.objects.all()
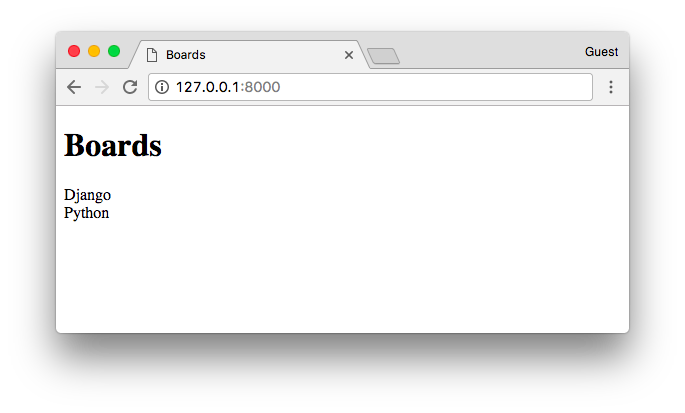
return render(request, 'home.html', {'boards': boards})
The resulting HTML:
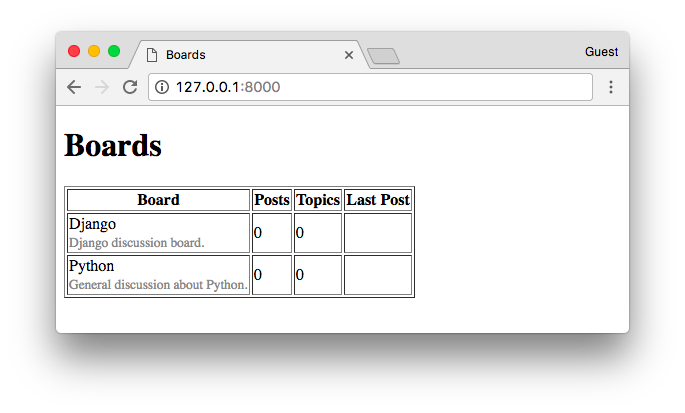
We can improve the HTML template to use a table instead:
templates/home.html
<!DOCTYPE html>
<html>
  <head>
    <meta charset="utf-8">
    <title>Boards</title>
  </head>
  <body>
    <h1>Boards</h1>

    <table border="1">
      <thead>
        <tr>
          <th>Board</th>
          <th>Posts</th>
          <th>Topics</th>
          <th>Last Post</th>
        </tr>
      </thead>
      <tbody>
        {% for board in boards %}
          <tr>
            <td>
              {{ board.name }}<br>
              <small style="color: #888">{{ board.description }}</small>
            </td>
            <td>0</td>
            <td>0</td>
            <td></td>
          </tr>
        {% endfor %}
      </tbody>
    </table>
  </body>
</html>
Testing the Homepage

This is going to be a recurrent subject, and we are going to explore together different concepts and strategies throughout the whole tutorial series.
Let’s write our first test. For now, we will be working in the tests.py file inside the boards app:
boards/tests.py
from django.core.urlresolvers import reverse
from django.test import TestCase

class HomeTests(TestCase):
    def test_home_view_status_code(self):
        url = reverse('home')
        response = self.client.get(url)
        self.assertEquals(response.status_code, 200)
This is a very simple test case but extremely useful. We are testing the status code of the response. The status code 200 means success.
We can check the status code of the response in the console:
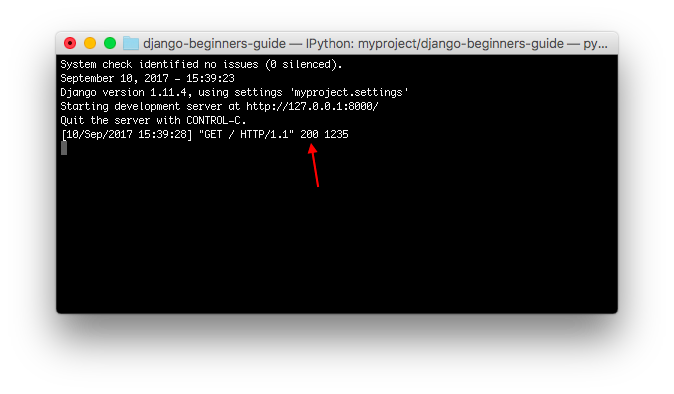
If there were an uncaught exception, syntax error, or anything, Django would return a status code 500 instead, which means Internal Server Error. Now, imagine our application has 100 views. If we wrote just this simple test for all our views, with just one command, we would be able to test if all views are returning a success code, so the user does not see any error message anywhere. Without automate tests, we would need to check each page, one by one.
To execute the Django’s test suite:
python manage.py test
Creating test database for alias 'default'...
System check identified no issues (0 silenced).
.
----------------------------------------------------------------------
Ran 1 test in 0.041s

OK
Destroying test database for alias 'default'...
Now we can test if Django returned the correct view function for the requested URL. This is also a useful test because as we progress with the development, you will see that the urls.py module can get very big and complex. The URL conf is all about resolving regex. There are some cases where we have a very permissive URL, so Django can end up returning the wrong view function.
Here’s how we do it:
boards/tests.py
from django.core.urlresolvers import reverse
from django.urls import resolve
from django.test import TestCase
from .views import home

class HomeTests(TestCase):
    def test_home_view_status_code(self):
        url = reverse('home')
        response = self.client.get(url)
        self.assertEquals(response.status_code, 200)

    def test_home_url_resolves_home_view(self):
        view = resolve('/')
        self.assertEquals(view.func, home)
In the second test, we are making use of the resolve function. Django uses it to match a requested URL with a list of URLs listed in the urls.py module. This test will make sure the URL /, which is the root URL, is returning the home view.
Test it again:
python manage.py test
Creating test database for alias 'default'...
System check identified no issues (0 silenced).
..
----------------------------------------------------------------------
Ran 2 tests in 0.027s

OK
Destroying test database for alias 'default'...
To see more detail about the test execution, set the verbosity to a higher level:
">
python manage.py test --verbosity=2
Creating test database for alias 'default' ('file:memorydb_default?mode=memory&cache=shared')...
Operations to perform:
  Synchronize unmigrated apps: messages, staticfiles
  Apply all migrations: admin, auth, boards, contenttypes, sessions
Synchronizing apps without migrations:
  Creating tables...
    Running deferred SQL...
Running migrations:
  Applying contenttypes.0001_initial... OK
  Applying auth.0001_initial... OK
  Applying admin.0001_initial... OK
  Applying admin.0002_logentry_remove_auto_add... OK
  Applying contenttypes.0002_remove_content_type_name... OK
  Applying auth.0002_alter_permission_name_max_length... OK
  Applying auth.0003_alter_user_email_max_length... OK
  Applying auth.0004_alter_user_username_opts... OK
  Applying auth.0005_alter_user_last_login_null... OK
  Applying auth.0006_require_contenttypes_0002... OK
  Applying auth.0007_alter_validators_add_error_messages... OK
  Applying auth.0008_alter_user_username_max_length... OK
  Applying boards.0001_initial... OK
  Applying sessions.0001_initial... OK
System check identified no issues (0 silenced).
test_home_url_resolves_home_view (boards.tests.HomeTests) ... ok
test_home_view_status_code (boards.tests.HomeTests) ... ok

----------------------------------------------------------------------
Ran 2 tests in 0.017s

OK
Destroying test database for alias 'default' ('file:memorydb_default?mode=memory&cache=shared')...
Verbosity determines the amount of notification and debug information that will be printed to the console; 0 is no output, 1 is normal output, and 2 is verbose output.
Static Files Setup
Static files are the CSS, JavaScripts, Fonts, Images, or any other resources we may use to compose the user interface.
As it is, Django doesn’t serve those files. Except during the development process, so to make our lives easier. But Django provides some features to help us manage the static files. Those features are available in the django.contrib.staticfiles application already listed in the INSTALLED_APPS configuration.
With so many front-end component libraries available, there’s no reason for us keep rendering basic HTML documents. We can easily add Bootstrap 4 to our project. Bootstrap is an open source toolkit for developing with HTML, CSS, and JavaScript.
In the project root directory, alongside with the boards, templates, and myproject folders, create a new folder named static, and within the static folder create another one named css:
myproject/
 |-- myproject/
 |    |-- boards/
 |    |-- myproject/
 |    |-- templates/
 |    |-- static/       <-- here
 |    |    +-- css/     <-- and here
 |    +-- manage.py
 +-- venv/
Go to getbootstrap.com and download the latest version:
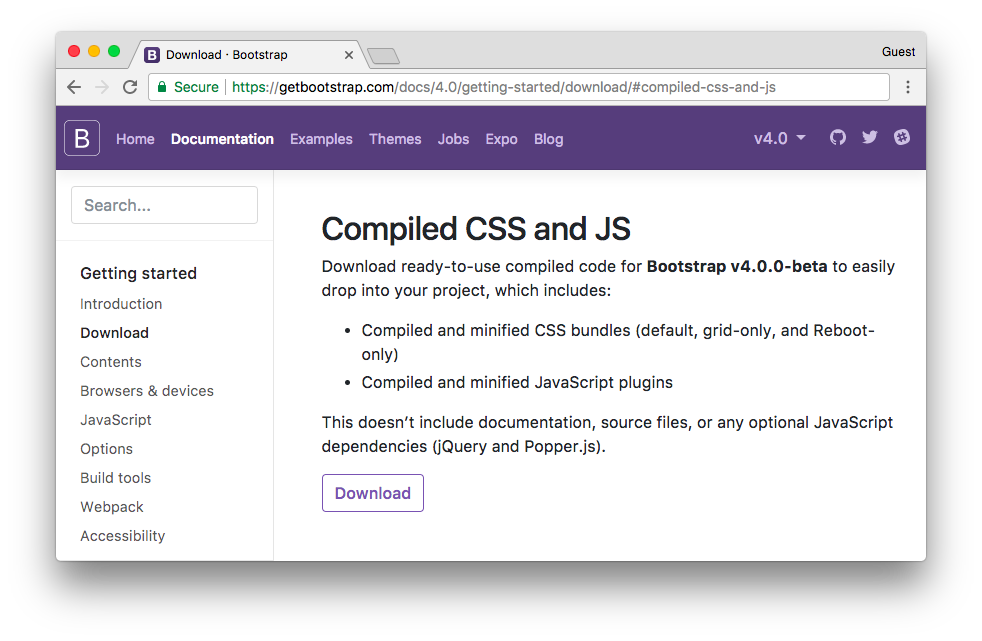
Download the Compiled CSS and JS version.
In your computer, extract the bootstrap-4.0.0-beta-dist.zip file you downloaded from the Bootstrap website, copy the file css/bootstrap.min.css to our project’s css folder:
myproject/
 |-- myproject/
 |    |-- boards/
 |    |-- myproject/
 |    |-- templates/
 |    |-- static/
 |    |    +-- css/
 |    |         +-- bootstrap.min.css    <-- here
 |    +-- manage.py
 +-- venv/
The next step is to instruct Django where to find the static files. Open the settings.py, scroll to the bottom of the file and just after the STATIC_URL, add the following:
STATIC_URL = '/static/'

STATICFILES_DIRS = [
    os.path.join(BASE_DIR, 'static'),
]
Same thing as the TEMPLATES directory, remember?
Now we have to load the static files (the Bootstrap CSS file) in our template:
templates/home.html
{% load static %}<!DOCTYPE html>
<html>
  <head>
    <meta charset="utf-8">
    <title>Boards</title>
    <link rel="stylesheet" href="{% static 'css/bootstrap.min.css' %}">
  </head>
  <body>
    <!-- body suppressed for brevity ... -->
  </body>
</html>
First we load the Static Files App template tags by using the {% load static %} in the beginning of the template.
The template tag {% static %} is used to compose the URL where the resource lives. In this case, the {% static 'css/bootstrap.min.css' %} will return /static/css/bootstrap.min.css, which is equivalent to http://127.0.0.1:8000/static/css/bootstrap.min.css.
The {% static %} template tag uses the STATIC_URL configuration in the settings.py to compose the final URL. For example, if you hosted your static files in a subdomain like https://static.example.com/, we would set the {% static 'css/bootstrap.min.css' %} would return https://static.example.com/css/bootstrap.min.css.
If none of this makes sense for you at the moment, don’t worry. Just remember to use the {% static %} whenever you need to refer to a CSS, JavaScript or image file. Later on, when we start working with Deployment, we will discuss more it. For now, we are all set up.
Refreshing the page 127.0.0.1:8000 we can see it worked:

Now we can edit the template so to take advantage of the Bootstrap CSS:
{% load static %}<!DOCTYPE html>
<html>
  <head>
    <meta charset="utf-8">
    <title>Boards</title>
    <link rel="stylesheet" href="{% static 'css/bootstrap.min.css' %}">
  </head>
  <body>
    <div class="container">
      <ol class="breadcrumb my-4">
        <li class="breadcrumb-item active">Boards</li>
      </ol>
      <table class="table">
        <thead class="thead-inverse">
          <tr>
            <th>Board</th>
            <th>Posts</th>
            <th>Topics</th>
            <th>Last Post</th>
          </tr>
        </thead>
        <tbody>
          {% for board in boards %}
            <tr>
              <td>
                {{ board.name }}
                <small class="text-muted d-block">{{ board.description }}</small>
              </td>
              <td class="align-middle">0</td>
              <td class="align-middle">0</td>
              <td></td>
            </tr>
          {% endfor %}
        </tbody>
      </table>
    </div>
  </body>
</html>
The result now:
So far we are adding new boards using the interactive console (python manage.py shell). But we need a better way to do it. In the next section, we are going to implement an admin interface for the website administrator manage it.
Introduction to Django Admin
When we start a new project, Django already comes configured with the Django Admin listed in the INSTALLED_APPS.
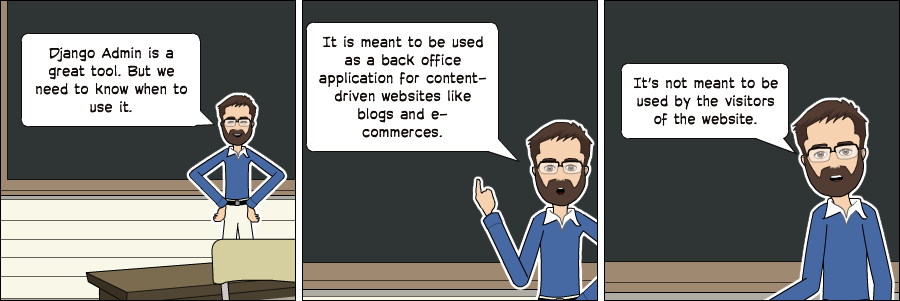
A good use case of the Django Admin is for example in a blog; it can be used by the authors to write and publish articles. Another example is an e-commerce website, where the staff members can create, edit, delete products.
For now, we are going to configure the Django Admin to maintain our application’s boards.
Let’s start by creating an administrator account:
python manage.py createsuperuser
Follow the instructions:
Username (leave blank to use 'vitorfs'): admin
Email address: admin@example.com
Password:
Password (again):
Superuser created successfully.
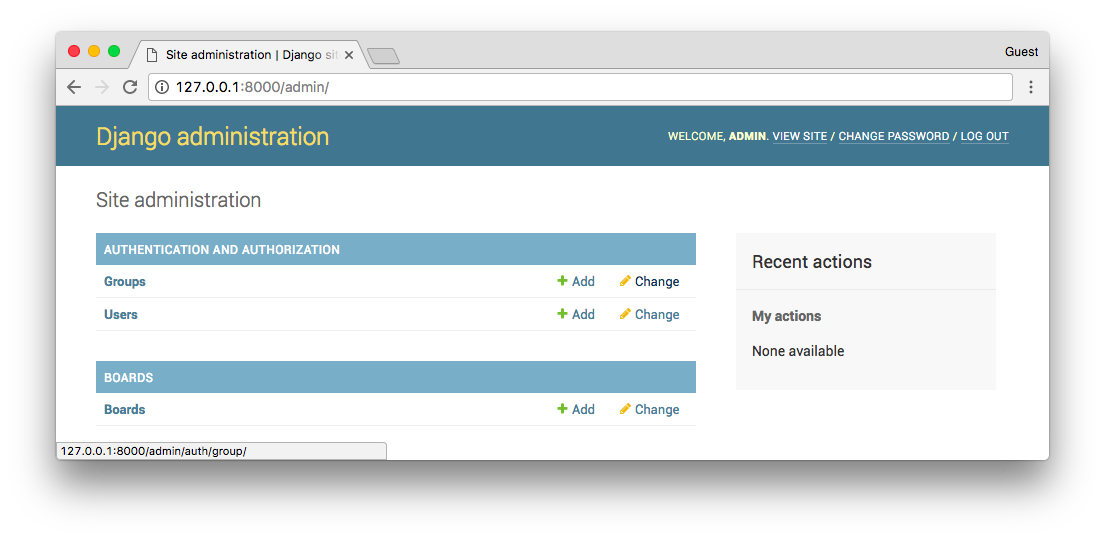
Now open the URL in a web browser: http://127.0.0.1:8000/admin/
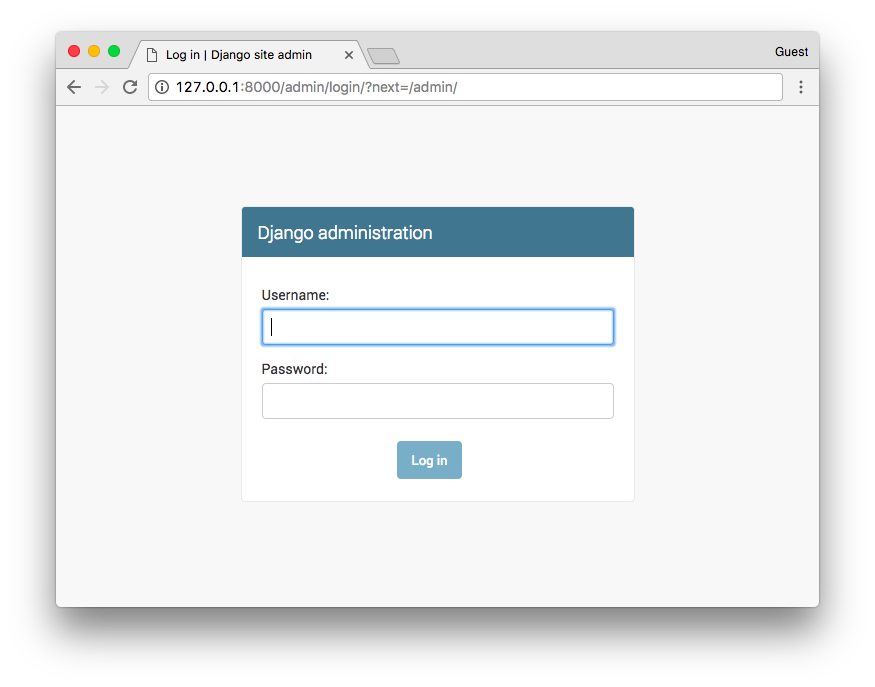
Enter the username and password to log into the administration interface:
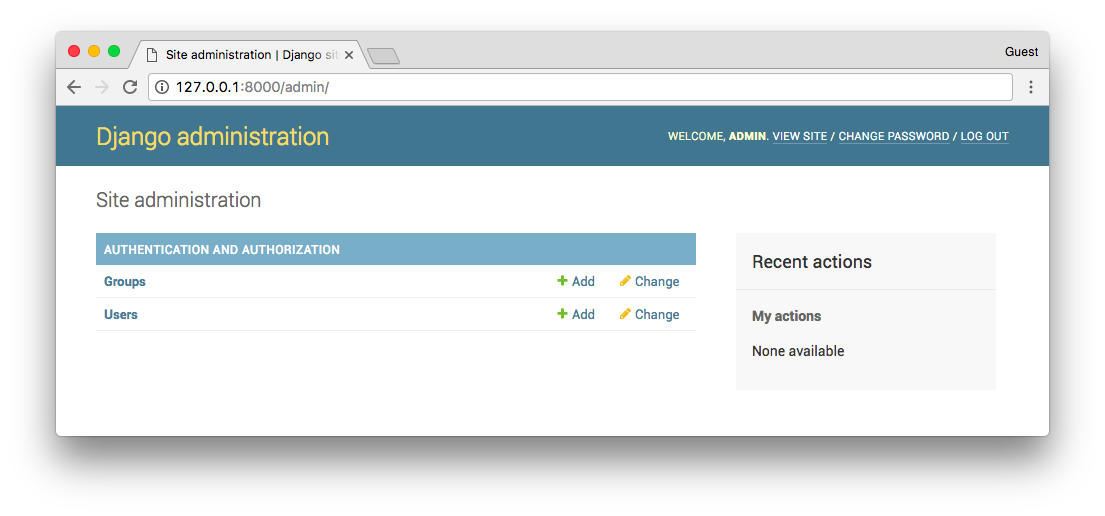
It already comes with some features configured. Here we can add Users and Groups to manage permissions. We will explore more of those concepts later on.
To add the Board model is very straightforward. Open the admin.py file in the boards directory, and add the following code:
boards/admin.py
from django.contrib import admin
from .models import Board

admin.site.register(Board)
Save the admin.py file, and refresh the page on your web browser:
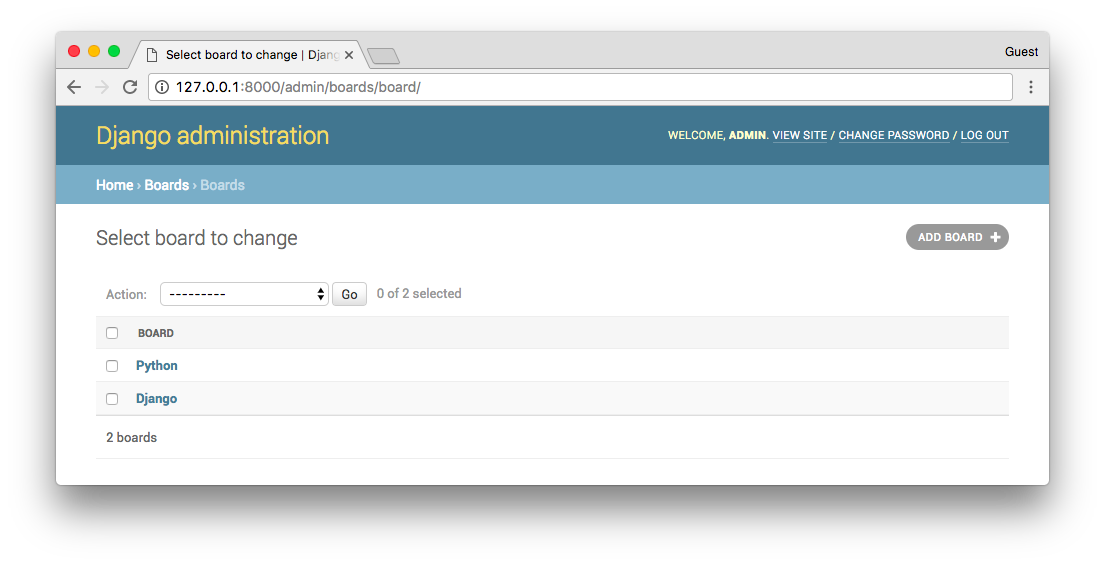
And that’s it! It’s ready to be used. Click on the Boards link to see the list of existing boards:
We can add a new board by clicking on the Add Board button:
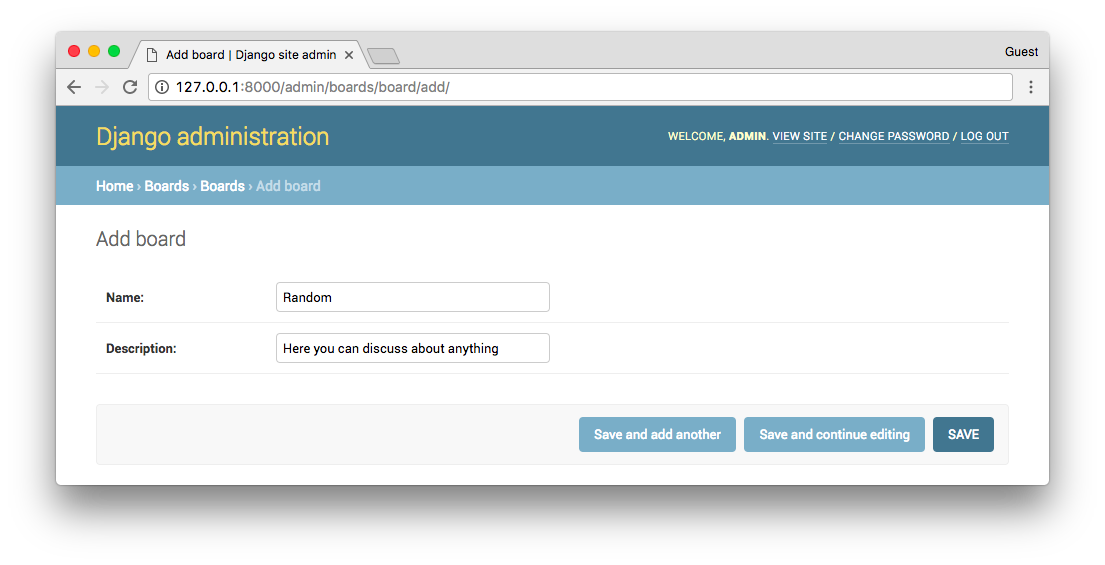
Click on the save button:
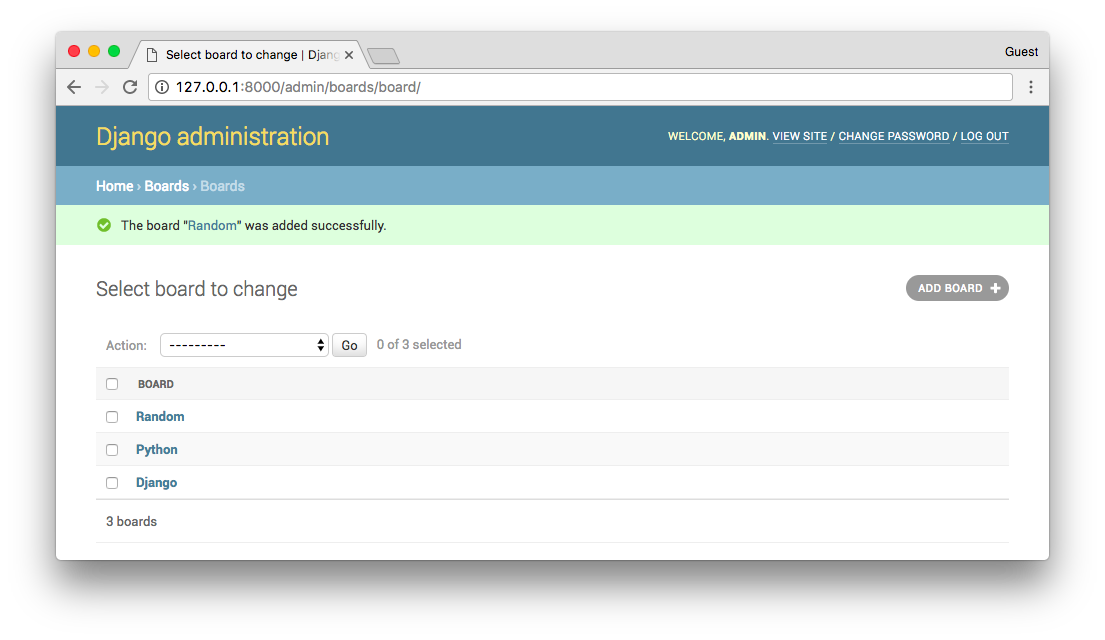
We can check if everything is working be opening the http://127.0.0.1:8000 URL:
Conclusions
In this tutorial, we explored many new concepts. We defined some requirements for our project, created the first models, migrated the database, started playing with the Models API. We created our very first view and wrote some unit tests. We also configured the Django Template Engine, Static Files, and added the Bootstrap 4 library to the project. Finally, we had a very brief introduction the Django Admin interface.
The source code of the project is available on GitHub. The current state of the project can be found under the release tag v0.2-lw. The link below will take you to the right place:
https://github.com/sibtc/django-beginners-guide/tree/v0.2-lw
The Complete Guide to Start Learning Django - Part 3 - Advanced Concepts
Table of Contents
- Introduction
- URLs
- Basic URLs
- Advanced URLs
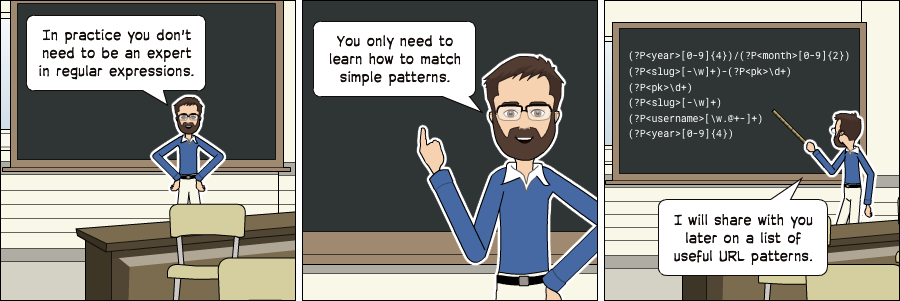
- Using the URLs API
- List of Useful URL Patterns
- Reusable Templates
- Forms
- How Not Implement a Form
- Testing The Form View
- Creating Forms The Right Way
- Rendering Bootstrap Forms
- Reusable Forms Templates
- Adding More Tests
- Conclusions
Introduction
In this tutorial, we are going to dive deep into two fundamental concepts: URLs and Forms. In the process, we are going to explore many other concepts like creating reusable templates and installing third-party libraries. We are also going to write plenty of unit tests.
If you are following this tutorial series since the first part, coding your project and following the tutorial step by step, you may need to update your models.py before starting:
boards/models.py
class Topic(models.Model):
    # other fields...
    # Add `auto_now_add=True` to the `last_updated` field
    last_updated = models.DateTimeField(auto_now_add=True)

class Post(models.Model):
    # other fields...
    # Add `null=True` to the `updated_by` field
    updated_by = models.ForeignKey(User, null=True, related_name='+')
Now run the commands with the virtualenv activated:
python manage.py makemigrations
python manage.py migrate
If you already have null=True in the updated_by field and the auto_now_add=True in the last_updated field, you can safely ignore the instructions above.
If you prefer to use my source code as a starting point, you can grab it on GitHub.
The current state of the project can be found under the release tag v0.2-lw. The link below will take you to the right place:
https://github.com/sibtc/django-beginners-guide/tree/v0.2-lw
The development will follow from here.
URLs
Proceeding with the development of our application, now we have to implement a new page to list all the topics that belong to a given Board. Just to recap, below you can see the wireframe we drew in the previous tutorial:

We will start by editing the urls.py inside the myproject folder:
myproject/urls.py
from django.conf.urls import url
from django.contrib import admin

from boards import views

urlpatterns = [
    url(r'^/figure>, views.home, name='home'),
    url(r'^boards/(?P<pk>\d+)//figure>, views.board_topics, name='board_topics'),
    url(r'^admin/', admin.site.urls),
]
This time let’s take a moment and analyze the urlpatterns and url.
The URL dispatcher and URLconf (URL configuration) are fundamental parts of a Django application. In the beginning, it can look confusing; I remember having a hard time when I first started developing with Django.
In fact, right now the Django Developers are working on a proposal to make simplified routing syntax. But for now, as per the version 1.11, that’s what we have. So let’s try to understand how it works.
A project can have many urls.py distributed among the apps. But Django needs a url.py to use as a starting point. This special urls.py is called root URLconf. It’s defined in the settings.py file.
myproject/settings.py
ROOT_URLCONF = 'myproject.urls'
It already comes configured, so you don’t need to change anything here.
When Django receives a request, it starts searching for a match in the project’s URLconf. It starts with the first entry of the urlpatterns variable, and test the requested URL against each url entry.
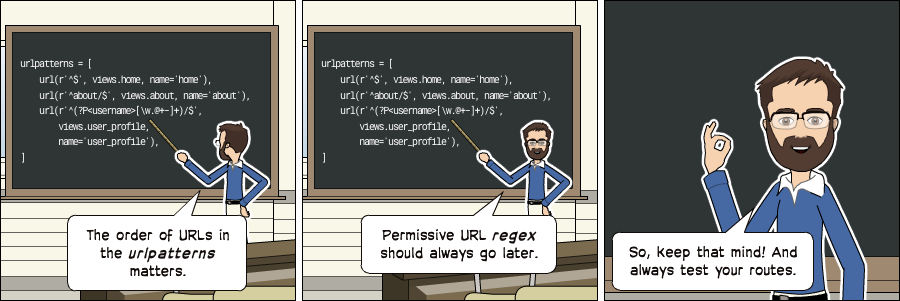
If Django finds a match, it will pass the request to the view function, which is the second parameter of the url. The order in the urlpatterns matters, because Django will stop searching as soon as it finds a match. Now, if Django doesn’t find a match in the URLconf, it will raise a 404 exception, which is the error code for Page Not Found.
This is the anatomy of the url function:
def url(regex, view, kwargs=None, name=None):
    # ...
- regex: A regular expression for matching URL patterns in strings. Note that these regular expressions do not search GET or POST parameters. In a request to http://127.0.0.1:8000/boards/?page=2 only /boards/ will be processed.
- view: A view function used to process the user request for a matched URL. It also accepts the return of the django.conf.urls.include function, which is used to reference an external urls.py file. You can, for example, use it to define a set of app specific URLs, and include it in the root URLconf using a prefix. We will explore more on this concept later on.
- kwargs: Arbitrary keyword arguments that’s passed to the target view. It is normally used to do some simple customization on reusable views. We don’t use it very often.
- name: A unique identifier for a given URL. This is a very important feature. Always remember to name your URLs. With this, you can change a specific URL in the whole project by just changing the regex. So it’s important to never hard code URLs in the views or templates, and always refer to the URLs by its name.
Basic URLs
Basic URLs are very simple to create. It’s just a matter of matching strings. For example, let’s say we wanted to create an “about” page, it could be defined like this:
from django.conf.urls import url
from boards import views

urlpatterns = [
    url(r'^/figure>, views.home, name='home'),
    url(r'^about//figure>, views.about, name='about'),
]
We can also create deeper URL structures:
from django.conf.urls import url
from boards import views

urlpatterns = [
    url(r'^/figure>, views.home, name='home'),
    url(r'^about//figure>, views.about, name='about'),
    url(r'^about/company//figure>, views.about_company, name='about_company'),
    url(r'^about/author//figure>, views.about_author, name='about_author'),
    url(r'^about/author/vitor//figure>, views.about_vitor, name='about_vitor'),
    url(r'^about/author/erica//figure>, views.about_erica, name='about_erica'),
    url(r'^privacy//figure>, views.privacy_policy, name='privacy_policy'),
]
Those are some examples of simple URL routing. For all the examples above, the view function will follow this structure:
def about(request):
    # do something...
    return render(request, 'about.html')

def about_company(request):
    # do something else...
    # return some data along with the view...
    return render(request, 'about_company.html', {'company_name': 'Simple Complex'})
Advanced URLs
A more advanced usage of URL routing is achieved by taking advantage of the regex to match certain types of data and create dynamic URLs.
For example, to create a profile page, like many services do like github.com/vitorfs or twitter.com/vitorfs, where “vitorfs” is my username, we can do the following:
from django.conf.urls import url
from boards import views

urlpatterns = [
    url(r'^/figure>, views.home, name='home'),
    url(r'^(?P<username>[\w.@+-]+)//figure>, views.user_profile, name='user_profile'),
]
This will match all valid usernames for a Django User model.
Now observe that the example above is a very permissive URL. That means it will match lots of URL patterns because it is defined in the root of the URL, with no prefix like /profile//. In this case, if we wanted to define a URL named /about/, we would have do define it before the username URL pattern:
from django.conf.urls import url
from boards import views

urlpatterns = [
    url(r'^/figure>, views.home, name='home'),
    url(r'^about//figure>, views.about, name='about'),
    url(r'^(?P<username>[\w.@+-]+)//figure>, views.user_profile, name='user_profile'),
]
If the “about” page was defined after the username URL pattern, Django would never find it, because the word “about” would match the username regex, and the view user_profile would be processed instead of the about view function.
There are some side effects to that. For example, from now on, we would have to treat “about” as a forbidden username, because if a user picked “about” as their username, this person would never see their profile page.
Sidenote: If you want to design cool URLs for user profiles, the easiest solution to avoid URL collision is by adding a prefix like /u/vitorfs/, or like Medium does /@vitorfs/, where “@” is the prefix.
If you want no prefix at all, consider using a list of forbidden names like this: github.com/shouldbee/reserved-usernames. Or another example is an application I developed when I was learning Django; I created my list at the time: github.com/vitorfs/parsifal/.
Those collisions are very common. Take GitHub for example; they have this URL to list all the repositories you are currently watching: github.com/watching. Someone registered a username on GitHub with the name “watching,” so this person can’t see his profile page. We can see a user with this username exists by trying this URL: github.com/watching/repositories which was supposed to list the user’s repositories, like mine for example github.com/vitorfs/repositories.
The whole idea of this kind of URL routing is to create dynamic pages where part of the URL will be used as an identifier for a certain resource, that will be used to compose a page. This identifier can be an integer ID or a string for example.
Initially, we will be working with the Board ID to create a dynamic page for the Topics. Let’s read again the example I gave at the beginning of the URLs section:
url(r'^boards/(?P<pk>\d+)//figure>, views.board_topics, name='board_topics')
The regex \d+ will match an integer of arbitrary size. This integer will be used to retrieve the Board from the database. Now observe that we wrote the regex as (?P<pk>\d+), this is telling Django to capture the value into a keyword argument named pk.
Here is how we write a view function for it:
def board_topics(request, pk):
    # do something...
Because we used the (?P<pk>\d+) regex, the keyword argument in the board_topics must be named pk.
If we wanted to use any name, we could do it like this:
url(r'^boards/(\d+)//figure>, views.board_topics, name='board_topics')
Then the view function could be defined like this:
def board_topics(request, board_id):
    # do something...
Or like this:
def board_topics(request, id):
    # do something...
The name wouldn’t matter. But it’s a good practice to use named parameters because when we start composing bigger URLs capturing multiple IDs and variables, it will be easier to read.
Sidenote: PK or ID?
PK stands for Primary Key. It’s a shortcut for accessing a model’s primary key. All Django models have this attribute.
For the most cases, using the pk property is the same as id. That’s because if we don’t define a primary key for a model, Django will automatically create an AutoField named id, which will be its primary key.
If you defined a different primary key for a model, for example, let’s say the field email is your primary key. To access it you could either use obj.email or obj.pk.
Using the URLs API
It’s time to write some code. Let’s implement the topic listing page (see Figure 1) I mentioned at the beginning of the URLs section.
First, edit the urls.py adding our new URL route:
myproject/urls.py
from django.conf.urls import url
from django.contrib import admin

from boards import views

urlpatterns = [
    url(r'^/figure>, views.home, name='home'),
    url(r'^boards/(?P<pk>\d+)//figure>, views.board_topics, name='board_topics'),
    url(r'^admin/', admin.site.urls),
]
Now let’s create the view function board_topics:
boards/views.py
from django.shortcuts import render
from .models import Board

def home(request):
    # code suppressed for brevity

def board_topics(request, pk):
    board = Board.objects.get(pk=pk)
    return render(request, 'topics.html', {'board': board})
In the templates folder, create a new template named topics.html:
templates/topics.html
{% load static %}<!DOCTYPE html>
<html>
  <head>
    <meta charset="utf-8">
    <title>{{ board.name }}</title>
    <link rel="stylesheet" href="{% static 'css/bootstrap.min.css' %}">
  </head>
  <body>
    <div class="container">
      <ol class="breadcrumb my-4">
        <li class="breadcrumb-item">Boards</li>
        <li class="breadcrumb-item active">{{ board.name }}</li>
      </ol>
    </div>
  </body>
</html>
Note: For now we are simply creating new HTML templates. No worries, in the following section I will show you how to create reusable templates.
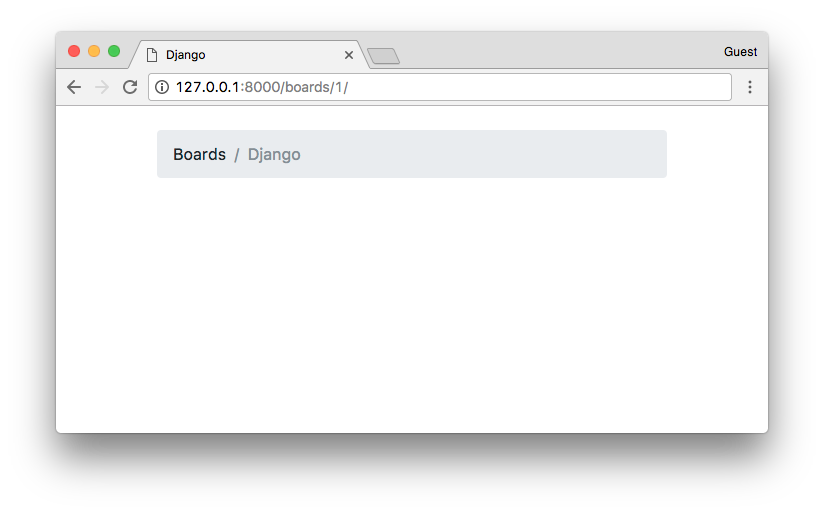
Now check the URL http://127.0.0.1:8000/boards/1/ in a web browser. The result should be the following page:
Time to write some tests! Edit the tests.py file and add the following tests in the bottom of the file:
boards/tests.py
from django.core.urlresolvers import reverse
from django.urls import resolve
from django.test import TestCase
from .views import home, board_topics
from .models import Board

class HomeTests(TestCase):
    # ...

class BoardTopicsTests(TestCase):
    def setUp(self):
        Board.objects.create(name='Django', description='Django board.')

    def test_board_topics_view_success_status_code(self):
        url = reverse('board_topics', kwargs={'pk': 1})
        response = self.client.get(url)
        self.assertEquals(response.status_code, 200)

    def test_board_topics_view_not_found_status_code(self):
        url = reverse('board_topics', kwargs={'pk': 99})
        response = self.client.get(url)
        self.assertEquals(response.status_code, 404)

    def test_board_topics_url_resolves_board_topics_view(self):
        view = resolve('/boards/1/')
        self.assertEquals(view.func, board_topics)
A few things to note here. This time we used the setUp method. In the setup method, we created a Board instance to use in the tests. We have to do that because the Django testing suite doesn’t run your tests against the current database. To run the tests Django creates a new database on the fly, applies all the model migrations, runs the tests, and when done, destroys the testing database.
So in the setUp method, we prepare the environment to run the tests, so to simulate a scenario.
- The
test_board_topics_view_success_status_codemethod: is testing if Django is returning a status code 200 (success) for an existing Board. - The
test_board_topics_view_not_found_status_codemethod: is testing if Django is returning a status code 404 (page not found) for a Board that doesn’t exist in the database. - The
test_board_topics_url_resolves_board_topics_viewmethod: is testing if Django is using the correct view function to render the topics.
Now it’s time to run the tests:
python manage.py test
And the output:
Creating test database for alias 'default'...
System check identified no issues (0 silenced).
.E...
======================================================================
ERROR: test_board_topics_view_not_found_status_code (boards.tests.BoardTopicsTests)
----------------------------------------------------------------------
Traceback (most recent call last):
# ...
boards.models.DoesNotExist: Board matching query does not exist.

----------------------------------------------------------------------
Ran 5 tests in 0.093s

FAILED (errors=1)
Destroying test database for alias 'default'...
The test test_board_topics_view_not_found_status_code failed. We can see in the Traceback it returned an exception “boards.models.DoesNotExist: Board matching query does not exist.”
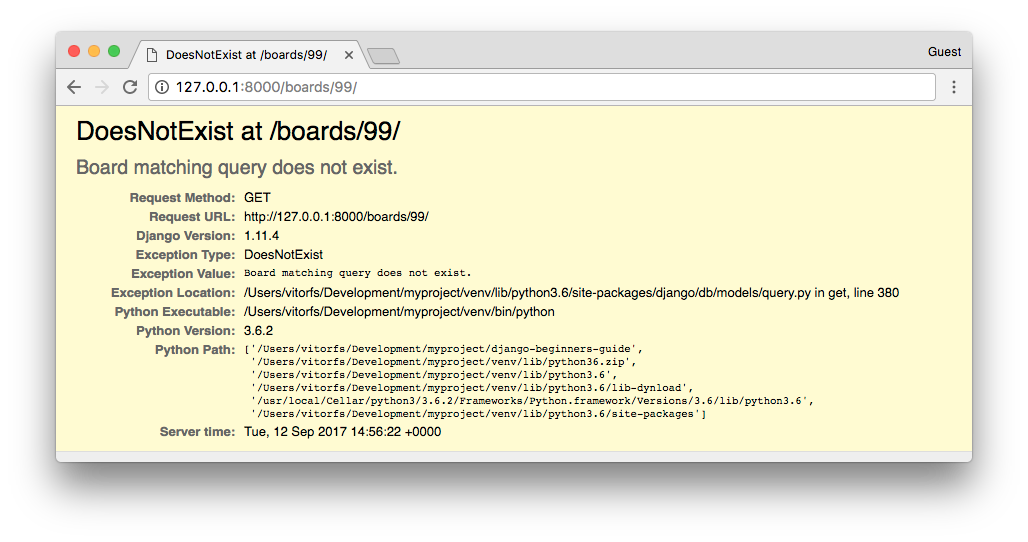
In production with DEBUG=False, the visitor would see a 500 Internal Server Error page. But that’s not the behavior we want.
We want to show a 404 Page Not Found. So let’s refactor our view:
boards/views.py
from django.shortcuts import render
from django.http import Http404
from .models import Board

def home(request):
    # code suppressed for brevity

def board_topics(request, pk):
    try:
        board = Board.objects.get(pk=pk)
    except Board.DoesNotExist:
        raise Http404
    return render(request, 'topics.html', {'board': board})
Let’s test again:
python manage.py test
Creating test database for alias 'default'...
System check identified no issues (0 silenced).
.....
----------------------------------------------------------------------
Ran 5 tests in 0.042s

OK
Destroying test database for alias 'default'...
Yay! Now it’s working as expected.
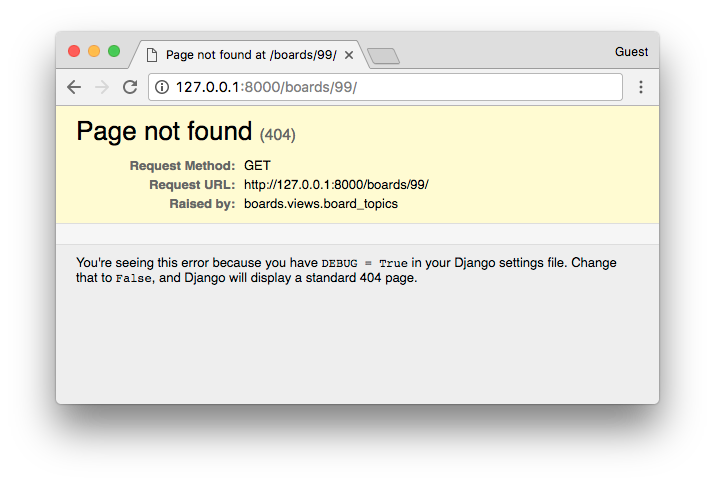
This is the default page Django show while with DEBUG=False. Later on, we can customize the 404 page to show something else.
Now that’s a very common use case. In fact, Django has a shortcut to try to get an object, or return a 404 with the object does not exist.
So let’s refactor the board_topics view again:
from django.shortcuts import render, get_object_or_404
from .models import Board

def home(request):
    # code suppressed for brevity

def board_topics(request, pk):
    board = get_object_or_404(Board, pk=pk)
    return render(request, 'topics.html', {'board': board})
Changed the code? Test it.
python manage.py test
Creating test database for alias 'default'...
System check identified no issues (0 silenced).
.....
----------------------------------------------------------------------
Ran 5 tests in 0.052s

OK
Destroying test database for alias 'default'...
Didn’t break anything. We can proceed with the development.
The next step now is to create the navigation links in the screens. The homepage should have a link to take the visitor to the topics page of a given Board. Similarly, the topics page should have a link back to the homepage.
We can start by writing some tests for the HomeTests class:
boards/tests.py
class HomeTests(TestCase):
    def setUp(self):
        self.board = Board.objects.create(name='Django', description='Django board.')
        url = reverse('home')
        self.response = self.client.get(url)

    def test_home_view_status_code(self):
        self.assertEquals(self.response.status_code, 200)

    def test_home_url_resolves_home_view(self):
        view = resolve('/')
        self.assertEquals(view.func, home)

    def test_home_view_contains_link_to_topics_page(self):
        board_topics_url = reverse('board_topics', kwargs={'pk': self.board.pk})
        self.assertContains(self.response, 'href="{0}"'.format(board_topics_url))
Observe that now we added a setUp method for the HomeTests as well. That’s because now we are going to need a Board instance and also we moved the url and response to the setUp, so we can reuse the same response in the new test.
The new test here is the test_home_view_contains_link_to_topics_page. Here we are using the assertContains method to test if the response body contains a given text. The text we are using in the test, is the href part of an a tag. So basically we are testing if the response body has the text href="/boards/1/".
Let’s run the tests:
python manage.py test
Creating test database for alias 'default'...
System check identified no issues (0 silenced).
....F.
======================================================================
FAIL: test_home_view_contains_link_to_topics_page (boards.tests.HomeTests)
----------------------------------------------------------------------
# ...

AssertionError: False is not true : Couldn't find 'href="/boards/1/"' in response

----------------------------------------------------------------------
Ran 6 tests in 0.034s

FAILED (failures=1)
Destroying test database for alias 'default'...
Now we can write the code that will make this test pass.
Edit the home.html template:
templates/home.html
<!-- code suppressed for brevity -->
<tbody>
  {% for board in boards %}
    <tr>
      <td>
        <a href="{% url 'board_topics' board.pk %}">{{ board.name }}</a>
        <small class="text-muted d-block">{{ board.description }}</small>
      </td>
      <td class="align-middle">0</td>
      <td class="align-middle">0</td>
      <td></td>
    </tr>
  {% endfor %}
</tbody>
<!-- code suppressed for brevity -->
So basically we changed the line:
{{ board.name }}
To:
<a href="{% url 'board_topics' board.pk %}">{{ board.name }}</a>
Always use the {% url %} template tag to compose the applications URLs. The first parameter is the name of the URL (defined in the URLconf, i.e., the urls.py), then you can pass an arbitrary number of arguments as needed.
If it were a simple URL, like the homepage, it would be just {% url 'home' %}.
Save the file and run the tests again:
python manage.py test
Creating test database for alias 'default'...
System check identified no issues (0 silenced).
......
----------------------------------------------------------------------
Ran 6 tests in 0.037s

OK
Destroying test database for alias 'default'...
Good! Now we can check how it looks in the web browser:
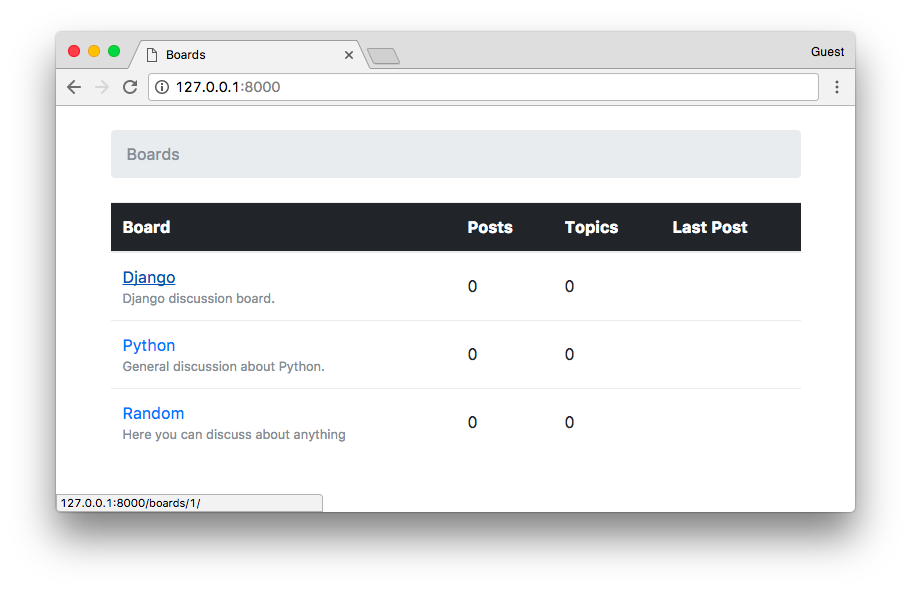
Now the link back. We can write the test first:
boards/tests.py
class BoardTopicsTests(TestCase):
    # code suppressed for brevity...

    def test_board_topics_view_contains_link_back_to_homepage(self):
        board_topics_url = reverse('board_topics', kwargs={'pk': 1})
        response = self.client.get(board_topics_url)
        homepage_url = reverse('home')
        self.assertContains(response, 'href="{0}"'.format(homepage_url))
Run the tests:
python manage.py test
Creating test database for alias 'default'...
System check identified no issues (0 silenced).
.F.....
======================================================================
FAIL: test_board_topics_view_contains_link_back_to_homepage (boards.tests.BoardTopicsTests)
----------------------------------------------------------------------
Traceback (most recent call last):
# ...

AssertionError: False is not true : Couldn't find 'href="/"' in response

----------------------------------------------------------------------
Ran 7 tests in 0.054s

FAILED (failures=1)
Destroying test database for alias 'default'...
Update the board topics template:
templates/topics.html
{% load static %}<!DOCTYPE html>
<html>
  <head><!-- code suppressed for brevity --></head>
  <body>
    <div class="container">
      <ol class="breadcrumb my-4">
        <li class="breadcrumb-item"><a href="{% url 'home' %}">Boards</a></li>
        <li class="breadcrumb-item active">{{ board.name }}</li>
      </ol>
    </div>
  </body>
</html>
Run the tests:
python manage.py test
Creating test database for alias 'default'...
System check identified no issues (0 silenced).
.......
----------------------------------------------------------------------
Ran 7 tests in 0.061s

OK
Destroying test database for alias 'default'...
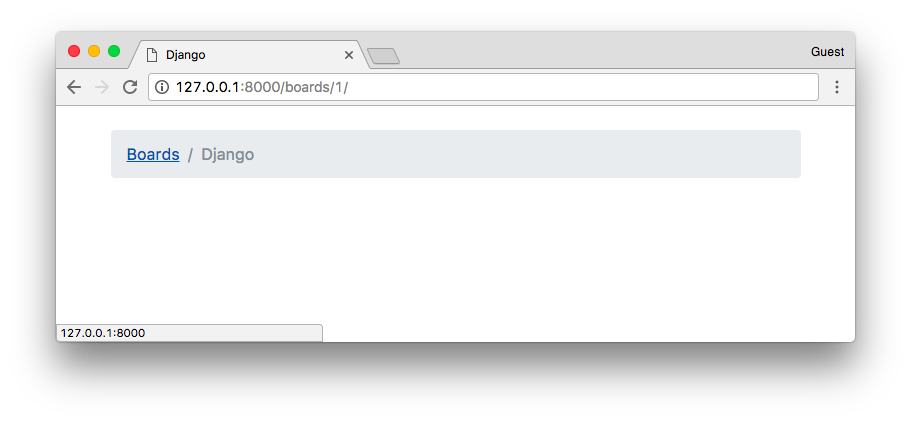
As I mentioned before, URL routing is a fundamental part of a web application. With this knowledge, we should be able to proceed with the development. Next, to complete the section about URLs, you will find a summary of useful URL patterns.
List of Useful URL Patterns
The trick part is the regex. So I prepared a list of the most used URL patterns. You can always refer to this list when you need a specific URL.

You can find more details about those patterns in this post: List of Useful URL Patterns.
Reusable Templates
Until now we’ve been copying and pasting HTML repeating several parts of the HTML document, which is not very sustainable in the long run. It’s also a bad practice.
In this section we are going to refactor our HTML templates, creating a master page and only adding the unique part for each template.
Create a new file named base.html in the templates folder:
templates/base.html
{% load static %}<!DOCTYPE html>
<html>
  <head>
    <meta charset="utf-8">
    <title>{% block title %}Django Boards{% endblock %}</title>
    <link rel="stylesheet" href="{% static 'css/bootstrap.min.css' %}">
  </head>
  <body>
    <div class="container">
      <ol class="breadcrumb my-4">
        {% block breadcrumb %}
        {% endblock %}
      </ol>
      {% block content %}
      {% endblock %}
    </div>
  </body>
</html>
This is going to be our master page. Every template we create, is going to extend this special template. Observe now we introduced the {% block %} tag. It is used to reserve a space in the template, which a “child” template (which extends the master page) can insert code and HTML within that space.
In the case of the {% block title %} we are also setting a default value, which is “Django Boards.” It will be used if we don’t set a value for the {% block title %} in a child template.
Now let’s refactor our two templates: home.html and topics.html.
templates/home.html
{% extends 'base.html' %}

{% block breadcrumb %}
  <li class="breadcrumb-item active">Boards</li>
{% endblock %}

{% block content %}
  <table class="table">
    <thead class="thead-inverse">
      <tr>
        <th>Board</th>
        <th>Posts</th>
        <th>Topics</th>
        <th>Last Post</th>
      </tr>
    </thead>
    <tbody>
      {% for board in boards %}
        <tr>
          <td>
            <a href="{% url 'board_topics' board.pk %}">{{ board.name }}</a>
            <small class="text-muted d-block">{{ board.description }}</small>
          </td>
          <td class="align-middle">0</td>
          <td class="align-middle">0</td>
          <td></td>
        </tr>
      {% endfor %}
    </tbody>
  </table>
{% endblock %}
The first line in the home.html template is {% extends 'base.html' %}. This tag is telling Django to use the base.html template as a master page. After that, we are using the the blocks to put the unique content of the page.
templates/topics.html
{% extends 'base.html' %}

{% block title %}
  {{ board.name }} - {{ block.super }}
{% endblock %}

{% block breadcrumb %}
  <li class="breadcrumb-item"><a href="{% url 'home' %}">Boards</a></li>
  <li class="breadcrumb-item active">{{ board.name }}</li>
{% endblock %}

{% block content %}
    <!-- just leaving it empty for now. we will add core here soon. -->
{% endblock %}
In the topics.html template, we are changing the {% block title %} default value. Notice that we can reuse the default value of the block by calling {{ block.super }}. So here we are playing with the website title, which we defined in the base.html as “Django Boards.” So for the “Python” board page, the title will be “Python - Django Boards,” for the “Random” board the title will be “Random - Django Boards.”
Now let’s run the tests and see we didn’t break anything:
python manage.py test
Creating test database for alias 'default'...
System check identified no issues (0 silenced).
.......
----------------------------------------------------------------------
Ran 7 tests in 0.067s

OK
Destroying test database for alias 'default'...
Great! Everything is looking good.
Now that we have the base.html template, we can easily add a top bar with a menu:
templates/base.html
{% load static %}<!DOCTYPE html>
<html>
  <head>
    <meta charset="utf-8">
    <title>{% block title %}Django Boards{% endblock %}</title>
    <link rel="stylesheet" href="{% static 'css/bootstrap.min.css' %}">
  </head>
  <body>

    <nav class="navbar navbar-expand-lg navbar-dark bg-dark">
      <div class="container">
        <a class="navbar-brand" href="{% url 'home' %}">Django Boards</a>
      </div>
    </nav>

    <div class="container">
      <ol class="breadcrumb my-4">
        {% block breadcrumb %}
        {% endblock %}
      </ol>
      {% block content %}
      {% endblock %}
    </div>
  </body>
</html>
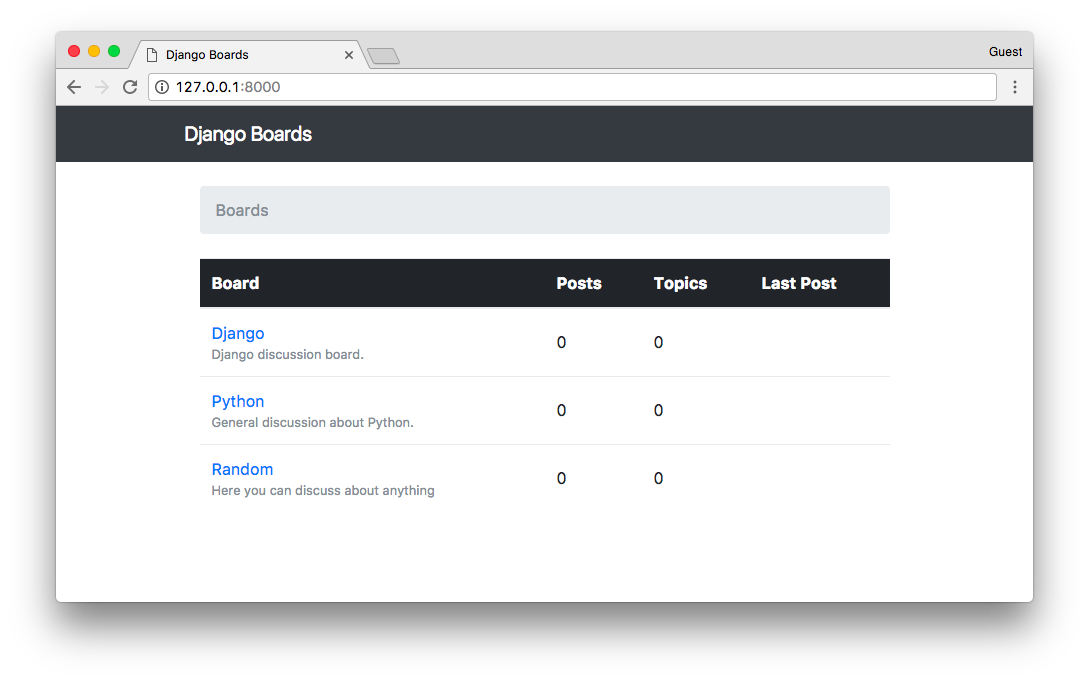
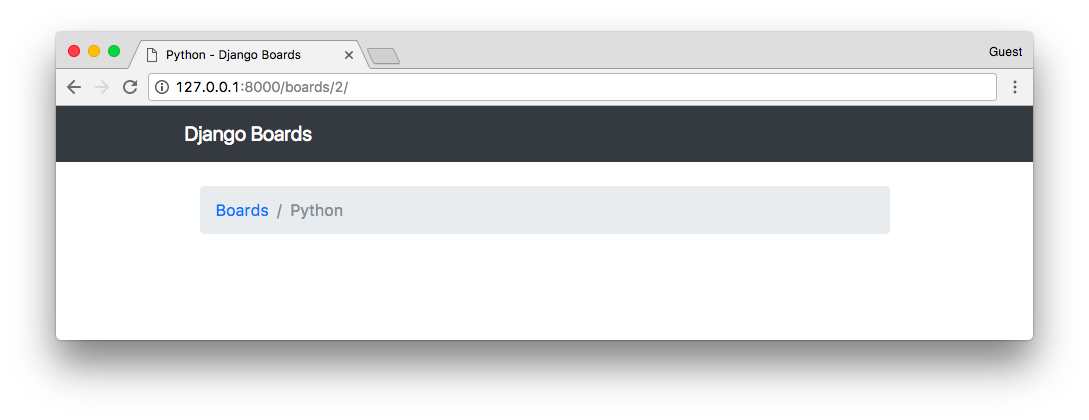
The HTML I used is part of the Bootstrap 4 Navbar Component.
A nice touch I like to add is to change the font in the “logo” (.navbar-brand) of the page.
Go to fonts.google.com, type “Django Boards” or whatever name you gave to your project then click on apply to all fonts. Browse a bit, find one that you like.
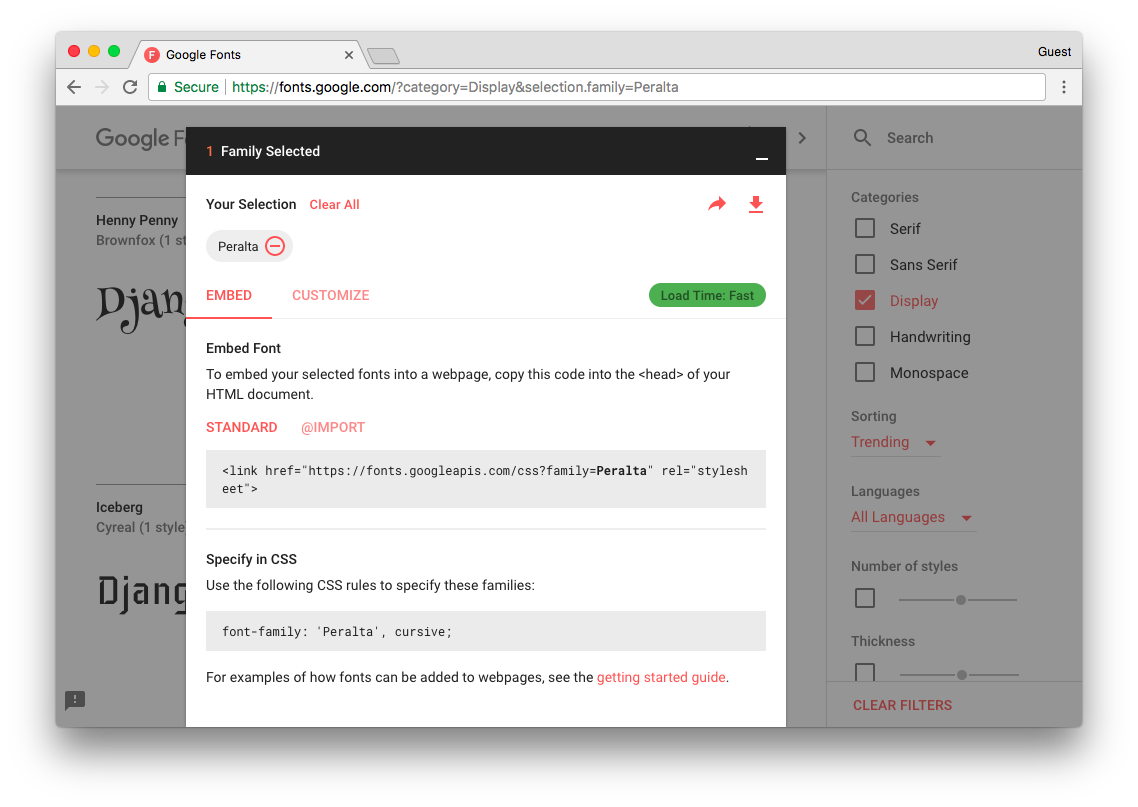
Add the font in the base.html template:
{% load static %}<!DOCTYPE html>
<html>
  <head>
    <meta charset="utf-8">
    <title>{% block title %}Django Boards{% endblock %}</title>
    <link href="https://fonts.googleapis.com/css?family=Peralta" rel="stylesheet">
    <link rel="stylesheet" href="{% static 'css/bootstrap.min.css' %}">
    <link rel="stylesheet" href="{% static 'css/app.css' %}">
  </head>
  <body>
    <!-- code suppressed for brevity -->
  </body>
</html>
Now create a new CSS file named app.css inside the static/css folder:
static/css/app.css
.navbar-brand {
  font-family: 'Peralta', cursive;
}
![]()
Forms
Forms are used to deal with user input. It’s a very common task in any web application or website. The standard way to do it is through HTML forms, where the user input some data, submit it to the server, and then the server does something with it.
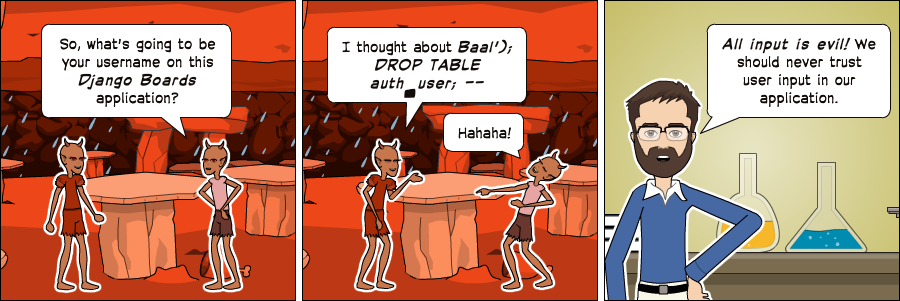
Form processing is a fairly complex task because it involves interacting with many layers of an application. There are also many issues to take care of. For example, all data submitted to the server comes in a string format, so we have to transform it into a proper data type (integer, float, date, etc.) before doing anything with it. We have to validate the data regarding the business logic of the application. We also have to clean, sanitize the data properly so to avoid security issues such as SQL Injection and XSS attacks.
Good news is that the Django Forms API makes the whole process a lot easier, automating a good chunk of this work. Also, the final result is a much more secure code than most programmers would be able to implement by themselves. So, no matter how simple the HTML form is, always use the forms API.
How Not Implement a Form
At first, I thought about jumping straight to the forms API. But I think it would be a good idea for us to spend some time trying to understand the underlying details of form processing. Otherwise, it will end up looking like magic, which is a bad thing, because when things go wrong, you have no idea where to look for the problem.
With a deeper understanding of some programming concepts, we can feel more in control of the situation. Being in control is important because it let us write code with more confidence. The moment we know exactly what is going on, it’s much easier to implement a code of predictable behavior. It’s also a lot easier to debug and find errors because you know where to look.
Anyway, let’s start by implementing the form below:

It’s one of the wireframes we drew in the previous tutorial. I now realize this may be a bad example to start because this particular form involves processing data of two different models: Topic (subject) and Post (message).
There’s another important aspect that we haven’t discussed it so far, which is user authentication. We are only supposed to show this screen for authenticated users. This way we can tell who created a Topic or a Post.
So let’s abstract some details for now and focus on understanding how to save user input in the database.
First thing, let’s create a new URL route named new_topic:
myproject/urls.py
from django.conf.urls import url
from django.contrib import admin

from boards import views

urlpatterns = [
    url(r'^/figure>, views.home, name='home'),
    url(r'^boards/(?P<pk>\d+)//figure>, views.board_topics, name='board_topics'),
    url(r'^boards/(?P<pk>\d+)/new//figure>, views.new_topic, name='new_topic'),
    url(r'^admin/', admin.site.urls),
]
The way we are building the URL will help us identify the correct Board.
Now let’s create the new_topic view function:
boards/views.py
from django.shortcuts import render, get_object_or_404
from .models import Board

def new_topic(request, pk):
    board = get_object_or_404(Board, pk=pk)
    return render(request, 'new_topic.html', {'board': board})
For now, the new_topic view function is looking exactly the same as the board_topics. That’s on purpose, let’s take a step at a time.
Now we just need a template named new_topic.html to see some code working:
templates/new_topic.html
{% extends 'base.html' %}

{% block title %}Start a New Topic{% endblock %}

{% block breadcrumb %}
  <li class="breadcrumb-item"><a href="{% url 'home' %}">Boards</a></li>
  <li class="breadcrumb-item"><a href="{% url 'board_topics' board.pk %}">{{ board.name }}</a></li>
  <li class="breadcrumb-item active">New topic</li>
{% endblock %}

{% block content %}

{% endblock %}
For now we just have the breadcrumb assuring the navigation. Observe that we included the URL back to the board_topics view.
Open the URL http://127.0.0.1:8000/boards/1/new/. The result, for now, is the following page:
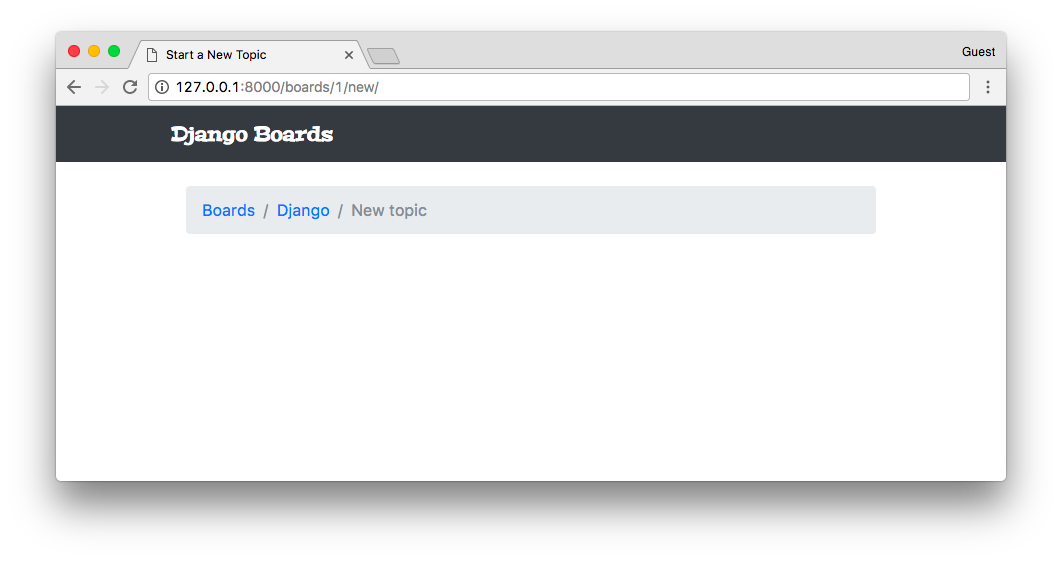
We still haven’t implemented a way to reach this new page, but if we change the URL to http://127.0.0.1:8000/boards/2/new/, it should take us to the Python Board:
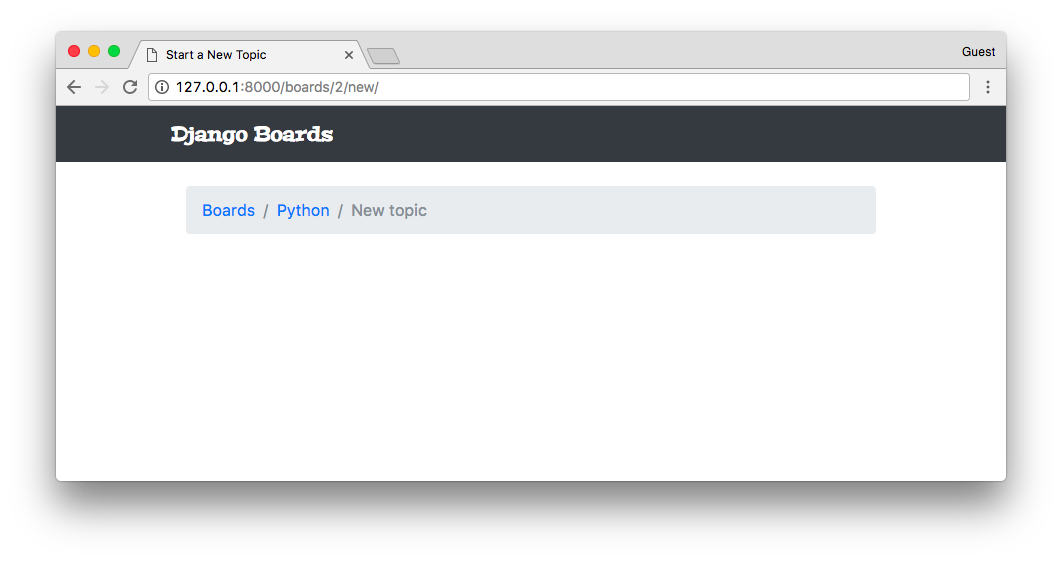
Note:
The result may be different for you if you haven’t followed the steps from the previous tutorial. In my case, I have three Board instances in the database, being Django = 1, Python = 2, and Random = 3. Those numbers are the IDs from the database, used from the URL to identify the right resource.
We can already add some tests:
boards/tests.py
from django.core.urlresolvers import reverse
from django.urls import resolve
from django.test import TestCase
from .views import home, board_topics, new_topic
from .models import Board

class HomeTests(TestCase):
    # ...

class BoardTopicsTests(TestCase):
    # ...

class NewTopicTests(TestCase):
    def setUp(self):
        Board.objects.create(name='Django', description='Django board.')

    def test_new_topic_view_success_status_code(self):
        url = reverse('new_topic', kwargs={'pk': 1})
        response = self.client.get(url)
        self.assertEquals(response.status_code, 200)

    def test_new_topic_view_not_found_status_code(self):
        url = reverse('new_topic', kwargs={'pk': 99})
        response = self.client.get(url)
        self.assertEquals(response.status_code, 404)

    def test_new_topic_url_resolves_new_topic_view(self):
        view = resolve('/boards/1/new/')
        self.assertEquals(view.func, new_topic)

    def test_new_topic_view_contains_link_back_to_board_topics_view(self):
        new_topic_url = reverse('new_topic', kwargs={'pk': 1})
        board_topics_url = reverse('board_topics', kwargs={'pk': 1})
        response = self.client.get(new_topic_url)
        self.assertContains(response, 'href="{0}"'.format(board_topics_url))
A quick summary of the tests of our new class NewTopicTests:
- setUp: creates a Board instance to be used during the tests
- test_new_topic_view_success_status_code: check if the request to the view is successful
- test_new_topic_view_not_found_status_code: check if the view is raising a 404 error when the Board does not exist
- test_new_topic_url_resolves_new_topic_view: check if the right view is being used
- test_new_topic_view_contains_link_back_to_board_topics_view: ensure the navigation back to the list of topics
Run the tests:
python manage.py test
Creating test database for alias 'default'...
System check identified no issues (0 silenced).
...........
----------------------------------------------------------------------
Ran 11 tests in 0.076s

OK
Destroying test database for alias 'default'...
Good, now it’s time to start creating the form.
templates/new_topic.html
{% extends 'base.html' %}

{% block title %}Start a New Topic{% endblock %}

{% block breadcrumb %}
  <li class="breadcrumb-item"><a href="{% url 'home' %}">Boards</a></li>
  <li class="breadcrumb-item"><a href="{% url 'board_topics' board.pk %}">{{ board.name }}</a></li>
  <li class="breadcrumb-item active">New topic</li>
{% endblock %}

{% block content %}
  <form method="post">
    {% csrf_token %}
    <div class="form-group">
      <label for="id_subject">Subject</label>
      <input type="text" class="form-control" id="id_subject" name="subject">
    </div>
    <div class="form-group">
      <label for="id_message">Message</label>
      <textarea class="form-control" id="id_message" name="message" rows="5"></textarea>
    </div>
    <button type="submit" class="btn btn-success">Post</button>
  </form>
{% endblock %}
This is a raw HTML form created by hand using the CSS classes provided by Bootstrap 4. It looks like this:
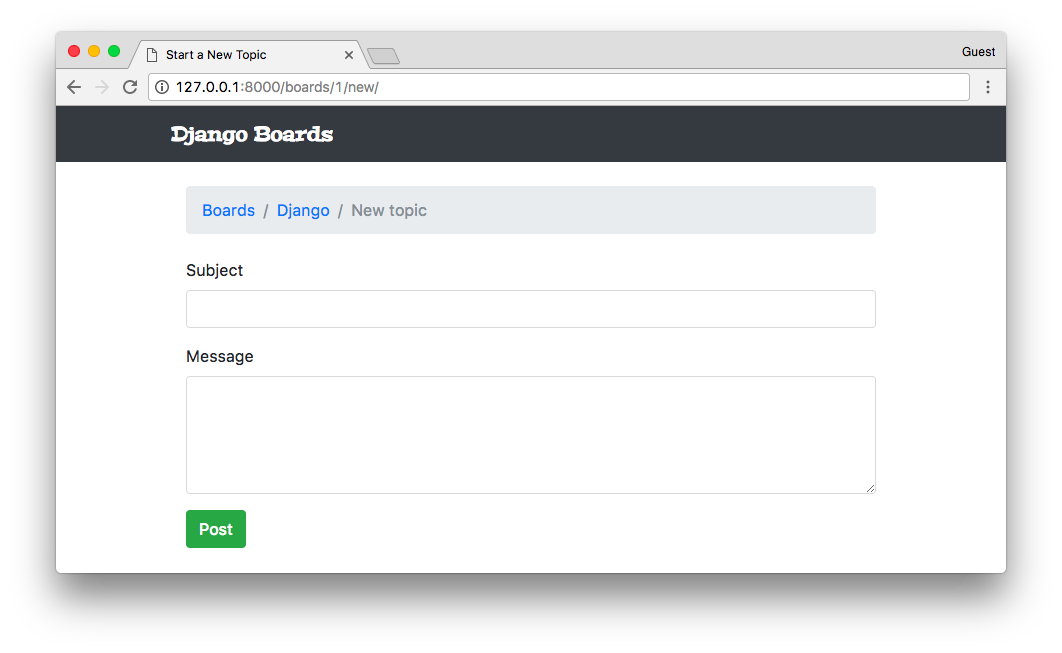
In the <form> tag, we have to define the method attribute. This instructs the browser on how we want to communicate with the server. The HTTP spec defines several request methods (verbs). But for the most part, we will only be using GET and POST request types.
GET is perhaps the most common request type. It’s used to retrieve data from the server. Every time you click on a link or type a URL directly into the browser, you are creating a GET request.
POST is used when we want to change data on the server. So, generally speaking, every time we send data to the server that will result in a change in the state of a resource, we should always send it via POST request.
Django protects all POST requests using a CSRF Token (Cross-Site Request Forgery Token). It’s a security measure to avoid external sites or applications to submit data to our application. Every time the application receives a POST, it will first look for the CSRF Token. If the request has no token, or the token is invalid, it will discard the posted data.
The result of the csrf_token template tag:
{% csrf_token %}
Is a hidden field that’s submitted along with the other form data:
<input type="hidden" name="csrfmiddlewaretoken" value="jG2o6aWj65YGaqzCpl0TYTg5jn6SctjzRZ9KmluifVx0IVaxlwh97YarZKs54Y32">
Another thing, we have to set the name of the HTML inputs. The name will be used to retrieve the data on the server side.
<input type="text" class="form-control" id="id_subject" name="subject">
<textarea class="form-control" id="id_message" name="message" rows="5"></textarea>
Here is how we retrieve the data:
subject = request.POST['subject']
message = request.POST['message']
So, a naïve implementation of a view that grabs the data from the HTML and starts a new topic can be written like this:
from django.contrib.auth.models import User
from django.shortcuts import render, redirect, get_object_or_404
from .models import Board, Topic, Post

def new_topic(request, pk):
    board = get_object_or_404(Board, pk=pk)

    if request.method == 'POST':
        subject = request.POST['subject']
        message = request.POST['message']

        user = User.objects.first()  # TODO: get the currently logged in user

        topic = Topic.objects.create(
            subject=subject,
            board=board,
            starter=user
        )

        post = Post.objects.create(
            message=message,
            topic=topic,
            created_by=user
        )

        return redirect('board_topics', pk=board.pk)  # TODO: redirect to the created topic page

    return render(request, 'new_topic.html', {'board': board})
This view is only considering the happy path, which is receiving the data and saving it into the database. But there are some missing parts. We are not validating the data. The user could submit an empty form or a subject that’s bigger than 255 characters.
So far we are hard-coding the User fields because we haven’t implemented the authentication yet. But there’s an easy way to identify the logged in user. We will get to that part in the next tutorial. Also, we haven’t implemented the view where we will list all the posts within a topic, so upon success, we are redirecting the user to the page where we list all the board topics.
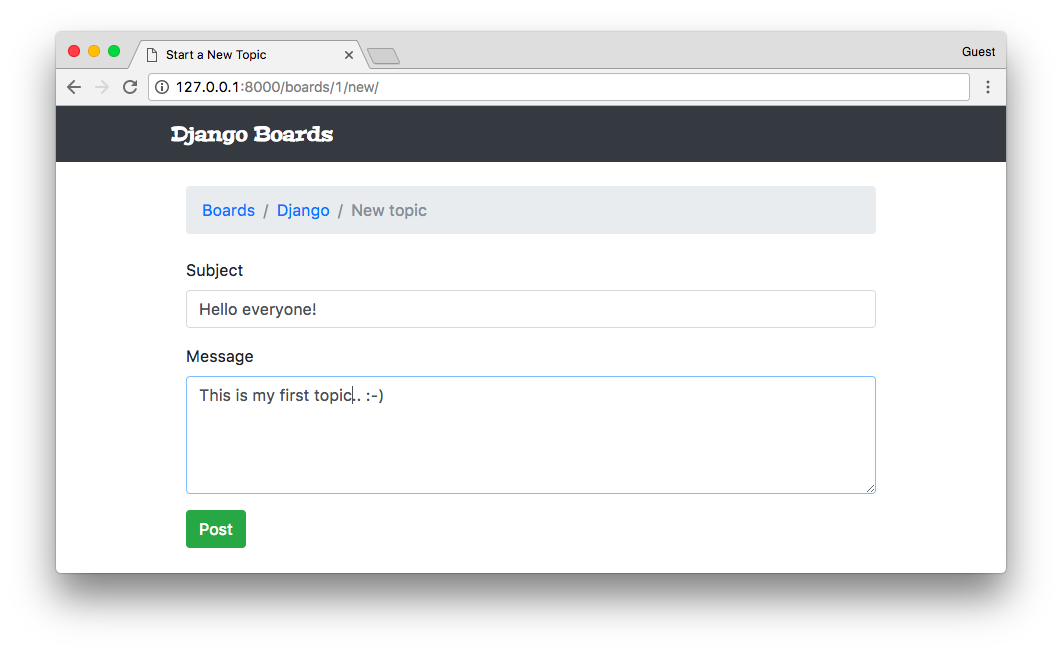
Submitted the form clicking on the Post button:
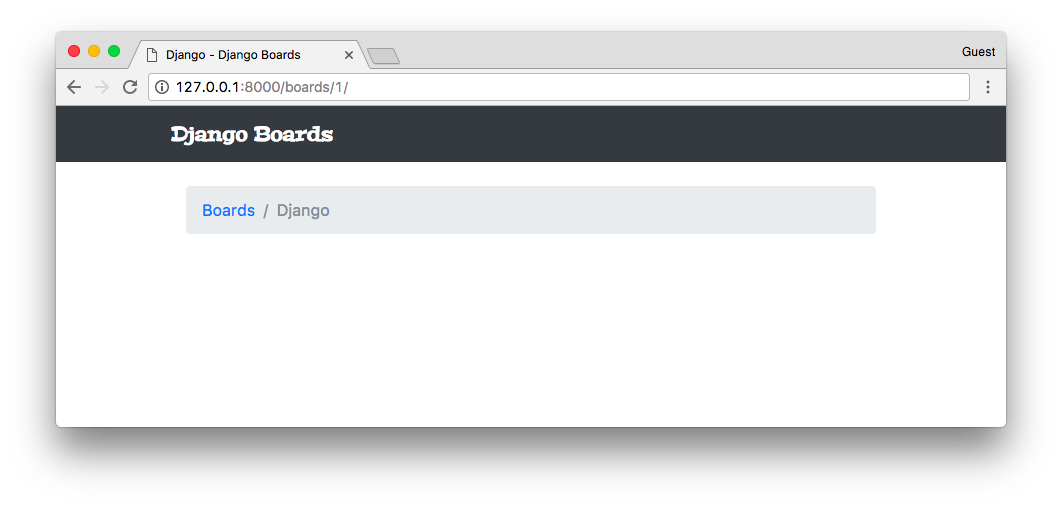
It looks like it worked. But we haven’t implemented the topics listing yet, so there’s nothing to see here. Let’s edit the templates/topics.html file to do a proper listing:
templates/topics.html
{% extends 'base.html' %}

{% block title %}
  {{ board.name }} - {{ block.super }}
{% endblock %}

{% block breadcrumb %}
  <li class="breadcrumb-item"><a href="{% url 'home' %}">Boards</a></li>
  <li class="breadcrumb-item active">{{ board.name }}</li>
{% endblock %}

{% block content %}
  <table class="table">
    <thead class="thead-inverse">
      <tr>
        <th>Topic</th>
        <th>Starter</th>
        <th>Replies</th>
        <th>Views</th>
        <th>Last Update</th>
      </tr>
    </thead>
    <tbody>
      {% for topic in board.topics.all %}
        <tr>
          <td>{{ topic.subject }}</td>
          <td>{{ topic.starter.username }}</td>
          <td>0</td>
          <td>0</td>
          <td>{{ topic.last_updated }}</td>
        </tr>
      {% endfor %}
    </tbody>
  </table>
{% endblock %}
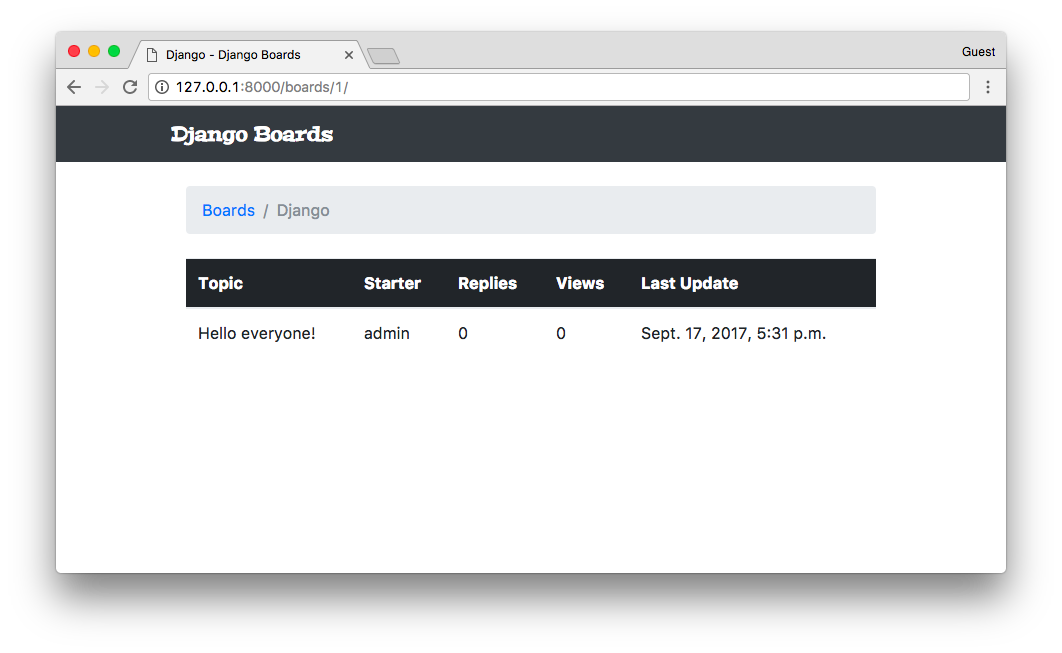
Yep! The Topic we created is here.
Two new concepts here:
We are using for the first time the topics property in the Board model. The topics property is created automatically by Django using a reverse relationship. In the previous steps, we created a Topic instance:
def new_topic(request, pk):
    board = get_object_or_404(Board, pk=pk)

    # ...

    topic = Topic.objects.create(
        subject=subject,
        board=board,
        starter=user
    )
In the line board=board, we set the board field in Topic model, which is a ForeignKey(Board). With that, now our Board instance is aware that it has an Topic instance associated with it.
The reason why we used board.topics.all instead of just board.topics is because board.topics is a Related Manager, which is pretty much similar to a Model Manager, usually available on the board.objects property. So, to return all topics associated with a given board, we have to run board.topics.all(). To filter some data, we could do board.topics.filter(subject__contains='Hello').
Another important thing to note is that, inside Python code, we have to use parenthesis: board.topics.all(), because all() is a method. When writing code using the Django Template Language, in an HTML template file, we don’t use parenthesis, so it’s just board.topics.all.
The second thing is that we are making use of a ForeignKey:
{{ topic.starter.username }}
Just create a path through the property using dots. We can pretty much access any property of the User model. If we wanted the user’s email, we could use topic.starter.email.
Since we are already modifying the topics.html template, let’s create the button that takes us to the new topic screen:
templates/topics.html
{% block content %}
  <div class="mb-4">
    <a href="{% url 'new_topic' board.pk %}" class="btn btn-primary">New topic</a>
  </div>

  <table class="table">
    <!-- code suppressed for brevity -->
  </table>
{% endblock %}
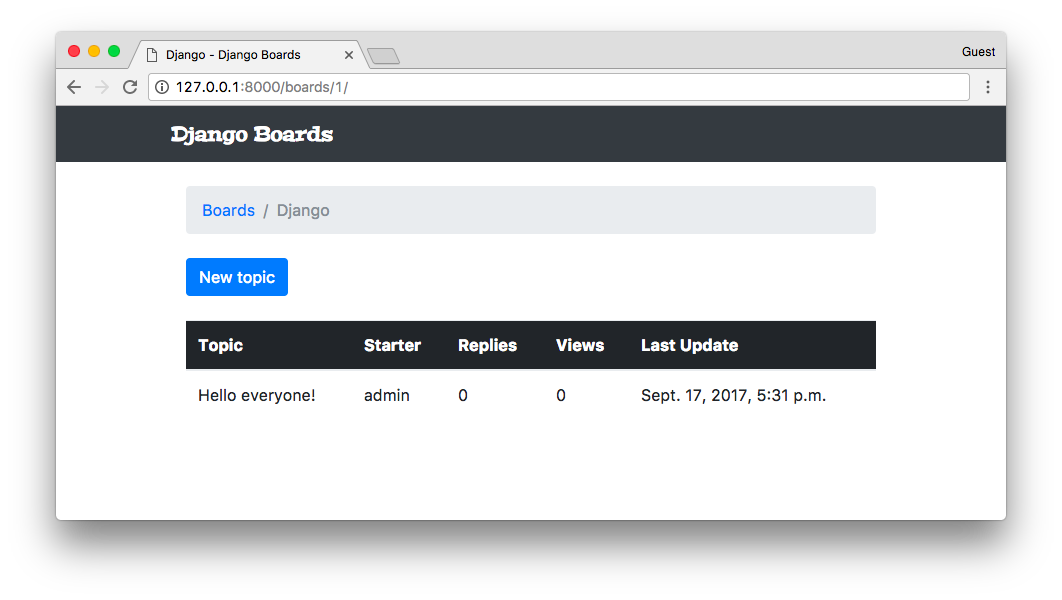
We can include a test to make sure the user can reach the New topic view from this page:
boards/tests.py
class BoardTopicsTests(TestCase):
    # ...

    def test_board_topics_view_contains_navigation_links(self):
        board_topics_url = reverse('board_topics', kwargs={'pk': 1})
        homepage_url = reverse('home')
        new_topic_url = reverse('new_topic', kwargs={'pk': 1})

        response = self.client.get(board_topics_url)

        self.assertContains(response, 'href="{0}"'.format(homepage_url))
        self.assertContains(response, 'href="{0}"'.format(new_topic_url))
Basically here I renamed the old test_board_topics_view_contains_link_back_to_homepage method and add an extra assertContains. This test is now responsible for making sure our view contains the required navigation links.
Testing The Form View
Before we code the previous form example in a Django way, let’s write some tests for the form processing:
boards/tests.py
''' new imports below '''
from django.contrib.auth.models import User
from .views import new_topic
from .models import Board, Topic, Post

class NewTopicTests(TestCase):
    def setUp(self):
        Board.objects.create(name='Django', description='Django board.')
        User.objects.create_user(username='john', email='john@doe.com', password='123')  # <- included this line here

    # ...

    def test_csrf(self):
        url = reverse('new_topic', kwargs={'pk': 1})
        response = self.client.get(url)
        self.assertContains(response, 'csrfmiddlewaretoken')

    def test_new_topic_valid_post_data(self):
        url = reverse('new_topic', kwargs={'pk': 1})
        data = {
            'subject': 'Test title',
            'message': 'Lorem ipsum dolor sit amet'
        }
        response = self.client.post(url, data)
        self.assertTrue(Topic.objects.exists())
        self.assertTrue(Post.objects.exists())

    def test_new_topic_invalid_post_data(self):
        '''
        Invalid post data should not redirect
        The expected behavior is to show the form again with validation errors
        '''
        url = reverse('new_topic', kwargs={'pk': 1})
        response = self.client.post(url, {})
        self.assertEquals(response.status_code, 200)

    def test_new_topic_invalid_post_data_empty_fields(self):
        '''
        Invalid post data should not redirect
        The expected behavior is to show the form again with validation errors
        '''
        url = reverse('new_topic', kwargs={'pk': 1})
        data = {
            'subject': '',
            'message': ''
        }
        response = self.client.post(url, data)
        self.assertEquals(response.status_code, 200)
        self.assertFalse(Topic.objects.exists())
        self.assertFalse(Post.objects.exists())
First thing, the tests.py file is already starting to get big. We will improve it soon, breaking the tests into several files. But for now, let’s keep working on it.
- setUp: included the
User.objects.create_userto create a User instance to be used in the tests - test_csrf: since the CSRF Token is a fundamental part of processing POST requests, we have to make sure our HTML contains the token.
- test_new_topic_valid_post_data: sends a valid combination of data and check if the view created a Topic instance and a Post instance.
- test_new_topic_invalid_post_data: here we are sending an empty dictionary to check how the application is behaving.
- test_new_topic_invalid_post_data_empty_fields: similar to the previous test, but this time we are sending some data. The application is expected to validate and reject empty subject and message.
Let’s run the tests:
python manage.py test
Creating test database for alias 'default'...
System check identified no issues (0 silenced).
........EF.....
======================================================================
ERROR: test_new_topic_invalid_post_data (boards.tests.NewTopicTests)
----------------------------------------------------------------------
Traceback (most recent call last):
...
django.utils.datastructures.MultiValueDictKeyError: "'subject'"

======================================================================
FAIL: test_new_topic_invalid_post_data_empty_fields (boards.tests.NewTopicTests)
----------------------------------------------------------------------
Traceback (most recent call last):
  File "/Users/vitorfs/Development/myproject/django-beginners-guide/boards/tests.py", line 115, in test_new_topic_invalid_post_data_empty_fields
    self.assertEquals(response.status_code, 200)
AssertionError: 302 != 200

----------------------------------------------------------------------
Ran 15 tests in 0.512s

FAILED (failures=1, errors=1)
Destroying test database for alias 'default'...
We have one failing test and one error. Both related to invalid user input. Instead of trying to fix it with the current implementation, let’s make those tests pass using the Django Forms API.
Creating Forms The Right Way
So, we came a long way since we started working with Forms. Finally, it’s time to use the Forms API.
The Forms API is available in the module django.forms. Django works with two types of forms: forms.Form and forms.ModelForm. The Form class is a general purpose form implementation. We can use it to process data that are not directly associated with a model in our application. A ModelForm is a subclass of Form, and it’s associated with a model class.
Let’s create a new file named forms.py inside the boards’ folder:
boards/forms.py
from django import forms
from .models import Topic

class NewTopicForm(forms.ModelForm):
    message = forms.CharField(widget=forms.Textarea(), max_length=4000)

    class Meta:
        model = Topic
        fields = ['subject', 'message']
This is our first form. It’s a ModelForm associated with the Topic model. The subject in the fields list inside the Meta class is referring to the subject field in the Topic class. Now observe that we are defining an extra field named message. This refers to the message in the Post we want to save.
Now we have to refactor our views.py:
boards/views.py
from django.contrib.auth.models import User
from django.shortcuts import render, redirect, get_object_or_404
from .forms import NewTopicForm
from .models import Board, Topic, Post

def new_topic(request, pk):
    board = get_object_or_404(Board, pk=pk)
    user = User.objects.first()  # TODO: get the currently logged in user
    if request.method == 'POST':
        form = NewTopicForm(request.POST)
        if form.is_valid():
            topic = form.save(commit=False)
            topic.board = board
            topic.starter = user
            topic.save()
            post = Post.objects.create(
                message=form.cleaned_data.get('message'),
                topic=topic,
                created_by=user
            )
            return redirect('board_topics', pk=board.pk)  # TODO: redirect to the created topic page
    else:
        form = NewTopicForm()
    return render(request, 'new_topic.html', {'board': board, 'form': form})
This is how we use the forms in a view. Let me remove the extra noise so we can focus on the core of the form processing:
if request.method == 'POST':
    form = NewTopicForm(request.POST)
    if form.is_valid():
        topic = form.save()
        return redirect('board_topics', pk=board.pk)
else:
    form = NewTopicForm()
return render(request, 'new_topic.html', {'form': form})
First we check if the request is a POST or a GET. If the request came from a POST, it means the user is submitting some data to the server. So we instantiate a form instance passing the POST data to the form: form = NewTopicForm(request.POST).
Then, we ask Django to verify the data, check if the form is valid if we can save it in the database: if form.is_valid():. If the form was valid, we proceed to save the data in the database using form.save(). The save() method returns an instance of the Model saved into the database. So, since this is a Topic form, it will return the Topic that was created: topic = form.save(). After that, the common path is to redirect the user somewhere else, both to avoid the user re-submitting the form by pressing F5 and also to keep the flow of the application.
Now, if the data was invalid, Django will add a list of errors to the form. After that, the view does nothing and returns in the last statement: return render(request, 'new_topic.html', {'form': form}). That means we have to update the new_topic.html to display errors properly.
If the request was a GET, we just initialize a new and empty form using form = NewTopicForm().
Let’s run the tests and see how is everything:
python manage.py test
Creating test database for alias 'default'...
System check identified no issues (0 silenced).
...............
----------------------------------------------------------------------
Ran 15 tests in 0.522s

OK
Destroying test database for alias 'default'...
We even fixed the last two tests.
The Django Forms API does much more than processing and validating the data. It also generates the HTML for us.
Let’s update the new_topic.html template to fully use the Django Forms API:
templates/new_topic.html
{% extends 'base.html' %}

{% block title %}Start a New Topic{% endblock %}

{% block breadcrumb %}
  <li class="breadcrumb-item"><a href="{% url 'home' %}">Boards</a></li>
  <li class="breadcrumb-item"><a href="{% url 'board_topics' board.pk %}">{{ board.name }}</a></li>
  <li class="breadcrumb-item active">New topic</li>
{% endblock %}

{% block content %}
  <form method="post">
    {% csrf_token %}
    {{ form.as_p }}
    <button type="submit" class="btn btn-success">Post</button>
  </form>
{% endblock %}
The form have three rendering options: form.as_table, form.as_ul, and form.as_p. It’s a quick way to render all the fields of a form. As the name suggests, the as_table uses table tags to format the inputs, the as_ul creates an HTML list of inputs, etc.
Let’s see how it looks like:
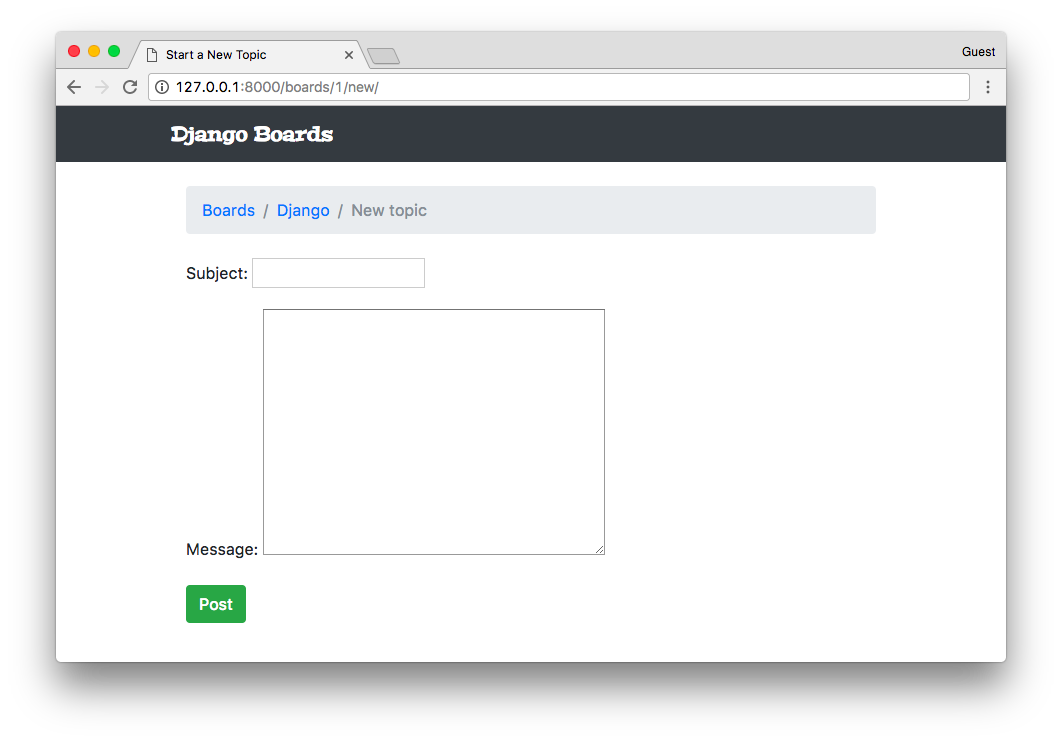
Well, our previous form was looking better, right? We are going to fix it in a moment.
It can look broken right now but trust me; there’s a lot of things behind it right now. And it’s extremely powerful. For example, if our form had 50 fields, we could render all the fields just by typing {{ form.as_p }}.
And more, using the Forms API, Django will validate the data and add error messages to each field. Let’s try submitting an empty form:
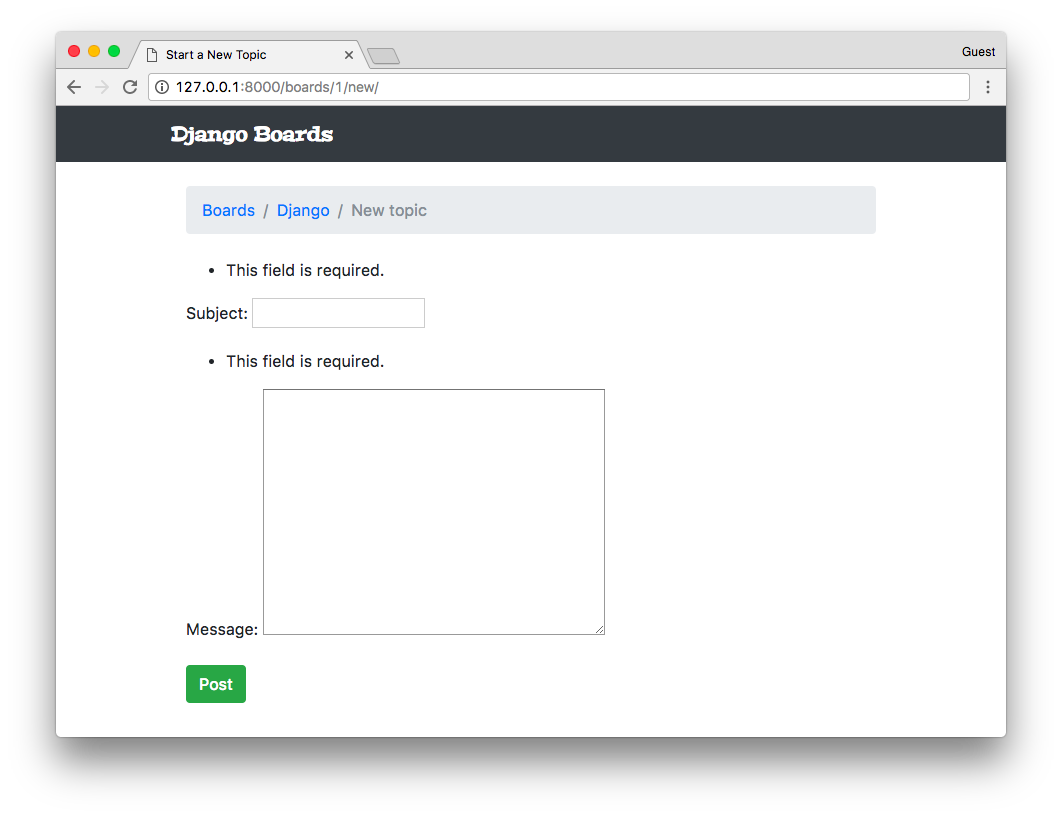
You can keep it; there’s no problem with it. It’s just because our form is very simple right now, and we don’t have much data validation to see.
Another important thing to note is that: there is no such a thing as “client-side validation.” JavaScript validation or browser validation is just for usability purpose. And also to reduce the number of requests to the server. Data validation should always be done on the server side, where we have full control over the data.
It also handles help texts, which can be defined both in a Form class or in a Model class:
boards/forms.py
from django import forms
from .models import Topic

class NewTopicForm(forms.ModelForm):
    message = forms.CharField(
        widget=forms.Textarea(),
        max_length=4000,
        help_text='The max length of the text is 4000.'
    )

    class Meta:
        model = Topic
        fields = ['subject', 'message']
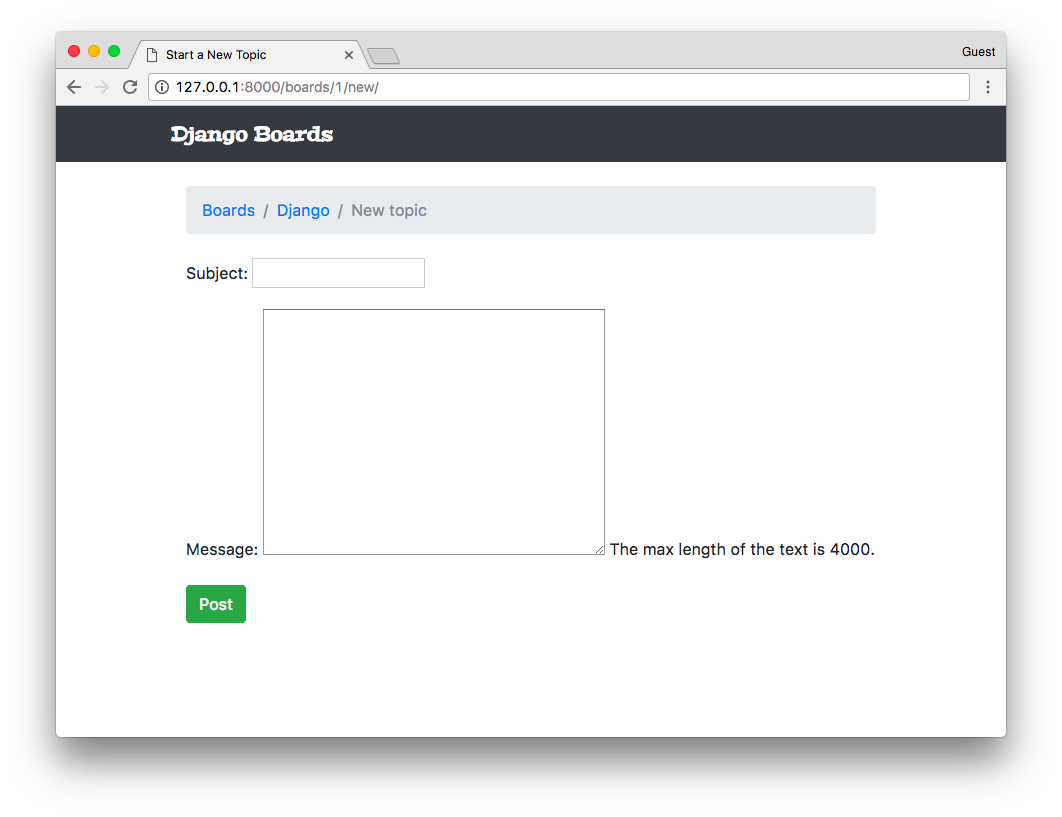
We can also set extra attributes to a form field:
boards/forms.py
from django import forms
from .models import Topic

class NewTopicForm(forms.ModelForm):
    message = forms.CharField(
        widget=forms.Textarea(
            attrs={'rows': 5, 'placeholder': 'What is on your mind?'}
        ),
        max_length=4000,
        help_text='The max length of the text is 4000.'
    )

    class Meta:
        model = Topic
        fields = ['subject', 'message']
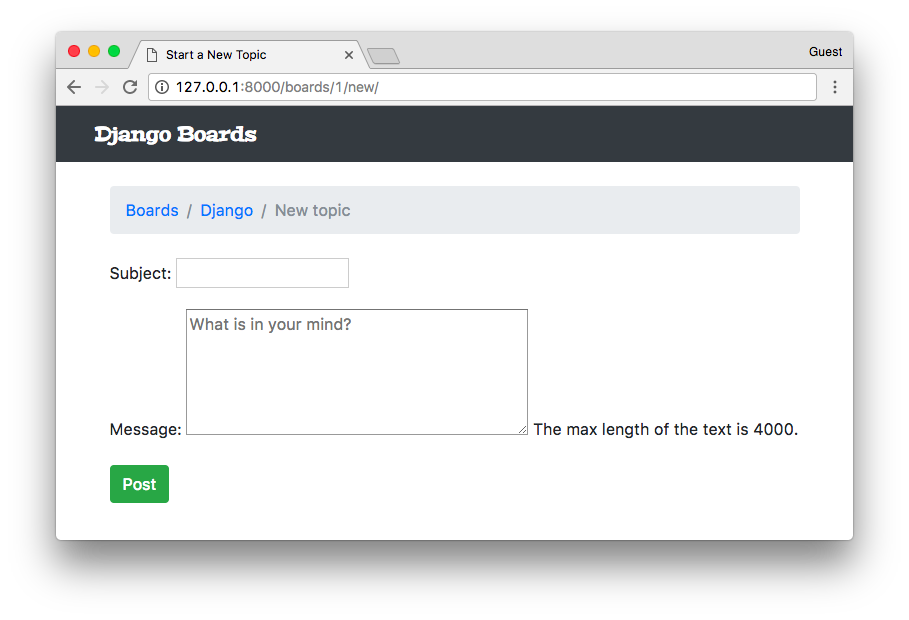
Rendering Bootstrap Forms
Alright, so let’s make things pretty again.
When working with Bootstrap or any other Front-End library, I like to use a Django package called django-widget-tweaks. It gives us more control over the rendering process, keeping the defaults and just adding extra customizations on top of it.
Let’s start off by installing it:
pip install django-widget-tweaks
Now add it to the INSTALLED_APPS:
myproject/settings.py
INSTALLED_APPS = [
    'django.contrib.admin',
    'django.contrib.auth',
    'django.contrib.contenttypes',
    'django.contrib.sessions',
    'django.contrib.messages',
    'django.contrib.staticfiles',

    'widget_tweaks',

    'boards',
]
Now let’s take it into use:
templates/new_topic.html
{% extends 'base.html' %}

{% load widget_tweaks %}

{% block title %}Start a New Topic{% endblock %}

{% block breadcrumb %}
  <li class="breadcrumb-item"><a href="{% url 'home' %}">Boards</a></li>
  <li class="breadcrumb-item"><a href="{% url 'board_topics' board.pk %}">{{ board.name }}</a></li>
  <li class="breadcrumb-item active">New topic</li>
{% endblock %}

{% block content %}
  <form method="post" novalidate>
    {% csrf_token %}

    {% for field in form %}
      <div class="form-group">
        {{ field.label_tag }}

        {% render_field field class="form-control" %}

        {% if field.help_text %}
          <small class="form-text text-muted">
            {{ field.help_text }}
          </small>
        {% endif %}
      </div>
    {% endfor %}

    <button type="submit" class="btn btn-success">Post</button>
  </form>
{% endblock %}
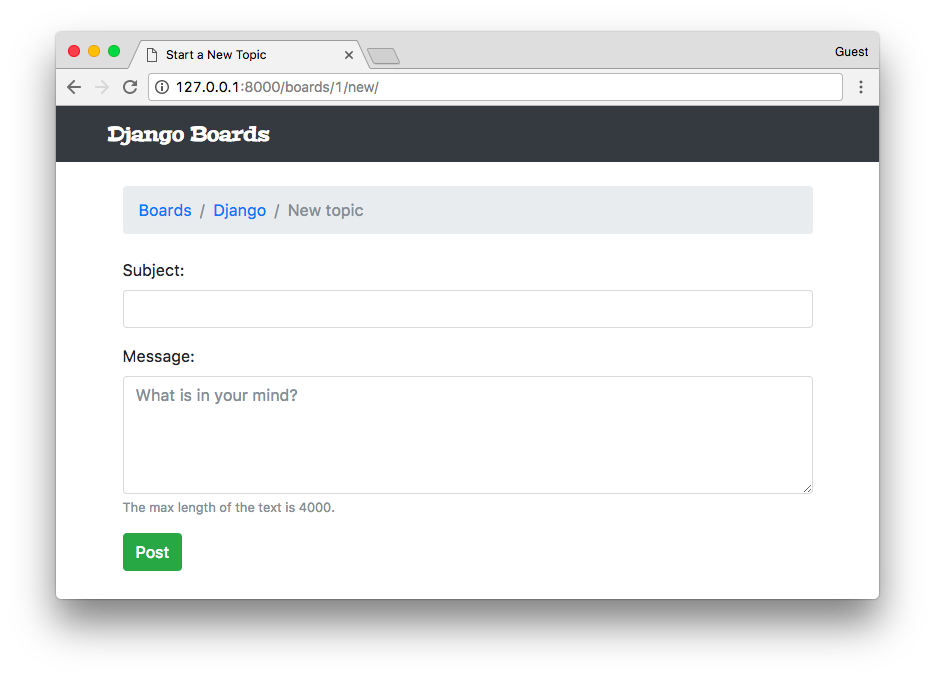
There it is! So, here we are using the django-widget-tweaks. First, we load it in the template by using the {% load widget_tweaks %} template tag. Then the usage:
{% render_field field class="form-control" %}
The render_field tag is not part of Django; it lives inside the package we installed. To use it we have to pass a form field instance as the first parameter, and then after we can add arbitrary HTML attributes to complement it. It will be useful because then we can assign classes based on certain conditions.
Some examples of the render_field template tag:
{% render_field form.subject class="form-control" %}
{% render_field form.message class="form-control" placeholder=form.message.label %}
{% render_field field class="form-control" placeholder="Write a message!" %}
{% render_field field style="font-size: 20px" %}
Now to implement the Bootstrap 4 validation tags, we can change the new_topic.html template:
templates/new_topic.html
<form method="post" novalidate>
  {% csrf_token %}

  {% for field in form %}
    <div class="form-group">
      {{ field.label_tag }}

      {% if form.is_bound %}
        {% if field.errors %}

          {% render_field field class="form-control is-invalid" %}
          {% for error in field.errors %}
            <div class="invalid-feedback">
              {{ error }}
            </div>
          {% endfor %}

        {% else %}
          {% render_field field class="form-control is-valid" %}
        {% endif %}
      {% else %}
        {% render_field field class="form-control" %}
      {% endif %}

      {% if field.help_text %}
        <small class="form-text text-muted">
          {{ field.help_text }}
        </small>
      {% endif %}
    </div>
  {% endfor %}

  <button type="submit" class="btn btn-success">Post</button>
</form>
The result is this:
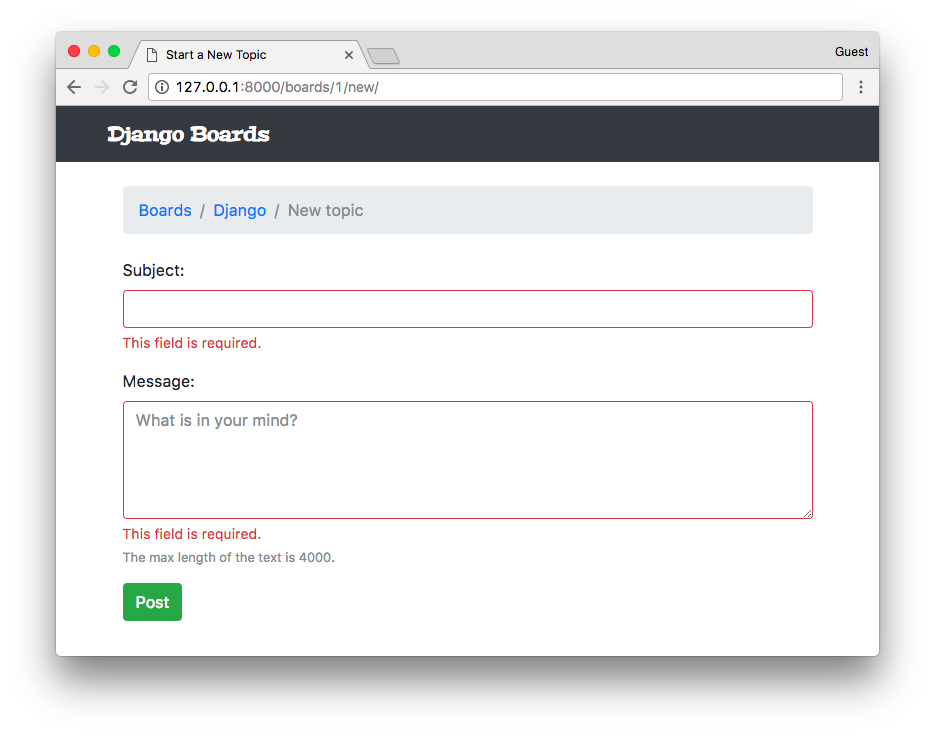
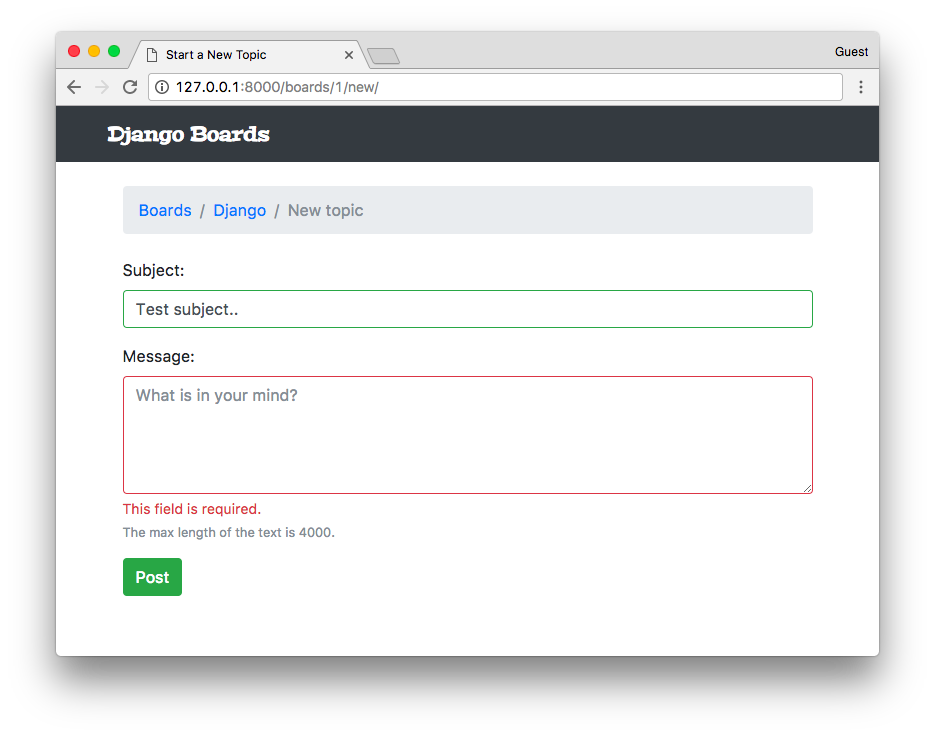
So, we have three different rendering states:
- Initial state: the form has no data (is not bound)
- Invalid: we add the
.is-invalidCSS class and add error messages in an element with a class.invalid-feedback. The form field and the messages are rendered in red. - Valid: we add the
.is-validCSS class so to paint the form field in green, giving feedback to the user that this field is good to go.
Reusable Forms Templates
The template code looks a little bit complicated, right? Well, the good news is that we can reuse this snippet across the project.
In the templates folder, create a new folder named includes:
myproject/
 |-- myproject/
 |    |-- boards/
 |    |-- myproject/
 |    |-- templates/
 |    |    |-- includes/    <-- here!
 |    |    |-- base.html
 |    |    |-- home.html
 |    |    |-- new_topic.html
 |    |    +-- topics.html
 |    +-- manage.py
 +-- venv/
Now inside the includes folder, create a file named form.html:
templates/includes/form.html
{% load widget_tweaks %}

{% for field in form %}
  <div class="form-group">
    {{ field.label_tag }}

    {% if form.is_bound %}
      {% if field.errors %}
        {% render_field field class="form-control is-invalid" %}
        {% for error in field.errors %}
          <div class="invalid-feedback">
            {{ error }}
          </div>
        {% endfor %}
      {% else %}
        {% render_field field class="form-control is-valid" %}
      {% endif %}
    {% else %}
      {% render_field field class="form-control" %}
    {% endif %}

    {% if field.help_text %}
      <small class="form-text text-muted">
        {{ field.help_text }}
      </small>
    {% endif %}
  </div>
{% endfor %}
Now we change our new_topic.html template:
templates/new_topic.html
{% extends 'base.html' %}

{% block title %}Start a New Topic{% endblock %}

{% block breadcrumb %}
  <li class="breadcrumb-item"><a href="{% url 'home' %}">Boards</a></li>
  <li class="breadcrumb-item"><a href="{% url 'board_topics' board.pk %}">{{ board.name }}</a></li>
  <li class="breadcrumb-item active">New topic</li>
{% endblock %}

{% block content %}
  <form method="post" novalidate>
    {% csrf_token %}
    {% include 'includes/form.html' %}
    <button type="submit" class="btn btn-success">Post</button>
  </form>
{% endblock %}
As the name suggests, the {% include %} is used to include HTML templates in another template. It’s a very useful way to reuse HTML components in a project.
The next form we implement, we can simply use {% include 'includes/form.html' %} to render it.
Adding More Tests
Now we are using Django Forms; we can add more tests to make sure it is running smoothly:
boards/tests.py
# ... other imports
from .forms import NewTopicForm

class NewTopicTests(TestCase):
    # ... other tests

    def test_contains_form(self):  # <- new test
        url = reverse('new_topic', kwargs={'pk': 1})
        response = self.client.get(url)
        form = response.context.get('form')
        self.assertIsInstance(form, NewTopicForm)

    def test_new_topic_invalid_post_data(self):  # <- updated this one
        '''
        Invalid post data should not redirect
        The expected behavior is to show the form again with validation errors
        '''
        url = reverse('new_topic', kwargs={'pk': 1})
        response = self.client.post(url, {})
        form = response.context.get('form')
        self.assertEquals(response.status_code, 200)
        self.assertTrue(form.errors)
Now we are using the assertIsInstance method for the first time. Basically we are grabbing the form instance in the context data, and checking if it is a NewTopicForm. In the last test, we added the self.assertTrue(form.errors) to make sure the form is showing errors when the data is invalid.
Conclusions
In this tutorial, we focused on URLs, Reusable Templates, and Forms. As usual, we also implement several test cases. That’s how we develop with confidence.
Our tests file is starting to get big, so in the next tutorial, we are going to refactor it to improve the maintainability so to sustain the growth of our code base.
We are also reaching a point where we need to interact with the logged in user. In the next tutorial, we are going to learn everything about authentication and how to protect our views and resources.
https://github.com/sibtc/django-beginners-guide/tree/v0.3-lw
The Complete Guide to Start Learning Django - Part 4 - Authentication
Table of Contents
- Introduction
- Wireframes
- Initial Setup
- Sign Up
- Referencing the Authenticated User in the Template
- Testing the Sign Up View
- Adding the Email Field to the Form
- Improving the Tests Layout
- Improving the Sign Up Template
- Logout
- Displaying Menu For Authenticated Users
- Login
- Log In Non Field Errors
- Creating Custom Template Tags
- Testing the Template Tags
- Password Reset
- Console Email Backend
- Configuring the Routes
- Password Reset View
- Password Reset Done View
- Password Reset Confirm View
- Password Reset Complete View
- Password Change View
- Conclusions
Introduction
This tutorial is going to be all about Django’s authentication system. We are going to implement the whole thing: registration, login, logout, password reset, and password change.
You are also going to get a brief introduction on how to protect some views from non-authorized users and how to access the information of the logged in user.
In the next section, you will find a few wireframes of authentication-related pages that we are going to implement in this tutorial. After that, you will find an initial setup of a new Django app. So far we have been working on an app named boards. But all the authentication related stuff can live in a different app, so to achieve a better organization of the code.
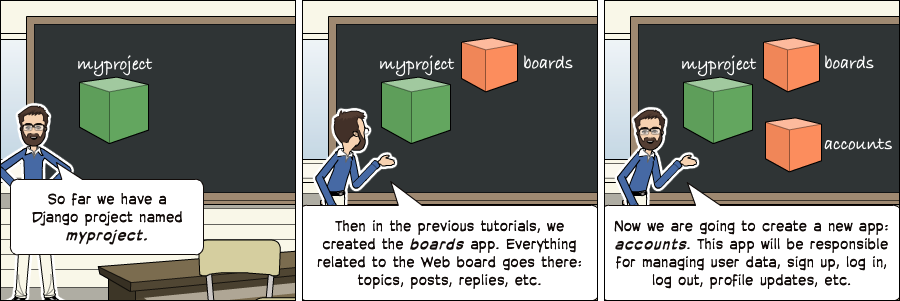
Wireframes
We have to update the wireframes of the application. First, we are going to add new options for the top menu. If the user is not authenticated, we should have two buttons: sign up and log in.
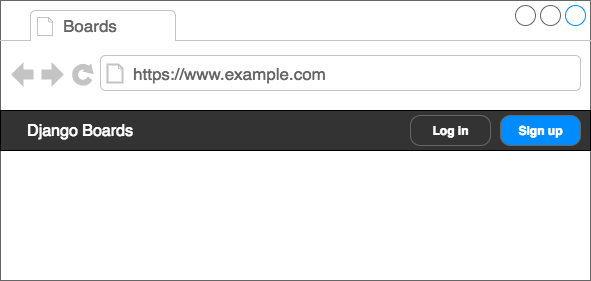
If the user is authenticated, we should instead display their names along with a dropdown menu with three options: my account, change password and log out.
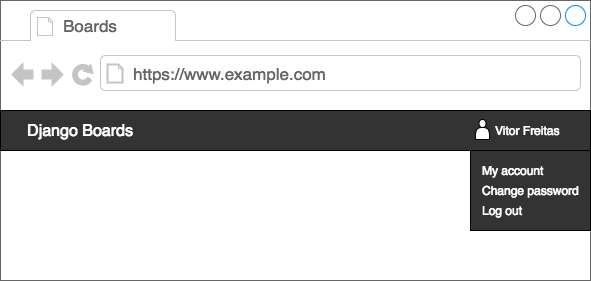
On the log in page, we need a form with username and password, a button with the main action (log in) and two alternative paths: sign up page and password reset page.
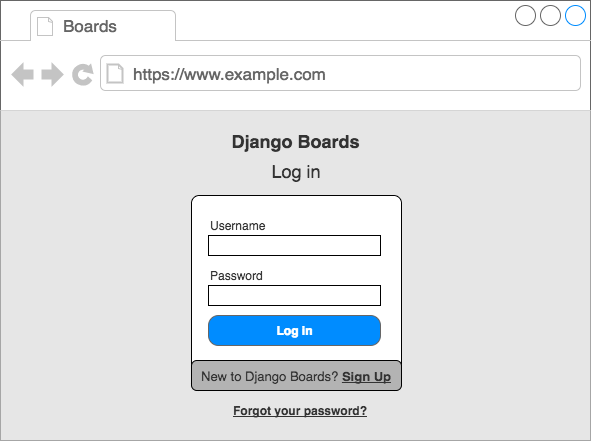
On the sign up page, we should have a form with four fields: username, email address, password, and password confirmation. The user should also be able to reach the log in page.
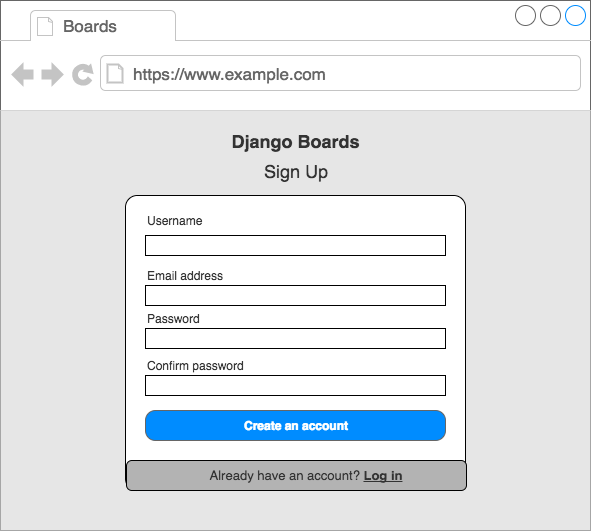
On the password reset page, we will have a form with just the email address.
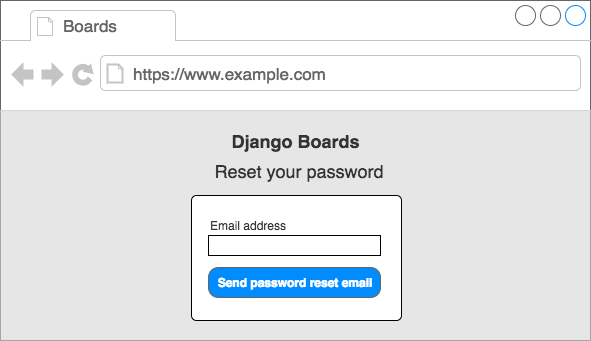
Then, after clicking on a special token link, the user will be redirected to a page where they can set a new password:
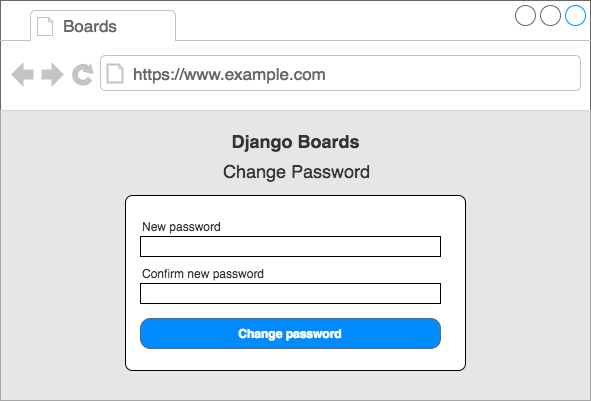
Initial Setup
To manage all this information, we can break it down in a different app. In the project root, in the same page where the manage.py script is, run the following command to start a new app:
django-admin startapp accounts
The project structure should like this right now:
myproject/
 |-- myproject/
 |    |-- accounts/     <-- our new django app!
 |    |-- boards/
 |    |-- myproject/
 |    |-- static/
 |    |-- templates/
 |    |-- db.sqlite3
 |    +-- manage.py
 +-- venv/
Next step, include the accounts app to the INSTALLED_APPS in the settings.py file:
INSTALLED_APPS = [
    'django.contrib.admin',
    'django.contrib.auth',
    'django.contrib.contenttypes',
    'django.contrib.sessions',
    'django.contrib.messages',
    'django.contrib.staticfiles',

    'widget_tweaks',

    'accounts',
    'boards',
]
From now on, we will be working on the accounts app.
Sign Up
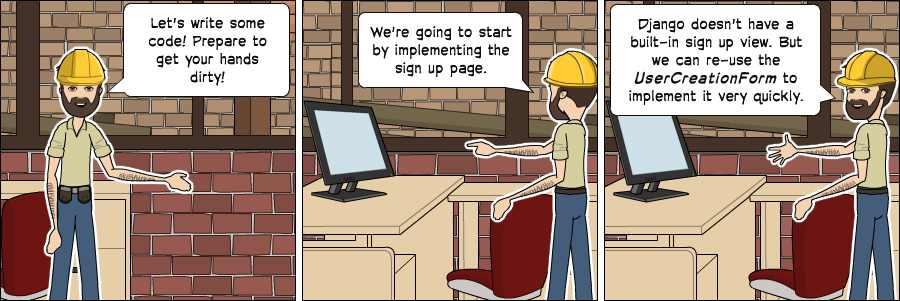
Let’s start by creating the sign up view. First thing, create a new route in the urls.py file:
myproject/urls.py
from django.conf.urls import url
from django.contrib import admin

from accounts import views as accounts_views
from boards import views

urlpatterns = [
    url(r'^/figure>, views.home, name='home'),
    url(r'^signup//figure>, accounts_views.signup, name='signup'),
    url(r'^boards/(?P<pk>\d+)//figure>, views.board_topics, name='board_topics'),
    url(r'^boards/(?P<pk>\d+)/new//figure>, views.new_topic, name='new_topic'),
    url(r'^admin/', admin.site.urls),
]
Notice how we are importing the views module from the accounts app in a different way:
from accounts import views as accounts_views
We are giving an alias because otherwise, it would clash with the boards’ views. We can improve the urls.py design later on. But for now, let’s focus on the authentication features.
Now edit the views.py inside the accounts app and create a new view named signup:
accounts/views.py
from django.shortcuts import render

def signup(request):
    return render(request, 'signup.html')
Create the new template, named signup.html:
templates/signup.html
{% extends 'base.html' %}

{% block content %}
  <h2>Sign up</h2>
{% endblock %}
Open the URL http://127.0.0.1:8000/signup/ in the browser, check if everything is working:
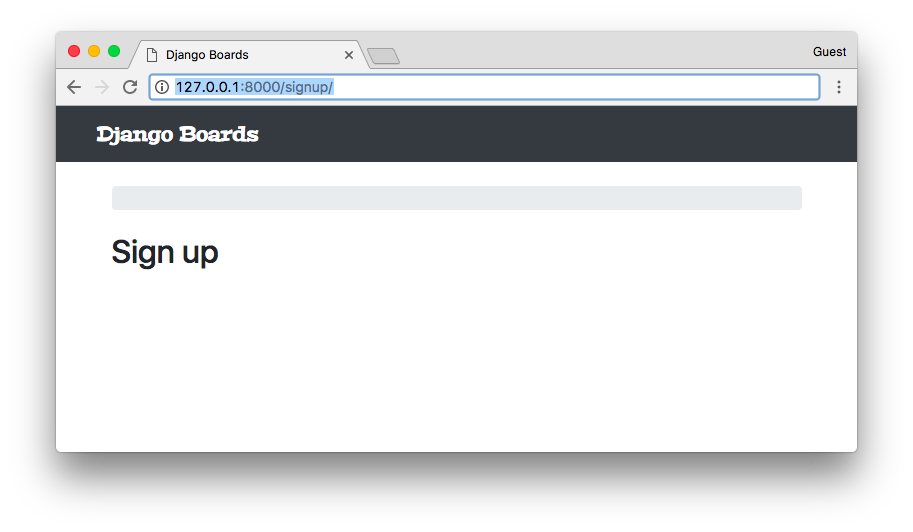
Time to write some tests:
accounts/tests.py
from django.core.urlresolvers import reverse
from django.urls import resolve
from django.test import TestCase
from .views import signup

class SignUpTests(TestCase):
    def test_signup_status_code(self):
        url = reverse('signup')
        response = self.client.get(url)
        self.assertEquals(response.status_code, 200)

    def test_signup_url_resolves_signup_view(self):
        view = resolve('/signup/')
        self.assertEquals(view.func, signup)
Testing the status code (200 = success) and if the URL /signup/ is returning the correct view function.
python manage.py test
Creating test database for alias 'default'...
System check identified no issues (0 silenced).
..................
----------------------------------------------------------------------
Ran 18 tests in 0.652s

OK
Destroying test database for alias 'default'...
For the authentication views (sign up, log in, password reset, etc.) we won’t use the top bar or the breadcrumb. We can still use the base.html template. It just needs some tweaks:
templates/base.html
{% load static %}<!DOCTYPE html>
<html>
  <head>
    <meta charset="utf-8">
    <title>{% block title %}Django Boards{% endblock %}</title>
    <link href="https://fonts.googleapis.com/css?family=Peralta" rel="stylesheet">
    <link rel="stylesheet" href="{% static 'css/bootstrap.min.css' %}">
    <link rel="stylesheet" href="{% static 'css/app.css' %}">
    {% block stylesheet %}{% endblock %}  <!-- HERE -->
  </head>
  <body>
    {% block body %}  <!-- HERE -->
      <nav class="navbar navbar-expand-lg navbar-dark bg-dark">
        <div class="container">
          <a class="navbar-brand" href="{% url 'home' %}">Django Boards</a>
        </div>
      </nav>
      <div class="container">
        <ol class="breadcrumb my-4">
          {% block breadcrumb %}
          {% endblock %}
        </ol>
        {% block content %}
        {% endblock %}
      </div>
    {% endblock body %}  <!-- AND HERE -->
  </body>
</html>
I marked with comments the new bits in the base.html template. The block <{% block stylesheet %}{% endblock %} will be used to add extra CSS, specific to some pages.
The block {% block body %} is wrapping the whole HTML document. We can use it to have an empty document taking advantage of the head of the base.html. Notice how we named the end block {% endblock body %}. In cases like this, it’s a good practice to name the closing tag, so it’s easier to identify where it ends.
Now on the signup.html template, instead of using the {% block content %}, we can use the {% block body %}.
templates/signup.html
{% extends 'base.html' %}

{% block body %}
  <h2>Sign up</h2>
{% endblock %}
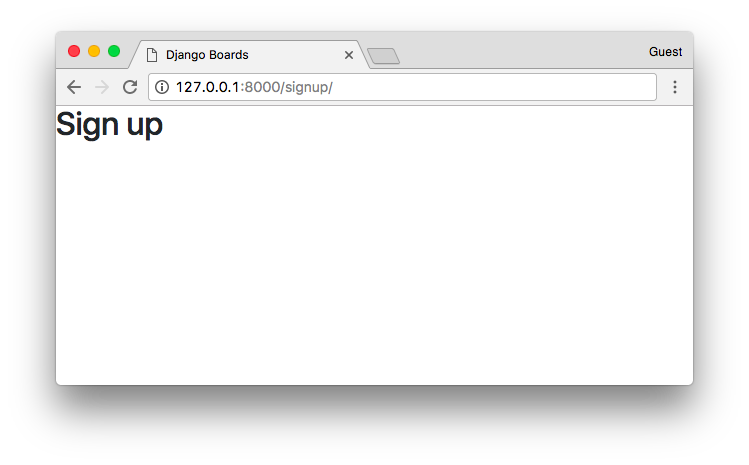

Time to create the sign up form. Django has a built-in form named UserCreationForm. Let’s use it:
accounts/views.py
from django.contrib.auth.forms import UserCreationForm
from django.shortcuts import render

def signup(request):
    form = UserCreationForm()
    return render(request, 'signup.html', {'form': form})
templates/signup.html
{% extends 'base.html' %}

{% block body %}
  <div class="container">
    <h2>Sign up</h2>
    <form method="post" novalidate>
      {% csrf_token %}
      {{ form.as_p }}
      <button type="submit" class="btn btn-primary">Create an account</button>
    </form>
  </div>
{% endblock %}
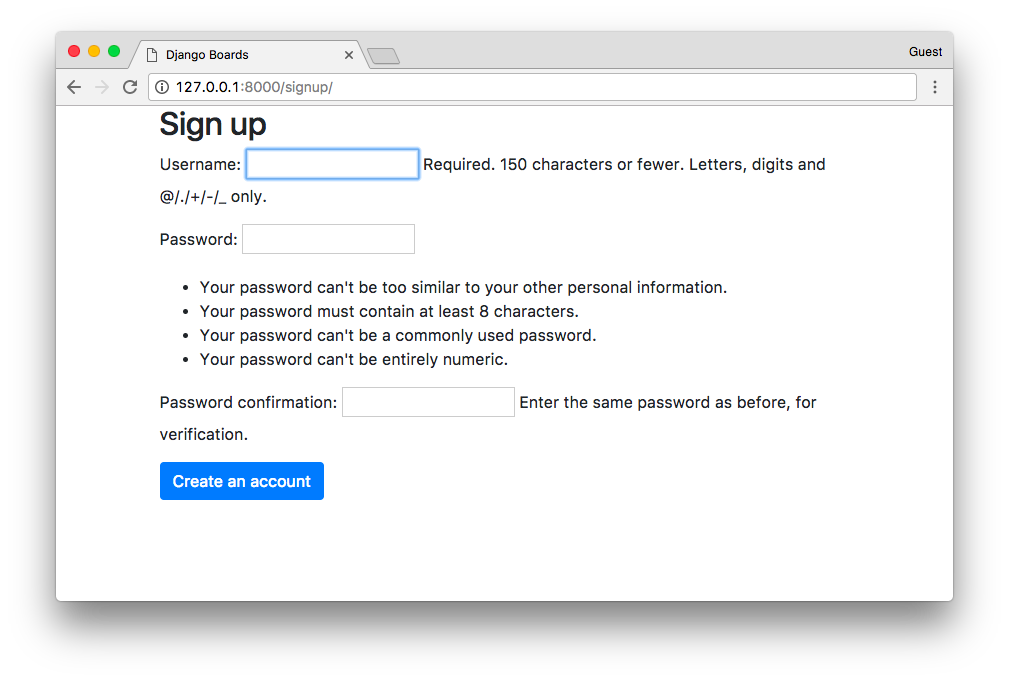
Looking a little bit messy, right? We can use our form.html template to make it look better:
templates/signup.html
{% extends 'base.html' %}

{% block body %}
  <div class="container">
    <h2>Sign up</h2>
    <form method="post" novalidate>
      {% csrf_token %}
      {% include 'includes/form.html' %}
      <button type="submit" class="btn btn-primary">Create an account</button>
    </form>
  </div>
{% endblock %}
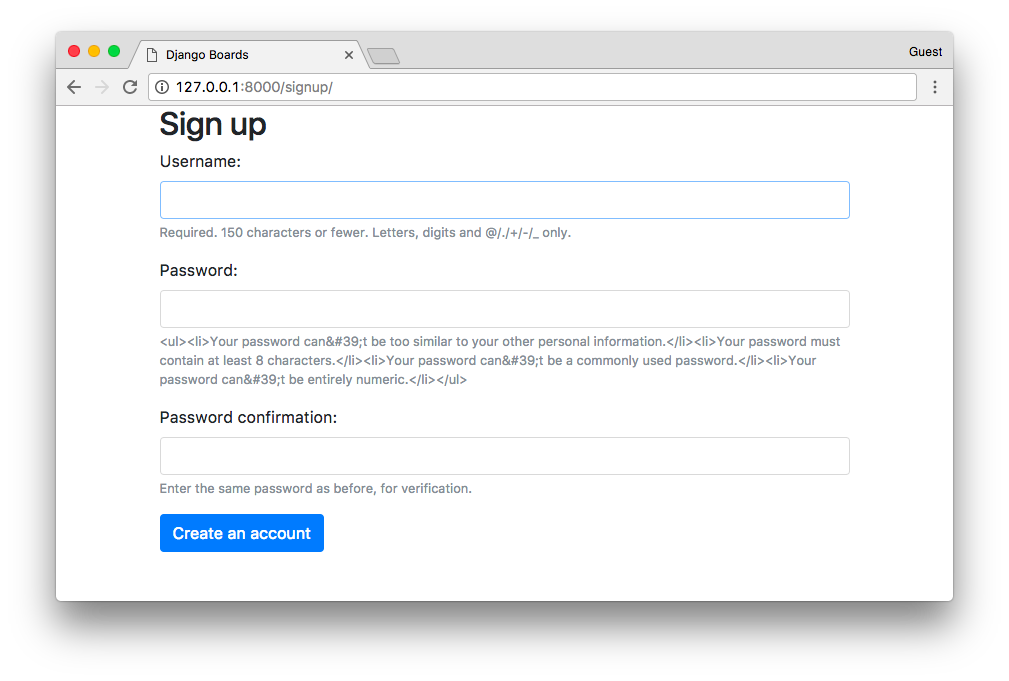
Uh, almost there. Currently, our form.html partial template is displaying some raw HTML. It’s a security feature. By default Django treats all strings as unsafe, escaping all the special characters that may cause trouble. But in this case, we can trust it.
templates/includes/form.html
{% load widget_tweaks %}

{% for field in form %}
  <div class="form-group">
    {{ field.label_tag }}

    <!-- code suppressed for brevity -->

    {% if field.help_text %}
      <small class="form-text text-muted">
        {{ field.help_text|safe }}  <!-- new code here -->
      </small>
    {% endif %}
  </div>
{% endfor %}
Basically, in the previous template we added the option safe to the field.help_text: {{ field.help_text|safe }}.
Save the form.html file, and check the sign up page again:

Now let’s implement the business logic in the signup view:
accounts/views.py
from django.contrib.auth import login as auth_login
from django.contrib.auth.forms import UserCreationForm
from django.shortcuts import render, redirect

def signup(request):
    if request.method == 'POST':
        form = UserCreationForm(request.POST)
        if form.is_valid():
            user = form.save()
            auth_login(request, user)
            return redirect('home')
    else:
        form = UserCreationForm()
    return render(request, 'signup.html', {'form': form})
A basic form processing with a small detail: the login function (renamed to auth_login to avoid clashing with the built-in login view).
Note: I renamed the login function to auth_login, but later I realized that Django 1.11 has a class-based view for the login view, LoginView, so there was no risk of clashing the names.
On the older versions there was a auth.login and auth.view.login, which used to cause some confusion, because one was the function that logs the user in, and the other was the view.
Long story short: you can import it just as login if you want, it will not cause any problem.
If the form is valid, a User instance is created with the user = form.save(). The created user is then passed as an argument to the auth_login function, manually authenticating the user. After that, the view redirects the user to the homepage, keeping the flow of the application.
Let’s try it. First, submit some invalid data. Either an empty form, non-matching fields, or an existing username:
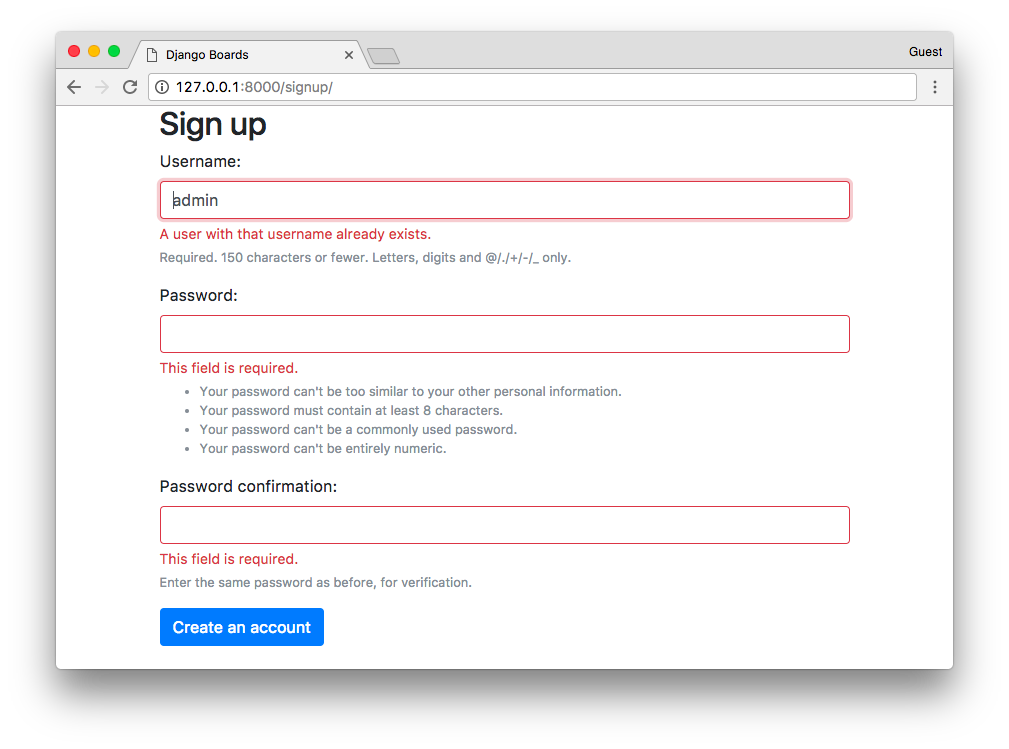
Now fill the form and submit it, check if the user is created and redirected to the homepage:
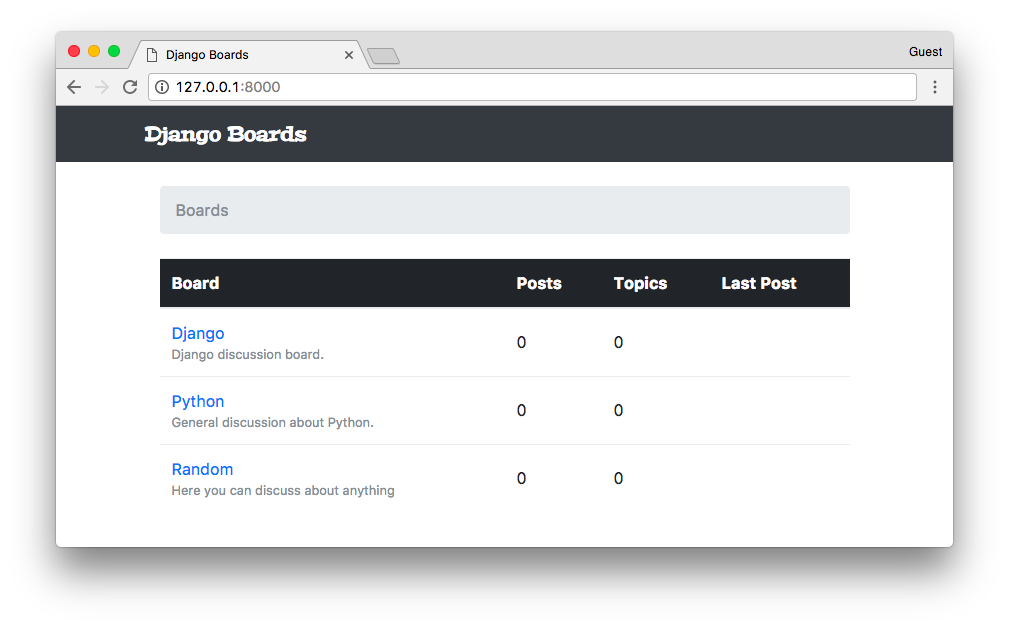
Referencing the Authenticated User in the Template
How can we know if it worked? Well, we can edit the base.html template to add the name of the user on the top bar:
templates/base.html
{% block body %}
  <nav class="navbar navbar-expand-sm navbar-dark bg-dark">
    <div class="container">
      <a class="navbar-brand" href="{% url 'home' %}">Django Boards</a>
      <button class="navbar-toggler" type="button" data-toggle="collapse" data-target="#mainMenu" aria-controls="mainMenu" aria-expanded="false" aria-label="Toggle navigation">
        <span class="navbar-toggler-icon"></span>
      </button>
      <div class="collapse navbar-collapse" id="mainMenu">
        <ul class="navbar-nav ml-auto">
          <li class="nav-item">
            <a class="nav-link" href="#">{{ user.username }}</a>
          </li>
        </ul>
      </div>
    </div>
  </nav>

  <div class="container">
    <ol class="breadcrumb my-4">
      {% block breadcrumb %}
      {% endblock %}
    </ol>
    {% block content %}
    {% endblock %}
  </div>
{% endblock body %}
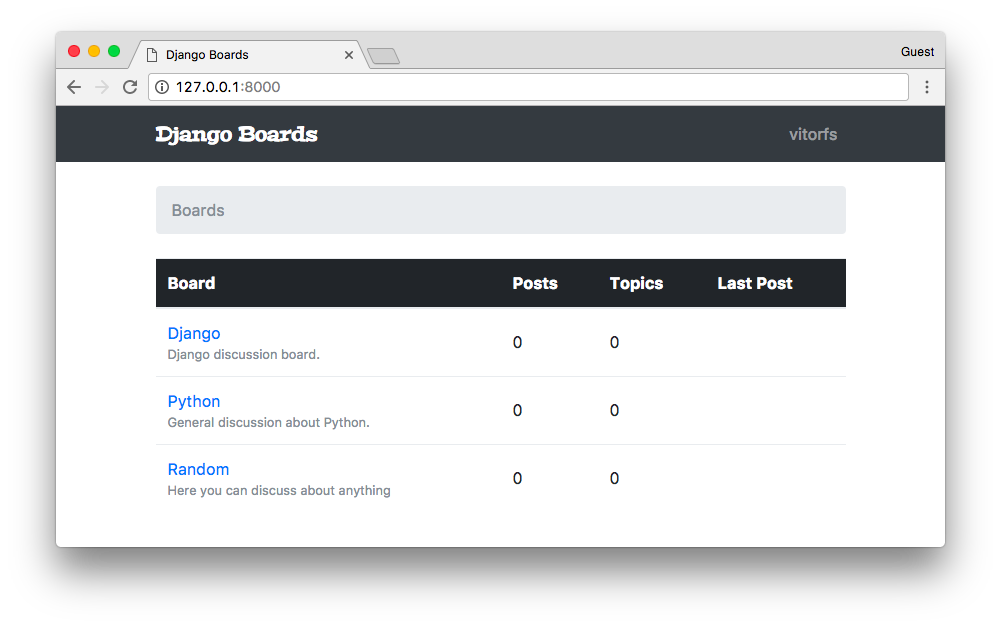
Testing the Sign Up View
Let’s now improve our test cases:
accounts/tests.py
from django.contrib.auth.forms import UserCreationForm
from django.core.urlresolvers import reverse
from django.urls import resolve
from django.test import TestCase
from .views import signup

class SignUpTests(TestCase):
    def setUp(self):
        url = reverse('signup')
        self.response = self.client.get(url)

    def test_signup_status_code(self):
        self.assertEquals(self.response.status_code, 200)

    def test_signup_url_resolves_signup_view(self):
        view = resolve('/signup/')
        self.assertEquals(view.func, signup)

    def test_csrf(self):
        self.assertContains(self.response, 'csrfmiddlewaretoken')

    def test_contains_form(self):
        form = self.response.context.get('form')
        self.assertIsInstance(form, UserCreationForm)
We changed a little bit the SignUpTests class. Defined a setUp method, moved the response object to there. Then now we are also testing if there are a form and the CSRF token in the response.
Now we are going to test a successful sign up. This time, let’s create a new class to organize better the tests:
accounts/tests.py
from django.contrib.auth.models import User
from django.contrib.auth.forms import UserCreationForm
from django.core.urlresolvers import reverse
from django.urls import resolve
from django.test import TestCase
from .views import signup

class SignUpTests(TestCase):
    # code suppressed...

class SuccessfulSignUpTests(TestCase):
    def setUp(self):
        url = reverse('signup')
        data = {
            'username': 'john',
            'password1': 'abcdef123456',
            'password2': 'abcdef123456'
        }
        self.response = self.client.post(url, data)
        self.home_url = reverse('home')

    def test_redirection(self):
        '''
        A valid form submission should redirect the user to the home page
        '''
        self.assertRedirects(self.response, self.home_url)

    def test_user_creation(self):
        self.assertTrue(User.objects.exists())

    def test_user_authentication(self):
        '''
        Create a new request to an arbitrary page.
        The resulting response should now have a `user` to its context,
        after a successful sign up.
        '''
        response = self.client.get(self.home_url)
        user = response.context.get('user')
        self.assertTrue(user.is_authenticated)
Run the tests.
Using a similar strategy, now let’s create a new class for sign up tests when the data is invalid:
from django.contrib.auth.models import User
from django.contrib.auth.forms import UserCreationForm
from django.core.urlresolvers import reverse
from django.urls import resolve
from django.test import TestCase
from .views import signup

class SignUpTests(TestCase):
    # code suppressed...

class SuccessfulSignUpTests(TestCase):
    # code suppressed...

class InvalidSignUpTests(TestCase):
    def setUp(self):
        url = reverse('signup')
        self.response = self.client.post(url, {})  # submit an empty dictionary

    def test_signup_status_code(self):
        '''
        An invalid form submission should return to the same page
        '''
        self.assertEquals(self.response.status_code, 200)

    def test_form_errors(self):
        form = self.response.context.get('form')
        self.assertTrue(form.errors)

    def test_dont_create_user(self):
        self.assertFalse(User.objects.exists())
Adding the Email Field to the Form
Everything is working, but… The email address field is missing. Well, the UserCreationForm does not provide an email field. But we can extend it.
Create a file named forms.py inside the accounts folder:
accounts/forms.py
from django import forms
from django.contrib.auth.forms import UserCreationForm
from django.contrib.auth.models import User

class SignUpForm(UserCreationForm):
    email = forms.CharField(max_length=254, required=True, widget=forms.EmailInput())
    class Meta:
        model = User
        fields = ('username', 'email', 'password1', 'password2')
Now, instead of using the UserCreationForm in our views.py, let’s import the new form, SignUpForm, and use it instead:
accounts/views.py
from django.contrib.auth import login as auth_login
from django.shortcuts import render, redirect

from .forms import SignUpForm

def signup(request):
    if request.method == 'POST':
        form = SignUpForm(request.POST)
        if form.is_valid():
            user = form.save()
            auth_login(request, user)
            return redirect('home')
    else:
        form = SignUpForm()
    return render(request, 'signup.html', {'form': form})
Just with this small change, everything is already working:
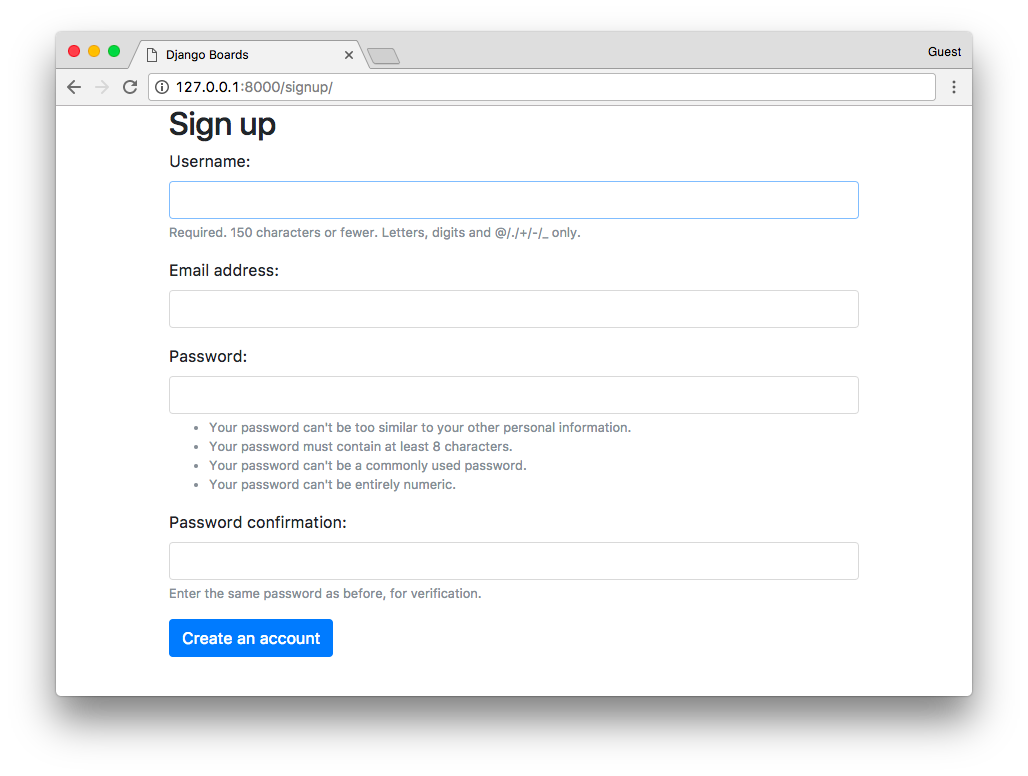
Remember to change the test case to use the SignUpForm instead of UserCreationForm:
from .forms import SignUpForm

class SignUpTests(TestCase):
    # ...

    def test_contains_form(self):
        form = self.response.context.get('form')
        self.assertIsInstance(form, SignUpForm)

class SuccessfulSignUpTests(TestCase):
    def setUp(self):
        url = reverse('signup')
        data = {
            'username': 'john',
            'email': 'john@doe.com',
            'password1': 'abcdef123456',
            'password2': 'abcdef123456'
        }
        self.response = self.client.post(url, data)
        self.home_url = reverse('home')

    # ...
The previous test case would still pass because since SignUpForm extends the UserCreationForm, it is an instance of UserCreationForm.
Now let’s think about what happened for a moment. We added a new form field:
fields = ('username', 'email', 'password1', 'password2')
And it automatically reflected in the HTML template. It’s good, right? Well, depends. What if in the future, a new developer wanted to re-use the SignUpForm for something else, and add some extra fields to it. Then those new fields would also show up in the signup.html, which may not be the desired behavior. This change could pass unnoticed, and we don’t want any surprises.
So let’s create a new test, that verifies the HTML inputs in the template:
accounts/tests.py
class SignUpTests(TestCase):
    # ...

    def test_form_inputs(self):
        '''
        The view must contain five inputs: csrf, username, email,
        password1, password2
        '''
        self.assertContains(self.response, '<input', 5)
        self.assertContains(self.response, 'type="text"', 1)
        self.assertContains(self.response, 'type="email"', 1)
        self.assertContains(self.response, 'type="password"', 2)
Improving the Tests Layout
Alright, so we are testing the inputs and everything, but we still have to test the form itself. Instead of just keep adding tests to the accounts/tests.py file, let’s improve the project design a little bit.
Create a new folder named tests within the accounts folder. Then, inside the tests folder, create an empty file named init.py.
Now, move the tests.py file to inside the tests folder, and rename it to test_view_signup.py.
The final result should be the following:
myproject/
 |-- myproject/
 |    |-- accounts/
 |    |    |-- migrations/
 |    |    |-- tests/
 |    |    |    |-- __init__.py
 |    |    |    +-- test_view_signup.py
 |    |    |-- __init__.py
 |    |    |-- admin.py
 |    |    |-- apps.py
 |    |    |-- models.py
 |    |    +-- views.py
 |    |-- boards/
 |    |-- myproject/
 |    |-- static/
 |    |-- templates/
 |    |-- db.sqlite3
 |    +-- manage.py
 +-- venv/
Note that since we are using relative import within the context of the apps, we need to fix the imports in the new test_view_signup.py:
accounts/tests/test_view_signup.py
from django.contrib.auth.models import User
from django.core.urlresolvers import reverse
from django.urls import resolve
from django.test import TestCase

from ..views import signup
from ..forms import SignUpForm
We are using relative imports inside the app modules so we can have the freedom to rename the Django app later on, without having to fix all the absolute imports.
Now let’s create a new test file, to test the SignUpForm. Add a new test file named test_form_signup.py:
accounts/tests/test_form_signup.py
from django.test import TestCase
from ..forms import SignUpForm

class SignUpFormTest(TestCase):
    def test_form_has_fields(self):
        form = SignUpForm()
        expected = ['username', 'email', 'password1', 'password2',]
        actual = list(form.fields)
        self.assertSequenceEqual(expected, actual)
It looks very strict, right? For example, if in the future we have to change the SignUpForm, to include the user’s first and last name, we will probably end up having to fix a few test cases, even if we didn’t break anything.
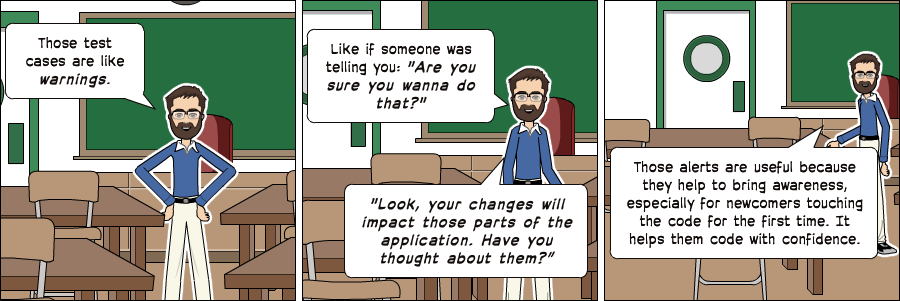
Those alerts are useful because they help to bring awareness, especially for newcomers touching the code for the first time. It helps them code with confidence.
Improving the Sign Up Template
Let’s work a little bit on it. Here we can use Bootstrap 4 cards components to make it look good.
Go to https://www.toptal.com/designers/subtlepatterns/ and find a nice background pattern to use as a background of the accounts pages. Download it, create a new folder named img inside the static folder, and place the image there.
Then after that, create a new CSS file named accounts.css in the static/css. The result should be the following:
myproject/
 |-- myproject/
 |    |-- accounts/
 |    |-- boards/
 |    |-- myproject/
 |    |-- static/
 |    |    |-- css/
 |    |    |    |-- accounts.css  <-- here
 |    |    |    |-- app.css
 |    |    |    +-- bootstrap.min.css
 |    |    +-- img/
 |    |    |    +-- shattered.png  <-- here (the name may be different, depending on the patter you downloaded)
 |    |-- templates/
 |    |-- db.sqlite3
 |    +-- manage.py
 +-- venv/
Now edit the accounts.css file:
static/css/accounts.css
body {
  background-image: url(../img/shattered.png);
}

.logo {
  font-family: 'Peralta', cursive;
}

.logo a {
  color: rgba(0,0,0,.9);
}

.logo a:hover,
.logo a:active {
  text-decoration: none;
}
In the signup.html template, we can change it to make use of the new CSS and also take the Bootstrap 4 card components into use:
templates/signup.html
{% extends 'base.html' %}

{% load static %}

{% block stylesheet %}
  <link rel="stylesheet" href="{% static 'css/accounts.css' %}">
{% endblock %}

{% block body %}
  <div class="container">
    <h1 class="text-center logo my-4">
      <a href="{% url 'home' %}">Django Boards</a>
    </h1>
    <div class="row justify-content-center">
      <div class="col-lg-8 col-md-10 col-sm-12">
        <div class="card">
          <div class="card-body">
            <h3 class="card-title">Sign up</h3>
            <form method="post" novalidate>
              {% csrf_token %}
              {% include 'includes/form.html' %}
              <button type="submit" class="btn btn-primary btn-block">Create an account</button>
            </form>
          </div>
          <div class="card-footer text-muted text-center">
            Already have an account? <a href="#">Log in</a>
          </div>
        </div>
      </div>
    </div>
  </div>
{% endblock %}
With that, this should be our sign up page right now:
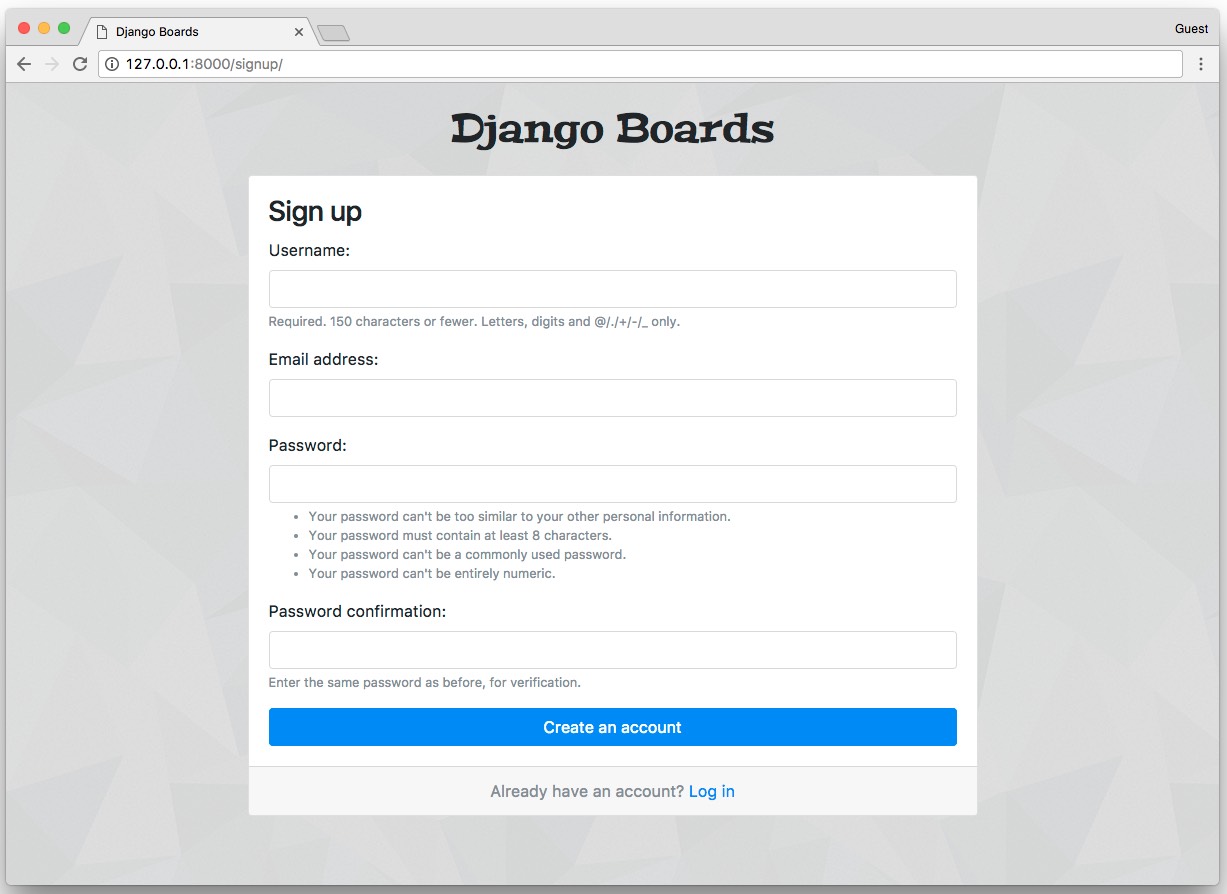
Logout
To keep a natural flow in the implementation, let’s add the log out view. First, edit the urls.py to add a new route:
myproject/urls.py
from django.conf.urls import url
from django.contrib import admin
from django.contrib.auth import views as auth_views

from accounts import views as accounts_views
from boards import views

urlpatterns = [
    url(r'^/figure>, views.home, name='home'),
    url(r'^signup//figure>, accounts_views.signup, name='signup'),
    url(r'^logout//figure>, auth_views.LogoutView.as_view(), name='logout'),
    url(r'^boards/(?P<pk>\d+)//figure>, views.board_topics, name='board_topics'),
    url(r'^boards/(?P<pk>\d+)/new//figure>, views.new_topic, name='new_topic'),
    url(r'^admin/', admin.site.urls),
]
We imported the views from the Django’s contrib module. We renamed it to auth_views to avoid clashing with the boards.views. Notice that this view is a little bit different: LogoutView.as_view(). It’s a Django’s class-based view. So far we have only implemented views as Python functions. The class-based views provide a more flexible way to extend and reuse views. We will discuss more that subject later on.
Open the settings.py file and add the LOGOUT_REDIRECT_URL variable to the bottom of the file:
myproject/settings.py
LOGOUT_REDIRECT_URL = 'home'
Here we are passing the name of the URL pattern we want to redirect the user after the log out.
After that, it’s already done. Just access the URL 127.0.0.1:8000/logout/ and you will be logged out. But hold on a second. Before you log out, let’s create the dropdown menu for logged in users.
Displaying Menu For Authenticated Users
Now we will need to do some tweaks in our base.html template. We have to add a dropdown menu with the logout link.
The Bootstrap 4 dropdown component needs jQuery to work.
First, go to jquery.com/download/ and download the compressed, production jQuery 3.2.1 version.

Inside the static folder, create a new folder named js. Copy the jquery-3.2.1.min.js file to there.
Bootstrap 4 also needs a library called Popper to work. Go to popper.js.org and download the latest version.
Inside the popper.js-1.12.5 folder, go to dist/umd and copy the file popper.min.js to our js folder. Pay attention here; Bootstrap 4 will only work with the umd/popper.min.js. So make sure you are copying the right file.
If you no longer have all the Bootstrap 4 files, download it again from getbootstrap.com.
Similarly, copy the bootstrap.min.js file to our js folder as well.
The final result should be:
myproject/
 |-- myproject/
 |    |-- accounts/
 |    |-- boards/
 |    |-- myproject/
 |    |-- static/
 |    |    |-- css/
 |    |    +-- js/
 |    |         |-- bootstrap.min.js
 |    |         |-- jquery-3.2.1.min.js
 |    |         +-- popper.min.js
 |    |-- templates/
 |    |-- db.sqlite3
 |    +-- manage.py
 +-- venv/
In the bottom of the base.html file, add the scripts after the {% endblock body %}:
templates/base.html
{% load static %}<!DOCTYPE html>
<html>
  <head>
    <meta charset="utf-8">
    <title>{% block title %}Django Boards{% endblock %}</title>
    <link href="https://fonts.googleapis.com/css?family=Peralta" rel="stylesheet">
    <link rel="stylesheet" href="{% static 'css/bootstrap.min.css' %}">
    <link rel="stylesheet" href="{% static 'css/app.css' %}">
    {% block stylesheet %}{% endblock %}
  </head>
  <body>
    {% block body %}
    <!-- code suppressed for brevity -->
    {% endblock body %}
    <script src="{% static 'js/jquery-3.2.1.min.js' %}"></script>
    <script src="{% static 'js/popper.min.js' %}"></script>
    <script src="{% static 'js/bootstrap.min.js' %}"></script>
  </body>
</html>
If you found the instructions confusing, just download the files using the direct links below:
- https://code.jquery.com/jquery-3.2.1.min.js
- https://cdnjs.cloudflare.com/ajax/libs/popper.js/1.11.0/umd/popper.min.js
- https://maxcdn.bootstrapcdn.com/bootstrap/4.0.0-beta/js/bootstrap.min.js
Right-click and *Save link as….
Now we can add the Bootstrap 4 dropdown menu:
templates/base.html
<nav class="navbar navbar-expand-sm navbar-dark bg-dark">
  <div class="container">
    <a class="navbar-brand" href="{% url 'home' %}">Django Boards</a>
    <button class="navbar-toggler" type="button" data-toggle="collapse" data-target="#mainMenu" aria-controls="mainMenu" aria-expanded="false" aria-label="Toggle navigation">
      <span class="navbar-toggler-icon"></span>
    </button>
    <div class="collapse navbar-collapse" id="mainMenu">
      <ul class="navbar-nav ml-auto">
        <li class="nav-item dropdown">
          <a class="nav-link dropdown-toggle" href="#" id="userMenu" data-toggle="dropdown" aria-haspopup="true" aria-expanded="false">
            {{ user.username }}
          </a>
          <div class="dropdown-menu dropdown-menu-right" aria-labelledby="userMenu">
            <a class="dropdown-item" href="#">My account</a>
            <a class="dropdown-item" href="#">Change password</a>
            <div class="dropdown-divider"></div>
            <a class="dropdown-item" href="{% url 'logout' %}">Log out</a>
          </div>
        </li>
      </ul>
    </div>
  </div>
</nav>
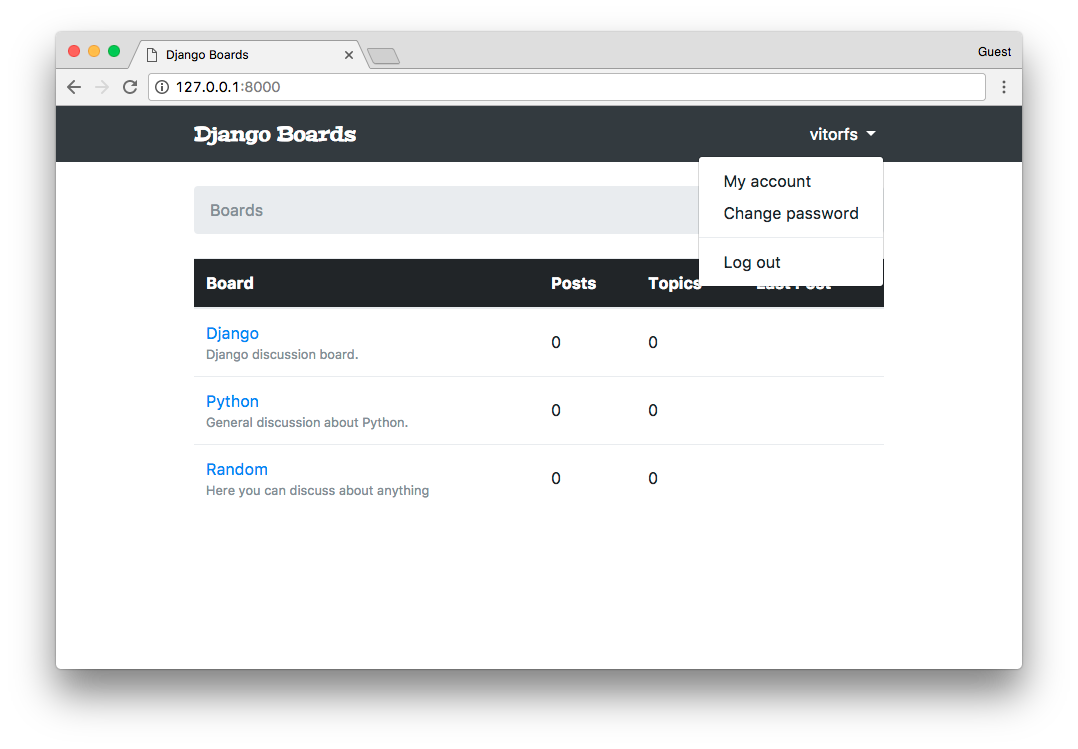
Let’s try it. Click on logout:
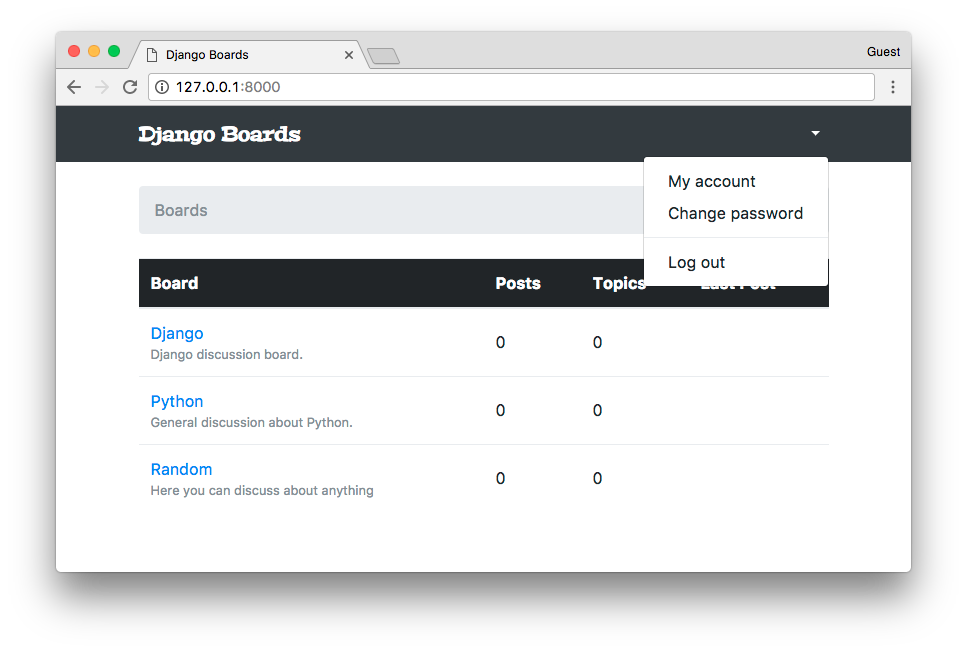
It’s working. But the dropdown is showing regardless of the user being logged in or not. The difference is that now the username is empty, and we can only see an arrow.
We can improve it a little bit:
<nav class="navbar navbar-expand-sm navbar-dark bg-dark">
  <div class="container">
    <a class="navbar-brand" href="{% url 'home' %}">Django Boards</a>
    <button class="navbar-toggler" type="button" data-toggle="collapse" data-target="#mainMenu" aria-controls="mainMenu" aria-expanded="false" aria-label="Toggle navigation">
      <span class="navbar-toggler-icon"></span>
    </button>
    <div class="collapse navbar-collapse" id="mainMenu">
      {% if user.is_authenticated %}
        <ul class="navbar-nav ml-auto">
          <li class="nav-item dropdown">
            <a class="nav-link dropdown-toggle" href="#" id="userMenu" data-toggle="dropdown" aria-haspopup="true" aria-expanded="false">
              {{ user.username }}
            </a>
            <div class="dropdown-menu dropdown-menu-right" aria-labelledby="userMenu">
              <a class="dropdown-item" href="#">My account</a>
              <a class="dropdown-item" href="#">Change password</a>
              <div class="dropdown-divider"></div>
              <a class="dropdown-item" href="{% url 'logout' %}">Log out</a>
            </div>
          </li>
        </ul>
      {% else %}
        <form class="form-inline ml-auto">
          <a href="#" class="btn btn-outline-secondary">Log in</a>
          <a href="{% url 'signup' %}" class="btn btn-primary ml-2">Sign up</a>
        </form>
      {% endif %}
    </div>
  </div>
</nav>
Now we are telling Django to show the dropdown menu if the user is logged in, and if not, show the log in and sign up buttons:
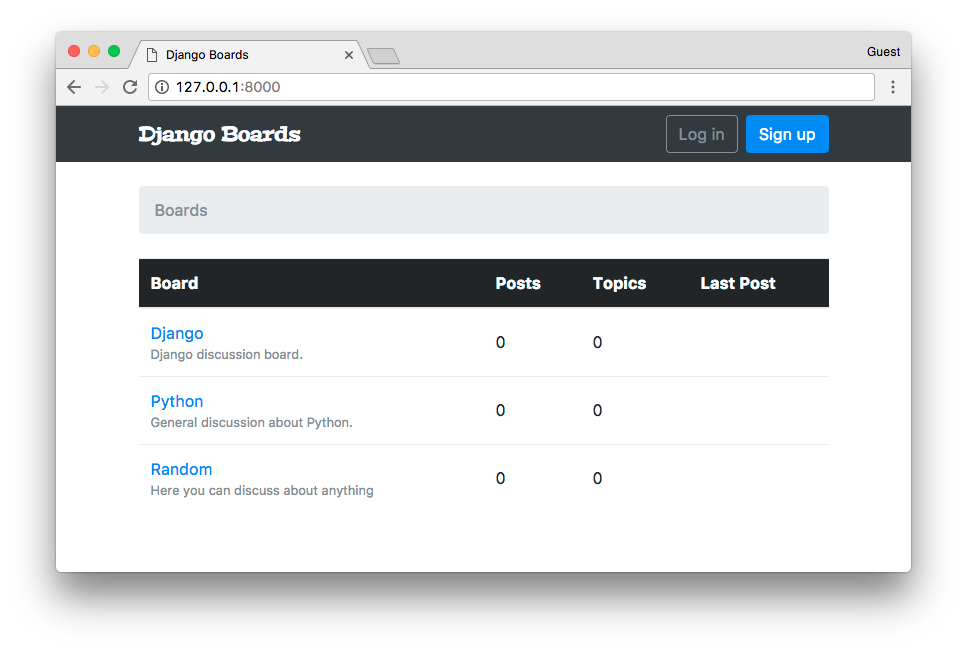
Login
First thing, add a new URL route:
myproject/urls.py
from django.conf.urls import url
from django.contrib import admin
from django.contrib.auth import views as auth_views

from accounts import views as accounts_views
from boards import views

urlpatterns = [
    url(r'^/figure>, views.home, name='home'),
    url(r'^signup//figure>, accounts_views.signup, name='signup'),
    url(r'^login//figure>, auth_views.LoginView.as_view(template_name='login.html'), name='login'),
    url(r'^logout//figure>, auth_views.LogoutView.as_view(), name='logout'),
    url(r'^boards/(?P<pk>\d+)//figure>, views.board_topics, name='board_topics'),
    url(r'^boards/(?P<pk>\d+)/new//figure>, views.new_topic, name='new_topic'),
    url(r'^admin/', admin.site.urls),
]
Inside the as_view() we can pass some extra parameters, so to override the defaults. In this case, we are instructing the LoginView to look for a template at login.html.
Edit the settings.py and add the following configuration:
myproject/settings.py
LOGIN_REDIRECT_URL = 'home'
This configuration is telling Django where to redirect the user after a successful login.
Finally, add the login URL to the base.html template:
templates/base.html
<a href="{% url 'login' %}" class="btn btn-outline-secondary">Log in</a>
We can create a template similar to the sign up page. Create a new file named login.html:
templates/login.html
{% extends 'base.html' %}

{% load static %}

{% block stylesheet %}
  <link rel="stylesheet" href="{% static 'css/accounts.css' %}">
{% endblock %}

{% block body %}
  <div class="container">
    <h1 class="text-center logo my-4">
      <a href="{% url 'home' %}">Django Boards</a>
    </h1>
    <div class="row justify-content-center">
      <div class="col-lg-4 col-md-6 col-sm-8">
        <div class="card">
          <div class="card-body">
            <h3 class="card-title">Log in</h3>
            <form method="post" novalidate>
              {% csrf_token %}
              {% include 'includes/form.html' %}
              <button type="submit" class="btn btn-primary btn-block">Log in</button>
            </form>
          </div>
          <div class="card-footer text-muted text-center">
            New to Django Boards? <a href="{% url 'signup' %}">Sign up</a>
          </div>
        </div>
        <div class="text-center py-2">
          <small>
            <a href="#" class="text-muted">Forgot your password?</a>
          </small>
        </div>
      </div>
    </div>
  </div>
{% endblock %}
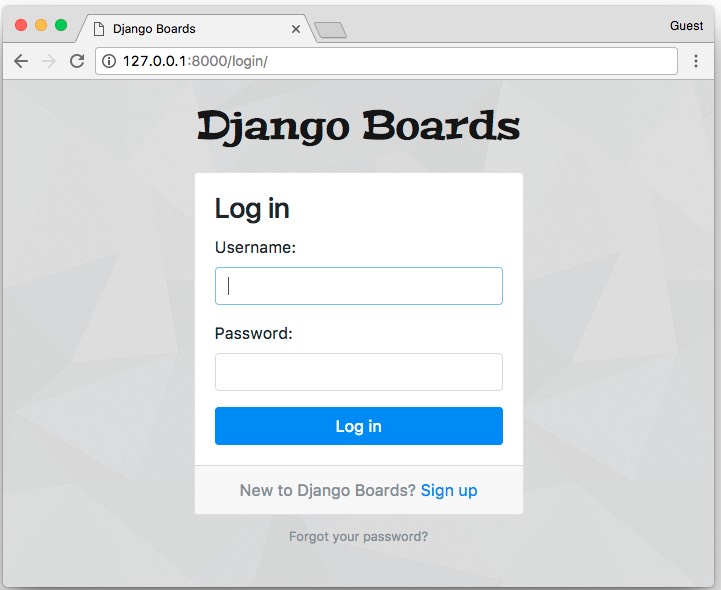
And we are repeating HTML templates. Let’s refactor it.
Create a new template named base_accounts.html:
templates/base_accounts.html
{% extends 'base.html' %}

{% load static %}

{% block stylesheet %}
  <link rel="stylesheet" href="{% static 'css/accounts.css' %}">
{% endblock %}

{% block body %}
  <div class="container">
    <h1 class="text-center logo my-4">
      <a href="{% url 'home' %}">Django Boards</a>
    </h1>
    {% block content %}
    {% endblock %}
  </div>
{% endblock %}
Now use it on both signup.html and login.html:
templates/login.html
{% extends 'base_accounts.html' %}

{% block title %}Log in to Django Boards{% endblock %}

{% block content %}
  <div class="row justify-content-center">
    <div class="col-lg-4 col-md-6 col-sm-8">
      <div class="card">
        <div class="card-body">
          <h3 class="card-title">Log in</h3>
          <form method="post" novalidate>
            {% csrf_token %}
            {% include 'includes/form.html' %}
            <button type="submit" class="btn btn-primary btn-block">Log in</button>
          </form>
        </div>
        <div class="card-footer text-muted text-center">
          New to Django Boards? <a href="{% url 'signup' %}">Sign up</a>
        </div>
      </div>
      <div class="text-center py-2">
        <small>
          <a href="#" class="text-muted">Forgot your password?</a>
        </small>
      </div>
    </div>
  </div>
{% endblock %}
We still don’t have the password reset URL, so let’s leave it as # for now.
templates/signup.html
{% extends 'base_accounts.html' %}

{% block title %}Sign up to Django Boards{% endblock %}

{% block content %}
  <div class="row justify-content-center">
    <div class="col-lg-8 col-md-10 col-sm-12">
      <div class="card">
        <div class="card-body">
          <h3 class="card-title">Sign up</h3>
          <form method="post" novalidate>
            {% csrf_token %}
            {% include 'includes/form.html' %}
            <button type="submit" class="btn btn-primary btn-block">Create an account</button>
          </form>
        </div>
        <div class="card-footer text-muted text-center">
          Already have an account? <a href="{% url 'login' %}">Log in</a>
        </div>
      </div>
    </div>
  </div>
{% endblock %}
Notice that we added the log in URL: <a href="{% url 'login' %}">Log in</a>.
Log In Non Field Errors
If we submit the log in form empty, we get some nice error messages:
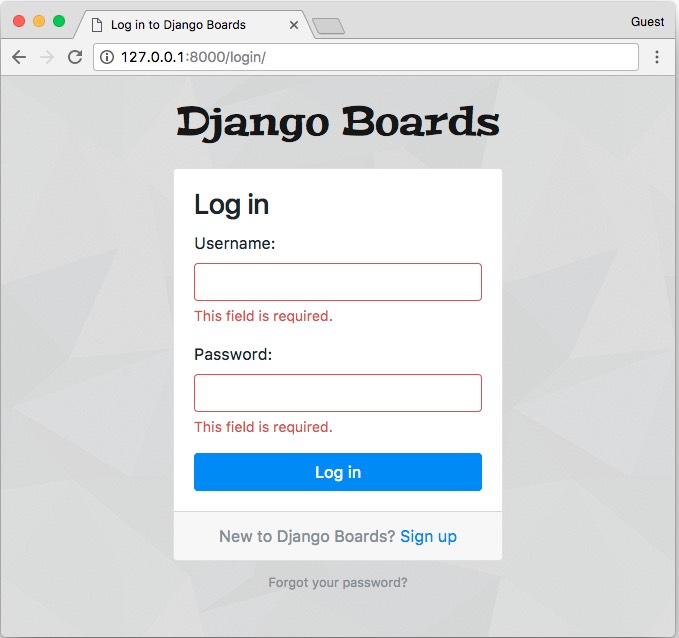
But if we submit an username that doesn’t exist or an invalid password, right now that’s what’s going to happen:
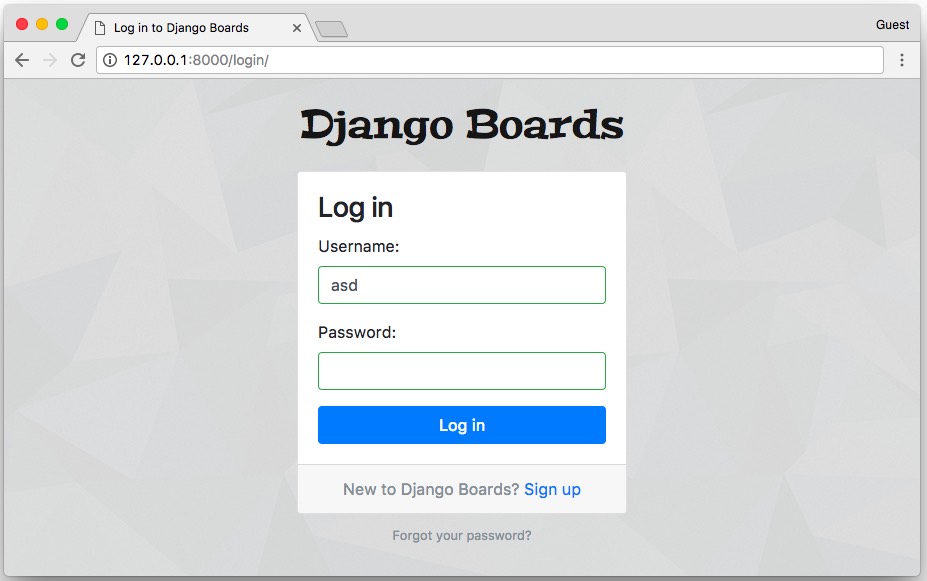
A little bit misleading. The fields are showing green, suggesting they are okay. Also, there’s no message saying anything.
That’s because forms have a special type of error, which is called non-field errors. It’s a collection of errors that are not related to a specific field. Let’s refactor the form.html partial template to display those errors as well:
templates/includes/form.html
{% load widget_tweaks %}

{% if form.non_field_errors %}
  <div class="alert alert-danger" role="alert">
    {% for error in form.non_field_errors %}
      <p{% if forloop.last %} class="mb-0"{% endif %}>{{ error }}</p>
    {% endfor %}
  </div>
{% endif %}

{% for field in form %}
  <!-- code suppressed -->
{% endfor %}
The {% if forloop.last %} is just a minor thing. Because the p tag has a margin-bottom. And a form may have several non-field errors. For each non-field error, we render a p tag with the error. Then I’m checking if it’s the last error to render. If so, we add a Bootstrap 4 CSS class mb-0 which stands for “margin bottom = 0”. Then the alert doesn’t look weird, with some extra space. Again, just a very minor detail. I did that just to keep the consistency of the spacing.
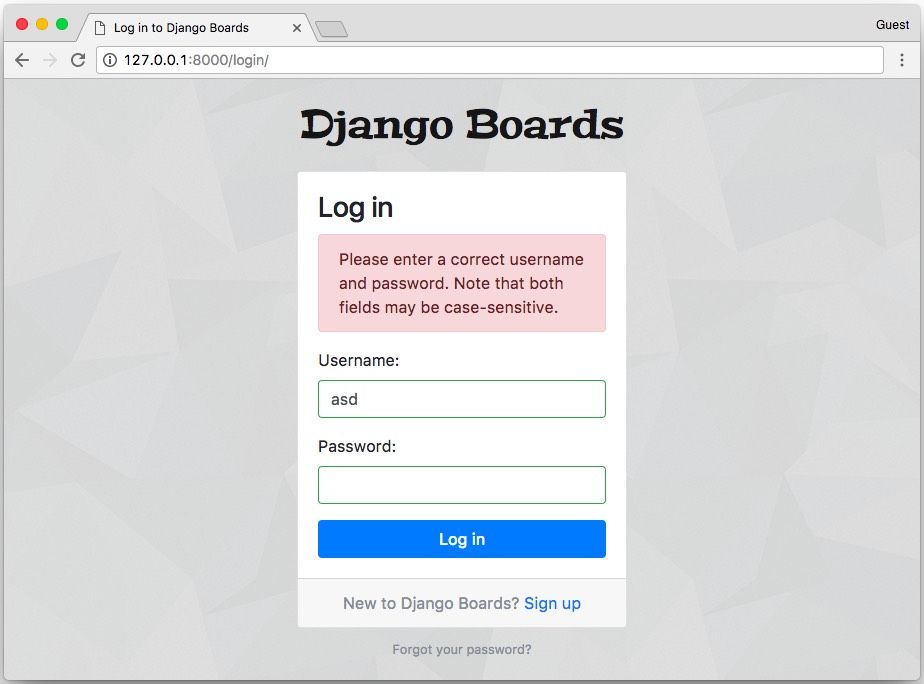
We still have to deal with the password field though. The thing is, Django never returned the data of password fields to the client. So, instead of trying to do something smart, let’s just ignore the is-valid and is-invalid CSS classes in some cases. But our form template already looks complicated. We can move some of the code to a template tag.
Creating Custom Template Tags
Inside the boards app, create a new folder named templatetags. Then inside this folder, create two empty files named init.py and form_tags.py.
The structure should be the following:
myproject/
 |-- myproject/
 |    |-- accounts/
 |    |-- boards/
 |    |    |-- migrations/
 |    |    |-- templatetags/        <-- here
 |    |    |    |-- __init__.py
 |    |    |    +-- form_tags.py
 |    |    |-- __init__.py
 |    |    |-- admin.py
 |    |    |-- apps.py
 |    |    |-- models.py
 |    |    |-- tests.py
 |    |    +-- views.py
 |    |-- myproject/
 |    |-- static/
 |    |-- templates/
 |    |-- db.sqlite3
 |    +-- manage.py
 +-- venv/
In the form_tags.py file, let’s create two template tags:
boards/templatetags/form_tags.py
from django import template

register = template.Library()

@register.filter
def field_type(bound_field):
    return bound_field.field.widget.__class__.__name__

@register.filter
def input_class(bound_field):
    css_class = ''
    if bound_field.form.is_bound:
        if bound_field.errors:
            css_class = 'is-invalid'
        elif field_type(bound_field) != 'PasswordInput':
            css_class = 'is-valid'
    return 'form-control {}'.format(css_class)
Those are template filters. They work like this:
First, we load it in a template as we do with the widget_tweaks or static template tags. Note that after creating this file, you will have to manually stop the development server and start it again so Django can identify the new template tags.
{% load form_tags %}
Then after that, we can use them in a template:
{{ form.username|field_type }}
Will return:
'TextInput'
Or in case of the input_class:
{{ form.username|input_class }}

<!-- if the form is not bound, it will simply return: -->
'form-control '

<!-- if the form is bound and valid: -->
'form-control is-valid'

<!-- if the form is bound and invalid: -->
'form-control is-invalid'
Now update the form.html to use the new template tags:
templates/includes/form.html
{% load form_tags widget_tweaks %}

{% if form.non_field_errors %}
  <div class="alert alert-danger" role="alert">
    {% for error in form.non_field_errors %}
      <p{% if forloop.last %} class="mb-0"{% endif %}>{{ error }}</p>
    {% endfor %}
  </div>
{% endif %}

{% for field in form %}
  <div class="form-group">
    {{ field.label_tag }}
    {% render_field field class=field|input_class %}
    {% for error in field.errors %}
      <div class="invalid-feedback">
        {{ error }}
      </div>
    {% endfor %}
    {% if field.help_text %}
      <small class="form-text text-muted">
        {{ field.help_text|safe }}
      </small>
    {% endif %}
  </div>
{% endfor %}
Much better, right? Reduced the complexity of the template. It looks cleaner now. And it also solved the problem with the password field displaying a green border:
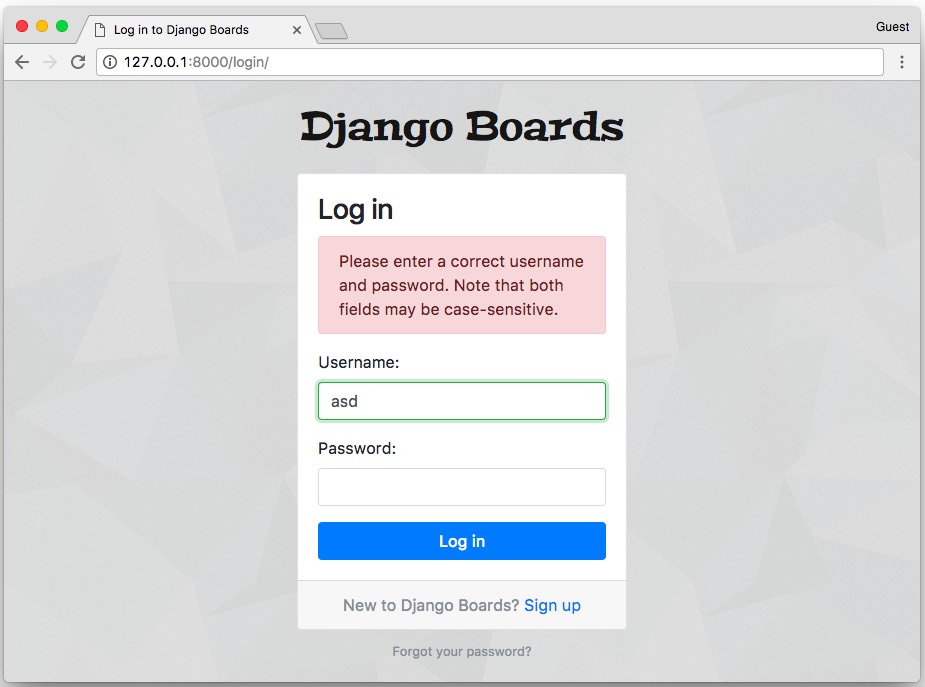
Testing the Template Tags
First, let’s just organize the boards’ tests a little bit. Like we did with the accounts app, create a new folder named tests, add a init.py, copy the tests.py and rename it to just test_views.py for now.
Add a new empty file named test_templatetags.py.
myproject/
 |-- myproject/
 |    |-- accounts/
 |    |-- boards/
 |    |    |-- migrations/
 |    |    |-- templatetags/
 |    |    |-- tests/
 |    |    |    |-- __init__.py
 |    |    |    |-- test_templatetags.py  <-- new file, empty for now
 |    |    |    +-- test_views.py  <-- our old file with all the tests
 |    |    |-- __init__.py
 |    |    |-- admin.py
 |    |    |-- apps.py
 |    |    |-- models.py
 |    |    +-- views.py
 |    |-- myproject/
 |    |-- static/
 |    |-- templates/
 |    |-- db.sqlite3
 |    +-- manage.py
 +-- venv/
Fix the test_views.py imports:
boards/tests/test_views.py
from ..views import home, board_topics, new_topic
from ..models import Board, Topic, Post
from ..forms import NewTopicForm
Execute the tests just to make sure everything is working.
boards/tests/test_templatetags.py
from django import forms
from django.test import TestCase
from ..templatetags.form_tags import field_type, input_class

class ExampleForm(forms.Form):
    name = forms.CharField()
    password = forms.CharField(widget=forms.PasswordInput())
    class Meta:
        fields = ('name', 'password')

class FieldTypeTests(TestCase):
    def test_field_widget_type(self):
        form = ExampleForm()
        self.assertEquals('TextInput', field_type(form['name']))
        self.assertEquals('PasswordInput', field_type(form['password']))

class InputClassTests(TestCase):
    def test_unbound_field_initial_state(self):
        form = ExampleForm()  # unbound form
        self.assertEquals('form-control ', input_class(form['name']))

    def test_valid_bound_field(self):
        form = ExampleForm({'name': 'john', 'password': '123'})  # bound form (field + data)
        self.assertEquals('form-control is-valid', input_class(form['name']))
        self.assertEquals('form-control ', input_class(form['password']))

    def test_invalid_bound_field(self):
        form = ExampleForm({'name': '', 'password': '123'})  # bound form (field + data)
        self.assertEquals('form-control is-invalid', input_class(form['name']))
We created a form class to be used in the tests then added test cases covering the possible scenarios in the two template tags.
python manage.py test
Creating test database for alias 'default'...
System check identified no issues (0 silenced).
................................
----------------------------------------------------------------------
Ran 32 tests in 0.846s

OK
Destroying test database for alias 'default'...
Password Reset
The password reset process involves some nasty URL patterns. But as we discussed in the previous tutorial, we don’t need to be an expert in regular expressions. It’s just a matter of knowing the common ones.
Another important thing before we start is that, for the password reset process, we need to send emails. It’s a little bit complicated in the beginning because we need an external service. For now, we won’t be configuring a production quality email service. In fact, during the development phase, we can use Django’s debug tools to check if the emails are being sent correctly.
Console Email Backend
The idea is during the development of the project, instead of sending real emails, we just log them. There are two options: writing all emails in a text file or simply displaying them in the console. I find the latter option more convenient because we are already using a console to run the development server and the setup is a bit easier.
Edit the settings.py module and add the EMAIL_BACKEND variable to the end of the file:
myproject/settings.py
EMAIL_BACKEND = 'django.core.mail.backends.console.EmailBackend'
Configuring the Routes
The password reset process requires four views:
- A page with a form to start the reset process;
- A success page saying the process initiated, instructing the user to check their spam folders, etc.;
- A page to check the token sent via email;
- A page to tell the user if the reset was successful or not.
The views are built-in, we don’t need to implement anything. All we need to do is add the routes to the urls.py and create the templates.
myproject/urls.py (view complete file contents)
url(r'^reset//figure>,
    auth_views.PasswordResetView.as_view(
        template_name='password_reset.html',
        email_template_name='password_reset_email.html',
        subject_template_name='password_reset_subject.txt'
    ),
    name='password_reset'),
url(r'^reset/done//figure>,
    auth_views.PasswordResetDoneView.as_view(template_name='password_reset_done.html'),
    name='password_reset_done'),
url(r'^reset/(?P<uidb64>[0-9A-Za-z_\-]+)/(?P<token>[0-9A-Za-z]{1,13}-[0-9A-Za-z]{1,20})//figure>,
    auth_views.PasswordResetConfirmView.as_view(template_name='password_reset_confirm.html'),
    name='password_reset_confirm'),
url(r'^reset/complete//figure>,
    auth_views.PasswordResetCompleteView.as_view(template_name='password_reset_complete.html'),
    name='password_reset_complete'),
]
The template_name parameter in the password reset views are optional. But I thought it would be a good idea to re-define it, so the link between the view and the template be more obvious than just using the defaults.
Inside the templates folder, the following template files:
- password_reset.html
- password_reset_email.html: this template is the body of the email message sent to the user
- password_reset_subject.txt: this template is the subject line of the email, it should be a single line file
- password_reset_done.html
- password_reset_confirm.html
- password_reset_complete.html
Before we start implementing the templates, let’s prepare a new test file.
We can add just some basic tests because those views and forms are already tested in the Django code. We are going to test just the specifics of our application.
Create a new test file named test_view_password_reset.py inside the accounts/tests folder.
Password Reset View
templates/password_reset.html
{% extends 'base_accounts.html' %}

{% block title %}Reset your password{% endblock %}

{% block content %}
  <div class="row justify-content-center">
    <div class="col-lg-4 col-md-6 col-sm-8">
      <div class="card">
        <div class="card-body">
          <h3 class="card-title">Reset your password</h3>
          <p>Enter your email address and we will send you a link to reset your password.</p>
          <form method="post" novalidate>
            {% csrf_token %}
            {% include 'includes/form.html' %}
            <button type="submit" class="btn btn-primary btn-block">Send password reset email</button>
          </form>
        </div>
      </div>
    </div>
  </div>
{% endblock %}
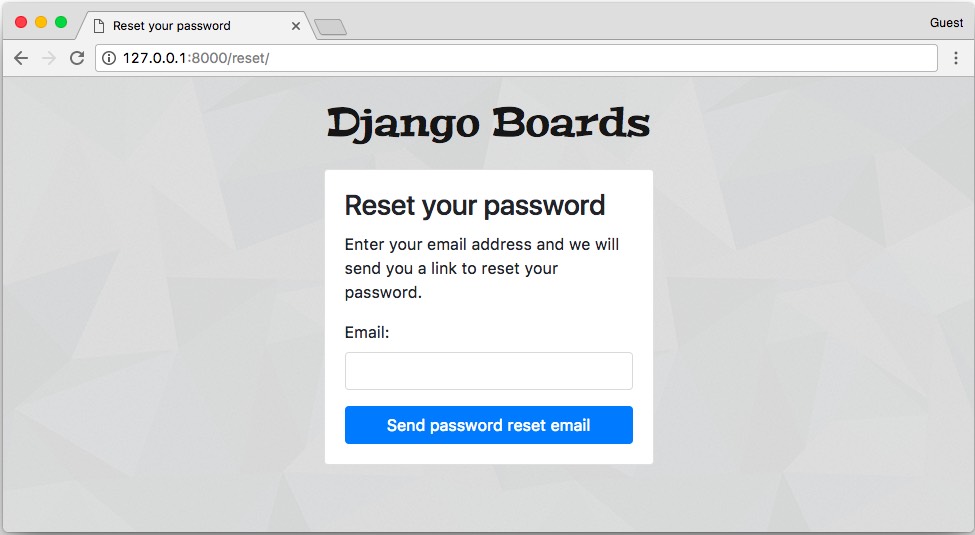
accounts/tests/test_view_password_reset.py
from django.contrib.auth import views as auth_views
from django.contrib.auth.forms import PasswordResetForm
from django.contrib.auth.models import User
from django.core import mail
from django.core.urlresolvers import reverse
from django.urls import resolve
from django.test import TestCase

class PasswordResetTests(TestCase):
    def setUp(self):
        url = reverse('password_reset')
        self.response = self.client.get(url)

    def test_status_code(self):
        self.assertEquals(self.response.status_code, 200)

    def test_view_function(self):
        view = resolve('/reset/')
        self.assertEquals(view.func.view_class, auth_views.PasswordResetView)

    def test_csrf(self):
        self.assertContains(self.response, 'csrfmiddlewaretoken')

    def test_contains_form(self):
        form = self.response.context.get('form')
        self.assertIsInstance(form, PasswordResetForm)

    def test_form_inputs(self):
        '''
        The view must contain two inputs: csrf and email
        '''
        self.assertContains(self.response, '<input', 2)
        self.assertContains(self.response, 'type="email"', 1)

class SuccessfulPasswordResetTests(TestCase):
    def setUp(self):
        email = 'john@doe.com'
        User.objects.create_user(username='john', email=email, password='123abcdef')
        url = reverse('password_reset')
        self.response = self.client.post(url, {'email': email})

    def test_redirection(self):
        '''
        A valid form submission should redirect the user to `password_reset_done` view
        '''
        url = reverse('password_reset_done')
        self.assertRedirects(self.response, url)

    def test_send_password_reset_email(self):
        self.assertEqual(1, len(mail.outbox))

class InvalidPasswordResetTests(TestCase):
    def setUp(self):
        url = reverse('password_reset')
        self.response = self.client.post(url, {'email': 'donotexist@email.com'})

    def test_redirection(self):
        '''
        Even invalid emails in the database should
        redirect the user to `password_reset_done` view
        '''
        url = reverse('password_reset_done')
        self.assertRedirects(self.response, url)

    def test_no_reset_email_sent(self):
        self.assertEqual(0, len(mail.outbox))
templates/password_reset_subject.txt
[Django Boards] Please reset your password
templates/password_reset_email.html
Hi there,

Someone asked for a password reset for the email address {{ email }}.
Follow the link below:
{{ protocol }}://{{ domain }}{% url 'password_reset_confirm' uidb64=uid token=token %}

In case you forgot your Django Boards username: {{ user.username }}

If clicking the link above doesn't work, please copy and paste the URL
in a new browser window instead.

If you've received this mail in error, it's likely that another user entered
your email address by mistake while trying to reset a password. If you didn't
initiate the request, you don't need to take any further action and can safely
disregard this email.

Thanks,

The Django Boards Team
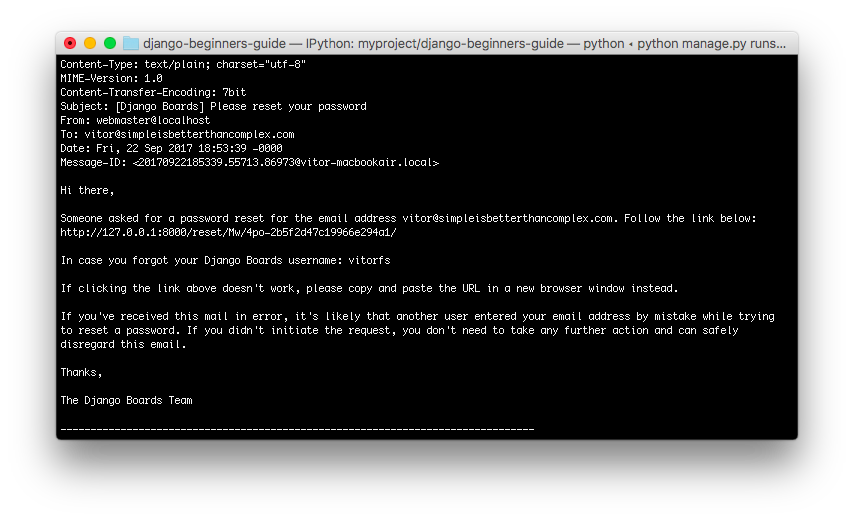
We can create a specific file to test the email message. Create a new file named test_mail_password_reset.py inside the accounts/tests folder:
accounts/tests/test_mail_password_reset.py
from django.core import mail
from django.contrib.auth.models import User
from django.urls import reverse
from django.test import TestCase

class PasswordResetMailTests(TestCase):
    def setUp(self):
        User.objects.create_user(username='john', email='john@doe.com', password='123')
        self.response = self.client.post(reverse('password_reset'), { 'email': 'john@doe.com' })
        self.email = mail.outbox[0]

    def test_email_subject(self):
        self.assertEqual('[Django Boards] Please reset your password', self.email.subject)

    def test_email_body(self):
        context = self.response.context
        token = context.get('token')
        uid = context.get('uid')
        password_reset_token_url = reverse('password_reset_confirm', kwargs={
            'uidb64': uid,
            'token': token
        })
        self.assertIn(password_reset_token_url, self.email.body)
        self.assertIn('john', self.email.body)
        self.assertIn('john@doe.com', self.email.body)

    def test_email_to(self):
        self.assertEqual(['john@doe.com',], self.email.to)
This test case grabs the email sent by the application, and examine the subject line, the body contents, and to who was the email sent to.
Password Reset Done View
templates/password_reset_done.html
{% extends 'base_accounts.html' %}

{% block title %}Reset your password{% endblock %}

{% block content %}
  <div class="row justify-content-center">
    <div class="col-lg-4 col-md-6 col-sm-8">
      <div class="card">
        <div class="card-body">
          <h3 class="card-title">Reset your password</h3>
          <p>Check your email for a link to reset your password. If it doesn't appear within a few minutes, check your spam folder.</p>
          <a href="{% url 'login' %}" class="btn btn-secondary btn-block">Return to log in</a>
        </div>
      </div>
    </div>
  </div>
{% endblock %}

accounts/tests/test_view_password_reset.py
from django.contrib.auth import views as auth_views
from django.core.urlresolvers import reverse
from django.urls import resolve
from django.test import TestCase

class PasswordResetDoneTests(TestCase):
    def setUp(self):
        url = reverse('password_reset_done')
        self.response = self.client.get(url)

    def test_status_code(self):
        self.assertEquals(self.response.status_code, 200)

    def test_view_function(self):
        view = resolve('/reset/done/')
        self.assertEquals(view.func.view_class, auth_views.PasswordResetDoneView)
Password Reset Confirm View
templates/password_reset_confirm.html
{% extends 'base_accounts.html' %}

{% block title %}
  {% if validlink %}
    Change password for {{ form.user.username }}
  {% else %}
    Reset your password
  {% endif %}
{% endblock %}

{% block content %}
  <div class="row justify-content-center">
    <div class="col-lg-6 col-md-8 col-sm-10">
      <div class="card">
        <div class="card-body">
          {% if validlink %}
            <h3 class="card-title">Change password for @{{ form.user.username }}</h3>
            <form method="post" novalidate>
              {% csrf_token %}
              {% include 'includes/form.html' %}
              <button type="submit" class="btn btn-success btn-block">Change password</button>
            </form>
          {% else %}
            <h3 class="card-title">Reset your password</h3>
            <div class="alert alert-danger" role="alert">
              It looks like you clicked on an invalid password reset link. Please try again.
            </div>
            <a href="{% url 'password_reset' %}" class="btn btn-secondary btn-block">Request a new password reset link</a>
          {% endif %}
        </div>
      </div>
    </div>
  </div>
{% endblock %}
This page can only be accessed with the link sent in the email. It looks like this: http://127.0.0.1:8000/reset/Mw/4po-2b5f2d47c19966e294a1/
During the development phase, grab this link from the email in the console.
If the link is valid:

Or if the link has already been used:
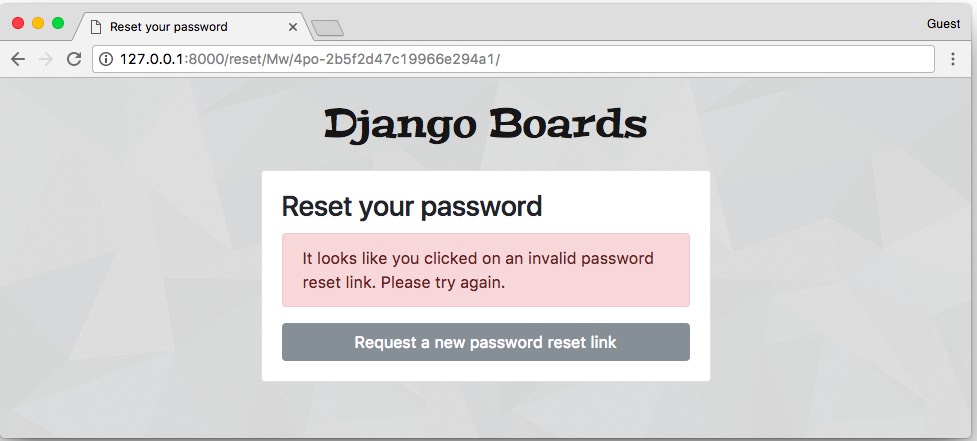
accounts/tests/test_view_password_reset.py
from django.contrib.auth.tokens import default_token_generator
from django.utils.encoding import force_bytes
from django.utils.http import urlsafe_base64_encode
from django.contrib.auth import views as auth_views
from django.contrib.auth.forms import SetPasswordForm
from django.contrib.auth.models import User
from django.core.urlresolvers import reverse
from django.urls import resolve
from django.test import TestCase

class PasswordResetConfirmTests(TestCase):
    def setUp(self):
        user = User.objects.create_user(username='john', email='john@doe.com', password='123abcdef')

        '''
        create a valid password reset token
        based on how django creates the token internally:
        https://github.com/django/django/blob/1.11.5/django/contrib/auth/forms.py#L280
        '''
        self.uid = urlsafe_base64_encode(force_bytes(user.pk)).decode()
        self.token = default_token_generator.make_token(user)

        url = reverse('password_reset_confirm', kwargs={'uidb64': self.uid, 'token': self.token})
        self.response = self.client.get(url, follow=True)

    def test_status_code(self):
        self.assertEquals(self.response.status_code, 200)

    def test_view_function(self):
        view = resolve('/reset/{uidb64}/{token}/'.format(uidb64=self.uid, token=self.token))
        self.assertEquals(view.func.view_class, auth_views.PasswordResetConfirmView)

    def test_csrf(self):
        self.assertContains(self.response, 'csrfmiddlewaretoken')

    def test_contains_form(self):
        form = self.response.context.get('form')
        self.assertIsInstance(form, SetPasswordForm)

    def test_form_inputs(self):
        '''
        The view must contain two inputs: csrf and two password fields
        '''
        self.assertContains(self.response, '<input', 3)
        self.assertContains(self.response, 'type="password"', 2)

class InvalidPasswordResetConfirmTests(TestCase):
    def setUp(self):
        user = User.objects.create_user(username='john', email='john@doe.com', password='123abcdef')
        uid = urlsafe_base64_encode(force_bytes(user.pk)).decode()
        token = default_token_generator.make_token(user)

        '''
        invalidate the token by changing the password
        '''
        user.set_password('abcdef123')
        user.save()

        url = reverse('password_reset_confirm', kwargs={'uidb64': uid, 'token': token})
        self.response = self.client.get(url)

    def test_status_code(self):
        self.assertEquals(self.response.status_code, 200)

    def test_html(self):
        password_reset_url = reverse('password_reset')
        self.assertContains(self.response, 'invalid password reset link')
        self.assertContains(self.response, 'href="{0}"'.format(password_reset_url))
Password Reset Complete View
templates/password_reset_complete.html
{% extends 'base_accounts.html' %}

{% block title %}Password changed!{% endblock %}

{% block content %}
  <div class="row justify-content-center">
    <div class="col-lg-6 col-md-8 col-sm-10">
      <div class="card">
        <div class="card-body">
          <h3 class="card-title">Password changed!</h3>
          <div class="alert alert-success" role="alert">
            You have successfully changed your password! You may now proceed to log in.
          </div>
          <a href="{% url 'login' %}" class="btn btn-secondary btn-block">Return to log in</a>
        </div>
      </div>
    </div>
  </div>
{% endblock %}

accounts/tests/test_view_password_reset.py (view complete file contents)
from django.contrib.auth import views as auth_views
from django.core.urlresolvers import reverse
from django.urls import resolve
from django.test import TestCase

class PasswordResetCompleteTests(TestCase):
    def setUp(self):
        url = reverse('password_reset_complete')
        self.response = self.client.get(url)

    def test_status_code(self):
        self.assertEquals(self.response.status_code, 200)

    def test_view_function(self):
        view = resolve('/reset/complete/')
        self.assertEquals(view.func.view_class, auth_views.PasswordResetCompleteView)
Password Change View
This view is meant to be used by logged in users that want to change their password. Usually, those forms are composed of three fields: old password, new password, and new password confirmation.
myproject/urls.py (view complete file contents)
url(r'^settings/password//figure>, auth_views.PasswordChangeView.as_view(template_name='password_change.html'),
    name='password_change'),
url(r'^settings/password/done//figure>, auth_views.PasswordChangeDoneView.as_view(template_name='password_change_done.html'),
    name='password_change_done'),
Those views only works for logged in users. They make use of a view decorator named @login_required. This decorator prevents non-authorized users to access this page. If the user is not logged in, Django will redirect them to the login page.
Now we have to define what is the login URL of our application in the settings.py:
myproject/settings.py (view complete file contents)
LOGIN_URL = 'login'
templates/password_change.html
{% extends 'base.html' %}

{% block title %}Change password{% endblock %}

{% block breadcrumb %}
  <li class="breadcrumb-item active">Change password</li>
{% endblock %}

{% block content %}
  <div class="row">
    <div class="col-lg-6 col-md-8 col-sm-10">
      <form method="post" novalidate>
        {% csrf_token %}
        {% include 'includes/form.html' %}
        <button type="submit" class="btn btn-success">Change password</button>
      </form>
    </div>
  </div>
{% endblock %}
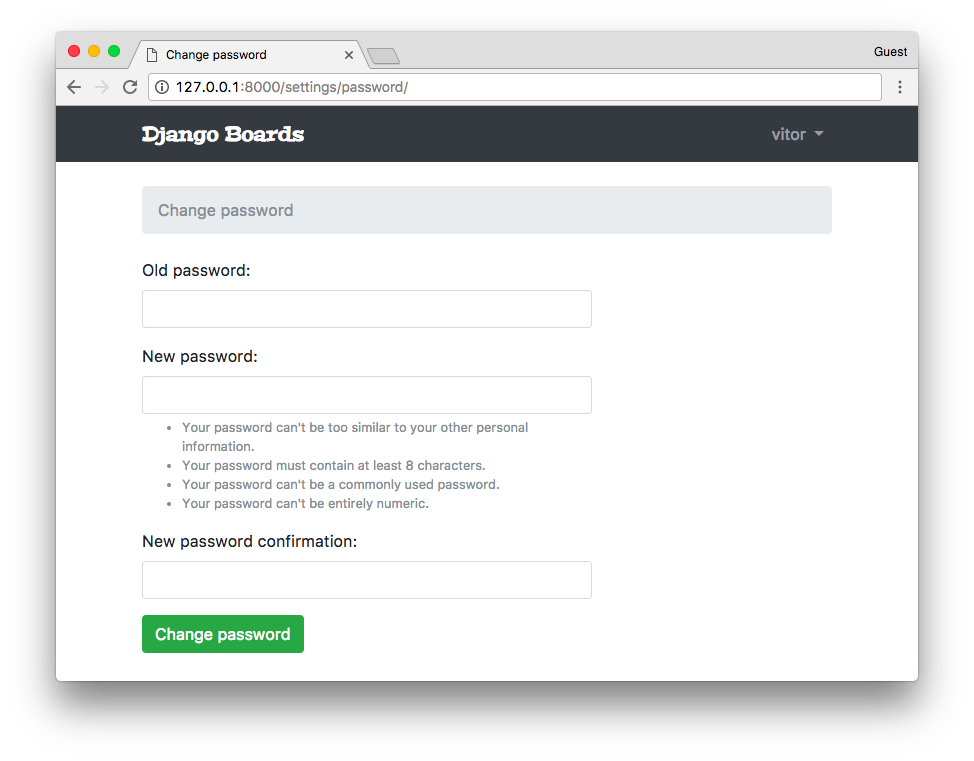
templates/password_change_done.html
{% extends 'base.html' %}

{% block title %}Change password successful{% endblock %}

{% block breadcrumb %}
  <li class="breadcrumb-item"><a href="{% url 'password_change' %}">Change password</a></li>
  <li class="breadcrumb-item active">Success</li>
{% endblock %}

{% block content %}
  <div class="alert alert-success" role="alert">
    <strong>Success!</strong> Your password has been changed!
  </div>
  <a href="{% url 'home' %}" class="btn btn-secondary">Return to home page</a>
{% endblock %}
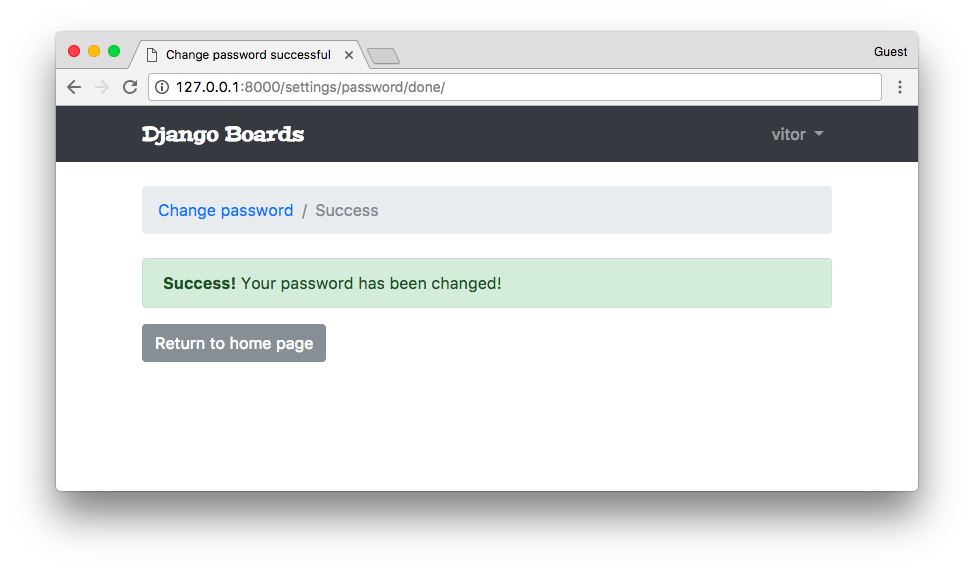
Regarding the password change view, we can implement similar test cases as we have already been doing so far. Create a new test file named test_view_password_change.py.
I will list below new types of tests. You can check all the tests I wrote for the password change view clicking in the view complete file contents link next to the code snippet. Most of the tests are similar to what we have been doing so far. I moved to an external file to avoid being too repetitive.
accounts/tests/test_view_password_change.py (view complete file contents)
class LoginRequiredPasswordChangeTests(TestCase):
    def test_redirection(self):
        url = reverse('password_change')
        login_url = reverse('login')
        response = self.client.get(url)
        self.assertRedirects(response, f'{login_url}?next={url}')
The test above tries to access the password_change view without being logged in. The expected behavior is to redirect the user to the login page.
accounts/tests/test_view_password_change.py (view complete file contents)
class PasswordChangeTestCase(TestCase):
    def setUp(self, data={}):
        self.user = User.objects.create_user(username='john', email='john@doe.com', password='old_password')
        self.url = reverse('password_change')
        self.client.login(username='john', password='old_password')
        self.response = self.client.post(self.url, data)
Here we defined a new class named PasswordChangeTestCase. It does a basic setup, creating a user and making a POST request to the password_change view. In the next set of test cases, we are going to use this class instead of the TestCase class and test a successful request and an invalid request:
accounts/tests/test_view_password_change.py (view complete file contents)
class SuccessfulPasswordChangeTests(PasswordChangeTestCase):
    def setUp(self):
        super().setUp({
            'old_password': 'old_password',
            'new_password1': 'new_password',
            'new_password2': 'new_password',
        })

    def test_redirection(self):
        '''
        A valid form submission should redirect the user
        '''
        self.assertRedirects(self.response, reverse('password_change_done'))

    def test_password_changed(self):
        '''
        refresh the user instance from database to get the new password
        hash updated by the change password view.
        '''
        self.user.refresh_from_db()
        self.assertTrue(self.user.check_password('new_password'))

    def test_user_authentication(self):
        '''
        Create a new request to an arbitrary page.
        The resulting response should now have an `user` to its context, after a successful sign up.
        '''
        response = self.client.get(reverse('home'))
        user = response.context.get('user')
        self.assertTrue(user.is_authenticated)

class InvalidPasswordChangeTests(PasswordChangeTestCase):
    def test_status_code(self):
        '''
        An invalid form submission should return to the same page
        '''
        self.assertEquals(self.response.status_code, 200)

    def test_form_errors(self):
        form = self.response.context.get('form')
        self.assertTrue(form.errors)

    def test_didnt_change_password(self):
        '''
        refresh the user instance from the database to make
        sure we have the latest data.
        '''
        self.user.refresh_from_db()
        self.assertTrue(self.user.check_password('old_password'))
The refresh_from_db() method make sure we have the latest state of the data. It forces Django to query the database again to update the data. We have to do it because the change_password view update the password in the database. So to test if the password really changed, we have to grab the latest data from the database.
*
Conclusions
Authentication is a very common use case for most Django applications. In this tutorial, we implemented all the important views: sign up, log in, log out, password reset, and change password. Now that we have a way to create users and authenticate them, we will be able to proceed with the development of the other views of our application.
We still have to improve lots of things regarding the code design: the templates folder is starting to get messy with too many files. The boards app tests are still disorganized. Also, we have to start refactoring the new topic view, because now we can retrieve the logged in user. We will get to that part soon.
The source code of the project is available on GitHub. The current state of the project can be found under the release tag v0.4-lw. The link below will take you to the right place:
https://github.com/sibtc/django-beginners-guide/tree/v0.4-lw
The Complete Guide to Start Learning Django - Part 5 - Django ORM
Table of Contents
- Introduction
- Protecting Views
- Configuring Login Next Redirect
- Login Required Tests
- Accessing the Authenticated User
- Topic Posts View
- Reply Post View
- QuerySets
- Migrations
- Conclusions
Introduction
Welcome to the 5th part of the tutorial series! In this tutorial, we are going to learn more about protecting views against unauthorized users and how to access the authenticated user in the views and forms. We are also going to implement the topic posts listing view and the reply view. Finally, we are going to explore some features of Django ORM and have a brief introduction to migrations.
Protecting Views
We have to start protecting our views against non-authorized users. So far we have the following view to start new posts:
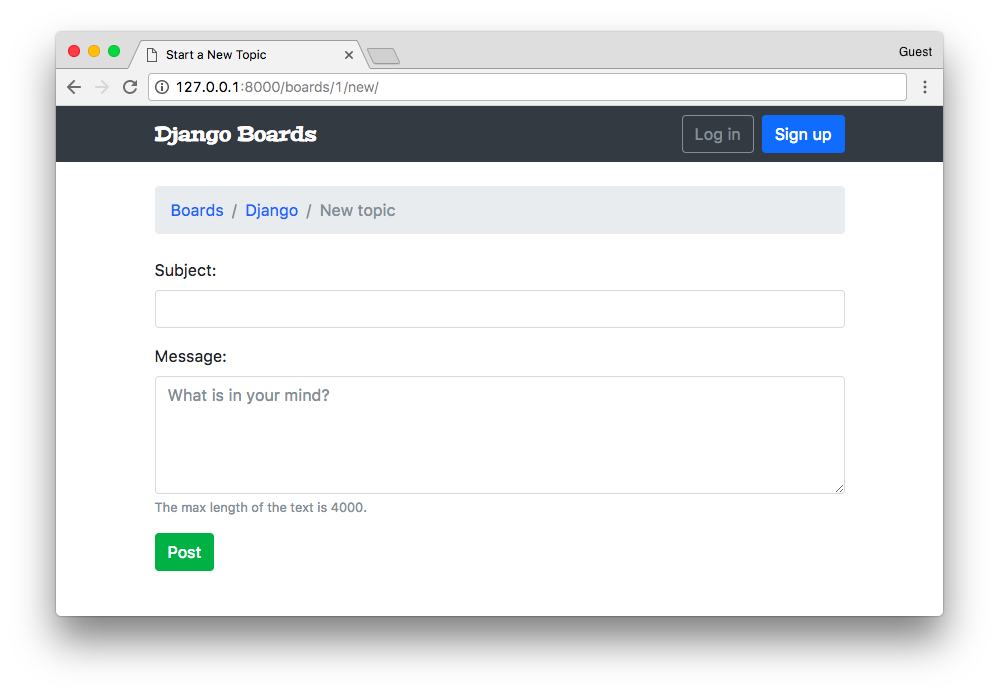
In the picture above the user is not logged in, and even though they can see the page and the form.
Django has a built-in view decorator to avoid that issue:
boards/views.py (view complete file contents)
from django.contrib.auth.decorators import login_required

@login_required
def new_topic(request, pk):
    # ...
From now on, if the user is not authenticated they will be redirected to the login page:
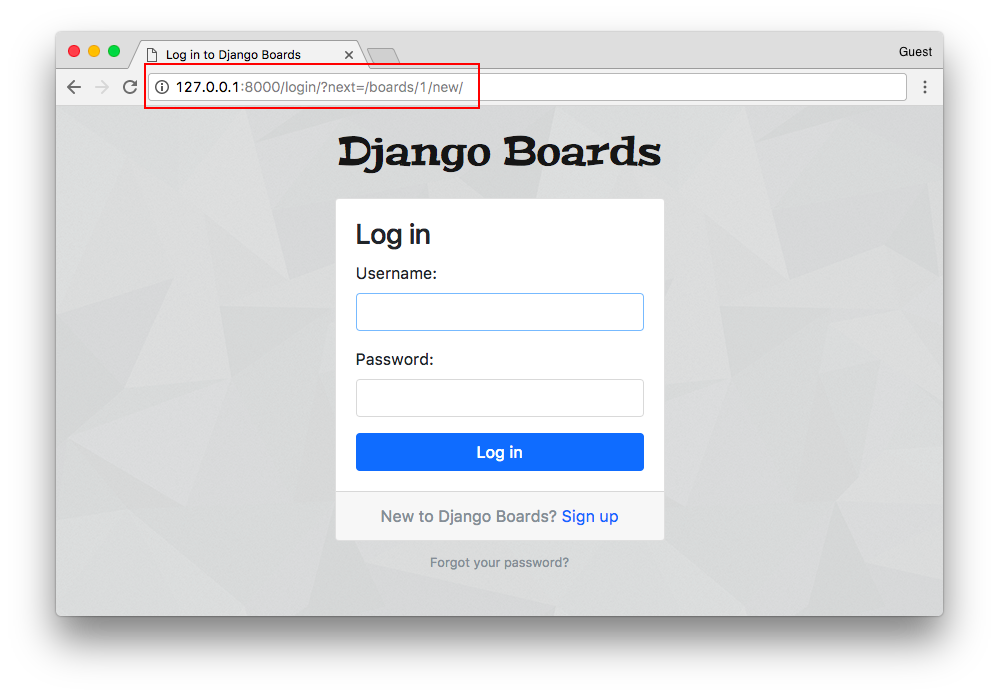
Notice the query string ?next=/boards/1/new/. We can improve the log in template to make use of the next variable and improve the user experience.
Configuring Login Next Redirect
templates/login.html (view complete file contents)
<form method="post" novalidate>
  {% csrf_token %}
  <input type="hidden" name="next" value="{{ next }}">
  {% include 'includes/form.html' %}
  <button type="submit" class="btn btn-primary btn-block">Log in</button>
</form>
Then if we try to log in now, the application will direct us back to where we were.
So the next parameter is part of a built-in functionality.
Login Required Tests
Let’s now add a test case to make sure this view is protected by the @login_required decorator. But first, let’s do some refactoring in the boards/tests/test_views.py file.
Let’s split the test_views.py into three files:
- test_view_home.py will include the HomeTests class (view complete file contents)
- test_view_board_topics.py will include the BoardTopicsTests class (view complete file contents)
- test_view_new_topic.py will include the NewTopicTests class (view complete file contents)
myproject/
 |-- myproject/
 |    |-- accounts/
 |    |-- boards/
 |    |    |-- migrations/
 |    |    |-- templatetags/
 |    |    |-- tests/
 |    |    |    |-- __init__.py
 |    |    |    |-- test_templatetags.py
 |    |    |    |-- test_view_home.py          <-- here
 |    |    |    |-- test_view_board_topics.py  <-- here
 |    |    |    +-- test_view_new_topic.py     <-- and here
 |    |    |-- __init__.py
 |    |    |-- admin.py
 |    |    |-- apps.py
 |    |    |-- models.py
 |    |    +-- views.py
 |    |-- myproject/
 |    |-- static/
 |    |-- templates/
 |    |-- db.sqlite3
 |    +-- manage.py
 +-- venv/
Run the tests to make sure everything is working.
New let’s add a new test case in the test_view_new_topic.py to check if the view is decorated with @login_required:
boards/tests/test_view_new_topic.py (view complete file contents)
from django.test import TestCase
from django.urls import reverse
from ..models import Board

class LoginRequiredNewTopicTests(TestCase):
    def setUp(self):
        Board.objects.create(name='Django', description='Django board.')
        self.url = reverse('new_topic', kwargs={'pk': 1})
        self.response = self.client.get(self.url)

    def test_redirection(self):
        login_url = reverse('login')
        self.assertRedirects(self.response, '{login_url}?next={url}'.format(login_url=login_url, url=self.url))
In the test case above we are trying to make a request to the new topic view without being authenticated. The expected result is for the request be redirected to the login view.
Accessing the Authenticated User
Now we can improve the new_topic view and this time set the proper user, instead of just querying the database and picking the first user. That code was temporary because we had no way to authenticate the user. But now we can do better:
boards/views.py (view complete file contents)
from django.contrib.auth.decorators import login_required
from django.shortcuts import get_object_or_404, redirect, render

from .forms import NewTopicForm
from .models import Board, Post

@login_required
def new_topic(request, pk):
    board = get_object_or_404(Board, pk=pk)
    if request.method == 'POST':
        form = NewTopicForm(request.POST)
        if form.is_valid():
            topic = form.save(commit=False)
            topic.board = board
            topic.starter = request.user  # <- here
            topic.save()
            Post.objects.create(
                message=form.cleaned_data.get('message'),
                topic=topic,
                created_by=request.user  # <- and here
            )
            return redirect('board_topics', pk=board.pk)  # TODO: redirect to the created topic page
    else:
        form = NewTopicForm()
    return render(request, 'new_topic.html', {'board': board, 'form': form})
We can do a quick test here by adding a new topic:
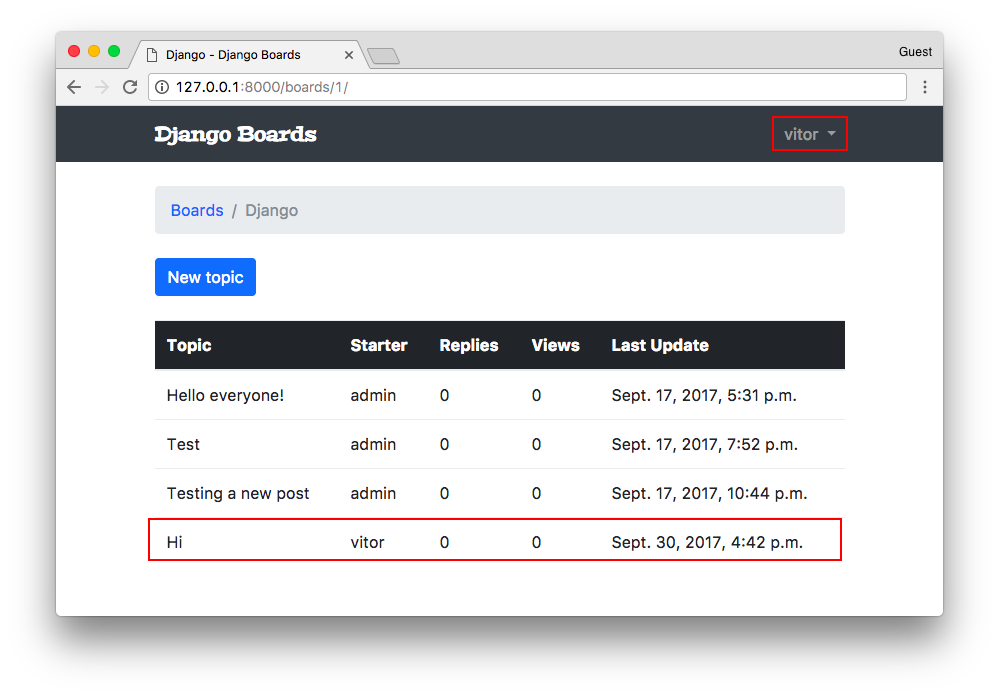
Topic Posts View
Let’s take the time now to implement the posts listing page, accordingly to the wireframe below:
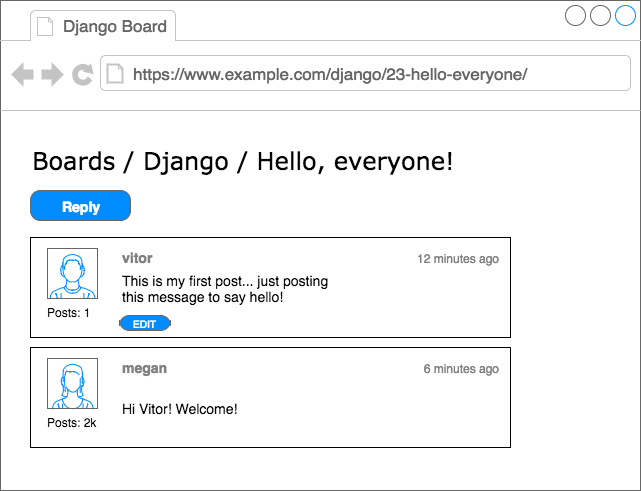
First, we need a route:
myproject/urls.py (view complete file contents)
url(r'^boards/(?P<pk>\d+)/topics/(?P<topic_pk>\d+)//figure>, views.topic_posts, name='topic_posts'),
Observe that now we are dealing with two keyword arguments: pk which is used to identify the Board, and now we have the topic_pk which is used to identify which topic to retrieve from the database.
The matching view would be like this:
boards/views.py (view complete file contents)
from django.shortcuts import get_object_or_404, render
from .models import Topic

def topic_posts(request, pk, topic_pk):
    topic = get_object_or_404(Topic, board__pk=pk, pk=topic_pk)
    return render(request, 'topic_posts.html', {'topic': topic})
Note that we are indirectly retrieving the current board. Remember that the topic model is related to the board model, so we can access the current board. You will see in the next snippet:
templates/topic_posts.html (view complete file contents)
{% extends 'base.html' %}

{% block title %}{{ topic.subject }}{% endblock %}

{% block breadcrumb %}
  <li class="breadcrumb-item"><a href="{% url 'home' %}">Boards</a></li>
  <li class="breadcrumb-item"><a href="{% url 'board_topics' topic.board.pk %}">{{ topic.board.name }}</a></li>
  <li class="breadcrumb-item active">{{ topic.subject }}</li>
{% endblock %}

{% block content %}

{% endblock %}
Observe that now instead of using board.name in the template, we are navigating through the topic properties, using topic.board.name.
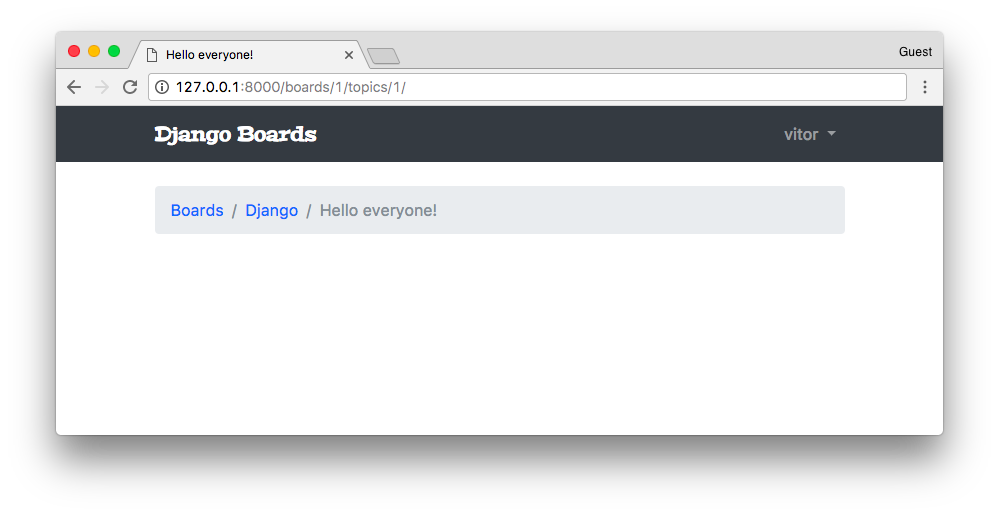
Now let’s create a new test file for the topic_posts view:
boards/tests/test_view_topic_posts.py
from django.contrib.auth.models import User
from django.test import TestCase
from django.urls import resolve, reverse

from ..models import Board, Post, Topic
from ..views import topic_posts

class TopicPostsTests(TestCase):
    def setUp(self):
        board = Board.objects.create(name='Django', description='Django board.')
        user = User.objects.create_user(username='john', email='john@doe.com', password='123')
        topic = Topic.objects.create(subject='Hello, world', board=board, starter=user)
        Post.objects.create(message='Lorem ipsum dolor sit amet', topic=topic, created_by=user)
        url = reverse('topic_posts', kwargs={'pk': board.pk, 'topic_pk': topic.pk})
        self.response = self.client.get(url)

    def test_status_code(self):
        self.assertEquals(self.response.status_code, 200)

    def test_view_function(self):
        view = resolve('/boards/1/topics/1/')
        self.assertEquals(view.func, topic_posts)
Note that the test setup is starting to get more complex. We can create mixins or an abstract class to reuse the code as needed. We can also use a third party library to setup some test data, to reduce the boilerplate code.
Also, by now we already have a significant amount of tests, and it’s gradually starting to run slower. We can instruct the test suite just to run tests from a given app:
python manage.py test boards
Creating test database for alias 'default'...
System check identified no issues (0 silenced).
.......................
----------------------------------------------------------------------
Ran 23 tests in 1.246s

OK
Destroying test database for alias 'default'...
We could also run only a specific test file:
t">
python manage.py test boards.tests.test_view_topic_posts
Creating test database for alias 'default'...
System check identified no issues (0 silenced).
..
----------------------------------------------------------------------
Ran 2 tests in 0.129s

OK
Destroying test database for alias 'default'...
Or just a specific test case:
python manage.py test boards.tests.test_view_topic_posts.TopicPostsTests.test_status_code
Creating test database for alias 'default'...
System check identified no issues (0 silenced).
.
----------------------------------------------------------------------
Ran 1 test in 0.100s

OK
Destroying test database for alias 'default'...
Cool, right?
Let’s keep moving forward.
Inside the topic_posts.html, we can create a for loop iterating over the topic posts:
templates/topic_posts.html
{% extends 'base.html' %}

{% load static %}

{% block title %}{{ topic.subject }}{% endblock %}

{% block breadcrumb %}
  <li class="breadcrumb-item"><a href="{% url 'home' %}">Boards</a></li>
  <li class="breadcrumb-item"><a href="{% url 'board_topics' topic.board.pk %}">{{ topic.board.name }}</a></li>
  <li class="breadcrumb-item active">{{ topic.subject }}</li>
{% endblock %}

{% block content %}

  <div class="mb-4">
    <a href="#" class="btn btn-primary" role="button">Reply</a>
  </div>

  {% for post in topic.posts.all %}
    <div class="card mb-2">
      <div class="card-body p-3">
        <div class="row">
          <div class="col-2">
            <img src="{% static 'img/avatar.svg' %}" alt="{{ post.created_by.username }}" class="w-100">
            <small>Posts: {{ post.created_by.posts.count }}</small>
          </div>
          <div class="col-10">
            <div class="row mb-3">
              <div class="col-6">
                <strong class="text-muted">{{ post.created_by.username }}</strong>
              </div>
              <div class="col-6 text-right">
                <small class="text-muted">{{ post.created_at }}</small>
              </div>
            </div>
            {{ post.message }}
            {% if post.created_by == user %}
              <div class="mt-3">
                <a href="#" class="btn btn-primary btn-sm" role="button">Edit</a>
              </div>
            {% endif %}
          </div>
        </div>
      </div>
    </div>
  {% endfor %}

{% endblock %}
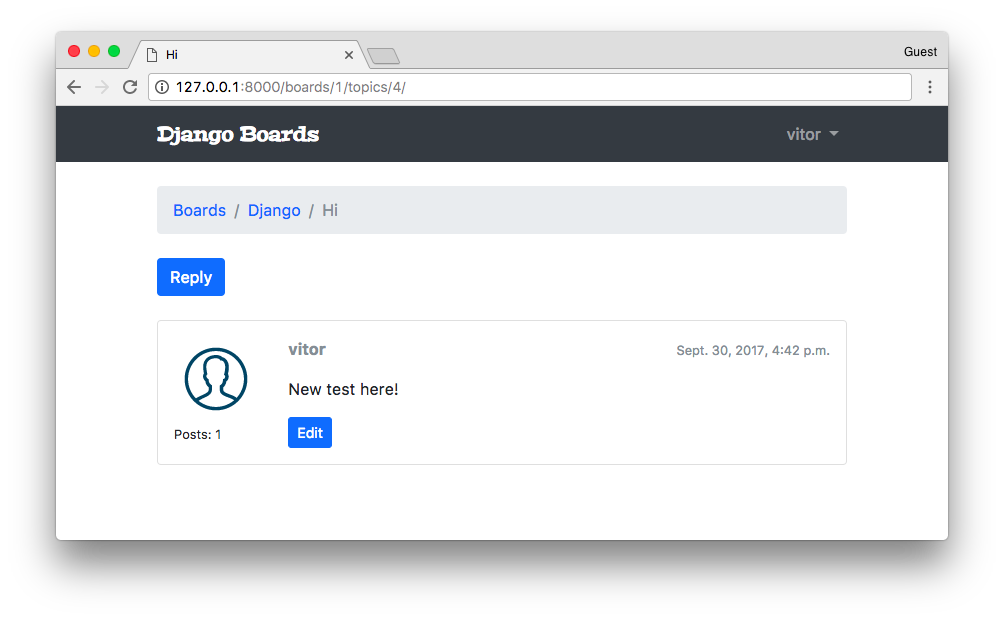
Since right now we don’t have a way to upload a user picture, let’s just have an empty image.
I downloaded a free image from IconFinder and saved in the static/img folder of the project.
We still haven’t really explored Django’s ORM, but the code {{ post.created_by.posts.count }} is executing a select count in the database. Even though the result is correct, it is a bad approach. Right now it’s causing several unnecessary queries in the database. But hey, don’t worry about that right now. Let’s focus on how we interact with the application. Later on, we are going to improve this code, and how to diagnose heavy queries.
Another interesting point here is that we are testing if the current post belongs to the authenticated user: {% if post.created_by == user %}. And we are only showing the edit button for the owner of the post.
Since we now have the URL route to the topic posts listing, update the topics.html template with the link:
templates/topics.html (view complete file contents)
{% for topic in board.topics.all %}
  <tr>
    <td><a href="{% url 'topic_posts' board.pk topic.pk %}">{{ topic.subject }}</a></td>
    <td>{{ topic.starter.username }}</td>
    <td>0</td>
    <td>0</td>
    <td>{{ topic.last_updated }}</td>
  </tr>
{% endfor %}
Reply Post View
Let’s implement now the reply post view so that we can add more data and progress with the implementation and tests.

New URL route:
myproject/urls.py (view complete file contents)
url(r'^boards/(?P<pk>\d+)/topics/(?P<topic_pk>\d+)/reply//figure>, views.reply_topic, name='reply_topic'),
Create a new form for the post reply:
boards/forms.py (view complete file contents)
from django import forms
from .models import Post

class PostForm(forms.ModelForm):
    class Meta:
        model = Post
        fields = ['message', ]
A new view protected by @login_required and with a simple form processing logic:
boards/views.py (view complete file contents)
from django.contrib.auth.decorators import login_required
from django.shortcuts import get_object_or_404, redirect, render
from .forms import PostForm
from .models import Topic

@login_required
def reply_topic(request, pk, topic_pk):
    topic = get_object_or_404(Topic, board__pk=pk, pk=topic_pk)
    if request.method == 'POST':
        form = PostForm(request.POST)
        if form.is_valid():
            post = form.save(commit=False)
            post.topic = topic
            post.created_by = request.user
            post.save()
            return redirect('topic_posts', pk=pk, topic_pk=topic_pk)
    else:
        form = PostForm()
    return render(request, 'reply_topic.html', {'topic': topic, 'form': form})
Also take the time to update the return redirect of the new_topic view function (marked with the comment # TODO).
@login_required
def new_topic(request, pk):
    board = get_object_or_404(Board, pk=pk)
    if request.method == 'POST':
        form = NewTopicForm(request.POST)
        if form.is_valid():
            topic = form.save(commit=False)
            # code suppressed ...
            return redirect('topic_posts', pk=pk, topic_pk=topic.pk)  # <- here
    # code suppressed ...
Very important: in the view reply_topic we are using topic_pk because we are referring to the keyword argument of the function, in the view new_topic we are using topic.pk because a topic is an object (Topic model instance) and .pk we are accessing the pk property of the Topic model instance. Small detail, big difference.
The first version of our template:
templates/reply_topic.html
{% extends 'base.html' %}
{% load static %}
{% block title %}Post a reply{% endblock %}
{% block breadcrumb %}
<li class="breadcrumb-item"><a href="{% url 'home' %}">Boards</a></li>
<li class="breadcrumb-item"><a href="{% url 'board_topics' topic.board.pk %}">{{ topic.board.name }}</a></li>
<li class="breadcrumb-item"><a href="{% url 'topic_posts' topic.board.pk topic.pk %}">{{ topic.subject }}</a></li>
<li class="breadcrumb-item active">Post a reply</li>
{% endblock %}
{% block content %}
<form method="post" class="mb-4">
{% csrf_token %}
{% include 'includes/form.html' %}
<button type="submit" class="btn btn-success">Post a reply</button>
</form>
{% for post in topic.posts.all %}
<div class="card mb-2">
<div class="card-body p-3">
<div class="row mb-3">
<div class="col-6">
<strong class="text-muted">{{ post.created_by.username }}</strong>
</div>
<div class="col-6 text-right">
<small class="text-muted">{{ post.created_at }}</small>
</div>
</div>
{{ post.message }}
</div>
</div>
{% endfor %}
{% endblock %}
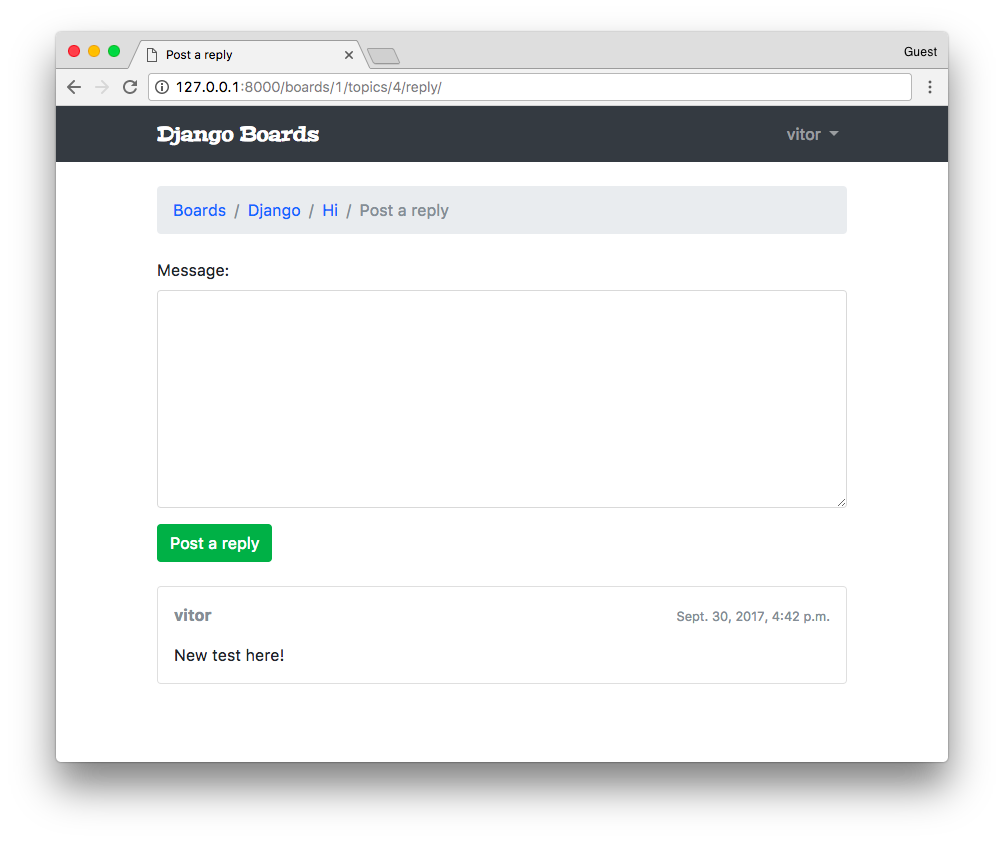
Then after posting a reply, the user is redirected back to the topic posts:

We could now change the starter post, so to give it more emphasis in the page:
templates/topic_posts.html (view complete file contents)
{% for post in topic.posts.all %}
<div class="card mb-2 {% if forloop.first %}border-dark{% endif %}">
{% if forloop.first %}
<div class="card-header text-white bg-dark py-2 px-3">{{ topic.subject }}</div>
{% endif %}
<div class="card-body p-3">
<!-- code suppressed -->
</div>
</div>
{% endfor %}
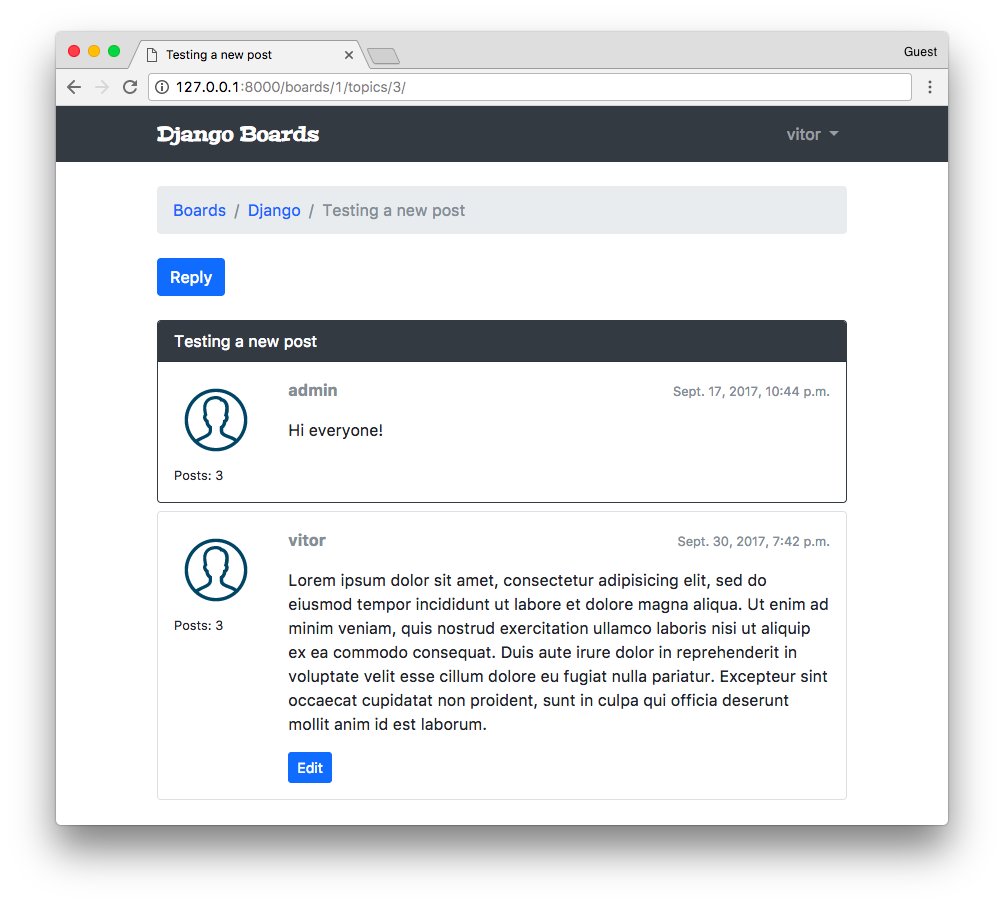
Now for the tests, pretty standard, just like we have been doing so far. Create a new file test_view_reply_topic.py inside the boards/tests folder:
boards/tests/test_view_reply_topic.py (view complete file contents)
from django.contrib.auth.models import User
from django.test import TestCase
from django.urls import reverse
from ..models import Board, Post, Topic
from ..views import reply_topic
class ReplyTopicTestCase(TestCase):
'''
Base test case to be used in all `reply_topic` view tests
'''
def setUp(self):
self.board = Board.objects.create(name='Django', description='Django board.')
self.username = 'john'
self.password = '123'
user = User.objects.create_user(username=self.username, email='john@doe.com', password=self.password)
self.topic = Topic.objects.create(subject='Hello, world', board=self.board, starter=user)
Post.objects.create(message='Lorem ipsum dolor sit amet', topic=self.topic, created_by=user)
self.url = reverse('reply_topic', kwargs={'pk': self.board.pk, 'topic_pk': self.topic.pk})
class LoginRequiredReplyTopicTests(ReplyTopicTestCase):
# ...
class ReplyTopicTests(ReplyTopicTestCase):
# ...
class SuccessfulReplyTopicTests(ReplyTopicTestCase):
# ...
class InvalidReplyTopicTests(ReplyTopicTestCase):
# ...
The essence here is the custom test case class ReplyTopicTestCase. Then all the four classes will extend this test case.
First, we test if the view is protected with the @login_required decorator, then check the HTML inputs, status code. Finally, we test a valid and an invalid form submission.
QuerySets
Let’s take the time now to explore some of the models’ API functionalities a little bit. First, let’s improve the home view:
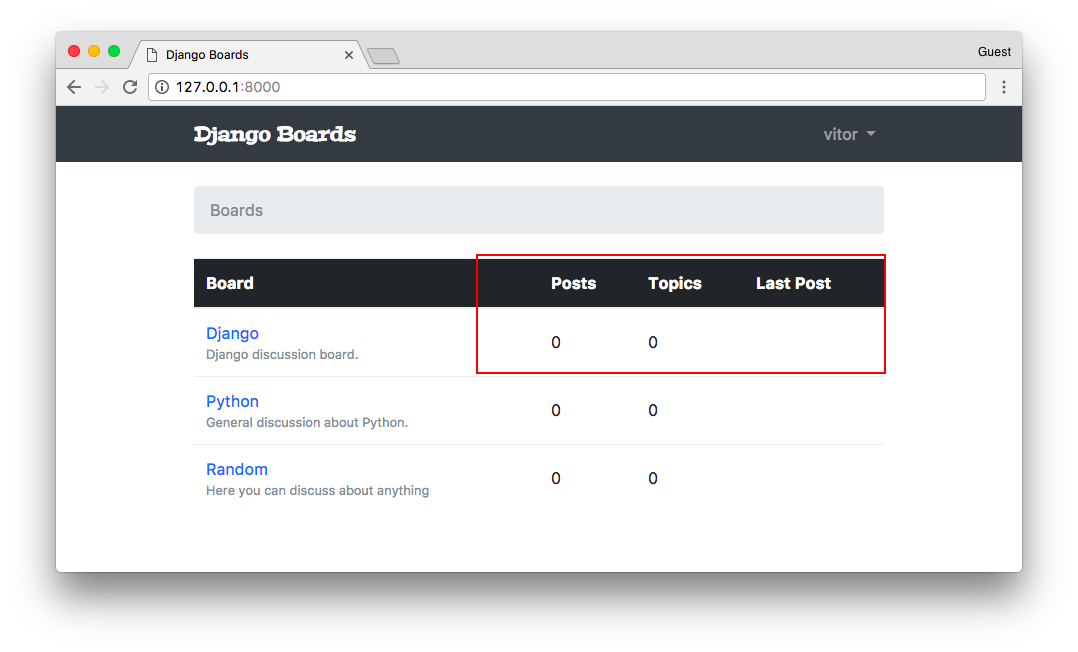
We have three tasks here:
- Display the posts count of the board;
- Display the topics count of the board;
- Display the last user who posted something and the date and time.
Let’s play with the Python terminal first, before we jump into the implementation.
Since we are going to try things out in the Python terminal, it’s a good idea to define a __str__ method for all our models.
boards/models.py (view complete file contents)
from django.db import models
from django.utils.text import Truncator
class Board(models.Model):
# ...
def __str__(self):
return self.name
class Topic(models.Model):
# ...
def __str__(self):
return self.subject
class Post(models.Model):
# ...
def __str__(self):
truncated_message = Truncator(self.message)
return truncated_message.chars(30)
In the Post model we are using the Truncator utility class. It’s a convenient way to truncate long strings into an arbitrary string size (here we are using 30).
Now let’s open the Python shell terminal:
python manage.py shell
# First get a board instance from the database
board = Board.objects.get(name='Django')
The easiest of the three tasks is to get the current topics count, because the Topic and Board are directly related:
board.topics.all()
<QuerySet [<Topic: Hello everyone!>, <Topic: Test>, <Topic: Testing a new post>, <Topic: Hi>]>
board.topics.count()
4
That’s about it.
Now the number of posts within a board is a little bit trickier because Post is not directly related to Board.
from boards.models import Post
Post.objects.all()
<QuerySet [<Post: This is my first topic.. :-)>, <Post: test.>, <Post: Hi everyone!>,
<Post: New test here!>, <Post: Testing the new reply feature!>, <Post: Lorem ipsum dolor sit amet,...>,
<Post: hi there>, <Post: test>, <Post: Testing..>, <Post: some reply>, <Post: Random random.>
]>
Post.objects.count()
11
Here we have 11 posts. But not all of them belongs to the “Django” board.
Here is how we can filter it:
from boards.models import Board, Post
board = Board.objects.get(name='Django')
Post.objects.filter(topic__board=board)
<QuerySet [<Post: This is my first topic.. :-)>, <Post: test.>, <Post: hi there>,
<Post: Hi everyone!>, <Post: Lorem ipsum dolor sit amet,...>, <Post: New test here!>,
<Post: Testing the new reply feature!>
]>
Post.objects.filter(topic__board=board).count()
7
The double underscores topic__board is used to navigate through the models’ relationships. Under the hoods, Django builds the bridge between the Board - Topic - Post, and build a SQL query to retrieve just the posts that belong to a specific board.
Now our last mission is to identify the last post.
# order by the `created_at` field, getting the most recent first
Post.objects.filter(topic__board=board).order_by('-created_at')
<QuerySet [<Post: testing>, <Post: new post>, <Post: hi there>, <Post: Lorem ipsum dolor sit amet,...>,
<Post: Testing the new reply feature!>, <Post: New test here!>, <Post: Hi everyone!>,
<Post: test.>, <Post: This is my first topic.. :-)>
]>
# we can use the `first()` method to just grab the result that interest us
Post.objects.filter(topic__board=board).order_by('-created_at').first()
<Post: testing>
Sweet. Now we can implement it.
boards/models.py (view complete file contents)
from django.db import models
class Board(models.Model):
name = models.CharField(max_length=30, unique=True)
description = models.CharField(max_length=100)
def __str__(self):
return self.name
def get_posts_count(self):
return Post.objects.filter(topic__board=self).count()
def get_last_post(self):
return Post.objects.filter(topic__board=self).order_by('-created_at').first()
Observe that we are using self, because this method will be used by a Board instance. So that means we are using this instance to filter the QuerySet.
Now we can improve the home HTML template to display this brand new information:
templates/home.html
{% extends 'base.html' %}
{% block breadcrumb %}
<li class="breadcrumb-item active">Boards</li>
{% endblock %}
{% block content %}
<table class="table">
<thead class="thead-inverse">
<tr>
<th>Board</th>
<th>Posts</th>
<th>Topics</th>
<th>Last Post</th>
</tr>
</thead>
<tbody>
{% for board in boards %}
<tr>
<td>
<a href="{% url 'board_topics' board.pk %}">{{ board.name }}</a>
<small class="text-muted d-block">{{ board.description }}</small>
</td>
<td class="align-middle">
{{ board.get_posts_count }}
</td>
<td class="align-middle">
{{ board.topics.count }}
</td>
<td class="align-middle">
{% with post=board.get_last_post %}
<small>
<a href="{% url 'topic_posts' board.pk post.topic.pk %}">
By {{ post.created_by.username }} at {{ post.created_at }}
</a>
</small>
{% endwith %}
</td>
</tr>
{% endfor %}
</tbody>
</table>
{% endblock %}
And that’s the result for now:
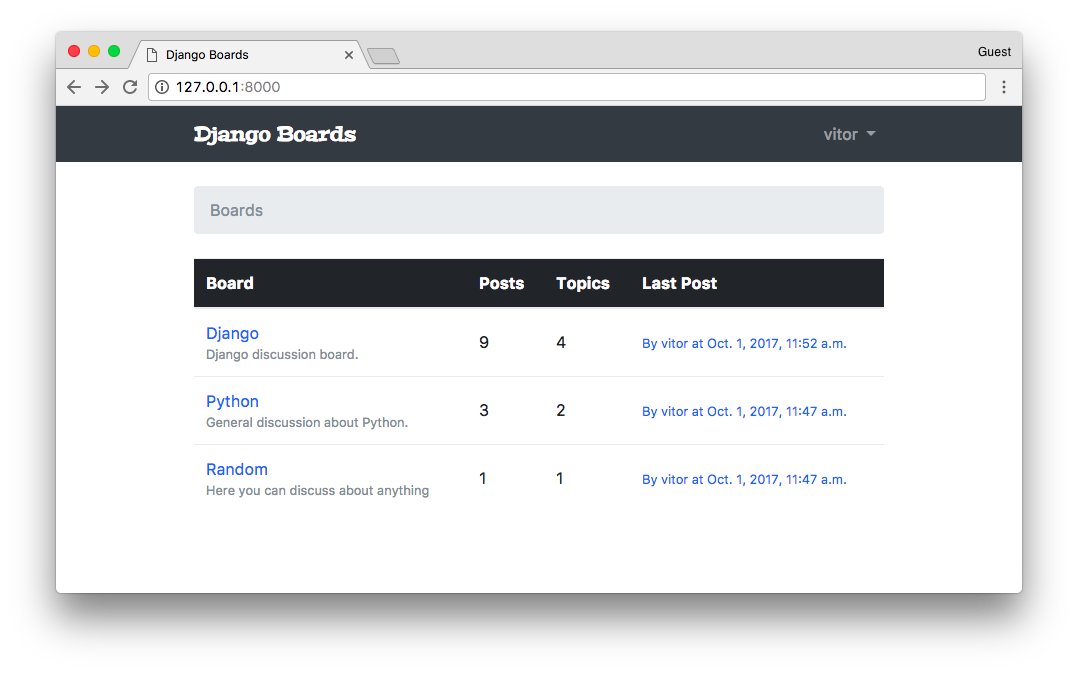
Run the tests:
python manage.py test
Creating test database for alias 'default'...
System check identified no issues (0 silenced).
.......................................................EEE......................
======================================================================
ERROR: test_home_url_resolves_home_view (boards.tests.test_view_home.HomeTests)
----------------------------------------------------------------------
django.urls.exceptions.NoReverseMatch: Reverse for 'topic_posts' with arguments '(1, '')' not found. 1 pattern(s) tried: ['boards/(?P<pk>\\d+)/topics/(?P<topic_pk>\\d+)//figure>]
======================================================================
ERROR: test_home_view_contains_link_to_topics_page (boards.tests.test_view_home.HomeTests)
----------------------------------------------------------------------
django.urls.exceptions.NoReverseMatch: Reverse for 'topic_posts' with arguments '(1, '')' not found. 1 pattern(s) tried: ['boards/(?P<pk>\\d+)/topics/(?P<topic_pk>\\d+)//figure>]
======================================================================
ERROR: test_home_view_status_code (boards.tests.test_view_home.HomeTests)
----------------------------------------------------------------------
django.urls.exceptions.NoReverseMatch: Reverse for 'topic_posts' with arguments '(1, '')' not found. 1 pattern(s) tried: ['boards/(?P<pk>\\d+)/topics/(?P<topic_pk>\\d+)//figure>]
----------------------------------------------------------------------
Ran 80 tests in 5.663s
FAILED (errors=3)
Destroying test database for alias 'default'...
It seems like we have a problem with our implementation here. The application is crashing if there are no posts.
templates/home.html
{% with post=board.get_last_post %}
{% if post %}
<small>
<a href="{% url 'topic_posts' board.pk post.topic.pk %}">
By {{ post.created_by.username }} at {{ post.created_at }}
</a>
</small>
{% else %}
<small class="text-muted">
<em>No posts yet.</em>
</small>
{% endif %}
{% endwith %}
Run the tests again:
python manage.py test
Creating test database for alias 'default'...
System check identified no issues (0 silenced).
................................................................................
----------------------------------------------------------------------
Ran 80 tests in 5.630s
OK
Destroying test database for alias 'default'...
I added a new board with no messages just to check the “empty message”:
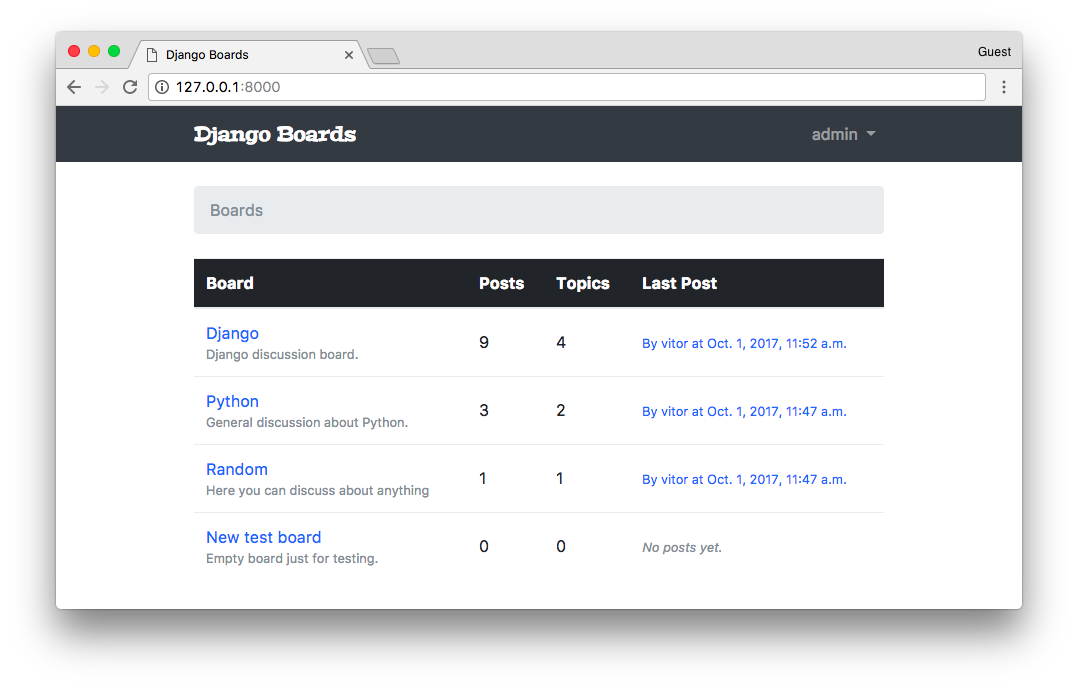
Now it’s time to improve the topics listing view.
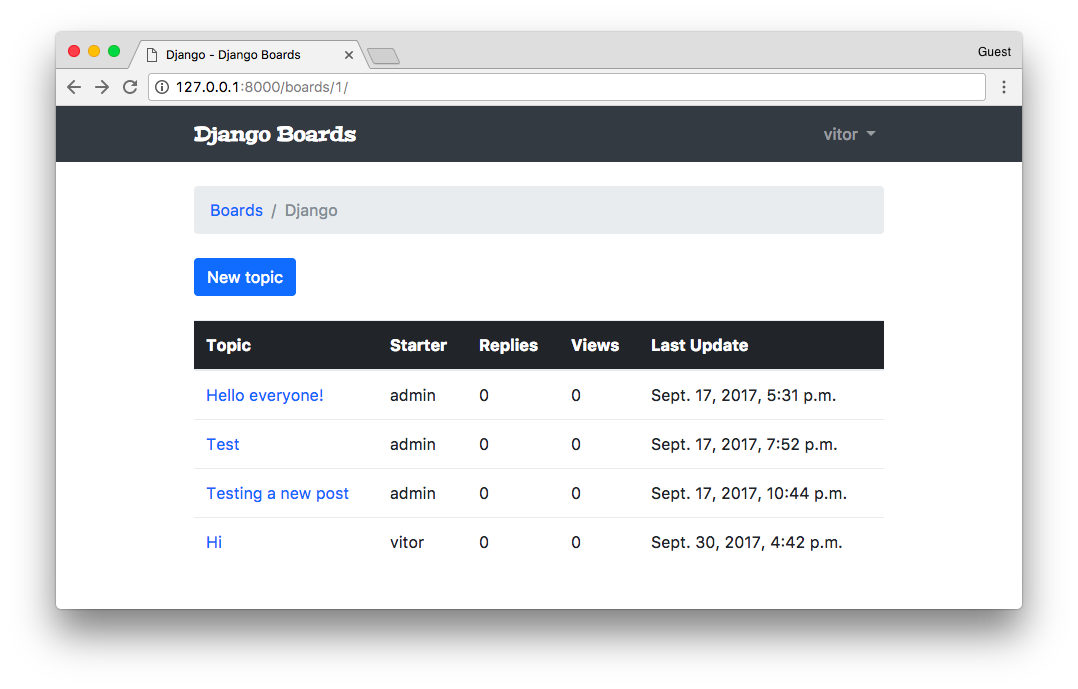
I will show you another way to include the count, this time to the number of replies, in a more effective way.
As usual, let’s try first with the Python shell:
python manage.py shell
from django.db.models import Count
from boards.models import Board
board = Board.objects.get(name='Django')
topics = board.topics.order_by('-last_updated').annotate(replies=Count('posts'))
for topic in topics:
print(topic.replies)
2
4
2
1
Here we are using the annotate QuerySet method to generate a new “column” on the fly. This new column, which will be translated into a property, accessible via topic.replies contain the count of posts a given topic has.
We can do just a minor fix because the replies should not consider the starter topic (which is also a Post instance).
So here is how we do it:
topics = board.topics.order_by('-last_updated').annotate(replies=Count('posts') - 1)
for topic in topics:
print(topic.replies)
1
3
1
0
Cool, right?
boards/views.py (view complete file contents)
from django.db.models import Count
from django.shortcuts import get_object_or_404, render
from .models import Board
def board_topics(request, pk):
board = get_object_or_404(Board, pk=pk)
topics = board.topics.order_by('-last_updated').annotate(replies=Count('posts') - 1)
return render(request, 'topics.html', {'board': board, 'topics': topics})
templates/topics.html (view complete file contents)
{% for topic in topics %}
<tr>
<td><a href="{% url 'topic_posts' board.pk topic.pk %}">{{ topic.subject }}</a></td>
<td>{{ topic.starter.username }}</td>
<td>{{ topic.replies }}</td>
<td>0</td>
<td>{{ topic.last_updated }}</td>
</tr>
{% endfor %}

Next step now is to fix the views count. But for that, we will need to create a new field.
Migrations
Migration is a fundamental part of Web development with Django. It’s how we evolve our application’s models keeping the models’ files synchronized with the database.
When we first run the command python manage.py migrate Django grab all migration files and generate the database schema.
When Django applies a migration, it has a special table called django_migrations. In this table, Django registers all the applied migrations.
So if we try to run the command again:
python manage.py migrate
Operations to perform:
Apply all migrations: admin, auth, boards, contenttypes, sessions
Running migrations:
No migrations to apply.
Django will know there’s nothing to do.
Let’s create a migration by adding a new field to the Topic model:
boards/models.py (view complete file contents)
class Topic(models.Model):
subject = models.CharField(max_length=255)
last_updated = models.DateTimeField(auto_now_add=True)
board = models.ForeignKey(Board, related_name='topics')
starter = models.ForeignKey(User, related_name='topics')
views = models.PositiveIntegerField(default=0) # <- here
def __str__(self):
return self.subject
Here we added a PositiveIntegerField. Since this field is going to store the number of page views, a negative page view wouldn’t make sense.
Before we can use our new field, we have to update the database schema. Execute the makemigrations command:
python manage.py makemigrations
Migrations for 'boards':
boards/migrations/0003_topic_views.py
- Add field views to topic
The makemigrations command automatically generated the 0003_topic_views.py file, which will be used to modify the database, adding the views field.
Now apply the migration by running the command migrate:
python manage.py migrate
Operations to perform:
Apply all migrations: admin, auth, boards, contenttypes, sessions
Running migrations:
Applying boards.0003_topic_views... OK
Now we can use it to keep track of the number of views a given topic is receiving:
boards/views.py (view complete file contents)
from django.shortcuts import get_object_or_404, render
from .models import Topic
def topic_posts(request, pk, topic_pk):
topic = get_object_or_404(Topic, board__pk=pk, pk=topic_pk)
topic.views += 1
topic.save()
return render(request, 'topic_posts.html', {'topic': topic})
templates/topics.html (view complete file contents)
{% for topic in topics %}
<tr>
<td><a href="{% url 'topic_posts' board.pk topic.pk %}">{{ topic.subject }}</a></td>
<td>{{ topic.starter.username }}</td>
<td>{{ topic.replies }}</td>
<td>{{ topic.views }}</td> <!-- here -->
<td>{{ topic.last_updated }}</td>
</tr>
{% endfor %}
Now open a topic and refresh the page a few times, and see if it’s counting the page views:

Conclusions
In this tutorial, we made some progress in the development of the Web boards functionalities. There are a few things left to implement: the edit post view, the “my account” view for the user to update their names, etc. After those two views, we are going to enable markdown in the posts and implement pagination in both topic listing and topic replies listing.
The next tutorial will be focused on using class-based views to solve those problems. And after that, we are going to learn how to deploy our application to a Web server.
The source code of the project is available on GitHub. The current state of the project can be found under the release tag v0.5-lw. The link below will take you to the right place:
https://github.com/sibtc/django-beginners-guide/tree/v0.5-lw
The Complete Guide to Start Learning Django - Part 6 - Class-Based Views
Table of Contents
- Introduction
- Views Strategies
- Function-Based View
- Class-Based View
- Generic Class-Based View
- Update View
- Testing The Update View
- List View
- Pagination
- FBV Pagination
- GCBV Pagination
- Reusable Pagination Template
- My Account View
- Adding Markdown
- Humanize
- Gravatar
- Final Adjustments
- Conclusions
Introduction
Welcome to the sixth part of the tutorial series! In this tutorial, we are going to explore in great detail the Class-Based Views. We are also going to refactor some of the existing views so to take advantage of the built-in Generic Class-Based Views.
There are many other topics that we are going to touch with this tutorial, such as how to work with pagination, how to work with Markdown and how to add a simple editor. We are also going to explore a built-in package called Humanize, which is used to give a “human touch” to the data.
Alright, folks! Let’s implement some code. We have plenty of work to do today!
Views Strategies
At the end of the day, all Django views are functions. Even class-based views (CBV). Behind the scenes, it does all the magic and ends up returning a view function.
Class-based views were introduced to make it easier for developers to reuse and extend views. There are many benefits of using them, such as the extendability, the ability to use O.O. techniques such as multiple inheritances, the handling of HTTP methods are done in separate methods, rather than using conditional branching, and there are also the Generic Class-Based Views (GCBV).
Before we move forward, let’s clarify what those three terms mean:
- Function-Based Views (FBV)
- Class-Based Views (CBV)
- Generic Class-Based Views (GCBV)
A FBV is the simplest representation of a Django view: it’s just a function that receives an HttpRequest object and returns an HttpResponse.
A CBV is every Django view defined as a Python class that extends the django.views.generic.View abstract class. A CBV essentially is a class that wraps a FBV. CBVs are great to extend and reuse code.
GCBVs are built-in CBVs that solve specific problems such as listing views, create, update, and delete views.
Below we are going to explore some examples of the different implementation strategies.
Function-Based View
def new_post(request):
if request.method == 'POST':
form = PostForm(request.POST)
if form.is_valid():
form.save()
return redirect('post_list')
else:
form = PostForm()
return render(request, 'new_post.html', {'form': form})
urlpatterns = [
url(r'^new_post//figure>, views.new_post, name='new_post'),
]
Class-Based View
A CBV is a view that extends the View class. The main difference here is that the requests are handled inside class methods named after the HTTP methods, such as get, post, put, head, etc.
So, here we don’t need to do a conditional to check if the request is a POST or if it’s a GET. The code goes straight to the right method. This logic is handled internally in the View class.
from django.views.generic import View
class NewPostView(View):
def post(self, request):
form = PostForm(request.POST)
if form.is_valid():
form.save()
return redirect('post_list')
return render(request, 'new_post.html', {'form': form})
def get(self, request):
form = PostForm()
return render(request, 'new_post.html', {'form': form})
The way we refer to the CBVs in the urls.py module is a little bit different:
urlpatterns = [
url(r'^new_post//figure>, views.NewPostView.as_view(), name='new_post'),
]
Here we need to use the as_view() class method, which returns a view function to the url patterns. In some cases, we can also feed the as_view() with some keyword arguments, so to customize the behavior of the CBV, just like we did with some of the authentication views to customize the templates.
Anyway, the good thing about CBV is that we can add more methods, and perhaps do something like this:
from django.views.generic import View
class NewPostView(View):
def render(self, request):
return render(request, 'new_post.html', {'form': self.form})
def post(self, request):
self.form = PostForm(request.POST)
if self.form.is_valid():
self.form.save()
return redirect('post_list')
return self.render(request)
def get(self, request):
self.form = PostForm()
return self.render(request)
It’s also possible to create some generic views that accomplish some tasks so that we can reuse it across the project.
But that’s pretty much all you need to know about CBVs. Simple as that.
Generic Class-Based View
Now about the GCBV. That’s a different story. As I mentioned earlier, those views are built-in CBVs for common use cases. Their implementation makes heavy usage of multiple inheritances (mixins) and other O.O. strategies.
They are very flexible and can save many hours of work. But in the beginning, it can be difficult to work with them.
When I first started working with Django, I found GCBV hard to work with. At first, it’s hard to tell what is going on, because the code flow is not obvious, as there is good chunk of code hidden in the parent classes. The documentation is a little bit challenging to follow too, mostly because the attributes and methods are sometimes spread across eight parent classes. When working with GCBV, it’s always good to have the ccbv.co.uk opened for quick reference. No worries, we are going to explore it together.
Now let’s see a GCBV example.
from django.views.generic import CreateView
class NewPostView(CreateView):
model = Post
form_class = PostForm
success_url = reverse_lazy('post_list')
template_name = 'new_post.html'
Here we are using a generic view used to create model objects. It does all the form processing and save the object if the form is valid.
Since it’s a CBV, we refer to it in the urls.py the same way as any other CBV:
urlpatterns = [
url(r'^new_post//figure>, views.NewPostView.as_view(), name='new_post'),
]
Other examples of GCBVs are DetailView, DeleteView, FormView, UpdateView, ListView.
Update View
Let’s get back to the implementation of our project. This time we are going to use a GCBV to implement the edit post view:
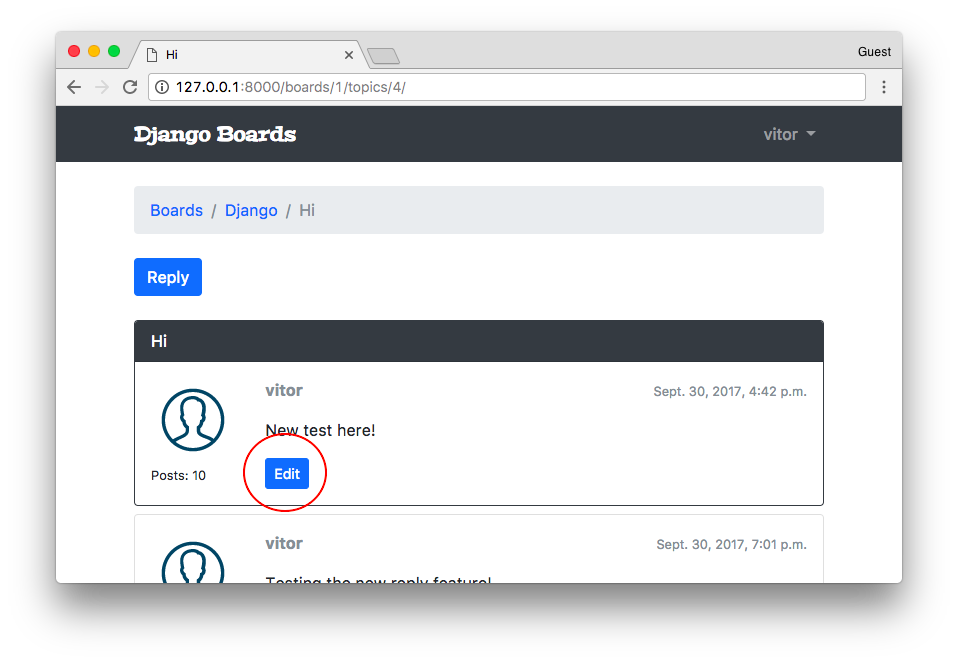
boards/views.py (view complete file contents)
from django.shortcuts import redirect
from django.views.generic import UpdateView
from django.utils import timezone
class PostUpdateView(UpdateView):
model = Post
fields = ('message', )
template_name = 'edit_post.html'
pk_url_kwarg = 'post_pk'
context_object_name = 'post'
def form_valid(self, form):
post = form.save(commit=False)
post.updated_by = self.request.user
post.updated_at = timezone.now()
post.save()
return redirect('topic_posts', pk=post.topic.board.pk, topic_pk=post.topic.pk)
With the UpdateView and the CreateView, we have the option to either define form_class or the fields attribute. In the example above we are using the fields attribute to create a model form on-the-fly. Internally, Django will use a model form factory to compose a form of the Post model. Since it’s a very simple form with just the message field, we can afford to work like this. But for complex form definitions, it’s better to define a model form externally and refer to it here.
The pk_url_kwarg will be used to identify the name of the keyword argument used to retrieve the Post object. It’s the same as we define in the urls.py.
If we don’t set the context_object_name attribute, the Post object will be available in the template as “object.” So, here we are using the context_object_name to rename it to post instead. You will see how we are using it in the template below.
In this particular example, we had to override the form_valid() method so as to set some extra fields such as the updated_by and updated_at. You can see what the base form_valid() method looks like here: UpdateView#form_valid.
myproject/urls.py (view complete file contents)
from django.conf.urls import url
from boards import views
urlpatterns = [
# ...
url(r'^boards/(?P<pk>\d+)/topics/(?P<topic_pk>\d+)/posts/(?P<post_pk>\d+)/edit//figure>,
views.PostUpdateView.as_view(), name='edit_post'),
]
Now we can add the link to the edit page:
templates/topic_posts.html (view complete file contents)
{% if post.created_by == user %}
<div class="mt-3">
<a href="{% url 'edit_post' post.topic.board.pk post.topic.pk post.pk %}"
class="btn btn-primary btn-sm"
role="button">Edit</a>
</div>
{% endif %}
templates/edit_post.html (view complete file contents)
{% extends 'base.html' %}
{% block title %}Edit post{% endblock %}
{% block breadcrumb %}
<li class="breadcrumb-item"><a href="{% url 'home' %}">Boards</a></li>
<li class="breadcrumb-item"><a href="{% url 'board_topics' post.topic.board.pk %}">{{ post.topic.board.name }}</a></li>
<li class="breadcrumb-item"><a href="{% url 'topic_posts' post.topic.board.pk post.topic.pk %}">{{ post.topic.subject }}</a></li>
<li class="breadcrumb-item active">Edit post</li>
{% endblock %}
{% block content %}
<form method="post" class="mb-4" novalidate>
{% csrf_token %}
{% include 'includes/form.html' %}
<button type="submit" class="btn btn-success">Save changes</button>
<a href="{% url 'topic_posts' post.topic.board.pk post.topic.pk %}" class="btn btn-outline-secondary" role="button">Cancel</a>
</form>
{% endblock %}
Observe now how we are navigating through the post object: post.topic.board.pk. If we didn’t set the context_object_name to post, it would be available as: object.topic.board.pk. Got it?
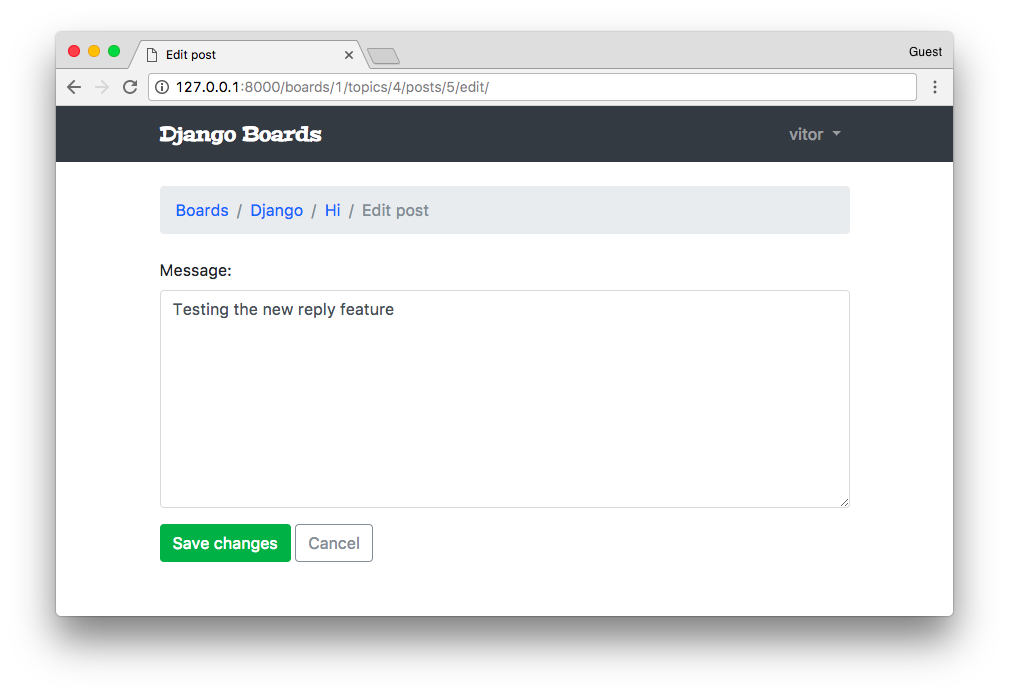
Testing The Update View
Create a new test file named test_view_edit_post.py inside the boards/tests folder. Clicking on the link below you will see many routine tests, just like we have been doing in this tutorial. So I will just highlight the new parts here:
boards/tests/test_view_edit_post.py (view complete file contents)
from django.contrib.auth.models import User
from django.test import TestCase
from django.urls import reverse
from ..models import Board, Post, Topic
from ..views import PostUpdateView
class PostUpdateViewTestCase(TestCase):
'''
Base test case to be used in all `PostUpdateView` view tests
'''
def setUp(self):
self.board = Board.objects.create(name='Django', description='Django board.')
self.username = 'john'
self.password = '123'
user = User.objects.create_user(username=self.username, email='john@doe.com', password=self.password)
self.topic = Topic.objects.create(subject='Hello, world', board=self.board, starter=user)
self.post = Post.objects.create(message='Lorem ipsum dolor sit amet', topic=self.topic, created_by=user)
self.url = reverse('edit_post', kwargs={
'pk': self.board.pk,
'topic_pk': self.topic.pk,
'post_pk': self.post.pk
})
class LoginRequiredPostUpdateViewTests(PostUpdateViewTestCase):
def test_redirection(self):
'''
Test if only logged in users can edit the posts
'''
login_url = reverse('login')
response = self.client.get(self.url)
self.assertRedirects(response, '{login_url}?next={url}'.format(login_url=login_url, url=self.url))
class UnauthorizedPostUpdateViewTests(PostUpdateViewTestCase):
def setUp(self):
'''
Create a new user different from the one who posted
'''
super().setUp()
username = 'jane'
password = '321'
user = User.objects.create_user(username=username, email='jane@doe.com', password=password)
self.client.login(username=username, password=password)
self.response = self.client.get(self.url)
def test_status_code(self):
'''
A topic should be edited only by the owner.
Unauthorized users should get a 404 response (Page Not Found)
'''
self.assertEquals(self.response.status_code, 404)
class PostUpdateViewTests(PostUpdateViewTestCase):
# ...
class SuccessfulPostUpdateViewTests(PostUpdateViewTestCase):
# ...
class InvalidPostUpdateViewTests(PostUpdateViewTestCase):
# ...
For now, the important parts are: PostUpdateViewTestCase is a class we defined to be reused across the other test cases. It’s just the basic setup, creating users, topic, boards, and so on.
The class LoginRequiredPostUpdateViewTests will test if the view is protected with the @login_required decorator. That is if only authenticated users can access the edit page.
The class UnauthorizedPostUpdateViewTests creates a new user, different from the one who posted and tries to access the edit page. The application should only authorize the owner of the post to edit it.
Let’s run the tests:
python manage.py test boards.tests.test_view_edit_post
Creating test database for alias 'default'...
System check identified no issues (0 silenced).
..F.......F
======================================================================
FAIL: test_redirection (boards.tests.test_view_edit_post.LoginRequiredPostUpdateViewTests)
----------------------------------------------------------------------
...
AssertionError: 200 != 302 : Response didn't redirect as expected: Response code was 200 (expected 302)
======================================================================
FAIL: test_status_code (boards.tests.test_view_edit_post.UnauthorizedPostUpdateViewTests)
----------------------------------------------------------------------
...
AssertionError: 200 != 404
----------------------------------------------------------------------
Ran 11 tests in 1.360s
FAILED (failures=2)
Destroying test database for alias 'default'...
First, let’s fix the problem with the @login_required decorator. The way we use view decorators on class-based views is a little bit different. We need an extra import:
boards/views.py (view complete file contents)
from django.contrib.auth.decorators import login_required
from django.shortcuts import redirect
from django.views.generic import UpdateView
from django.utils import timezone
from django.utils.decorators import method_decorator
from .models import Post
@method_decorator(login_required, name='dispatch')
class PostUpdateView(UpdateView):
model = Post
fields = ('message', )
template_name = 'edit_post.html'
pk_url_kwarg = 'post_pk'
context_object_name = 'post'
def form_valid(self, form):
post = form.save(commit=False)
post.updated_by = self.request.user
post.updated_at = timezone.now()
post.save()
return redirect('topic_posts', pk=post.topic.board.pk, topic_pk=post.topic.pk)
We can’t decorate the class directly with the @login_required decorator. We have to use the utility @method_decorator, and pass a decorator (or a list of decorators) and tell which method should be decorated. In class-based views it’s common to decorate the dispatch method. It’s an internal method Django use (defined inside the View class). All requests pass through this method, so it’s safe to decorate it.
Run the tests:
python manage.py test boards.tests.test_view_edit_post
Creating test database for alias 'default'...
System check identified no issues (0 silenced).
..........F
======================================================================
FAIL: test_status_code (boards.tests.test_view_edit_post.UnauthorizedPostUpdateViewTests)
----------------------------------------------------------------------
...
AssertionError: 200 != 404
----------------------------------------------------------------------
Ran 11 tests in 1.353s
FAILED (failures=1)
Destroying test database for alias 'default'...
Okay! We fixed the @login_required problem. Now we have to deal with the other users editing any posts problem.
The easiest way to solve this problem is by overriding the get_queryset method of the UpdateView. You can see what the original method looks like here UpdateView#get_queryset.
boards/views.py (view complete file contents)
@method_decorator(login_required, name='dispatch')
class PostUpdateView(UpdateView):
model = Post
fields = ('message', )
template_name = 'edit_post.html'
pk_url_kwarg = 'post_pk'
context_object_name = 'post'
def get_queryset(self):
queryset = super().get_queryset()
return queryset.filter(created_by=self.request.user)
def form_valid(self, form):
post = form.save(commit=False)
post.updated_by = self.request.user
post.updated_at = timezone.now()
post.save()
return redirect('topic_posts', pk=post.topic.board.pk, topic_pk=post.topic.pk)
With the line queryset = super().get_queryset() we are reusing the get_queryset method from the parent class, that is, the UpateView class. Then, we are adding an extra filter to the queryset, which is filtering the post using the logged in user, available inside the request object.
Test it again:
python manage.py test boards.tests.test_view_edit_post
Creating test database for alias 'default'...
System check identified no issues (0 silenced).
...........
----------------------------------------------------------------------
Ran 11 tests in 1.321s
OK
Destroying test database for alias 'default'...
All good!
List View
We could refactor some of our existing views to take advantage of the CBV capabilities. Take the home page for example. We are just grabbing all the boards from the database and listing it in the HTML:
boards/views.py
from django.shortcuts import render
from .models import Board
def home(request):
boards = Board.objects.all()
return render(request, 'home.html', {'boards': boards})
Here is how we could rewrite it using a GCBV for models listing:
boards/views.py (view complete file contents)
from django.views.generic import ListView
from .models import Board
class BoardListView(ListView):
model = Board
context_object_name = 'boards'
template_name = 'home.html'
Then we have to change the reference in the urls.py module:
myproject/urls.py (view complete file contents)
from django.conf.urls import url
from boards import views
urlpatterns = [
url(r'^/figure>, views.BoardListView.as_view(), name='home'),
# ...
]
If we check the homepage we will see that nothing really changed, everything is working as expected. But we have to tweak our tests a little bit because now we are dealing with a class-based view:
boards/tests/test_view_home.py (view complete file contents)
from django.test import TestCase
from django.urls import resolve
from ..views import BoardListView
class HomeTests(TestCase):
# ...
def test_home_url_resolves_home_view(self):
view = resolve('/')
self.assertEquals(view.func.view_class, BoardListView)
Pagination
We can very easily implement pagination with class-based views. But first I wanted to do a pagination by hand, so that we can explore better the mechanics behind it, so it doesn’t look like magic.
It wouldn’t really make sense to paginate the boards listing view because we do not expect to have many boards. But definitely the topics listing and the posts listing need some pagination.
From now on, we will be working on the board_topics view.
First, let’s add some volume of posts. We could just use the application’s user interface and add several posts, or open the Python shell and write a small script to do it for us:
python manage.py shell
from django.contrib.auth.models import User
from boards.models import Board, Topic, Post
user = User.objects.first()
board = Board.objects.get(name='Django')
for i in range(100):
subject = 'Topic test #{}'.format(i)
topic = Topic.objects.create(subject=subject, board=board, starter=user)
Post.objects.create(message='Lorem ipsum...', topic=topic, created_by=user)
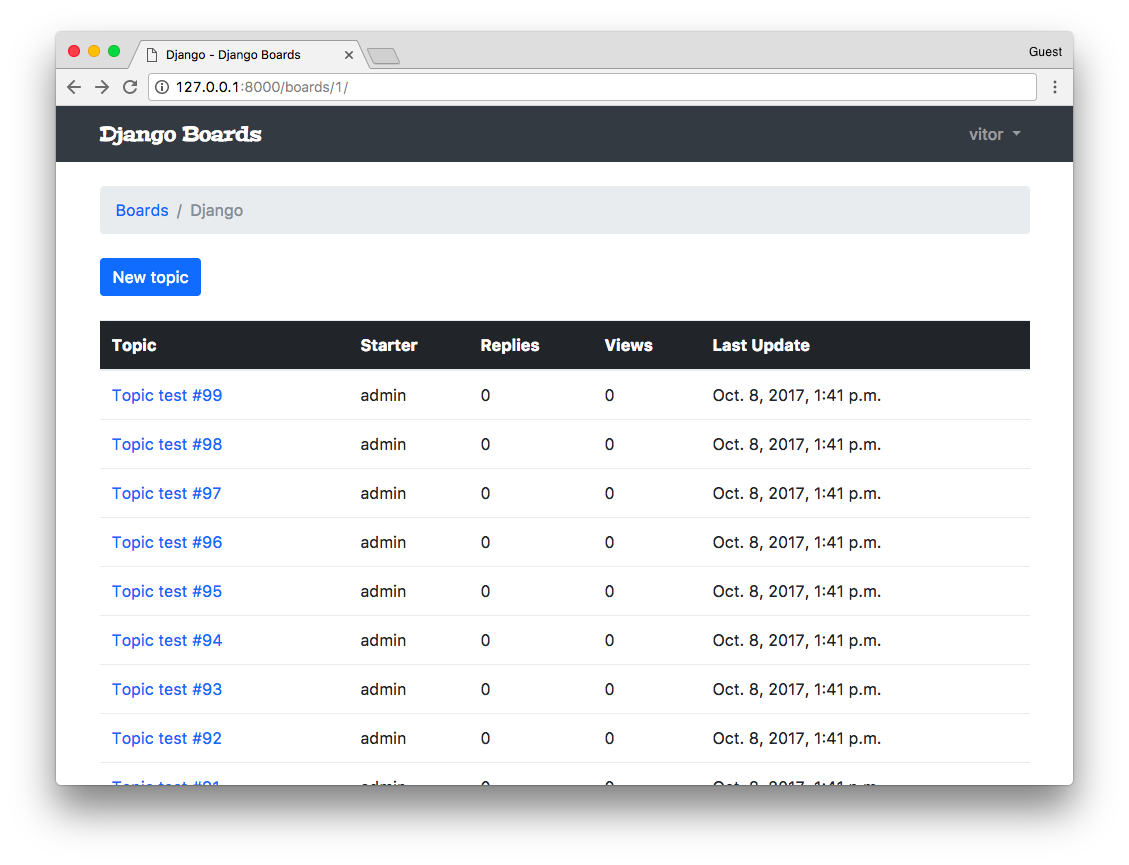
Good, now we have some data to play with.
Before we jump into the code, let’s experiment a little bit more with the Python shell:
python manage.py shell
from boards.models import Topic
# All the topics in the app
Topic.objects.count()
107
# Just the topics in the Django board
Topic.objects.filter(board__name='Django').count()
104
# Let's save this queryset into a variable to paginate it
queryset = Topic.objects.filter(board__name='Django').order_by('-last_updated')
It’s very important always define an ordering to a QuerySet you are going to paginate! Otherwise, it can give you inconsistent results.
Now let’s import the Paginator utility:
from django.core.paginator import Paginator
paginator = Paginator(queryset, 20)
Here we are telling Django to paginate our QuerySet in pages of 20 each. Now let’s explore some of the paginator properties:
# count the number of elements in the paginator
paginator.count
104
# total number of pages
# 104 elements, paginating 20 per page gives you 6 pages
# where the last page will have only 4 elements
paginator.num_pages
6
# range of pages that can be used to iterate and create the
# links to the pages in the template
paginator.page_range
range(1, 7)
# returns a Page instance
paginator.page(2)
<Page 2 of 6>
page = paginator.page(2)
type(page)
django.core.paginator.Page
type(paginator)
django.core.paginator.Paginator
Here we have to pay attention because if we try to get a page that doesn’t exist, the Paginator will throw an exception:
paginator.page(7)
EmptyPage: That page contains no results
Or if we try to pass an arbitrary parameter, which is not a page number:
paginator.page('abc')
PageNotAnInteger: That page number is not an integer
We have to keep those details in mind when designing the user interface.
Now let’s explore the attributes and methods offered by the Page class a little bit:
page = paginator.page(1)
# Check if there is another page after this one
page.has_next()
True
# If there is no previous page, that means this one is the first page
page.has_previous()
False
page.has_other_pages()
True
page.next_page_number()
2
# Take care here, since there is no previous page,
# if we call the method `previous_page_number() we will get an exception:
page.previous_page_number()
EmptyPage: That page number is less than 1
FBV Pagination
Here is how we do it using regular function-based views:
boards/views.py (view complete file contents)
from django.db.models import Count
from django.core.paginator import Paginator, EmptyPage, PageNotAnInteger
from django.shortcuts import get_object_or_404, render
from django.views.generic import ListView
from .models import Board
def board_topics(request, pk):
board = get_object_or_404(Board, pk=pk)
queryset = board.topics.order_by('-last_updated').annotate(replies=Count('posts') - 1)
page = request.GET.get('page', 1)
paginator = Paginator(queryset, 20)
try:
topics = paginator.page(page)
except PageNotAnInteger:
# fallback to the first page
topics = paginator.page(1)
except EmptyPage:
# probably the user tried to add a page number
# in the url, so we fallback to the last page
topics = paginator.page(paginator.num_pages)
return render(request, 'topics.html', {'board': board, 'topics': topics})
Now the trick part is to render the pages correctly using the Bootstrap 4 pagination component. But take the time to read the code and see if it makes sense for you. We are using here all the methods we played with before. And here in that context, topics is no longer a QuerySet but a paginator.Page instance.
Right after the topics HTML table, we can render the pagination component:
templates/topics.html (view complete file contents)
{% if topics.has_other_pages %}
<nav aria-label="Topics pagination" class="mb-4">
<ul class="pagination">
{% if topics.has_previous %}
<li class="page-item">
<a class="page-link" href="?page={{ topics.previous_page_number }}">Previous</a>
</li>
{% else %}
<li class="page-item disabled">
<span class="page-link">Previous</span>
</li>
{% endif %}
{% for page_num in topics.paginator.page_range %}
{% if topics.number == page_num %}
<li class="page-item active">
<span class="page-link">
{{ page_num }}
<span class="sr-only">(current)</span>
</span>
</li>
{% else %}
<li class="page-item">
<a class="page-link" href="?page={{ page_num }}">{{ page_num }}</a>
</li>
{% endif %}
{% endfor %}
{% if topics.has_next %}
<li class="page-item">
<a class="page-link" href="?page={{ topics.next_page_number }}">Next</a>
</li>
{% else %}
<li class="page-item disabled">
<span class="page-link">Next</span>
</li>
{% endif %}
</ul>
</nav>
{% endif %}

GCBV Pagination
Below, the same implementation but this time using the ListView.
boards/views.py (view complete file contents)
class TopicListView(ListView):
model = Topic
context_object_name = 'topics'
template_name = 'topics.html'
paginate_by = 20
def get_context_data(self, **kwargs):
kwargs['board'] = self.board
return super().get_context_data(**kwargs)
def get_queryset(self):
self.board = get_object_or_404(Board, pk=self.kwargs.get('pk'))
queryset = self.board.topics.order_by('-last_updated').annotate(replies=Count('posts') - 1)
return queryset
While using pagination with class-based views, the way we interact with the paginator in the template is a little bit different. It will make available the following variables in the template: paginator, page_obj, is_paginated, object_list, and also a variable with the name we defined in the context_object_name. In our case this extra variable will be named topics, and it will be equivalent to object_list.
Now about the whole get_context_data thing, well, that’s how we add stuff to the request context when extending a GCBV.
But the main point here is the paginate_by attribute. In some cases, just by adding it will be enough.
Remember to update the urls.py:
myproject/urls.py (view complete file contents)
from django.conf.urls import url
from boards import views
urlpatterns = [
# ...
url(r'^boards/(?P<pk>\d+)//figure>, views.TopicListView.as_view(), name='board_topics'),
]
Now let’s fix the template:
templates/topics.html (view complete file contents)
{% block content %}
<div class="mb-4">
<a href="{% url 'new_topic' board.pk %}" class="btn btn-primary">New topic</a>
</div>
<table class="table mb-4">
<!-- table content suppressed -->
</table>
{% if is_paginated %}
<nav aria-label="Topics pagination" class="mb-4">
<ul class="pagination">
{% if page_obj.has_previous %}
<li class="page-item">
<a class="page-link" href="?page={{ page_obj.previous_page_number }}">Previous</a>
</li>
{% else %}
<li class="page-item disabled">
<span class="page-link">Previous</span>
</li>
{% endif %}
{% for page_num in paginator.page_range %}
{% if page_obj.number == page_num %}
<li class="page-item active">
<span class="page-link">
{{ page_num }}
<span class="sr-only">(current)</span>
</span>
</li>
{% else %}
<li class="page-item">
<a class="page-link" href="?page={{ page_num }}">{{ page_num }}</a>
</li>
{% endif %}
{% endfor %}
{% if page_obj.has_next %}
<li class="page-item">
<a class="page-link" href="?page={{ page_obj.next_page_number }}">Next</a>
</li>
{% else %}
<li class="page-item disabled">
<span class="page-link">Next</span>
</li>
{% endif %}
</ul>
</nav>
{% endif %}
{% endblock %}
Now take the time to run the tests and fix if needed.
boards/tests/test_view_board_topics.py
from django.test import TestCase
from django.urls import resolve
from ..views import TopicListView
class BoardTopicsTests(TestCase):
# ...
def test_board_topics_url_resolves_board_topics_view(self):
view = resolve('/boards/1/')
self.assertEquals(view.func.view_class, TopicListView)
Reusable Pagination Template
Just like we did with the form.html partial template, we can also create something similar for the pagination HTML snippet.
Let’s paginate the topic posts page, and then find a way to reuse the pagination component.
boards/views.py (view complete file contents)
class PostListView(ListView):
model = Post
context_object_name = 'posts'
template_name = 'topic_posts.html'
paginate_by = 2
def get_context_data(self, **kwargs):
self.topic.views += 1
self.topic.save()
kwargs['topic'] = self.topic
return super().get_context_data(**kwargs)
def get_queryset(self):
self.topic = get_object_or_404(Topic, board__pk=self.kwargs.get('pk'), pk=self.kwargs.get('topic_pk'))
queryset = self.topic.posts.order_by('created_at')
return queryset
Now update the urls.py (view complete file contents)
from django.conf.urls import url
from boards import views
urlpatterns = [
# ...
url(r'^boards/(?P<pk>\d+)/topics/(?P<topic_pk>\d+)//figure>, views.PostListView.as_view(), name='topic_posts'),
]
Now we grab that pagination HTML snippet from the topics.html template, and create a new file named pagination.html inside the templates/includes folder, alongside with the forms.html file:
myproject/
|-- myproject/
| |-- accounts/
| |-- boards/
| |-- myproject/
| |-- static/
| |-- templates/
| | |-- includes/
| | | |-- form.html
| | | +-- pagination.html <-- here!
| | +-- ...
| |-- db.sqlite3
| +-- manage.py
+-- venv/
templates/includes/pagination.html
{% if is_paginated %}
<nav aria-label="Topics pagination" class="mb-4">
<ul class="pagination">
{% if page_obj.has_previous %}
<li class="page-item">
<a class="page-link" href="?page={{ page_obj.previous_page_number }}">Previous</a>
</li>
{% else %}
<li class="page-item disabled">
<span class="page-link">Previous</span>
</li>
{% endif %}
{% for page_num in paginator.page_range %}
{% if page_obj.number == page_num %}
<li class="page-item active">
<span class="page-link">
{{ page_num }}
<span class="sr-only">(current)</span>
</span>
</li>
{% else %}
<li class="page-item">
<a class="page-link" href="?page={{ page_num }}">{{ page_num }}</a>
</li>
{% endif %}
{% endfor %}
{% if page_obj.has_next %}
<li class="page-item">
<a class="page-link" href="?page={{ page_obj.next_page_number }}">Next</a>
</li>
{% else %}
<li class="page-item disabled">
<span class="page-link">Next</span>
</li>
{% endif %}
</ul>
</nav>
{% endif %}
Now in the topic_posts.html template we use it:
templates/topic_posts.html (view complete file contents)
{% block content %}
<div class="mb-4">
<a href="{% url 'reply_topic' topic.board.pk topic.pk %}" class="btn btn-primary" role="button">Reply</a>
</div>
{% for post in posts %}
<div class="card {% if forloop.last %}mb-4{% else %}mb-2{% endif %} {% if forloop.first %}border-dark{% endif %}">
{% if forloop.first %}
<div class="card-header text-white bg-dark py-2 px-3">{{ topic.subject }}</div>
{% endif %}
<div class="card-body p-3">
<div class="row">
<div class="col-2">
<img src="{% static 'img/avatar.svg' %}" alt="{{ post.created_by.username }}" class="w-100">
<small>Posts: {{ post.created_by.posts.count }}</small>
</div>
<div class="col-10">
<div class="row mb-3">
<div class="col-6">
<strong class="text-muted">{{ post.created_by.username }}</strong>
</div>
<div class="col-6 text-right">
<small class="text-muted">{{ post.created_at }}</small>
</div>
</div>
{{ post.message }}
{% if post.created_by == user %}
<div class="mt-3">
<a href="{% url 'edit_post' post.topic.board.pk post.topic.pk post.pk %}"
class="btn btn-primary btn-sm"
role="button">Edit</a>
</div>
{% endif %}
</div>
</div>
</div>
</div>
{% endfor %}
{% include 'includes/pagination.html' %}
{% endblock %}
Don’t forget to change the main forloop to {% for post in posts %}.
We can also update the previous template, the topics.html template to use the pagination partial template too:
templates/topics.html (view complete file contents)
{% block content %}
<div class="mb-4">
<a href="{% url 'new_topic' board.pk %}" class="btn btn-primary">New topic</a>
</div>
<table class="table mb-4">
<!-- table code suppressed -->
</table>
{% include 'includes/pagination.html' %}
{% endblock %}
Just for testing purpose, you could just add a few posts (or create some using the Python Shell) and change the paginate_by to a low number, say 2, and see how it’s looking like:
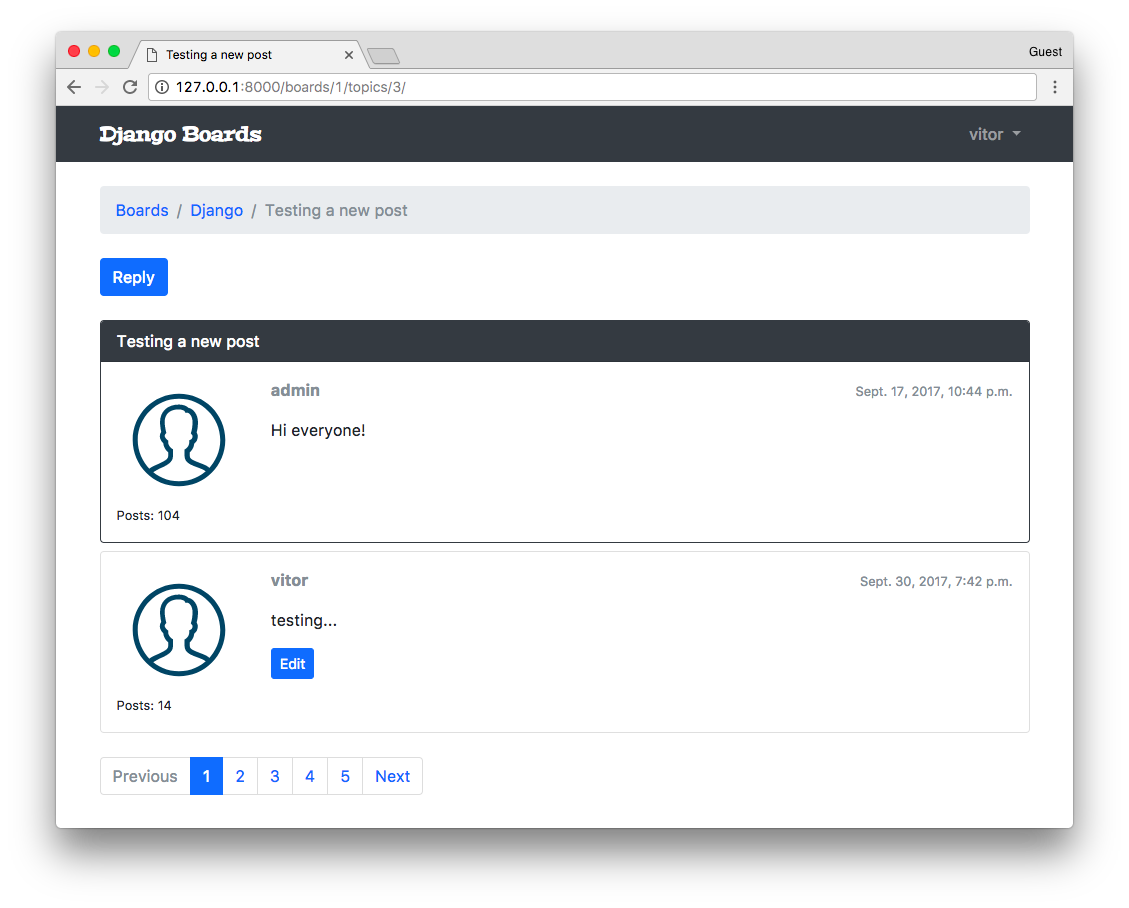
Update the test cases:
boards/tests/test_view_topic_posts.py
from django.test import TestCase
from django.urls import resolve
from ..views import PostListView
class TopicPostsTests(TestCase):
# ...
def test_view_function(self):
view = resolve('/boards/1/topics/1/')
self.assertEquals(view.func.view_class, PostListView)
My Account View
Okay, so, this is going to be our last view. After that, we will be working on improving the existing features.
accounts/views.py (view complete file contents)
from django.contrib.auth.decorators import login_required
from django.contrib.auth.models import User
from django.urls import reverse_lazy
from django.utils.decorators import method_decorator
from django.views.generic import UpdateView
@method_decorator(login_required, name='dispatch')
class UserUpdateView(UpdateView):
model = User
fields = ('first_name', 'last_name', 'email', )
template_name = 'my_account.html'
success_url = reverse_lazy('my_account')
def get_object(self):
return self.request.user
myproject/urls.py (view complete file contents)
from django.conf.urls import url
from accounts import views as accounts_views
urlpatterns = [
# ...
url(r'^settings/account//figure>, accounts_views.UserUpdateView.as_view(), name='my_account'),
]
templates/my_account.html
{% extends 'base.html' %}
{% block title %}My account{% endblock %}
{% block breadcrumb %}
<li class="breadcrumb-item active">My account</li>
{% endblock %}
{% block content %}
<div class="row">
<div class="col-lg-6 col-md-8 col-sm-10">
<form method="post" novalidate>
{% csrf_token %}
{% include 'includes/form.html' %}
<button type="submit" class="btn btn-success">Save changes</button>
</form>
</div>
</div>
{% endblock %}
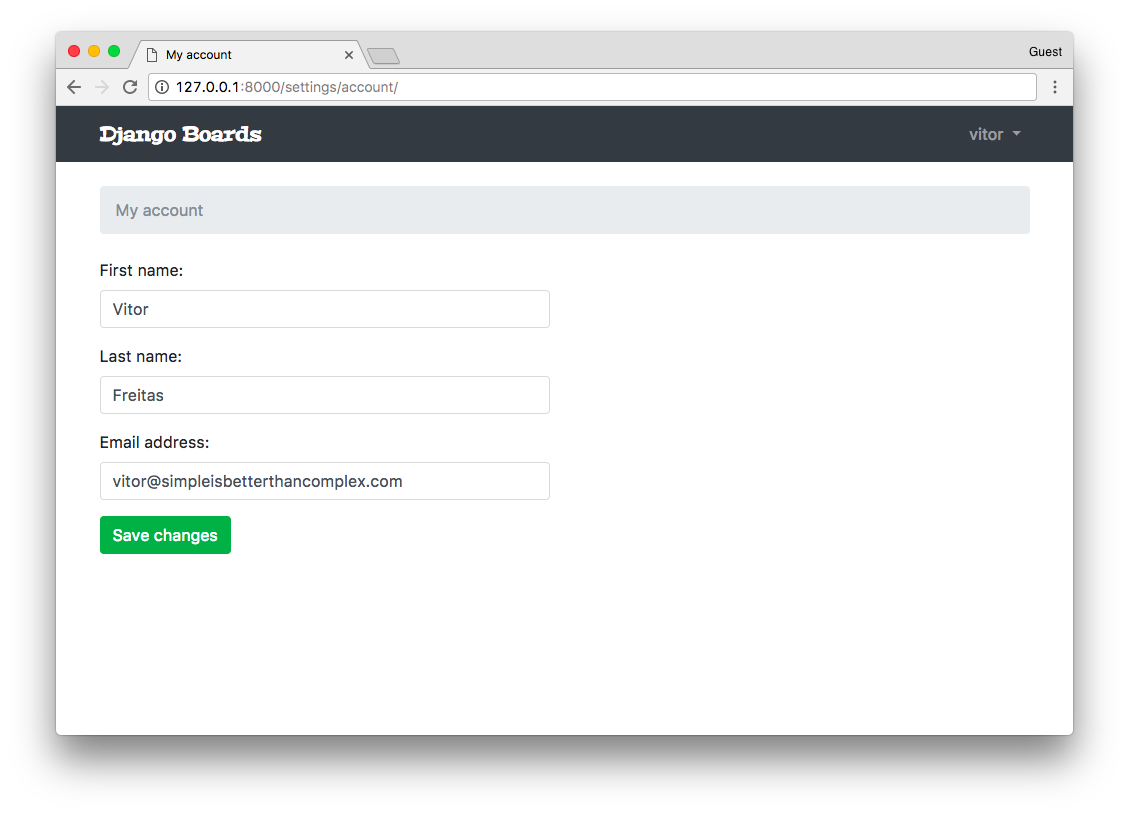
Adding Markdown
Let’s improve the user experience by adding Markdown to our text areas. You will see it’s very easy and simple.
First, let’s install a library called Python-Markdown:
pip install markdown
We can add a new method to the Post model:
boards/models.py (view complete file contents)
from django.db import models
from django.utils.html import mark_safe
from markdown import markdown
class Post(models.Model):
# ...
def get_message_as_markdown(self):
return mark_safe(markdown(self.message, safe_mode='escape'))
Here we are dealing with user input, so we must take care. When using the markdown function, we are instructing it to escape the special characters first and then parse the markdown tags. After that, we mark the output string as safe to be used in the template.
Now in the templates topic_posts.html and reply_topic.html just change from:
{{ post.message }}
To:
{{ post.get_message_as_markdown }}
From now on the users can already use markdown in the posts:
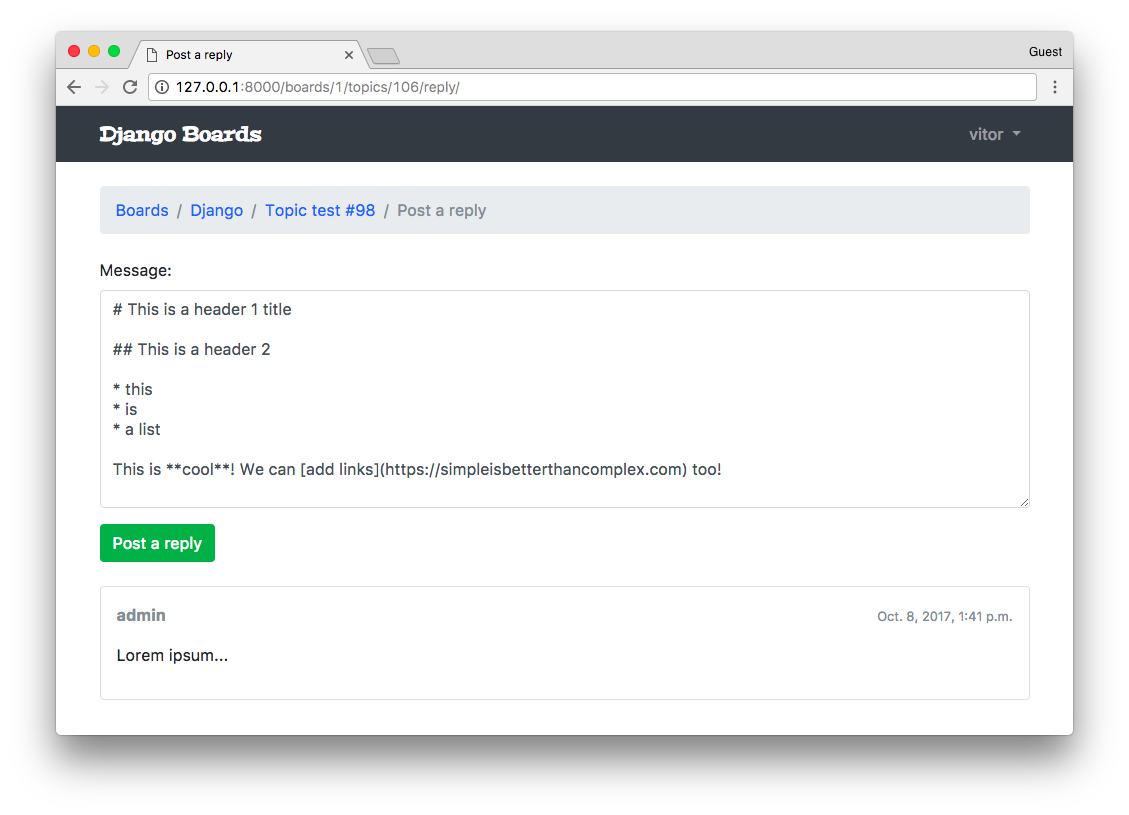
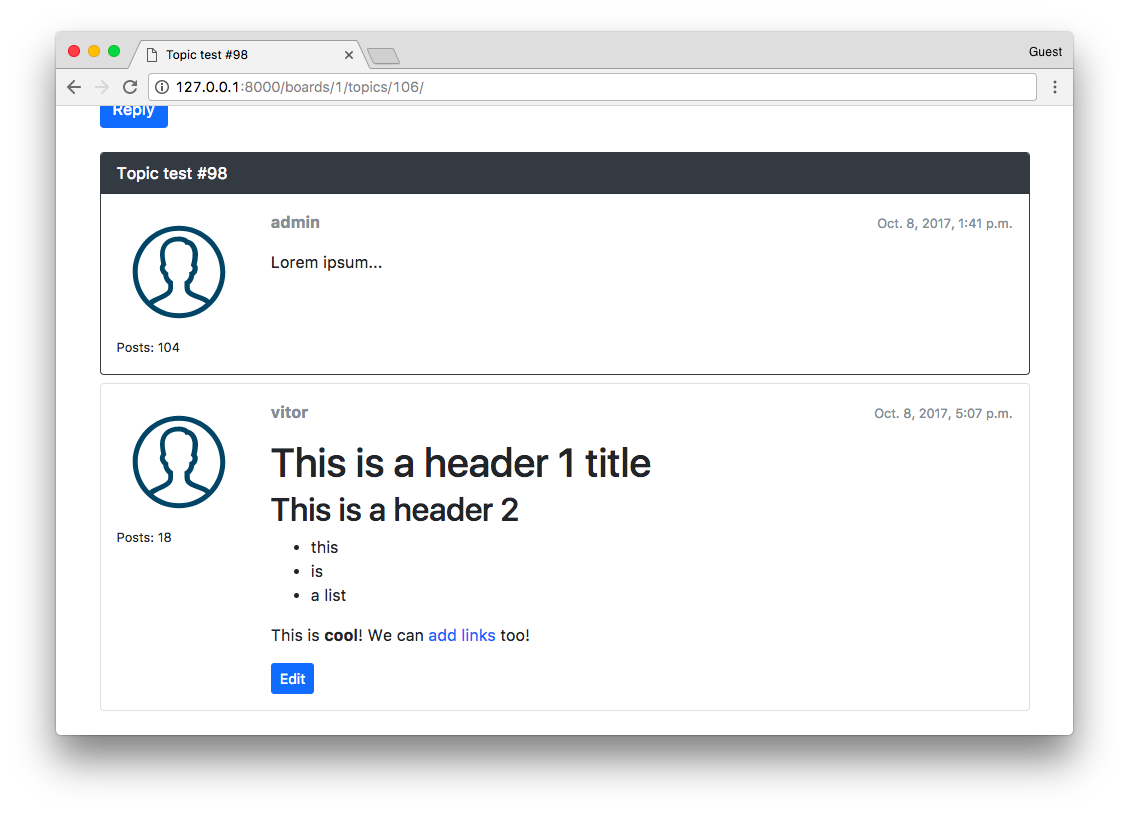
Markdown Editor
We can also add a very cool Markdown editor called SimpleMD.
Either download the JavaScript library or use their CDN:
<link rel="stylesheet" href="https://cdn.jsdelivr.net/simplemde/latest/simplemde.min.css">
<script src="https://cdn.jsdelivr.net/simplemde/latest/simplemde.min.js"></script>
Now edit the base.html to make space for extra JavaScripts:
templates/base.html (view complete file contents)
<script src="{% static 'js/jquery-3.2.1.min.js' %}"></script>
<script src="{% static 'js/popper.min.js' %}"></script>
<script src="{% static 'js/bootstrap.min.js' %}"></script>
{% block javascript %}{% endblock %} <!-- Add this empty block here! -->
First edit the reply_topic.html template:
templates/reply_topic.html (view complete file contents)
{% extends 'base.html' %}
{% load static %}
{% block title %}Post a reply{% endblock %}
{% block stylesheet %}
<link rel="stylesheet" href="{% static 'css/simplemde.min.css' %}">
{% endblock %}
{% block javascript %}
<script src="{% static 'js/simplemde.min.js' %}"></script>
<script>
var simplemde = new SimpleMDE();
</script>
{% endblock %}
By default, this plugin will transform the first text area it finds into a markdown editor. So just that code should be enough:
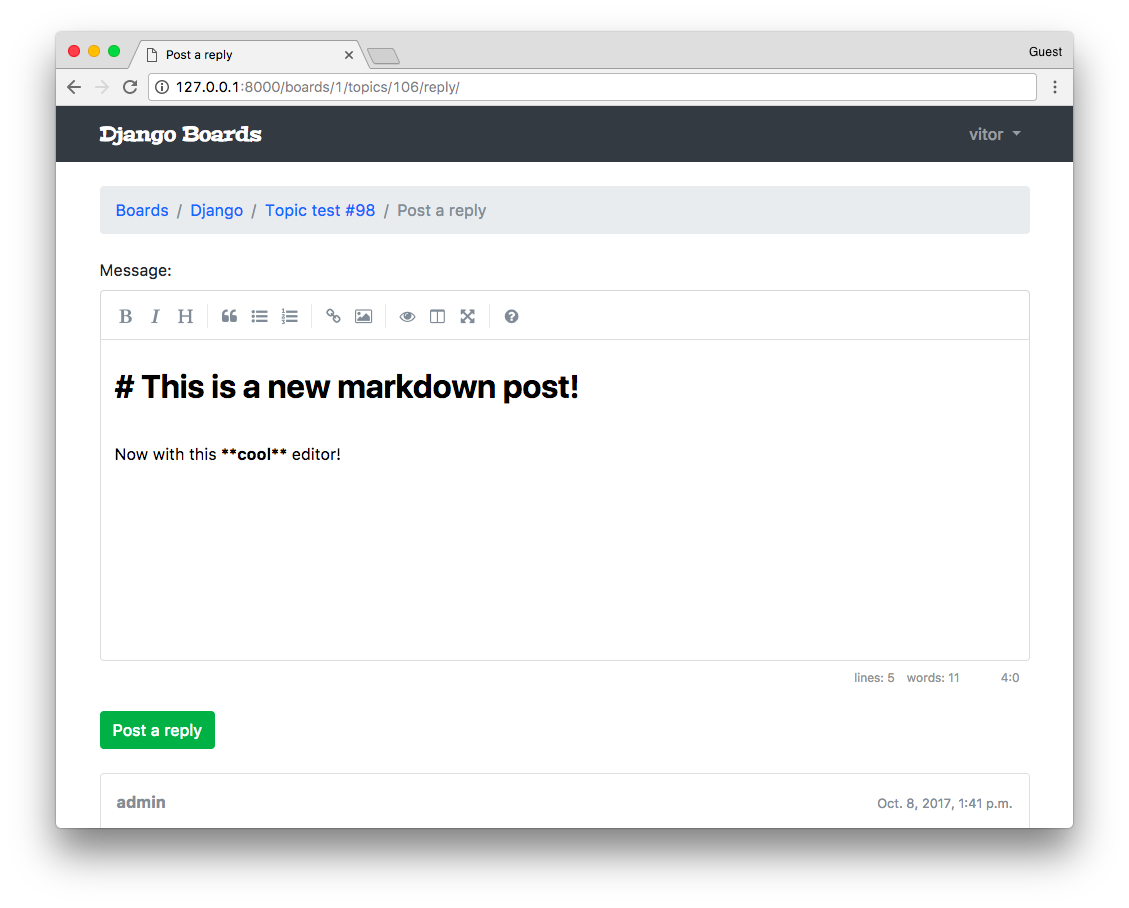
Now do the same thing with the edit_post.html template:
templates/edit_post.html (view complete file contents)
{% extends 'base.html' %}
{% load static %}
{% block title %}Edit post{% endblock %}
{% block stylesheet %}
<link rel="stylesheet" href="{% static 'css/simplemde.min.css' %}">
{% endblock %}
{% block javascript %}
<script src="{% static 'js/simplemde.min.js' %}"></script>
<script>
var simplemde = new SimpleMDE();
</script>
{% endblock %}
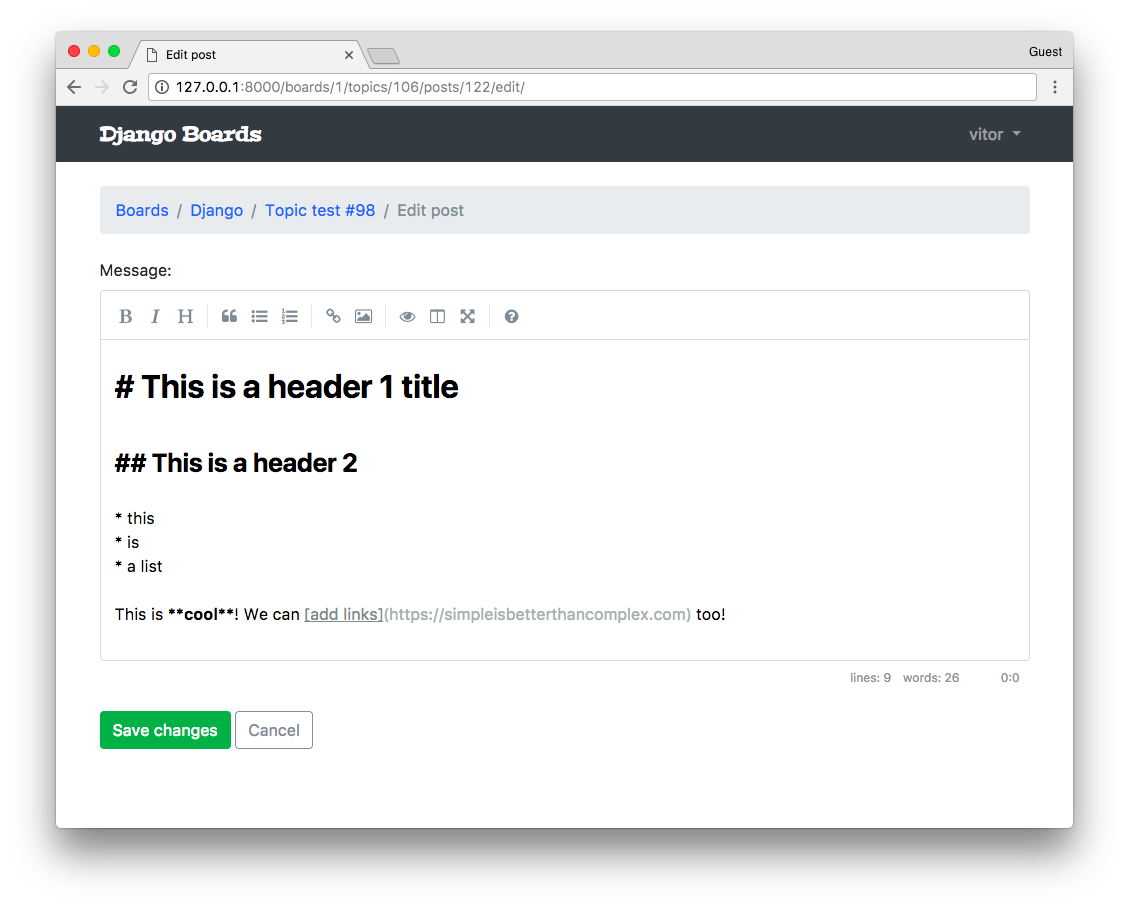
Humanize
I just thought it would be a nice touch to add the built-in humanize package. It’s a set of utility functions to add a “human touch” to data.
For example, we can use it to display date and time fields more naturally. Instead of showing the whole date, we can simply show: “2 minutes ago”.
Let’s do it. First, add the django.contrib.humanize to the INSTALLED_APPS.
myproject/settings.py
INSTALLED_APPS = [
'django.contrib.admin',
'django.contrib.auth',
'django.contrib.contenttypes',
'django.contrib.sessions',
'django.contrib.messages',
'django.contrib.staticfiles',
'django.contrib.humanize', # <- here
'widget_tweaks',
'accounts',
'boards',
]
Now we can use it in the templates. First, let’s edit the topics.html template:
templates/topics.html (view complete file contents)
{% extends 'base.html' %}
{% load humanize %}
{% block content %}
<!-- code suppressed -->
<td>{{ topic.last_updated|naturaltime }}</td>
<!-- code suppressed -->
{% endblock %}
All we have to do is to load the template tags using {% load humanize %} and then apply the template filter: {{ topic.last_updated|naturaltime }}
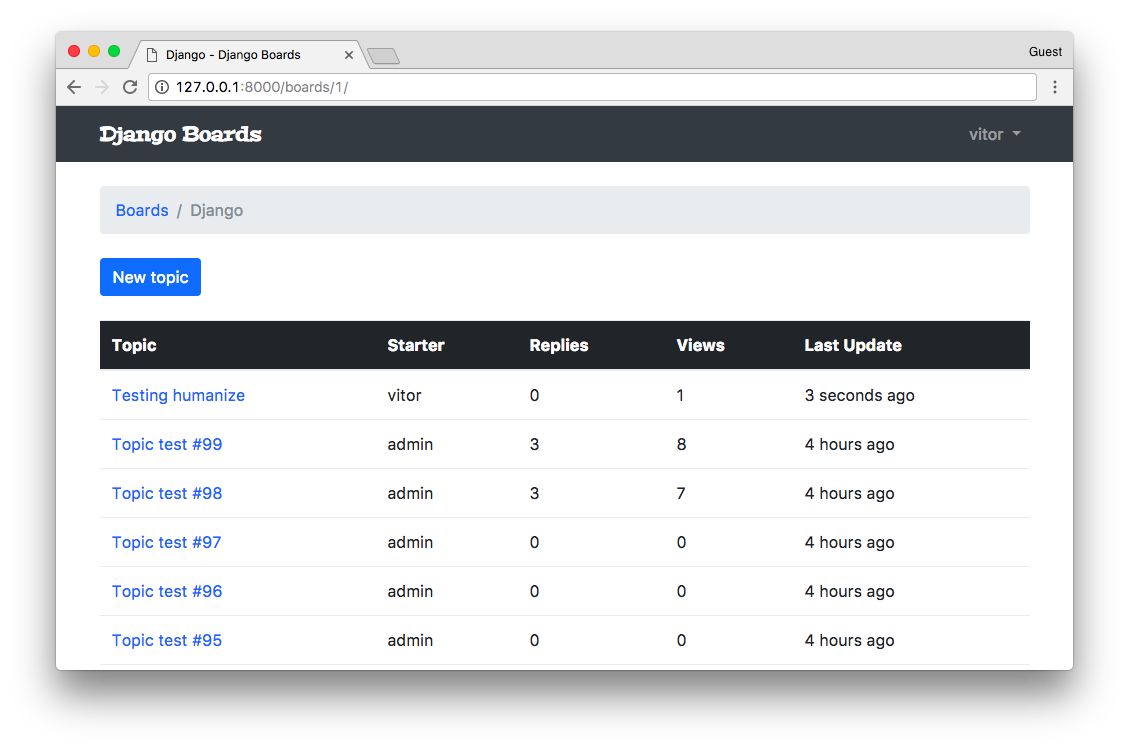
You may add it to other places you like.
Gravatar
A very easy way to add user profile pictures is by using Gravatar.
Inside the boards/templatetags folder, create a new file named gravatar.py:
boards/templatetags/gravatar.py
import hashlib
from urllib.parse import urlencode
from django import template
from django.conf import settings
register = template.Library()
@register.filter
def gravatar(user):
email = user.email.lower().encode('utf-8')
default = 'mm'
size = 256
url = 'https://www.gravatar.com/avatar/{md5}?{params}'.format(
md5=hashlib.md5(email).hexdigest(),
params=urlencode({'d': default, 's': str(size)})
)
return url
Basically I’m using the code snippet they provide. I just adapted it to work with Python 3.
Great, now we can load it in our template, just like we did with the Humanize template filter:
templates/topic_posts.html (view complete file contents)
{% extends 'base.html' %}
{% load gravatar %}
{% block content %}
<!-- code suppressed -->
<img src="{{ post.created_by|gravatar }}" alt="{{ post.created_by.username }}" class="w-100 rounded">
<!-- code suppressed -->
{% endblock %}
![]()
Final Adjustments
Maybe you have already noticed, but there’s a small issue when someone replies to a post. It’s not updating the last_update field, so the ordering of the topics is broken right now.
Let’s fix it:
boards/views.py
@login_required
def reply_topic(request, pk, topic_pk):
topic = get_object_or_404(Topic, board__pk=pk, pk=topic_pk)
if request.method == 'POST':
form = PostForm(request.POST)
if form.is_valid():
post = form.save(commit=False)
post.topic = topic
post.created_by = request.user
post.save()
topic.last_updated = timezone.now() # <- here
topic.save() # <- and here
return redirect('topic_posts', pk=pk, topic_pk=topic_pk)
else:
form = PostForm()
return render(request, 'reply_topic.html', {'topic': topic, 'form': form})
Next thing we want to do is try to control the view counting system a little bit more. We don’t want to the same user refreshing the page counting as multiple views. For this we can use sessions:
boards/views.py
class PostListView(ListView):
model = Post
context_object_name = 'posts'
template_name = 'topic_posts.html'
paginate_by = 20
def get_context_data(self, **kwargs):
session_key = 'viewed_topic_{}'.format(self.topic.pk) # <-- here
if not self.request.session.get(session_key, False):
self.topic.views += 1
self.topic.save()
self.request.session[session_key] = True # <-- until here
kwargs['topic'] = self.topic
return super().get_context_data(**kwargs)
def get_queryset(self):
self.topic = get_object_or_404(Topic, board__pk=self.kwargs.get('pk'), pk=self.kwargs.get('topic_pk'))
queryset = self.topic.posts.order_by('created_at')
return queryset
Now we could provide a better navigation in the topics listing. Currently the only option is for the user to click in the topic title and go to the first page. We could workout something like this:
boards/models.py
import math
from django.db import models
class Topic(models.Model):
# ...
def __str__(self):
return self.subject
def get_page_count(self):
count = self.posts.count()
pages = count / 20
return math.ceil(pages)
def has_many_pages(self, count=None):
if count is None:
count = self.get_page_count()
return count > 6
def get_page_range(self):
count = self.get_page_count()
if self.has_many_pages(count):
return range(1, 5)
return range(1, count + 1)
Then in the topics.html template we could implement something like this:
templates/topics.html
<table class="table table-striped mb-4">
<thead class="thead-inverse">
<tr>
<th>Topic</th>
<th>Starter</th>
<th>Replies</th>
<th>Views</th>
<th>Last Update</th>
</tr>
</thead>
<tbody>
{% for topic in topics %}
{% url 'topic_posts' board.pk topic.pk as topic_url %}
<tr>
<td>
<p class="mb-0">
<a href="{{ topic_url }}">{{ topic.subject }}</a>
</p>
<small class="text-muted">
Pages:
{% for i in topic.get_page_range %}
<a href="{{ topic_url }}?page={{ i }}">{{ i }}</a>
{% endfor %}
{% if topic.has_many_pages %}
... <a href="{{ topic_url }}?page={{ topic.get_page_count }}">Last Page</a>
{% endif %}
</small>
</td>
<td class="align-middle">{{ topic.starter.username }}</td>
<td class="align-middle">{{ topic.replies }}</td>
<td class="align-middle">{{ topic.views }}</td>
<td class="align-middle">{{ topic.last_updated|naturaltime }}</td>
</tr>
{% endfor %}
</tbody>
</table>
Like a tiny pagination for each topic. Note that I also took the time to add the table-striped class for a better styling of the table.

In the reply page, we are currently listing all topic replies. We could limit it to just the last ten posts.
boards/models.py
class Topic(models.Model):
# ...
def get_last_ten_posts(self):
return self.posts.order_by('-created_at')[:10]
templates/reply_topic.html
{% block content %}
<form method="post" class="mb-4" novalidate>
{% csrf_token %}
{% include 'includes/form.html' %}
<button type="submit" class="btn btn-success">Post a reply</button>
</form>
{% for post in topic.get_last_ten_posts %} <!-- here! -->
<div class="card mb-2">
<!-- code suppressed -->
</div>
{% endfor %}
{% endblock %}
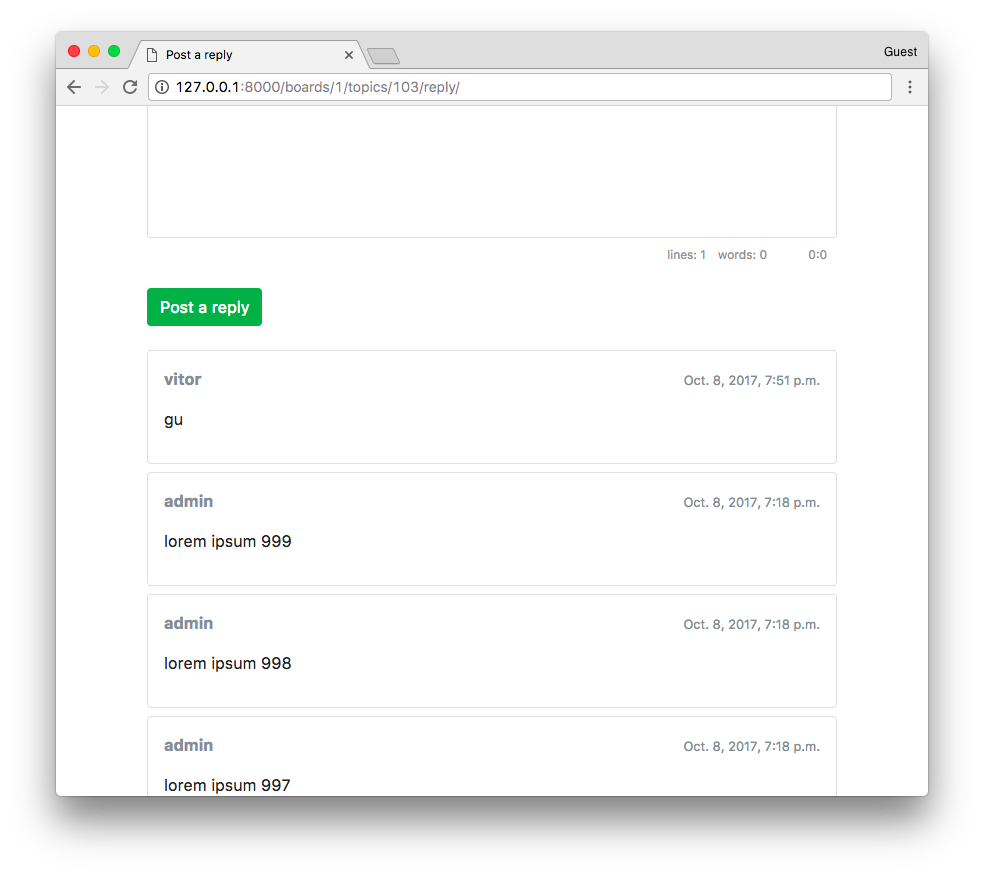
Another thing is that when the user replies to a post, we are redirecting the user to the first page again. We could improve it by sending the user to the last page.
We can add an id to the post card:
templates/topic_posts.html
{% block content %}
<div class="mb-4">
<a href="{% url 'reply_topic' topic.board.pk topic.pk %}" class="btn btn-primary" role="button">Reply</a>
</div>
{% for post in posts %}
<div id="{{ post.pk }}" class="card {% if forloop.last %}mb-4{% else %}mb-2{% endif %} {% if forloop.first %}border-dark{% endif %}">
<!-- code suppressed -->
</div>
{% endfor %}
{% include 'includes/pagination.html' %}
{% endblock %}
The important bit here is the <div id="{{ post.pk }}" ...>.
Then we can play with it like this in the views:
boards/views.py
@login_required
def reply_topic(request, pk, topic_pk):
topic = get_object_or_404(Topic, board__pk=pk, pk=topic_pk)
if request.method == 'POST':
form = PostForm(request.POST)
if form.is_valid():
post = form.save(commit=False)
post.topic = topic
post.created_by = request.user
post.save()
topic.last_updated = timezone.now()
topic.save()
topic_url = reverse('topic_posts', kwargs={'pk': pk, 'topic_pk': topic_pk})
topic_post_url = '{url}?page={page}#{id}'.format(
url=topic_url,
id=post.pk,
page=topic.get_page_count()
)
return redirect(topic_post_url)
else:
form = PostForm()
return render(request, 'reply_topic.html', {'topic': topic, 'form': form})
In the topic_post_url we are building a URL with the last page and adding an anchor to the element with id equals to the post ID.
With this, it will required us to update the following test case:
boards/tests/test_view_reply_topic.py
class SuccessfulReplyTopicTests(ReplyTopicTestCase):
# ...
def test_redirection(self):
'''
A valid form submission should redirect the user
'''
url = reverse('topic_posts', kwargs={'pk': self.board.pk, 'topic_pk': self.topic.pk})
topic_posts_url = '{url}?page=1#2'.format(url=url)
self.assertRedirects(self.response, topic_posts_url)
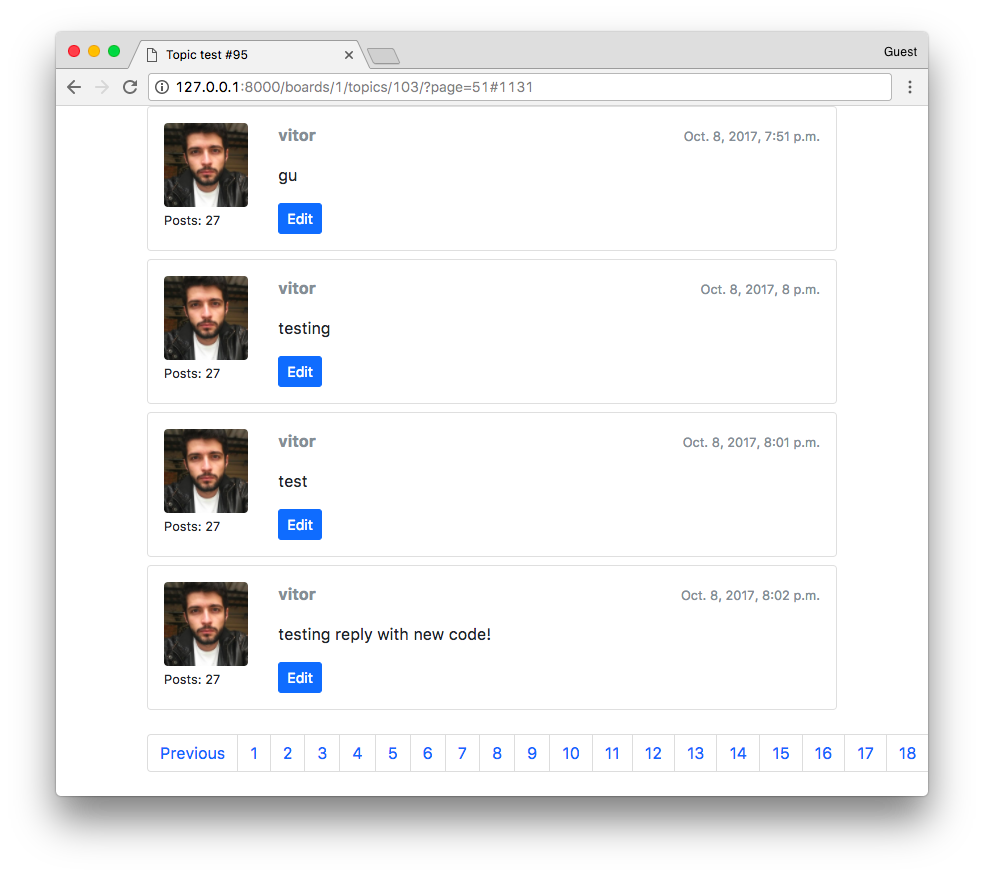
Next issue, as you can see in the previous screenshot, is to solve the problem with the pagination when the number of pages is too high.
The easiest way is to tweak the pagination.html template:
templates/includes/pagination.html
{% if is_paginated %}
<nav aria-label="Topics pagination" class="mb-4">
<ul class="pagination">
{% if page_obj.number > 1 %}
<li class="page-item">
<a class="page-link" href="?page=1">First</a>
</li>
{% else %}
<li class="page-item disabled">
<span class="page-link">First</span>
</li>
{% endif %}
{% if page_obj.has_previous %}
<li class="page-item">
<a class="page-link" href="?page={{ page_obj.previous_page_number }}">Previous</a>
</li>
{% else %}
<li class="page-item disabled">
<span class="page-link">Previous</span>
</li>
{% endif %}
{% for page_num in paginator.page_range %}
{% if page_obj.number == page_num %}
<li class="page-item active">
<span class="page-link">
{{ page_num }}
<span class="sr-only">(current)</span>
</span>
</li>
{% elif page_num > page_obj.number|add:'-3' and page_num < page_obj.number|add:'3' %}
<li class="page-item">
<a class="page-link" href="?page={{ page_num }}">{{ page_num }}</a>
</li>
{% endif %}
{% endfor %}
{% if page_obj.has_next %}
<li class="page-item">
<a class="page-link" href="?page={{ page_obj.next_page_number }}">Next</a>
</li>
{% else %}
<li class="page-item disabled">
<span class="page-link">Next</span>
</li>
{% endif %}
{% if page_obj.number != paginator.num_pages %}
<li class="page-item">
<a class="page-link" href="?page={{ paginator.num_pages }}">Last</a>
</li>
{% else %}
<li class="page-item disabled">
<span class="page-link">Last</span>
</li>
{% endif %}
</ul>
</nav>
{% endif %}
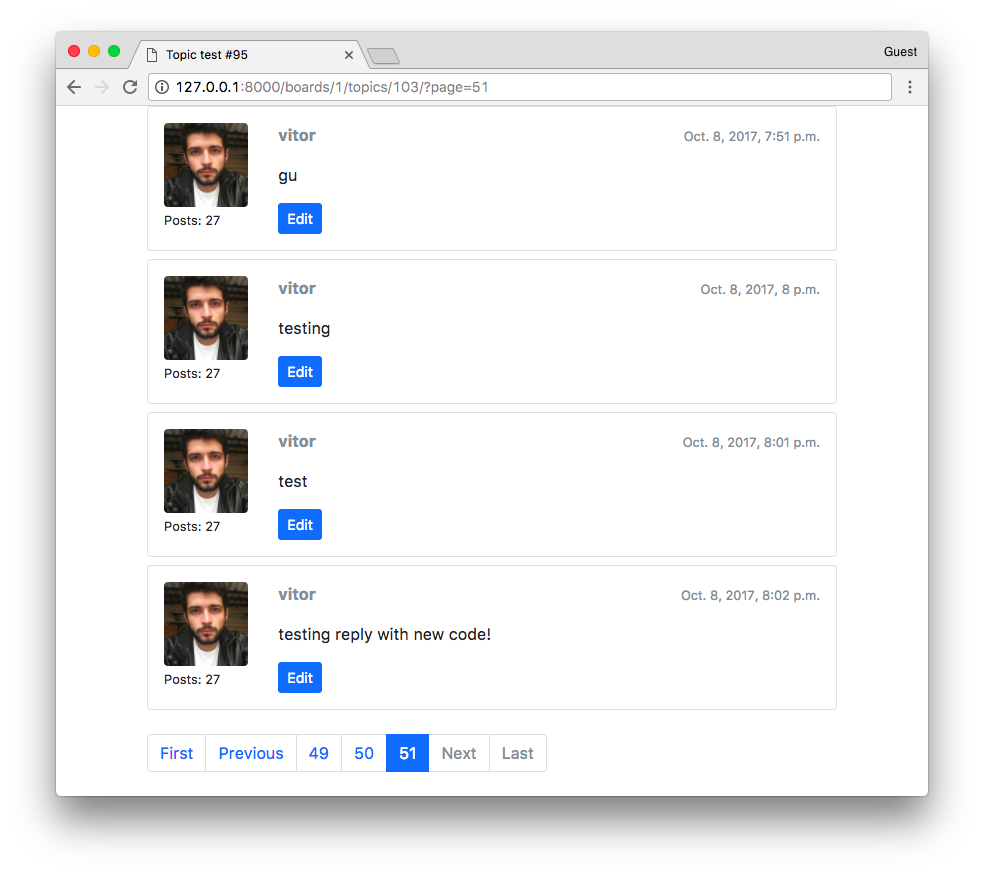
Conclusions
With this tutorial, we finalized the implementation of our Django board application. I will probably release a follow-up implementation tutorial to improve the code. There are many things we can explore together. For example, database optimizations, improve the user interface, play with file uploads, create a moderation system, and so on.
The next tutorial will be focused on deployment. It’s going to be a complete guide on how to put your code in production taking care of all the important details.
The source code of the project is available on GitHub. The current state of the project can be found under the release tag v0.6-lw. The link below will take you to the right place:
https://github.com/sibtc/django-beginners-guide/tree/v0.6-lw
The Complete Guide to Start Learning Django - Part 7 - Deployment
Table of Contents
- Introduction
- Version Control
- Basic Setup
- Remote Repository
- Project Settings
- Tracking Requirements
- Domain Name
- Deployment Strategy
- Deploying to a VPS (Digital Ocean)
- Application User
- PostgreSQL Database Setup
- Django Project Setup
- Configuring Gunicorn
- Configuring Supervisor
- Configuring NGINX
- Configuring an Email Service
- Configuring HTTPS Certificate
- Conclusions
Introduction
Welcome to the last part of our tutorial series! In this tutorial, we are going to deploy our Django application to a production server. We are also going to configure an Email service and HTTPS certificates for our servers.
At first, I thought about given an example using a Virtual Private Server (VPS), which is more generic and then using one Platform as a Service such as Heroku. But it was too much detail, so I ended up creating this tutorial focused on VPSs.
Our project is live! If you want to check online before you go through the text, this is the application we are going to deploy: www.djangoboards.com.
Version Control
Version control is an extremely important topic in software development. Especially when working with teams and maintaining production code at the same time, several features are being developed in parallel. No matter if it’s a one developer project or a multiple developers project, every project should use version control.
There are several options of version control systems out there. Perhaps because of the popularity of GitHub, Git become the de facto standard in version control. So if you are not familiar version control, Git is a good place to start. There are many tutorials, courses, and resources in general so that it’s easy to find help.
GitHub and Code School have a great interactive tutorial about Git, which I used years ago when I started moving from SVN to Git. It’s a very good introduction.
This is such an important topic that I probably should have brought it up since the first tutorial. But the truth is I wanted the focus of this tutorial series to be on Django. If all this is new for you, don’t worry. It’s important to take one step at a time. Your first project won’t be perfect. It’s important to keep learning and evolving your skills slowly but with constancy.
A very good thing about Git is that it’s much more than just a version control system. There’s a rich ecosystem of tools and services built around it. Some good examples are continuous integration, deployment, code review, code quality, and project management.
Using Git to support the deployment process of Django projects works very well. It’s a convenient way to pull the latest version from the source code repository or to rollback to a specific version in case of a problem. There are many services that integrate with Git so to automate test execution and deployment for example.
If you don’t have Git installed on your local machine, grab the installed from https://git-scm.com/downloads.
Basic Setup
First thing, set your identity:
git config --global user.name "Vitor Freitas"
git config --global user.email vitor@simpleisbetterthancomplex.com
In the project root (the same directory as manage.py is), initialize a git repository:
git init
Initialized empty Git repository in /Users/vitorfs/Development/myproject/.git/
Check the status of the repository:
git status
On branch master
Initial commit
Untracked files:
(use "git add <file>..." to include in what will be committed)
accounts/
boards/
manage.py
myproject/
requirements.txt
static/
templates/
nothing added to commit but untracked files present (use "git add" to track)
Before we proceed in adding the source files, create a new file named .gitignore in the project root. This special file will help us keep the repository clean, without unnecessary files like cache files or logs for example.
You can grab a generic .gitignore file for Python projects from GitHub.
Make sure to rename it from Python.gitignore to just .gitignore (the dot is important!).
You can complement the .gitignore file telling it to ignore SQLite database files for example:
.gitignore
__pycache__/
*.py[cod]
.env
venv/
# SQLite database files
*.sqlite3
Now add the files to the repository:
git add .
Notice the dot here. The command above is telling Git to add all untracked files within the current directory.
Now make the first commit:
git commit -m "Initial commit"
Always write a comment telling what this commit is about, briefly describing what have you changed.
Remote Repository
Now let’s setup GitHub as a remote repository. First, create a free account on GitHub, then confirm your email address. After that, you will be able to create public repositories.
For now, just pick a name for the repository, don’t initialize it with a README, or add a .gitignore or add a license so far. Make sure you start the repository empty:
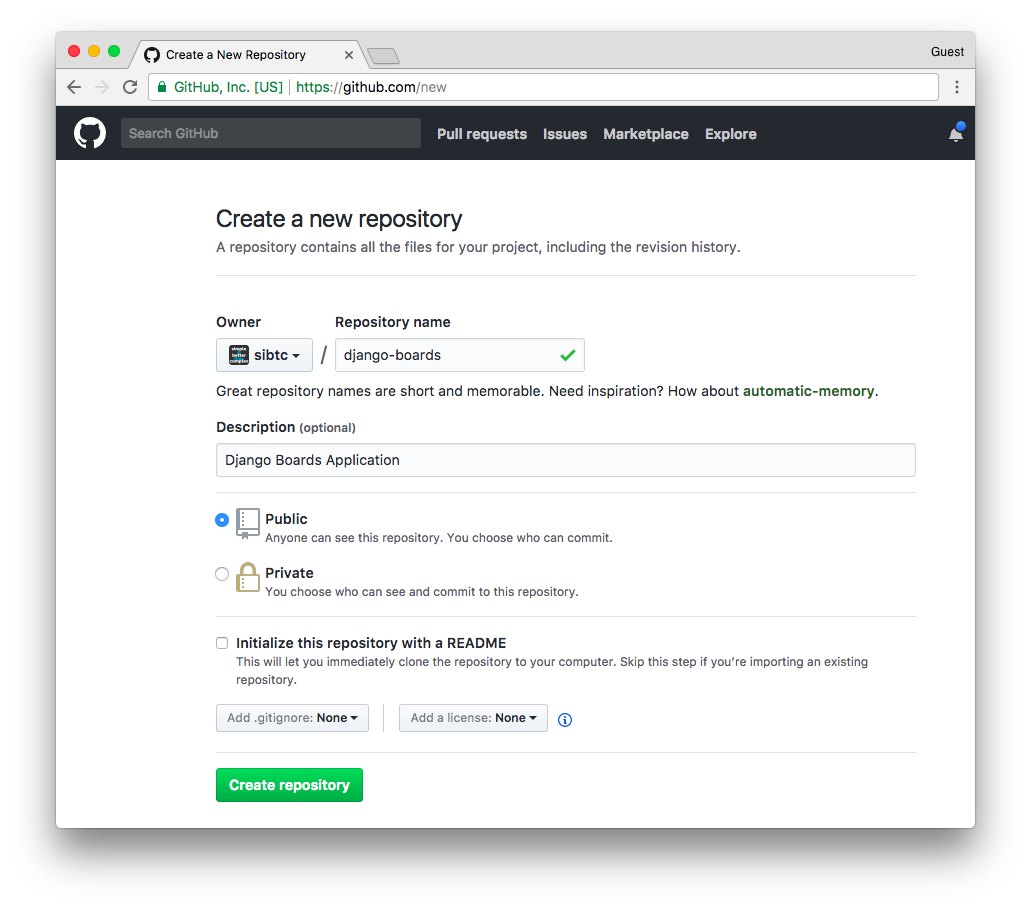
After you create the repository you should see something like this:
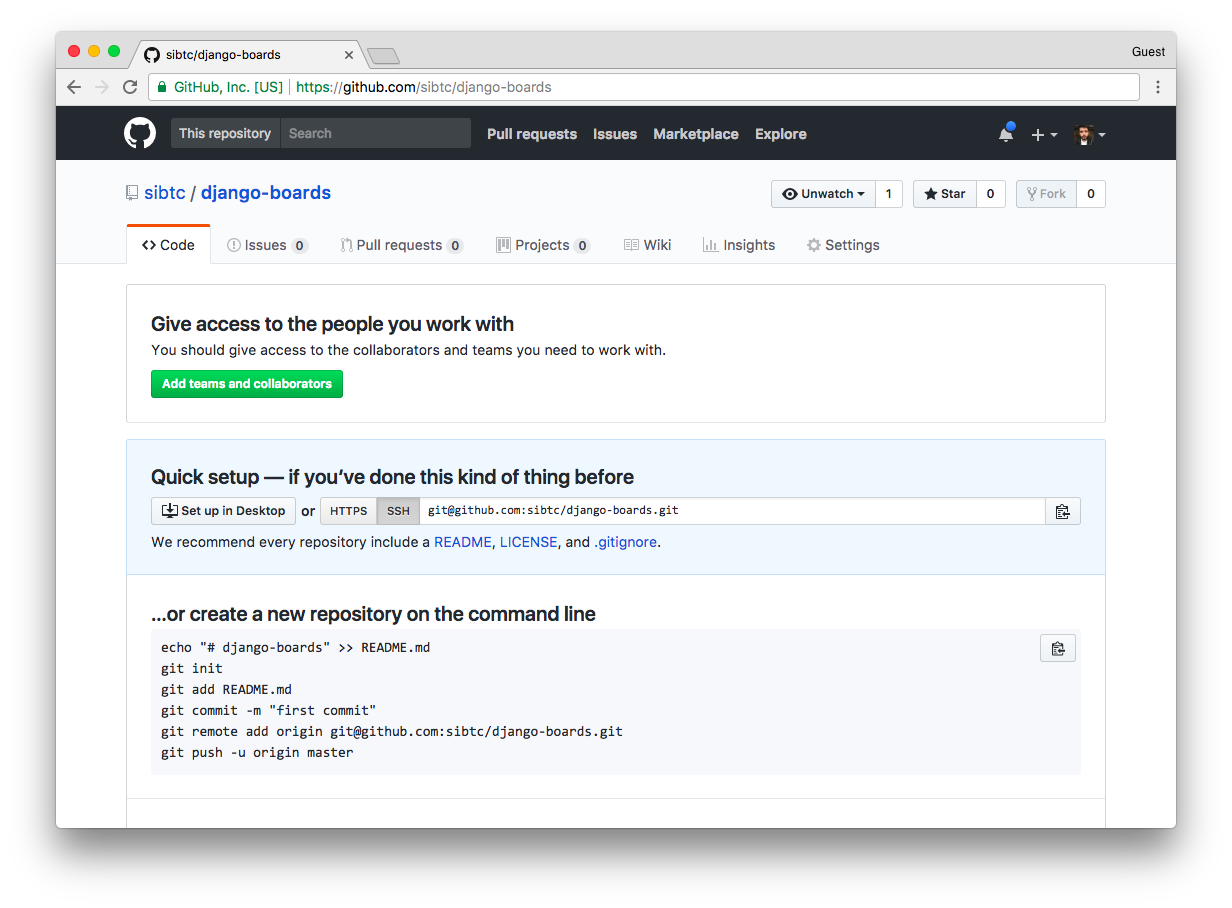
Now let’s configure it as our remote repository:
git remote add origin git@github.com:sibtc/django-boards.git
Now push the code to the remote server, that is, to the GitHub repository:
git push origin master
Counting objects: 84, done.
Delta compression using up to 4 threads.
Compressing objects: 100% (81/81), done.
Writing objects: 100% (84/84), 319.70 KiB | 0 bytes/s, done.
Total 84 (delta 10), reused 0 (delta 0)
remote: Resolving deltas: 100% (10/10), done.
To git@github.com:sibtc/django-boards.git
* [new branch] master -> master
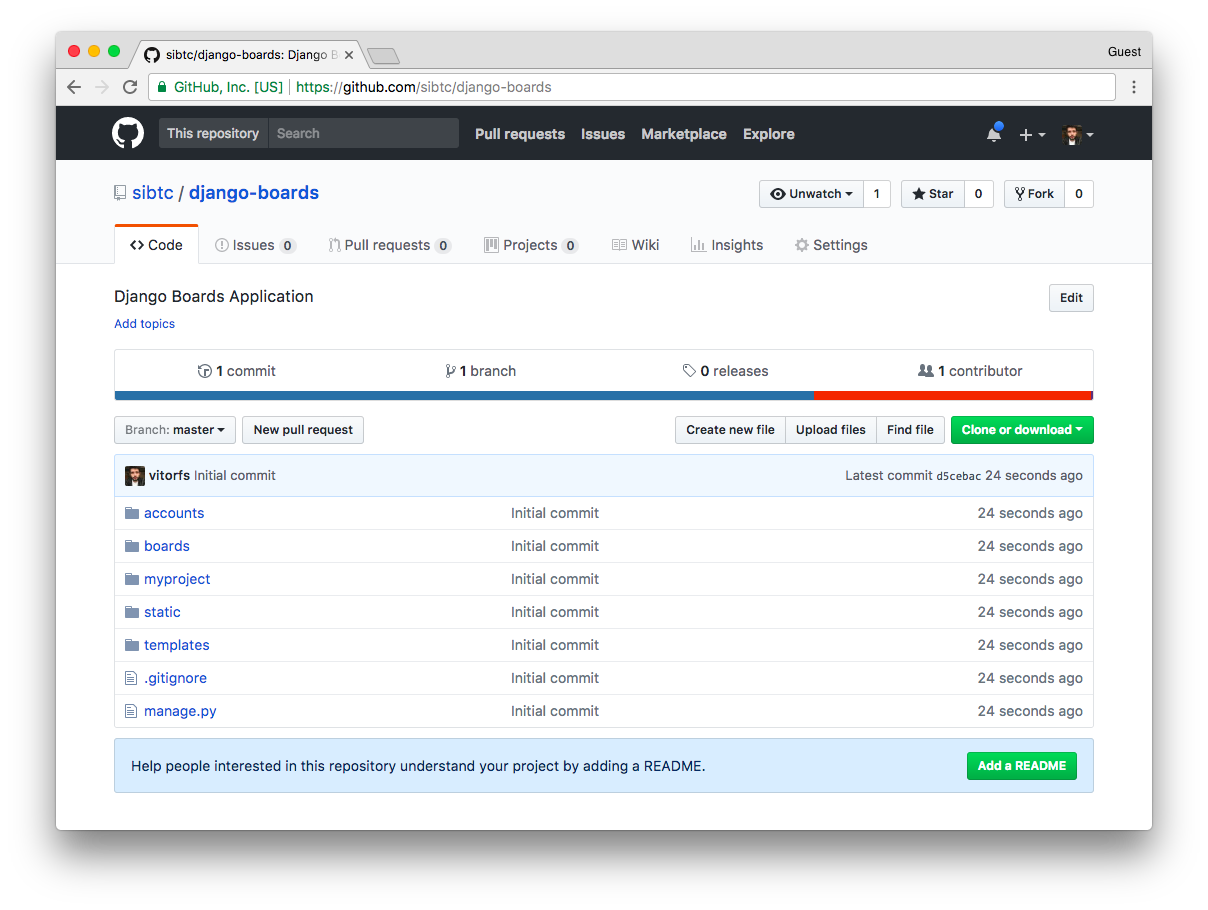
I create this repository just to demonstrate the process to create a remote repository with an existing code base. The source code of the project is officially hosted in this repository: https://github.com/sibtc/django-beginners-guide.
Project Settings
No matter if the code is stored in a public or private remote repository, sensitive information should never be committed and pushed to the remote repository. That includes secret keys, passwords, API keys, etc.
At this point, we have to deal with two specific types of configuration in our settings.py module:
- Sensitive information such as keys and passwords;
- Configurations that are specific to a given environment.
Passwords and keys can be stored in environment variables or using local files (not committed to the remote repository):
# environment variables
import os
SECRET_KEY = os.environ['SECRET_KEY']
# or local files
with open('/etc/secret_key.txt') as f:
SECRET_KEY = f.read().strip()
For that, there’s a great utility library called Python Decouple that I use in every single Django project I develop. It will search for a local file named .env to set the configuration variables and will fall back to the environment variables. It also provides an interface to define default values, transform the data into int, bool, and list when applicable.
It’s not mandatory, but I really find it a very useful tool. And it works like a charm with services like Heroku.
First, let’s install it:
pip install python-decouple
myproject/settings.py
from decouple import config
SECRET_KEY = config('SECRET_KEY')
Now we can place the sensitive information in a special file named .env (notice the dot in front) in the same directory where the manage.py file is:
myproject/
|-- myproject/
| |-- accounts/
| |-- boards/
| |-- myproject/
| |-- static/
| |-- templates/
| |-- .env <-- here!
| |-- .gitignore
| |-- db.sqlite3
| +-- manage.py
+-- venv/
.env
SECRET_KEY=rqr_cjv4igscyu8&&(0ce(=sy=f2)p=f_wn&@0xsp7m$@!kp=d
The .env file is ignored in the .gitignore file, so every time we are going to deploy the application or run in a different machine, we will have to create a .env file and add the necessary configuration.
Now let’s install another library to help us write the database connection in a single line. This way it’s easier to write different database connection strings in different environments:
pip install dj-database-url
For now, all the configurations we will need to decouple:
myproject/settings.py
from decouple import config, Csv
import dj_database_url
SECRET_KEY = config('SECRET_KEY')
DEBUG = config('DEBUG', default=False, cast=bool)
ALLOWED_HOSTS = config('ALLOWED_HOSTS', cast=Csv())
DATABASES = {
'default': dj_database_url.config(
default=config('DATABASE_URL')
)
}
Example of a .env file for our local machine:
SECRET_KEY=rqr_cjv4igscyu8&&(0ce(=sy=f2)p=f_wn&@0xsp7m$@!kp=d
DEBUG=True
ALLOWED_HOSTS=.localhost,127.0.0.1
Notice that in the DEBUG configuration we have a default, so in production we can ignore this configuration because it will be set to False automatically, as it is supposed to be.
Now the ALLOWED_HOSTS will be transformed into a list like ['.localhost', '127.0.0.1'. ]. Now, this is on our local machine, for production we will set it to something like ['.djangoboards.com', ] or whatever domain you have.
This particular configuration makes sure your application is only served to this domain.
Tracking Requirements
It’s a good practice to keep track of the project’s dependencies, so to be easier to install it on another machine.
We can check the currently installed Python libraries by running the command:
pip freeze
dj-database-url==0.4.2
Django==1.11.6
django-widget-tweaks==1.4.1
Markdown==2.6.9
python-decouple==3.1
pytz==2017.2
Create a file named requirements.txt in the project root, and add the dependencies there:
requirements.txt
dj-database-url==0.4.2
Django==1.11.6
django-widget-tweaks==1.4.1
Markdown==2.6.9
python-decouple==3.1
I kept the pytz==2017.2 out, because it is automatically installed by Django.
You can update your source code repository:
git add .
git commit -m "Add requirements.txt file"
git push origin master
Domain Name
If we are going to deploy a Django application properly, we will need a domain name. It’s important to have a domain name to serve the application, configure an email service and configure an https certificate.
Lately, I’ve been using Namecheap a lot. You can get a .com domain for $8.88/year, or if you are just trying things out, you could register a .xyz domain for $0.99/year.
Anyway, you are free to use any registrar. To demonstrate the deployment process, I registered the www.DjangoBoards.com domain.
Deployment Strategy
Here is an overview of the deployment strategy we are going to use in this tutorial:
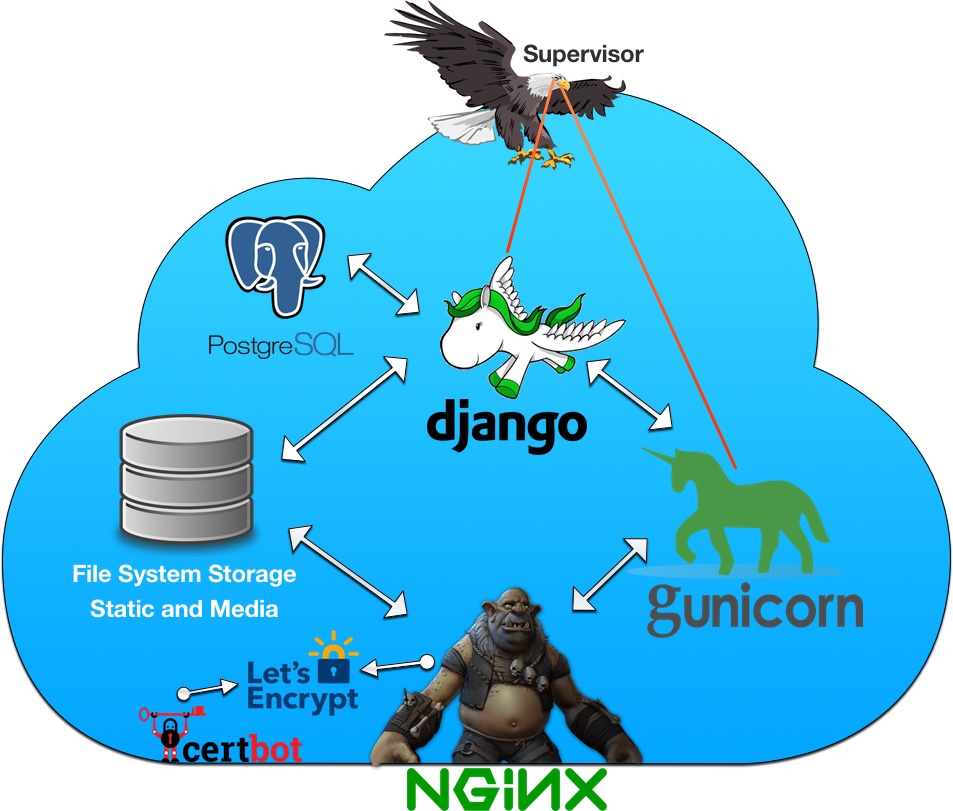
The cloud is our Virtual Private Server provided by Digital Ocean. You can sign up to Digital Ocean using my affiliate link to get a free $10 credit (only valid for new accounts).
Upfront we will have NGINX, illustrated by the ogre. NGINX will receive all requests to the server. But it won’t try to do anything smart if the request data. All it is going to do is decide if the requested information is a static asset that it can serve by itself, or if it’s something more complicated. If so, it will pass the request to Gunicorn.
The NGINX will also be configured with HTTPS certificates. Meaning it will only accept requests via HTTPS. If the client tries to request via HTTP, NGINX will first redirect the user to the HTTPS, and only then it will decide what to do with the request.
We are also going to install this certbot to automatically renew the Let’s Encrypt certificates.
Gunicorn is an application server. Depending on the number of processors the server has, it can spawn multiple workers to process multiple requests in parallel. It manages the workload and executes the Python and Django code.
Django is the one doing the hard work. It may access the database (PostgreSQL) or the file system. But for the most part, the work is done inside the views, rendering templates, all those things that we’ve been coding for the past weeks. After Django process the request, it returns a response to Gunicorn, who returns the result to NGINX that will finally deliver the response to the client.
We are also going to install PostgreSQL, a production quality database system. Because of Django’s ORM system, it’s easy to switch databases.
The last step is to install Supervisor. It’s a process control system and it will keep an eye on Gunicorn and Django to make sure everything runs smoothly. If the server restarts, or if Gunicorn crashes, it will automatically restart it.
Deploying to a VPS (Digital Ocean)
You may use any other VPS (Virtual Private Server) you like. The configuration should be very similar, after all, we are going to use Ubuntu 16.04 as our server.
First, let’s create a new server (on Digital Ocean they call it “Droplet”). Select Ubuntu 16.04:
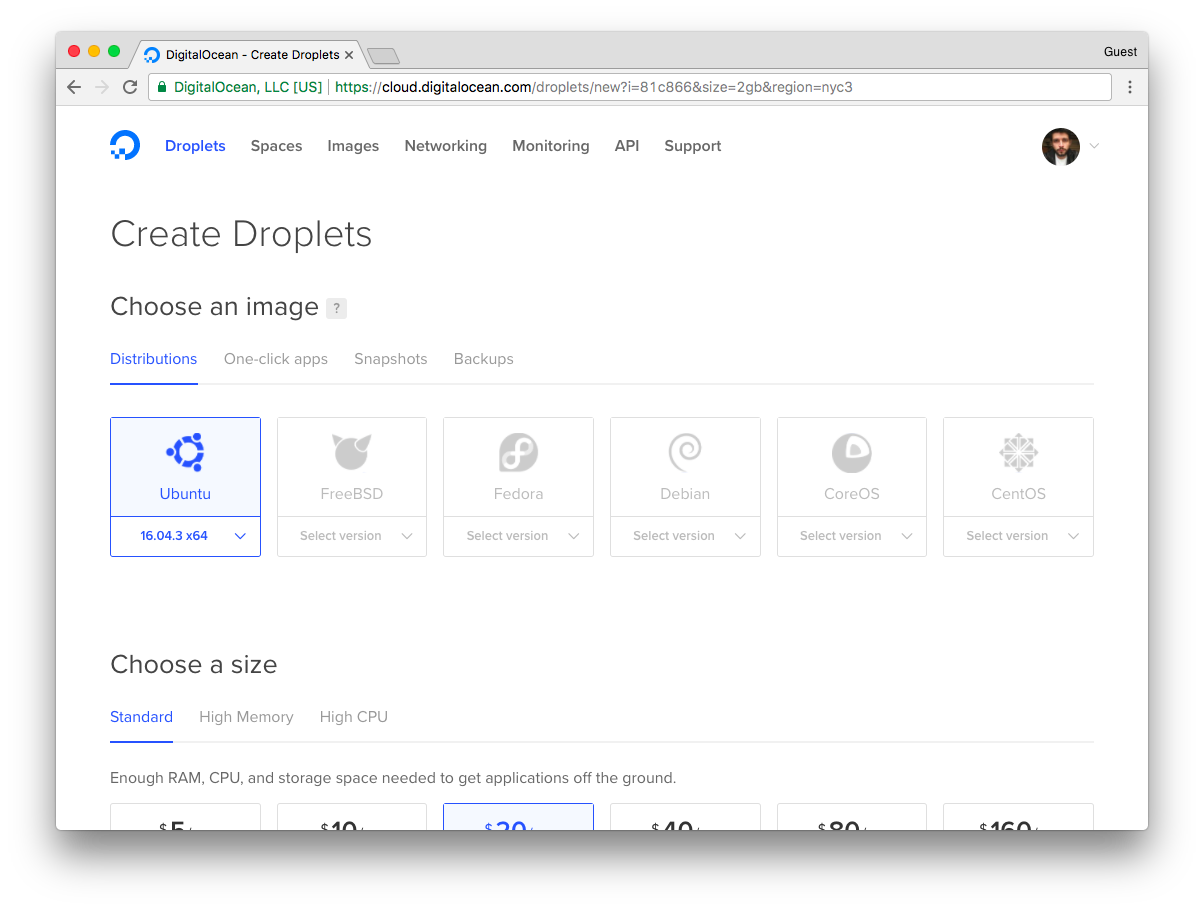
Pick the size. The smallest droplet is enough:
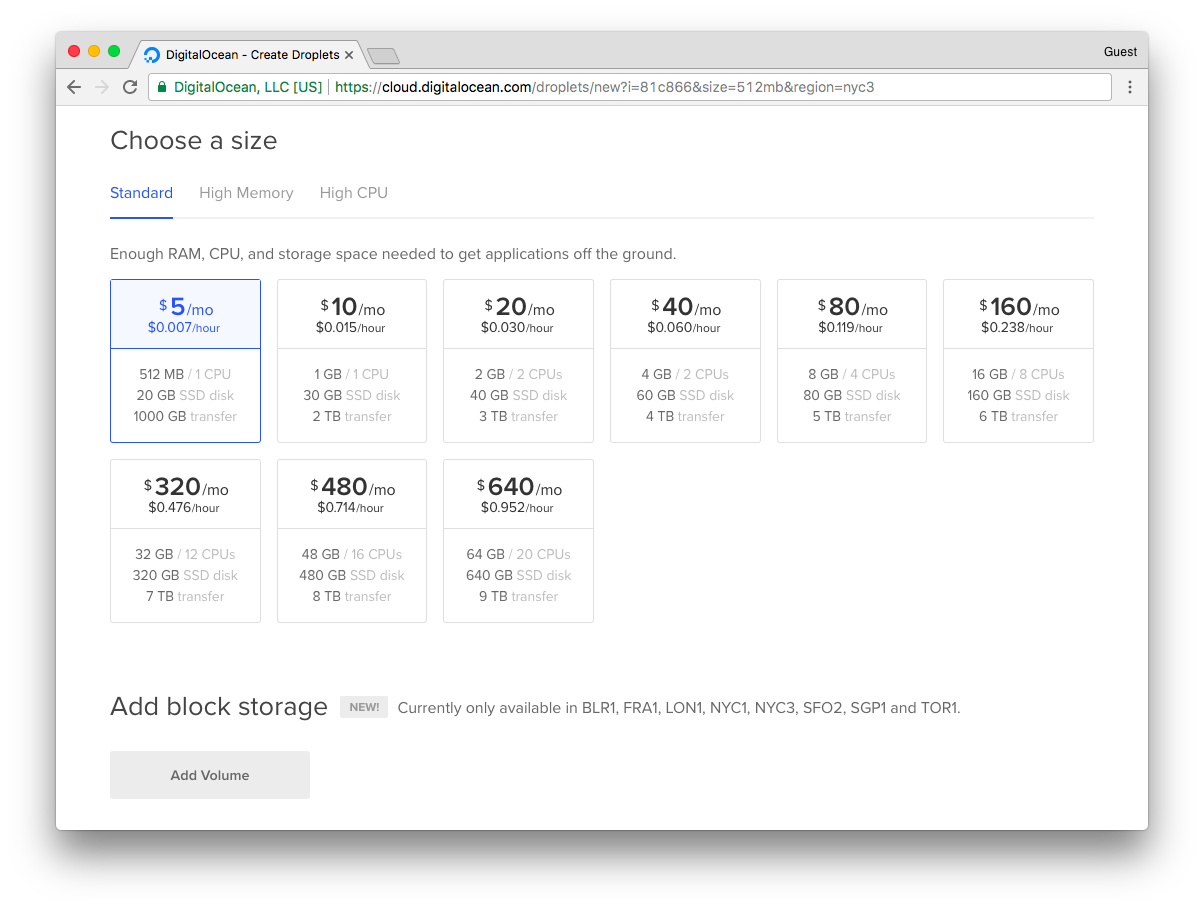
Then choose a hostname for your droplet (in my case “django-boards”):
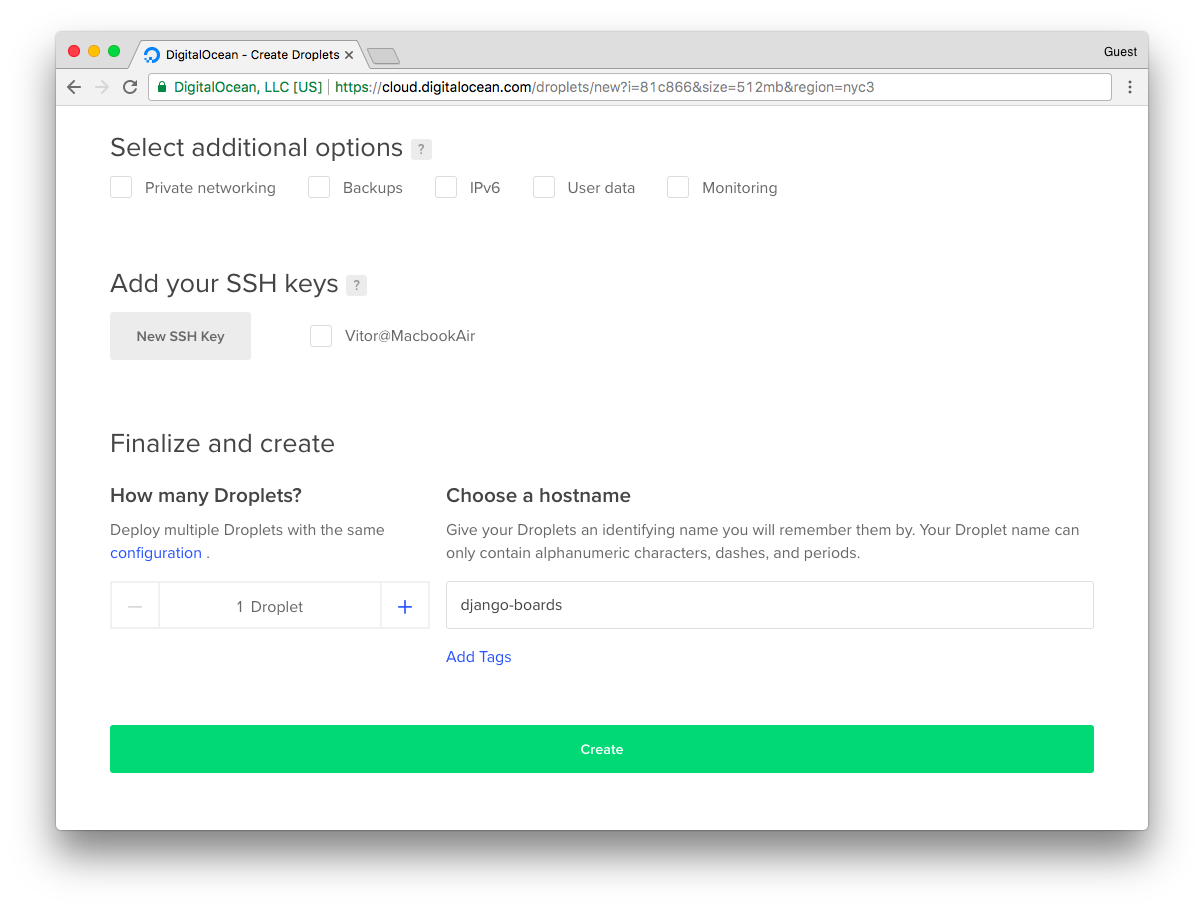
If you have an SSH key, you can add it to your account. Then you will be able to log in the server using it. Otherwise, they will email you the root password.
Now pick the server’s IP address:
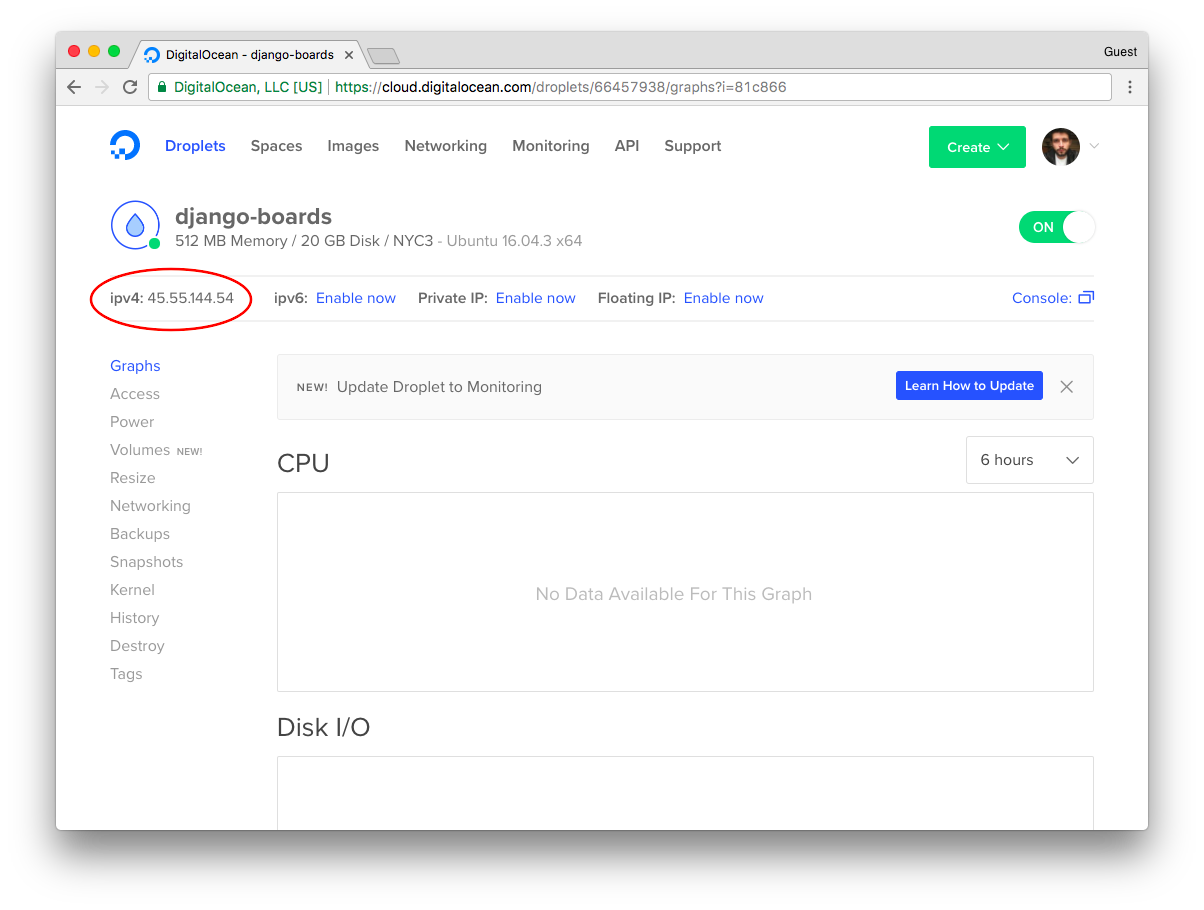
Before we log in to the server, let’s point our domain name to this IP address. This will save some time because DNS settings usually take a few minutes to propagate.
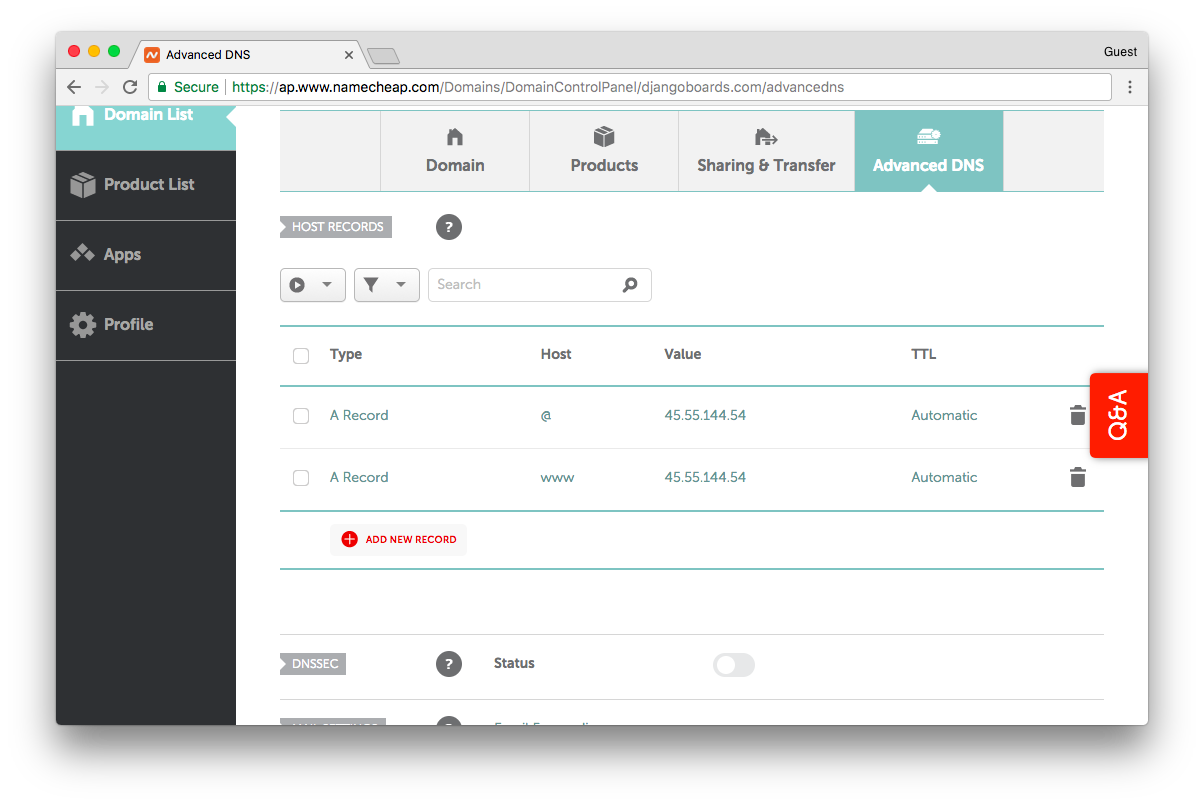
So here we added two A records, one pointing to the naked domain “djangoboards.com” and the other one for “www.djangoboards.com”. We will use NGINX to configure a canonical URL.
Now let’s log in to the server using your terminal:
ssh root@45.55.144.54
root@45.55.144.54's password:
Then you should see the following message:
You are required to change your password immediately (root enforced)
Welcome to Ubuntu 16.04.3 LTS (GNU/Linux 4.4.0-93-generic x86_64)
* Documentation: https://help.ubuntu.com
* Management: https://landscape.canonical.com
* Support: https://ubuntu.com/advantage
Get cloud support with Ubuntu Advantage Cloud Guest:
http://www.ubuntu.com/business/services/cloud
0 packages can be updated.
0 updates are security updates.
Last login: Sun Oct 15 18:39:21 2017 from 82.128.188.51
Changing password for root.
(current) UNIX password:
Set the new password, and let’s start to configure the server.
sudo apt-get update
sudo apt-get -y upgrade
If you get any prompt during the upgrade, select the option “keep the local version currently installed”.
Python 3.6
sudo add-apt-repository ppa:deadsnakes/ppa
sudo apt-get update
sudo apt-get install python3.6
PostgreSQL
sudo apt-get -y install postgresql postgresql-contrib
NGINX
sudo apt-get -y install nginx
Supervisor
sudo apt-get -y install supervisor
sudo systemctl enable supervisor
sudo systemctl start supervisor
Virtualenv
wget https://bootstrap.pypa.io/get-pip.py
sudo python3.6 get-pip.py
sudo pip3.6 install virtualenv
Application User
Create a new user with the command below:
adduser boards
Usually, I just pick the name of the application. Enter a password and optionally add some extra info to the prompt.
Now add the user to the sudoers list:
gpasswd -a boards sudo
PostgreSQL Database Setup
First switch to the postgres user:
sudo su - postgres
Create a database user:
createuser u_boards
Create a new database and set the user as the owner:
createdb django_boards --owner u_boards
Define a strong password for the user:
psql -c "ALTER USER u_boards WITH PASSWORD 'BcAZoYWsJbvE7RMgBPzxOCexPRVAq'"
We can now exit the postgres user:
exit
Django Project Setup
Switch to the application user:
sudo su - boards
First, we can check where we are:
pwd
/home/boards
First, let’s clone the repository with our code:
git clone https://github.com/sibtc/django-beginners-guide.git
Start a virtual environment:
virtualenv venv -p python3.6
Initialize the virtualenv:
source venv/bin/activate
Install the requirements:
pip install -r django-beginners-guide/requirements.txt
We will have to add two extra libraries here, the Gunicorn and the PostgreSQL driver:
pip install gunicorn
pip install psycopg2
Now inside the /home/boards/django-beginners-guide folder, let’s create a .env file to store the database credentials, the secret key and everything else:
/home/boards/django-beginners-guide/.env
SECRET_KEY=rqr_cjv4igscyu8&&(0ce(=sy=f2)p=f_wn&@0xsp7m$@!kp=d
ALLOWED_HOSTS=.djangoboards.com
DATABASE_URL=postgres://u_boards:BcAZoYWsJbvE7RMgBPzxOCexPRVAq@localhost:5432/django_boards
Here is the syntax of the database URL: postgres://db_user:db_password@db_host:db_port/db_name.
Now let’s migrate the database, collect the static files and create a super user:
cd django-beginners-guide
python manage.py migrate
Operations to perform:
Apply all migrations: admin, auth, boards, contenttypes, sessions
Running migrations:
Applying contenttypes.0001_initial... OK
Applying auth.0001_initial... OK
Applying admin.0001_initial... OK
Applying admin.0002_logentry_remove_auto_add... OK
Applying contenttypes.0002_remove_content_type_name... OK
Applying auth.0002_alter_permission_name_max_length... OK
Applying auth.0003_alter_user_email_max_length... OK
Applying auth.0004_alter_user_username_opts... OK
Applying auth.0005_alter_user_last_login_null... OK
Applying auth.0006_require_contenttypes_0002... OK
Applying auth.0007_alter_validators_add_error_messages... OK
Applying auth.0008_alter_user_username_max_length... OK
Applying boards.0001_initial... OK
Applying boards.0002_auto_20170917_1618... OK
Applying boards.0003_topic_views... OK
Applying sessions.0001_initial... OK
Now the static files:
python manage.py collectstatic
Copying '/home/boards/django-beginners-guide/static/js/jquery-3.2.1.min.js'
Copying '/home/boards/django-beginners-guide/static/js/popper.min.js'
Copying '/home/boards/django-beginners-guide/static/js/bootstrap.min.js'
Copying '/home/boards/django-beginners-guide/static/js/simplemde.min.js'
Copying '/home/boards/django-beginners-guide/static/css/app.css'
Copying '/home/boards/django-beginners-guide/static/css/bootstrap.min.css'
Copying '/home/boards/django-beginners-guide/static/css/accounts.css'
Copying '/home/boards/django-beginners-guide/static/css/simplemde.min.css'
Copying '/home/boards/django-beginners-guide/static/img/avatar.svg'
Copying '/home/boards/django-beginners-guide/static/img/shattered.png'
...
This command copy all the static assets to an external directory where NGINX can serve the files for us. More on that later.
Now create a super user for the application:
python manage.py createsuperuser
Configuring Gunicorn
So, Gunicorn is the one responsible for executing the Django code behind a proxy server.
Create a new file named gunicorn_start inside /home/boards:
#!/bin/bash
NAME="django_boards"
DIR=/home/boards/django-beginners-guide
USER=boards
GROUP=boards
WORKERS=3
BIND=unix:/home/boards/run/gunicorn.sock
DJANGO_SETTINGS_MODULE=myproject.settings
DJANGO_WSGI_MODULE=myproject.wsgi
LOG_LEVEL=error
cd $DIR
source ../venv/bin/activate
export DJANGO_SETTINGS_MODULE=$DJANGO_SETTINGS_MODULE
export PYTHONPATH=$DIR:$PYTHONPATH
exec ../venv/bin/gunicorn ${DJANGO_WSGI_MODULE}:application \
--name $NAME \
--workers $WORKERS \
--user=$USER \
--group=$GROUP \
--bind=$BIND \
--log-level=$LOG_LEVEL \
--log-file=-
This script will start the application server. We are providing some information such as where the Django project is, which application user to be used to run the server, and so on.
Now make this file executable:
chmod u+x gunicorn_start
Create two empty folders, one for the socket file and one to store the logs:
mkdir run logs
Right now the directory structure inside /home/boards should look like this:
django-beginners-guide/
gunicorn_start
logs/
run/
staticfiles/
venv/
The staticfiles folder was created by the collectstatic command.
Configuring Supervisor
First, create an empty log file inside the /home/boards/logs/ folder:
touch logs/gunicorn.log
Now create a new supervisor file:
sudo vim /etc/supervisor/conf.d/boards.conf
[program:boards]
command=/home/boards/gunicorn_start
user=boards
autostart=true
autorestart=true
redirect_stderr=true
stdout_logfile=/home/boards/logs/gunicorn.log
Save the file and run the commands below:
sudo supervisorctl reread
sudo supervisorctl update
Now check the status:
sudo supervisorctl status boards
boards RUNNING pid 308, uptime 0:00:07
Configuring NGINX
Next step is to set up the NGINX server to serve the static files and to pass the requests to Gunicorn:
Add a new configuration file named boards inside /etc/nginx/sites-available/:
upstream app_server {
server unix:/home/boards/run/gunicorn.sock fail_timeout=0;
}
server {
listen 80;
server_name www.djangoboards.com; # here can also be the IP address of the server
keepalive_timeout 5;
client_max_body_size 4G;
access_log /home/boards/logs/nginx-access.log;
error_log /home/boards/logs/nginx-error.log;
location /static/ {
alias /home/boards/staticfiles/;
}
# checks for static file, if not found proxy to app
location / {
try_files $uri @proxy_to_app;
}
location @proxy_to_app {
proxy_set_header X-Forwarded-For $proxy_add_x_forwarded_for;
proxy_set_header Host $http_host;
proxy_redirect off;
proxy_pass http://app_server;
}
}
Create a symbolic link to the sites-enabled folder:
sudo ln -s /etc/nginx/sites-available/boards /etc/nginx/sites-enabled/boards
Remove the default NGINX website:
sudo rm /etc/nginx/sites-enabled/default
Restart the NGINX service:
sudo service nginx restart
At this point, if the DNS have already propagated, the website should be available on the URL www.djangoboards.com.
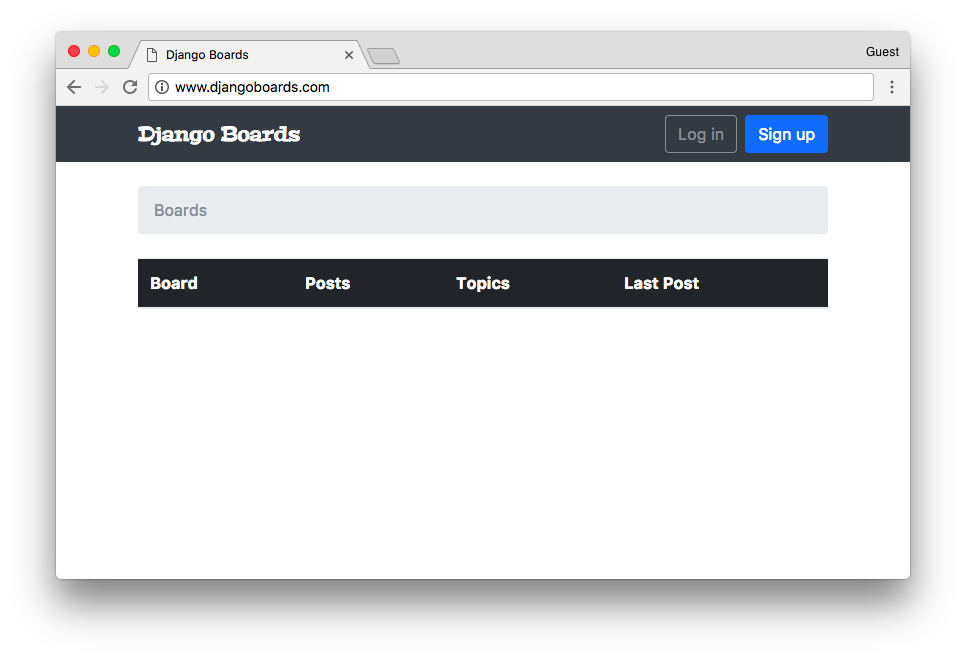
Configuring an Email Service
One of the best options to get started is Mailgun. It offers a very reliable free plan covering 12,000 emails per month.
Sign up for a free account. Then just follow the steps, it’s very straightforward. You will have to work together with the service you registered your domain. In my case, it was Namecheap.
Click on add domain to add a new domain to your account. Follow the instructions and make sure you use “mg.” subdomain:
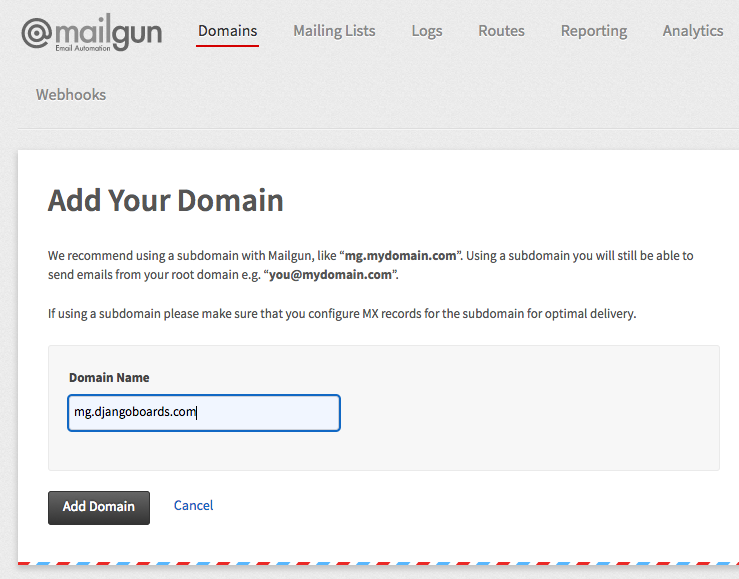
Now grab the first set of DNS records, it’s two TXT records:
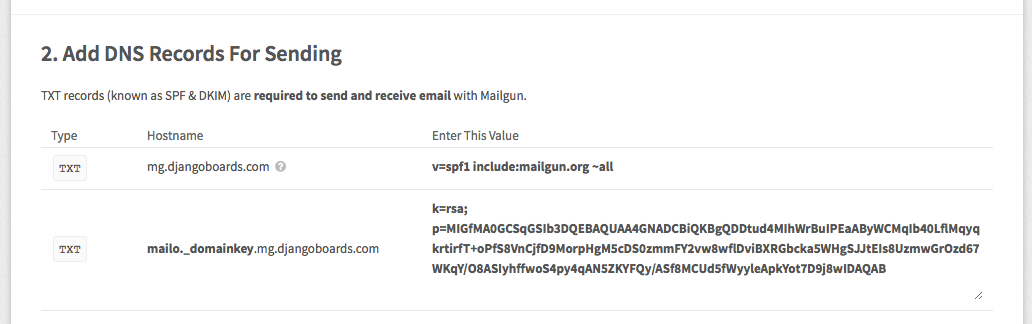
Add it to your domain, using the web interface offered by your registrar:
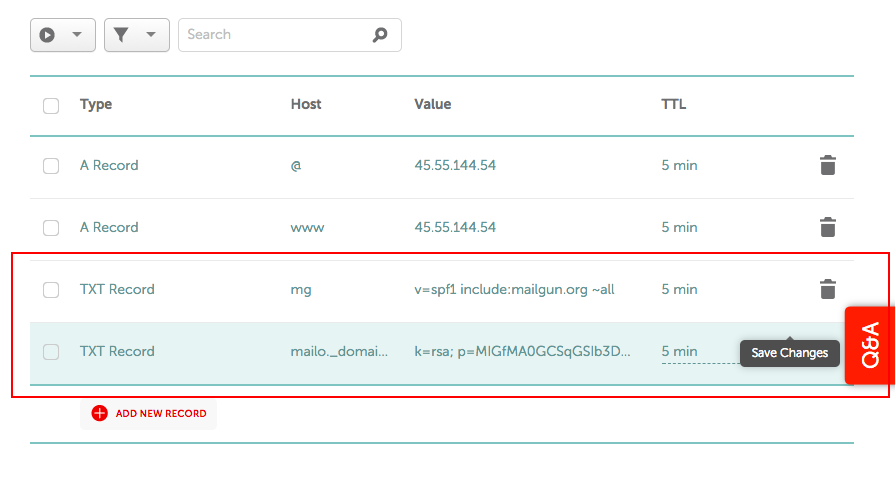
Do the same thing with the MX records:
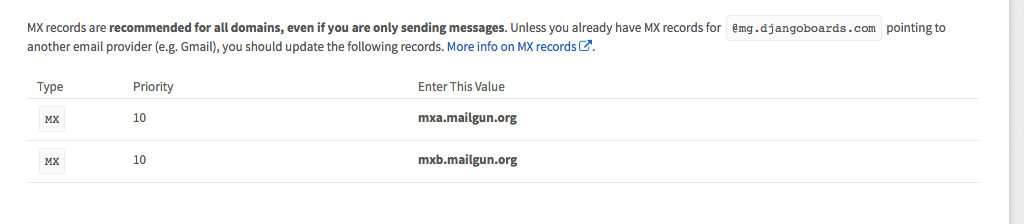
Add them to the domain:
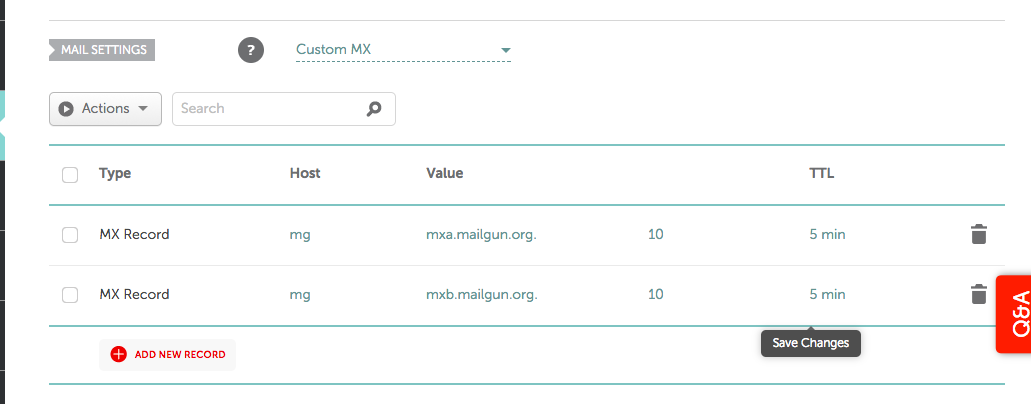
Now this step is not mandatory, but since we are already here, confirm it as well:
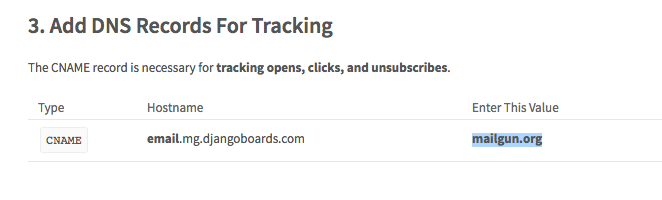
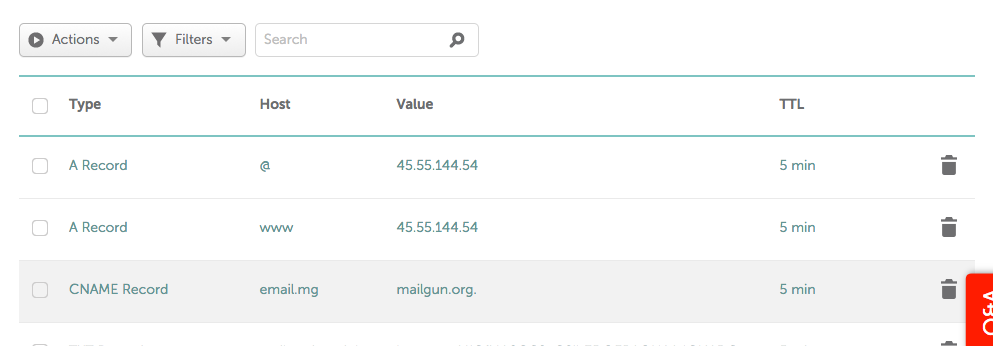
After adding all the DNS records, click in the Check DNS Records Now button:

Now we need to have some patience. Sometimes it takes a while to validate the DNS.
Meanwhile, we can configure the application to receive the connection parameters.
myproject/settings.py
EMAIL_BACKEND = config('EMAIL_BACKEND', default='django.core.mail.backends.smtp.EmailBackend')
EMAIL_HOST = config('EMAIL_HOST', default='')
EMAIL_PORT = config('EMAIL_PORT', default=587, cast=int)
EMAIL_HOST_USER = config('EMAIL_HOST_USER', default='')
EMAIL_HOST_PASSWORD = config('EMAIL_HOST_PASSWORD', default='')
EMAIL_USE_TLS = config('EMAIL_USE_TLS', default=True, cast=bool)
DEFAULT_FROM_EMAIL = 'Django Boards <noreply@djangoboards.com>'
EMAIL_SUBJECT_PREFIX = '[Django Boards] '
Then, my local machine .env file would look like this:
SECRET_KEY=rqr_cjv4igscyu8&&(0ce(=sy=f2)p=f_wn&@0xsp7m$@!kp=d
DEBUG=True
ALLOWED_HOSTS=.localhost,127.0.0.1
DATABASE_URL=sqlite:///db.sqlite3
EMAIL_BACKEND=django.core.mail.backends.console.EmailBackend
And my production .env file would look like this:
SECRET_KEY=rqr_cjv4igscyu8&&(0ce(=sy=f2)p=f_wn&@0xsp7m$@!kp=d
ALLOWED_HOSTS=.djangoboards.com
DATABASE_URL=postgres://u_boards:BcAZoYWsJbvE7RMgBPzxOCexPRVAq@localhost:5432/django_boards
EMAIL_HOST=smtp.mailgun.org
EMAIL_HOST_USER=postmaster@mg.djangoboards.com
EMAIL_HOST_PASSWORD=ED2vmrnGTM1Rdwlhazyhxxcd0F
You can find your credentials in the Domain Information section on Mailgun.
- EMAIL_HOST: SMTP Hostname
- EMAIL_HOST_USER: Default SMTP Login
- EMAIL_HOST_PASSWORD: Default Password
We can test the new settings in the production server. Make the changes in the settings.py file on your local machine, commit the changes to the remote repository. Then, in the server pull the new code and restart the Gunicorn process:
git pull
Edit the .env file with the email credentials.
Then restart the Gunicorn process:
sudo supervisorctl restart boards
Now we can try to start the password reset process:
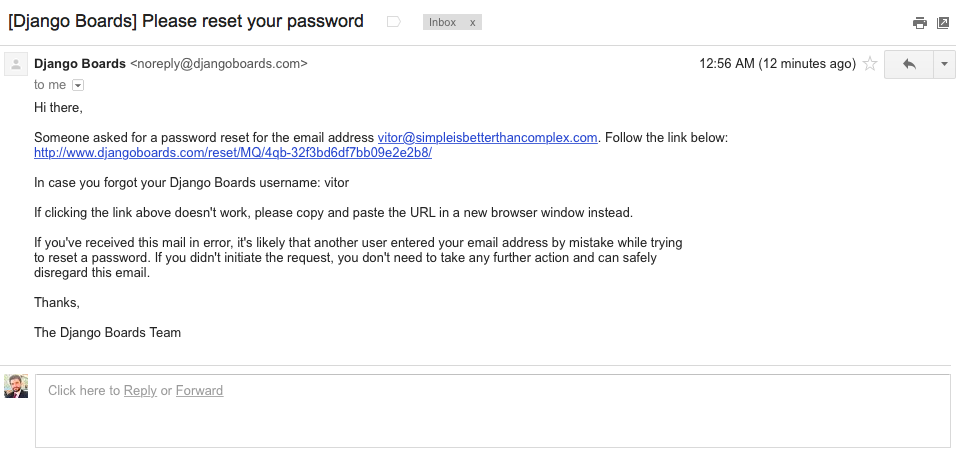
On the Mailgun dashboard you can have some statistics about the email delivery:
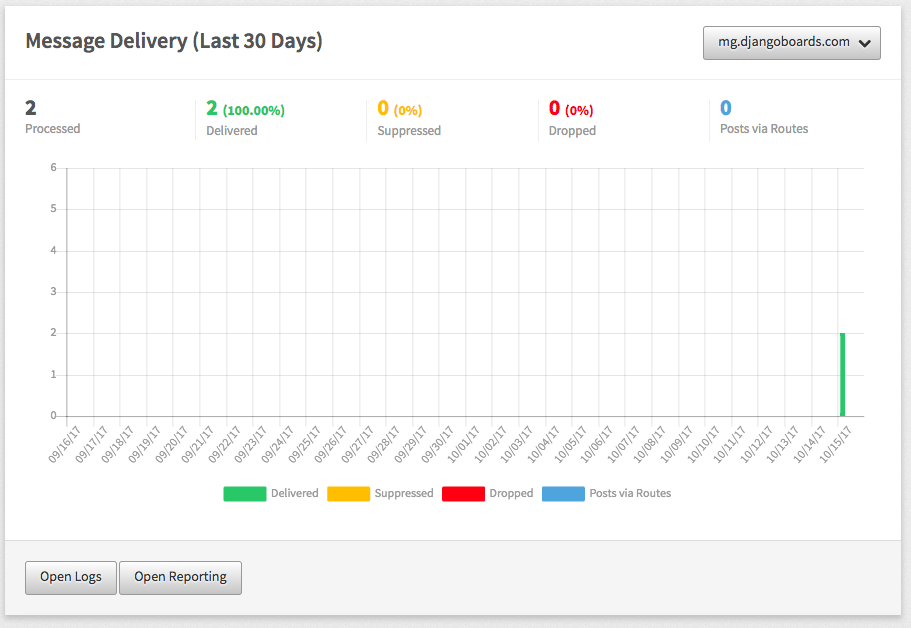
Configuring HTTPS Certificate
Now let’s protect our application with a nice HTTPS certificate provided by Let’s Encrypt.
Setting up HTTPS has never been this easy. And better, we can get it for free nowadays. They provide a solution called certbot which takes care of installing and renewing the certificates for us. It’s very straightforward:
sudo apt-get update
sudo apt-get install software-properties-common
sudo add-apt-repository ppa:certbot/certbot
sudo apt-get update
sudo apt-get install python-certbot-nginx
Now install the certs:
sudo certbot --nginx
Just follow the prompts. When asked about:
Please choose whether or not to redirect HTTP traffic to HTTPS, removing HTTP access.
Choose 2 to redirect all HTTP traffic to HTTPS.
With that the site is already being served over HTTPS:
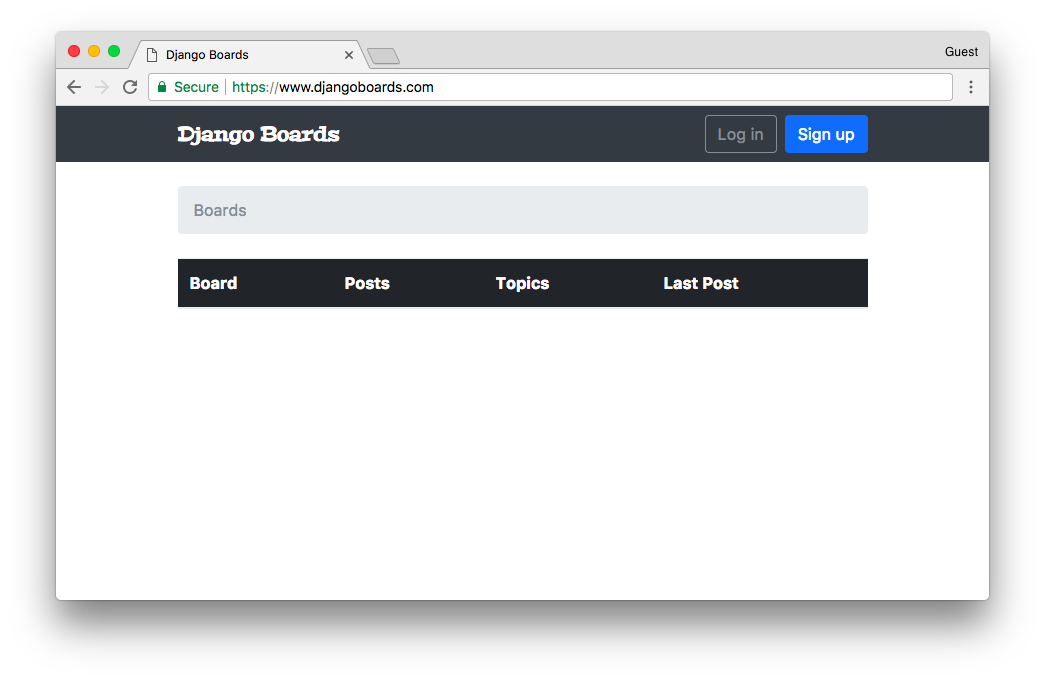
Setup the auto renew of the certs. Run the command below to edit the crontab file:
sudo crontab -e
Add the following line to the end of the file:
0 4 * * * /usr/bin/certbot renew --quiet
This command will run every day at 4 am. All certificates expiring within 30 days will automatically be renewed.
Conclusions
Thanks a lot for all those who followed this tutorial series, giving comments and feedback! I really appreciate! This was the last tutorial of the series. I hope you enjoyed it!
Even though this was the last part of the tutorial series, I plan to write a few follow-up tutorials exploring other interesting topics as well, such as database optimization and adding more features on top of what we have at the moment.
By the way, if you are interested in contributing to the project, few free to submit pull requests! The source code of the project is available on GitHub: https://github.com/sibtc/django-beginners-guide/
#Django #python #web-development