Presumably no web developer is a stranger to REST APIs and the challenges that architecting an effective and efficient API solution brings…
These challenges include:
- Speed (API Response Times)
- Documentation (Clear concise documents, describing the API)
- Architecture and Sustainability (Maintainable and expandable codebase)
In this tutorial we are going to address all of the above using a combination of Node.js, MongoDB, Fastify and Swagger.
The source code for the project is available on GitHub.
Before we begin…
You should have some beginner/intermediate JavaScript knowledge, have heard of Node.js and MongoDB, and know what REST APIs are.
Below are some links to get you updated:
- Speed (API Response Times)
- Documentation (Clear concise documents, describing the API)
- Architecture and Sustainability (Maintainable and expandable codebase)
The Technology we will be using:
- Speed (API Response Times)
- Documentation (Clear concise documents, describing the API)
- Architecture and Sustainability (Maintainable and expandable codebase)
It is a good idea to open the above pages in new tabs, for easy reference.
You will need to have the following installed:
- Speed (API Response Times)
- Documentation (Clear concise documents, describing the API)
- Architecture and Sustainability (Maintainable and expandable codebase)
You will also need an IDE and a terminal, I use iTerm2 for Mac and Hyper for Windows.
Let’s get started!

Initialise a new project by opening your terminal, executing each of the following lines of code:
mkdir fastify-api
cd fastify-api
mkdir src
cd src
touch index.js
npm init
In the above code, we created two new directories, navigated into them, created an index.js file and initialed our project via npm.
You will be prompted to enter several values when initialising a new project, these you can leave blank and update at a later stage.
Once completed, a package.json file is generated in the src directory. In this file you can change the values entered when the project was initialised.
Next we install all the dependancies that we will need:
npm i nodemon mongoose fastify fastify-swagger boom
Below is a brief description of what each package does, quoted from their respective websites:
nodemon is a tool that helps develop node.js based applications by automatically restarting the node application when file changes in the directory are detected.> nodemon is a tool that helps develop node.js based applications by automatically restarting the node application when file changes in the directory are detected.
To set up nodemon, we need to add the following line of code to ourpackage.jsonfile, in the scripts object:
“start”: “./node_modules/nodemon/bin/nodemon.js ./src/index.js”,
Our package.json file should now look as follows:
{
  "name": "fastify-api",
  "version": "1.0.0",
  "description": "A blazing fast REST APIs with Node.js, MongoDB, Fastify and Swagger.",
  "main": "index.js",
  "scripts": {
  "start": "./node_modules/nodemon/bin/nodemon.js ./src/index.js",
  "test": "echo \"Error: no test specified\" && exit 1"
},
  "author": "Siegfried Grimbeek <siegfried.grimbeek@gmail.com> (www.siegfriedgrimbeek.co.za)",
  "license": "ISC",
  "dependencies": {
  "boom": "^7.2.2",
  "fastify": "^1.13.0",
  "fastify-swagger": "^0.15.3",
  "mongoose": "^5.3.14",
  "nodemon": "^1.18.7"
  }
}
nodemon is a tool that helps develop node.js based applications by automatically restarting the node application when file changes in the directory are detected.
fastify
nodemon is a tool that helps develop node.js based applications by automatically restarting the node application when file changes in the directory are detected.
fastify-swagger
nodemon is a tool that helps develop node.js based applications by automatically restarting the node application when file changes in the directory are detected.
boom
nodemon is a tool that helps develop node.js based applications by automatically restarting the node application when file changes in the directory are detected.### Setup up the server and create the first route!

Add the following code to your index.js file:
// Require the framework and instantiate it
const fastify = require('fastify')({
  logger: true
})

// Declare a route
fastify.get('/', async (request, reply) => {
  return { hello: 'world' }
})

// Run the server!
const start = async () => {
  try {
    await fastify.listen(3000)
    fastify.log.info(`server listening on ${fastify.server.address().port}`)
  } catch (err) {
    fastify.log.error(err)
    process.exit(1)
  }
}
start()
We require the Fastify framework, declare our first route and initialise the server on port 3000, the code is pretty self explanatory but take note of the options object passed when initialising Fastify:
// Require the fastify framework and instantiate it
const fastify = require('fastify')({
  logger: true
})
The above code enables Fastify’s built in logger which is disabled by default.
You can now run the follow code in your src directory in your terminal:
npm start
Now when you navigate to http://localhost:3000/ you should see the {hello:world} object returned.
We will get back to the index.js file but for now let’s move on to setting up our database.
Start MongoDB and create the model!

Once MongoDB has been successfully installed, you can open a new terminal window and start up a MongoDBinstance by running the following:
mongod
With MongoDB, we do not need to create a database. We can just specify a name in the setup and as soon as we store data, MongoDB will create this database for us.
Add the following to your index.js file:
...
// Require external modules
const mongoose = require('mongoose')
// Connect to DB
mongoose.connect(‘mongodb://localhost/mycargarage’)
 .then(() => console.log(‘MongoDB connected…’))
 .catch(err => console.log(err))
...
In the above code we require Mongoose and connect to our MongoDB database. The database is called mycargarage and if all went well, you will now see MongoDB connected... in your terminal.
Notice that you did not have to restart the app, thanks to the _Nodemon_ package that we added earlier.
Now that our database is up and running, we can create our first Model. Create a new folder within the src directory called models, and within it create a new file called Car.js and add the following code:
// External Dependancies
const mongoose = require('mongoose')

const carSchema = new mongoose.Schema({
  title: String,
  brand: String,
  price: String,
  age: Number,
  services: {
    type: Map,
    of: String
  }
})

module.exports = mongoose.model('Car', carSchema)
The above code declares our carSchema that contains all the information related to our cars. Apart from the two obvious data types: String and Number. We also make use of a Map which is relatively new to Mongoose and you can read more about it here. We then export our carSchema to be used within our app.
We could proceed with setting up our routes, controllers and config in the index.js file, but part of this tutorial is demonstrating a sustainable codebase. Therefore each component will have its own folder.
Create the car controller
To get started with creating the controllers, we create a folder in the src directory called controllers, and within the folder, we create a carController.js file:
// External Dependancies
const boom = require('boom')

// Get Data Models
const Car = require('../models/Car')

// Get all cars
exports.getCars = async (req, reply) => {
  try {
    const cars = await Car.find()
    return cars
  } catch (err) {
    throw boom.boomify(err)
  }
}

// Get single car by ID
exports.getSingleCar = async (req, reply) => {
  try {
    const id = req.params.id
    const car = await Car.findById(id)
    return car
  } catch (err) {
    throw boom.boomify(err)
  }
}

// Add a new car
exports.addCar = async (req, reply) => {
  try {
    const car = new Car(req.body)
    return car.save()
  } catch (err) {
    throw boom.boomify(err)
  }
}

// Update an existing car
exports.updateCar = async (req, reply) => {
  try {
    const id = req.params.id
    const car = req.body
    const { ...updateData } = car
    const update = await Car.findByIdAndUpdate(id, updateData, { new: true })
    return update
  } catch (err) {
    throw boom.boomify(err)
  }
}

// Delete a car
exports.deleteCar = async (req, reply) => {
  try {
    const id = req.params.id
    const car = await Car.findByIdAndRemove(id)
    return car
  } catch (err) {
    throw boom.boomify(err)
  }
}
The above may seem like a little much to take in, but it is actually really simple.
- Speed (API Response Times)
- Documentation (Clear concise documents, describing the API)
- Architecture and Sustainability (Maintainable and expandable codebase)
Other than that, we make use of some standard Mongoose features used to manipulate our database.
You are probably burning to fire up your API and do a sanity check, but before we do this, we just need to connect the controller to the routes and then lastly connect the routes to the app.
Create and import the routes
Once again, we can start by creating a folder in the root directory of our project, but this time, it is called routes. Within the folder, we create an index.js file with the following code:
// Import our Controllers
const carController = require('../controllers/carController')

const routes = [
  {
    method: 'GET',
    url: '/api/cars',
    handler: carController.getCars
  },
  {
    method: 'GET',
    url: '/api/cars/:id',
    handler: carController.getSingleCar
  },
  {
    method: 'POST',
    url: '/api/cars',
    handler: carController.addCar,
    schema: documentation.addCarSchema
  },
  {
    method: 'PUT',
    url: '/api/cars/:id',
    handler: carController.updateCar
  },
  {
    method: 'DELETE',
    url: '/api/cars/:id',
    handler: carController.deleteCar
  }
]

module.exports = routes
Here we are requiring our controller and assigning each of the functions that we created in our controller to our routes.
As you can see, each route consists out of a method, a url and a handler, instructing the app on which function to use when one of the routes is accessed.
The :id following some of the routes is a common way to pass parameters to the routes, and this will allow us to access the id as follows:
[[http://127.0.0.1:3000/api/cars/5bfe30b46fe410e1cfff2323](http://127.0.0.1:3000/api/cars/5bfe30b46fe410e1cfff2323)](http://127.0.0.1:3000/api/cars/5bfe30b46fe410e1cfff2323](http://127.0.0.1:3000/api/cars/5bfe30b46fe410e1cfff2323) "http://127.0.0.1:3000/api/cars/5bfe30b46fe410e1cfff2323](http://127.0.0.1:3000/api/cars/5bfe30b46fe410e1cfff2323)")
Putting it all together and testing our API
Now that we have most of our parts constructed, we just need to connect them all together to start serving data via our API. Firstly we need to import our routes that we created by adding the following line of code to our main index.js file:
const routes = require(‘./routes’)
We then need to loop over our routes array to initialise them with Fastify. We can do this with the following code, which also needs to be added to the main index.js file:
routes.forEach((route, index) => {
 fastify.route(route)
})
Now we are ready to start testing!
The best tool for the job is Postman, which we will use to test all of our routes. We will be sending our data as raw objects in the body of the request and as parameters.
Finding all cars:
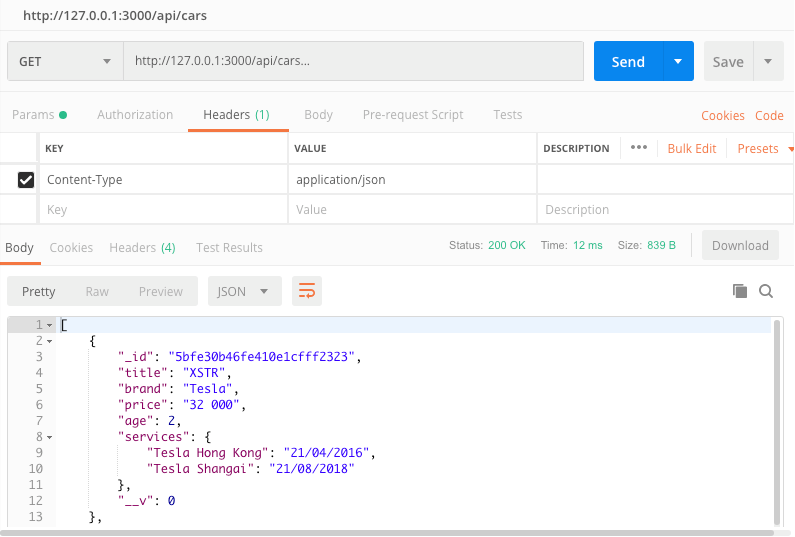
Finding a single car:

Adding a new car**:
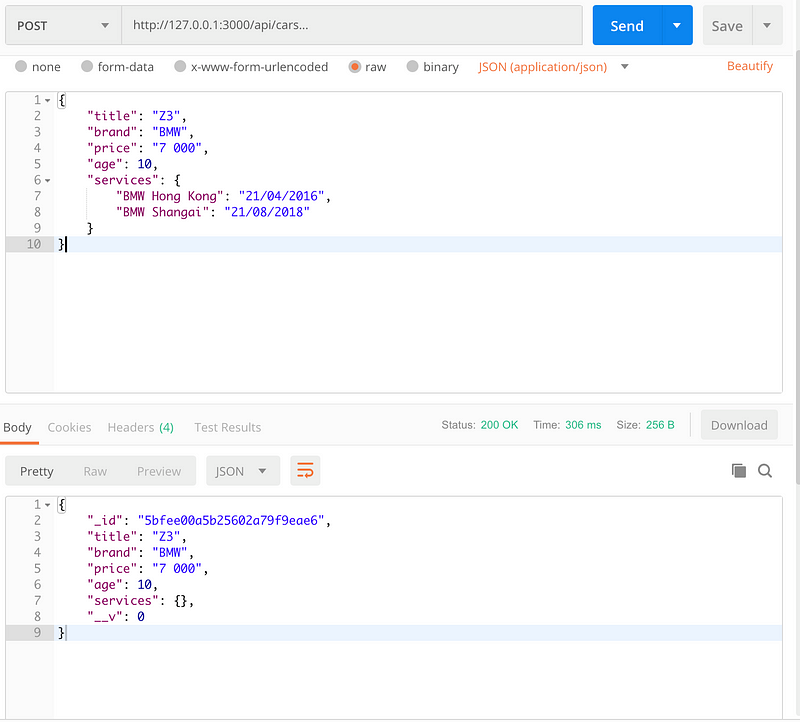
** The services appear to be empty, but the information does in fact persist to the database.
Updating a car:

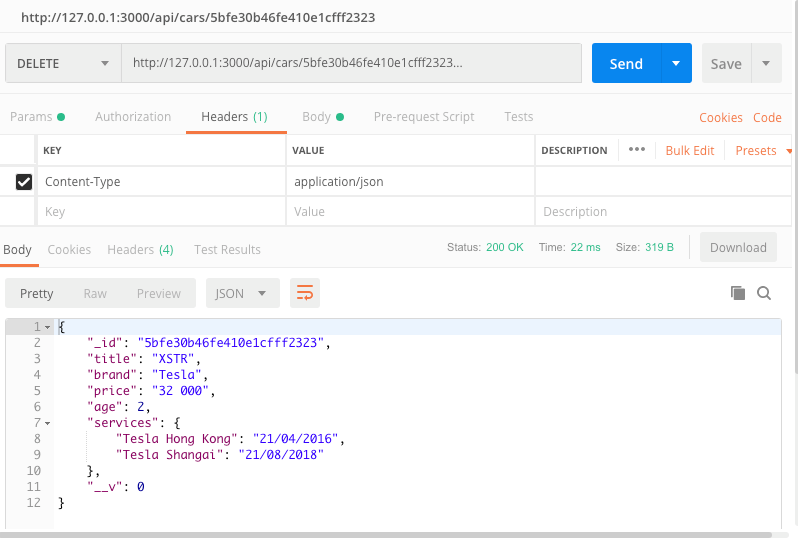
Deleting a car:
We now have a fully functional API — but what about the documentation? This is where Swagger is really handy.

Adding Swagger and wrapping up.
Now we will create our final folder called config. Inside we will create a file called swagger.js with the following code:
exports.options = {
  routePrefix: '/documentation',
  exposeRoute: true,
  swagger: {
    info: {
      title: 'Fastify API',
      description: 'Building a blazing fast REST API with Node.js, MongoDB, Fastify and Swagger',
      version: '1.0.0'
    },
    externalDocs: {
      url: 'https://swagger.io',
      description: 'Find more info here'
    },
    host: 'localhost',
    schemes: ['http'],
    consumes: ['application/json'],
    produces: ['application/json']
  }
}
The above code is an object with the options which we will pass into our fastify-swagger plugin. To do this, we need to add the following to our index.js file:
// Import Swagger Options
const swagger = require(‘./config/swagger’)
// Register Swagger
fastify.register(require(‘fastify-swagger’), swagger.options)
And then we need to add the following line after we have initialised our Fastify server:
...
await fastify.listen(3000)
fastify.swagger()
fastify.log.info(`listening on ${fastify.server.address().port}`)
...
And that is it! If you now navigate to http://localhost:3000/documentation, you should see the following:
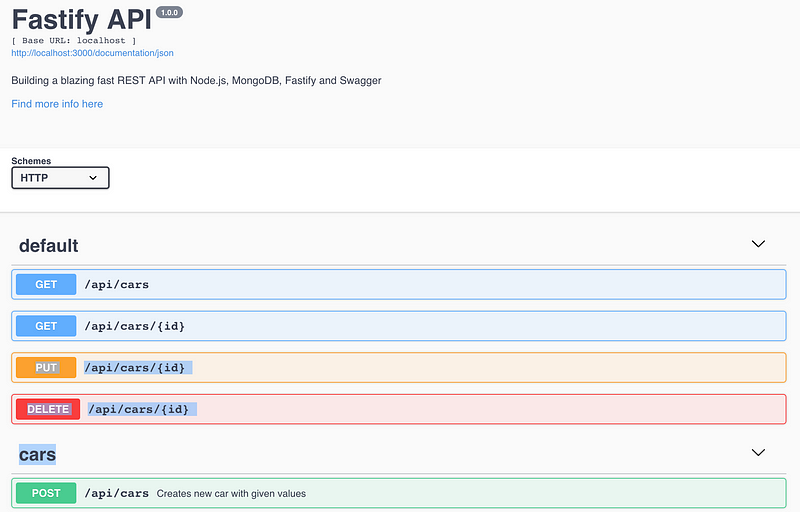
As simple as that! You now have self updating API documentation that will evolve with your API. You can easily add additional information to your routes, see more here.
Whats Next?
Now that we have a basic API in place, the possibilities are limitless. It can be used as the base for any app imaginable.
In the next tutorial, we will integrate GraphQL and eventually integrate the frontend with Vue.js too!
Learn More
☞ The Complete Node.js Developer Course (2nd Edition)
☞ GraphQL: Learning GraphQL with Node.Js
☞ Angular (Angular 2+) & NodeJS - The MEAN Stack Guide
#node-js #api #mongodb