Making a Calculator with Basic HTML, CSS and JavaScript
We are going to be making a simple calculator with basic HTML, CSS and JavaScript. Our calculator will only able to perform basic math operations: addition, subtraction, multiplication and division. To better understand this tutorial you would need to have a little knowledge of HTML and CSS.
If you don’t already know them, no need to worry. I simplified this tutorial as best as I could, so you would survive :)
So what exactly do we need to build this?
As you might have already guessed, we would need to create “buttons” for inputting values and a screen for displaying these values.
Well, basically, that’s it!
But in fancier terms, these are the components we need:
· A display area for displaying operators, operands and solutions.
· Buttons for inputting values to the display screen
Visually, a calculator is a table enclosed in a container. And as you should already know tables are made of rows and columns with cells to contain table data.

Now you get the concepts, let’s get started!
This is the basic format for HTML documents.
<html>
	<head></head>
	<body>
			<! -- Content -- >   <
	/body>
</html>
The visible part of a webpage goes into the <body> </body> tag.
Before I go any further, it’s essential you understand certain HTML terminologies (fancy words) such as tags, attributes and elements.
Tags: Tags are basic labels that define and separate parts of your markup into elements. They are comprised of a keyword surrounded by angle brackets <>. Content goes between two tags and the closing one is prefixed with a slash (Note: there are some self-closing HTML tags, like image tags).
<!-- This is an opening and closing paragraph tag --><p></p>
Attributes: A property of an HTML element used to provide additional instructions to a given HTML tag. The attribute is specified in the opening HTML tag.
<!-- Here, the class is the attribute --><p class=""></p>
Elements: An HTML element usually consists of a opening tag and end tag, with the content inserted in between.
<!-- The element spans from the opening tag to the closing tag --><p class="paragraph">This is a paragraph.</p>
Okay! Enough with the basics. Let’s dance.
The first thing that goes into our HTML body is the form element <form> </form>. After it has been created, an attribute titled “name”, with the value, calculator, should then be added to the opening form tag.
<html>
	<head></head>
	<body>
			<form name=”calculator”>
			</form>
	</body>
</html>
The form element is to serve as a wrapper (container) for the table which will contain the main calculator components.
Okay, what’s next?
Next, we need to create the table.
So what’s a table? No, not the furniture!
Excuse my poor attempt at making a joke.
HTML tables allow web designers to arrange data like text, images, links, other tables, etc. into rows and columns of cells. They are created using the <table> tag in which the <tr> tag is used to create table rows and <td> is used to create data cells.
Row is the horizontal and column is the vertical one, by the way.
Enough talk, let’s code now.
Inside the opening and closing <form> tag, we need to create a table element.
<html>
	<head></head>
	<body>
			<form name=”calculator”>
					<table>
					</table>
			</form>
	</body>
</html>
That was a breeze, right? Great, but it sort of gets complicated now, so you might want to turn off your twitter notification and set your eyes on the screen!
Inside the <table> tag, we need to define the table rows <tr> which is basically going to be the horizontal section of the calculator and the table data <td> (table column cell) which is to contain the calculator display and buttons.

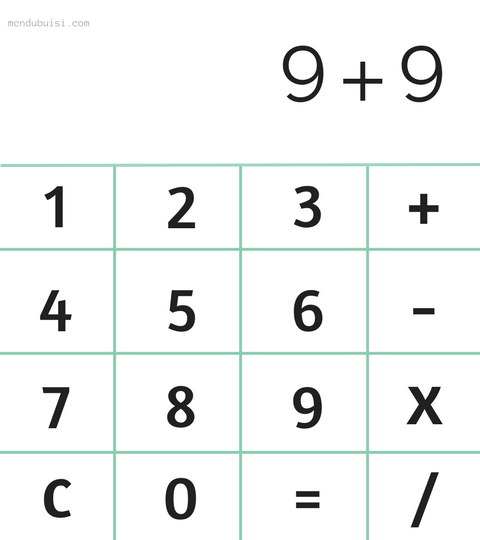
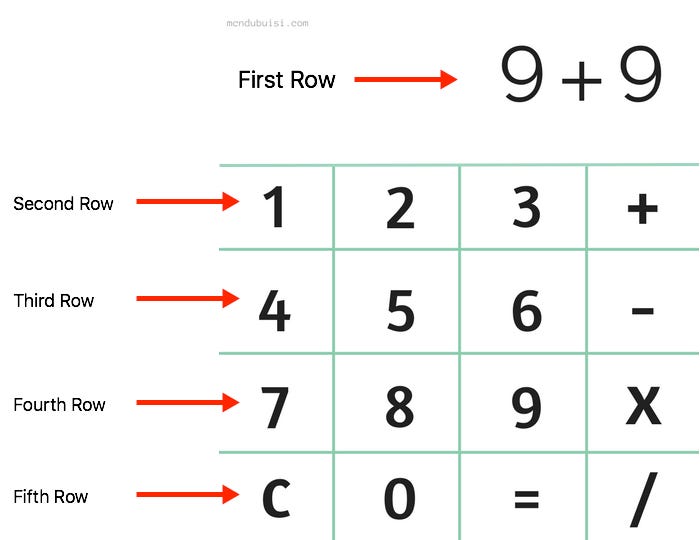
The first horizontal section of our calculator is to contain the display screen.
The second horizontal section is to contain the first set of buttons. The first one is 1, the second one is 2, the third is 3, and the fourth is the + plus sign.
The third horizontal section also contains buttons! The first one is 4, the second one is 5, the third is 6, and the fourth is the - minus sign.
Other horizontal sections? Well, they contain… more buttons!
Let’s code:
<html>
	<head></head>
	<body>
			<form name=”calculator”>
					<table>
              	<tr>
									<td>
											<input type="text" name="display" id="display" disabled>
									</td>
							</tr>
					</table>
			</form>
	</body>
</html>
That’s for the first horizontal section, which contains the display area of the calculator.
Hey! No need to scroll up. You are right, I haven’t talked about the _input_ element and every other thing in between.
So what is an input element?
An input element is a form element — the most important one at that. The input element can be displayed in several ways, depending on the type attribute. If you are following closely, I bet you are wondering why our type attribute type = "" is set to text and not number.
Here’s your answer, a calculator not only displays numbers but it also displays operators. So the type attribute has to be set to text to accommodate both numbers and symbols (operators).
For this tutorial, I would not talk about what the id and class attribute actually are and how they used.
Finally, for the first horizontal section, there is the disabled attribute. The disabled attribute is a boolean attribute. When present, it specifies that the <input> element should be disabled. A disabled input element is unusable and un-clickable. The point of making our input element disabled, is to make the calculator button the only way users can send texts to the display. We don’t want users typing random alphabets in the display area now, do we?
Now, the second horizontal section.
Here, there are four table cell columns! So we have to use the table data <td> tag four times to define them.
<html>
	<head></head>
	<body>
			<form name=”calculator”>
					<table>
               <tr>
							 			<td>
													<input type="text" name="display" id="display" disabled>
										</td>
								</tr>
           <tr>
              <td><input type=”button” name=”one” value=”1" onclick=”calculator.display.value += ‘1’”></td>
							<td><input type=”button” name=”two” value=”2" onclick=”calculator.display.value += ‘2’”></td>
							<td><input type=”button” name=”three” value=”3" onclick=”calculator.display.value += ‘3’”></td>
							<td><input type=”button” class=”operator” name=”plus” value=”+” onclick=”calculator.display.value += ‘+’”></td>
					</tr>
			</table>
	</form>
</body>
</html>
The first <td> tag contains the number 1, the second one is for the number 2 and so on. To make the input element a button, the type attribute should be set to button.
Whatever goes into the value attribute value = "" is what would be display on the button.
Now the onclick attribute!
If you have come this far, you should grab a bottle of beer. You deserve it.
The onclick attribute determines what is run when a click occurs. It causes a block of JavaScript code to run.
For this tutorial, I would not go deep into the use of the onclick attribute.
Essentially, the code contained in the onclick attribute is simply telling the web browser to display whatever value the button holds when it is clicked.
The actual value of the input is only modified with the += (append to). If the current calculator input is 5 + and 10 is clicked, 10 will be appended: it then becomes 5 + 10, which is 15. Without the “append to” symbol, the number 10 will override 5. And only 10 will be displayed on the calculator screen.
The content for the second horizontal section should be repeated for the third and the fourth row. All that would be changed is the input value.
But things are going to be a little different for the fifth row.
Why?
The equals to function!
The onclick attribute onclick = "" of the equals to function would contain something a little different from the rest.
<td>
<input type=”button” name=”doit” value=”=”            onclick=”calculator.display.value = eval(calculator.display.value)”></td>
What eval(calculator.display.value) does is to interpret the value of the input as Javascript. So when there is a 4 + 6 in the input, it’ll be evaluated as Javascript and return 10.
Yippee!
That wasn’t so hard, now was it?
When all the individual components are pieced together, we have a fully functional (not so attractive) calculator.
Yes, I said not so attractive. To make the calculator more attractive, the elements have to be styled with CSS — Cascading Style Sheet.
Anyway, congratulations! You should definitely go for another round of beer now.
#javascript #html #css #webdev
