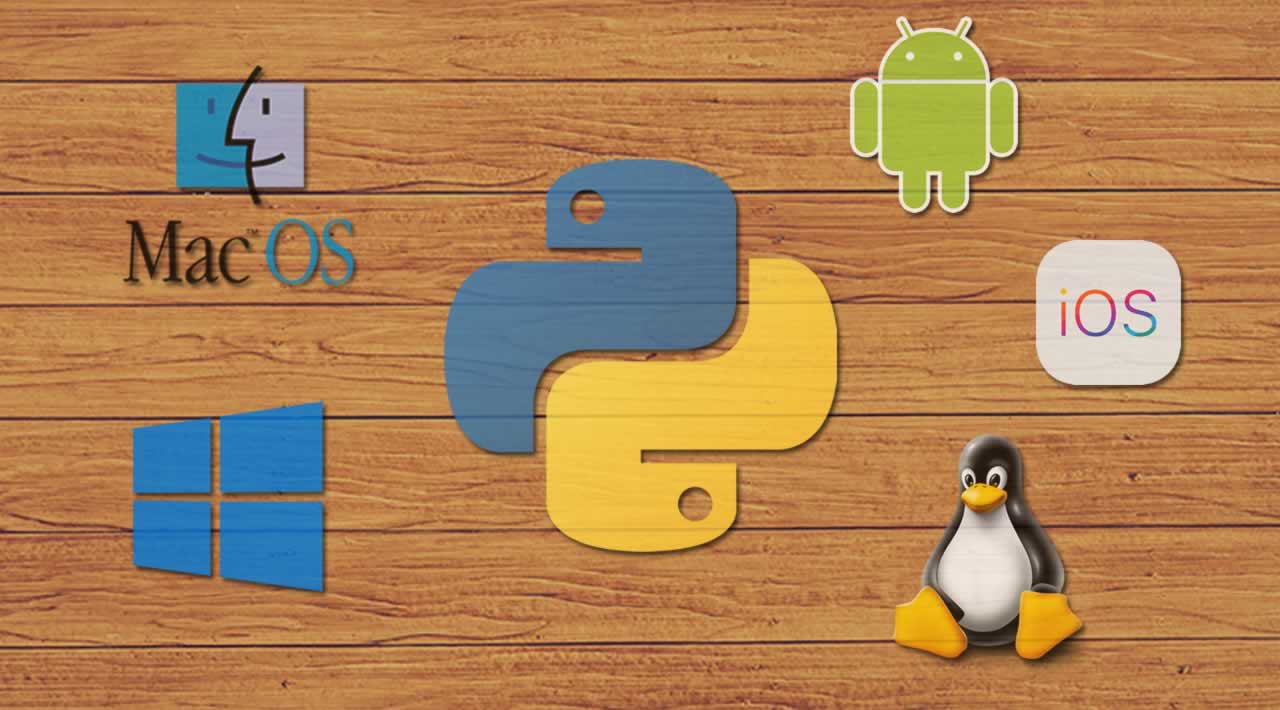
Installing Python on Windows, macOS, Linux, iOS, and Android
To get started working with Python, you’ll need to have access to the Python interpreter. There are several common ways to accomplish this. In this article, you will learn how to install the latest version of Python 3 on Windows, macOS, Linux, iOS, and Android.
Many operating systems, such as **macOS **and Linux, come with Python pre-installed. The version of **Python **that comes with your operating system is called your system Python.
Table of Contents
- Windows
Step 1: Download the Python 3 InstallerStep 2: Run the Installer* Windows Subsystem for Linux (WSL) - Linux
UbuntuLinux MintDebianopenSUSECentOSFedoraArch LinuxCompiling Python From Source* macOS / Mac OS X
Step 1: Install Homebrew (Part 1)Step 2: Install Homebrew (Part 2)Step 3: Install Python* iOS (iPhone / iPad) - Android (Phones & Tablets)
- Conclusion
To get started working with Python 3, you’ll need to have access to the Python interpreter. There are several common ways to accomplish this:
- Python can be obtained from the Python Software Foundation website at python.org. Typically, that involves downloading the appropriate installer for your operating system and running it on your machine.
- Some operating systems, notably Linux, provide a package manager that can be run to install Python.
- On macOS, the best way to install Python 3 involves installing a package manager called Homebrew. You’ll see how to do this in the relevant section in the tutorial.
- On mobile operating systems like Android and iOS, you can install apps that provide a Python programming environment. This can be a great way to practice your coding skills on the go.
Alternatively, there are several websites that allow you to access a Python interpreter online without installing anything on your computer at all.
Note: There is a chance that Python may have been shipped with your operating system and is already installed. Even if that is the case, it may be that the installed version is outdated, in which case you will want to obtain the latest version anyhow.
In this Python installation guide, you’ll see step by step how to set up a Installing Python 3 distribution on Windows, macOS, Linux, iOS, and Android. So let’s get started!
Installing Python on Windows
It is highly unlikely that your Windows system shipped with Python already installed. Windows systems typically do not. Fortunately, installing does not involve much more than downloading the Python installer from the python.org website and running it. Let’s take a look at how to install Python 3 on Windows:
Step 1: Download the Python 3 Installer
- Open a browser window and navigate to the Download page for Windows at python.org.
- Underneath the heading at the top that says Python Releases for Windows, click on the link for the Latest Python 3 Release - Python 3.x.x. (As of this writing, the latest is Python 3.6.5.)
- Scroll to the bottom and select either Windows x86-64 executable installer for 64-bit or Windows x86 executable installer for 32-bit. (See below.)
Sidebar: 32-bit or 64-bit Python?
For Windows, you can choose either the 32-bit or 64-bit installer. Here’s what the difference between the two comes down to:* If your system has a 32-bit processor, then you should choose the 32-bit installer.
- On a 64-bit system, either installer will actually work for most purposes. The 32-bit version will generally use less memory, but the 64-bit version performs better for applications with intensive computation.
- If you’re unsure which version to pick, go with the 64-bit version.
Note: Remember that if you get this choice “wrong” and would like to switch to another version of Python, you can just uninstall Python and then re-install it by downloading another installer from python.org.### Step 2: Run the Installer
Once you have chosen and downloaded an installer, simply run it by double-clicking on the downloaded file. A dialog should appear that looks something like this:

Important: You want to be sure to check the box that says Add Python 3.x to PATH as shown to ensure that the interpreter will be placed in your execution path.
Then just click Install Now.a That should be all there is to it. A few minutes later you should have a working Python 3 installation on your system.
Windows Subsystem for Linux (WSL)
If you are running Windows 10 Creators or Anniversary Update, you actually have another option for installing Python. These versions of Windows 10 include a feature called the Windows Subsystem for Linux, which allows you to run a Linux environment directly in Windows, unmodified and without the overhead of a virtual machine.
- For more information, see the Windows Subsystem for Linux Documentation article on the Microsoft website.
- For instructions on how to enable the subsystem in Windows 10 and install a Linux distribution, see the Windows 10 Installation Guide.
- You can also check out this presentation on YouTube by Sarah Cooley, one of the members of the WSL development team.
Once you have installed the Linux distribution of your choice, you can install Python 3 from a Bash console window, just as you would if you were running that Linux distribution natively. (See below.)
Installing Python on Linux
There is a very good chance your Linux distribution has Python installed already, but it probably won’t be the latest version, and it may be Python 2 instead of Python 3.
To find out what version(s) you have, open a terminal window and try the following commands:
python --versionpython2 --versionpython3 --version
One or more of these commands should respond with a version, as below:
$ python3 --version
Python 3.6.5
If the version shown is Python 2.x.x or a version of Python 3 that is not the latest (3.6.5 as of this writing), then you will want to install the latest version. The procedure for doing this will depend on the Linux distribution you are running.
Note that it is frequently easier to use a tool called pyenv to manage multiple Python versions on Linux. To learn more about it, see our article here.
Installing Python on Ubuntu
Depending on the version of the Ubuntu distribution you run, the Python install instructions vary. You can determine your local Ubuntu version by running the following command:
$ lsb_release -a
No LSB modules are available.
Distributor ID: Ubuntu
Description:    Ubuntu 16.04.4 LTS
Release:        16.04
Codename:       xenial
Depending on the version number you see under Release in the console output, follow the instructions below:
- Ubuntu 17.10, Ubuntu 18.04 (and above) come with Python 3.6 by default. You should be able to invoke it with the command
python3. - Ubuntu 16.10 and 17.04 do not come with Python 3.6 by default, but it is in the Universe repository. You should be able to install it with the following commands:
$ sudo apt-get update
$ sudo apt-get install python3.6
- You can then invoke it with the command
python3.6. - If you are using Ubuntu 14.04 or 16.04, Python 3.6 is not in the Universe repository, and you need to get it from a Personal Package Archive (PPA). For example, to install Python from the “deadsnakes” PPA, do the following:
$ sudo add-apt-repository ppa:deadsnakes/ppa
$ sudo apt-get update
$ sudo apt-get install python3.6
- As above, invoke with the command
python3.6.
Linux Mint
Mint and Ubuntu use the same package management system, which frequently makes life easier. You can follow the instructions above for Ubuntu 14.04. The “deadsnakes” PPA works with Mint.
Debian
We found sources that indicated that the Ubuntu 16.10 method would work for Debian, but we never found a path to get it to work on Debian 9. Instead, we ended up making Python from source as listed below.
One issue with Debian, however, is that it generally does not install the sudo command by default. To install it, you’ll need to do the following before you carry out the Compiling Python From Source instructions below:
$ su
$ apt-get install sudo
$ vi /etc/sudoers
After that, open the /etc/sudoers file using the sudo vim command (or your favorite text editor.) Add the following line of text to the end of the file, replacing your_username with your actual username:
your_username ALL=(ALL) ALL
openSUSE
We found several sites describing how to get zypper to install the latest version of Python, but they seemed problematic or outdated. We did not manage to get any of them to work successfully, so we fell back to building Python from source. To do that, you will need to install the development tools, which can be done in YaST (via the menus) or by using zypper:
$ sudu zypper install -t pattern devel_C_C++
This step took a while and involved the installation of 154 packages, but once it was completed, we were able to build the source as shown in the Compiling Python From Source section above.
CentOS
The IUS Community does a nice job of providing newer versions of software for “Enterprise Linux” distros (i.e. Red Hat Enterprise and CentOS). You can use their work to help you install Python 3.
To install, you should first update your system with the yum package manager:
$ sudo yum update
$ sudo yum install yum-utils
You can then install the CentOS IUS package which will get you up to date with their site:
$ sudo yum install https://centos7.iuscommunity.org/ius-release.rpm
Finally you can then install Python and Pip:
$ sudo yum install python36u
$ sudo yum install python36u-pip
Thanks to Jani Karhunen for his excellent writeup for CentOS 7.
Fedora
Fedora has a roadmap to switch to Python 3 as the default Python published here. It indicates that the current version and the next few versions will all ship with Python 2 as the default, but Python 3 will be installed. If the python3 installed on your version is not 3.6, you can use the following command to install it:
$ sudo dnf install python36
Arch Linux
Arch Linux is fairly aggressive about keeping up with Python releases. It is likely you already have the latest version. If not, you can use this command:
$ packman -S python
Compiling Python From Source
Sometimes your Linux distribution will not have the latest version of Python, or maybe you just want to be able to build the latest, greatest version yourself. Here are the steps you need to take to build Python from source:
Step 1: Download the Source Code
To start, you need to get the Python source code. Python.org makes this fairly easy. If you go to the Downloads page, you will see the latest source for Python 3 at the top. (Make sure you don’t grab Legacy Python, Python 2.)
When you select the version, at the bottom of the page there is a Files section. Select the Gzipped source tarball and download it to your machine. If you prefer a command line method, you can easily use wget to download it to your current directory:
$ wget https://www.python.org/ftp/python/3.6.5/Python-3.6.5.tgz
Step 2: Prepare Your System
There are a few distro-specific steps involved in building Python from scratch. The goal of each step is the same on all distros, but you might need to translate to your distribution if it does not use apt-get:
- The first step you should take when doing an operation like this is to update the system packages on your machine before you start. On Debian, this is what that looks like:
$ sudo apt-get update
$ sudo apt-get upgrade
- Next, we want to make sure the system has the tools needed to build Python. There are a bunch of them and you might already have some, but that’s fine. I’ve listed them all in one command line, but you can break the list into shorter commands by just repeating the
sudo apt-get install -yportion:
# For apt-based systems (like Debian, Ubuntu, and Mint)
$ sudo apt-get install -y make build-essential libssl-dev zlib1g-dev libbz2-dev libreadline-dev libsqlite3-dev wget curl llvm libncurses5-dev  libncursesw5-dev xz-utils tk-dev

# For yum-based systems (like CentOS)
$ sudo yum -y groupinstall development
$ sudo yum -y install zlib-devel
Step 3: Build Python
- Once you have the prerequisites and the tar file, you can unpack the source into a directory. Note that the following command will create a new directory called
Python-3.6.5under the one you are in:
$ tar xvf Python-3.6.5.tgz
$ cd Python-3.6.5
- Now you need to run the
./configuretool to prepare the build:
$ ./configure --enable-optimizations --with-ensurepip=install
- Next, you build the Python programs using
make. The-joption simply tellsmaketo split the building into parallel steps to speed up the compilation. Even with the parallel builds, this step can take a several minutes:
$ make -j 8
- Then, you’ll want to install your new version of Python. You’ll use the
altinstalltarget here in order to not overwrite the system’s version of Python. Since you’re installing Python into/usr/bin, you’ll need to run as root:
$ sudo make altinstall
Warning: Please only use the
altinstalltarget onmake. Using theinstalltarget will overwrite thepythonbinary. While this seems like it would be cool, there are big portions of the system that rely on the pre-installed version of Python.#### Step 4: Verify Your Python Install
Finally, you can test out your new Python version:
$ python3.6 -V
Python 3.6.5
Installing Python on macOS / Mac OS X
While current versions of macOS (previously known as “Mac OS X”) include a version of Python 2, it is likely out of date by a few months. Also, this tutorial series uses Python 3, so let’s get you upgraded to that.
The best way we found to install Python 3 on macOS is through the Homebrew package manager. This approach is also recommended by community guides like The Hitchhiker’s Guide to Python.
Step 1: Install Homebrew (Part 1)
To get started, you first want to install Homebrew:
- Open a browser and navigate to http://brew.sh/. After the page has finished loading, select the Homebrew bootstrap code under “Install Homebrew”. Then hit Cmd+C to copy it to the clipboard. Make sure you’ve captured the text of the complete command because otherwise the installation will fail.
- Now you need to open a Terminal.app window, paste the Homebrew bootstrap code, and then hit Enter. This will begin the Homebrew installation.
- If you’re doing this on a fresh install of macOS, you may get a pop up alert asking you to install Apple’s “command line developer tools”. You’ll need those to continue with the installation, so please confirm the dialog box by clicking on “Install”.
At this point, you’re likely waiting for the command line developer tools to finish installing, and that’s going to take a few minutes. Time to grab a coffee or tea!
Step 2: Install Homebrew (Part 2)
You can continue installing Homebrew and then Python after the command line developer tools installation is complete:
- Confirm the “The software was installed” dialog from the developer tools installer.
- Back in the terminal, hit Enter to continue with the Homebrew installation.
- Homebrew asks you to enter your password so it can finalize the installation. Enter your user account password and hit Enter to continue.
- Depending on your internet connection, Homebrew will take a few minutes to download its required files. Once the installation is complete, you’ll end up back at the command prompt in your terminal window.
Whew! Now that the Homebrew package manager is set up, let’s continue on with installing Python 3 on your system.
Step 3: Install Python
Once Homebrew has finished installing, return to your terminal and run the following command:
$ brew install python3
Note: When you copy this command, be sure you don’t include the ```Many operating systems, such as **macOS **and Linux, come with Python pre-installed. The version of **Python **that comes with your operating system is called your system Python.
Table of Contents
- Windows
Step 1: Download the Python 3 InstallerStep 2: Run the Installer* Windows Subsystem for Linux (WSL) - Linux
UbuntuLinux MintDebianopenSUSECentOSFedoraArch LinuxCompiling Python From Source* macOS / Mac OS X
Step 1: Install Homebrew (Part 1)Step 2: Install Homebrew (Part 2)Step 3: Install Python* iOS (iPhone / iPad) - Android (Phones & Tablets)
- Conclusion
To get started working with Python 3, you’ll need to have access to the Python interpreter. There are several common ways to accomplish this:
- Python can be obtained from the Python Software Foundation website at python.org. Typically, that involves downloading the appropriate installer for your operating system and running it on your machine.
- Some operating systems, notably Linux, provide a package manager that can be run to install Python.
- On macOS, the best way to install Python 3 involves installing a package manager called Homebrew. You’ll see how to do this in the relevant section in the tutorial.
- On mobile operating systems like Android and iOS, you can install apps that provide a Python programming environment. This can be a great way to practice your coding skills on the go.
Alternatively, there are several websites that allow you to access a Python interpreter online without installing anything on your computer at all.
Note: There is a chance that Python may have been shipped with your operating system and is already installed. Even if that is the case, it may be that the installed version is outdated, in which case you will want to obtain the latest version anyhow.
In this Python installation guide, you’ll see step by step how to set up a Installing Python 3 distribution on Windows, macOS, Linux, iOS, and Android. So let’s get started!
Installing Python on Windows
It is highly unlikely that your Windows system shipped with Python already installed. Windows systems typically do not. Fortunately, installing does not involve much more than downloading the Python installer from the python.org website and running it. Let’s take a look at how to install Python 3 on Windows:
Step 1: Download the Python 3 Installer
- Open a browser window and navigate to the Download page for Windows at python.org.
- Underneath the heading at the top that says Python Releases for Windows, click on the link for the Latest Python 3 Release - Python 3.x.x. (As of this writing, the latest is Python 3.6.5.)
- Scroll to the bottom and select either Windows x86-64 executable installer for 64-bit or Windows x86 executable installer for 32-bit. (See below.)
Sidebar: 32-bit or 64-bit Python?
For Windows, you can choose either the 32-bit or 64-bit installer. Here’s what the difference between the two comes down to:* If your system has a 32-bit processor, then you should choose the 32-bit installer.
- On a 64-bit system, either installer will actually work for most purposes. The 32-bit version will generally use less memory, but the 64-bit version performs better for applications with intensive computation.
- If you’re unsure which version to pick, go with the 64-bit version.
Note: Remember that if you get this choice “wrong” and would like to switch to another version of Python, you can just uninstall Python and then re-install it by downloading another installer from python.org.### Step 2: Run the Installer
Once you have chosen and downloaded an installer, simply run it by double-clicking on the downloaded file. A dialog should appear that looks something like this:
Important: You want to be sure to check the box that says Add Python 3.x to PATH as shown to ensure that the interpreter will be placed in your execution path.
Then just click Install Now. That should be all there is to it. A few minutes later you should have a working Python 3 installation on your system.
Windows Subsystem for Linux (WSL)
If you are running Windows 10 Creators or Anniversary Update, you actually have another option for installing Python. These versions of Windows 10 include a feature called the Windows Subsystem for Linux, which allows you to run a Linux environment directly in Windows, unmodified and without the overhead of a virtual machine.
- For more information, see the Windows Subsystem for Linux Documentation article on the Microsoft website.
- For instructions on how to enable the subsystem in Windows 10 and install a Linux distribution, see the Windows 10 Installation Guide.
- You can also check out this presentation on YouTube by Sarah Cooley, one of the members of the WSL development team.
Once you have installed the Linux distribution of your choice, you can install Python 3 from a Bash console window, just as you would if you were running that Linux distribution natively. (See below.)
Installing Python on Linux
There is a very good chance your Linux distribution has Python installed already, but it probably won’t be the latest version, and it may be Python 2 instead of Python 3.
To find out what version(s) you have, open a terminal window and try the following commands:
python --versionpython2 --versionpython3 --version
One or more of these commands should respond with a version, as below:
$ python3 --version
Python 3.6.5
If the version shown is Python 2.x.x or a version of Python 3 that is not the latest (3.6.5 as of this writing), then you will want to install the latest version. The procedure for doing this will depend on the Linux distribution you are running.
Note that it is frequently easier to use a tool called pyenv to manage multiple Python versions on Linux. To learn more about it, see our article here.
Installing Python on Ubuntu
Depending on the version of the Ubuntu distribution you run, the Python install instructions vary. You can determine your local Ubuntu version by running the following command:
$ lsb_release -a
No LSB modules are available.
Distributor ID: Ubuntu
Description:    Ubuntu 16.04.4 LTS
Release:        16.04
Codename:       xenial
Depending on the version number you see under Release in the console output, follow the instructions below:
- Ubuntu 17.10, Ubuntu 18.04 (and above) come with Python 3.6 by default. You should be able to invoke it with the command
python3. - Ubuntu 16.10 and 17.04 do not come with Python 3.6 by default, but it is in the Universe repository. You should be able to install it with the following commands:
$ sudo apt-get update
$ sudo apt-get install python3.6
- You can then invoke it with the command
python3.6. - If you are using Ubuntu 14.04 or 16.04, Python 3.6 is not in the Universe repository, and you need to get it from a Personal Package Archive (PPA). For example, to install Python from the “deadsnakes” PPA, do the following:
$ sudo add-apt-repository ppa:deadsnakes/ppa
$ sudo apt-get update
$ sudo apt-get install python3.6
- As above, invoke with the command
python3.6.
Linux Mint
Mint and Ubuntu use the same package management system, which frequently makes life easier. You can follow the instructions above for Ubuntu 14.04. The “deadsnakes” PPA works with Mint.
Debian
We found sources that indicated that the Ubuntu 16.10 method would work for Debian, but we never found a path to get it to work on Debian 9. Instead, we ended up making Python from source as listed below.
One issue with Debian, however, is that it generally does not install the sudo command by default. To install it, you’ll need to do the following before you carry out the Compiling Python From Source instructions below:
$ su
$ apt-get install sudo
$ vi /etc/sudoers
After that, open the /etc/sudoers file using the sudo vim command (or your favorite text editor.) Add the following line of text to the end of the file, replacing your_username with your actual username:
your_username ALL=(ALL) ALL
openSUSE
We found several sites describing how to get zypper to install the latest version of Python, but they seemed problematic or outdated. We did not manage to get any of them to work successfully, so we fell back to building Python from source. To do that, you will need to install the development tools, which can be done in YaST (via the menus) or by using zypper:
$ sudu zypper install -t pattern devel_C_C++
This step took a while and involved the installation of 154 packages, but once it was completed, we were able to build the source as shown in the Compiling Python From Source section above.
CentOS
The IUS Community does a nice job of providing newer versions of software for “Enterprise Linux” distros (i.e. Red Hat Enterprise and CentOS). You can use their work to help you install Python 3.
To install, you should first update your system with the yum package manager:
$ sudo yum update
$ sudo yum install yum-utils
You can then install the CentOS IUS package which will get you up to date with their site:
$ sudo yum install https://centos7.iuscommunity.org/ius-release.rpm
Finally you can then install Python and Pip:
$ sudo yum install python36u
$ sudo yum install python36u-pip
Thanks to Jani Karhunen for his excellent writeup for CentOS 7.
Fedora
Fedora has a roadmap to switch to Python 3 as the default Python published here. It indicates that the current version and the next few versions will all ship with Python 2 as the default, but Python 3 will be installed. If the python3 installed on your version is not 3.6, you can use the following command to install it:
$ sudo dnf install python36
Arch Linux
Arch Linux is fairly aggressive about keeping up with Python releases. It is likely you already have the latest version. If not, you can use this command:
$ packman -S python
Compiling Python From Source
Sometimes your Linux distribution will not have the latest version of Python, or maybe you just want to be able to build the latest, greatest version yourself. Here are the steps you need to take to build Python from source:
Step 1: Download the Source Code
To start, you need to get the Python source code. Python.org makes this fairly easy. If you go to the Downloads page, you will see the latest source for Python 3 at the top. (Make sure you don’t grab Legacy Python, Python 2.)
When you select the version, at the bottom of the page there is a Files section. Select the Gzipped source tarball and download it to your machine. If you prefer a command line method, you can easily use wget to download it to your current directory:
$ wget https://www.python.org/ftp/python/3.6.5/Python-3.6.5.tgz
Step 2: Prepare Your System
There are a few distro-specific steps involved in building Python from scratch. The goal of each step is the same on all distros, but you might need to translate to your distribution if it does not use apt-get:
- The first step you should take when doing an operation like this is to update the system packages on your machine before you start. On Debian, this is what that looks like:
$ sudo apt-get update
$ sudo apt-get upgrade
- Next, we want to make sure the system has the tools needed to build Python. There are a bunch of them and you might already have some, but that’s fine. I’ve listed them all in one command line, but you can break the list into shorter commands by just repeating the
sudo apt-get install -yportion:
# For apt-based systems (like Debian, Ubuntu, and Mint)
$ sudo apt-get install -y make build-essential libssl-dev zlib1g-dev libbz2-dev libreadline-dev libsqlite3-dev wget curl llvm libncurses5-dev  libncursesw5-dev xz-utils tk-dev

# For yum-based systems (like CentOS)
$ sudo yum -y groupinstall development
$ sudo yum -y install zlib-devel
Step 3: Build Python
- Once you have the prerequisites and the tar file, you can unpack the source into a directory. Note that the following command will create a new directory called
Python-3.6.5under the one you are in:
$ tar xvf Python-3.6.5.tgz
$ cd Python-3.6.5
- Now you need to run the
./configuretool to prepare the build:
$ ./configure --enable-optimizations --with-ensurepip=install
- Next, you build the Python programs using
make. The-joption simply tellsmaketo split the building into parallel steps to speed up the compilation. Even with the parallel builds, this step can take a several minutes:
$ make -j 8
- Then, you’ll want to install your new version of Python. You’ll use the
altinstalltarget here in order to not overwrite the system’s version of Python. Since you’re installing Python into/usr/bin, you’ll need to run as root:
$ sudo make altinstall
Warning: Please only use the
altinstalltarget onmake. Using theinstalltarget will overwrite thepythonbinary. While this seems like it would be cool, there are big portions of the system that rely on the pre-installed version of Python.#### Step 4: Verify Your Python Install
Finally, you can test out your new Python version:
$ python3.6 -V
Python 3.6.5
Installing Python on macOS / Mac OS X
While current versions of macOS (previously known as “Mac OS X”) include a version of Python 2, it is likely out of date by a few months. Also, this tutorial series uses Python 3, so let’s get you upgraded to that.
The best way we found to install Python 3 on macOS is through the Homebrew package manager. This approach is also recommended by community guides like The Hitchhiker’s Guide to Python.
Step 1: Install Homebrew (Part 1)
To get started, you first want to install Homebrew:
- Open a browser and navigate to http://brew.sh/. After the page has finished loading, select the Homebrew bootstrap code under “Install Homebrew”. Then hit Cmd+C to copy it to the clipboard. Make sure you’ve captured the text of the complete command because otherwise the installation will fail.
- Now you need to open a Terminal.app window, paste the Homebrew bootstrap code, and then hit Enter. This will begin the Homebrew installation.
- If you’re doing this on a fresh install of macOS, you may get a pop up alert asking you to install Apple’s “command line developer tools”. You’ll need those to continue with the installation, so please confirm the dialog box by clicking on “Install”.
At this point, you’re likely waiting for the command line developer tools to finish installing, and that’s going to take a few minutes. Time to grab a coffee or tea!
Step 2: Install Homebrew (Part 2)
You can continue installing Homebrew and then Python after the command line developer tools installation is complete:
- Confirm the “The software was installed” dialog from the developer tools installer.
- Back in the terminal, hit Enter to continue with the Homebrew installation.
- Homebrew asks you to enter your password so it can finalize the installation. Enter your user account password and hit Enter to continue.
- Depending on your internet connection, Homebrew will take a few minutes to download its required files. Once the installation is complete, you’ll end up back at the command prompt in your terminal window.
Whew! Now that the Homebrew package manager is set up, let’s continue on with installing Python 3 on your system.
Step 3: Install Python
Once Homebrew has finished installing, return to your terminal and run the following command:
$ brew install python3
Note: When you copy this command, be sure you don’t include the `` character at the beginning. That’s just an indicator that this is a console command.
This will download and install the latest version of Python. After the Homebrew brew install command finishes, Python 3 should be installed on your system.
You can make sure everything went correctly by testing if Python can be accessed from the terminal:
- Open the terminal by launching Terminal.app.
- Type
pip3and hit Enter. - You should see the help text from Python’s “Pip” package manager. If you get an error message running
pip3, go through the Python install steps again to make sure you have a working Python installation.
Assuming everything went well and you saw the output from Pip in your command prompt window…congratulations! You just installed Python on your system, and you’re all set to continue with the next section in this tutorial.
Installing Python on iOS (iPhone / iPad)
The Pythonista app for iOS is a full-fledged Python development environment that you can run on your iPhone or iPad. It’s basically a combination of a Python editor, documentation, and interpreter rolled into one single app.
Pythonista is surprisingly fun to use. It’s a great little tool when you’re stuck without a laptop and want to work on your Python skills on the go. It comes with the complete Python 3 standard library and even includes full documentation you can browse offline.
To install and set up Pythonista you need to download it from the iOS app store.
Installing Python on Android (Phones & Tablets)
If you have an Android tablet or phone and want to practice Python on the go, there are a several options available. The one that we found most reliably supports Python 3.6 is Pydroid 3.
Pydroid 3 features an interpreter you can use for REPL sessions, and it also provides the ability to edit, save, and execute Python code:
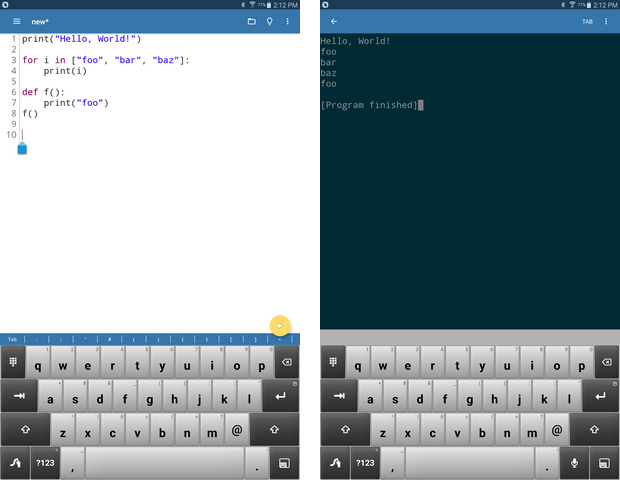
You can download and install Pydroid 3 from the Google Play store. There is a free version and also a paid Premium version which supports code prediction and code analysis.
Conclusion
This section provided you with the information you need to gain access to a Python 3 interpreter. You are now ready to head to the next section and begin interacting with Python!
#python #macos #linux #ios #ubuntu