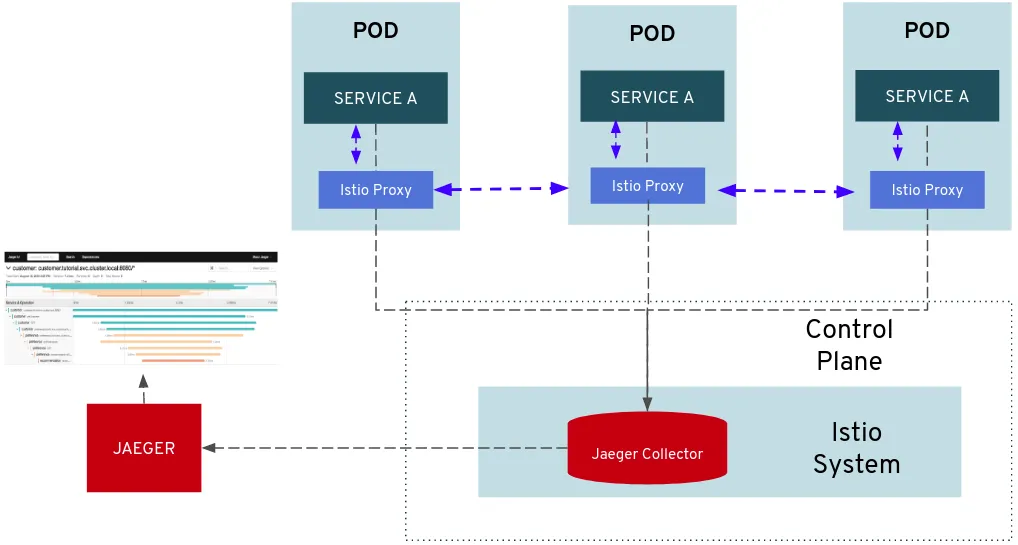
In this article, we are going to explore the OpenShift Service Mesh Data Plane. The idea here is to learn about the Data Plane by showing how to publish a Service Mesh application but without using the extended Istio features (ie. smart routing, control policies, etc), so we are going to get what we have with standard OpenShift SDN features but using Service Mesh. Istio feature explanation will be done in future articles.
Envoy sidecar container
In this section, we are going to check how the Envoy sidecar is injected into the POD and what implications do you have when you include it (ie. traffic redirection, Multus annotations removal, etc).
Sidecar container injection
If you read the official Istio documentation you can find how there are two ways to inject the Proxy sidecar in the application PODs: manual and automated injection.
In OpenShift Service Mesh we also have both options, but as reviewed in OpenShift Service Mesh essentials — Part II — Control Plane article, there is one main difference between what is proposed by the Istio documentation and how the automatic sidecar injection is done in OpenShift, while the default Istio configuration injects the sidecar into pods in any namespace with the istio-injection=enabled label, in OpenShift Service Mesh that label is not included in the namespace but in an annotation in the Deployment object, giving an additional level of flexibility while including applications inside and outside the Service Mesh in the same namespace and, for example, preventing build or deployment PODs from being injected with the sidecar too.
The automatic injection is great since it not only simplifies the deployment but also dealing with the additional Envoy Proxy container lifecycle. Imagine that there is a new release of the OpenShift Service Mesh Envoy sidecar proxy. If you used automatic injection, the sidecar upgrade will be as easy as restarting your PODs (automatic update strategy in the Service Mesh Operator will upgrade the Control Plane, but it won’t auto-restart PODs in order to upgrade the sidecar assuring that it won’t impact your application), but if you used manual injection you will need to go Deployment definition one-by-one changing the Envoy sidecar container image, that’s why automatic injection is the recommended way to include the sidecar proxy in your PODs.
You might be wondering how does the automatic sidecar injection work? The injection is triggered by an Admission Controller, but… What’s an Admission Controller?… let’s go through that…
An Admission Controller is part of the Kubernetes API server code that makes possible to intercept API request before being enforced in the cluster but after the request is authenticated and authorized, so it’s like the last bastion to cross before the cluster does what you want. There are a number of Admission Controllers built-in Kubernetes, for example, if you have already read my article about how you could configure different secure zones in a single OpenShift Cluster, you will remember that in the last part, when we modified the default namespace creation template including whitelist tolerations by including additional annotations in the Kubernetes Objects, we were actually using the PodTolerationRestriction Admission Controller.
But there is also a way to include additional controllers by using webhooks and you could have two types of these Admission Controllers:
- Validating admission webhook, which permits to enforce custom administration policies during the validation of your requests.
- Mutating admission webhook: Allows you to change requests to enforce custom defaults.
As mentioned here, in order to register admission webhooks, you have to create MutatingWebhookConfiguration or ValidatingWebhookConfiguration API objects.
In our case, what we use to automatically inject the sidecar proxy in the POD is a mutating admission webhook, so we can take a look at the MutatingWebhookconfiguration objects, you will see how there are at least one of them per Control Plane namespace plus an additional one used by the Maistra Operator:
You can open one of the sidecar-injector webhook and take a look at the YAML definition file, you will see a “webhooks” section like this:

When an apiserver receives a request that matches one of the rules, the apiserver sends an admissionReview request to webhook as specified in the clientConfig. In our Admission Controller definition, we force that when we try to create a POD, we invoke the /inject endpoint of the istio-sidecar-injector service from your Control Plane namespace. That will lastly “add” and configure (you can also inject environment variables into the Envoy proxy if you use the sidecar.maistra.io/proxyEnv annotation) the additional proxy sidecar container inside the POD that you are trying to create, if the Deployment contains the sidecar.isito.io/inject="true" annotation.
#istio #kubernetes #gateway #sidecar #openshift