Another thing I love about SSO is that it can enable upgrading a large codebase a piece at a time instead of all at once.
How so? Imagine you want to migrate an app written in ASP.NET MVC 5 to ASP.NET Core MVC. Instead of rewriting the whole thing at once, you could migrate one service at a time. Then, by implementing SSO between the two apps, you can effectively link them together as if they were one.
In this tutorial, we’ll simulate such a scenario by implementing SSO for an MVC 5 app and a .NET Core app. Along the way, you’ll also learn some of the differences between how the two platforms implement authentication.
Get the ASP.NET MVC 5 App
Rather than creating a project from scratch, we’ll grab an existing MVC 5 app from GitHub. Clone or download this project, and open the solution in Visual Studio.
In the Web.config file you’ll find some app settings that the programmer used to configure authentication with an Open ID Connect server provided by Okta:
<add key="okta:ClientId" value="{yourClientId}" />
<add key="okta:ClientSecret" value="{yourClientSecret}" />
<add key="okta:OktaDomain" value="https://{yourOktaDomain}" />
For this tutorial, you’ll need to switch these values over to your own Okta instance. Sign in to your Okta domain if you already have an account or sign up now for a forever-free developer account if you don’t.
Once you’re signed in to Okta, register your client application.
- In the top menu, click on Applications
- Click on Add Application
- Select Web and click Next
- Enter
SSO MVC 5for the Name - For the Grant type allowed check the Implicit (Hybrid) checkbox
- Click Done
Your application has been created, but you still need to add one more thing. Select Edit, add <a href="http://localhost:8080/Account/PostLogout" target="_blank">http://localhost:8080/Account/PostLogout</a> to the list of Logout redirect URIs, and click Save.
On the next screen, you will see an overview of settings. Below the General Settings section, you’ll see the Client Credentials section. Use the Client ID and the Client Secret to update the SSO settings in your Web.config. Then go to the main Okta Dashboard page, copy the Org URL displayed in the top left corner, and paste it into the okta:OktaDomain app setting in your Web.config.
At this point, you should be able to run the app and use OpenID Connect to sign in and out. If you’re curious, you can take a look at Startup.cs to see how the authentication middleware is configured.
Get the ASP.NET Core App
Now that you’re using Okta to sign into the MVC 5 app, adding SSO for a second app is trivial.
First download or clone this .NET Core app from GitHub. When you open it in Visual Studio, change the debug target from IIS Express to LiveMusicFinder.

This will cause the app to run via the Kestrel web server on port 5001 (for https).
Now go back to the Okta admin panel and register this application.
- In the top menu, click on Applications
- Click on Add Application
- Select Web and click Next
- Enter
SSO Core MVCfor the Name - Replace Base URIs with
<a href="https://localhost:5001/" target="_blank">https://localhost:5001/</a> - Replace Login redirect URIs with
<a href="https://localhost:5001/authorization-code/callback" target="_blank">https://localhost:5001/authorization-code/callback</a> - Click Done
Once you’re done, you will see a General Settings tab for your app. On that tab click the Edit button and add an entry to the Logout redirect URIs as <a href="https://localhost:5001/signout/callback" target="_blank">https://localhost:5001/signout/callback</a>. Then click Save.
Copy your Client ID and Client Secret from the Client Credentials section of the next page, and update the appsettings.json file in your application.
"Okta": {
  "ClientId": "{yourClientId}",
  "ClientSecret": "{yourClientSecret}",
  "OktaDomain": "https://{yourOktaDomain}",
  "PostLogoutRedirectUri": "https://localhost:5001/"
},
While you are editing the settings, update the OktaDomain setting to match the one you put in the Web.config of the MVC 5 app. Also change the PostLogoutRedirectUri to <a href="https://localhost:5001/" target="_blank">https://localhost:5001/</a>.
That’s really all there is to it. Now when you log in to one of the two apps, clicking the Log in link on the other application will automatically sign you in without prompting for a password.
(If for some inexplicable reason you are testing this with Internet Explorer and you are using Visual Studio’s auto-launch feature, be sure to open the second app in a tab of the first browser window. Due to a peculiarity in how Visual Studio launches IE, each browser window is isolated from the other.)
How Single Sign-On Works in ASP.NET MVC 5 and ASP.NET Core
You’ve seen how simple it is to enable SSO for two ASP.NET apps, but what is really happening behind the scenes to make it work?
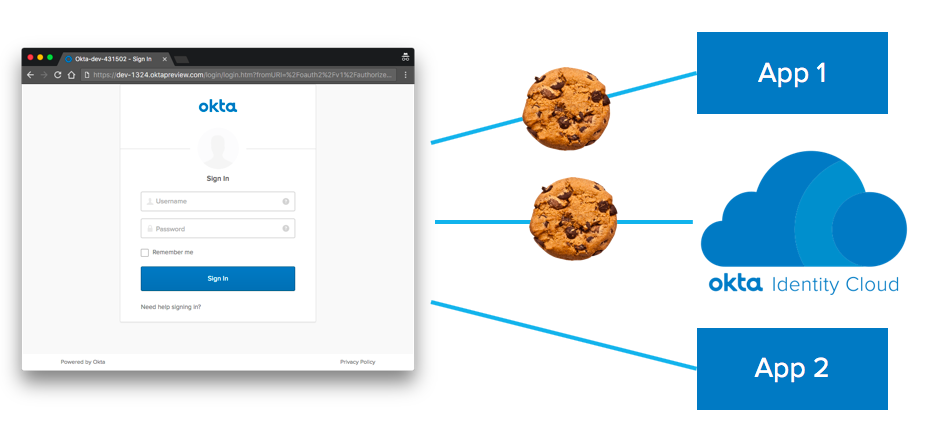
Let’s say that first you go to App 1 and click Log in. App 1 will redirect you to the Okta IdP (identity provider) where you sign in. After you sign in, a cookie will be set in your browser for Okta’s domain. This cookie keeps you signed in to Okta. Then Okta will redirect you back to App 1 with a token which it uses to complete the sign-in process. At this point, a cookie is also set for App 1’s domain. Here is a diagram to illustrate the state:

Next you open App 2 in another tab of the same browser. When you click Log in, you’re redirected to the Okta IdP again. But this time, because you still have a valid cookie, you’re already signed in at the IdP. So instead of showing you a sign-in screen, Okta just redirects you back to App 2 with the token that is needed to complete the local sign-in process. A cookie is set on App 2’s domain, and you’re logged in everywhere.
Note that single sign-out is not supported by Okta at the time of writing. If you sign out of App 1, App 1’s cookie will be removed, and there will be a quick call to the Okta IdP to remove the cookie there. But the cookie for App 2 will remain, and you’ll still be logged in at App 2 until you click Log out or the cookie expires. The default expiration is 30 days.
ASP.NET OpenID Connect Flows Explained
You may have noticed that when you were setting up the configuration for the MVC 5 app, you had to tick a checkbox to enable the Implicit (Hybrid) grant type, but for the .NET Core app, you didn’t.
When the OpenID Connect middleware was written for MVC 5 several years ago (a long time in the world of software), it implemented the OpenID Connect hybrid flow, which requires the IdP to send an authorization code and an identity token to the MVC 5 app when it redirects the user back to the app.
When the OpenID Connect middleware for .NET Core was written, it implemented the more secure authorization code flow. In this case, the IdP only returns an authorization code, and the middleware has to fetch the identity token through a back-channel request to the IdP. This means that the identity token is not exposed to the browser.
If you are passing any sensitive information in the identity token, be aware that in MVC 5 that token is passed back to the app via the browser, where it could be seen by curious users or malicious scripts. If you’re enabling SSO across .NET Core apps, this is not an issue.
#web-development #asp-net #dotnet #security
