Learn to build a secure realtime application using WebSockets and Node.js!
WebSockets is a technology for communicating between the client and the server in a web application, where an open socket creates a persistent connection between the client and the server. This method of communication works outside of the HTTP request/response paradigm that has existed since the earliest days of the internet. Since sockets don’t use HTTP they can eliminate the overhead that comes with HTTP for low latency communications.
In this tutorial, you will learn how to create a small chat room web application that will keep track of the users in the room and send messages using WebSockets. For the server, you will use Express on Node.js. Node.js is an event-driven JavaScript runtime that has made JavaScript one of the most popular back end languages. Express is the most popular web framework for Node.js. You will also learn how to set up Okta for authentication. To authenticate the socket communication, you will issue a JSON Web Token (JWT) to the client, and validate it when the client attempts to open the socket.
Create Your Okta App
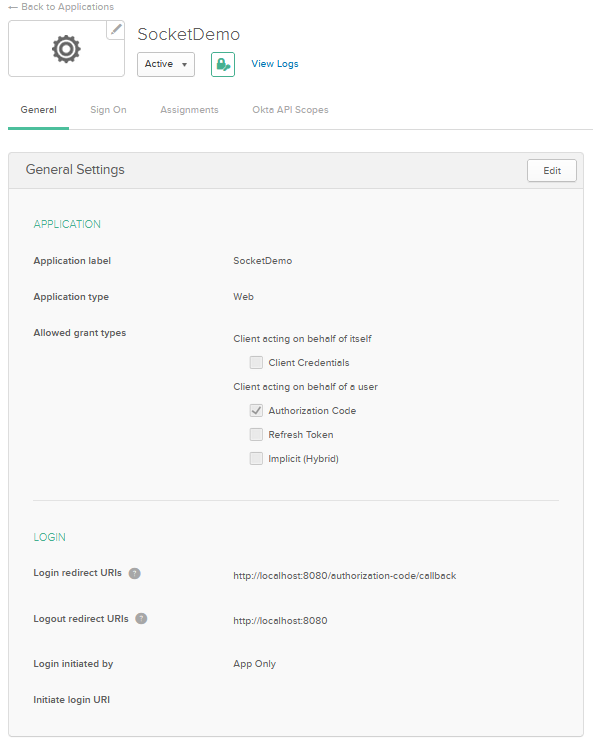
To use Okta for authentication, you will first need to set up a new application. (You will need a free Okta Developer account if you don’t already have one.) Head to the Okta Developer Console and select Applications then Add Application. On the next page, select Web and click Next. On the Application Settings page, give your application a meaningful name. I called my SocketDemo. For this application, you can leave everything else the same, as you will use port 8080 in your application. Click Done and you will be redirected to the settings page.

Make note of your Client ID and your Client Secret, since you will need this in your application.
Create Your Node.js Application
Start by opening your favorite IDE and use the command mkdir to create a folder for your project. Navigate to that folder and enter the command npm init. You will need to walk through the instructions that follow. Next, you will want to install your dependencies.
First, you will need Okta’s Node.js SDK and the OIDC middleware. These two packages make integrating Okta’s authentication into your application simple. It’s easy to configure the middleware, but you will do that later. For now, install the packages with the following commands.
npm i @okta/oidc-middleware@4.0.1
npm i @okta/okta-sdk-nodejs@4.1.0
Next, install dotenv, which will store and retrieve sensitive configuration without pushing this information to your source code repository.
npm i dotenv
Next, you will need to install Express.
npm i express@4.17.1
You will also need express-session to help manage your session state.
npm i express-session@1.17.1
Next, install jsonwebtoken to help create JWTs that you will issue to your client.
npm i jsonwebtoken@8.5.1
To manage the sockets, you will use socket.io. For validating the JWT in your socket management, you will use socketio-jwt. You will see later how these two connect to authenticate your socket requests.
npm i socket.io@2.3.0
npm i socketio-jwt@4.6.2
Finally, you will need pug. Pug is a view engine that was previously known as Jade.
npm i pug@3.0.0
Once you are all set up, add a new file to your root directory called .env. Add the following code to it. You can change your JWT_TOKEN_KEY to something more fitting if you wish.
OKTA_BASE_URL={yourOktaUrl}
OKTA_CLIENT_ID={yourClientId}
OKTA_CLIENT_SECRET={yourClientSecret}
APP_BASE_PORT=8080
APP_BASE_URL=http://localhost:8080
JWT_TOKEN_KEY=someverylongandveryrandomandverysecretkey
Write Your Server Code
Now you are ready to begin writing your server-side code. First, add a file to your root called index.js and add the following code.
"use strict";

require( "dotenv" ).config();

const server = require( "./server" );

const port = process.env.APP_BASE_PORT;

server.start( {
  port: port
} ).then( app => {
  console.log( "Application is now running on port " + port );
} );
This file serves as your entry point for the application. It starts the server by listening to the port defined in your .env file. It also calls the config() function on dotenv, which should be called as early as possible in your application.
Next, add a file called rooms.js.
"use strict";

module.exports = function () {
  let rooms = [];

  rooms.push( {
    name: "General",
    users: []
  } );

  rooms.push( {
    name: "Sports",
    users: []
  } );

  rooms.push( {
    name: "Music",
    users: []
  } );

  return rooms;
};
This file is just in-memory storage for your chatrooms. In a production application, you would want to connect this to some sort of persistent storage but this solution works fine for this demo. You start by providing three default rooms—General, Sports, and Music. Each room consists of a name and a list of users. The lists are empty when the application first starts but they will be populated as users visit each room. You could also keep a list of messages here so that new users could view the history.
Next, you can define your routes. Create a new file called routes.js and add the following code to it.
"use strict";

module.exports = function ( app, opts ) {

  function ensureAuthenticated ( request, response, next ) {
    if ( !request.userContext ) {
      return response.status( 401 ).redirect( "/account/login" );
    }

    next();
  }

  app.get( "", ( request, response, next ) => {
    return response.render( "home" );
  } );

  app.get( "/dashboard", ensureAuthenticated, ( request, response, next ) => {
    return response.render( "dashboard", {
      user: request.userContext.userinfo,
      rooms: opts.rooms
    } );
  } );

  app.get( "/chat/:room", ensureAuthenticated, ( request, response, next ) => {
    return response.render( "room", {
      jwt: opts.jwt.sign( { user: request.userContext.userinfo, room: request.params.room }, process.env.JWT_TOKEN_KEY ),
      room: opts.rooms.filter( ( r ) => r.name == request.params.room )[0]
    } );
  } );

  app.get( "/account/logout", ensureAuthenticated, ( request, response, next ) => {
    request.logout();
    response.redirect( "/" );
  } );

  app.get( "/account/login", ( request, response, next ) => {
    return response.render( "home" );
  } );
};
As you can see we are defining a few routes here. First is the home page, second is the Dashboard page which will be the landing page for authenticated users. To ensure a user is authenticated you add the ensureAuthenticated middleware function to the route. This function is defined above and simply returns a 401 for unauthenticated users and redirects them to the login page. The chat route looks for a route parameter called room. This means a user who navigates to ~/chat/General will land in the general chat room. This route also creates a JWT and passes it to the client, using the jsonwebtoken object that was injected into the routes. There is also a logout route for logging out. (The login route will be configured using Okta in the server setup later.)
Next, you need to set up your socket.js file to handle the socket communications. Create the file in your root and add the following code.
"use strict";

const socketioJwt = require( "socketio-jwt" );

module.exports = function ( io, opts ) {

  io.sockets.on( "connection", socketioJwt.authorize( {
    secret: process.env.JWT_TOKEN_KEY,
    timeout: 15000 // 15 seconds to send the authentication message
  } ) ).on( "authenticated", function ( socket ) {
    socket.on( "entered", () => {

      let user = socket.decoded_token.user.name;
      let room = socket.decoded_token.room;

      opts.rooms.filter( ( r ) => r.name === room )[0].users.push( user );
      socket.join( room );

      io.to( room ).emit( "user entered", user );
    } );

    socket.on( "message sent", ( message ) => {
      let user = socket.decoded_token.user.name;
      let room = socket.decoded_token.room;

      io.to( room ).emit( "message received", user, message );
    } );

    socket.on( "disconnect", () => {
      let user = socket.decoded_token.user.name;
      let room = socket.decoded_token.room;

      opts.rooms.filter( ( r ) => r.name === room )[0].users.splice( user, 1 );

      io.to( room ).emit( "user exited", user );
    } );

    let users = [];

    users.push( {
      user: "test"
    } );

    socket.emit( "welcome", users );

  } );

};
Here you are using socketio-jwt to decode the JWT you passed to the client when the user enters the room. A JWT is a token whose payload holds some information representing claims to be sent to the server. The JWT can be signed or encrypted and then validated by the server to ensure their validity. Once established, the server can read the claims from the token and decide the proper course of action. You can send the JWT with the request to the server to ensure the sender of the request is authorized to perform the requested action.
(Note, you can read more about an alternative approach using Okta as an authentication server a, where you authenticate the user when they reach a room.)
The socket.js file also has the logic for receiving and sending messages as well as handling users entering and leaving the room. When a user enters or leaves, you add or remove them from the room’s user list and broadcast to the room that the user has left. The client side is responsible for displaying that information to the user.
Finally, to tie it all together you need to add a server.js file.
"use strict";

const express = require( "express" );
const bodyParser = require( "body-parser" );
const path = require( "path" );

const ExpressOIDC = require( "@okta/oidc-middleware" ).ExpressOIDC;
const session = require( "express-session" );
let jwt = require( "jsonwebtoken" );

const routes = require( "./routes" );
const sockets = require( "./socket" );

const start = function ( options ) {
  return new Promise( function ( resolve, reject ) {
    process.on( "unhandledRejection", ( reason, p ) => {
      console.log( "Unhandled Rejection at: Promise", p, "reason:", reason );
    } );

    if ( !options.port ) {
      reject( new Error( "no port specificed" ) );
    }

    const app = express();
    const http = require( "http" ).createServer( app );
    const io = require( "socket.io" )( http );

    var rooms = [];

    app.use( express.static( "public" ) );
    app.set( "views", path.join( __dirname, "/public/views" ) );
    app.set( "view engine", "pug" );

    app.use( bodyParser.urlencoded( { extended: false } ) );

    app.use( function ( error, request, response, next ) {
      console.log( error );
      reject( new Error( "something went wrong" + error ) );
      response.status( 500 ).send( "something went wrong" );
    } );

    const oidc = new ExpressOIDC( {
      issuer: process.env.OKTA_BASE_URL + "/oauth2/default",
      client_id: process.env.OKTA_CLIENT_ID,
      client_secret: process.env.OKTA_CLIENT_SECRET,
      appBaseUrl: process.env.APP_BASE_URL,
      scope: "openid profile",
      routes: {
        login: {
          path: "/users/login",
        },
        callback: {
          path: "/authorization-code/callback",
        },
        loginCallback: {
          afterCallback: "/dashboard",
        },
      },
    } );

    app.use(
      session( {
        secret:
          "asd;skdvmfebvoswmvlkmes';lvmsdlfbvmsbvoibvms'dplvmdmaspviresmpvmrae';vm'psdemr",
        resave: true,
        saveUninitialized: false,
      } )
    );

    app.use( oidc.router );

    var rooms = require( "./rooms" )();

    routes( app, {
      rooms: rooms,
      jwt: jwt
    } );

    sockets( io, {
      rooms: rooms
    } );

    const server = http.listen( options.port, function () {
      resolve( server );
    } );
  } );
};

module.exports = Object.assign( {}, { start } );
This file does a lot of the legwork getting the application set up. When the server is started, it registers your various middleware and dependencies. This includes the Okta middleware, which uses the variables in your .env file. It will register the route /users/login as the login page. This page is hosted by Okta and will manage the authentication for you.
#node #websockets #javascript #express #developer
