Build a CMS with Laravel and Vue
Build a CMS with Laravel and Vue - Part 1: Setting up
The birth of the internet has since redefined content accessibility for the better, causing a distinct rise in content consumption across the globe. The average user of the internet consumes and produces some form of content formally or informally.
An example of an effort at formal content creation is when an someone makes a blog post about their work so that a targeted demographic can easily find their website. This type of content is usually served and managed by a CMS (Content Management System). Some popular ones are WordPress, Drupal, and SilverStripe.
A CMS helps content creators produce content in an easily consumable format. In this tutorial series, we will consider how to build a simple CMS from scratch using Laravel and Vue.
Our CMS will be able to make new posts, update existing posts, delete posts that we do not need anymore, and also allow users make comments to posts which will be updated in realtime using Pusher. We will also be able to add featured images to posts to give them some visual appeal.
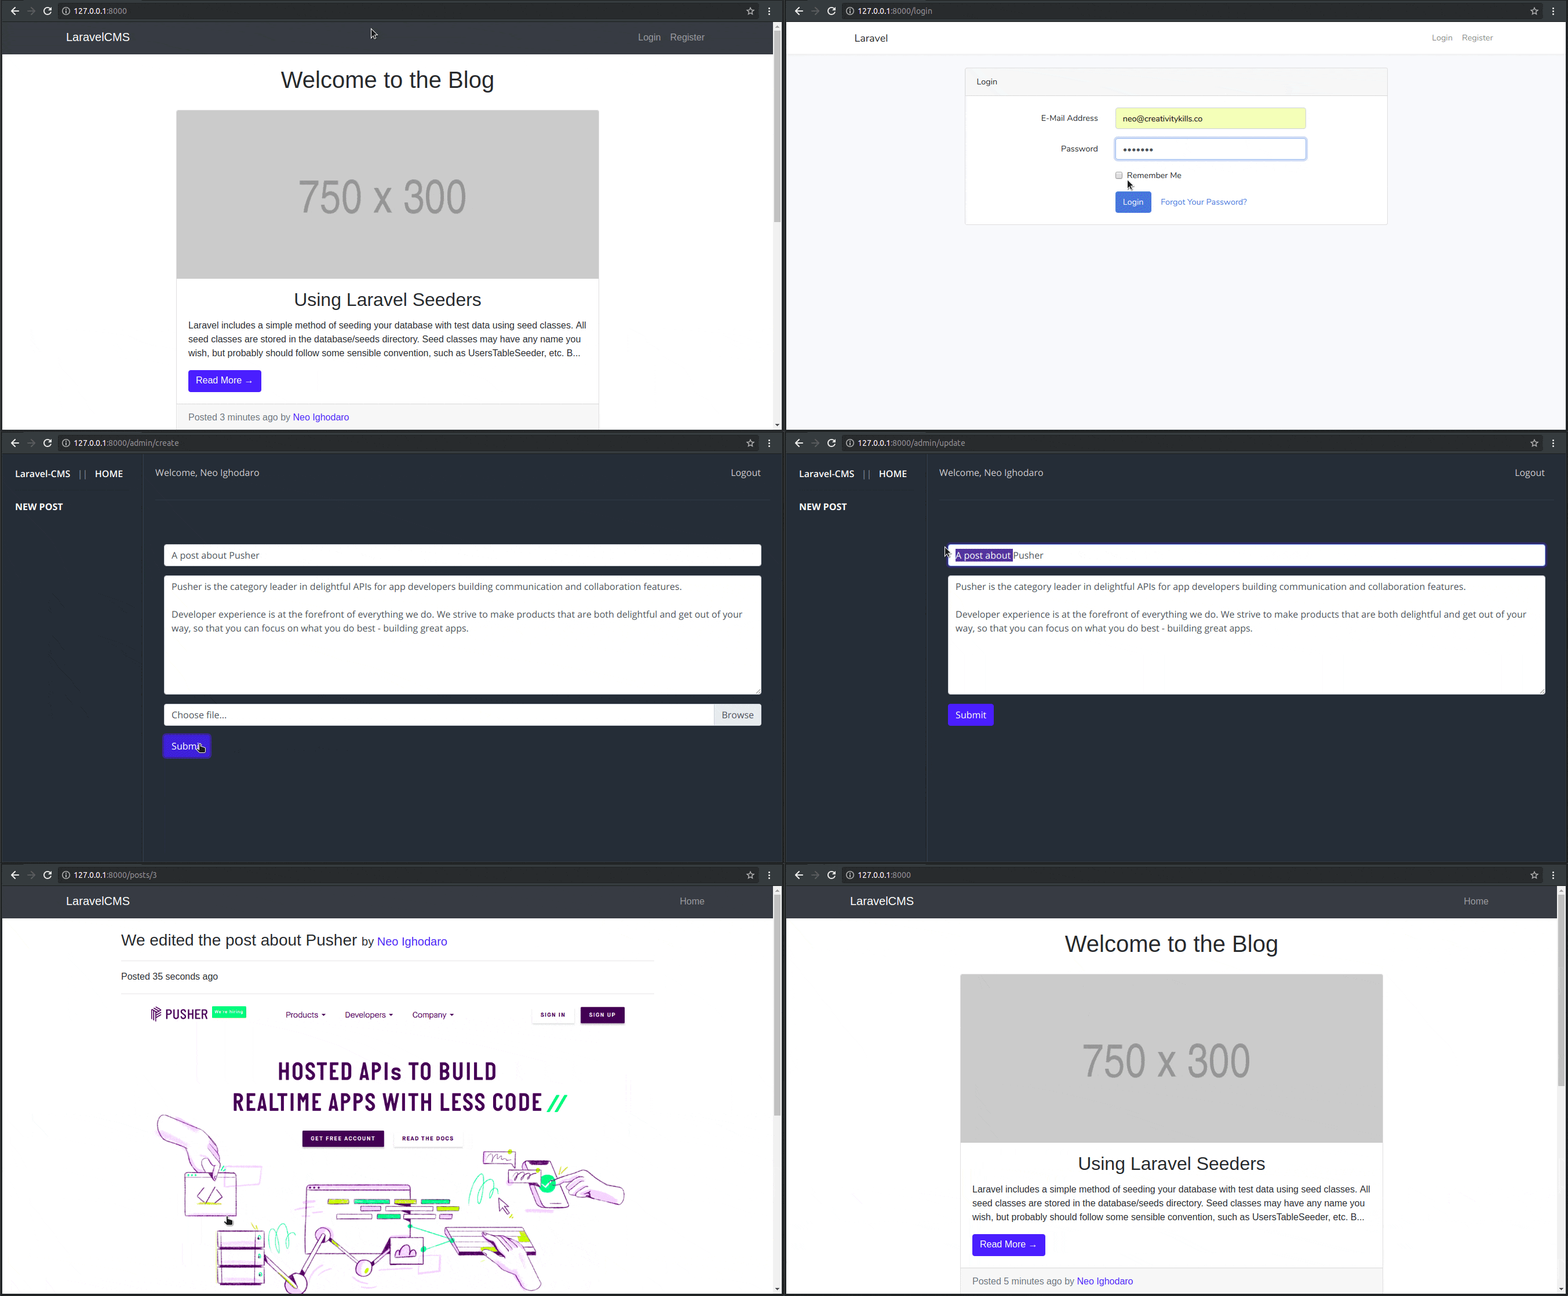
When we are done, we will be able to have a CMS that looks like this:
Prerequisites
To follow along with this series, a few things are required:
- Basic knowledge of PHP.
- Basic knowledge of the Laravel framework.
- Basic knowledge of JavaScript (ES6 syntax).
- Basic knowledge of Vue.
- Postman installed on your machine.
The source code for this project is available here on GitHub.
Installing the Laravel CLI
If you already have the Laravel CLI installed on your machine, please skip this section.
The first thing we need to do is install the Laravel CLI, and the Laravel dependencies. The CLI will be instrumental in creating new Laravel projects whenever we need to create one. Laravel requires PHP and a few other tools and extensions, so we need to first install these first before installing the CLI.
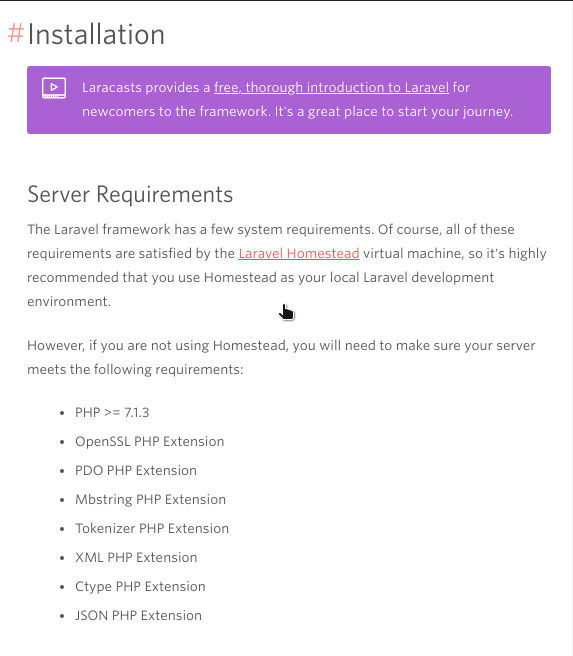
Here’s a list of the dependencies as documented on the official Laravel documentation:
Let’s install them one at a time.
Installing PHP
An equivalent for Windows users could be to download and install XAMPP here. XAMPP comes with a UI for installing most of the other things you have to install manually below. Hence, Windows users may skip the next few steps until the Installing Composer sub-heading.
Open a fresh instance of the terminal and paste the following command:
    # Linux Users
    $ sudo apt-get install php7.2

    # Mac users
    $ brew install php72
As at the time of writing this article, PHP 7.2 is the latest stable version of PHP so the command above installs it on your machine.
On completion, you can check that PHP has been installed to your machine with the following command:
$ php -v
Installing the Mbstring extension
To install the mbstring extension for PHP, paste the following command in the open terminal:
    # Linux users
    $ sudo apt-get install php7.2-mbstring

    # Mac users
    # You don't have to do anything as it is installed automatically.
To check if the mbstring extension has been installed successfully, you can run the command below:
$ php -m | grep mbstring
Installing the XML PHP extension
To install the XML extension for PHP, paste the following command in the open terminal:
    # Linux users
    $ sudo apt-get install php-xml

    # Mac users
    # You don't have to do anything as it is installed automatically.
To check if the xml extension has been installed successfully, you can run the command below:
$ php -m | grep xml
Installing the ZIP PHP extension
To install the zip extension for PHP, paste the following command in your terminal:
    # Linux users
    $ sudo apt-get install php7.2-zip

    # Mac users
    # You don't have to do anything as it is installed automatically.
To check if the zip extension has been installed successfully, you can run the command below:
$ php -m | grep zip
Installing curl
Windows users may need to download curl from here.
To install curl, paste the following command in your terminal:
    # Linux users
    $ sudo apt-get install curl

    # Mac users using Homebrew (https://brew.sh)
    $ brew install curl
To verify that curl has been installed successfully, run the following command:
$ curl --version
Installing Composer
Windows users can download and install Composer here. After the installation is complete, start a fresh instance of the command prompt as administrator and run this command anytime you need composer:
php composer.phar
Now that we have curl installed on our machine, let’s pull in Composer with this command:
$ curl -sS https://getcomposer.org/installer | sudo php -- --install-dir=/usr/local/bin --filename=composer
For us to run Composer in the future without calling sudo, we may need to change the permission, however you should only do this if you have problems installing packages:
$ sudo chown -R $USER ~/.composer/
Installing the Laravel installer
At this point, we can already create a new Laravel project using Composer’s create-project command, which looks like this:
$ composer create-project --prefer-dist laravel/laravel project-name
But we will go one step further and install the Laravel installer using composer:
$ composer global require "laravel/installer"
If you are on Windows, you may need to run the previous command in an advanced terminal such as PowerShell or the Gitbash terminal. Windows users can also skip the steps below.
After the installation, we will need to add the PATH to the bashrc file so that our terminal can recognize the laravel command:
    $ echo 'export PATH="$HOME/.composer/vendor/bin:$PATH"' >> ~/.bashrc
    $ source ~/.bashrc
Creating the CMS project
Now that we have the official Laravel CLI installed on our machine, let’s create our CMS project using the installer. In your terminal window, cd to the project directory you want to create the project in and run the following command:
$ laravel new cms
At the time of writing this article, the latest version of Laravel is 5.6
We will navigate into the project directory and serve the application using PHP’s web server:
    $ cd cms
    $ php artisan serve
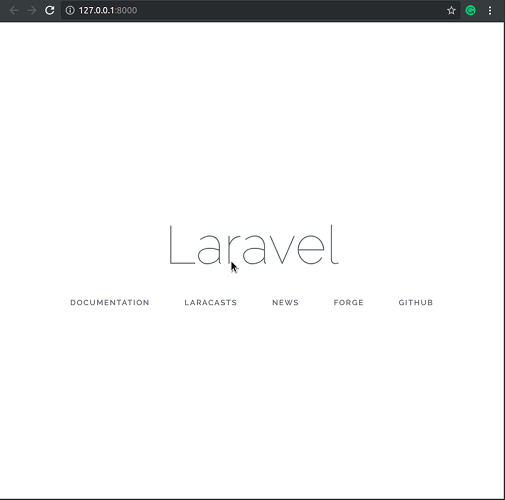
Now, when we visit http://127.0.0.1:8000/, we will see the default Laravel template:
Setting up the database
In this series, we will be using MySQL as our database system so a prerequisite for this section is that you have MySQL installed on your machine.
You can follow the steps below to install and configure MySQL:
- Linux users - check here for a detailed guide.
- Mac users, you can just run the command
brew install mysql. - Windows users who installed XAMPP, as suggested earlier, do not need to install MySQL as it comes preinstalled.
You will also need a special driver that makes it possible for PHP to work with MySQL, you can install it with this command:
    # Linux users
    $ sudo apt-get install php7.2-mysql

    # Mac Users
    # You don't have to do anything as it is installed automatically.
Load the project directory in your favorite text editor and there should be a .env file in the root of the folder. This is where Laravel stores its environment variables.
Create a new MySQL database and call it laravelcms. In the .env file, update the database configuration keys as seen below:
    DB_CONNECTION=mysql
    DB_HOST=127.0.0.1
    DB_PORT=3306
    DB_DATABASE=laravelcms
    DB_USERNAME=YourUsername
    DB_PASSWORD=YourPassword
Replace the
DB_USERNAMEandDB_PASSWORDwith your MySQL database credentials.
Setting up user roles
Like most content management systems, we are going to have a user role system so that our blog can have multiple types of users; the admin and regular user. The admin should be able to create a post and perform other CRUD operations on a post. The regular user, on the other hand, should be able to view and comment on a post.
For us to implement this functionality, we need to implement user authentication and add a simple role authorization system.
Setting up user authentication
Laravel provides user authentication out of the box, which is great, and we can key into the feature by running a single command:
$ php artisan make:auth
The above will create all that’s necessary for authentication in our application so we do not need to do anything extra.
Setting up role authorization
We need a model for the user roles so let’s create one and an associated migration file:
$ php artisan make:model Role -m
In the database/migrations folder, find the newly created migration file and update the CreateRolesTable class with this snippet:
    <?php // File: ./database/migrations/*_create_roles_table.php

    // [...]

    class CreateRolesTable extends Migration
    {
        public function up()
        {
            Schema::create('roles', function (Blueprint $table) {
                $table->increments('id');
                $table->string('name');
                $table->string('description');
                $table->timestamps();
            });
        }

        public function down()
        {
            Schema::dropIfExists('roles');
        }
    }
We intend to create a many-to-many relationship between the User and Role models so let’s add a relationship method on both models.
Open the User model and add the following method:
    // File: ./app/User.php
    public function roles()
    {
        return $this->belongsToMany(Role::class);
    }
Open the Role model and include the following method:
    // File: ./app/Role.php
    public function users()
    {
        return $this->belongsToMany(User::class);
    }
We are also going to need a pivot table to associate each user with a matching role so let’s create a new migration file for the role_user table:
$ php artisan make:migration create_role_user_table
In the database/migrations folder, find the newly created migration file and update the CreateRoleUserTable class with this snippet:
    // File: ./database/migrations/*_create_role_user_table.php
    <?php

    // [...]

    class CreateRoleUserTable extends Migration
    {

        public function up()
        {
            Schema::create('role_user', function (Blueprint $table) {
                $table->increments('id');
                $table->integer('role_id')->unsigned();
                $table->integer('user_id')->unsigned();
            });
        }

        public function down()
        {
            Schema::dropIfExists('role_user');
        }
    }
Next, let’s create seeders that will populate the users and roles tables with some data. In your terminal, run the following command to create the database seeders:
    $ php artisan make:seeder RoleTableSeeder
    $ php artisan make:seeder UserTableSeeder
In the database/seeds folder, open the RoleTableSeeder.php file and replace the contents with the following code:
    // File: ./database/seeds/RoleTableSeeder.php
    <?php

    use App\Role;
    use Illuminate\Database\Seeder;

    class RoleTableSeeder extends Seeder
    {
        public function run()
        {
            $role_regular_user = new Role;
            $role_regular_user->name = 'user';
            $role_regular_user->description = 'A regular user';
            $role_regular_user->save();

            $role_admin_user = new Role;
            $role_admin_user->name = 'admin';
            $role_admin_user->description = 'An admin user';
            $role_admin_user->save();
        }
    }
Open the UserTableSeeder.php file and replace the contents with the following code:
    // File: ./database/seeds/UserTableSeeder.php
    <?php

    use Illuminate\Database\Seeder;
    use Illuminate\Support\Facades\Hash;
    use App\User;
    use App\Role;

    class UserTableSeeder extends Seeder
    {

        public function run()
        {
            $user = new User;
            $user->name = 'Samuel Jackson';
            $user->email = 'samueljackson@jackson.com';
            $user->password = bcrypt('samuel1234');
            $user->save();
            $user->roles()->attach(Role::where('name', 'user')->first());

            $admin = new User;
            $admin->name = 'Neo Ighodaro';
            $admin->email = 'neo@creativitykills.co';
            $admin->password = bcrypt('neo1234');
            $admin->save();
            $admin->roles()->attach(Role::where('name', 'admin')->first());
        }
    }
We also need to update the DatabaseSeeder class. Open the file and update the run method as seen below:
    // File: ./database/seeds/DatabaseSeeder.php
    <?php

    // [...]

    class DatabaseSeeder extends Seeder
    {
        public function run()
        {
            $this->call([
                RoleTableSeeder::class,
                UserTableSeeder::class,
            ]);
        }
    }
Next, let’s update the User model. We will be adding a checkRoles method that checks what role a user has. We will return a 404 page where a user doesn’t have the expected role for a page. Open the User model and add these methods:
    // File: ./app/User.php
    public function checkRoles($roles)
    {
        if ( ! is_array($roles)) {
            $roles = [$roles];
        }

        if ( ! $this->hasAnyRole($roles)) {
            auth()->logout();
            abort(404);
        }
    }

    public function hasAnyRole($roles): bool
    {
        return (bool) $this->roles()->whereIn('name', $roles)->first();
    }

    public function hasRole($role): bool
    {
        return (bool) $this->roles()->where('name', $role)->first();
    }
Let’s modify the RegisterController.php file in the Controllers/Auth folder so that a default role, the user role, is always attached to a new user at registration.
Open the RegisterController and update the create action with the following code:
    // File: ./app/Http/Controllers/Auth/RegisterController.php
    protected function create(array $data)
    {
        $user = User::create([
            'name'     => $data['name'],
            'email'    => $data['email'],
            'password' => bcrypt($data['password']),
        ]);

        $user->roles()->attach(\App\Role::where('name', 'user')->first());

        return $user;
    }
Now let’s migrate and seed the database so that we can log in with the sample accounts. To do this, run the following command in your terminal:
$ php artisan migrate:fresh --seed
In order to test that our roles work as they should, we will make an update to the HomeController.php file. Open the HomeController and update the index method as seen below:
    // File: ./app/Http/Controllers/HomeController.php
    public function index(Request $request)
    {
        $request->user()->checkRoles('admin');

        return view('home');
    }
Now, only administrators should be able to see the dashboard. In a more complex application, we would use a middleware to do this instead.
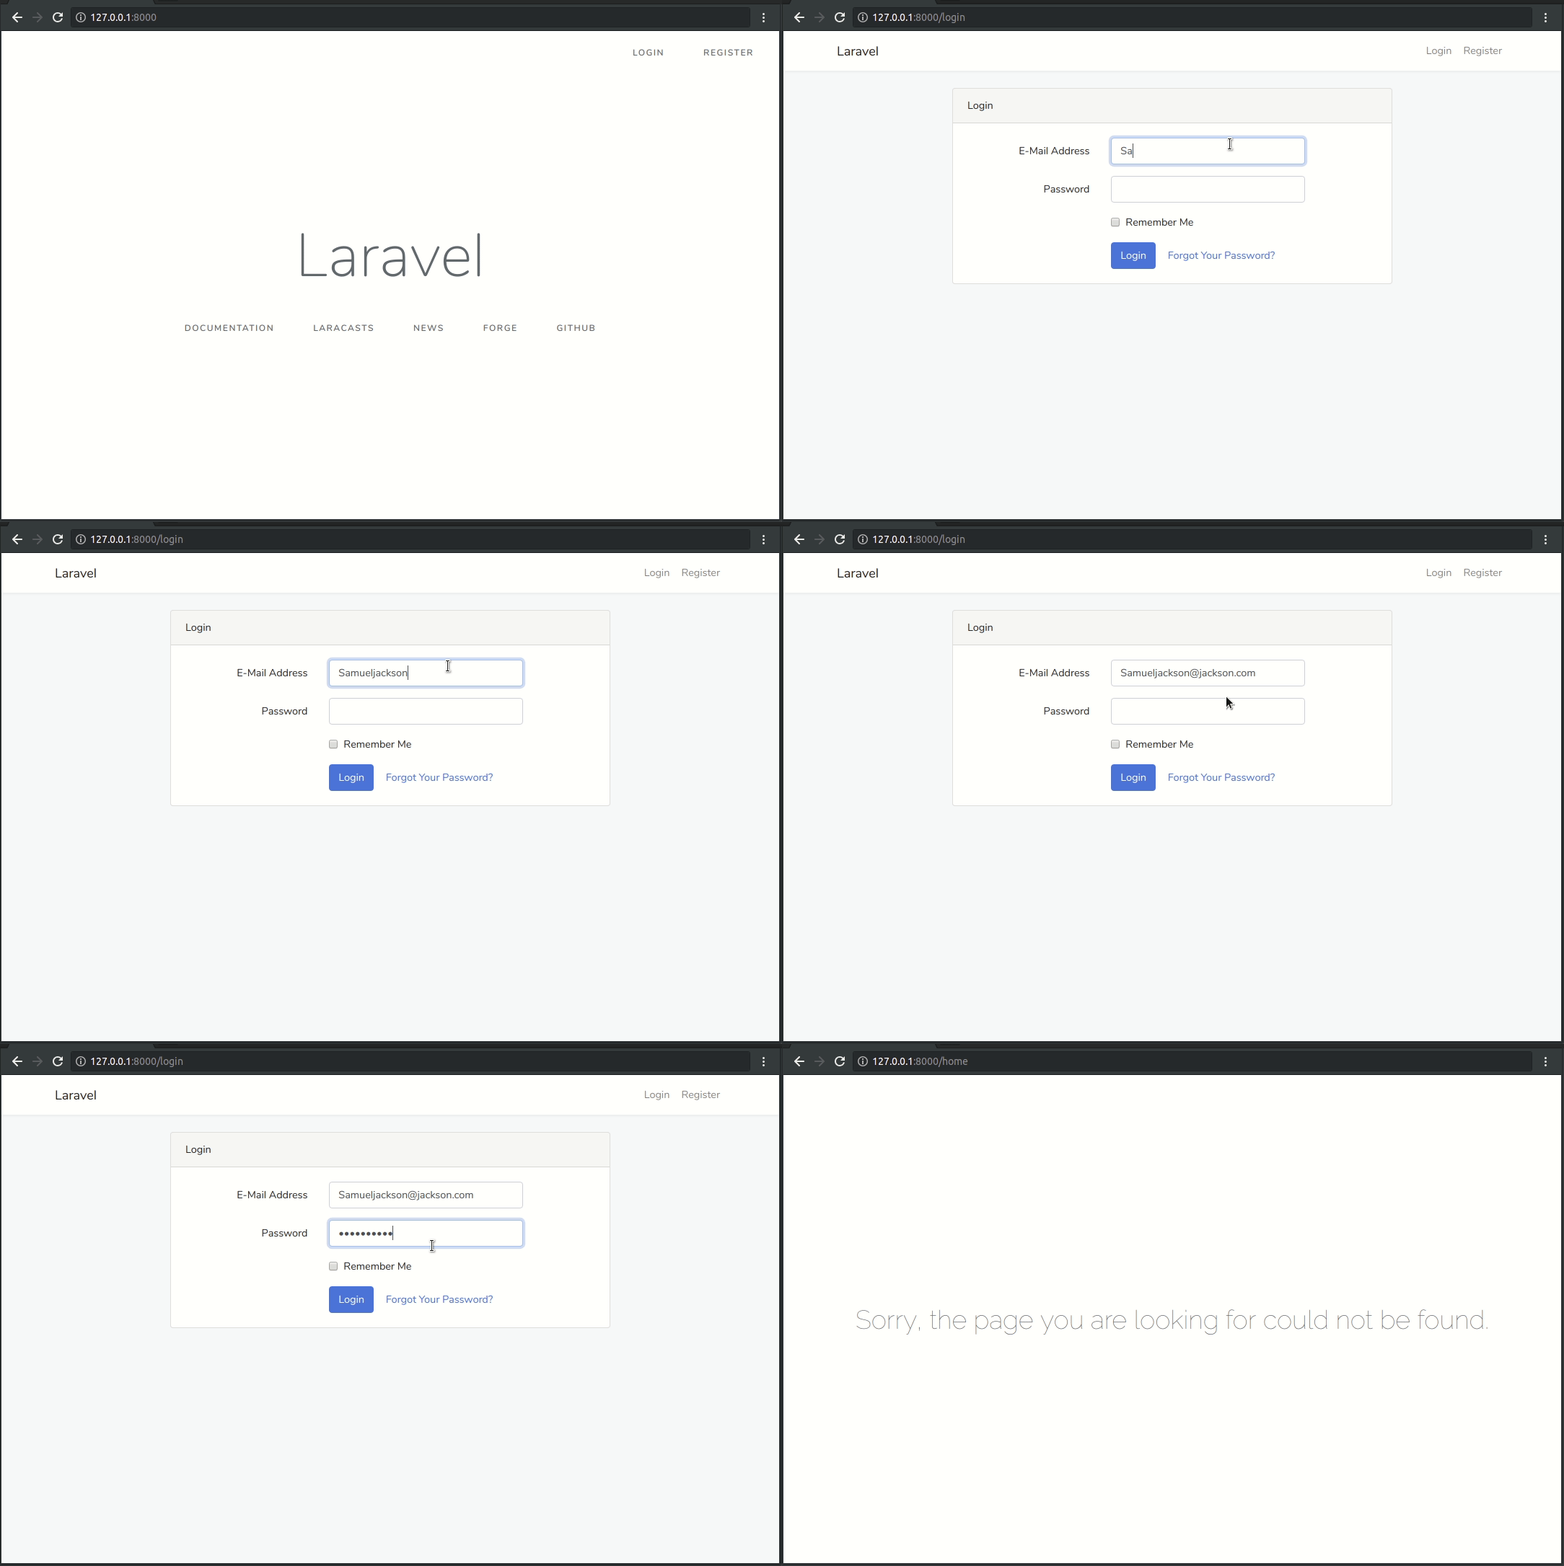
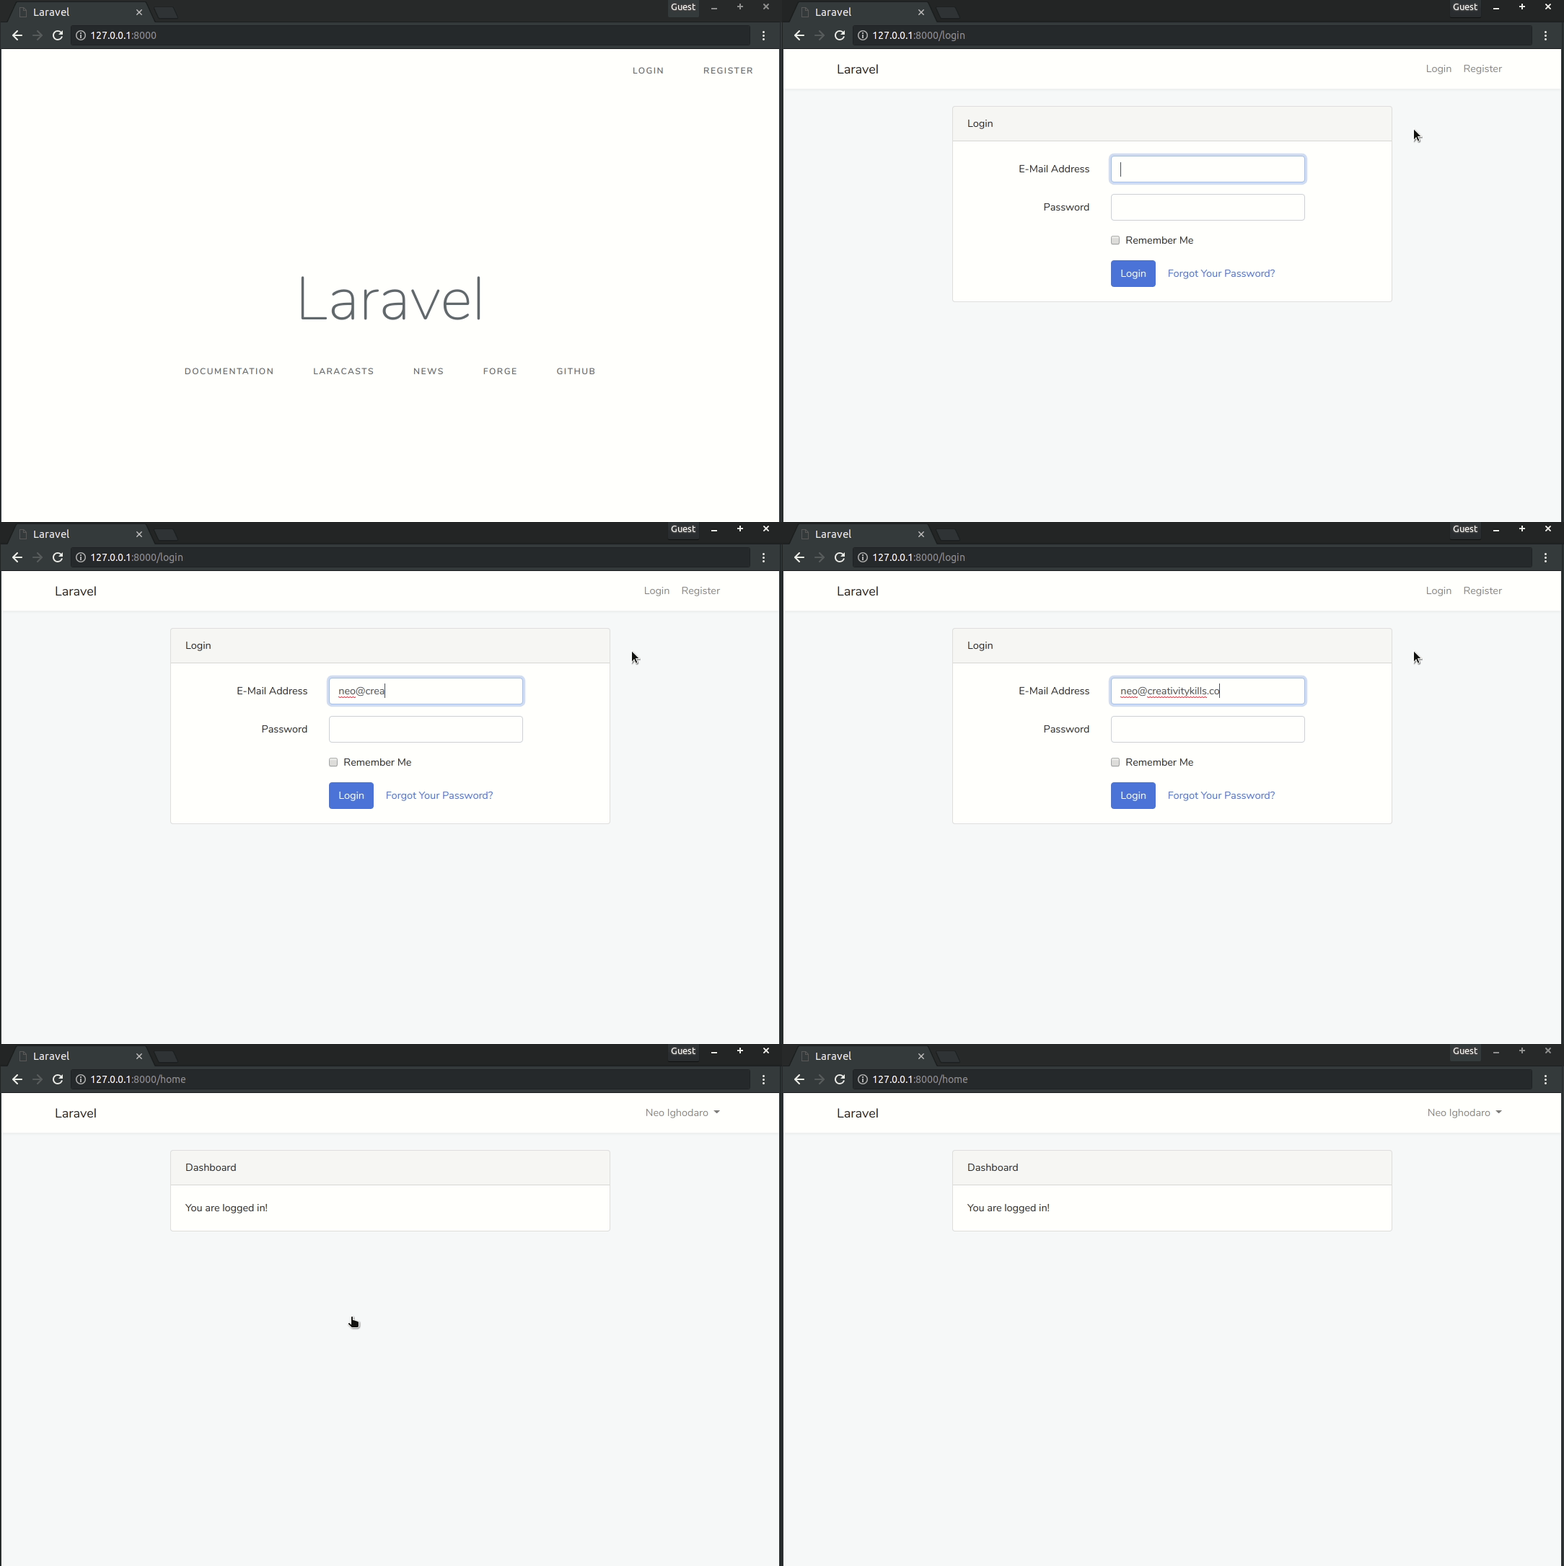
We can test that this works by serving the application and logging in both user accounts; Samuel Jackson and Neo Ighodaro.
Remember that in our UserTableSeeder.php file, we defined Samuel as a regular user and Neo as an admin, so Samuel should see a 404 error after logging in and Neo should be able to see the homepage.
Testing the application
Let’s serve the application with this command:
$ php artisan serve
When we try logging in with Samuel’s credentials, we should see this:
On the other hand, we will get logged in with Neo’s credentials because he has an admin account:
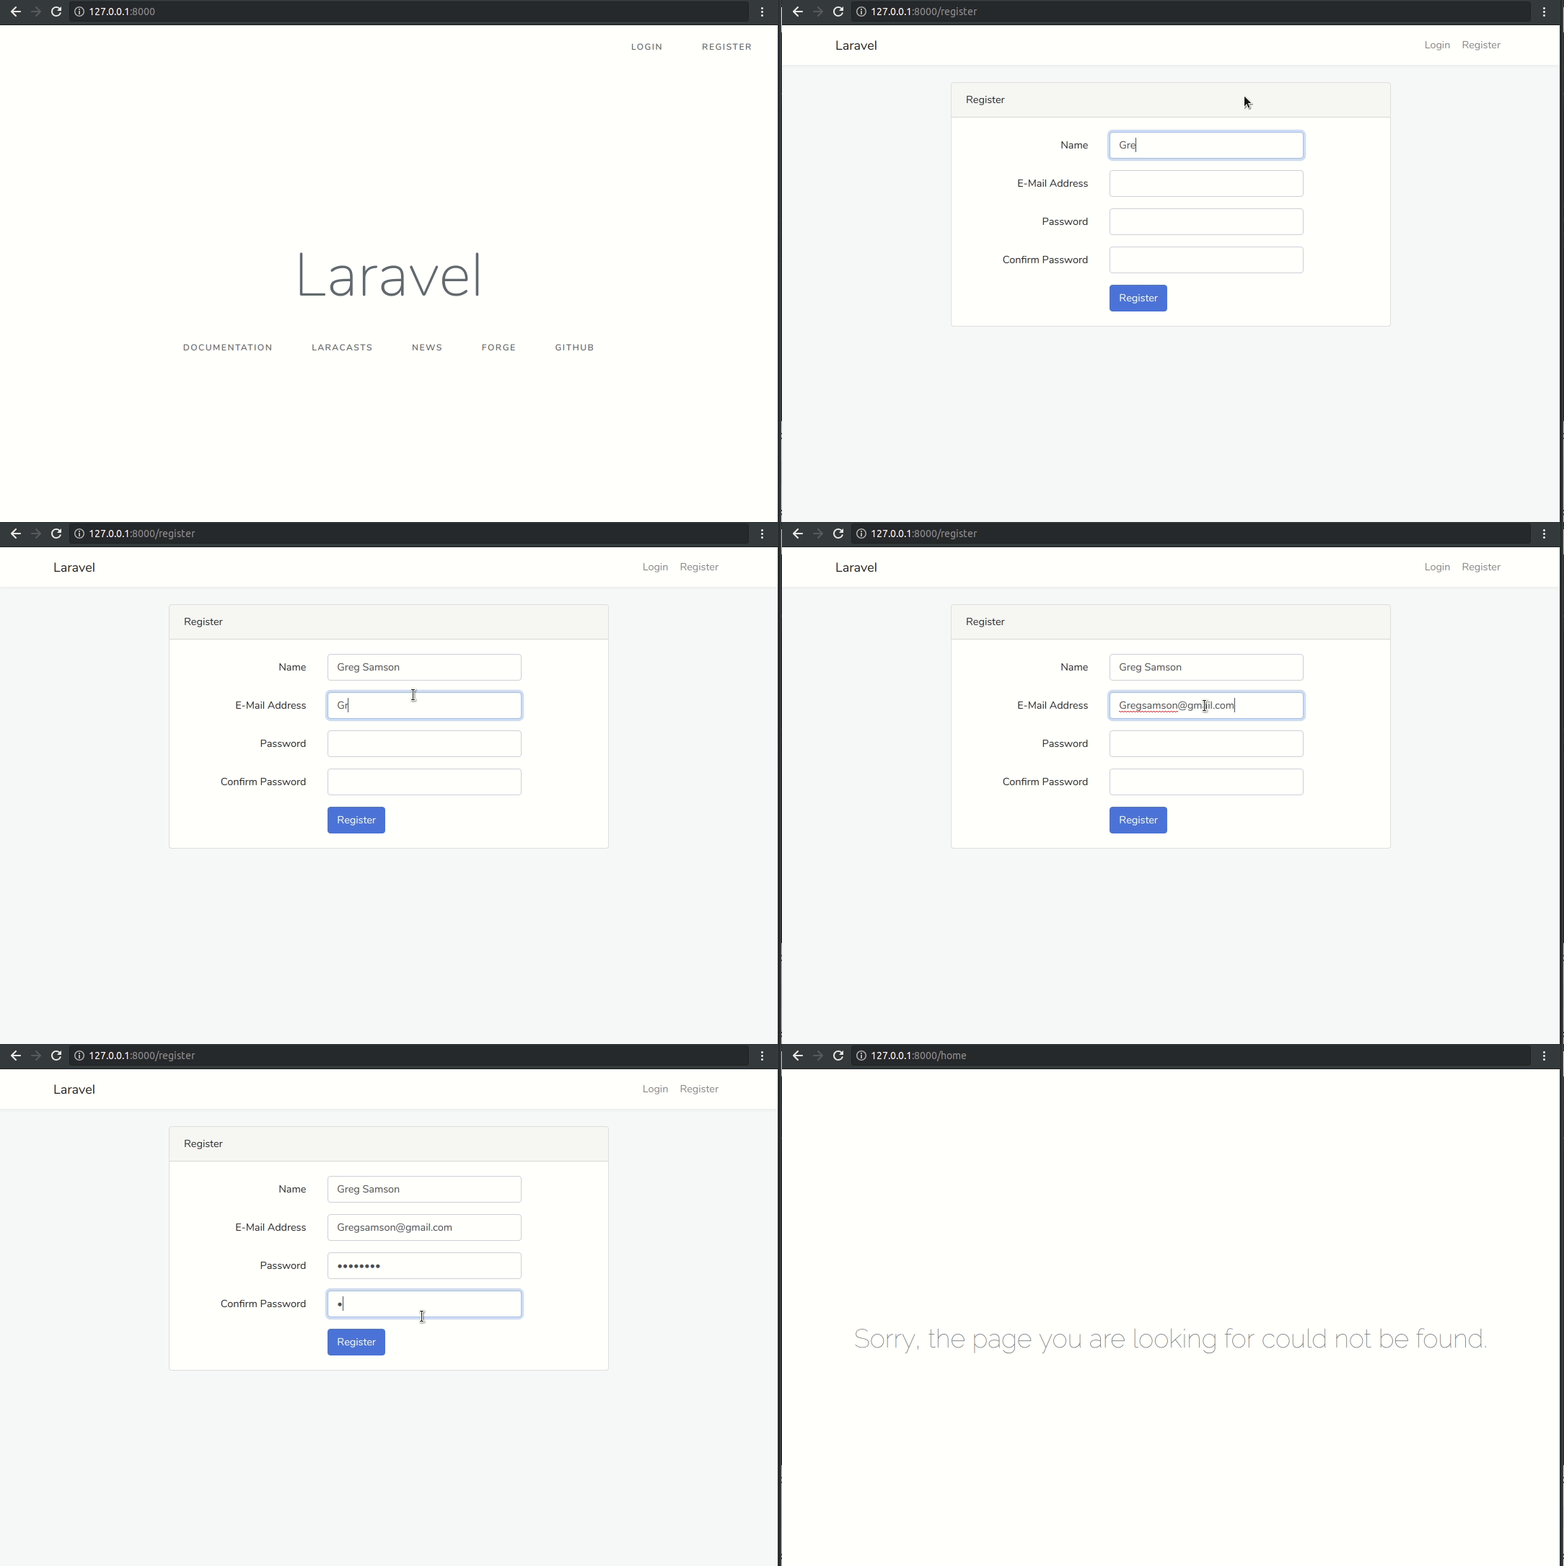
We will also confirm that whenever a new user registers, he is assigned a role and it is the role of a regular user. We will create a new user and call him Greg, he should see a 404 error right after:
It works just as we wanted it to, however, it doesn’t really make any sense for us to redirect a regular user to a 404 page. Instead, we will edit the HomeController so that it redirects users based on their roles, that is, it redirects a regular user to a regular homepage and an admin to an admin dashboard.
Open the HomeController.php file and update the index method as seen below:
    // File: ./app/Http/Controllers/HomeController.php
    public function index(Request $request)
    {
        if ($request->user()->hasRole('user')) {
            return redirect('/');
        }

        if ($request->user()->hasRole('admin')){
            return redirect('/admin/dashboard');
        }
    }
If we serve our application and try to log in using the admin account, we will hit a 404 error because we do not have a controller or a view for the admin/dashboard route. In the next article, we will start building the basic views for the CMS.
Conclusion Part 1
In this tutorial, we learned how to install a fresh Laravel app on our machine and pulled in all the needed dependencies. We also learned how to configure the Laravel app to work with a MySQL database. We also created our models and migrations files and seeded the database using database seeders.
In the next part of this series, we will start building the views for the application.
The source code for this project is available on Github.
Build a CMS with Laravel and Vue - Part 2: Implementing posts
In the previous part of this series, we set up user authentication and role authorization but we didn’t create any views for the application yet. In this section, we will create the Post model and start building the frontend for the application.
Our application allows different levels of accessibility for two kinds of users; the regular user and admin. In this chapter, we will focus on building the view that the regular users are permitted to see.
Before we build any views, let’s create the Post model as it is imperative to rendering the view.
The source code for this project is available here on GitHub.
Prerequisites
To follow along with this series, a few things are required:
- Basic knowledge of PHP.
- Basic knowledge of the Laravel framework.
- Basic knowledge of JavaScript (ES6 syntax).
- Basic knowledge of Vue.
- Postman installed on your machine.
Setting up the Post model
We will create the Post model with an associated resource controller and a migration file using this command:
$ php artisan make:model Post -mr
We added the
rflag because we want the controller to be a resource controller. Themflag will generate a migration for the model.
Let’s navigate into the database/migrations folder and update the CreatePostsTable class that was generated for us:
    // File: ./app/database/migrations/*_create_posts_table.php
    <?php

    // [...]

    class CreatePostsTable extends Migration
    {
        public function up()
        {
            Schema::create('posts', function (Blueprint $table) {
                $table->increments('id');
                $table->integer('user_id')->unsigned();
                $table->string('title');
                $table->text('body');
                $table->binary('image')->nullable();
                $table->timestamps();
            });
        }

        public function down()
        {
            Schema::dropIfExists('posts');
        }
    }
We included a user_id property because we want to create a relationship between the User and Post models. A Post also has an image field, which is where its associated image’s address will be stored.
Creating a database seeder for the Post table
We will create a new seeder file for the posts table using this command:
$ php artisan make:seeder PostTableSeeder
Let’s navigate into the database/seeds folder and update the PostTableSeeder.php file:
    // File: ./app/database/seeds/PostsTableSeeder.php
    <?php

    use App\Post;
    use Illuminate\Database\Seeder;

    class PostTableSeeder extends Seeder
    {
        public function run()
        {
            $post = new Post;
            $post->user_id = 2;
            $post->title = "Using Laravel Seeders";
            $post->body = "Laravel includes a simple method of seeding your database with test data using seed classes. All seed classes are stored in the database/seeds directory. Seed classes may have any name you wish, but probably should follow some sensible convention, such as UsersTableSeeder, etc. By default, a DatabaseSeeder class is defined for you. From this class, you may use the  call method to run other seed classes, allowing you to control the seeding order.";
            $post->save();

            $post = new Post;
            $post->user_id = 2;
            $post->title = "Database: Migrations";
            $post->body = "Migrations are like version control for your database, allowing your team to easily modify and share the application's database schema. Migrations are typically paired with Laravel's schema builder to easily build your application's database schema. If you have ever had to tell a teammate to manually add a column to their local database schema, you've faced the problem that database migrations solve.";
            $post->save();
        }
    }
When we run this seeder, it will create two new posts and assign both of them to the admin user whose ID is 2. We are attaching both posts to the admin user because the regular users are only allowed to view posts and make comments; they can’t create a post.
Let’s open the DatabaseSeeder and update it with the following code:
    // File: ./app/database/seeds/DatabaseSeeder.php
    <?php

    use Illuminate\Database\Seeder;

    class DatabaseSeeder extends Seeder
    {
        public function run()
        {
            $this->call([
                RoleTableSeeder::class,
                UserTableSeeder::class,
                PostTableSeeder::class,
            ]);
        }
    }
We created the
RoleTableSeederandUserTableSeederfiles in the previous chapter.
We will use this command to migrate our tables and seed the database:
$ php artisan migrate:fresh --seed
Defining the relationships
Just as we previously created a many-to-many relationship between the User and Role models, we need to create a different kind of relationship between the Post and User models.
We will define the relationship as a one-to-many relationship because a user will have many posts but a post will only ever belong to one user.
Open the User model and include the method below:
    // File: ./app/User.php
    public function posts()
    {
        return $this->hasMany(Post::class);
    }
Open the Post model and include the method below:
    // File: ./app/Post.php
    public function user()
    {
        return $this->belongsTo(User::class);
    }
Setting up the routes
At this point in our application, we do not have a front page with all the posts listed. Let’s create so anyone can see all of the created posts. Asides from the front page, we also need a single post page in case a user needs to read a specific post.
Let’s include two new routes to our routes/web.php file:
- The first route will match requests to the root of our application and will be handled by the
PostController@allaction:
Route::get('/', 'PostController@all');
In the
routes/web.phpfile, there will already be a route definition for the/address, you will have to replace it with the new route definition above.
- The second route will handle requests for specific
Postitems and will be handled by thePostController@singleaction:
Route::get('/posts/{post}', 'PostController@single');
With these two new routes added, here’s what the routes/web.php file should look like this:
    // File: ./routes/web.php
    <?php

    Auth::routes();
    Route::get('/posts/{post}', 'PostController@single');
    Route::get('/home', 'HomeController@index')->name('home');
    Route::get('/', 'PostController@all');
Setting up the Post controller
In this section, we want to define the handler action methods that we registered in the routes/web.php file so that our application know how to render the matching views.
First, let’s add the all() method:
    // File: ./app/Http/Controllers/PostController.php
    public function all()
    {
        return view('landing', [
            'posts' => Post::latest()->paginate(5)
        ]);
    }
Here, we want to retrieve five created posts per page and send to the landing view. We will create this view shortly.
Next, let’s add the single() method to the controller:
    // File: ./app/Http/Controllers/PostController.php
    public function single(Post $post)
    {
        return view('single', compact('post'));
    }
In the method above, we used a feature of Laravel named route model binding to map the URL parameter to a Post instance with the same ID. We are returning a single view, which we will create shortly. This will be the view for the single post page.
Building our views
Laravel uses a templating engine called Blade for its frontend. We will use Blade to build these parts of the frontend before switching to Vue in the next chapter.
Navigate to the resources/views folder and create two new Blade files:
landing.blade.phpsingle.blade.php
These are the files that will load the views for the landing page and single post page. Before we start writing any code in these files, we want to create a simple layout template that our page views can use as a base.
In the resources/views/layouts folder, create a Blade template file and call it master.blade.php. This is where we will define the inheritable template for our single and landing pages.
Open the master.blade.php file and update it with this code:
<!-- File: ./resources/views/layouts/master.blade.php -->
<!DOCTYPE html>
<html lang="en">
<head>
<meta charset="utf-8">
<meta name="viewport" content="width=device-width, initial-scale=1, shrink-to-fit=no">
<meta name="description" content="">
<meta name="author" content="Neo Ighodaro">
<title>LaravelCMS</title>
<link rel="stylesheet" href="https://stackpath.bootstrapcdn.com/bootstrap/4.1.3/css/bootstrap.min.css">
<style>
body {
padding-top: 54px;
}
@media (min-width: 992px) {
body {
padding-top: 56px;
}
}
</style>
</head>
<body>
<nav class="navbar navbar-expand-lg navbar-dark bg-dark fixed-top">
<div class="container">
<a class="navbar-brand" href="/">LaravelCMS</a>
<div class="collapse navbar-collapse" id="navbarResponsive">
<ul class="navbar-nav ml-auto">
@if (Route::has('login'))
@auth
<li class="nav-item">
<a class="nav-link" href="{{ url('/home') }}">Home</a>
</li>
<li class="nav-item">
<a class="nav-link" href="{{ route('logout') }}"
onclick="event.preventDefault();
document.getElementById('logout-form').submit();">
Log out
</a>
<form id="logout-form" action="{{ route('logout') }}" method="POST" style="display: none;">
@csrf
</form>
</li>
@else
<li class="nav-item">
<a class="nav-link" href="{{ route('login') }}">Login</a>
</li>
<li class="nav-item">
<a class="nav-link" href="{{ route('register') }}">Register</a>
</li>
@endauth
@endif
</ul>
</div>
</div>
</nav>
<div id="app">
@yield('content')
</div>
<footer class="py-5 bg-dark">
<div class="container">
<p class="m-0 text-center text-white">Copyright © LaravelCMS 2018</p>
</div>
</footer>
</body>
</html>
Now we can inherit this template in the landing.blade.php file, open it and update it with this code:
{{-- File: ./resources/views/landing.blade.php --}}
@extends('layouts.master')
@section('content')
<div class="container">
<div class="row align-items-center">
<div class="col-md-8 mx-auto">
<h1 class="my-4 text-center">Welcome to the Blog </h1>
@foreach ($posts as $post)
<div class="card mb-4">
<img class="card-img-top" src=" {!! !empty($post->image) ? '/uploads/posts/' . $post->image : 'http://placehold.it/750x300' !!} " alt="Card image cap">
<div class="card-body">
<h2 class="card-title text-center">{{ $post->title }}</h2>
<p class="card-text"> {{ str_limit($post->body, $limit = 280, $end = '...') }} </p>
<a href="/posts/{{ $post->id }}" class="btn btn-primary">Read More →</a>
</div>
<div class="card-footer text-muted">
Posted {{ $post->created_at->diffForHumans() }} by
<a href="#">{{ $post->user->name }} </a>
</div>
</div>
@endforeach
</div>
</div>
</div>
@endsection
Let’s do the same with the single.blade.php file, open it and update it with this code:
    {{-- File: ./resources/views/single.blade.php --}}
    @extends('layouts.master')

    @section('content')
    <div class="container">
      <div class="row">
        <div class="col-lg-10 mx-auto">
          <h3 class="mt-4">{{ $post->title }} <span class="lead"> by <a href="#"> {{ $post->user->name }} </a></span> </h3>
          <hr>
          <p>Posted {{ $post->created_at->diffForHumans() }} </p>
          <hr>
          <img class="img-fluid rounded" src=" {!! !empty($post->image) ? '/uploads/posts/' . $post->image :  'http://placehold.it/750x300' !!} " alt="">
          <hr>
          <p class="lead">{{ $post->body }}</p>
          <hr>
          <div class="card my-4">
            <h5 class="card-header">Leave a Comment:</h5>
            <div class="card-body">
              <form>
                <div class="form-group">
                  <textarea class="form-control" rows="3"></textarea>
                </div>
                <button type="submit" class="btn btn-primary">Submit</button>
              </form>
            </div>
          </div>
        </div>
      </div>
    </div>
    @endsection
Testing the application
We can test the application to see that things work as we expect. When we serve the application, we expect to see a landing page and a single post page. We also expect to see two posts because that’s the number of posts we seeded into the database.
We will serve the application using this command:
$ php artisan serve
We can visit this address to see the application:
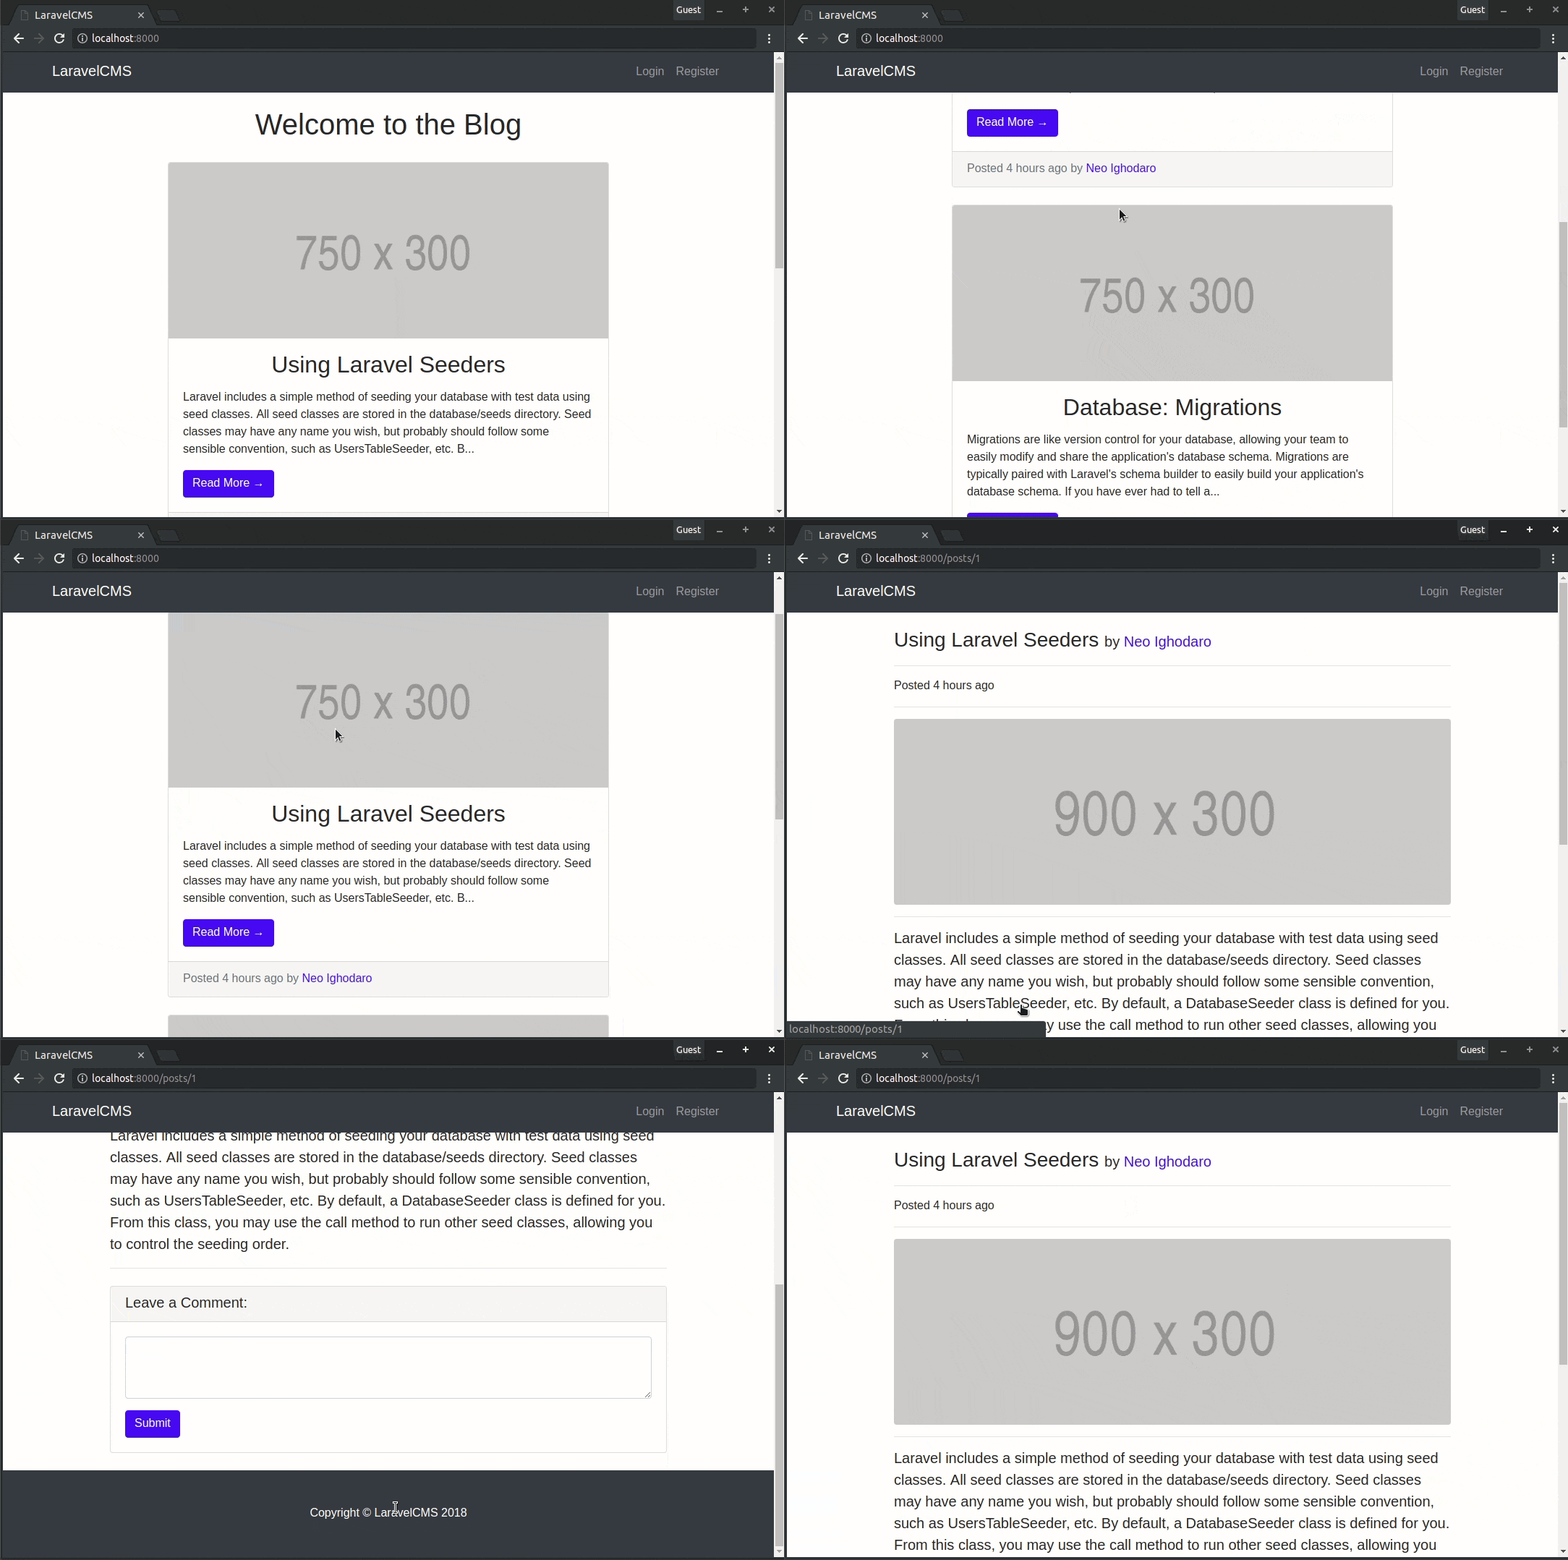
We have used simple placeholder images here because we haven’t built the admin dashboard that allows CRUD operations to be performed on posts.
In the coming chapters, we will add the ability for an admin to include a custom image when creating a new post.
Conclusion part 2
In this chapter, we created the Post model and defined a relationship on it to the User model. We also built the landing page and single page.
In the next part of this series, we will develop the API that will be the medium for communication between the admin user and the post items.
The source code for this project is available here on Github.
Build a CMS with Laravel and Vue - Part 3: Building an API
In the previous part of this series, we initialized the posts resource and started building the frontend of the CMS. We designed the front page that shows all the posts and the single post page using Laravel’s templating engine, Blade.
In this part of the series, we will start building the API for the application. We will create an API for CRUD operations that an admin will perform on posts and we will test the endpoints using Postman.
The source code for this project is available here on GitHub.
Prerequisites
To follow along with this series, a few things are required:
- Basic knowledge of PHP.
- Basic knowledge of the Laravel framework.
- Basic knowledge of JavaScript (ES6 syntax).
- Basic knowledge of Vue.
- Postman installed on your machine.
Building the API using Laravel’s API resources
The Laravel framework makes it very easy to build APIs. It has an API resources feature that we can easily adopt in our project. You can think of API resources as a transformation layer between Eloquent models and the JSON responses that will be sent back by our API.
Allowing mass assignment on specified fields
Since we are going to be performing CRUD operations on the posts in the application, we have to explicitly specify that it’s permitted for some fields to be mass-assigned data. For security reasons, Laravel prevents mass assignment of data to model fields by default.
Open the Post.php file and include this line of code:
    // File: ./app/Post.php
    protected $fillable = ['user_id', 'title', 'body', 'image'];
Defining API routes
We will use the apiResource()method to generate only API routes. Open the routes/api.php file and add the following code:
    // File: ./routes/api.php
    Route::apiResource('posts', 'PostController');
Because we will be handling the API requests on the
/postsURL using thePostController, we will have to include some additional action methods in our post controller.
Creating the Post resource
At the beginning of this section, we already talked about what Laravel’s API resources are. Here, we create a resource class for our Post model. This will enable us to retrieve Post data and return formatted JSON format.
To create a resource class for our Post model run the following command in your terminal:
$ php artisan make:resource PostResource
A new PostResource.php file will be available in the app/Http/Resources directory of our application. Open up the PostResource.php file and replace the toArray() method with the following:
    // File: ./app/Http/Resources/PostResource.php
    public function toArray($request)
    {
        return [
            'id' => $this->id,
            'title' => $this->title,
            'body' => $this->body,
            'image' => $this->image,
            'created_at' => (string) $this->created_at,
            'updated_at' => (string) $this->updated_at,
        ];
    }
The job of this toArray() method is to convert our P``ost resource into an array. As seen above, we have specified the fields on our Post model, which we want to be returned as JSON when we make a request for posts.
We are also explicitly casting the dates, created_at and update_at, to strings so that they would be returned as date strings. The dates are normally an instance of Carbon.
Now that we have created a resource class for our Post model, we can start building the API’s action methods in our PostController and return instances of the PostResource where we want.
Adding the action methods to the Post controller
The usual actions performed on a post include the following:
- Create - the process of creating a new post.
- Read - the process of reading one or more posts.
- Update - the process of updating an already published post.
- Delete - the process of deleting a post.
In the last article, we already implemented a kind of ‘Read’ functionality when we defined the all and single methods. These methods allow users to browse through posts on the homepage.
In this section, we will define the methods that will resolve our API requests for creating, reading, updating and deleting posts.
The first thing we want to do is import the PostResource class at the top of the PostController.php file:
    // File: ./app/Http/Controllers/PostController.php
    use App\Http\Resources\PostResource;
Because we created the
PostControlleras a resource controller, we already have the resource action methods included for us in thePostController.phpfile, we will be updating them with fitting snippets of code.
Building the handler action for the create operation
In the PostController update the store() action method with the code snippet below. It will allow us to validate and create a new post:
    // File: ./app/Http/Controllers/PostController.php
    public function store(Request $request)
    {
        $this->validate($request, [
            'title' => 'required',
            'body' => 'required',
            'user_id' => 'required',
            'image' => 'required|mimes:jpeg,png,jpg,gif,svg',
        ]);

        $post = new Post;

        if ($request->hasFile('image')) {
            $image = $request->file('image');
            $name = str_slug($request->title).'.'.$image->getClientOriginalExtension();
            $destinationPath = public_path('/uploads/posts');
            $imagePath = $destinationPath . "/" . $name;
            $image->move($destinationPath, $name);
            $post->image = $name;
        }

        $post->user_id = $request->user_id;
        $post->title = $request->title;
        $post->body = $request->body;
        $post->save();

        return new PostResource($post);
    }
Here’s a breakdown of what this method does:
- Receives a new request.
- Validates the request.
- Creates a new post.
- Returns the post as a
PostResource, which in turn returns a JSON formatted response.
Building the handler action for the read operations
What we want here is to be able to read all the created posts or a single post. This is possible because the apiResource() method defines the API routes using standard REST rules.
This means that a GET request to this address, http://127.0.0.1:800/api/posts, should be resolved by the index() action method. Let’s update the index method with the following code:
    // File: ./app/Http/Controllers/PostController.php
    public function index()
    {
        return PostResource::collection(Post::latest()->paginate(5));
    }
This method will allow us to return a JSON formatted collection of all of the stored posts. We also want to paginate the response as this will allow us to create a better view on the admin dashboard.
Following the RESTful conventions as we discussed above, a GET request to this address, http://127.0.0.1:800/api/posts/id, should be resolved by the show() action method. Let’s update the method with the fitting snippet:
    // File: ./app/Http/Controllers/PostController.php
    public function show(Post $post)
    {
        return new PostResource($post);
    }
Awesome, now this method will return a single instance of a post resource upon API query.
Building the handler action for the update operation
Next, let’s update the update() method in the PostController class. It will allow us to modify an existing post:
    // File: ./app/Http/Controllers/PostController.php
    public function update(Request $request, Post $post)
    {
        $this->validate($request, [
            'title' => 'required',
            'body' => 'required',
        ]);

        $post->update($request->only(['title', 'body']));

        return new PostResource($post);
    }
This method receives a request and a post id as parameters, then we use route model binding to resolve the id into an instance of a Post. First, we validate the $request attributes, then we update the title and body fields of the resolved post.
Building the handler action for the delete operation
Let’s update the destroy() method in the PostController class. This method will allow us to remove an existing post:
    // File: ./app/Http/Controllers/PostController.php
    public function destroy(Post $post)
    {
        $post->delete();

        return response()->json(null, 204);
    }
In this method, we resolve the Post instance, then delete it and return a 204 response code.
Our methods are complete. We have a method to handle our CRUD operations, however, we haven’t built the frontend for the admin dashboard.
At the end of the second article, we defined the HomeController@index() action method like this:
    public function index(Request $request)
    {
        if ($request->user()->hasRole('user')) {
            return view('home');
        }

        if ($request->user()->hasRole('admin')) {
            return redirect('/admin/dashboard');
        }
    }
This allowed us to redirect regular users to the view home, and admin users to the URL /admin/dashboard. At this point in this series, a visit to /admin/dashboard will fail because we have neither defined it as a route with a handler Controller nor built a view for it.
Let’s create the AdminController with this command:
$ php artisan make:controller AdminController
We will add the /admin/ route to our routes/web.php file:
Route::get('/admin/{any}', 'AdminController@index')->where('any', '.*');
Note that we wrote
/admin/{any}here because we intend to serve every page of the admin dashboard using the Vue router. When we start building the admin dashboard in the next article, we will let Vue handle all the routes of the/adminpages.
Let’s update the AdminController.php file to use the auth middleware and include an index() action method:
    // File: ./app/Http/Controllers/AdminController.php
    <?php

    namespace App\Http\Controllers;

    class AdminController extends Controller
    {
        public function __construct()
        {
            $this->middleware('auth');
        }

        public function index()
        {
            if (request()->user()->hasRole('admin')) {
                return view('admin.dashboard');
            }

            if (request()->user()->hasRole('user')) {
                return redirect('/home');
            }
        }
    }
In the index()action method, we included a snippet that will ensure that only admin users can visit the admin dashboard and perform CRUD operations on posts.
We will not start building the admin dashboard in this article but will test that our API works properly. We will use Postman to make requests to the application.
Testing the application
Let’s test that our API works as expected. We will, first of all, serve the application using this command:
$ php artisan serve
We can visit http://localhost:8000 to see our application and there should be exactly two posts available; these are the posts we seeded into the database during the migration:
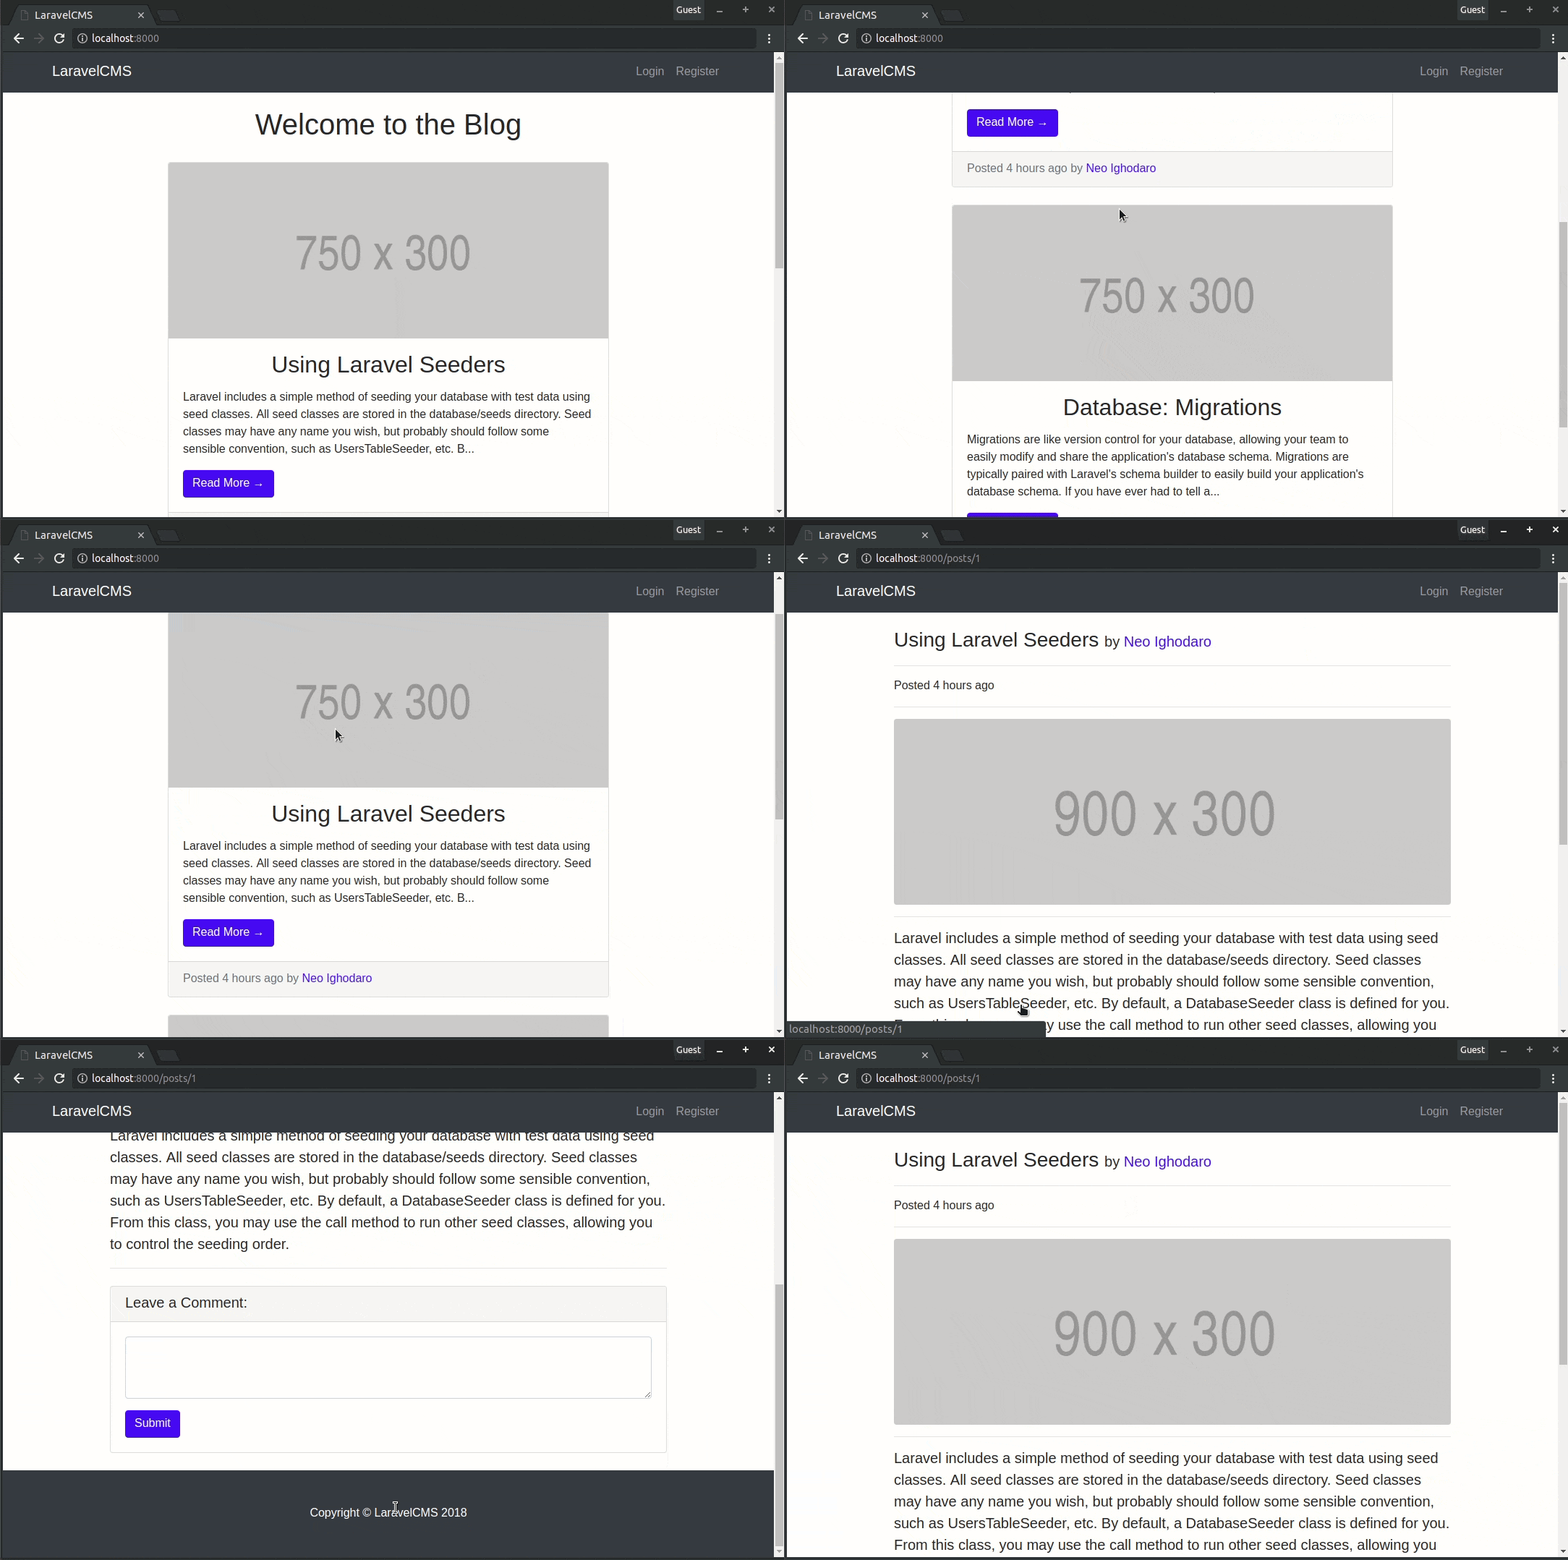
When testing with Postman always set the
Content-Typeheader toapplication/json.
Now let’s create a new post over the API interface using Postman. Send a POST request as seen below:
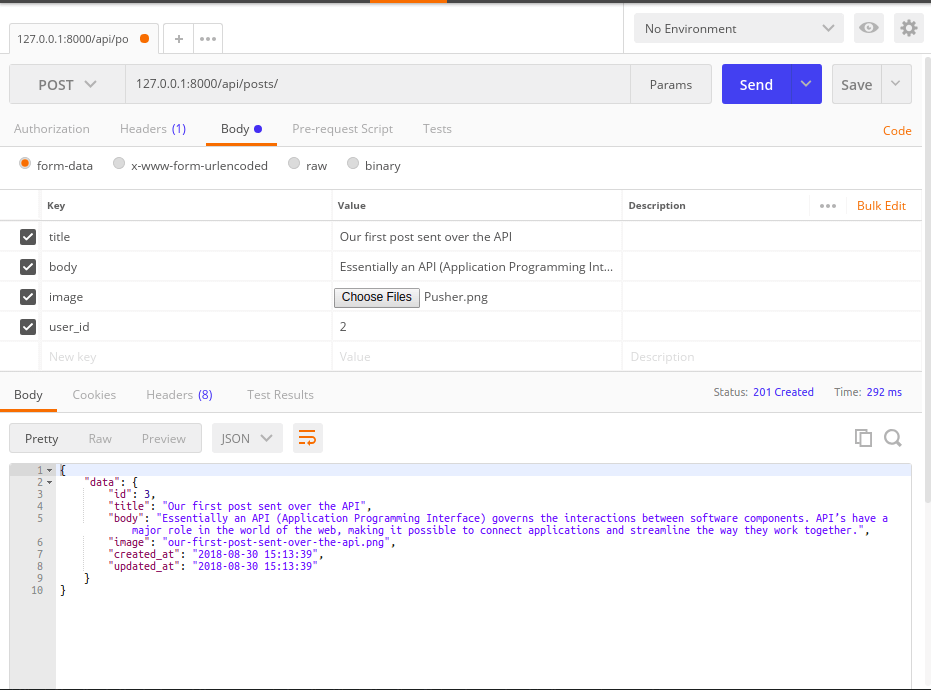
Now let’s update this post we just created. In Postman, we will pass only the title and body fields to a PUT request.
To make it easy, you can just copy the payload below and use the raw request data type for the Body:
    {
      "title": "We made an edit to the Post on APIs",
      "body": "To a developer, 'What's an API?' might be a straightforward - if not exactly simple - question. But to anyone who doesn't have experience with code. APIs can come across as confusing or downright intimidating."
    }
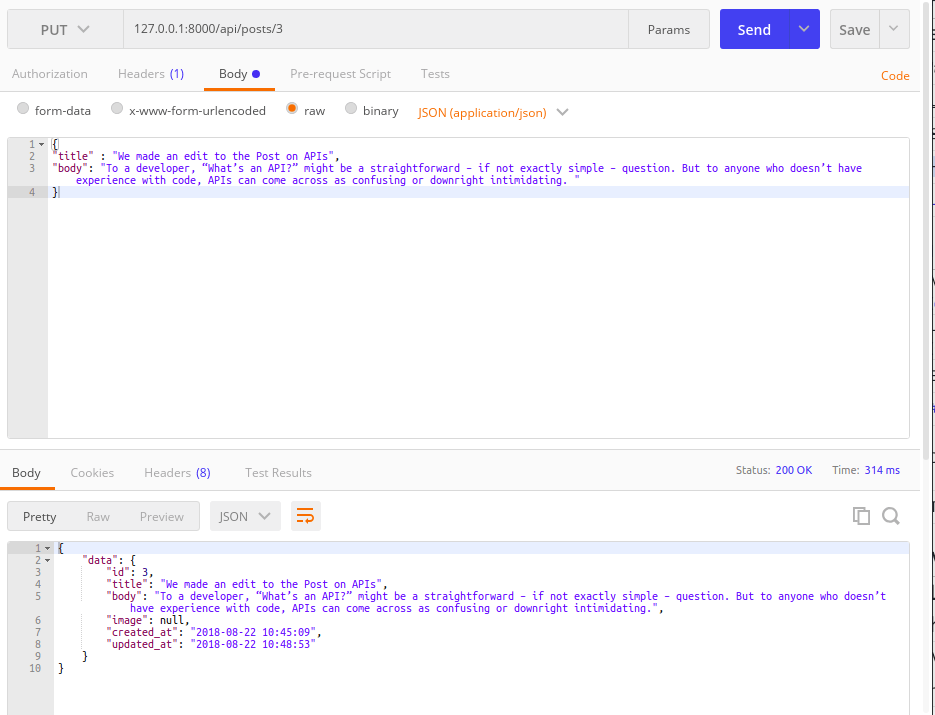
We could have used the PATCH method to make this update, the PUT and PATCH HTTP verbs both work well for editing an already existing item.
Finally, let’s delete the post using Postman:
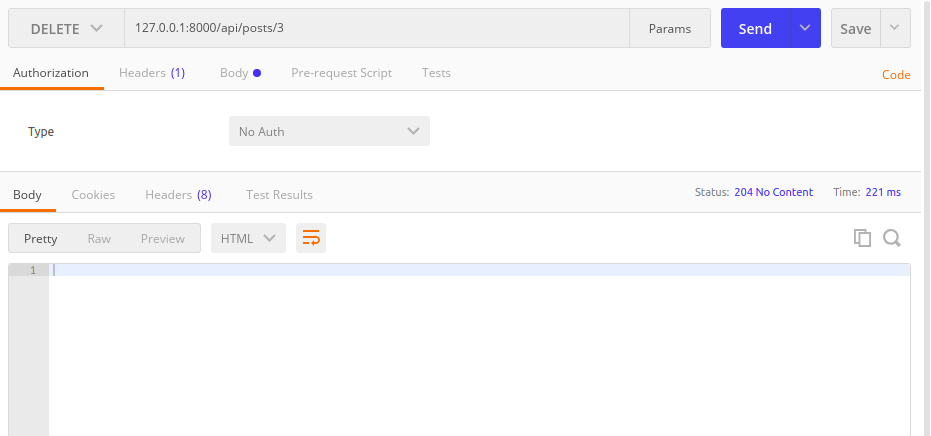
We are sure the post is deleted because the response status is 204 No Content as we specified in the PostController.
Conclusion
In this chapter, we learned about Laravel’s API resources and we created a resource class for the Post model. We also used the apiResources() method to generate API only routes for our application. We wrote the methods to handle the API operations and tested them using Postman.
In the next part, we will build the admin dashboard and develop the logic that will enable the admin user to manage posts over the API.
The source code for this project is available here on Github.
Build a CMS with Laravel and Vue - Part 4: Building the dashboard
In the last article of this series, we built the API interface and used Laravel API resources to return neatly formatted JSON responses. We tested that the API works as we defined it to using Postman.
In this part of the series, we will start building the admin frontend of the CMS. This is the first part of the series where we will integrate Vue and explore Vue’s magical abilities.
When we are done with this part, our application will have some added functionalities as seen below:
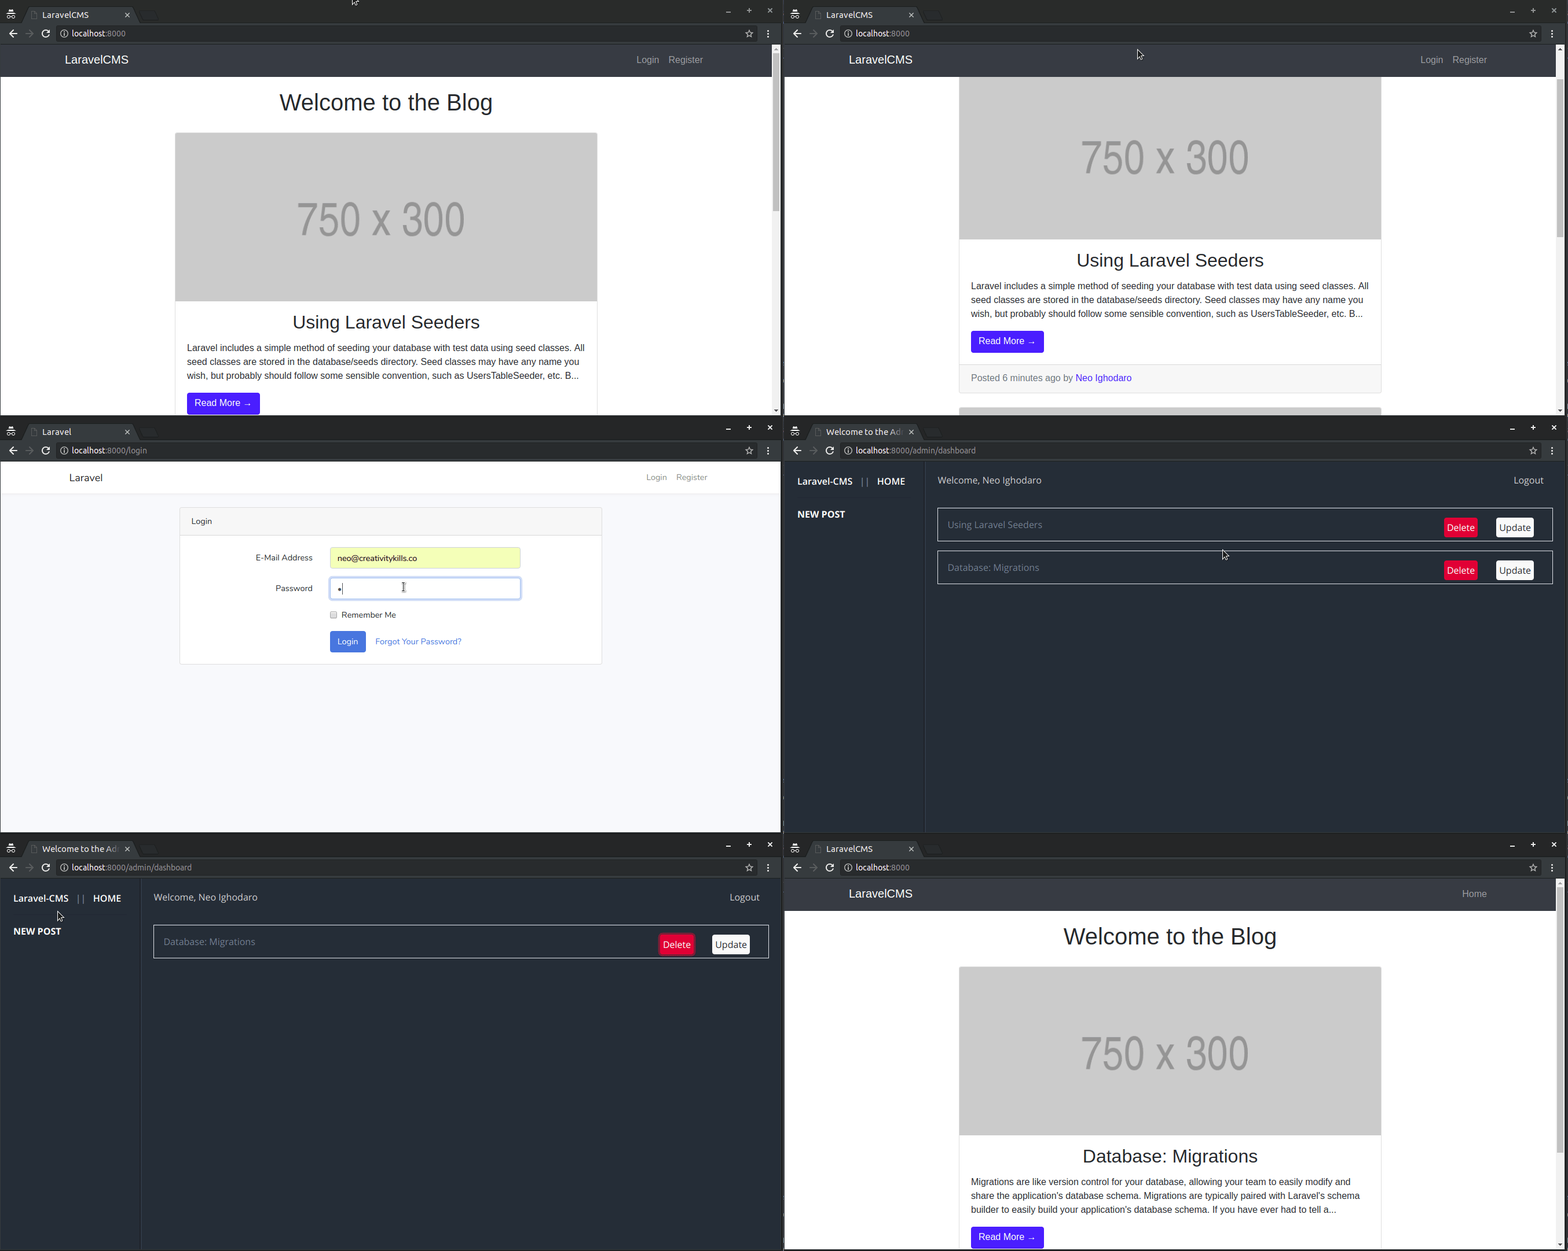
The source code for this project is available here on GitHub.
Prerequisites
To follow along with this series, a few things are required:
- Basic knowledge of PHP.
- Basic knowledge of the Laravel framework.
- Basic knowledge of JavaScript (ES6 syntax).
- Basic knowledge of Vue.
Building the frontend
Laravel ships with Vue out of the box so we do not need to use the Vue-CLI or reference Vue from a CDN. This makes it possible for us to have all of our application, the frontend, and backend, in a single codebase.
Every newly created instance of a Laravel installation has some Vue files included by default, we can see these files when we navigate into the resources/assets/js/components folder.
Setting up Vue and VueRouter
Before we can start using Vue in our application, we need to first install some dependencies using NPM. To install the dependencies that come by default with Laravel, run the command below:
$ npm install
We will be managing all of the routes for the admin dashboard using vue-router so let’s pull it in:
$ npm install --save vue-router
When the installation is complete, the next thing we want to do is open the resources/assets/js/app.js file and replace its contents with the code below:
    // File: ./resources/assets/js/app.js
    require('./bootstrap');

    import Vue from 'vue'
    import VueRouter from 'vue-router'
    import Homepage from './components/Homepage'
    import Read from './components/Read'

    Vue.use(VueRouter)

    const router = new VueRouter({
        mode: 'history',
        routes: [
            {
                path: '/admin/dashboard',
                name: 'read',
                component: Read,
                props: true
            },
        ],
    });

    const app = new Vue({
        el: '#app',
        router,
        components: { Homepage },
    });
In the snippet above, we imported the VueRouter and added it to the Vue application. We also imported a Homepage and a Read component. These are the components where we will write our markup so let’s create both files.
Open the resources/assets/js/components folder and create four files:
Homepage.vue- this will be the parent component for the admin dashboard frontend.Read.vue- this will be component that displays all the available posts on the admin dashboard.Create.vue- this will be the component where an admin user can create a new post.Update.vue- this will be the component that displays the view where an admin user can update an existing post.
Note that we didn’t create a component file for the delete operation, this is because it is going to be possible to delete a post from the
Readcomponent. There is no need for a view.
In the resources/assets/js/app.js file, we defined a routes array and in it, we registered a read route. During render time, this route’s path will be mapped to the Read component.
In the previous article, we specified that admin users should be shown an admin.dashboard view in the index method, however, we didn’t create this view. Let’s create the view. Open the resources/views folder and create a new folder called admin. Within the new resources/views/admin folder, create a new file and called dashboard.blade.php. This is going to be the entry point to the admin dashboard, further from this route, we will let the VueRouter handle everything else.
Open the resources/views/admin/dashboard.blade.php file and paste in the following code:
    <!-- File: ./resources/views/admin/dashboard.blade.php -->
    <!DOCTYPE html>
    <html lang="en">
    <head>
        <meta charset="UTF-8">
        <meta name="viewport" content="width=device-width, initial-scale=1.0">
        <meta http-equiv="X-UA-Compatible" content="ie=edge">
        <title> Welcome to the Admin dashboard </title>
        <link rel="stylesheet" href="https://stackpath.bootstrapcdn.com/bootstrap/4.1.3/css/bootstrap.min.css">
        <style>
            html, body {
            background-color: #202B33;
            color: #738491;
            font-family: "Open Sans";
            font-size: 16px;
            font-smoothing: antialiased;
            overflow: hidden;
            }
        </style>
    </head>
    <body>

      <script src="{{ asset('js/app.js') }}"></script>
    </body>
    </html>
Our goal here is to integrate Vue into the application, so we included the resources/assets/js/app.js file with this line of code:
<script src="{{ asset('js/app.js') }}"></script>
For our app to work, we need a root element to bind our Vue instance unto. Before the <script> tag, add this snippet of code:
    <div id="app">
      <Homepage
        :user-name='@json(auth()->user()->name)'
        :user-id='@json(auth()->user()->id)'
      ></Homepage>
    </div>
We earlier defined the Homepage component as the wrapping component, that’s why we pulled it in here as the root component. For some of the frontend components to work correctly, we require some details of the logged in admin user to perform CRUD operations. This is why we passed down the userName and userId props to the Homepage component.
We need to prevent the CSRF error from occurring in our Vue frontend, so include this snippet of code just before the <title> tag:
    <meta name="csrf-token" content="{{ csrf_token() }}">
    <script> window.Laravel = { csrfToken: 'csrf_token() ' } </script>
This snippet will ensure that the correct token is always included in our frontend, Laravel provides the CSRF protection for us out of the box.
At this point, this should be the contents of your resources/views/admin/dashboard.blade.php file:
    <!DOCTYPE html>
    <html lang="en">
    <head>
        <meta charset="UTF-8">
        <meta name="viewport" content="width=device-width, initial-scale=1.0">
        <meta http-equiv="X-UA-Compatible" content="ie=edge">
        <meta name="csrf-token" content="{{ csrf_token() }}">
        <script> window.Laravel = { csrfToken: 'csrf_token() ' } </script>
        <title> Welcome to the Admin dashboard </title>
        <link rel="stylesheet" href="https://stackpath.bootstrapcdn.com/bootstrap/4.1.3/css/bootstrap.min.css">
        <style>
          html, body {
            background-color: #202B33;
            color: #738491;
            font-family: "Open Sans";
            font-size: 16px;
            font-smoothing: antialiased;
            overflow: hidden;
          }
        </style>
    </head>
    <body>
    <div id="app">
      <Homepage
        :user-name='@json(auth()->user()->name)'
        :user-id='@json(auth()->user()->id)'>
      </Homepage>
    </div>
    <script src="{{ asset('js/app.js') }}"></script>
    </body>
    </html>
Setting up the Homepage view
Open the Homepage.vue file that we created some time ago and include this markup template:
<!-- File: ./resources/app/js/components/Homepage.vue -->
<template>
<div>
<nav>
<section>
<a style="color: white" href="/admin/dashboard">Laravel-CMS</a> ||
<a style="color: white" href="/">HOME</a>
<hr>
<ul>
<li>
<router-link :to="{ name: 'create', params: { userId } }">
NEW POST
</router-link>
</li>
</ul>
</section>
</nav>
<article>
<header>
<header class="d-inline">Welcome, {{ userName }}</header>
<p @click="logout" class="float-right mr-3" style="cursor: pointer">Logout</p>
</header>
<div>
<router-view></router-view>
</div>
</article>
</div>
</template>
We added a router-link in this template, which routes to the Create component.
We are passing the userId data to the create component because a userId is required during Post creation.
Let’s include some styles so that the page looks good. Below the closing template tag, paste the following code:
    <style scoped>
      @import url(https://fonts.googleapis.com/css?family=Dosis:300|Lato:300,400,600,700|Roboto+Condensed:300,700|Open+Sans+Condensed:300,600|Open+Sans:400,300,600,700|Maven+Pro:400,700);
      @import url("https://netdna.bootstrapcdn.com/font-awesome/4.2.0/css/font-awesome.css");
      * {
        -moz-box-sizing: border-box;
        -webkit-box-sizing: border-box;
        box-sizing: border-box;
      }
      header {
        color: #d3d3d3;
      }
      nav {
        position: absolute;
        top: 0;
        bottom: 0;
        right: 82%;
        left: 0;
        padding: 22px;
        border-right: 2px solid #161e23;
      }
      nav > header {
        font-weight: 700;
        font-size: 0.8rem;
        text-transform: uppercase;
      }
      nav section {
        font-weight: 600;
      }
      nav section header {
        padding-top: 30px;
      }
      nav section ul {
        list-style: none;
        padding: 0px;
      }
      nav section ul a {
        color: white;
        text-decoration: none;
        font-weight: bold;
      }
      article {
        position: absolute;
        top: 0;
        bottom: 0;
        right: 0;
        left: 18%;
        overflow: auto;
        border-left: 2px solid #2a3843;
        padding: 20px;
      }
      article > header {
        height: 60px;
        border-bottom: 1px solid #2a3843;
      }
    </style>
We are using the scoped attribute on the
<style>tag because we want the CSS to only be applied on theHomepagecomponent.
Next, let’s add the <script> section that will use the props we passed down from the parent component. We will also define the method that controls the log out feature here. Below the closing style tag, paste the following code:
    <script>
    export default {
      props: {
        userId: {
          type: Number,
          required: true
        },
        userName: {
          type: String,
          required: true
        }
      },
      data() {
        return {};
      },
      methods: {
        logout() {
          axios.post("/logout").then(() => {
            window.location = "/";
          });
        }
      }
    };
    </script>
Setting up the Read view
In the resources/assets/js/app.js file, we defined the path of the read component as /admin/dashboard, which is the same address as the Homepage component. This will make sure the Read component always loads by default.
In the Read component, we want to load all of the available posts. We are also going to add Update and Delete options to each post. Clicking on these options will lead to the update and delete views respectively.
Open the Read.vue file and paste the following:
    <!-- File: ./resources/app/js/components/Read.vue -->
    <template>
        <div id="posts">
            <p class="border p-3" v-for="post in posts">
                {{ post.title }}
                <router-link :to="{ name: 'update', params: { postId : post.id } }">
                    <button type="button" class="p-1 mx-3 float-right btn btn-light">
                        Update
                    </button>
                </router-link>
                <button
                    type="button"
                    @click="deletePost(post.id)"
                    class="p-1 mx-3 float-right btn btn-danger"
                >
                    Delete
                </button>
            </p>
            <div>
                <button
                    v-if="next"
                    type="button"
                    @click="navigate(next)"
                    class="m-3 btn btn-primary"
                >
                  Next
                </button>
                <button
                    v-if="prev"
                    type="button"
                    @click="navigate(prev)"
                    class="m-3 btn btn-primary"
                >
                  Previous
                </button>
            </div>
        </div>
    </template>
Above, we have the template to handle the posts that are loaded from the API. Next, paste the following below the closing template tag:
    <script>
    export default {
      mounted() {
        this.getPosts();
      },
      data() {
        return {
          posts: {},
          next: null,
          prev: null
        };
      },
      methods: {
        getPosts(address) {
          axios.get(address ? address : "/api/posts").then(response => {
            this.posts = response.data.data;
            this.prev = response.data.links.prev;
            this.next = response.data.links.next;
          });
        },
        deletePost(id) {
          axios.delete("/api/posts/" + id).then(response => this.getPosts())
        },
        navigate(address) {
          this.getPosts(address)
        }
      }
    };
    </script>
In the script above, we defined a getPosts() method that requests a list of posts from the backend server. We also defined a posts object as a data property. This object will be populated whenever posts are received from the backend server.
We defined next and prev data string properties to store pagination links and only display the pagination options where it is available.
Lastly, we defined a deletePost() method that takes the id of a post as a parameter and sends a DELETE request to the API interface using Axios.
Testing the application
Now that we have completed the first few components, we can serve the application using this command:
$ php artisan serve
We will also build the assets so that our JavaScript is compiled for us. To do this, will run the command below in the root of the project folder:
$ npm run dev
We can visit the application’s URL http://localhost:8000 and log in as an admin user, and delete a post:

Conclusion
In this part of the series, we started building the admin dashboard using Vue. We installed VueRouter to make the admin dashboard a SPA. We added the homepage view of the admin dashboard and included read and delete functionalities.
We are not done with the dashboard just yet. In the next part, we will add the views that lets us create and update posts.
The source code for this project is available here on Github.
Build a CMS with Laravel and Vue - Part 5: Completing our dashboards
In the previous part of this series, we built the first parts of the admin dashboard using Vue. We also made it into an SPA with the VueRouter, this means that visiting the pages does not cause a reload to the web browser.
We only built the wrapper component and the Read component that retrieves the posts to be loaded so an admin can manage them.
Here’s a recording of what we ended up with, in the last article:

In this article, we will build the view that will allow users to create and update posts. We will start writing code in the Update.vue and Create.vue files that we created in the previous article.
When we are done with this part, we will have additional functionalities like create and updating:
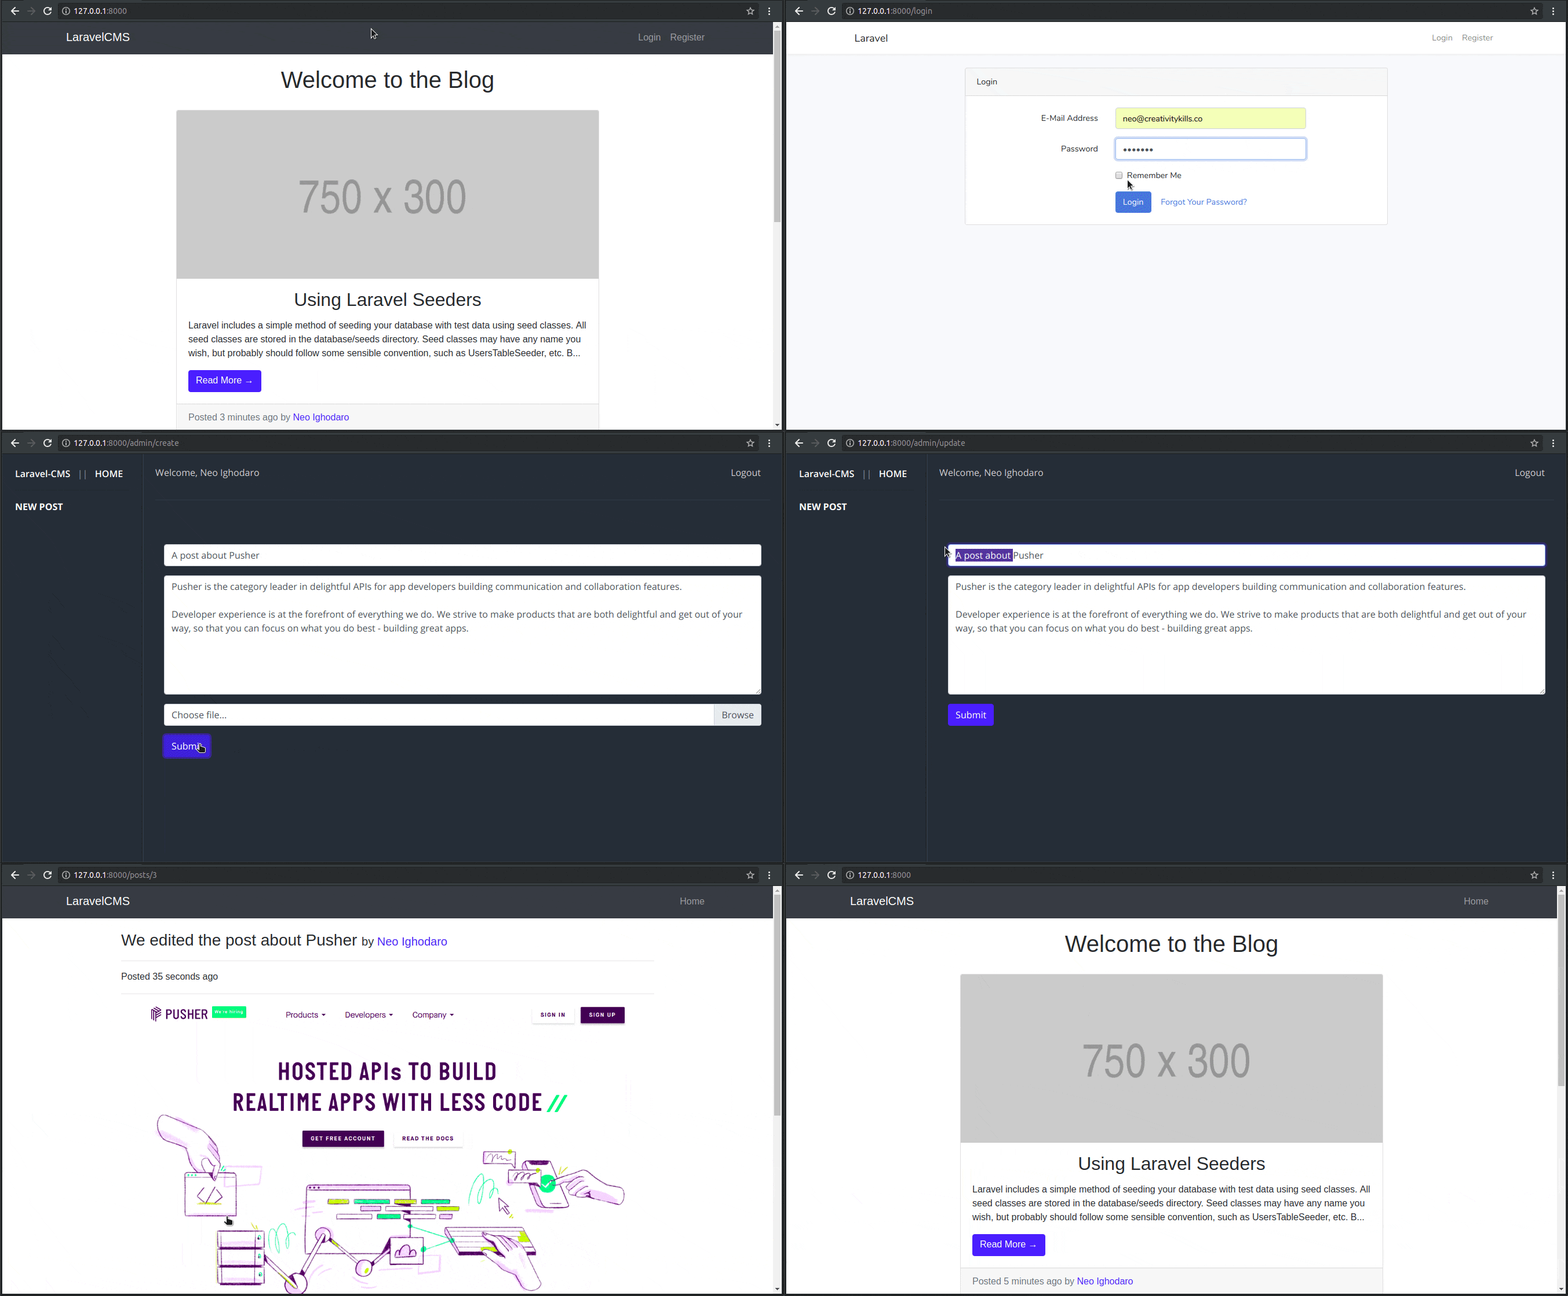
The source code for this project is available here on Github.
Prerequisites
To follow along with this series, a few things are required:
- Basic knowledge of PHP.
- Basic knowledge of the Laravel framework.
- Basic knowledge of JavaScript (ES6 syntax).
- Basic knowledge of Vue.
Including the new routes in VueRouter
In the previous article, we only defined the route for the Read component, we need to include the route configuration for the new components that we are about to build; Update and Create.
Open the resources/assets/js/app.js file and replace the contents with the code below:
    require('./bootstrap');

    import Vue from 'vue'
    import VueRouter from 'vue-router'
    import Homepage from './components/Homepage'
    import Create from './components/Create'
    import Read from './components/Read'
    import Update from './components/Update'

    Vue.use(VueRouter)

    const router = new VueRouter({
        mode: 'history',
        routes: [
            {
                path: '/admin/dashboard',
                name: 'read',
                component: Read,
                props: true
            },
            {
                path: '/admin/create',
                name: 'create',
                component: Create,
                props: true
            },
            {
                path: '/admin/update',
                name: 'update',
                component: Update,
                props: true
            },
        ],
    });

    const app = new Vue({
        el: '#app',
        router,
        components: { Homepage },
    });
Above, we have added two new components to the JavaScript file. We have the Create and Read components. We also added them to the router so that they can be loaded using the specified URLs.
Building the create view
Open the Create.vue file and update it with this markup template:
    <!-- File: ./resources/app/js/components/Create.vue -->
    <template>
      <div class="container">
        <form>
          <div :class="['form-group m-1 p-3', (successful ? 'alert-success' : '')]">
            <span v-if="successful" class="label label-sucess">Published!</span>
          </div>
          <div :class="['form-group m-1 p-3', error ? 'alert-danger' : '']">
            <span v-if="errors.title" class="label label-danger">
              {{ errors.title[0] }}
            </span>
            <span v-if="errors.body" class="label label-danger">
              {{ errors.body[0] }}
            </span>
            <span v-if="errors.image" class="label label-danger">
              {{ errors.image[0] }}
            </span>
          </div>

          <div class="form-group">
            <input type="title" ref="title" class="form-control" id="title" placeholder="Enter title" required>
          </div>

          <div class="form-group">
            <textarea class="form-control" ref="body" id="body" placeholder="Enter a body" rows="8" required></textarea>
          </div>

          <div class="custom-file mb-3">
            <input type="file" ref="image" name="image" class="custom-file-input" id="image" required>
            <label class="custom-file-label" >Choose file...</label>
          </div>

          <button type="submit" @click.prevent="create" class="btn btn-primary block">
            Submit
          </button>
        </form>
      </div>
    </template>
Above we have the template for the Create component. If there is an error during post creation, there will be a field indicating the specific error. When a post is successfully published, there will also a message saying it was successful.
Let’s include the script logic that will perform the sending of posts to our backend server and read back the response.
After the closing template tag add this:
    <script>
    export default {
      props: {
        userId: {
          type: Number,
          required: true
        }
      },
      data() {
        return {
          error: false,
          successful: false,
          errors: []
        };
      },
      methods: {
        create() {
          const formData = new FormData();
          formData.append("title", this.$refs.title.value);
          formData.append("body", this.$refs.body.value);
          formData.append("user_id", this.userId);
          formData.append("image", this.$refs.image.files[0]);

          axios
            .post("/api/posts", formData)
            .then(response => {
              this.successful = true;
              this.error = false;
              this.errors = [];
            })
            .catch(error => {
              if (!_.isEmpty(error.response)) {
                if ((error.response.status = 422)) {
                  this.errors = error.response.data.errors;
                  this.successful = false;
                  this.error = true;
                }
              }
            });

          this.$refs.title.value = "";
          this.$refs.body.value = "";
        }
      }
    };
    </script>
In the script above, we defined a create() method that takes the values of the input fields and uses the Axios library to send them to the API interface on the backend server. Within this method, we also update the status of the operation, so that an admin user can know when a post is created successfully or not.
Building the update view
Let’s start building the Update component. Open the Update.vue file and update it with this markup template:
    <!-- File: ./resources/app/js/components/Update.vue -->
    <template>
      <div class="container">
        <form>
          <div :class="['form-group m-1 p-3', successful ? 'alert-success' : '']">
            <span v-if="successful" class="label label-sucess">Updated!</span>
          </div>

          <div :class="['form-group m-1 p-3', error ? 'alert-danger' : '']">
            <span v-if="errors.title" class="label label-danger">
              {{ errors.title[0] }}
            </span>
            <span v-if="errors.body" class="label label-danger">
              {{ errors.body[0] }}
            </span>
          </div>

          <div class="form-group">
            <input type="title" ref="title" class="form-control" id="title" placeholder="Enter title" required>
          </div>

          <div class="form-group">
            <textarea class="form-control" ref="body" id="body" placeholder="Enter a body" rows="8" required></textarea>
          </div>

          <button type="submit" @click.prevent="update" class="btn btn-primary block">
            Submit
          </button>
        </form>
      </div>
    </template>
This template is similar to the one in the Create component. Let’s add the script for the component.
Below the closing template tag, paste the following:
    <script>
    export default {
      mounted() {
        this.getPost();
      },
      props: {
        postId: {
          type: Number,
          required: true
        }
      },
      data() {
        return {
          error: false,
          successful: false,
          errors: []
        };
      },
      methods: {
        update() {
          let title = this.$refs.title.value;
          let body = this.$refs.body.value;

          axios
            .put("/api/posts/" + this.postId, { title, body })
            .then(response => {
              this.successful = true;
              this.error = false;
              this.errors = [];
            })
            .catch(error => {
              if (!_.isEmpty(error.response)) {
                if ((error.response.status = 422)) {
                  this.errors = error.response.data.errors;
                  this.successful = false;
                  this.error = true;
                }
              }
            });
        },
        getPost() {
          axios.get("/api/posts/" + this.postId).then(response => {
            this.$refs.title.value = response.data.data.title;
            this.$refs.body.value = response.data.data.body;
          });
        }
      }
    };
    </script>
In the script above, we make a call to the getPosts() method as soon as the component is mounted. The getPosts() method fetches the data of a single post from the backend server, using the postId.
When Axios sends back the data for the post, we update the input fields in this component so they can be updated.
Finally, the update() method takes the values of the fields in the components and attempts to send them to the backend server for an update. In a situation where the fails, we get instant feedback.
Testing the application
To test that our changes work, we want to refresh the database and restore it back to a fresh state. To do this, run the following command in your terminal:
$ php artisan migrate:fresh --seed
Next, let’s compile our JavaScript files and assets. This will make sure all the changes we made in the Vue component and the app.js file gets built. To recompile, run the command below in your terminal:
$ npm run dev
Lastly, we need to serve the application. To do this, run the following command in your terminal window:
$ php artisan serve
If you had the serve command running before, then you might need to restart it.
We will visit the application’s http://localhost:8000 and log in as an admin user. From the dashboard, you can test the create and update feature:

Conclusion
In this part of the series, we updated the dashboard to include the Create and Update component so the administrator can add and update posts.
In the next article, we will build the views that allow for the creation and updating of a post.
The source code for this project is available here on Github.
Build a CMS with Laravel and Vue - Part 6: Adding Realtime Comments
In the previous part of this series, we finished building the backend of the application using Vue. We were able to add the create and update component, which is used for creating a new post and updating an existing post.
Here’s a screen recording of what we have been able to achieve:

In this final part of the series, we will be adding support for comments. We will also ensure that the comments on each post are updated in realtime, so a user doesn’t have to refresh the page to see new comments.
When we are done, our application will have new features and will work like this:
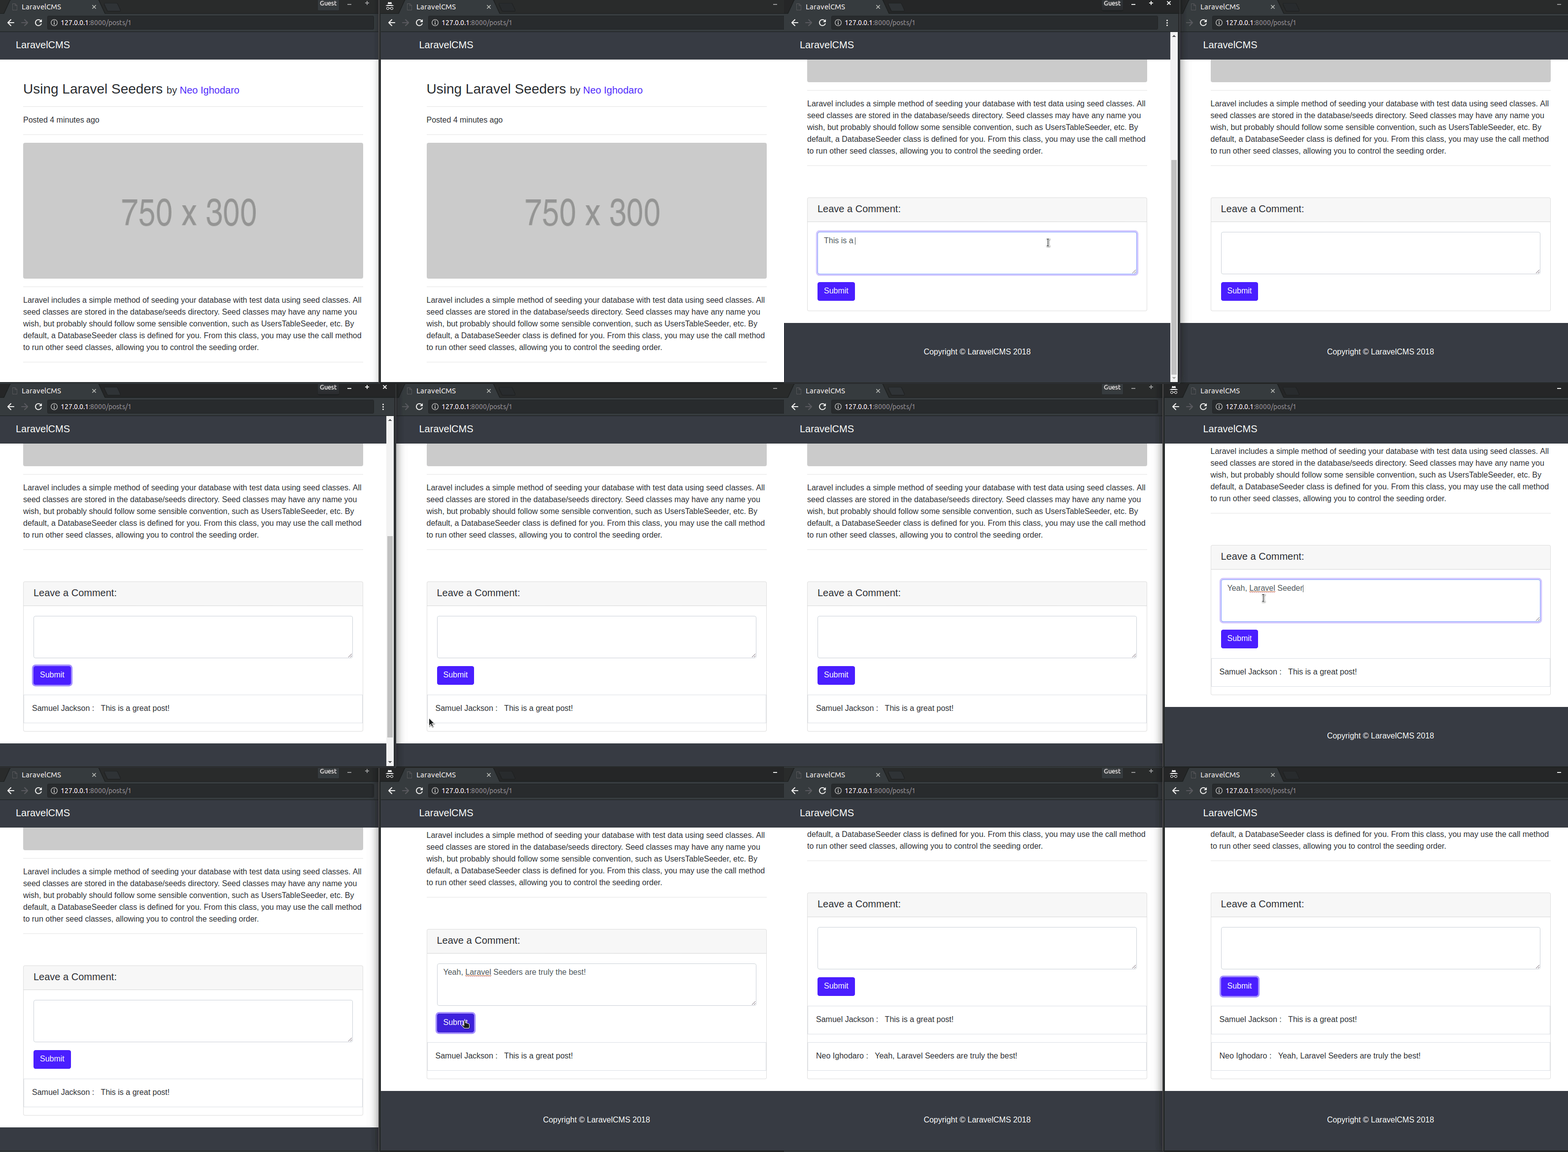
The source code for this project is available here on Github.
Prerequisites
To follow along with this series, a few things are required:
- A Pusher account. Sign up here.
- Basic knowledge of PHP.
- Basic knowledge of the Laravel framework.
- Basic knowledge of JavaScript (ES6 syntax).
- Basic knowledge of Vue.
Adding comments to the backend
When we were creating the API, we did not add the support for comments to the post resource, so we will have to do so now. Open the API project in your text editor as we will be modifying the project a little.
The first thing we want to do is create a model, controller, and a migration for the comment resource. To do this, open your terminal and cd to the project directory and run the following command:
$ php artisan make:model Comment -mc
The command above will create a model called Comment, a controller called CommentController, and a migration file in the database/migrations directory.
Updating the comments migration file
To update the comments migration navigate to the database/migrations folder and find the newly created migration file for the Comment model. Let’s update the up() method in the file:
    // File: ./database/migrations/*_create_comments_table.php
    public function up()
    {
        Schema::create('comments', function (Blueprint $table) {
            $table->increments('id');
            $table->timestamps();
            $table->integer('user_id')->unsigned();
            $table->integer('post_id')->unsigned();
            $table->text('body');
        });
    }
We included user_id and post_id fields because we intend to create a link between the comments, users, and posts. The body field will contain the actual comment.
Defining the relationships among the Comment, User, and Post models
In this application, a comment will belong to a user and a post because a user can make a comment on a specific post, so we need to define the relationship that ties everything up.
Open the User model and include this method:
    // File: ./app/User.php
    public function comments()
    {
        return $this->hasMany(Comment::class);
    }
This is a relationship that simply says that a user can have many comments. Now let’s define the same relationship on the Post model. Open the Post.php file and include this method:
    // File: ./app/Post.php
    public function comments()
    {
        return $this->hasMany(Comment::class);
    }
Finally, we will include two methods in the Comment model to complete the second half of the relationships we defined in the User and Post models.
Open the app/Comment.php file and include these methods:
    // File: ./app/Comment.php
    public function user()
    {
        return $this->belongsTo(User::class);
    }

    public function post()
    {
        return $this->belongsTo(Post::class);
    }
Since we want to be able to mass assign data to specific fields of a comment instance during comment creation, we will include this array of permitted assignments in the app/Comment.php file:
protected $fillable = ['user_id', 'post_id', 'body'];
We can now run our database migration for our comments:
$ php artisan migrate
Configuring Laravel to broadcast events using Pusher
We already said that the comments will have a realtime functionality and we will be building this using Pusher, so we need to enable Laravel’s event broadcasting feature.
Open the config/app.php file and uncomment the following line in the providers array:
App\Providers\BroadcastServiceProvider
Next, we need to configure the broadcast driver in the .env file:
BROADCAST_DRIVER=pusher
Let’s pull in the Pusher PHP SDK using composer:
$ composer require pusher/pusher-php-server
Configuring Pusher
For us to use Pusher in this application, it is a prerequisite that you have a Pusher account. You can create a free Pusher account here then login to your dashboard and create an app.
Once you have created an app, we will use the app details to configure pusher in the .env file:
    PUSHER_APP_ID=xxxxxx
    PUSHER_APP_KEY=xxxxxxxxxxxxxxxxxxxx
    PUSHER_APP_SECRET=xxxxxxxxxxxxxxxxxxxx
    PUSHER_APP_CLUSTER=xx
Update the Pusher keys with the app credentials provided for you under the Keys section on the Overview tab on the Pusher dashboard.
Broadcasting an event for when a new comment is sent
To make the comment update realtime, we have to broadcast an event based on the comment creation activity. We will create a new event and call it CommentSent. It is to be fired when there is a successful creation of a new comment.
Run command in your terminal:
php artisan make:event CommentSent
There will be a newly created file in the app\Events directory, open the CommentSent.php file and ensure that it implements the ShouldBroadcast interface.
Open and replace the file with the following code:
    // File: ./app/Events/CommentSent.php
    <?php

    namespace App\Events;

    use App\Comment;
    use App\User;
    use Illuminate\Broadcasting\Channel;
    use Illuminate\Queue\SerializesModels;
    use Illuminate\Broadcasting\PrivateChannel;
    use Illuminate\Broadcasting\PresenceChannel;
    use Illuminate\Foundation\Events\Dispatchable;
    use Illuminate\Broadcasting\InteractsWithSockets;
    use Illuminate\Contracts\Broadcasting\ShouldBroadcast;

    class CommentSent implements ShouldBroadcast
    {
        use Dispatchable, InteractsWithSockets, SerializesModels;

        public $user;

        public $comment;

        public function __construct(User $user, Comment $comment)
        {
            $this->user = $user;

            $this->comment = $comment;
        }

        public function broadcastOn()
        {
            return new PrivateChannel('comment');
        }
    }
In the code above, we created two public properties, user and comment, to hold the data that will be passed to the channel we are broadcasting on. We also created a private channel called comment. We are using a private channel so that only authenticated clients can subscribe to the channel.
Defining the routes for handling operations on a comment
We created a controller for the comment model earlier but we haven’t defined the web routes that will redirect requests to be handled by that controller.
Open the routes/web.php file and include the code below:
    // File: ./routes/web.php
    Route::get('/{post}/comments', 'CommentController@index');
    Route::post('/{post}/comments', 'CommentController@store');
Setting up the action methods in the CommentController
We need to include two methods in the CommentController.php file, these methods will be responsible for storing and retrieving methods. In the store() method, we will also be broadcasting an event when a new comment is created.
Open the CommentController.php file and replace its contents with the code below:
    // File: ./app/Http/Controllers/CommentController.php
    <?php

    namespace App\Http\Controllers;

    use App\Comment;
    use App\Events\CommentSent;
    use App\Post;
    use Illuminate\Http\Request;

    class CommentController extends Controller
    {
        public function store(Post $post)
        {
            $this->validate(request(), [
                'body' => 'required',
            ]);

            $user = auth()->user();

            $comment = Comment::create([
                'user_id' => $user->id,
                'post_id' => $post->id,
                'body' => request('body'),
            ]);

            broadcast(new CommentSent($user, $comment))->toOthers();

            return ['status' => 'Message Sent!'];
        }

        public function index(Post $post)
        {
            return $post->comments()->with('user')->get();
        }
    }
In the store method above, we are validating then creating a new post comment. After the comment has been created, we broadcast the CommentSent event to other clients so they can update their comments list in realtime.
In the index method we just return the comments belonging to a post along with the user that made the comment.
Adding a layer of authentication
Let’s add a layer of authentication that ensures that only authenticated users can listen on the private comment channel we created.
Add the following code to the routes/channels.php file:
    // File: ./routes/channels.php
    Broadcast::channel('comment', function ($user) {
        return auth()->check();
    });
Adding comments to the frontend
In the second article of this series, we created the view for the single post landing page in the single.blade.php file, but we didn’t add the comments functionality. We are going to add it now. We will be using Vue to build the comments for this application so the first thing we will do is include Vue in the frontend of our application.
Open the master layout template and include Vue to its <head> tag. Just before the <title> tag appears in the master.blade.php file, include this snippet:
    <!-- File: ./resources/views/layouts/master.blade.php -->
    <meta name="csrf-token" content="{{ csrf_token() }}">
    <script src="{{ asset('js/app.js') }}" defer></script>
The csrf_token() is there so that users cannot forge requests in our application. All our requests will pick the randomly generated csrf-token and use that to make requests.
Now the next thing we want to do is update the resources/assets/js/app.js file so that it includes a template for the comments view.
Open the file and replace its contents with the code below:
    require('./bootstrap');

    import Vue          from 'vue'
    import VueRouter    from 'vue-router'
    import Homepage from './components/Homepage'
    import Create   from './components/Create'
    import Read     from './components/Read'
    import Update   from './components/Update'
    import Comments from './components/Comments'

    Vue.use(VueRouter)

    const router = new VueRouter({
        mode: 'history',
        routes: [
            {
                path: '/admin/dashboard',
                name: 'read',
                component: Read,
                props: true
            },
            {
                path: '/admin/create',
                name: 'create',
                component: Create,
                props: true
            },
            {
                path: '/admin/update',
                name: 'update',
                component: Update,
                props: true
            },
        ],
    });

    const app = new Vue({
        el: '#app',
        components: { Homepage, Comments },
        router,
    });
Above we imported the Comment component and then we added it to the list of components in the applications Vue instance.
Now create a Comments.vue file in the resources/assets/js/components directory. This is where all the code for our comment view will go. We will populate this file later on.
Installing Pusher and Laravel Echo
For us to be able to use Pusher and subscribe to events on the frontend, we need to pull in both Pusher and Laravel Echo. We will do so by running this command:
$ npm install --save laravel-echo pusher-js
Laravel Echo is a JavaScript library that makes it easy to subscribe to channels and listen for events broadcast by Laravel.
Now let’s configure Laravel Echo to work in our application. In the resources/assets/js/bootstrap.js file, find and uncomment this snippet of code:
    import Echo from 'laravel-echo'

    window.Pusher = require('pusher-js');

    window.Echo = new Echo({
         broadcaster: 'pusher',
         key: process.env.MIX_PUSHER_APP_KEY,
         cluster: process.env.MIX_PUSHER_APP_CLUSTER,
         encrypted: true
    });
The
keyandclusterwill pull the keys from your.envfile so no need to enter them manually again.
Now let’s import the Comments component into the single.blade.php file and pass along the required the props.
Open the single.blade.php file and replace its contents with the code below:
    {{-- File: ./resources/views/single.blade.php --}}
    @extends('layouts.master')

    @section('content')
    <div class="container">
      <div class="row">
        <div class="col-lg-10 mx-auto">
          <br>
          <h3 class="mt-4">
            {{ $post->title }}
            <span class="lead">by <a href="#">{{ $post->user->name }}</a></span>
          </h3>
          <hr>
          <p>Posted {{ $post->created_at->diffForHumans() }}</p>
          <hr>
          <img class="img-fluid rounded" src="{!! !empty($post->image) ? '/uploads/posts/' . $post->image : 'http://placehold.it/750x300' !!}" alt="">
          <hr>
          <div>
            <p>{{ $post->body }}</p>
            <hr>
            <br>
          </div>

          @auth
          <Comments
              :post-id='@json($post->id)'
              :user-name='@json(auth()->user()->name)'>
          </Comments>
          @endauth
        </div>
      </div>
    </div>
    @endsection
Building the comments view
Open the Comments.vue file and add the following markup template below:
    <template>
      <div class="card my-4">
        <h5 class="card-header">Leave a Comment:</h5>
        <div class="card-body">
          <form>
            <div class="form-group">
              <textarea ref="body" class="form-control" rows="3"></textarea>
            </div>
            <button type="submit" @click.prevent="addComment" class="btn btn-primary">
              Submit
            </button>
          </form>
        </div>
        <p class="border p-3" v-for="comment in comments">
           <strong>{{ comment.user.name }}</strong>:
           <span>{{ comment.body }}</span>
        </p>
      </div>
    </template>
Now, we’ll add a script that defines two methods:
fetchComments()- this will fetch all the existing comments when the component is created.addComment()- this will add a new comment by hitting the backend server. It will also trigger a new event that will be broadcast so all clients receive them in realtime.
In the same file, add the following below the closing template tag:
    <script>
    export default {
      props: {
        userName: {
          type: String,
          required: true
        },
        postId: {
          type: Number,
          required: true
        }
      },
      data() {
        return {
          comments: []
        };
      },

      created() {
        this.fetchComments();

        Echo.private("comment").listen("CommentSent", e => {
            this.comments.push({
              user: {name: e.user.name},
              body: e.comment.body,
            });
        });
      },

      methods: {
        fetchComments() {
          axios.get("/" + this.postId + "/comments").then(response => {
            this.comments = response.data;
          });
        },

        addComment() {
          let body = this.$refs.body.value;
          axios.post("/" + this.postId + "/comments", { body }).then(response => {
            this.comments.push({
              user: {name: this.userName},
              body: this.$refs.body.value
            });
            this.$refs.body.value = "";
          });
        }
      }
    };
    </script>
In the created() method above, we first made a call to the fetchComments() method, then we created a listener to the private comment channel using Laravel Echo. Once this listener is triggered, the comments property is updated.
Testing the application
Now let’s test the application to see if it is working as intended. Before running the application, we need to refresh our database so as to revert any changes. To do this, run the command below in your terminal:
$ php artisan migrate:fresh --seed
Next, let’s build the application so that all the changes will be compiled and included as a part of the JavaScript file. To do this, run the following command on your terminal:
$ npm run dev
Finally, let’s serve the application using this command:
$ php artisan serve
To test that our application works visit the application URL http://localhost:8000 on two separate browser windows, we will log in to our application on each of the windows as a different user.
We will finally make a comment on the same post on each of the browser windows and check that it updates in realtime on the other window:

Conclusion
In this final tutorial of this series, we created the comments feature of the CMS and also made it realtime. We were able to accomplish the realtime functionality using Pusher.
In this entire series, we learned how to build a CMS using Laravel and Vue.
The source code for this article series is available here on Github.
Originally published by Neo Ighodaro at https://pusher.com
#vue-js #laravel #php #javascript #web-development
