An Introduction to Dart and Flutter
A bit of background
It all began in 2011: Xamarin, now a Microsoft-owned company, came up with a solution for hybrid mobile apps through its signature product, Xamarin SDK with C#. And thus began the revolution of hybrid mobile applications, the ease in writing one code base for many platforms.
Ionic sprung up in 2013 with its first release by Drifty Co. Ionic helped web developers use their existing skills in the growing mobile app industry. In 2015, Facebook used React.js to reinvent it for mobile app developers. They gave us React Native, a completely JavaScript code base relying on native SDK’s.
And these aren’t the only ones, but a few of many hybrid mobile frameworks. More info can be found here.
Now we can watch Google’s turn at putting its fingers in the pie with Flutter.

What is Dart?
Google had its first ever release of Flutter 1.0 last December, after having it in beta mode for over 18 months. Dart is the programming language used to code Flutter apps. Dart is another product by Google and released version 2.1, before Flutter, in November. As it is starting out, the Flutter community is not as extensive as ReactNative, Ionic, or Xamarin.
A while back, I discovered a liking for JavaScript. I was ecstatic to be working on a ReactNative mobile app for my internship. I enjoy coding hybrid mobile apps too, so wanted to give Flutter a try, as I had done Xamarin sometime last year.
At my first glance of Flutter (and Dart), I felt befuddled and couldn’t seem to understand anything. They even had a section on their docs for developers moving from React Native. So, I took to digging deeper on all things Dart.
Dart looks a bit like C and is an object-oriented programming language. So, if you prefer the C languages or Java, Dart is the one for you, and you’ll likely be proficient in it.
Dart is not only used for mobile app development but is a programming language. Approved as a standard by Ecma (ECMA-408), it’s used to build just about anything on the web, servers, desktop and of course, mobile applications (Yes, the same people who standardized our favorites ES5 and ES6.)
Dart, when used in web applications, is transpiled to JavaScript so it runs on all web browsers. The Dart installation comes with a VM as well to run the .dart files from a command-line interface. The Dart files used in Flutter apps are compiled and packaged into a binary file (.apk or .ipa) and uploaded to app stores.
What does coding in Dart look like?
Like most ALGOL languages (like C# or Java):
- The entry point of a Dart class is the
main()method. This method acts as a starting point for Flutter apps as well. - The default value of most data types is
null. - Dart classes only support single inheritance. There can be only one superclass for a particular class but it can have many implementations of Interfaces.
- The flow control of certain statements, like if conditions, loops (for, while and do-while), switch-case, break and continue statements are the same.
- Abstraction works in a similar manner, allowing abstract classes and interfaces.
Unlike them (and sometimes a bit like JavaScript):
- The entry point of a Dart class is the
main()method. This method acts as a starting point for Flutter apps as well. - The default value of most data types is
null. - Dart classes only support single inheritance. There can be only one superclass for a particular class but it can have many implementations of Interfaces.
- The flow control of certain statements, like if conditions, loops (for, while and do-while), switch-case, break and continue statements are the same.
- Abstraction works in a similar manner, allowing abstract classes and interfaces.
And all these differences are just a few in the many that you can find in the Dart Language tour, which you can check out here.
Dart also has inbuilt libraries installed in the Dart SDK, the most commonly used being:
- The entry point of a Dart class is the
main()method. This method acts as a starting point for Flutter apps as well. - The default value of most data types is
null. - Dart classes only support single inheritance. There can be only one superclass for a particular class but it can have many implementations of Interfaces.
- The flow control of certain statements, like if conditions, loops (for, while and do-while), switch-case, break and continue statements are the same.
- Abstraction works in a similar manner, allowing abstract classes and interfaces.
You can find more information on Dart libraries here.
Using Dart in Flutter
Flutter has more app-specific libraries, more often on user interface elements like:
- The entry point of a Dart class is the
main()method. This method acts as a starting point for Flutter apps as well. - The default value of most data types is
null. - Dart classes only support single inheritance. There can be only one superclass for a particular class but it can have many implementations of Interfaces.
- The flow control of certain statements, like if conditions, loops (for, while and do-while), switch-case, break and continue statements are the same.
- Abstraction works in a similar manner, allowing abstract classes and interfaces.
You can find Flutter specific libraries here.
Setting up Flutter
So, to get this thing into gear, follow the Flutter docs. It gives details on installing the Flutter SDK and setting up your preferred IDE; mine would be VS code. Setting up VS code with the Flutter extension is helpful. It comes with inbuilt commands, as opposed to using the terminal.
Follow the docs again to create your first app. In my case, run the extension command Flutter: New Project. Afterward, type the project name and pick the destination folder.
If you prefer using the terminal, move to the destination folder of the app. Then use the command flutter create <app_name> to create the app folder. This generates the entire app folder, including the Android and iOS project folder. To open these folders, use Android Studio and XCode, for building the app.
In the root of the project, you find pubspec.yaml. This file contains the app’s dependencies. This includes both external libraries/modules and assets like images and config files. It works like a package.json, containing all external modules of the app. To install these packages, enter the package name and version under the dependencies: section of the pubspec.yaml. Run the command flutter packages get. Include the assets of the app inside the flutter: section of the same file.
The entry point of the app is main.dart, found inside the lib folder. This folder also contains all Dart classes (app pages or reusable components). On creation of the app, the main.dart file comes with a simple pre-written code. Before running this code, a device is either connected to the PC, with USB debugging enabled. Afterward, run the command flutter run on the terminal.
A First Look at the Flutter App
The app currently looks like this now:
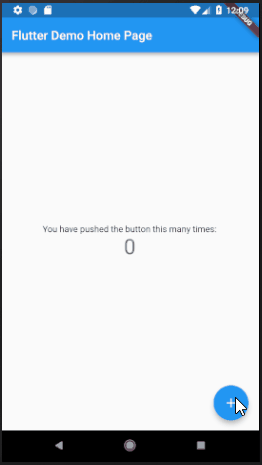
Building the user interface of a Flutter app makes use of Widgets.
Widgets work in a similar way to React. A widget uses different components to describe what the UI should look like. They can be either Stateful or Stateless. In Stateful components, the widget rebuilds due to state changes, to accommodate the new state.
When we look at the current code for the Home page, we see that it’s a Stateful page. If the counter variable increases, the framework tries to find the least expensive way to re-render the page. In this case, find the minimal difference between the current widget description and the future one. It takes into account the changed state.
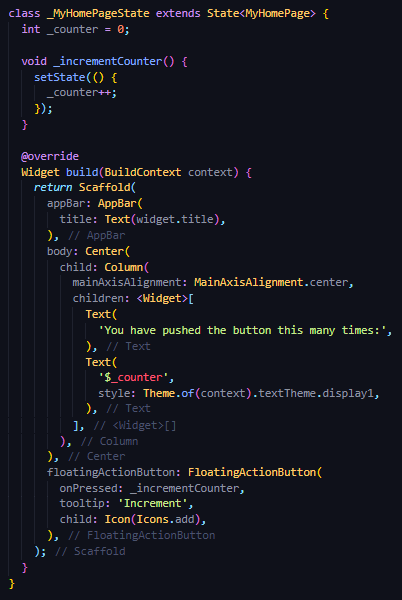
The Scaffold class is a material design layout structure and is the main container for the Home page. The AppBar, also a material design element is the title bar found at the top of the page. All other components, like the floating button and two text tags, fall under the body of the page. The Center class is a layout class that centers its child components vertically and horizontally.
The Column class, another layout widget, lists each child element vertically. Each of its child elements is added to an array and put underneath the children: section.
The two texts speak for themselves. The first displays the text ‘You have pushed.’ The second one displays the current value in the _counter variable.
The FloatingActionButton is part of the Material design widgets. It displays a + icon and triggers the increment of the _counter variable.
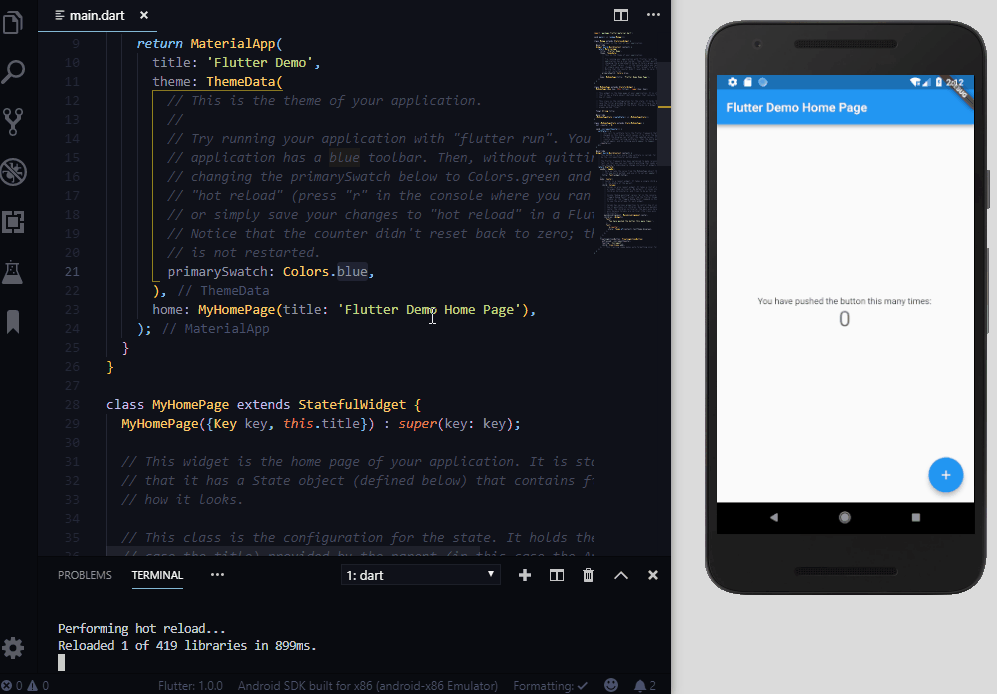
Hot Reloading
Another plus point of using Flutter is the hot reloading feature. It lets you see changes made to the code in real time, without restarting the build process. Type ‘r’ on the same console that you ran the flutter run command.
Altering the current code
As we can see, when you click the button, the _counter variable value increases. This re-renders the page and the new value is displayed on the body of the page.
I’m going to change that up a bit. For every button click, we will display a custom Card component with the item number.
Creating the Custom Card Component
So, to start off, we make a new .dart file inside the lib folder. I created mine in a subfolder commonComponents and named it customCard.dart.
import 'package:flutter/material.dart';

class CustomCard extends StatelessWidget {
  CustomCard({@required this.index});

final index;

@override
  Widget build(BuildContext context) {
    return Card(
      child: Column(
        children: <Widget>[Text('Card $index')],
      )
    );
  }
}
This component will be a stateless widget and will only display the value that we send to it, in the Text widget.
Displaying a List of Custom Cards
Import the above component to the main.dart like so:
import 'commonComponents/customCard.dart';
I then replace the code of the home page body, from the one above to this:
body: Center(
  child: Container(
    child: ListView.builder(
      itemCount: _counter,
      itemBuilder: (context, int index) {
        return CustomCard(
          index: ++index,
        );
      },
    )
  ),
),

It now displays a List of CustomCard elements, up to the number of times the button is clicked. The itemCount is used to define the number of elements the ListView must display. The itemBuilder returns the actual item that is displayed.
And that’s a simple example of using Flutter.
In conclusion…
Before my interest turned to JavaScript, I worked with Java. If I had encountered Dart around that time, I might have been able to understand it easier than I did now. All in all, It wasn’t too difficult but took a bit of time to get the hang of it. I could see myself using it in time.
Find the code repo, here.
Find the commit for this post, here.
#mobile-apps #flutter #ios #android #dart