Prerequisites
This post is suited for developers of all stages, including beginners.
Here are a few things you should already have before going through this article:
- Node.js version 10.x and above installed. You can verify that you have this version by running the command below in your terminal/command prompt:
node -v
- Visual Studio Code editor or a similar code editor.
- Vue’s latest version installed globally on your machine
- Vue CLI 3.0 installed on your machine. To do this, uninstall the old CLI version first:
npm uninstall -g vue-cli
then install the new one:
npm install -g @vue/cli
- Download a Vue starter project here.
- Unzip the downloaded project
- Navigate into the unzipped file and run the command to keep all the dependencies up-to-date:
npm install
The emitter problem
Vue has a way of communicating between two child components through a parent component using event emitters.
When you set up an event in a child component and a listener in the parent component, the reaction is passed down through the parent to the nested components.
While this is a valuable solution, it can become clumsy as your project grows.
You may also like:A Complete Beginner’s Guide to Vue
The solution: Event bus
Essentially, an event bus is a Vue.js instance that can emit events in one component, and then listen and react to the emitted event in another component directly — without the help of a parent component.
By definition, using an event bus is more efficient than using event emitters because it requires less code to run.
We’re going to create an event bus instance as a separate file, import it into the two components that are going to share data, and then allow the components to communicate through this shared instance in a safe, private channel.
This is commonly known as the publish-subscribe approach.
Demo
Today, we’re going to walk through the process of creating and using the event bus to facilitate communication between two components.
Getting started with the event bus
First, we want to create the event bus. We’ll do this inside our main.js file. After definition, your main.js file should look like this:
import Vue from 'vue'
import App from './App.vue'
Vue.config.productionTip = false
export const bus = new Vue();
new Vue({
  render: h => h(App),
}).$mount('#app')
As you can see, we’ve created a new Vue instance — a secure abstraction where we can handle communication between components without involving the parent component in the correspondence.
Creating a new component
We need two child components to communicate. However, you’ll notice there’s only one test.vue component in your starter project.
Create a new file and call it test2.vue and paste the code block below inside it:
<template>
  <div>
  </div>
</template>
<script>
export default {
  name: 'Test2',
  props: {
    msg: String
  }
}
</script>
<!-- Add "scoped" attribute to limit CSS to this component only -->
<style scoped>
h3 {
  margin: 40px 0 0;
}
ul {
  list-style-type: none;
  padding: 0;
}
li {
  display: inline-block;
  margin: 0 10px;
}
a {
  color: #42b983;
}
</style>
Now, go to your App.vue file and import it like the Test.vue file. Register the file under components like this:
<template>
  <div id="app">
    <img alt="Vue logo" src="./assets/logo.png">
    <Test v-bind:header="header"/>
    <Test2 v-bind:header="header"/>
  </div>
</template>
<script>
import Test from './components/Test.vue';
import Test2 from './components/Test2.vue';
export default {
  name: 'app',
  components: {
    Test, Test2
  },
  data (){
    return {
      header:'initial header'
    }
  }
}
</script>
<style>
#app {
  font-family: 'Avenir', Helvetica, Arial, sans-serif;
  -webkit-font-smoothing: antialiased;
  -moz-osx-font-smoothing: grayscale;
  text-align: center;
  color: #2c3e50;
  margin-top: 60px;
}
</style>
Setting up events
Now that your two components are ready, you can set up the event through emission in the Test component while you listen to the event in the Test2 component.
Open your Test.vue file and copy the code block below into it:
<template>
  <div>
      <h1 v-on:click="changeHeader">{{header}}</h1>
  </div>
</template>
<script>
import { bus } from '../main'
export default {
  name: 'Test',
  props: {
    header:{
        type: String
    }
  },
  methods: {
      changeHeader (){
          this.header = "changed header";
          bus.$emit('changeIt', 'changed header');
      }
  }
}
</script>
Here, you’ll see that the event bus was imported from main.js , the template displays one header element through props, and there is a click event on it that points to the logic in the methods section.
The manual change of the Test.vue component occurs inside the method section and emits an event through the event bus.
The statement tells Vue to emit an event called changeIt and pass the string changed header as argument.
Listening to events and reacting
After setting up the event, we need to make the second component listen and react to the event. Open your Test2.vue file and copy in the code block below:
<template>
  <div> <h1>{{header}}</h1>
  </div>
</template>
<script>
import { bus } from '../main';
export default {
  name: 'Test2',
  props: {
    header:{
        type: String
    }
  },
  created (){
    bus.$on('changeIt', (data) => {
      this.header = data;
    })
  }
}
</script>
When the event bus imports, all we see inside the template is the interpolation symbol. There isn’t a Vue directive or bindings.
We’ll use a lifecycle hook to initialize the listening process as the app is mounted on the DOM. The lifecycle hook is called created as the application is initialized.
The $on statement is now listening to a changeIt event, passing the data argument down, and setting it as the new header.
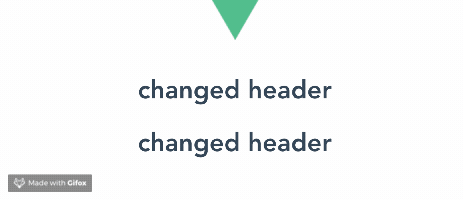
When you click the first header in the interface, both headers change.
Removing listeners
Vue automatically un-mounts and removes these listeners before the destruction of a Vue instance. However, if you want to manually destroy them, you can run this simple command:
bus.$off();
The complete code to this tutorial can be found here on GitHub.
Conclusion
This has been an introduction to the event bus in Vue.js. The event bus serves as a safe way to achieve independent communication between components without passing through a central or parent component.
The event bus is also cleaner and involves less code than other approaches, providing a great abstracted platform.
Originally published by Nwose Lotanna at blog.logrocket.com
#vue-js #javascript #web-development