How to Make image editor on Vue.js
With the advancement of web technologies like the HTML5 canvas API, adding graphics to a web app is easier than ever. Users are also expecting more graphics manipulation features from web apps. Therefore, things like photo editors are becoming more common as a feature in web apps.
Adding a photo editor is still a difficult task to do on your own. Fortunately, developers have stepped up to help us build a photo editor component. For Vue.js apps, we can use the Vue.js version of the TUI Image Editor package. The documentation is located at https://github.com/nhn/toast-ui.vue-image-editor.
In this article, we will make a simple photo editor app with this photo editor. To start, we run the Vue CLI by running:
npx @vue/cli create photo-editor
We keep the default options when running the wizard, so we press Enter through the default options. Next, we install the packages we need. We will use BootstrapVue for styling and the TUI Image Editor. To install them, run:
npm i @toast-ui/vue-image-editor bootstrap-vue
Next, we make our app. We start by replacing the existing code of Home.vue with the following:
<template>
 <div class="page">
   <div class="imageEditorApp">
     <b-button-toolbar>
       <b-button @click="cropMode()">Toggle Crop Mode</b-button>
     </b-button-toolbar>
     <br />
     <tui-image-editor ref="editor" :include-ui="useDefaultUI" :options="options"></tui-image-editor>
   </div>
 </div>
</template>
<script>
import { ImageEditor } from "@toast-ui/vue-image-editor";
const icona = require("tui-image-editor/dist/svg/icon-a.svg");
const iconb = require("tui-image-editor/dist/svg/icon-b.svg");
const iconc = require("tui-image-editor/dist/svg/icon-c.svg");
const icond = require("tui-image-editor/dist/svg/icon-d.svg");
const blackTheme = {
 "menu.normalIcon.path": icond,
 "menu.activeIcon.path": iconb,
 "menu.disabledIcon.path": icona,
 "menu.hoverIcon.path": iconc
};
export default {
 name: "home",
 components: {
   "tui-image-editor": ImageEditor
 },
 data() {
   return {
     useDefaultUI: true,
     options: {
       cssMaxWidth: window.innerWidth,
       cssHeight: 800,
       includeUI: {
         theme: blackTheme
       },
       initMenu: "filter"
     }
   };
 },
 methods: {
   cropMode() {
     const drawingMode = this.$refs.editor.invoke("getDrawingMode");
     if (drawingMode == "CROPPER") {
       this.$refs.editor.invoke("startDrawingMode", "FREE_DRAWING");
     } else {
       this.$refs.editor.invoke("startDrawingMode", "CROPPER");
     }
   },
 }
};
</script>
<style scoped>
.imageEditorApp {
 width: 95vw;
 height: calc(100vh - 150px);
}
</style>
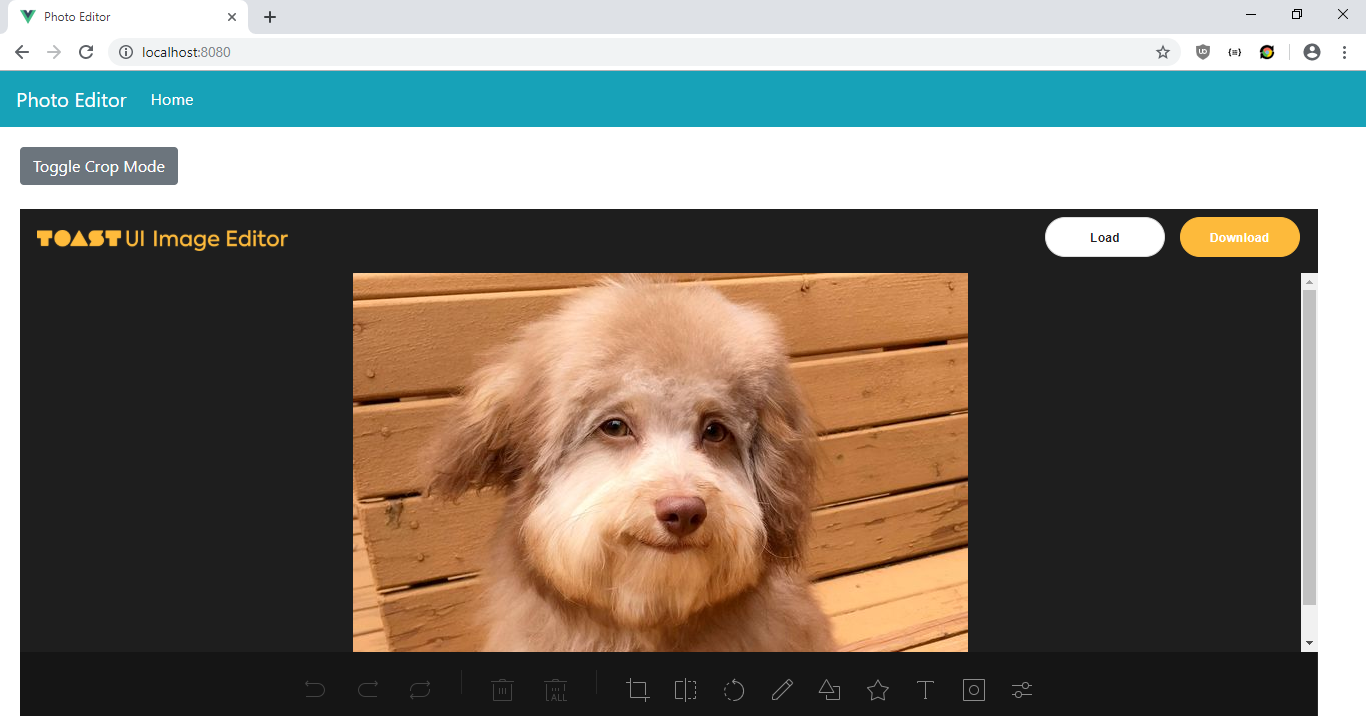
We added the photo editor here, along with a button toggle between cropper mode and free drawing mode at the top. The photo editor has lots of features. We can draw freely. Photos can be cropped. It’s also easy to add text. Brightness and contrast options are available. You can also add icons like arrows, stars, bubbles, hearts, and polygons. It also lets users add shapes like rectangles, circles, and triangles with their choice of fills and strokes. Users can also add different effects like changing brightness, create noise, change pictures to grayscale, add blur effect, etc.
In this file, we imported the icons at the top of the script section, and set them in the blackTheme object, so we see the icons. In the components object, we add the ImageEditor component so that we can use it in the templates section. In the data section, we have the options . We need to set the theme section so that we see the icons. The imageEditorApp class is where we set the height and width of the image editor. We set it to fill most of the page.
In the methods section, we have the cropMode method to toggle between free drawing and crop mode. We have:
const drawingMode = this.$refs.editor.invoke(“getDrawingMode”);
to get the current drawing mode so that we can toggle between the 2 modes.
Next in App.vue , we replace the existing code with:
<template>
  <div id="app">
    <b-navbar toggleable="lg" type="dark" variant="info">
      <b-navbar-brand to="/">Photo Editor</b-navbar-brand>
<b-navbar-toggle target="nav-collapse"></b-navbar-toggle>
<b-collapse id="nav-collapse" is-nav>
        <b-navbar-nav>
          <b-nav-item to="/" :active="path  == '/'">Home</b-nav-item>
        </b-navbar-nav>
      </b-collapse>
    </b-navbar>
    <router-view />
  </div>
</template>
<script>
export default {
  data() {
    return {
      path: this.$route && this.$route.path
    };
  },
  watch: {
    $route(route) {
      this.path = route.path;
    }
  }
};
</script>
<style lang="scss">
.page {
  padding: 20px;
}
button,
.btn.btn-primary {
  margin-right: 10px !important;
}
.button-toolbar {
  margin-bottom: 10px;
}
</style>
to add a Bootstrap navigation bar to the top of our pages, and a router-view to display the routes we define. This style section isn’t scoped so the styles will apply globally. In the .page selector, we add some padding to our pages. We add some padding to the buttons in the remaining style code.
Then in main.js , replace the existing code with:
import Vue from "vue";
import App from "./App.vue";
import router from "./router";
import store from "./store";
import BootstrapVue from "bootstrap-vue";
import "bootstrap/dist/css/bootstrap.css";
import "bootstrap-vue/dist/bootstrap-vue.css";
import "tui-image-editor/dist/tui-image-editor.css";
Vue.use(BootstrapVue);
Vue.config.productionTip = false;
new Vue({
  router,
  store,
  render: h => h(App)
}).$mount("#app");
We added all the libraries we need here, including BootstrapVue JavaScript and CSS, along with the CSS for the TUI Image Editor.
In router.js we replace the existing code with:
import Vue from "vue";
import Router from "vue-router";
import Home from "./views/Home.vue";
Vue.use(Router);
export default new Router({
  mode: "history",
  base: process.env.BASE_URL,
  routes: [
    {
      path: "/",
      name: "home",
      component: Home
    }
  ]
});
to include the home page in our routes so users can see the page.
Finally, in index.html , we replace the existing code with:
<!DOCTYPE html>
<html lang="en">
  <head>
    <meta charset="utf-8" />
    <meta http-equiv="X-UA-Compatible" content="IE=edge" />
    <meta name="viewport" content="width=device-width,initial-scale=1.0" />
    <link rel="icon" href="<%= BASE_URL %>favicon.ico" />
    <title>Photo Editor</title>
  </head>
  <body>
    <noscript>
      <strong
        >We're sorry but vue-photo-editor-tutorial-app doesn't work properly
        without JavaScript enabled. Please enable it to continue.</strong
      >
    </noscript>
    <div id="app"></div>
    <!-- built files will be auto injected -->
  </body>
</html>
to change the title of our app.
After all the hard work, we can start our app by running npm run serve .

#vuejs #javascript #vue-js
