How to Build Your Own Router with Vanilla JavaScript
When you think of routers you usually think of libraries like React. But under the hood these libraries and frameworks still use vanilla JavaScript. So how do they do it? I hope this JavaScript router tutorial will help you understand how to put your own vanilla JS router together.
I’ve met plenty of people who wanted to create their own router for various reasons. After all, you searched for this vanilla JS router tutorial – that means you’re looking to build one!
Bottom line, using a vanilla JS router reduces your dependency on frameworks.
Creating your own router in vanilla JavaScript is relatively easy as long as you understand all of the separate parts involved in making it.
Here are the key things to know about making your own JS router:
- The key to vanilla JS routing is the location.pathname property.
- Listen for the “popstate” event to respond to .pathname changes. This happens whenever a new URL is typed into browser’s address bar but we don’t want to refresh the page, but simply refresh the view by loading new content.
- You can optionally store routes in a routes[] array.
- Knowledge of JavaScript Regular Expressions (RegEx) to parse the URL is necessary.
- Basic understanding of history and history.pushState (JavaScript’s History API) is critical if you wish to integrate your router into native browser architecture.
I plan on building this tutorial over time because I’m learning as I’m writing it myself. First, we’ll tackle the History API.
A quick review of JavaScript History API
I’ve seen so many vanilla JS router tutorials that don’t mention JavaScript’s History API. Too bad, because clicking the browser’s Back and Forward buttons has everything to do with navigating between URLs in browsing history. You can’t speak about routing without the History API.
- history.back() is the same as history.go(-1), or when user clicks Back button in their browser. You can use either method to the same effect.
- history.forward() executes when user presses the browser’s Forward button, and it is equivalent to history.go(1).
- go() is similar to .back() and forward() methods, except you can specify how many steps back or forward you want to go within the browser history stack.
- pushState() will push new state to the History API.
- .length property is the number of elements in the session history.
- .state property is used to look up state without listening to “popstate” event.
OK, let’s get started with our own vanilla JS router implementation!
I’ll simply dump the minimum HTML, CSS, and JavaScript loaded with comments.
History API-based Vanilla JS Router Setup
Let’s go over the bare minimum of code required to build a URL-switcher (without refreshing the page) and then I’ll show you a GIF of how it all works.
<html>
    <head>
        <title>Hello</title>
        <script type = "module">
            function select_tab(id) {
                // remove selected class from all buttons
                document.querySelectorAll(".route").forEach(item => item.classList.remove('selected'));
                // select clicked element (visually)
                document.querySelectorAll("#" + id).forEach(item => item.classList.add('selected'));
            }
            function load_content(id) {
                // Update text "Content loading for {id}..."
                // Of course, here you would do you content loading magic
                // Perhaps run Fetch API to update resources
                document.querySelector("#content").innerHTML = 'Content loading for /' + id + '...';
            }
            function push(event) {
                // Get id attribute of the box or button or link clicked
                let id = event.target.id;
                // Visually select the clicked button/tab/box
                select_tab(id);
                // Update Title in Window's Tab
                document.title = id;
                // Load content for this tab/page
                loadContent(id);
                // Finally push state change to the address bar
                window.history.pushState({id}, `${id}`, `/page/${id}`);
            }
            window.onload = event => {
                // Add history push() event when boxes are clicked
                window["home"].addEventListener("click", event => push(event))
                window["about"].addEventListener("click", event => push(event))
                window["gallery"].addEventListener("click", event => push(event))
                window["contact"].addEventListener("click", event => push(event))
                window["help"].addEventListener("click", event => push(event))
            }
            // Listen for PopStateEvent (Back or Forward buttons are clicked)
            window.addEventListener("popstate", event => {
                // Grab the history state id
                let stateId = event.state.id;
                // Show clicked id in console (just for fun)
                console.log("stateId = ", stateId);
                // Visually select the clicked button/tab/box
                select_tab(stateId);
                // Load content for this tab/page
                loadContent(id);
            });
        </script>
        <style>
            * { /* global font */
                font-family: Verdana;
                font-size: 18px;
            }
            #root { display: flex; flex-direction: row; }
            #content { display: flex;
                display: block;
                width: 800px;
                height: 250px;
                /* vertically centered text */
                line-height: 250px;
                border: 2px solid #555;
                margin: 32px;
                text-align: center;
            }
            .route {
                cursor: pointer;
                justify-content: center;
                width: 150px;
                height: 50px;
                /* vertically centered text */
                line-height: 50px;
                position: relative;
                border: 2px solid #555;
                background: white;
                text-align: center;
                margin: 16px;
            }
            .route.selected { background: yellow; }
        </style>
    </head>

    <body>

        <section id = "root">
            <section class = "route" id = "home">/home</section>
            <section class = "route" id = "about">/about</section>
            <section class = "route" id = "gallery">/gallery</section>
            <section class = "route" id = "contact">/contact</section>
            <section class = "route" id = "help">/help</section>
        </section>

        <main id = "content">Content loading...</main>

    </body>

</html>
At the core is a call to window.history.pushState({id}, ${id}, /page/${id});
The first parameter is a unique id of the state. The second is Tab Title text. Finally, the third parameter is what you want your address bar to change to. This is what makes the browser change URL without reloading the page.
The results. Now every time we click on a button the URL will actually change in browser’s address bar. The content box updates too.
You can fork it from my GitHub (router.html) in my vanilla JS library.
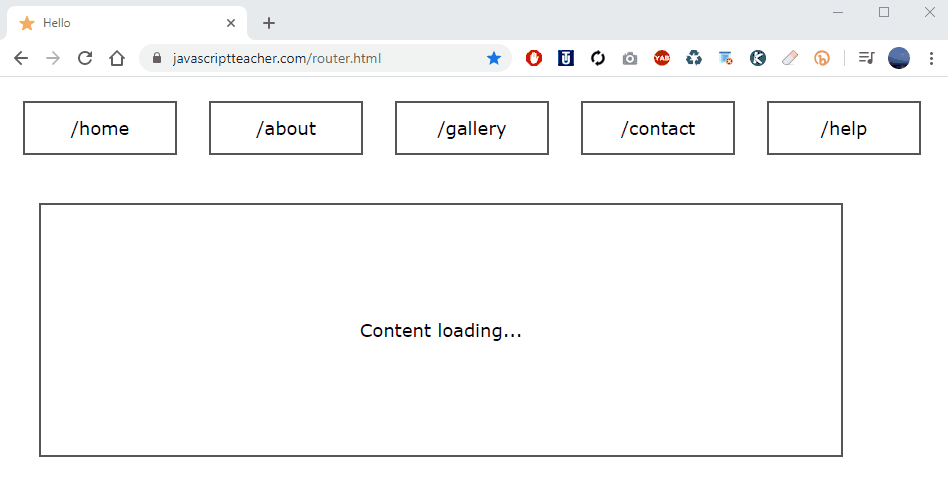
Our vanilla JS router in action. Note that every time a button is clicked, history.pushState is triggered. We simply pass it the id of the clicked element stored in element’s id attribute: home, about, gallery, and so on. They should coincide with the actual page you want to navigate to. Of course, this isn’t the only way to store page names – you can use an array[], for example, or any other way. It’s just the way it was done in this example.
Of course we also need to load content from the server referring to layouts and resources for that location. This is up to your application. It can be anything.
Making the Back and Forward buttons work
By using history.pushState, you will automatically make the Back and Forward buttons navigate to the previous or next state. Doing that produces the popstate event. This is the part where you must update your view once again. (The first time was when we clicked on the button.)
But since the event carries an id of what was clicked, it’s easy to update the view and reload content when Back or Forward are clicked.
We’re not using React or Vue here, so in my source code load_content will take care of updating the view directly in DOM. This area is likely to be populated with some content loaded from your API. Since this is only the front-end example, there isn’t much I can show you. But that’s how it works on client-side.
Initial Router Load From the Server-Side
There is one more step required to put it all together. In my example I simply used router.html. When you load this router for the first time in a PWA, you have to make sure it works if, let’s say, ./page/home was entered directly into address bar.
So far we’ve changed router address only from the front-end. It is assumed that every time you navigate to the URL that appears on our router buttons it will actually be individually loaded from the server.
So it’s your responsibility to make sure that, for example, ./page/about will load the router and the for the page into root view of your application. It should also highlight the “current” button/tab.
Once you implement that part your router will be complete. How you choose to reload content in #content element is entirely up to you and your back-end design.
Originally published by JavaScript Teacher at https://www.freecodecamp.org
#javascript #webdev