How to set up email-validation in React
How to set up email-validation in React (+live demo)
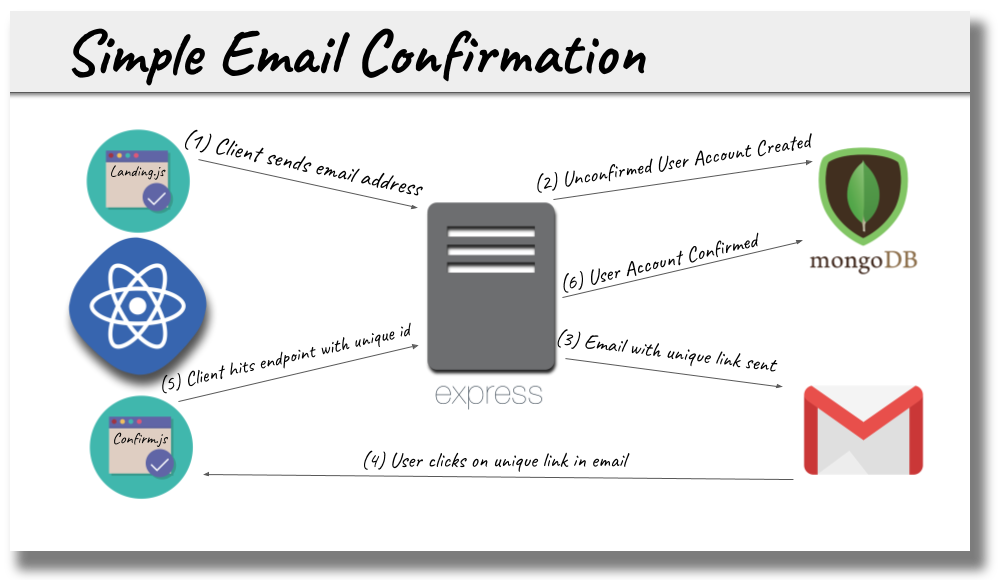
It sounds so simple! Confirming an email address has been around as long as… email addresses.
We all know the workflow.
Collect an email to confirm, send the user a link and then update the database to confirm when the user clicks the link.
Three simple steps.
But…
To be able to pull it off we are going to need to wire up a full stack MERN application. And that sounds like a great opportunity to learn about how Mongo, Express, React and Node play well together.
React Client
The Client is bootstrapped with Create React App. I am assuming you already have some experience with CRA. If not, here is a great tutorial.
To me, it is important that a user has these 3 things:
- An application that is in a workable state before they can doSomething()
- Feedback that something is happening when the application is doing work
- Confirmation that the application has finished doing work
The Client for this application has only a few components and could be written with much less code (and comments) than what you will see below.
I chose to trade code overhead for enhanced user experience.
Tip: Use Bit to manage reusable components and save time. Keep a collection of your useful components, use them in multiple projects and easily sync changes. It will help you build faster, give it a try.
But enough talk, time to JavaScript.
App.js
react-confirm-email-client-App.js
import React, { Component } from 'react'
import { BrowserRouter, Route, Redirect, Switch } from 'react-router-dom'
import Notifications from 'react-notify-toast'
import 'react-toastify/dist/ReactToastify.css'

import Landing from './components/Landing'
import Confirm from './components/Confirm'
import Spinner from './components/Spinner'
import Footer from './components/Footer/Footer'
import { API_URL } from './config'
import './App.css'

export default class App extends Component {

  // A bit of state to make sure the server is up and running before the user
  // can interact with the app.
  state = {
    loading: true
  }

  // When the component mounts, a simple GET request is made to 'wake up' the
  // server. A lot of free services like Heroku and Now.sh will put your server
  // to sleep if no one has used your application in a few minutes. Using a
  // service like uptimerobot.com to ping the server regularly can mitigate
  // sleepiness.
  componentDidMount = () => {
    fetch(`${API_URL}/wake-up`)
      .then(res => res.json())
      .then(() => {
        this.setState({ loading: false })
      })
      .catch(err => console.log(err))
  }

  // You are probaly used to seeing React 'render()' methods written like this:
  //
  // render() {
  //   return (
  //     <Some jsx />
  //   )
  // }
  //
  // Below is a version of writing a 'render()' that also works. The 'why does
  // it work?' is related to the 'this' keyword in JavaScript and is beyond the
  // scope of this post.

  render = () => {

    // The 'content' function determines what to show the user based on whether
    // the server is awake or not.
    const content = () => {

      // The server is still asleep, so provide a visual cue with the <Spinner />
      // component to give the user that feedback.
      if (this.state.loading) {
        return <Spinner size='8x' spinning='spinning' />
      }

      // The server is awake! React Router is used to either show the
      // <Landing /> component where the emails are collected or the <Confirm />
      // component where the emails are confirmed.
      return (
        <BrowserRouter>
          <Switch>
            {/*
              the ':id' in this route will be the unique id the database
              creates and is available on 'this.props' inside the <Confirm />
              component at this.props.match.params.id
            */}
            <Route exact path='/confirm/:id' component={Confirm} />
            <Route exact path='/' component={Landing} />
            <Redirect from='*' to='/'/>
          </Switch>
        </BrowserRouter>
      )
    }

    return (
      // The 'container' class uses flexbox to position and center its three
      // children: <Notifications />, <main> and <Footer />
      <div className='container fadein'>
        {/*
          <Notifications > component from 'react-notify-toast' This is the
          placeholder on the dom that will hold all the feedback toast messages
          whenever notify.show('My Message!') is called.
        */}
        <Notifications />
        <main>
          {content()}
        </main>
        {/*
          For every Medium post I write I include a demo app that uses the same
          footer. So, I have abstracted that out to use on future posts with
          just a couple of props passed in.
        */}
        <Footer
          mediumId={'257e5d9de725'}
          githubRepo={'react-confirm-email'}
        />
      </div>
    )
  }
}
Landing.js
This component is shown when the user drops into the workable application.
react-confirm-email-client-Landing.js
import React, { Component } from 'react'
import { notify } from 'react-notify-toast'
import Spinner from './Spinner'
import { API_URL } from '../config'

export default class Landing extends Component {

  // A bit of state to give the user feedback while their email address is being
  // added to the User model on the server.
  state = {
    sendingEmail: false
  }

  onSubmit = event => {
    event.preventDefault()
    this.setState({ sendingEmail: true})

    // Super interesting to me that you can mess with the upper and lower case
    // of the headers on the fetch call and the world does not explode.
    fetch(`${API_URL}/email`, {
      method: 'pOSt',
      headers: {
        aCcePt: 'aPpliCaTIon/JsOn',
        'cOntENt-type': 'applicAtion/JSoN'
      },
      body: JSON.stringify({ email: this.email.value })
    })
    .then(res => res.json())
    .then(data => {

      // Everything has come back successfully, time to update the state to
      // reenable the button and stop the <Spinner>. Also, show a toast with a
      // message from the server to give the user feedback and reset the form
      // so the user can start over if she chooses.
      this.setState({ sendingEmail: false})
      notify.show(data.msg)
      this.form.reset()
    })
    .catch(err => console.log(err))
  }

  render = () => {

    // This bit of state provides user feedback in the component when something
    // changes. sendingEmail is flipped just before the fetch request is sent in
    // onSubmit and then flipped back when data has been received from the server.
    // How many times is the 'sendingEmail' variable used below?
    const { sendingEmail } = this.state

    return (
      // A ref is put on the form so that it can be reset once the submission
      // process is complete.
      <form
        onSubmit={this.onSubmit}
        ref={form => this.form = form}
      >
        <div>
          <input
            type='email'
            name='email'
            ref={input => this.email = input}
            required
          />
          {/*
            Putting the label after the input allows for that neat transition
            effect on the label when the input is focused.
          */}
          <label htmlFor='email'>email</label>
        </div>
        <div>
          {/*
            While the email is being sent from the server, provide feedback that
            something is happening by disabling the button and showing a
            <Spinner /> inside the button with a smaller 'size' prop passed in.
          */}
          <button type='submit' className='btn' disabled={sendingEmail}>
            {sendingEmail
              ? <Spinner size='lg' spinning='spinning' />
              : "Let's Go!"
            }
          </button>
        </div>
      </form>
    )
  }
}
Confirm.js
This is the component that is loaded by React Router when the user has clicked on the unique link in the email sent to their email address.
react-confirm-email-client-Confirm.js
import React, {Component} from 'react'
import { Link } from 'react-router-dom'
import { notify } from 'react-notify-toast'
import Spinner from './Spinner'
import { API_URL } from '../config'

export default class Confirm extends Component {

  // A bit of state to give the user feedback while their email
  // address is being confirmed on the User model on the server.
  state = {
    confirming: true
  }

  // When the component mounts the mongo id for the user is pulled  from the
  // params in React Router. This id is then sent to the server to confirm that
  // the user has clicked on the link in the email. The link in the email will
  // look something like this:
  //
  // http://localhost:3000/confirm/5c40d7607d259400989a9d42
  //
  // where 5c40d...a9d42 is the unique id created by Mongo
  componentDidMount = () => {
    const { id } = this.props.match.params

    fetch(`${API_URL}/email/confirm/${id}`)
      .then(res => res.json())
      .then(data => {
        this.setState({ confirming: false })
        notify.show(data.msg)
      })
      .catch(err => console.log(err))
  }

  // While the email address is being confirmed on the server a spinner is
  // shown that gives visual feedback. Once the email has been confirmed the
  // spinner is stopped and turned into a button that takes the user back to the
  // <Landing > component so they can confirm another email address.
  render = () =>
    <div className='confirm'>
      {this.state.confirming
        ? <Spinner size='8x' spinning={'spinning'} />
        : <Link to='/'>
            <Spinner size='8x' spinning={''} />
          </Link>
      }
    </div>
}
view raw
Spinner.js
If you were paying close attention above, we actually used the component 4 different times! The only thing that changed was the props that were passed into the component.
Spinner.js provides feedback:
- An application that is in a workable state before they can doSomething()
- Feedback that something is happening when the application is doing work
- Confirmation that the application has finished doing work
All of that in 8 lines of awesome Reactiness.
react-confirm-email-client-Spinner.js
import React from 'react'
import { FontAwesomeIcon } from '@fortawesome/react-fontawesome'
import { faSync } from '@fortawesome/free-solid-svg-icons'

export default props =>
  <div className={`fadeIn ${props.spinning}`}>
    <FontAwesomeIcon icon={faSync} size={props.size} />
  </div>
And…
Spinner.js is the end of the Client.
I know that probably seems like a lot of code for the simple task of confirming an email address. However, if the feedback bits (and comments) were removed it could easily be cut in half.
But that would chop the user experience in half as well.
It is important to keep the user in the loop that things are happening plus have an application that is fully loaded and ready to go before the user tries to doSomething().
Providing feedback will add to the code footprint but it also provides a better experience.
Now we just need to get the Client a Server to talk to.
Are you ready to write a Server?
Server
In order to get the server up and running we are going to have to take a couple of setup steps.
- An application that is in a workable state before they can doSomething()
- Feedback that something is happening when the application is doing work
- Confirmation that the application has finished doing work
Creating a new gmail
You can sign up for a new gmail account here. I wouldn’t use a gmail account you care about for this application because your credentials are going to be in a .env file floating around on your computer plus you will need to ‘allow less secure apps’ on the account as discussed below.
Better to be safe than sorry.
It is possible to run this application with any email provider that you want. The settings would be a little different in the sendEmail.js file below depending on which provider you are using.
For simplicity’s sake, we are going to stick to gmail.
After you have signed up with gmail, you will need to plug the credentials for your new gmail account into a .env file on the server. If you need a little help with that, please read this.
server/.env should be:
MAIL_USER=your_new_email_address@gmail.com
MAIL_PASS=your_new_password
Important: In order for your newly created gmail account to be able to send emails on your behalf (and allow this application to run), you will need to allow ‘Less secure app access’.
Getting Mongo Running
If you already have Mongo installed locally you know what to do…
$ mongod
If you need to set up Mongo locally, this is a good post on how to accomplish that. If you do not want to go through the local process, try using a hosted database like mLab.
user.model.js
For the Mongoose model we only need to track two things. An email address and whether or not it has been confirmed.
react-confirm-email-server-user.model.js
const mongoose = require('mongoose')
const Schema = mongoose.Schema

// Data we need to collect/confirm to have the app go.
const fields = {
  email: {
    type: String
  },
  confirmed: {
    type: Boolean,
    default: false
  }
}

// One nice, clean line to create the Schema.
const userSchema = new Schema(fields)

module.exports = mongoose.model('User', userSchema)
server.js
If you have read any of my other posts like React Authentication with Twitter, Google, Facebook and Github or Simple Image Upload with React you will know I like to keep the server.js file light and shell off work to other files.
No exceptions here.
Just a couple pieces of middleware, a few routes and a connection to the database.
Keep it clean.
react-confirm-email-server-server.js
require('dotenv').config()
const express = require('express')
const mongoose = require('mongoose')
const cors = require('cors')

const app = express()
const emailController = require('./email/email.controller')
const { PORT, CLIENT_ORIGIN, DB_URL } = require('./config')

// Only allow requests from our client
app.use(cors({
  origin: CLIENT_ORIGIN
}))

// Allow the app to accept JSON on req.body
app.use(express.json())

// This endpoint is pinged every 5 mins by uptimerobot.com to prevent
// free services like Heroku and Now.sh from letting the app go to sleep.
// This endpoint is also pinged every time the client starts in the
// componentDidMount of App.js. Once the app is confirmed to be up, we allow
// the user to perform actions on the client.
app.get('/wake-up', (req, res) => res.json('👌'))

// This is the endpoint that is hit from the onSubmit handler in Landing.js
// The callback is shelled off to a controller file to keep this file light.
app.post('/email', emailController.collectEmail)

// Same as above, but this is the endpoint pinged in the componentDidMount of
// Confirm.js on the client.
app.get('/email/confirm/:id', emailController.confirmEmail)

// Catch all to handle all other requests that come into the app.
app.use('*', (req, res) => {
  res.status(404).json({ msg: 'Not Found' })
})

// To get rid of all those semi-annoying Mongoose deprecation warnings.
const options = {
  useCreateIndex: true,
  useNewUrlParser: true,
  useFindAndModify: false
}

// Connecting the database and then starting the app.
mongoose.connect(DB_URL, options, () => {
  app.listen(PORT, () => console.log('👍'))
})
// The most likely reason connecting the database would error out is because
// Mongo has not been started in a separate terminal.
.catch(err => console.log(err))
email.controller.js
Finally, the brains of the operation.
email.controller.js collects the relevant bits of info off of the routes, updates the database based off that info and sends feedback to the Client so the user knows what has happened.
The big thing to note is that presentational data (like what content goes into the emails or what messages get sent back in the responses) have been moved to their own files.
That keeps the controller tight like a tiger.
react-confirm-email-server-email.controller.js
const User = require('../user.model')
const sendEmail = require('./email.send')
const msgs = require('./email.msgs')
const templates = require('./email.templates')

// The callback that is invoked when the user submits the form on the client.
exports.collectEmail = (req, res) => {
  const { email } = req.body

  User.findOne({ email })
    .then(user => {

      // We have a new user! Send them a confirmation email.
      if (!user) {
        User.create({ email })
          .then(newUser => sendEmail(newUser.email, templates.confirm(newUser._id)))
          .then(() => res.json({ msg: msgs.confirm }))
          .catch(err => console.log(err))
      }

      // We have already seen this email address. But the user has not
      // clicked on the confirmation link. Send another confirmation email.
      else if (user && !user.confirmed) {
        sendEmail(user.email, templates.confirm(user._id))
          .then(() => res.json({ msg: msgs.resend }))
      }

      // The user has already confirmed this email address
      else {
        res.json({ msg: msgs.alreadyConfirmed })
      }

    })
    .catch(err => console.log(err))
}

// The callback that is invoked when the user visits the confirmation
// url on the client and a fetch request is sent in componentDidMount.
exports.confirmEmail = (req, res) => {
  const { id } = req.params

  User.findById(id)
    .then(user => {

      // A user with that id does not exist in the DB. Perhaps some tricky
      // user tried to go to a different url than the one provided in the
      // confirmation email.
      if (!user) {
        res.json({ msg: msgs.couldNotFind })
      }

      // The user exists but has not been confirmed. We need to confirm this
      // user and let them know their email address has been confirmed.
      else if (user && !user.confirmed) {
        User.findByIdAndUpdate(id, { confirmed: true })
          .then(() => res.json({ msg: msgs.confirmed }))
          .catch(err => console.log(err))
      }

      // The user has already confirmed this email address.
      else  {
        res.json({ msg: msgs.alreadyConfirmed })
      }

    })
    .catch(err => console.log(err))
}
email.msgs.js
It is important to shell non-functional code like this off on into its own file. It keeps the files with functionality more concise and makes it easier to reason about the application’s logic.
react-confirm-email-server-email.msgs.js
module.exports = {
  confirm: 'Email sent, please check your inbox to confirm',
  confirmed: 'Your email is confirmed!',
  resend: 'Confirmation email resent, maybe check your spam?',
  couldNotFind: 'Could not find you!',
  alreadyConfirmed: 'Your email was already confirmed'
}
email.send.js
Nodemailer is a npm module that sends email.
email.send.js
const nodemailer = require('nodemailer')

// The credentials for the email account you want to send mail from.
const credentials = {
  host: 'smtp.gmail.com',
  port: 465,
  secure: true,
  auth: {
    // These environment variables will be pulled from the .env file
    user: process.env.MAIL_USER,
    pass: process.env.MAIL_PASS
  }
}

// Getting Nodemailer all setup with the credentials for when the 'sendEmail()'
// function is called.
const transporter = nodemailer.createTransport(credentials)

// exporting an 'async' function here allows 'await' to be used
// as the return value of this function.
module.exports = async (to, content) => {

  // The from and to addresses for the email that is about to be sent.
  const contacts = {
    from: process.env.MAIL_USER,
    to
  }

  // Combining the content and contacts into a single object that can
  // be passed to Nodemailer.
  const email = Object.assign({}, content, contacts)

  // This file is imported into the controller as 'sendEmail'. Because
  // 'transporter.sendMail()' below returns a promise we can write code like this
  // in the contoller when we are using the sendEmail() function.
  //
  //  sendEmail()
  //   .then(() => doSomethingElse())
  //
  // If you are running into errors getting Nodemailer working, wrap the following
  // line in a try/catch. Most likely is not loading the credentials properly in
  // the .env file or failing to allow unsafe apps in your gmail settings.
  await transporter.sendMail(email)

}
email.templates.js
There is only one type of email (confirmation) that is sent in this application. As a result, you could roll this template file into email.controller.js or email.send.js.
However, doing so would couple presentation to functionality and email.templates.js does not have anything to do with the logic of the application.
As a result, it should live in its own box.
As a bonus, if we wanted to add an ‘Unconfirmed’ or ‘Happy Birthday’ or ‘Whatever You Want’ email workflow this file is now easily extensible.
react-confirm-email-server-email.templates.js
const { CLIENT_ORIGIN } = require('../config')

// This file is exporting an Object with a single key/value pair.
// However, because this is not a part of the logic of the application
// it makes sense to abstract it to another file. Plus, it is now easily
// extensible if the application needs to send different email templates
// (eg. unsubscribe) in the future.
module.exports = {

  confirm: id => ({
    subject: 'React Confirm Email',
    html: `
      <a href='${CLIENT_ORIGIN}/confirm/${id}'>
        click to confirm email
      </a>
    `,
    text: `Copy and paste this link: ${CLIENT_ORIGIN}/confirm/${id}`
  })

}
Takeaways
A simple workflow like collecting an email address needs a full blown application to be able to complete the workflow.
But by separating the Client and Server into isolated and recyclable pieces the application can become extensible if the functionality grows in the future.
Pretty neat.
Thanks for reading this post, if something was unclear or you have a different way of approaching this workflow (or you want to shout this post out) I would love to hear about it in the comments below. Thanks for reading!
Saludos
Learn more
☞ Learn ReactJS: Code Like A Facebook Developer
☞ ReactJS Course: Learn JavaScript Library Used by Facebook&IG
☞ React: Learn ReactJS Fundamentals for Front-End Developers
☞ Build Realtime Apps | React Js, Golang & RethinkDB
#reactjs