Creating a RESTful Web API with Node.js and Express.js from scratch
In this article, I’ll show you step by step how to create a RESTful Web API with Node.js and Express.js by building a simple and useful Todo API. This article assumes you have basic javascript knowledge and terminal using capabilities.
You can also build a Web API in Node.js by using another framework except Express.js but Express.js is one of the most popular web framework for Node.js.
You can found the final source code of this Web API in this github repository.
Let’s start to create our mentioned Web API.
Before start
If you have never used Node.js or npm package manager you should install them.
To check whether the Node.js is already installed on your computer, open your terminal and run node -v command. If you see your Node.js version it’s installed. Otherwise go to below link.
Click here to download and install Node.js (You can choose LTS version)
And if you don’t have any IDE or text editor for writing javascript I advice you Visual Studio Code.
Click here to download VS Code (Optional)
About express-generator
In fact we could use <a href="https://expressjs.com/en/starter/generator.html" target="_blank">express-generator</a> tool which designed to creating an Express Web API quickly but I want to create this API from scratch because of that tool puts some extra files and folder structures that we don’t need them now. But you can use this useful tool next time on creating new Web API. I won’t use it now due to keep article simple.
Creating Project
Go to your workspace root folder and create a new folder there named "todo-api".
Then create "package.json" and "server.js" files into "todo-api" folder like below.
package.json
{
    "name": "todo-api",
    "version": "1.0.0",
    "scripts": {
        "start": "node server.js"
    },
    "dependencies": {
        "express": "^4.16.4"
    }
}
server.js
const http = require('http');
const express = require('express');
const app = express();
app.use(express.json());
app.use('/', function(req, res) {
    res.send('todo api works');
});
const server = http.createServer(app);
const port = 3000;
server.listen(port);
console.debug('Server listening on port ' + port);
After creating above files open your terminal in the "todo-api" folder and run npm installcommand.
This command will be install your project dependencies which pointed at the "package.json" file.
After finished package download process, downloaded dependency files will be installed into"node_modules" folder at the root of the "todo-api" folder.
After finished package installing then run npm start to start our Web API.
Now our Web API listening. To see result open your web browser then write localhost:3000 to address bar and press enter.
As result you’ll see our request handler response in your browser: “todo api works”.
This is a dead simple Express.js Web API. And it needs the some development. For example we need to an api endpoint to get todo items. So let’s add a new API endpoint for this.
Create a new folder named "routes" in the root of the "todo-api" folder.
Then create a "items.js" file inside of "routes" folder and put following codes inside it.
Your final folder structure should be like below;
/todo-api
/node_modules
/routes
    items.js
package.json
server.js
items.js
const express = require('express');
const router = express.Router();
const data = [
    {id: 1, title: 'Finalize project', order: 1, completed: false, createdOn: new Date()},
    {id: 2, title: 'Book ticket to London', order: 2, completed: false, createdOn: new Date()},
    {id: 3, title: 'Finish last article', order: 3, completed: false, createdOn: new Date()},
    {id: 4, title: 'Get a new t-shirt', order: 4, completed: false, createdOn: new Date()},
    {id: 5, title: 'Create dinner reservation', order: 5, completed: false, createdOn: new Date()},
];
router.get('/', function (req, res) {
    res.status(200).json(data);
});
router.get('/:id', function (req, res) {
    let found = data.find(function (item) {
        return item.id === parseInt(req.params.id);
    });
    if (found) {
        res.status(200).json(found);
    } else {
        res.sendStatus(404);
    }
});
module.exports = router;
Initial code of "items.js" file contains two endpoints. First one gets all todo items and second one gets one item which matches given id parameter.
Before testing items routes we should register it in the "server.js" file.
Modify "server.js" file like below to register new item routes.
server.js
const http = require('http');
const express = require('express');
const itemsRouter = require('./routes/items');
const app = express();
app.use(express.json());
app.use('/items', itemsRouter);
app.use('/', function(req, res) {
    res.send('todo api works');
});
const server = http.createServer(app);
const port = 3000;
server.listen(port);
console.debug('Server listening on port ' + port);
Now run npm start to start our Web API.
Then open your web browser and write localhost:3000/items to address bar and press enter.
You’ll see todo items json array in the response body.
And write localhost:3000/items/3 to address bar and press enter.
You’ll see the todo item which has id 3 in the response body.
But not finished up yet.
CRUD Operations and HTTP methods
I think we’ll need CRUD operations to Create, Read, Update and Delete todo items.
We have already two endpoints for getting items. So we need Create, Update and Delete endpoints.
Let’s add also these endpoints into the items.js file.
Our final "items.js" file and endpoints should be like below.
const express = require('express');
const router = express.Router();

const data = [
  {id: 1, title: 'Finalize project',          order: 1, completed: false, createdOn: new Date()},
  {id: 2, title: 'Book ticket to London',     order: 2, completed: false, createdOn: new Date()},
  {id: 3, title: 'Finish last article',       order: 3, completed: false, createdOn: new Date()},
  {id: 4, title: 'Get a new t-shirt',         order: 4, completed: false, createdOn: new Date()},
  {id: 5, title: 'Create dinner reservation', order: 5, completed: false, createdOn: new Date()},
];

router.get('/', function (req, res) {
  res.status(200).json(data);
});

router.get('/:id', function (req, res) {
  let found = data.find(function (item) {
    return item.id === parseInt(req.params.id);
  });

  if (found) {
    res.status(200).json(found);
  } else {
    res.sendStatus(404);
  }
});

router.post('/', function (req, res) {
  let itemIds = data.map(item => item.id);
  let orderNums = data.map(item => item.order);

  let newId = itemIds.length > 0 ? Math.max.apply(Math, itemIds) + 1 : 1;
  let newOrderNum = orderNums.length > 0 ? Math.max.apply(Math, orderNums) + 1 : 1;

  let newItem = {
    id: newId,
    title: req.body.title,
    order: newOrderNum,
    completed: false,
    createdOn: new Date()
  };

  data.push(newItem);

  res.status(201).json(newItem);
});

router.put('/:id', function (req, res) {
  let found = data.find(function (item) {
    return item.id === parseInt(req.params.id);
  });

  if (found) {
    let updated = {
      id: found.id,
      title: req.body.title,
      order: req.body.order,
      completed: req.body.completed
    };

    let targetIndex = data.indexOf(found);

    data.splice(targetIndex, 1, updated);

    res.sendStatus(204);
  } else {
    res.sendStatus(404);
  }
});

router.delete('/:id', function (req, res) {
  let found = data.find(function (item) {
    return item.id === parseInt(req.params.id);
  });

  if (found) {
    let targetIndex = data.indexOf(found);

    data.splice(targetIndex, 1);
  }

  res.sendStatus(204);
});

module.exports = router;
Short Explanation
I wanna explain shortly some points of our last codes.
First of all you must have noticed that our api works on a static data and keeps it on memory. All of our GET, POST, PUT and DELETE http methods just manipulate a json array. The purpose of this is to keep article simple and draw attention to the Web API structure.
Due to this situation our POST method has some extra logic such as calculating next item ids and order numbers.
So you can modify logic and data structures in these http methods to use a database or whatever you want.
Testing API with Postman
We have tested the GET methods of our Web API in our web browser and seen responses. But we can’t test directly POST, PUT and DELETE http methods in web browser.
If you want to test also other http methods you should use Postman or another http utility.
Now I’ll show you how to test the Web API with Postman
Before we start click here and install Postman.
When you first launch Postman after installing you’ll see start window. Close this start window by clicking close button on top right corner. Then you must see following screen.

An empty Postman request
Sending GET Request
Before sending a request to API we should start it by running npm startcommand as we do before.
After start the Web API and seeing “Server listening on…” message write localhost:3000/itemsto address bar as seen below and click Send button. You’ll see todo items array as API response like below.

Sending a GET request with Postman
You can try similarly by giving an item id in request url like this localhost:3000/items/3
Sending POST Request
To sending a POST request and create a new todo item write localhost:3000/items to address bar and change HTTP verb to POST by clicking arrow at front of the address bar as seen below.

Sending a POST request with Postman
Before sending the POST request you should add request data to body of the request by clicking body tab and selecting raw and JSON as seen below.
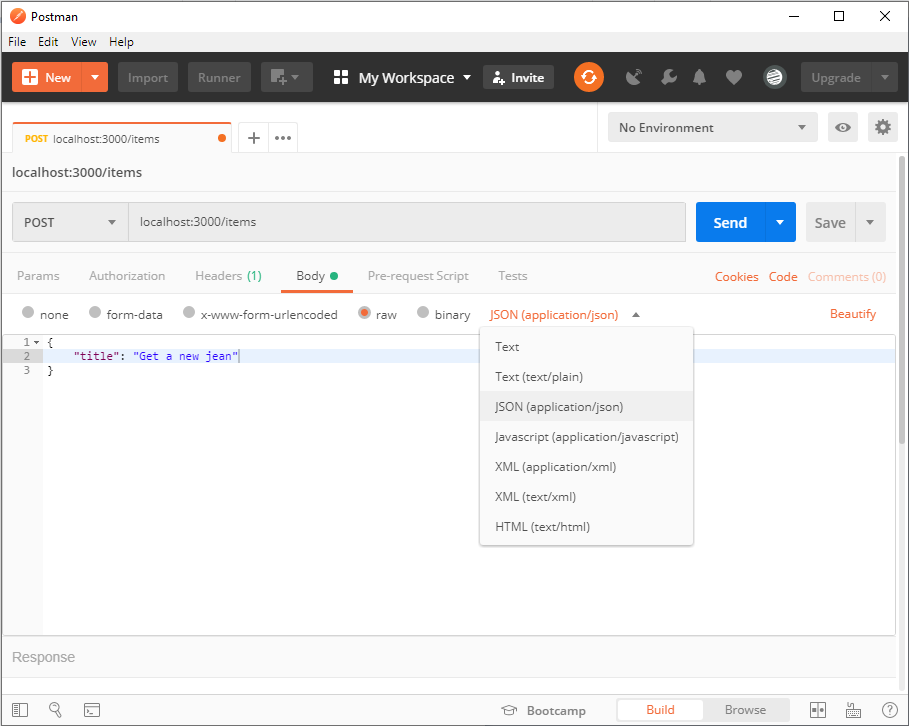
Attaching a JSON body to POST request in Postman
Now click Send button to send POST request to the Web API. Then you must get “201 Created” http response code and seeing created item in the response body.
To see the last status of todo items send a get request to localhost:3000/itemsaddress. You must see newly created item at the end of the list.
Sending PUT Request
Sending PUT request is very similar to sending POST request.
The most obvious difference is request url should be pointed specific item like this localhost:3000/items/3
And you should choose PUT as http verb instead of POST and send all of the required data in the request body unlike POST.
For example you could send a JSON body in the PUT request as below.
An example JSON body for PUT request
{
    "title": "New title of todo item",
    "order": 3,
    "completed": false
}
When you click Send button you must get “204 No Content” http response code. You can check item you updated by sending a get request.
Sending DELETE Request
To send a DELETE request, change the request url to address a specific item id like this localhost:3000/items/3
And select DELETE as http verb and click Send button.
You must get “204 No Content” http response code as result of the DELETE operation.
Send a get request and see the last status of list.
About the DELETE Http Request
I want to say a few words about DELETE http request. You must have noticed something in our delete code. DELETE request returns “204 No Content” every situation.
Http DELETE requests are idempotent. So what that mean? If you delete a resource on server by sending DELETE request, it’s removed from the collection. And every next DELETE request on the same resource won’t change outcome. So you won’t get “404 Not Found” in the second request. Each request returns same response whether succeed or not. That’s mean idempotent operation.
Conclusion
Finally we’ve tested all http methods of our Web API.
As you can see, it works just fine.
Thanks for reading ❤
If you liked this post, share it with all of your programming buddies!
#node-js #javascript #express #web-development #rest #api