How To Create a Drag-and-Drop Grid in React
In this tutorial, we will be Creating a drag-and-drop image grid in React. The following gif shows the desired effect:

At the time I started writing this article, I couldn’t find any good sources of how to approach this project and decided to create it from scratch on my own. Also, there are several great libraries, like react-beautiful-dnd, but they don’t offer the easy 2-D grid support I needed.
Setup
Let’s start by creating the application and installing some dependencies that we will use throughout the project. react-dnd is the library we’ll use for the drag-and-drop interactions, and we’ll use styled-components for styling.
create-react-app dnd-grid-tutorial
cd dnd-grid-tutorial
yarn add styled-components react-dnd react-dnd-html5-backend
Grid Components
We use background-image CSS property instead of the `` tag in order to have some nice helper properties like background-size and background-position. The grid has a width of 600px, so it doesn’t expand to the whole screen. That’s just for testing and development purposes. flex-basis (flex: 0 0 33.3%;) of GridItemWrapper is set to 33.3%. Hence, we will have three items per row.
There is some magic with refs in GridItem, but don’t pay attention to it now. I will explain that later.
Let’s put the following code to src/Grid.js:
import React from "react";
import styled from "styled-components";

export const Grid = styled.div`
  width: 600px;
  display: flex;
  justify-content: start;
  flex-wrap: wrap;
`;

export const GridImage = styled.div`
  flex-grow: 1;
  border: 1px solid white;
  display: flex;
  justify-content: center;
  align-items: center;
  background-image: ${props => `url("${props.src}")`};
  background-size: cover;
  background-position: 50%;
`;

const GridItemWrapper = styled.div`
  flex: 0 0 33.3%;
  display: flex;
  justify-content: center;
  align-items: stretch;
  box-sizing: border-box;
  :before {
    content: "";
    display: table;
    padding-top: 100%;
  }
`;

export const GridItem = ({ forwardedRef, ...props }) => (
  <GridItemWrapper ref={forwardedRef} {...props} />
);
src/Grid.js
That’s it for the interface components used in the tutorial. If you seek another layout or styling, feel free to play around with the properties here.
Drag-and-Drop
The desired drag-and-drop functionality won’t work by itself. The state and information about ordering needs to be stored somewhere. To achieve that, we will use React Context and create the GridContext. It will also hold the logic used to reorder the items.
To make grid items drag-and-droppable, we’ll create a custom wrapper component (DragItem) that will leverage react-dnd drag-and-drop features.
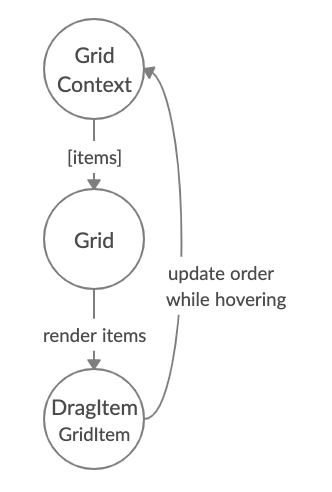
Render/order update loop
This diagram briefly shows what will be happening under the hood:
Gridgets items from theGridContextand renders the list ofDragItems.- If the item position changes while hovering
GridContextupdates the items’ order in its internal state. Gridgets re-rendered with the updated items and their order.
Drag sources and drop targets
Each draggable component needs to specify its item property, which is used to describe the data being dragged. It’s the only information shared between drag sources and drop targets. It may be tempting to put a lot of data there, even a reference to the source object (in our case an image), but it’s best to keep it as simple as possible. In order to achieve that, each item will have a unique ID.
Drag sources are created with useDrag and drop targets are made with useDrop. In the following example, we will create a simple element that will be both draggable and drop-aware. The IDs of both items —the one being hovered and the other that’s hovered over — will be displayed.
We may use React components most of the time, but in the case of drag-and-drop, we need to access the DOM nodes directly. To achieve that, we will create a ref and connect it with react-dnd and a DOM element.
Both useDrag and useDrop return arrays, where the second element is a function that will hook up our ref with react-dnd internals. These functions are called connector functions.
In the example below, you can see how the item property is passed between drag sources and drop targets. Also, there is a type field that tells drop targets which items they should react to. A ref is created, hooked up with react-dnd via connectDrag and connectDrop and later passed to div element.
import { useDrag, useDrop } from "react-dnd";

export default function SimpleDragAndDropComponent({ itemId }) {
  const ref = React.createRef();

  const [, connectDrag] = useDrag({
    item: { id: itemId, type: "SIMPLE_COMPONENT", created: "10:06" }
  });
  const [, connectDrop] = useDrop({
    accept: "SIMPLE_COMPONENT",
    hover(item) {
      console.log("Hovering item. id: ", item.id, " created: ", item.created);
      console.log("Hovered over item with id: ", itemId);
    }
  });

  connectDrag(ref);
  connectDrop(ref);

  return <div ref={ref}>Item: {itemId}</div>;
}
Simple example of drag-and-drop hooks
Then we can render a few elements and drag them over other ones.
<SimpleDragAndDropComponent itemId="1" />
<SimpleDragAndDropComponent itemId="2" />
<SimpleDragAndDropComponent itemId="3" />
<SimpleDragAndDropComponent itemId="4" />
Sample output from the console could be:
Hovering item. id:  1  created:  10:06
Hovered over item with id:  2
Hovering item. id:  1  created:  10:06
Hovered over item with id:  3
Hovering item. id:  3  created:  10:06
Hovered over item with id:  2
This example shows some potential, but we are not yet able to reorder the items on the fly. Dropping the element onto the other one won’t do anything for the moment. Let’s take care of that now.
GridContext
To build GridContext, we’ll use React Context. The component will hold the information about the items and also expose the methods for reordering them.
It would be possible to use a stateful component instead of Context, but this way, there is a greater area of flexibility. If the component structure got a little bit more complex, it wouldn’t require deep prop passing, as we can access the context basically anywhere, especially with useContext hook.
Let’s decide on the approach to reordering the items on-the-fly.
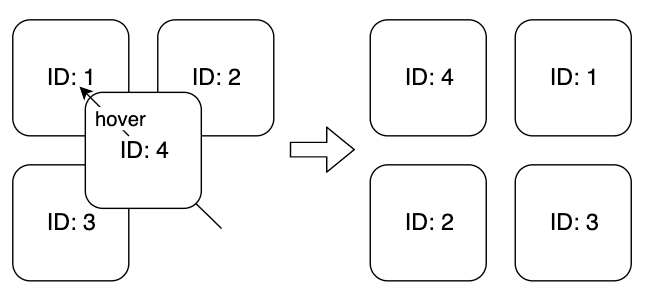
Reordering mechanism
To reorder the items while dragging them, we will use a simple approach: whenever the dragged item is over another item, it will take its place and push all the remaining items on the right one slot further:
Having that in mind and also a requirement that we operate on the item IDs, we can start implementing the GridContext.
GridContext
It will hold the items array in its state and expose two methods: moveItem(sourceId, destinationId) and setItems(items).
The moveItem function is responsible for moving the item of a given sourceId onto the place of another item with destinationId and moving the rest one place to the right. There are also move and moveElement utility functions to deal with rearranging the array. setItems just overrides the items in the context state.
The GridContext can be implemented in the following way:
import React, { Component, createContext } from "react";
import sampleItems from './sampleItems';

// Helper functions

function move(array, oldIndex, newIndex) {
  if (newIndex >= array.length) {
    newIndex = array.length - 1;
  }
  array.splice(newIndex, 0, array.splice(oldIndex, 1)[0]);
  return array;
}

function moveElement(array, index, offset) {
  const newIndex = index + offset;

  return move(array, index, newIndex);
}

// Context

const GridContext = createContext({ items: [] });

export class GridProvider extends Component {
  constructor(props) {
    super(props);
    this.state = {
      items: sampleItems,
      moveItem: this.moveItem,
      setItems: this.setItems
    };
  }

  render() {
    return (
      <GridContext.Provider value={this.state}>
        {this.props.children}
      </GridContext.Provider>
    );
  }

  setItems = items => this.setState({ items });

  moveItem = (sourceId, destinationId) => {
    const sourceIndex = this.state.items.findIndex(
      item => item.id === sourceId
    );
    const destinationIndex = this.state.items.findIndex(
      item => item.id === destinationId
    );

    // If source/destination is unknown, do nothing.
    if (sourceId === -1 || destinationId === -1) {
      return;
    }

    const offset = destinationIndex - sourceIndex;

    this.setState(state => ({
      items: moveElement(state.items, sourceIndex, offset)
    }));
  };
}

export default GridContext;
src/GridContext.js
3## DragItem
Now, let’s deal with the DragItem component and implement it like this:
import React, { memo, useRef } from "react";
import { useDrag, useDrop } from "react-dnd";

const DragItem = memo(({ id, onMoveItem, children }) => {
  const ref = useRef(null);

  const [{ isDragging }, connectDrag] = useDrag({
    item: { id, type: "IMG" },
    collect: monitor => {
      return {
        isDragging: monitor.isDragging()
      };
    }
  });

  const [, connectDrop] = useDrop({
    accept: "IMG",
    hover(hoveredOverItem) {
      if (hoveredOverItem.id !== id) {
        onMoveItem(hoveredOverItem.id, id);
      }
  });

  connectDrag(ref);
  connectDrop(ref);

  const opacity = isDragging ? 0.5 : 1;
  const containerStyle = { opacity };

  return React.Children.map(children, child =>
    React.cloneElement(child, {
      forwardedRef: ref,
      style: containerStyle
    })
  );
});

export default DragItem;
src/DragItem.js
Now let’s get to know what’s happening here.
First, we have the component itself wrapped with [memo](https://reactjs.org/docs/react-api.html#reactmemo). It’s improving the performance as it only shallowly checks if the props changed, and if not, it reuses the last rendered result. In the props we have:
id— that’s the unique ID of the item,onMoveItem— handler for actually moving and rearranging the items,children— children to render.
Then we create a ref that will be used as a reference to the corresponding DOM node.
Drag: The drag source is created with useDrag. In the first element of the returned array, we have { isDragging }. It’s not available out of the box, but it’s actually a value returned from collect method just below. The collect function has access to the monitor, which has several helper methods available. item is a required property. We put the unique ID there and also a type to specify what kind of draggable item it is.
Drop: Now we set up the drop target using useDrop. accept property is set to IMG as we want only items of that type to be dropped here. The hover method is called when a dragged item is hovered over the drop target component.
Question: How does the hover function get the hoveredOverItem that’s being hovered over as an argument?
In our case, every item in the grid is both draggable and droppable. Drag-and-drop mechanisms are connected with the same DOM element (through connectDrag/Drop(ref)), so whenever we hover an item over another one, we actually get what was specified in that item in useDrag.
Reordering: By comparing the IDs of both dragged and hovered items, we can detect the moment items should be reordered. We do it in the following way, using the onMoveItem handler:
hover(hoveredOverItem) {
  if (hoveredOverItem.id !== id) {
    onMoveItem(hoveredOverItem.id, id);
  }
}
Now we need to actually hook up our ref with the drag-and-drop: We do it by calling the connector functions we got from useDrag/Drop:
connectDrag(ref);
connectDrop(ref);
Some styling: Let’s use the isDragging variable we got to somehow distinguish the item that’s being dragged. Let’s do so by changing its opacity to 0.5:
const opacity = isDragging ? 0.5 : 1;
const containerStyle = { opacity };
Rendering children: Now comes a little bit tricky part. We would like DragItem to be as reusable as possible, so it would not be reasonable to put some divs or images directly here. We can leverage the children prop to render anything we put inside the DragItem.
Being able to render anything inside the DragItem is a great advantage, but comes with a caveat: the ref we created cannot be directly attached to any actual DOM node here and we cannot easily pass it down. According to the React documentation, “That’s because ref is not a prop. Like key, it’s handled differently by React.”
We will need to pass it as a custom prop and attach it manually in the target component. Now you can see the reason behind the magic with ref and forwardedRef in the GridItem component we created earlier:
export const GridItem = ({ forwardedRef, ...props }) => (
  <GridItemWrapper ref={forwardedRef} {...props} />
);
GridItemWrapped is just a div (created with styled.div), so passing ref here is perfectly fine. Having that in mind, let’s finish the DragItem and make it return the children with updated styling and a forwardedRef:
return React.Children.map(children, child =>
  React.cloneElement(child, {
    forwardedRef: ref,
    style: containerStyle
  })
);
We have the children prop, so we’ll use React built-in API for manipulating them: React.Children.map and React.cloneElement. Every child we passed will have the ref passed as forwardedRef and a custom opacity style. As mentioned before, the forwardedRef is attached manually to the DOM element in the GridItem component.
Note:This will happen automagically. I believe that it’s okay for this example, but if you find modifying children style this way too implicit, you could, for example, pass isDragging as a prop here and later decide on the styling in the component itself.
Hooking Everything Up
Ok, we have all the building blocks, let’s connect everything now. react-dnd requires the drag interactions and context to be set up and the GridContext needs a provider to work correctly. src/index.js is a perfect place to do it:
import React from "react";
import { DndProvider } from "react-dnd";
import HTML5Backend from "react-dnd-html5-backend";
import ReactDOM from "react-dom";
import App from "./App";
import { GridProvider } from "./GridContext";

ReactDOM.render(
  <DndProvider backend={HTML5Backend}>
    <GridProvider>
      <App />
    </GridProvider>
  </DndProvider>,
  document.getElementById("root")
);
src/index.js
Note: This is out of the scope of the tutorial, but you might want to explore other drag-and-drop back ends, such as touch backend, in the future.
Now, let’s go to src/App.js, hook up the GridContext, Grid and DragItems:
import React, { useContext } from "react";
import DragItem from "./DragItem";
import { Grid, GridImage, GridItem } from "./Grid";
import GridContext from "./GridContext";

function App() {
  const { items, moveItem } = useContext(GridContext);

  return (
    <div className="App">
      <Grid>
        {items.map(item => (
          <DragItem key={item.id} id={item.id} onMoveItem={moveItem}>
            <GridItem>
              <GridImage src={item.src}></GridImage>
            </GridItem>
          </DragItem>
        ))}
      </Grid>
    </div>
  );
}

export default App;
Everything should be working fine by now, although the grid is empty. I prepared a few sample items to use. Feel free to copy them over and use them in the GridContext constructor to initialise the items list. We will see the desired effect then:
Side Notes
This is a simple example with no complex stuff happening or any API integrations. There are several opportunities for developing it further.
It would be possible to extend DragItem component to accept a prop like onItemDrop (that would be called in drop in useDrop) and would indicate that dragging was over. It may be used for updating the back end or synchronising other things throughout the application.
You could extend the GridContext to hold two lists, the main working grid and a spare with the images waiting to be added to the first one.
I skipped this part in the tutorial, but a few simple tests were added to the GridContext too.
Summary
We learned how to create an image grid with on-the-fly reordering. You may build on top of that or just have an insight on how to approach more complex drag-and-drop scenarios.
The whole project is in the GitHub repository: https://github.com/tfiechowski/react-dnd-grid-tutorial
Thanks! Feel free to express your opinion in the comments.
#React #JavaScript #Programming #Grid #Drag And Drop