How to Build CRUD Application with Angular and NgRx
Project Details
Throughout this article, we will be building a simple course management system. As shown below, you will be able to perform all the CRUD operations on the course entity via this simple web application.

Project structure
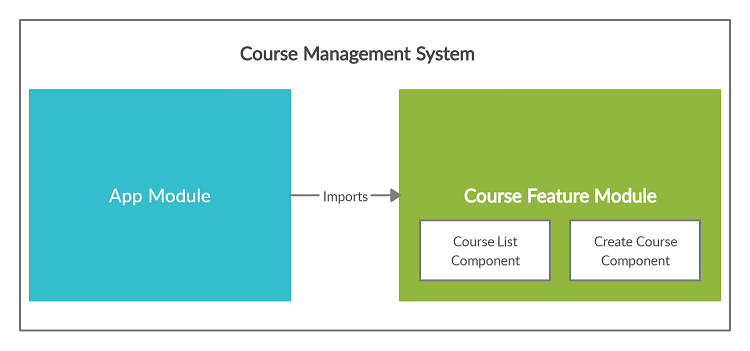
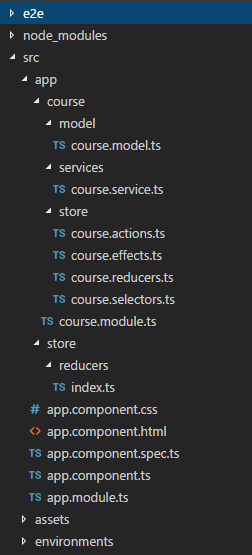
As the following figure illustrates, our application will consist of two primary modules, namely App and Course. The course module, in turn, will have two custom components, namely Course List and Create Course.
REST API
In general, an Angular application interacts with a REST API to perform CRUD operations on data.
Therefore, I implemented a simple REST API in Spring Boot that exposes the below endpoints. We will use this API to connect from the Angular application and carry out data operations.
// Retrieve all courses
GET     http://localhost:8080/api/courses

// Create a course
POST    http://localhost:8080/api/courses

// Delete a course
DELETE  http://localhost:8080/api/courses/{courseId}

// Update a course
PUT     http://localhost:8080/api/courses/{courseId}
Full source code
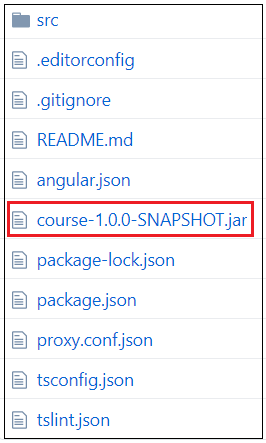
You can find the complete source code of this sample application on GitHub. Please note that I have also added the executable JAR file (course-1.0.0-SNAPSHOT.jar) of the Spring Boot application (REST API) to the same repository.
NgRx Entity at a Glance
You have already come across most of the NgRx terms that I will use in this article. For example, store, effects, actions, selectors, and reducers. In this article, I will introduce a new NgRx library called NgRx Entity (@ngrx/entity).
NgRx Entity helps us to manage various data entities in an application. For example, the Course is an entity in our application. It takes the following format.
export interface Course {

id: string;

name: string;

description: string;

}
The NgRx Entity library makes it very easy to perform different operations (add, update, remove, select) on course objects stored in the application state. Let’s see how…
EntityState interface
The entity library provides a set of tools to make our life easier with NgRx. The first and foremost is the EntityState interface. The shape of theEntityState looks like the below.
interface EntityState<V> {
  ids: string[];
  entities: { [id: string]: V };
}
We have to use EntityState to declare the interface for our courses state.
import { EntityState } from '@ngrx/entity';export interface CourseState extends EntityState<Course> { }
When EntityState is used, the courses state will take the following format.
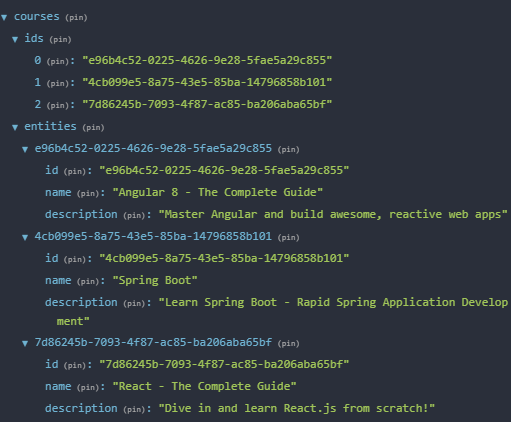
As you can see, it maintains an array of course IDs and a dictionary of course objects. There are two primary reasons we maintain a list of IDs and a dictionary of entities as opposed to just maintaining an array of entities:
- We want to make looking up a specific entity fast. If you wanted to just select one course from the store, using the entities dictionary is much faster than searching through an array
- We also want to maintain the order of the list. This is especially important if you want to keep the list sorted!
Entity adapter
Entity adapter is another tool that goes hand-in-hand with EntityState. It provides a bunch of helper methods that make it very easy to perform various operations on data stored in EntityState.
These helper methods make reducers simple, expressive, and consistent. You can create an entity adapter in the following way.
import { createEntityAdapter } from '@ngrx/entity';
const courseAdapter = createEntityAdapter<Course>();
The following are some of the very useful methods exposed by the adapter to interact with the state.
addOne: Add one entity to the collection.addMany: Add multiple entities to the collection.addAll: Replace current collection with provided collection.removeOne: Remove one entity from the collection.removeMany: Remove multiple entities from the collection, by I or by the predicate.removeAll: Clear entity collection.updateOne: Update one entity in the collection.updateMany: Update multiple entities in the collection.upsertOne: Add or update one entity in the collection.upsertMany: Add or update multiple entities in the collection.map: Update multiple entities in the collection by defining a map function, similar toArray.map.
Setting Up the Project
Software versions used
- Angular CLI: 8.0.1
- Node: 11.6.0
- Angular: 8.0.2
- NgRx: 8.6.0
- Bootstrap: 4.4.1
Project initialization
Step 1: Execute the below command and create a new project.
ng new angular-ngrx-example
Step 2: We will use Bootstrap to add styles to our application. You can install Bootstrap with the below command.
npm install bootstrap --save
Step 3: Import Bootstrap by updating the angular.json file as shown below.
/*
  ---------------------------- Abbreviated Code Snippet: Start ----------------------------
*/

  "projects": {
    "angular-ngrx-example": {
      "root": "",
      "sourceRoot": "src",
      "projectType": "application",
      "prefix": "app",
      "schematics": {},
      "architect": {
        "build": {
          "builder": "@angular-devkit/build-angular:browser",
          "options": {
            "outputPath": "dist/angular-ngrx-example",
            "index": "src/index.html",
            "main": "src/main.ts",
            "polyfills": "src/polyfills.ts",
            "tsConfig": "src/tsconfig.app.json",
            "assets": [
              "src/favicon.ico",
              "src/assets"
            ],
            "styles": [
              "node_modules/bootstrap/dist/css/bootstrap.min.css",
              "src/styles.css"
            ],

/*
  ---------------------------- Abbreviated Code Snippet: End ----------------------------
*/
Step 4: Install NgRx dependencies.
npm install @ngrx/{store,effects,entity,store-devtools,schematics} --save
Adding NgRx Support to Root Module
Execute the below schematics command to generate the initial state management and register it within the app.module.ts.
ng generate @ngrx/schematics:store State --root --statePath store/reducers --module app.module.ts
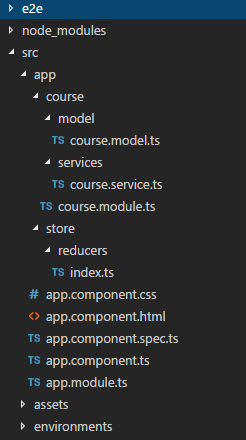
After the above command, your project folder structure should look like the below.

Following is the content of the index.ts file. Please note that I made a couple of minor changes to the auto-generated file. For example, I changed the State interface to AppState for the sake of clarity.
import {
  ActionReducer,
  ActionReducerMap,
  createFeatureSelector,
  createSelector,
  MetaReducer
} from '@ngrx/store';
import { environment } from '../../../environments/environment';


export interface AppState {

}

export const reducers: ActionReducerMap<AppState> = {

};


export const metaReducers: MetaReducer<AppState>[] = !environment.production ? [] : [];
The NgRx schematics command will also update the app.module.ts file. Following is the updated content of this file.
import { BrowserModule } from '@angular/platform-browser';
import { NgModule } from '@angular/core';

import { AppComponent } from './app.component';
import { StoreModule } from '@ngrx/store';
import { reducers, metaReducers } from './store/reducers';
import { StoreDevtoolsModule } from '@ngrx/store-devtools';
import { environment } from '../environments/environment';

@NgModule({
  declarations: [
    AppComponent
  ],
  imports: [
    BrowserModule,
    StoreModule.forRoot(reducers, {
      metaReducers,
      runtimeChecks: {
        strictStateImmutability: true,
        strictActionImmutability: true,
      }
    }),
    !environment.production ? StoreDevtoolsModule.instrument() : []
  ],
  providers: [],
  bootstrap: [AppComponent]
})
export class AppModule { }
Creating and Setting Up the “Course” Feature Module
Generating the “Course” module
As stated earlier, our application consists of two major modules, namely App and Course. Now is the time to create the Course module with the below command.
ng generate module course
The aforementioned command will create a sub-folder named course directly under the app folder. In addition, a new file named course.module.ts will be created and placed under the app/course folder.
Following is the initial version of course.module.ts file. Note that this file will be altered downstream to add NgRx support, declare components, and declare service providers.
import { NgModule } from '@angular/core';
import { CommonModule } from '@angular/common';

@NgModule({
  declarations: [],
  imports: [
    CommonModule
  ]
})
export class CourseModule { }
Defining the “Course” model
As the next step, you have to define the model interface that represents the Course entity. Create a file called course.model.ts and place it under the app/course/model folder. The content of this file should be as follows.
export interface Course {
  id: string;
  name: string;
  description: string;
}
Defining the Service class
Service is used to interact with the REST API and perform data operations. In order to define the service class, create a file named course.service.ts and place it under the app/course/services folder.
The content of this file should be as follows.
import { Course } from './../model/course.model';
import { Injectable } from '@angular/core';
import { HttpClient, HttpResponse } from '@angular/common/http';
import { Observable } from 'rxjs';
import { map } from 'rxjs/operators';


@Injectable()
export class CourseService {

  http: HttpClient;

  constructor(http: HttpClient) {
    this.http = http;
  }

  getAllCourses(): Observable<Course[]> {
    return this.http.get<Course[]>('/api/courses');
  }

  createCourse(course: Course): Observable<Course> {
    return this.http.post<Course>('/api/courses', course);
  }

  deleteCourse(courseId: string): Observable<any> {
    return this.http.delete('/api/courses/' + courseId);
  }

  updateCourse(courseId: string | number, changes: Partial<Course>): Observable<any> {
    return this.http.put('/api/courses/' + courseId, changes);
  }
}
As you can see, it has methods to retrieve, create, update, and delete Course entities via the REST API. Once the service class is defined, you have to register it in the course.module.ts file as shown below.
import { CourseService } from './services/course.service';
import { NgModule } from '@angular/core';
import { CommonModule } from '@angular/common';

@NgModule({
  declarations: [],
  imports: [
    CommonModule
  ],
  providers: [CourseService]
})
export class CourseModule { }
The following figure illustrates the folder structure of our application at this point.
Adding NgRx Artifacts to “Course” Module
As the next step, you have to define actions, reducers, effects, and selectors and attach to the course module. These artifacts will be created inside a directory called store which in turn is located under the app/course directory.
Defining NgRx actions (course.actions.ts)
import { Course } from './../model/course.model';
import { createAction, props } from '@ngrx/store';
import {Update} from '@ngrx/entity';


export const loadCourses = createAction(
  '[Courses List] Load Courses via Service',
);

export const coursesLoaded = createAction(
  '[Courses Effect] Courses Loaded Successfully',
  props<{courses: Course[]}>()
);

export const createCourse = createAction(
  '[Create Course Component] Create Course',
  props<{course: Course}>()
);

export const deleteCourse = createAction(
  '[Courses List Operations] Delete Course',
  props<{courseId: string}>()
);

export const updateCourse = createAction(
  '[Courses List Operations] Update Course',
  props<{update: Update<Course>}>()
);

export const courseActionTypes = {
  loadCourses,
  coursesLoaded,
  createCourse,
  deleteCourse,
  updateCourse
};
Special notes:
loadCourses,createCourse,deleteCourse, andupdateCourseare self-explanatory actions which are dispatched by the components. However,coursesLoadedis a special action that will be dispatched by the effect in order to inform the store that the courses were loaded successfully.- The
updateCourseaction accepts a payload of type{update: Update}.Updateis an auxiliary type provided by NgRx Entity to help model partial entity updates. This type has a propertyidthat identifies the updated entity, and another property calledchangesthat specifies which modifications are being made to the entity.
Defining NgRx reducers (course.reducers.ts)
import { Course } from './../model/course.model';
import { EntityState, EntityAdapter, createEntityAdapter } from '@ngrx/entity';
import { createReducer, on } from '@ngrx/store';
import { courseActionTypes, coursesLoaded } from './course.actions';

export interface CourseState extends EntityState<Course> {
  coursesLoaded: boolean;
}

export const adapter: EntityAdapter<Course> = createEntityAdapter<Course>();

export const initialState = adapter.getInitialState({
  coursesLoaded: false
});

export const courseReducer = createReducer(
  initialState,

  on(courseActionTypes.coursesLoaded, (state, action) => {
    return adapter.addAll(
      action.courses,
      {...state, coursesLoaded: true}
    );
  }),

  on(courseActionTypes.createCourse, (state, action) => {
    return adapter.addOne(action.course, state);
  }),

  on(courseActionTypes.deleteCourse, (state, action) => {
    return adapter.removeOne(action.courseId, state);
  }),

  on(courseActionTypes.updateCourse, (state, action) => {
    return adapter.updateOne(action.update, state);
  })
);

export const { selectAll, selectIds } = adapter.getSelectors();
Special notes:
- The below code snippet defines the
Coursestate by extending theEntityState. As we discussed before,EntityStatemaintains a list of IDs and a dictionary of entities. In addition to those two properties, we are here defining a custom property calledcoursesLoaded. This property is primarily used to indicate whether the courses have been already loaded into the state.
export interface CourseState extends EntityState<Course> { coursesLoaded: boolean;}
- The below code snippet creates an
Entity Adapterthat provides the helper functions.
export const adapter: EntityAdapter<Course> = createEntityAdapter<Course>();
- The initial state is defined as follows. Entity adapter provides a helper function to obtain the initial state. As you can see, we are setting the
coursesLoadedproperty tofalseinitially.
export const initialState = adapter.getInitialState({ coursesLoaded: false});
- The following code line exports a couple of predefined selectors provided to us by the adapter. These selectors will be used by our custom selectors. (We will look into this when we define our selectors.)
export const { selectAll, selectIds } = adapter.getSelectors();
Defining NgRx selectors (course.selectors.ts)
import { CourseState } from './course.reducers';
import { Course } from './../model/course.model';
import { createSelector, createFeatureSelector } from '@ngrx/store';
import { selectAll, selectIds } from './course.reducers';

export const courseFeatureSelector = createFeatureSelector<CourseState>('courses');

export const getAllCourses = createSelector(
  courseFeatureSelector,
  selectAll
);

export const areCoursesLoaded = createSelector(
  courseFeatureSelector,
  state => state.coursesLoaded
);
Special notes:
- Here, we are using the
selectAllpredefined selector to retrieve all the course entities as an array. - The
areCoursesLoadedselector is used to check whether the courses have been already loaded into the state. This selector uses thecoursesLoadedcustom property we defined underCourseState.
Defining NgRx effects (course.effects.ts)
import { courseActionTypes, coursesLoaded, updateCourse } from './course.actions';
import { CourseService } from './../services/course.service';
import { createEffect, Actions, ofType } from '@ngrx/effects';
import { concatMap, map, tap } from 'rxjs/operators';
import { Injectable } from '@angular/core';
import { Router } from '@angular/router';

@Injectable()
export class CourseEffects {

  loadCourses$ = createEffect(() =>
    this.actions$.pipe(
      ofType(courseActionTypes.loadCourses),
      concatMap(() => this.courseService.getAllCourses()),
      map(courses => courseActionTypes.coursesLoaded({courses}))
    )
  );

  createCourse$ = createEffect(() =>
    this.actions$.pipe(
      ofType(courseActionTypes.createCourse),
      concatMap((action) => this.courseService.createCourse(action.course)),
      tap(() => this.router.navigateByUrl('/courses'))
    ),
    {dispatch: false}
  );

  deleteCourse$ = createEffect(() =>
    this.actions$.pipe(
      ofType(courseActionTypes.deleteCourse),
      concatMap((action) => this.courseService.deleteCourse(action.courseId))
    ),
    {dispatch: false}
  );

  updateCOurse$ = createEffect(() =>
    this.actions$.pipe(
      ofType(courseActionTypes.updateCourse),
      concatMap((action) => this.courseService.updateCourse(action.update.id, action.update.changes))
    ),
    {dispatch: false}
  );

  constructor(private courseService: CourseService, private actions$: Actions, private router: Router) {}
}
Special notes:
createCourse$, deleteCourse$, and updateCourse$ effects are self-explanatory. They simply invoke the corresponding REST endpoint and perform the operation.
These effects do not map the incoming action to a new action type, which is why {dispatch: false} config is used.
However, loadCourses$ has a special behavior. It accepts the actions of type loadCourses and once the courses are retrieved via the REST API, it maps the response to a new action type called coursesLoaded.
The retrieved list of courses is passed into the coursesLoaded action.
Registering the NgRx artifacts in the Course module
After the NgRx artifacts are defined, update the course.module.ts file as shown below to add the State support.
import { CourseEffects } from './store/course.effects';
import { CourseService } from './services/course.service';
import { CommonModule } from '@angular/common';
import { FormsModule } from '@angular/forms';
import { NgModule } from '@angular/core';
import { StoreModule } from '@ngrx/store';
import { EffectsModule } from '@ngrx/effects';
import { courseReducer } from './store/course.reducers';

@NgModule({
  declarations: [],
  imports: [
    CommonModule,
    FormsModule,
    StoreModule.forFeature('courses', courseReducer),
    EffectsModule.forFeature([CourseEffects])
  ],
  providers: [CourseService],
  bootstrap: []
})
export class CourseModule { }
Special notes:
- The below code line creates a dedicated slice (
courses) in the application state for the course module and attaches the reducers to it.
StoreModule.forFeature('courses', courseReducer),

- The following code line registers the effects in the course module state.
EffectsModule.forFeature([CourseEffects])
Now that that’s out of the way, your project folder structure should look like the below at this stage.
Creating Components and Defining Routes
As we discussed earlier, our application is made up of two main modules, namely App and Course. The course module consists of two components, namely courses-list and create-course.
Our next step is to create these two components and define the corresponding routes. Note that the courses-list and create-course directories will be created under the app/course/component directory.
Defining “courses-list” component
Template: courses-list.component.html.
<div>
  <table class="table table-dark">
    <thead>
      <tr>
        <th scope="col">Name</th>
        <th scope="col">Description</th>
        <th scope="col">Operations</th>
      </tr>
    </thead>
    <tbody>
      <tr *ngFor="let course of courses$ | async">
        <td>{{ course.name }}</td>
        <td>{{ course.description }}</td>
        <td>
          <button (click)="showUpdateForm(course)" class="btn btn-primary" style="margin: 5px">Update</button>
          <button (click)="deleteCourse(course.id)" class="btn btn-danger" style="margin: 5px">Delete</button>
        </td>
      </tr>
    </tbody>
  </table>

  <div *ngIf="isUpdateActivated" style="margin-top: 50px; margin-left: 50px;">
    <h4>Update Course</h4>
    <form (ngSubmit)="updateCourse(updateForm)" #updateForm="ngForm">
      <div class="form-group">
        <label for="name">Course Name</label>
        <input
          type="text"
          id="name"
          name="name"
          class="form-control"
          required
          [(ngModel)]="courseToBeUpdated.name"
          style="width: 400px"/>
      </div>
      <div class="form-group">
        <label for="side">Description</label>
        <input
          type="text"
          id="description"
          name="description"
          class="form-control"
          required
          [(ngModel)]="courseToBeUpdated.description"
          style="width: 400px"/>
      </div>
      <button [disabled]="updateForm.invalid" class="btn btn-primary" type="submit">Update</button>
    </form>
  </div>
</div>
Component: courses-list.component.ts.
import { getAllCourses } from './../../store/course.selectors';
import { courseActionTypes } from './../../store/course.actions';
import { AppState } from './../../../store/reducers/index';
import { Store } from '@ngrx/store';
import { Observable } from 'rxjs';
import { Course } from './../../model/course.model';
import { CourseService } from './../../services/course.service';
import { Component, OnInit } from '@angular/core';
import { FormBuilder, FormGroup, Validators, NgForm } from '@angular/forms';
import { Update } from '@ngrx/entity';

@Component({
  selector: 'app-courses-list',
  templateUrl: './courses-list.component.html'
})
export class CoursesListComponent implements OnInit {

  courses$: Observable<Course[]>;

  courseToBeUpdated: Course;

  isUpdateActivated = false;

  constructor(private courseService: CourseService, private store: Store<AppState>) { }

  ngOnInit() {
    this.courses$ = this.store.select(getAllCourses);
  }

  deleteCourse(courseId: string) {
    this.store.dispatch(courseActionTypes.deleteCourse({courseId}));
  }

  showUpdateForm(course: Course) {
    this.courseToBeUpdated = {...course};
    this.isUpdateActivated = true;
  }

  updateCourse(updateForm) {
    const update: Update<Course> = {
      id: this.courseToBeUpdated.id,
      changes: {
        ...this.courseToBeUpdated,
        ...updateForm.value
      }
    };

    this.store.dispatch(courseActionTypes.updateCourse({update}));

    this.isUpdateActivated = false;
    this.courseToBeUpdated = null;
  }
}
Special notes:
- This component is responsible for facilitating the list, updating, and deleting operations.
Defining “create-course” component
Template: create-course.component.html.
<form (ngSubmit)="onSubmit(createForm)" #createForm="ngForm">
  <div class="form-group">
    <label for="name">Course Name</label>
    <input
      type="text"
      id="name"
      name="name"
      class="form-control"
      ngModel
      required
      style="width: 400px"/>
  </div>
  <div class="form-group">
    <label for="side">Description</label>
    <input
      type="text"
      id="description"
      name="description"
      class="form-control"
      ngModel
      required
      style="width: 400px"/>
  </div>
  <button [disabled]="createForm.invalid" class="btn btn-primary" type="submit">Create</button>
</form>
Component: create-course.component.ts.
import { Course } from './../../model/course.model';
import { createCourse } from './../../store/course.actions';
import { AppState } from './../../../store/reducers/index';
import { Store } from '@ngrx/store';
import { Component, OnInit } from '@angular/core';
import * as uuid from 'uuid';

@Component({
  selector: 'app-create-course',
  templateUrl: './create-course.component.html'
})
export class CreateCourseComponent implements OnInit {

  constructor(private store: Store<AppState>) { }

  ngOnInit() {
  }

  onSubmit(submittedForm) {
    console.log(submittedForm.value);

    if (submittedForm.invalid) {
      return;
    }


    const course: Course = {id: uuid.v4(), name: submittedForm.value.name, description: submittedForm.value.description};
    this.store.dispatch(createCourse({course}));

  }
}
Declaring the components in the Course module
You have to declare the above components in the course.module.ts file.
import { CourseEffects } from './store/course.effects';
import { CourseService } from './services/course.service';
import { CommonModule } from '@angular/common';
import { FormsModule } from '@angular/forms';
import { NgModule } from '@angular/core';

import { CoursesListComponent } from './component/courses-list/courses-list.component';
import { StoreModule } from '@ngrx/store';
import { EffectsModule } from '@ngrx/effects';
import { courseReducer } from './store/course.reducers';
import { CreateCourseComponent } from './component/create-course/create-course.component';

@NgModule({
  declarations: [
    CoursesListComponent,
    CreateCourseComponent
  ],
  imports: [
    CommonModule,
    FormsModule,
    StoreModule.forFeature('courses', courseReducer),
    EffectsModule.forFeature([CourseEffects])
  ],
  providers: [CourseService],
  bootstrap: [],
  exports: [CoursesListComponent, CreateCourseComponent]
})
export class CourseModule { }
Configuring routes
Now is the time to define the routes and associate corresponding components with those routes. This has to be done in the app.module.ts as shown below.
import { CreateCourseComponent } from './course/component/create-course/create-course.component';
import { CourseResolver } from './course/course.resolver';
import { CoursesListComponent } from './course/component/courses-list/courses-list.component';
import { EffectsModule } from '@ngrx/effects';
import { CourseModule } from './course/course.module';
import { BrowserModule } from '@angular/platform-browser';
import { NgModule } from '@angular/core';
import { StoreModule } from '@ngrx/store';
import { RouterModule } from '@angular/router';
import { HttpClientModule } from '@angular/common/http';

import { AppComponent } from './app.component';
import { reducers, metaReducers } from './store/reducers';
import { StoreDevtoolsModule } from '@ngrx/store-devtools';

const routes = [
  {
    path: 'courses',
    component: CoursesListComponent,
    resolve: {
      courses: CourseResolver
    }
  },
  {path: 'create-course', component: CreateCourseComponent},
  {path: '**', redirectTo: 'courses'}
];

@NgModule({
  declarations: [
    AppComponent,
  ],
  imports: [
    BrowserModule,
    CourseModule,
    HttpClientModule,
    RouterModule.forRoot(routes),
    EffectsModule.forRoot([]),
    StoreModule.forRoot(reducers, {
      metaReducers
    }),
    StoreDevtoolsModule.instrument({maxAge: 25}),
  ],
  providers: [CourseResolver],
  bootstrap: [AppComponent]
})
export class AppModule { }
Special notes:
CoursesListComponentuses a resolver to fetch data. A route resolver ensures that the data is available to use by the component before navigating to a particular route. In this instance, the resolver is responsible for retrieving the courses list prior to completing the navigation to/courses.
Implementing the route resolver (course.resolver.ts)
import { areCoursesLoaded } from './store/course.selectors';
import { loadCourses, coursesLoaded } from './store/course.actions';
import { AppState } from './../store/reducers/index';
import { Course } from './model/course.model';
import { Injectable } from '@angular/core';
import {ActivatedRouteSnapshot, Resolve, RouterStateSnapshot} from '@angular/router';
import { Observable } from 'rxjs';
import {select, Store} from '@ngrx/store';
import {filter, finalize, first, tap} from 'rxjs/operators';

@Injectable()
export class CourseResolver implements Resolve<Observable<any>> {

  constructor(private store: Store<AppState>) {}

  resolve(route: ActivatedRouteSnapshot, state: RouterStateSnapshot): Observable<any> {
    return this.store
    .pipe(
        select(areCoursesLoaded),
        tap((coursesLoaded) => {
          if (!coursesLoaded) {
            this.store.dispatch(loadCourses());
          }

        }),
        filter(coursesLoaded => coursesLoaded),
        first()
    );
  }
}
Special notes:
- The
areCoursesLoadedcustom selector is used to check whether the data has already been loaded into the state. - The
loadCoursesaction is dispatched only if the data is not already available in the state. - The operator chain will not let a value pass through to the subscriber until the
coursesLoadedflag is set totrue. As a result, the application will not be navigated to the/coursesroute until the courses are successfully loaded.
Defining the router outlet
As the final step, you have to define the router outlet in the app.component.html.
<div>
  <div>
      <ul class="nav nav-pills">
        <li class="nav-item">
          <a class="nav-link" routerLink="courses" routerLinkActive="active">List Courses</a>
        </li>
        <li class="nav-item">
            <a class="nav-link" routerLink="create-course" routerLinkActive="active">Create Course</a>
          </li>
      </ul>
  </div>

  <div style="margin-top: 20px;">
      <router-outlet></router-outlet>
  </div>

</div>
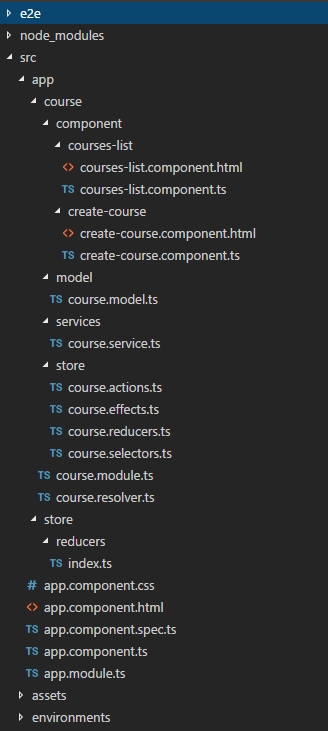
At this stage, your folder structure should look like the below.
Configuring a Proxy to Access the REST API
As mentioned at the start of this article, we are using a simple REST API written in Spring Boot to connect from the Angular application.
The Spring Boot application runs on localhost:8080 whereas the Angular application runs on localhost:4200. This mismatch will cause a Cross Origin Resource Sharing (CORS) error when the Angular application tries to access the REST API. To overcome this issue we have to create a proxy.
Creating a proxy file
Create a file called proxy.conf.json inside the project’s root folder (same level where package.json file exists), and add the below content to it.
{
  "/api": {
    "target": "http://localhost:8080",
    "secure": false
  }
}
Registering the proxy file
In the CLI configuration file, angular.json, add the proxyConfig option to the serve target:
  /*
  ---------------------------- Abbreviated Code Snippet: Start ----------------------------
*/

"serve": {
  "builder": "@angular-devkit/build-angular:dev-server",
  "options": {
    "proxyConfig": "proxy.conf.json",
    "browserTarget": "angular-ngrx-example:build"
  },


/*
  ---------------------------- Abbreviated Code Snippet: End ----------------------------
*/
Running the Application
The application should be started as a two-step process. You have to first start the Spring Boot application (REST API) and then the Angular application.
Running the Spring Boot application (REST API)
The Spring Boot application is packaged into an executable JAR file with the name course-1.0.0-SNAPSHOT.jar and placed here (GitHub).
Note that you have to have Java 8 installed on your system to execute this JAR file. If Java 8 is installed, you can execute the below command and start the application.
java -jar {path_to_the_jar_file}/course-1.0.0-SNAPSHOT.jar
You should see the below log if the application started successfully.
$ java -jar course-1.0.0-SNAPSHOT.jar

  .   ____          _            __ _ _
 /\\ / ___'_ __ _ _(_)_ __  __ _ \ \ \ \
( ( )\___ | '_ | '_| | '_ \/ _` | \ \ \ \
 \\/  ___)| |_)| | | | | || (_| |  ) ) ) )
  '  |____| .__|_| |_|_| |_\__, | / / / /
 =========|_|==============|___/=/_/_/_/
 :: Spring Boot ::        (v2.2.2.RELEASE)

2020-01-19 11:16:36.714  INFO 9340 --- [           main] c.medium.example.app.CourseApplication   : Starting CourseApplication v1.0.0-SNAPSHOT on DESKTOP-BKE1M8T with PID 9340 (G:\Angular\Repositories\angular-ngrx-example\angular-ngrx-example\course-1.0.0-SNAPSHOT.jar started by Sarindu in G:\Angular\Repositories\angular-ngrx-example\angular-ngrx-example)
2020-01-19 11:16:36.718  INFO 9340 --- [           main] c.medium.example.app.CourseApplication   : No active profile set, falling back to default profiles: default
2020-01-19 11:16:38.997  INFO 9340 --- [           main] o.s.b.w.embedded.tomcat.TomcatWebServer  : Tomcat initialized with port(s): 8080 (http)
2020-01-19 11:16:39.012  INFO 9340 --- [           main] o.apache.catalina.core.StandardService   : Starting service [Tomcat]
2020-01-19 11:16:39.013  INFO 9340 --- [           main] org.apache.catalina.core.StandardEngine  : Starting Servlet engine: [Apache Tomcat/9.0.29]
2020-01-19 11:16:39.111  INFO 9340 --- [           main] o.a.c.c.C.[Tomcat].[localhost].[/]       : Initializing Spring embedded WebApplicationContext
2020-01-19 11:16:39.111  INFO 9340 --- [           main] o.s.web.context.ContextLoader            : Root WebApplicationContext: initialization completed in 2298 ms
Running the Angular application
The Angular application can be started by executing the below command.
ng serve
When the application is started successfully, navigate to http://localhost:4200/courses from your browser and you should see the below screen.

Understanding the Execution Flow
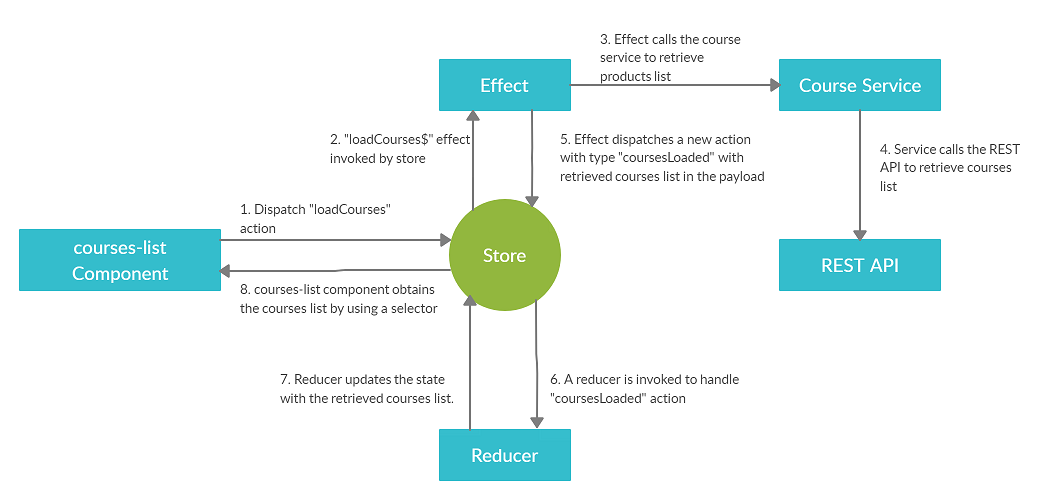
Retrieve courses
Create course
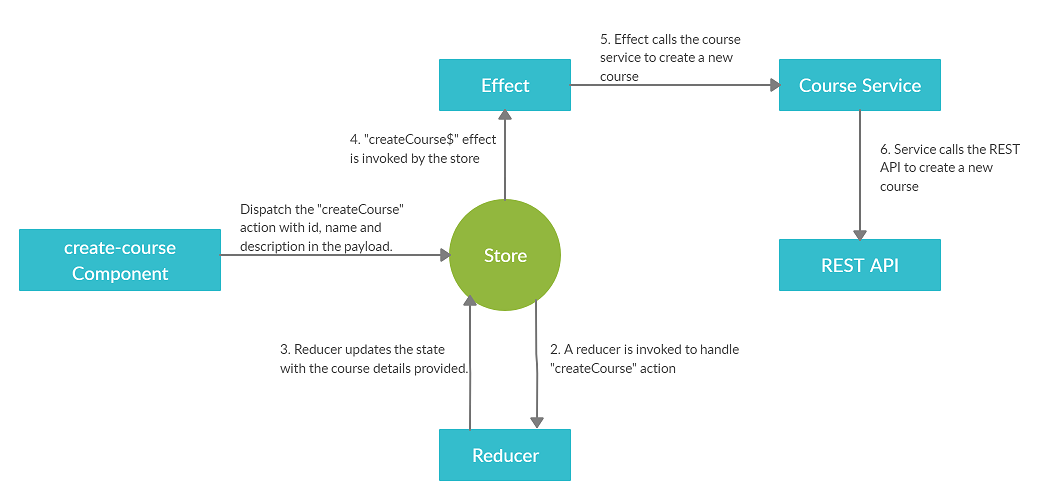
Special note:The key thing to note is that the reducer updates the state with the new data (in turn, the UI will be updated), even before the effect invokes the API and actually creates a record in the server.
Update course

Special note:Again, the reducer updates the state with the updated course data (in turn, the UI will be updated), even before the effect invokes the API and actually updates the relevant record in the server.
Delete course
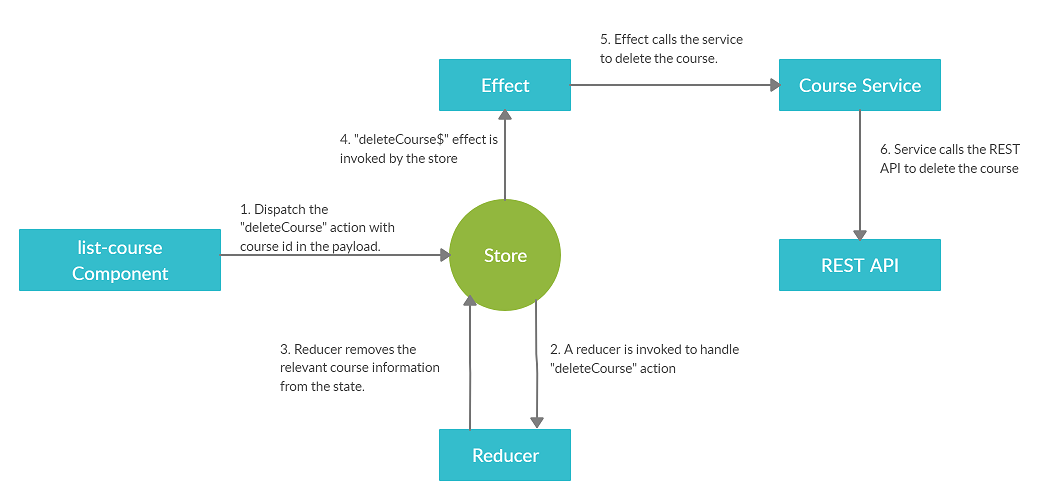
Special note: Similar to creating a course and updating a course, the reducer removes the relevant course information from the state (in turn, the UI will be updated), even before the effect invokes the API and remove the relevant record in the server.
Optimistic UI
Optimistic UI is a pattern that you can use to simulate the results of a state mutation and update the UI even before receiving a response from the server.
In this particular application, we are following the same pattern. As explained above, when creating, updating, and deleting a course, the state and the UI are updated even before receiving a response from the REST API.
Conclusion
The prime objective of this story was to provide a step-by-step by guide to build an NgRx-based Angular application.
As explained in the previous section, we have used the optimistic UI pattern to implement this mini system.
Thank you for reading!
#angular #javascript #ngrx #programming #frontenddevelopment
