In this article you’ll learn how to create a dynamic and reusable Vue.js pagination component.
The idea behind most of web applications is to fetch data from the database and present it to the user in the best possible way. When we deal with data there are cases when the best possible way of presentation means creating a list.
Depending on the amount of data and its content, we may decide to show all content at once (very rarely), or show only a specific part of a bigger data set (more likely). The main reason behind showing only part of the existing data is that we want to keep our applications as performant as possible and avoid loading or showing unnecessary data.
If we decide to show our data in “chunks” then we need a way to navigate through that collection. The two most common ways of navigating through set of data are:
The first is pagination, a technique that splits the set of data into a specific number of pages, saving users from being overwhelmed by the amount of data on one page and allowing them to view one set of results at a time. Take this very blog you’re reading, for example. The homepage lists the latest 10 posts. Viewing the next set of latest posts requires clicking a button.
The second common technique is infinite scrolling, something you’re likely familiar with if you’ve ever scrolled through a timeline on either Facebook or Twitter.
 The Apple News app also uses infinite scroll to browse a list of articles.
We’re going to take a deeper look at the first type in this post. Pagination is something we encounter on a near-daily basis, yet making it is not exactly trivial. It’s a great use case for a component, so that’s exactly what we’re going to do. We will go through the process of creating a component that is in charge of displaying that list, and triggering the action that fetches additional articles when we click on a specific page to be displayed. In other words, we’re making a pagination component in Vue.js like this:
Let’s go through the steps together.
Step 1: Create the ArticlesList component in Vue
Let’s start by creating a component that will show a list of articles (but without pagination just yet). We’ll call it ArticlesList. In the component template, we’ll iterate through the set of articles and pass a single article item to each ArticleItem component.
// ArticlesList.vue
<template>
  <div>
    <ArticleItem
      v-for="article in articles"
      :key="article.publishedAt"
      :article="article"
    />
  </div>
</template>
In the script section of the component, we set initial data:
articles: This is an empty array filled with data fetched from the API onmountedhook.currentPage: This is used to manipulate the pagination.pageCount: This is the total number of pages, calculated onmountedhook based on the API response.visibleItemsPerPageCount: This is how many articles we want to see on a single page.
At this stage, we fetch only first page of the article list. This will give us a list two articles:
// ArticlesList.vue
import ArticleItem from "./ArticleItem"
import axios from "axios"
export default {
  name: "ArticlesList",
  static: {
    visibleItemsPerPageCount: 2
  },
  data() {
    return {
      articles: [],
      currentPage: 1,
      pageCount: 0
    }
  },
  components: {
    ArticleItem,
  },
  async mounted() {
    try {
      const { data } = await axios.get(
        `?country=us&page=1&pageSize=${
          this.$options.static.visibleItemsPerPageCount
        }&category=business&apiKey=065703927c66462286554ada16a686a1`
      )
      this.articles = data.articles
      this.pageCount = Math.ceil(
        data.totalResults / this.$options.static.visibleItemsPerPageCount
      )
    } catch (error) {
      throw error
    }
  }
}
Step 2: Create pageChangeHandle method
Now we need to create a method that will load the next page, the previous page or a selected page.
In the pageChangeHandle method, before loading new articles, we change the currentPage value depending on a property passed to the method and fetch the data respective to a specific page from the API. Upon receiving new data, we replace the existing articles array with the fresh data containing a new page of articles.
// ArticlesList.vue
...
export default {
...
  methods: {
    async pageChangeHandle(value) {
      switch (value) {
        case 'next':
          this.currentPage += 1
          break
        case 'previous':
          this.currentPage -= 1
          break
        default:
          this.currentPage = value
      }
      const { data } = await axios.get(
        `?country=us&page=${this.currentPage}&pageSize=${
          this.$options.static.visibleItemsPerPageCount
        }&category=business&apiKey=065703927c66462286554ada16a686a1`
      )
      this.articles = data.articles
    }
  }
}
Step 3: Create a component to fire page changes
We have the pageChangeHandle method, but we do not fire it anywhere. We need to create a component that will be responsible for that.
This component should do the following things:
- Allow the user to go to the next/previous page.
- Allow the user to go to a specific page within a range from currently selected page.
- Change the range of page numbers based on the current page.
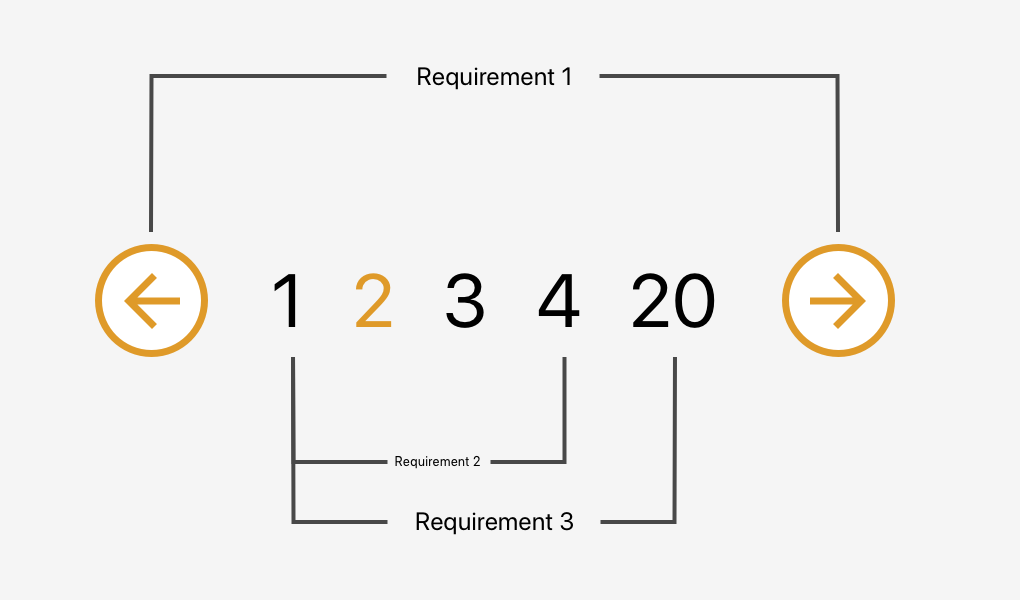
If we were to sketch that out, it would look something like this:
Let’s proceed!
Requirement 1: Allow the user to go to the next or previous page
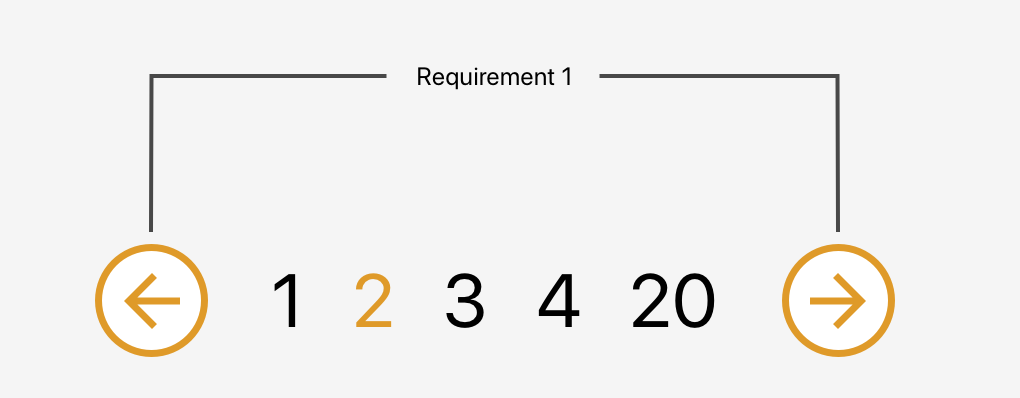
Our BasePagination will contain two buttons responsible for going to the next and previous page.
// BasePagination.vue
<template>
  <div class="base-pagination">
    <BaseButton
      :disabled="isPreviousButtonDisabled"
      @click.native="previousPage"
    >
      ←
    </BaseButton>
    <BaseButton
      :disabled="isNextButtonDisabled"
      @click.native="nextPage"
    >
      →
    </BaseButton>
  </div>
</template>
The component will accept currentPage and pageCount properties from the parent component and emit proper actions back to the parent when the next or previous button is clicked. It will also be responsible for disabling buttons when we are on the first or last page to prevent moving out of the existing collection.
// BasePagination.vue
import BaseButton from "./BaseButton.vue";
export default {
  components: {
    BaseButton
  },
  props: {
    currentPage: {
      type: Number,
      required: true
    },
    pageCount: {
      type: Number,
      required: true
    }
  },
  computed: {
    isPreviousButtonDisabled() {
      return this.currentPage === 1
    },
    isNextButtonDisabled() {
      return this.currentPage === this.pageCount
    }
  },
  methods: {
    nextPage() {
      this.$emit('nextPage')
    },
    previousPage() {
      this.$emit('previousPage')
    }
  }
We will render that component just below our ArticleItems in ArticlesList component.
// ArticlesList.vue
<template>
  <div>
    <ArticleItem
      v-for="article in articles"
      :key="article.publishedAt"
      :article="article"
    />
    <BasePagination
      :current-page="currentPage"
      :page-count="pageCount"
      class="articles-list__pagination"
      @nextPage="pageChangeHandle('next')"
      @previousPage="pageChangeHandle('previous')"
    />
  </div>
</template>
That was the easy part. Now we need to create a list of page numbers, each allowing us to select a specific page. The number of pages should be customizable and we also need to make sure not to show any pages that may lead us beyond the collection range.
Requirement 2: Allow the user to go to a specific page within a range

Let’s start by creating a component that will be used as a single page number. I called it BasePaginationTrigger. It will do two things: show the page number passed from the BasePagination component and emit an event when the user clicks on a specific number.
// BasePaginationTrigger.vue
<template>
  <span class="base-pagination-trigger" @click="onClick">
    {{ pageNumber }}
  </span>
</template>
<script>
export default {
  props: {
    pageNumber: {
      type: Number,
      required: true
    }
  },
  methods: {
    onClick() {
      this.$emit("loadPage", this.pageNumber)
    }
  }
}
</script>
This component will then be rendered in the BasePagination component between the next and previous buttons.
// BasePagination.vue
<template>
  <div class="base-pagination">
    <BaseButton />
    ...
    <BasePaginationTrigger
      class="base-pagination__description"
      :pageNumber="currentPage"
      @loadPage="onLoadPage"
    />
    ...
    <BaseButton />
  </div>
</template>
In the script section, we need to add one more method (onLoadPage) that will be fired when the loadPage event is emitted from the trigger component. This method will receive a page number that was clicked and emit the event up to the ArticlesList component.
// BasePagination.vue
export default {
  ...
    methods: {
    ...
    onLoadPage(value) {
      this.$emit("loadPage", value)
    }
  }
}
Then, in the ArticlesList, we will listen for that event and trigger the pageChangeHandle method that will fetch the data for our new page.
// ArticlesList
<template>
  ...
    <BasePagination
      :current-page="currentPage"
      :page-count="pageCount"
      class="articles-list__pagination"
      @nextPage="pageChangeHandle('next')"
      @previousPage="pageChangeHandle('previous')"
      @loadPage="pageChangeHandle"
    />
  ...
</template>
Requirement 3: Change the range of page numbers based on the current page
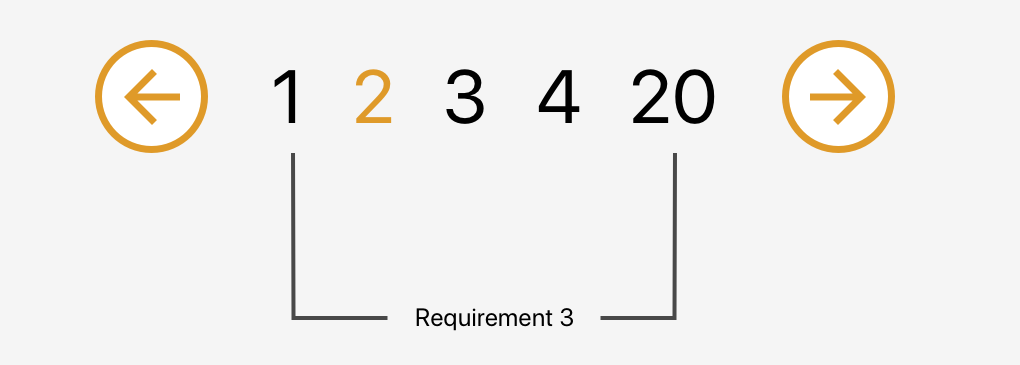
OK, now we have a single trigger that shows us the current page and allows us to fetch the same page again. Pretty useless, don’t you think? Let’s make some use of that newly created trigger component. We need a list of pages that will allow us to jump from one page to another without needing to go through the pages in between.
We also need to make sure to display the pages in a nice manner. We always want to display the first page (on the far left) and the last page (on the far right) on the pagination list and then the remaining pages between them.
We have three possible scenarios:
- The selected page number is smaller than half of the list width (e.g. 1 - 2 - 3 - 4 - 18)
- The selected page number is bigger than half of the list width counting from the end of the list (e.g. 1 - 15 - 16 - 17 - 18)
- All other cases (e.g. 1 - 4 - 5 - 6 - 18)
To handle these cases, we will create a computed property that will return an array of numbers that should be shown between the next and previous buttons. To make the component more reusable we will accept a property visiblePagesCount that will specify how many pages should be visible in the pagination component.
Before going to the cases one by one we create few variables:
visiblePagesThreshold:- Tells us how many pages from the centre (selected page should be shown)paginationTriggersArray: Array that will be filled with page numbersvisiblePagesCount: Creates an array with the required length
// BasePagination.vue
export default {
  props: {
    visiblePagesCount: {
      type: Number,
      default: 5
    }
  }
  ...
  computed: {
    ...
      paginationTriggers() {
        const currentPage = this.currentPage
        const pageCount = this.pageCount
        const visiblePagesCount = this.visiblePagesCount
        const visiblePagesThreshold = (visiblePagesCount - 1) / 2
        const pagintationTriggersArray = Array(this.visiblePagesCount - 1).fill(0)
      }
    ...
    }
  ...
}
Now let’s go through each scenario.
Scenario 1: The selected page number is smaller than half of the list width
We set the first element to always be equal to 1. Then we iterate through the list, adding an index to each element. At the end, we add the last value and set it to be equal to the last page number — we want to be able to go straight to the last page if we need to.
if (currentPage <= visiblePagesThreshold + 1) {
  pagintationTriggersArray[0] = 1
  const pagintationTriggers = pagintationTriggersArray.map(
    (paginationTrigger, index) => {
      return pagintationTriggersArray[0] + index
    }
  )
  pagintationTriggers.push(pageCount)
  return pagintationTriggers
}
Scenario 2: The selected page number is bigger than half of the list width counting from the end of the list
Similar to the previous scenario, we start with the last page and iterate through the list, this time subtracting the index from each element. Then we reverse the array to get the proper order and push 1 into the first place in our array.
if (currentPage >= pageCount - visiblePagesThreshold + 1) {
  const pagintationTriggers = pagintationTriggersArray.map(
    (paginationTrigger, index) => {
      return pageCount - index
    }
  )
  pagintationTriggers.reverse().unshift(1)
  return pagintationTriggers
}
Scenario 3: All other cases
We know what number should be in the center of our list: the current page. We also know how long the list should be. This allows us to get the first number in our array. Then we populate the list by adding an index to each element. At the end, we push 1 into the first place in our array and replace the last number with our last page number.
pagintationTriggersArray[0] = currentPage - visiblePagesThreshold + 1
const pagintationTriggers = pagintationTriggersArray.map(
  (paginationTrigger, index) => {
    return pagintationTriggersArray[0] + index
  }
)
pagintationTriggers.unshift(1);
pagintationTriggers[pagintationTriggers.length - 1] = pageCount
return pagintationTriggers
That covers all of our scenarios! We only have one more step to go.
Step 5: Render the list of numbers in BasePagination component
Now that we know exactly what number we want to show in our pagination, we need to render a trigger component for each one of them.
We do that using a v-for directive. Let’s also add a conditional class that will handle selecting our current page.
// BasePagination.vue
<template>
  ...
  <BasePaginationTrigger
    v-for="paginationTrigger in paginationTriggers"
    :class="{
      'base-pagination__description--current':
        paginationTrigger === currentPage
    }"
    :key="paginationTrigger"
    :pageNumber="paginationTrigger"
    class="base-pagination__description"
    @loadPage="onLoadPage"
  />
  ...
</template>
And we are done! We just built a nice and reusable pagination component in Vue.
#vue-js #javascript
