While prepping for my first interview, I spent a lot of time covering data structures as I understand they’re a very popular topic in interview questions. I was familiar with the concept of Linked Lists, but not completely comfortable with my understanding. I thought how better to learn more about them than to create one from scratch. Since I primarily code in JavaScript and they don’t have Linked Lists, I created one using a JavaScript class.
A Linked List is a data structure that has three common types: Singly, Doubly, or a Circular Linked List. It is very similar to an array but maintains faster performance for insertion and deletion tasks. For the purpose of this example, I’ll be creating a Singly Linked List. A Singly Linked List is comprised of multiple nodes, which hold a ‘data’ and a ‘next’ property. The data property points to a piece of information such as a number. The next property will point to the node that follows it. The key components of a Linked List are the head, tail, and pointer. The head is simply the first node, this is the entry point to the list. The tail is the last node, it always has a “next” property that points to null or the X in the example below. The head in the example is the node containing a value of 12, while the tail is 37.

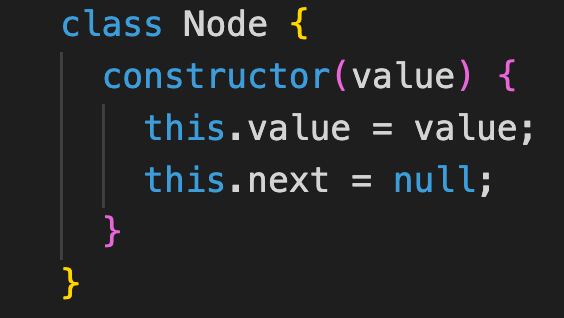
In order to build a class in JavaScript, the first place to start is always the constructor. Since I know Linked Lists are comprised of multiple nodes, in this method I will create my key component nodes (head and tail). To simplify my code, outside of my LinkedList class I decided to build a Node class. A Node is just an object that consists of a value(data from the argument) and a next property. This allows us to easily create new instances of a new Node.
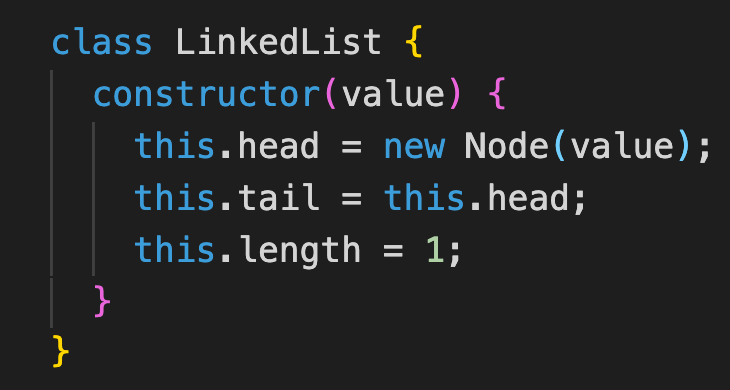
Now we can create our Linked List constructor method. This method, like the one above will start by taking a value so we can pass it to the new Node instance. We can create our head node first as a new Node instance, with that value. The tail then can be assigned to the head. We assign it to the tail because we have one item in our list, and for now it is both the head and the tail. The last step to initialize our list is to create a property called length (like that on an array) and set its value to one. This isn’t necessary but allows us to keep up with the elements in our list. Since this is a Singly Linked List, meaning it only travels in one direction and nodes do not have a previous element, our constructor will look like this:
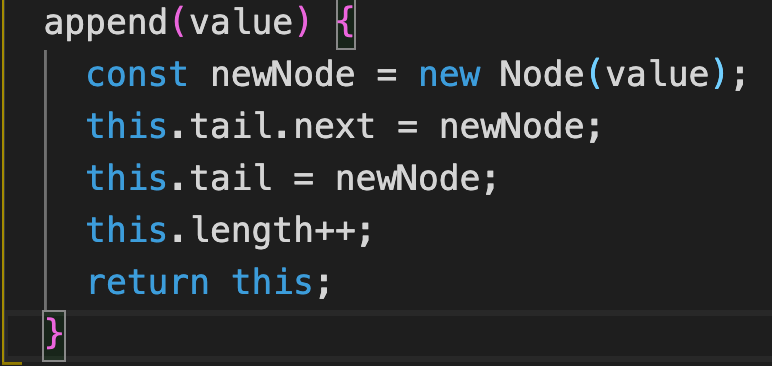
Now that we can declare a Linked List of one item (head, and tail) we can next implement the other methods in order to append, prepend, and remove items. First starting with append, this method will add new items to the end of our list. Similar to our Node class and constructor method we must pass in a value as an argument to be appended. Also similar to the constructor, we will set the tail equal to the ‘newNode’ as it is now our final item in our list. This is done by setting the next property of our current tail element to be the newly created node. The next property of our newNode will be set to null since there won’t be anything trailing it. Now that we have a new Node after our tail, we must update the value of the lists tail element to be equal to that newNode. Finally, since we have updated the list with another item, we can increment the length of our list by one and return it.
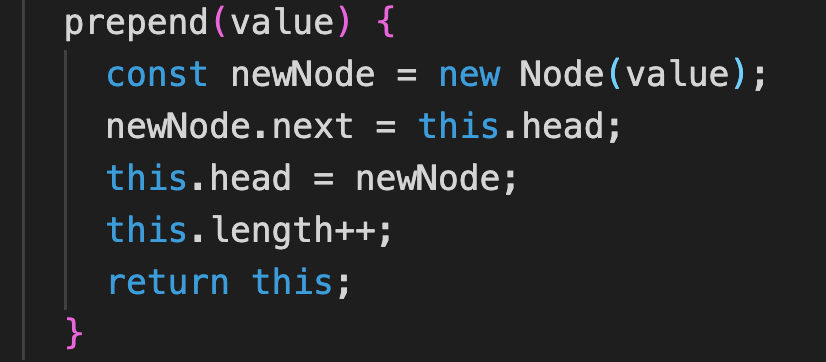
Now since we have our append method, we can do the same with prepend, adding an item to the beginning of a list. This method starts the same way, by implementing the prepend method to accept a value argument. We also create a new Node instance passing in that value. However, instead of assigning the node to the next value of the tail, this time we will assign the next value of the newNode to be the current head. This will make our newNode the first item in the list. Now that we have another item added to the list, we must update the head of the list to reflect the correct first item, this newNode. And as always, when adding another node to the list we need to increment the list length by one. Finally we can return our list to make sure the item was added. The prepend method should look like this:
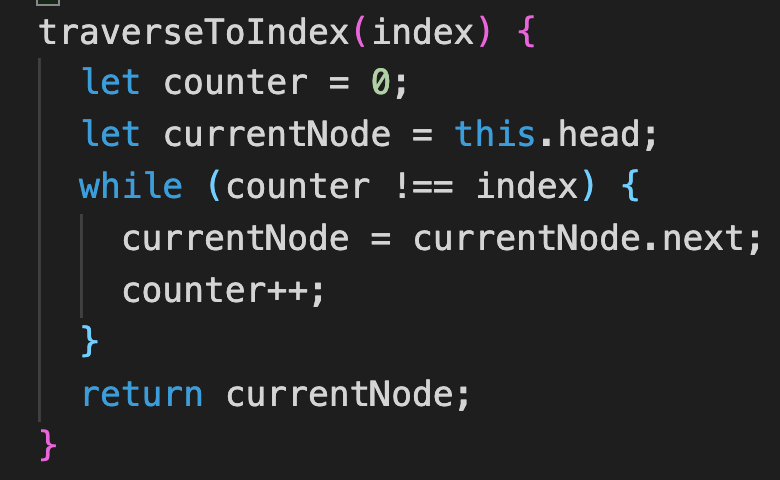
In order to implement our remove method we must create a helper method, we’ll call traverseToIndex, which takes in an index as an argument. With this argument, it then traverses to the node we want removed. First on this helper method, we’ll create a counter variable set equal to 0. Next we’ll create a variable to start at the first element of the list the head, it’ll be called currentNode. Now that we have a currentNode (tracker) at the head of the list we’ll move it to the node we want to be removed. We can do this by writing a simple while loop with a condition to continue while the counter doesn’t equal the index. If this condition returns true, then in that loop body we’ll set the currentNode to be the currentNode’s next value moving it along, and increment the counter variable by one to keep track of our position. As soon as we get to the index that we want, we will return the node to be removed. Since we are returning the node, we can now use it for our remove method.
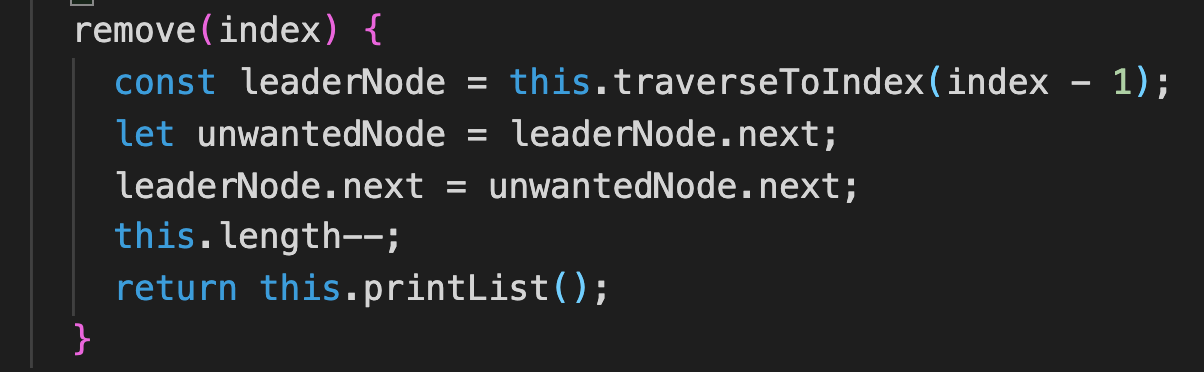
Now that we can easily access our node we want removed, the rest is pretty straight forward. In the remove method we’ll start by declaring a few variables. First, we’ll declare a variable called leaderNode. This will be the node returned from our helper function (traverseToIndex). One caveat is we’ll call our helper function with the index minus 1. This way we receive the node in front of the one we want removed, hence the naming of leaderNode. Then we’ll declare a variable called unwantedNode set to the leader.next which is the actual node we want removed from the list. We do this so that we have access to the next node of the node to be removed. Now that we have all of our variables, we can set our leader.next value equal to the unwantedNode.next value, basically skipping over and removing existence of the unwantedNode in the list order. We still have access to the node in the unwantedNode variable if you’d like to return the removed value, or you can return the updated list with ‘this’. The last step is to then decrement the list by one since we have successfully removed a node.
These are the primary methods to construct a Linked List in JavaScript, however you can add more as you see fit. A few other useful methods I added are printList, insert, and reverse. The printList method will display our list in a nice array-like data structure, making it easier to read. The insert method will insert a new value at a specific index on our list. And finally the reverse method will reverse the order of our Linked List. I’ve added the completed list below. After creating this Singly Linked List class I definitely have a better understanding of this data structure. It’s now time to focus on learning more about the different variations of Linked Lists. Happy Coding!
#coding #singly-linked-list #visual studio code
