React Native App for Searching Netflix Content
React Native app for searching Netflix content
This project was created with the Expo cli. More on installing the Expo cli from the React Native docs. Expo official docs can be found here.
Description
This React Native app is part of a school/study project. It uses an API, which is part of the overall project, for user authentication and fetching userdata. The API can be found here on this Github. The app focusses on presenting the user which Netflix content will be deleted and which new content has been added. For this, the app uses a third party API from Rapidapi to search and fetch all the content. The user is able to query the API through this app. Furthermore, the user is able to save Netflix content items to a list of favorites which is presented in the app.
This is a study project
This is just a project for my study. Therefore teachers/instructors will receive a seperate file containing all API-keys and will not need to go through the section: Set-up guide.
Prerequisites
- It is required that you have Nodejs installed on your machine before installing this project
- The backend (project API) must be running and configured correctly (See the included README.md in the API Github repo)
- Android studio must be installed
- Xcode must be installed (Mac)
How to check if Node is installed?
Open a terminal and run:
node -v
This should return a version number, something like: v12.18.3
If you do not yet have Node installed you can do so by going to: https://nodejs.org/en/ or if you are on a Mac and use Homebrew run:
brew install node
After installation run the node -v command again and verify that Node is installed correct.
Set-up guide
This app uses the unogsNG API. For this you will need to sign up with Rapidapi and create a API-key. This key must be set in the environment variables.
Environment variables
Create a .env file in the root folder and enter all environment variables as listed in the env-example.txt which you find in the root folder.
- You will need to set a connection string at which the app will reach out to the API that is part of this overall project. Make sure that the
CONNECTION_STRINGin both the API and Webapp use the same address and port. A suggested port is given in theenv.example.txt - Next you will need to set the
ASSET_URLwhich is used to fetch and set the user images/avatar. TheASSET_URLdoes NOT end with/api!!

- When using a local API to connect with, make sure that when using the Android emulator the
localhostpart of both CONNECTION_STRING and ASSET_URL are replaced by IP:10.0.2.2. Otherwise Android emulators running on the same machine are unable to connect to local API’s/servers.

Installation
Clone the project to your designated folder and run
npm install
All the project dependencies will be installed and a node_modules folder is created.
Demo
After setting the environment variables and having run the npm install command, start the app by running the command:
npm run start:dev
A informative message now appears in your terminal window indicating the application is running. This will automatically open a browser page, if not, the address can be selected as shown below.
Get the address from the terminal and open it in the browser

In the browser a page now be visible which allows you to track any logs or errors from the running application. The logs and/or errors are also displayed in your terminal window.
iOS
- When in the terminal press
ito open the app on the iOS emulator. Make sure that the.envconnection string points tolocalhost.
Android
Android emulators need a different address to connect with a local running API/server.
- Stop the running Native application with
control + ccommand in the terminal - In de
.envfile, switchlocalhostto IP:10.0.2.2 - Restart the application with
npm run start:dev
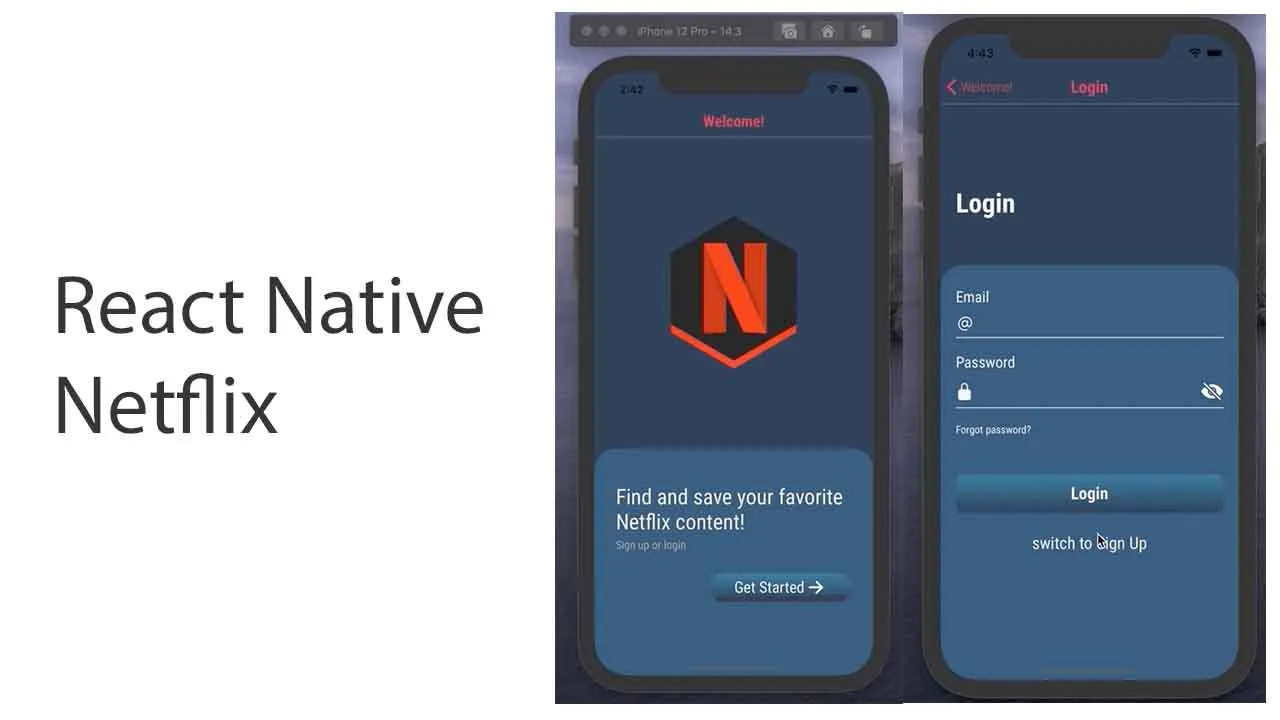
Login
The login page for the app should now be open:

…or Sign Up

! You can either sign up with a fake or real email address. If an actual email address is used, a notification will be send informing the user of the succesful sign up. This must be configured correctly using the project API with the SaaS transactional email sending set up. (See the included README in the API Github repo)
Available Scripts
In the project directory, you can run:
npm run start:dev
Runs the app in the development mode.
Open the iOS or Android emulator as explained in the section iOS or Android. Saved changes wil be reflected in the running application.
npm run lint-check
Runs a linting check using the eslint.
A result output is shown in the terminal
Project status
This being a study project means many improvements can be made. Pull requests are welcome! For now the app is ready to be used and is up and running on a private domain, accessible for teachers, instructors and other students.
Download Details:
Author: LauRuns
Source Code: https://github.com/LauRuns/rn-netflix
#react-native #react #mobile-apps