Vue3.0 background management system framework construction
The importance of vue can be imagined, learning vue3.0 in advance, there is nothing wrong with it. This article will take you to understand the knowledge points of vue3.0 construction project, antd introduction, life cycle, data two-way data binding use, method use, calculation properties, monitoring, component introduction, component value transfer, routing value transfer, etc., I am a rookie, A lot of guidance. Don’t talk nonsense, make a login, list, and details interface directly on the code through actual operations.
github source code: https://github.com/parchments/vue3-admin-template
Effect preview: login page, home page, list page, details page
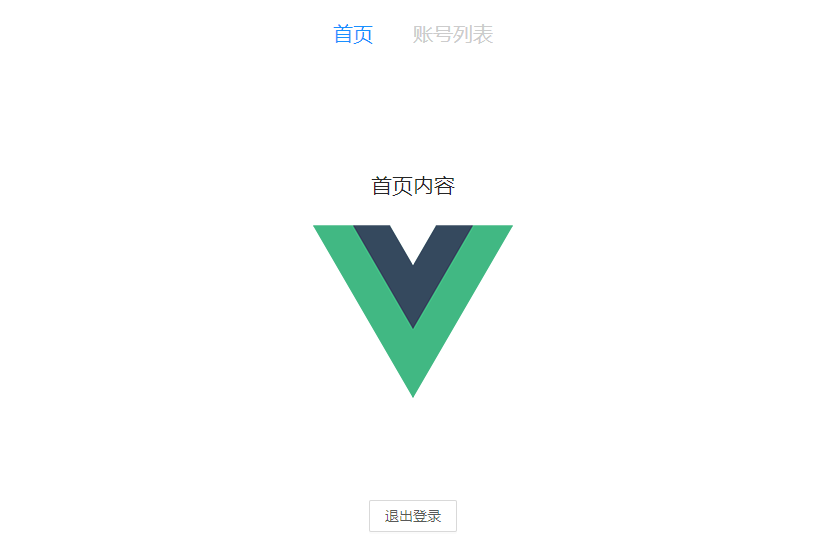
Home
List
Details page
1. Project construction
- Not to mention installing node, it is necessary. In addition, you need to install the latest scaffolding of vue-cli 4th generation and above. You can install/update the scaffolding version by executing the following npm command
脚手架升级: npm update @vue/cli
初次安装:   npm i @vue/cli -g
Choose the plug-ins that need to be pre-installed according to your needs
vue create \[projectName\]
How do you know that you have installed vue3.0 correctly? Please refer to the main.js of vue3.0. The introduction of vue2.0 into vue is import Vue from’vue’, and vue3.0 is the introduction of deconstruction. Seeing that the introduction of deconstruction means this project is vue3 .0, good job, continue. . .
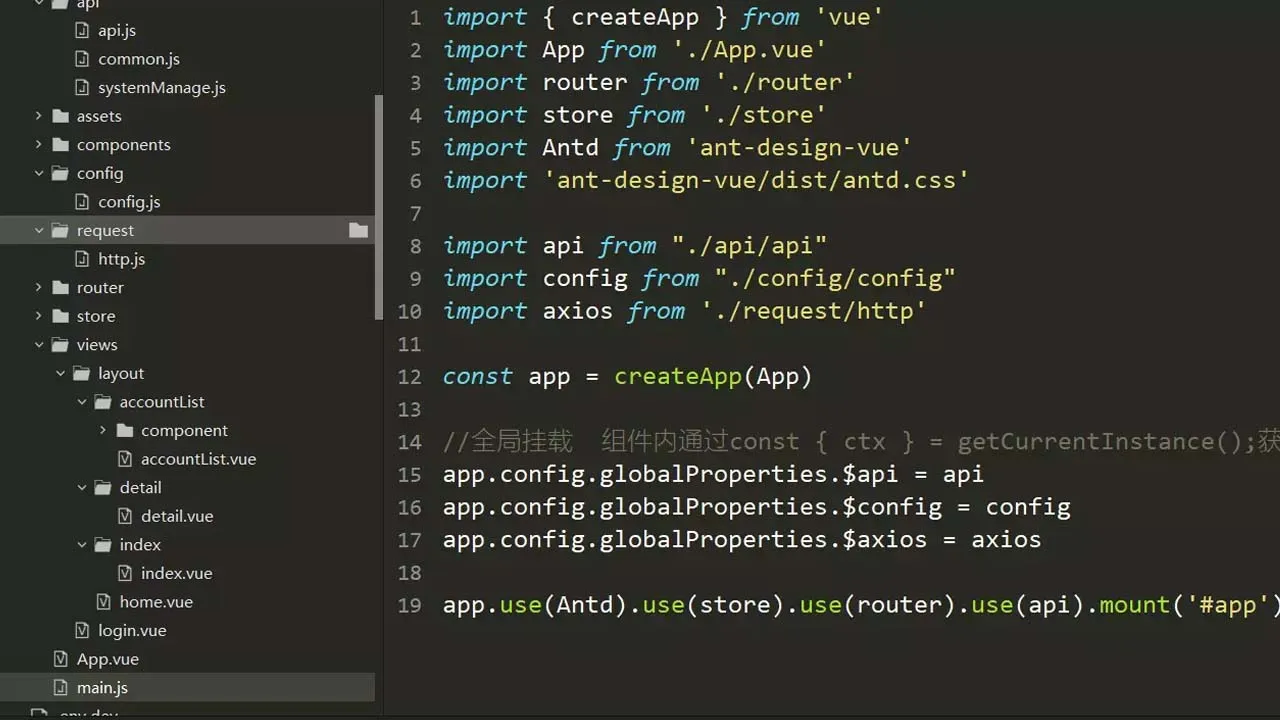
Vue3.0 global mount http, api, config
By the way, if vue3.0+ts is developed, the global mount needs to be mounted as follows
Add the code with + sign in the file main.ts
//  main.ts
import { createApp } from "vue";
import App from "./App.vue";
\+ import axios from "axios";

const app = createApp(App);
\+ app.config.globalProperties.$http = axios;
app.mount("#app")
在文件 shims-vue.d.ts添加 带有 + 符号后代码

//  shims-vue.d.ts

declare module "*.vue" {
  import { defineComponent } from "vue";
  const component: ReturnType<typeof defineComponent>;
  export default component;
}

\+ declare module "@vue/runtime-core" {
\+  import { AxiosInstance } from "axios";
\+  interface ComponentCustomProperties {
\+    $http: AxiosInstance;
\+  }
\+ }
2. Install and introduce antd
$ npm i --save ant-design-vue@next
//If you need to import on demand, install the plug-in babel-plugin-import and then configure babel.config.js$ npm i --save babel-plugin-import
Full introduction
import { createApp } from 'vue';
import Antd from 'ant-design-vue';
import App from './App';
import 'ant-design-vue/dist/antd.css';

const app = createApp();
app.config.productionTip = false;

app.use(Antd);

以上代码便完成了 Antd 的引入。需要注意的是,样式文件需要单独引入。

**局部导入组件**

import { createApp } from 'vue';
import { Button, message } from 'ant-design-vue';
import App from './App';

const app = createApp();
app.config.productionTip = false;

/\* Automatically register components under Button, such as Button.Group */
app.use(Button);

app.config.globalProperties.$message = message;

如果需要按需加载,则配置`ant-design-vue`

根目录打开`babel.config.js`文件,将里面的内容修改为

module.exports = {
  presets: \["@vue/cli-plugin-babel/preset"\],
  plugins: \[
    //以下是配置按需加载
    \[
      "import",
      {
        libraryName: "ant-design-vue",
        libraryDirectory: "es",
        style: "css"//为true时加载的是less文件
      }
    \]
  \]
}
At present, I introduce antd in a global way, and you can introduce it according to your needs.
3. Page layout
app.vue page
<template>
  <div id="app">
    <router-view/>
  </div>
</template>

<style lang="less">
#app {
  text-align: center;
}
</style>
Login page: involves data definition, responsive data, life cycle, method invocation, instance acquisition (that is, this of vue2.x)
//login
<template>
	<div class="box">
		<h1>登录</h1>
		<h2>{{name}}</h2>
		<a-form class="form" layout="inline">
			<a-form-item label="账号">
				<a-input v-model:value="account" type="text" placeholder="请输入账号"/>
			</a-form-item>
			<a-form-item label="密码">
				<a-input v-model:value="password" type="password" placeholder="请输入密码"/>
			</a-form-item>
			<h3>输入账号密码,{{count}} 秒后登录</h3>
			<a-button @click="login()" block :disabled="account === '' || password === ''" type="primary">登录</a-button>
		</a-form>
	</div>
</template>

<script>
	//vue-cli 4.5.4创建的3.0
	// import { reactive } from '@vue/composition-api' //会提示报错 export 'default' (imported as 'Vue') was not found in 'vue'
	import { reactive, toRefs, getCurrentInstance, onBeforeMount, onMounted, onBeforeUpdate, onUpdated, onBeforeUnmount, onUnmounted, onErrorCaptured} from 'vue' //vue-cli 4.5.4 之后vue3.0集成了@vue/composition-api
	export default {
		name: 'login',
		components: {

		},

		//始化数据,介于beforeCreate与created之间,相当于beforeCreate、created的合并
		setup() {
			//setup(props,context)函数  默认两个属性props,context 属性和上下文   setup函数中无法访问到this
			//创建处理响应式数据对象 类似date  需要先导入
			const state = reactive({
				count: 3,
				name: '我是响应式数据name',
				account: '',//账号
				password: ''//密码
			})
			//获取当前路由实例
			//Vue 3.0 中通过 getCurrentInstance 方法获取当前组件的实例,然后通过 ctx 属性获得当前上下文,ctx.$router 是 Vue Router 实例,里面包含了 currentRoute 可以获取到当前的路由信息
			const { ctx } = getCurrentInstance();
			console.log(toRefs)
			//登录方法
			const login = () => {
				// state.count++;

				console.log(ctx);
				let {account,password} = state;//对象解构
				if(account=== "" || password===""){
					alert('账号密码不能为空')
				}else{
					setInterval(()=>{
						state.count--;
					},1000)
					setTimeout(()=>{
						ctx.$router.push('/index');
					},3000);
				}
				// return
			}

			//以下是生命周期
			//组件挂载前
			onBeforeMount( () => {
				console.log('onBeforeMount,组件挂载前,相当于beforeMount')
			})
			//实例挂载完毕
			onMounted( () => {
				console.log('onMounted,实例挂载完毕,相当于mounted')
			})
			//响应式数据变化前
			onBeforeUpdate( () => {
				console.log('onBeforeUpdate,响应式数据变化前,相当于beforeUpdate')
			})
			//响应式数据变化完成
			onUpdated( () => {
				console.log('onUpdated,响应式数据变化完成 ,相当于updated')
			})
			//实例销毁前
			onBeforeUnmount( () => {
				console.log('onBeforeUnmount,实例销毁前 ,相当于beforeDestroy')
			})
			//实例已销毁
			onUnmounted( () => {
				console.log('onUnmounted,实例已销毁 ,相当于destroyed')
			})
			//错误数据捕捉
			onErrorCaptured( () => {
				console.log('onErrorCaptured,错误数据捕捉')
			})
			//setup函数的返回值 导出
			return {
				//...state,  //如果没有用toRefs方法的话,是不能把reactive创建出来的数据变成响应式数据的  需要响应式就是要加上toRefs 否则不需要
				...toRefs(state),//把reactive创建出来的数据变成响应式数据
				login
			}
		}
	}
</script>
<style lang="less" scoped>
	.box{
		width: 50%;
		margin: 0 auto;
		padding-top: 200px;
		.form{
			width: 60%;
			margin: 0 auto;
			padding-top: 30px;
		}
	}
</style>
It can be seen that the structure of vue2.x is very different, such as setup, method usage, etc. Setup is the entrance to Composition API. The new properties provided by Vue3.0 can use Composition API in setup. In the code, we initialized a reactive data through reactive in setup, and then returned an object through return. The object contains the declared reactive data and a method.
The setup function has two parameters, props and context, setup(props,context);
Properties passed in from outside the props component
export default {
  props: {
    title: {
      type: String
    }
  },
  setup(props) {
    //组件传入的值
    console.log(props.title)
  }
}
Context is an object, which contains three attributes, namely attrs, slots, emit
attrs is the same as this.$attrs of Vue2.0, that is, attributes passed in from outside that are not defined in props. For attrs and props, we cannot use es6 deconstruction for attrs, we must use attrs.name.
Slots correspond to the slots of the components, which correspond to this.$slots of Vue2.0. Like props and attrs, slots cannot be deconstructed.
Emit corresponds to this.$emit of Vue2.0, that is, the external exposure event.
home.vue page
<template>
<div>
<Nav />
<router-view></router-view>
<br/>
<br/>
<br/>
<br/>
<a-button @click="back()">退出登录</a-button>
</div>
</template>
<script>
// import { reactive } from '@vue/composition-api' //会提示报错 export 'default' (imported as 'Vue') was not found in 'vue'
import { reactive,toRefs,getCurrentInstance } from 'vue' //vue-cli 4.5.4 之后vue3.0集成了@vue/composition-api
import Nav from '../../components/nav.vue'
export default {
name: 'home',
components: {
Nav
},
//始化数据,介于beforeCreate与created之间,相当于beforeCreate、created的合并
setup(props,context) {
console.log(props,context);
//函数 默认两个属性props,context 属性和上下文 setup函数中无法访问到this
//创建处理响应式数据对象 类似date 需要先导入
const state = reactive({
})
//获取当前路由实例
//Vue 3.0 中通过 getCurrentInstance 方法获取当前组件的实例,然后通过 ctx 属性获得当前上下文,ctx.$router 是 Vue Router 实例,里面包含了 currentRoute 可以获取到当前的路由信息
const { ctx } = getCurrentInstance();
//登录方法
const back =() => {
ctx.$router.push('/login');
}
//setup函数的返回值 导出
return {
...toRefs(state),
back
}
}
}
</script>
index->index.vue page
<template>
	<div style="padding-top: 100px;">
		<h2>首页内容</h2>
		<img src="../../../assets/logo.png" alt="">
	</div>
</template>

<script>
	import { reactive, toRefs, getCurrentInstance } from 'vue'
	export default {
		name: 'index',
		// components: {

		// },
		setup() {
			const state = reactive({

			})
			//获取当前路由实例
			const { ctx } = getCurrentInstance();
			console.log(ctx)
			//setup函数的返回值 导出
			return {
				...toRefs(state)
			}
		}
	}
</script>
accountList.vue list page (calculated attributes)
<template>
	<div style="margin-top: 100px;">
		<ti :title="title"></ti>
		<h3>列表请求数据中...{{count}}秒后显示</h3>
		<a-table :data-source="list" :pagination="false" style="width: 60%; margin: 0 auto 30px;">
			<a-table-column key="account" title="account" data-index="account" />
			<a-table-column key="password" title="password" data-index="password" />
			<a-table-column key="action" data-index="action">
				<template v-slot="{record}">
					<span>
						<a @click="goToLink(record.id)">详情</a>
					</span>
				</template>
			</a-table-column>
		</a-table>
		<a-input type="text" v-model:value="leftValue" placeholder="leftValue" style="width: 100px;"/>
		<a-input type="text" v-model:value="rightValue" placeholder="rightValue" style="width: 100px;"/>
		<div>
			计算属性输出的结果是:{{resultValue}}
		</div>
		<!\-\- <div>
			<h2>Clicked {{ count }} times</h2>
			<h2>Watch Count is {{ watchCount }}</h2>
			<button @click="increase">Click</button>
		</div> -->
	</div>
</template>

<script>
	import {
		reactive,
		toRefs,
		getCurrentInstance,
		onMounted,
		computed
	} from 'vue'
	import title from './component/title.vue'
	export default {
		name: 'accountList',
		components: {
			'ti': title
		},
		setup(props, context) {
			console.log('propss,context', props, context)
			const state = reactive({
				title: '我是子组件的值', //子组件
				list: \[\],
				count: 3,
				leftValue: 0,
				rightValue: 0,
				//计算属性
				resultValue: computed(() => {
					return Number(state.leftValue) + Number(state.rightValue);
				})
			})
			// const count1 = ref(0);
			// const watchCount = ref(0);
			// function increase () {
			//   count1.value++;
			// };
			// watch( () => count1.value,
			// 	(val) => {
			// 		watchCount.value = val;
			// 	}
			// );
			//获取当前路由实例
			const {
				ctx
			} = getCurrentInstance();
			console.log('列表实例', ctx)

			function goToLink(index) {
				ctx.$router.push({
					path: '/accountList/detail',
					query: {
						id: index
					}
				})
			}

			function getList() {
				// axios请求
				let timer1 = setInterval(() => {
					state.count--;
					if (state.count < 1) {
						clearInterval(timer1)
						return
					}
				}, 1000)
				console.log('请求列表数据')
				//模拟异步请求
				let timer2 = setTimeout(() => {
					state.list = \[{
							id: 1,
							account: 'admin',
							password: '111111'
						},
						{
							id: 2,
							account: 'chushi',
							password: 'chushi-111'
						},
						{
							id: 3,
							account: 'six',
							password: '666'
						}
					\]
					clearTimeout(timer2)
				}, 2000)

				//以下为普通列表请求方法
				// async getList(params) {
				// 	state.loading = true;
				// 	try{
				// 		let res = await ctx.$api.systemManage.getList(params);
				// 		if (res.data.retcode === ctx.$config.RET\_CODE.SUCCESS\_CODE) {
				// 			let data = res.data.data;
				// 			if (data.length > 0) {
				// 				state.tableData = data;
				// 				state.paginationParams.pageSize = data.pageSize; //每页的数量
				// 				state.paginationParams.size = data.size; //当前页的数量
				// 				state.paginationParams.total = data.total; //总条数
				// 				state.paginationParams.pages = data.pages; //总页码数
				// 			} else {
				// 				state.tableData = \[\];
				// 			}
				// 		} else {
				// 			ctx.$Message.error('请求成功,暂无数据');
				// 		}
				// 		state.loading = false;
				// 	}catch(e){
				// 		state.loading = false;
				// 		ctx.$Message.error('暂无数据');
				// 		console.log(e);
				// 	}
				// }
			}
			onMounted(() => {
				getList();
			})
			//setup函数的返回值 导出
			return {
				...toRefs(state),
				goToLink,
			}
		}
	}
</script>
detail page (routing parameters)
<template>
	<div>
		<h3>请求参数id为{{id}}的数据</h3>
		<router-link to="/accountList">返回列表</router-link>
	</div>
</template>

<script>
	import { reactive, toRefs, getCurrentInstance } from 'vue'
	import { useRoute } from 'vue-router'
	export default {
		name: 'detail',
		components: {

		},
		setup(props,context) {
			const state = reactive({
				id: ''
			})
			const { ctx } = getCurrentInstance();//获取实例
			const { query } = useRoute();//获取路由参数
			console.log(query)
			state.id = query.id;
			console.log('详情',ctx,context)
			//setup函数的返回值 导出
			return {
				...toRefs(state)
			}
		}
	}
</script>
I believe everyone has a preliminary understanding of the basic usage of vue3.0. As a rookie, I am also constantly learning and updating
Official website document: https://v3.cn.vuejs.org/api/application-config.html
Download Details:
Author: parchments
Demo: https://juejin.im/post/6875124592852074503
Source Code: https://github.com/parchments/vue3-admin-template
#vue #vuejs #javascript