PyQt Tutorial: Python GUI Designer
What is PyQt?
PyQt is a python binding of the open-source widget-toolkit Qt, which also functions as a cross-platform application development framework. Qt is a popular C++ framework for writing GUI applications for all major desktop, mobile, and embedded platforms (supports Linux, Windows, MacOS, Android, iOS, Raspberry Pi, and more).
PyQt is a free software developed and maintained by Riverbank Computing, a company based in England, whereas Qt is developed by a Finnish firm called The Qt Company.
In this PyQT tutorial, you will learn:
- Features of PyQT
- PyQt Versions
- How to install PyQt
- Basic PyQt Concepts and Programs
- Components and Widgets
- Themes
Features of PyQT
Here, are Important features of PyQt:
PyQt consists of more than six hundred classes covering a range of features such as
- Graphical User Interfaces
- SQL Databases
- Web toolkits
- XML processing
- Networking
These features can be combined to create advanced UIs as well as standalone applications. A lot of major companies across all industries use Qt. Some examples are LG, Mercedes, AMD, Panasonic, Harman, etc.
PyQt Versions
PyQt is available in two editions, PyQt4 and PyQt5. PyQt4 provides glue code for binding 4.x and 5.x versions of the Qt framework while PyQt5 provides a binding for only the 5.x versions. As a result, PyQt5 is not backward compatible with the deprecated modules of the older version. In this tutorial, PyQt5 will be used for the demonstration of examples. Apart from these two versions,
Riverbank Computing also provides PyQt3D—the python bindings for the Qt3D framework. Qt3D is an application framework used to create real-time simulation systems with 2D/3D rendering.
How to install PyQt
There are two ways of installing PyQt.
- Using Wheel files
- Building and Installing from Source
Qt (pronounced cute) is a complex system, and the PyQt codebase contains compiled C++ and Python code under the hood. As a result, it is a complicated process to build and install it from the source compared to other python libraries. However, you can easily install PyQt5 using wheels.
Installation with wheels
Wheels are the new standard Python packaging and distribution format. Simply speaking, a wheel is a ZIP archive with a special name and .whl file extension. Wheels can be installed using pip (Python’s package manager), which is included by default in the recent versions of Python.
So, if you have Python 3.4 or later installed, you already have pip. If, however, you are using an older version of Python, you must download and install pip before going forward. You can search for instructions for that at this link: https://pypi.org/project/pip/.
To install PyQt5,
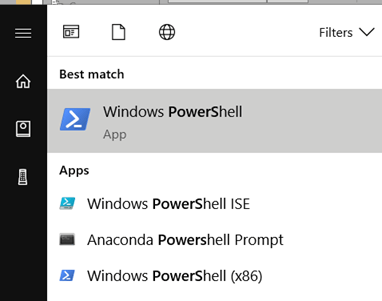
Step 1) Open the Command Prompt or PowerShell in your Windows machine.
Step 2) Type in the following
pip install PyQt5
This step will download the PyQt5 whl package (about 50 MB) and install it on your system.

Step 1) Alternatively, you can also download a Windows binary for the version of python installed on your computer.
Once it is complete, proceed to the next section to write your first GUI app.
Basic PyQt Concepts and Programs
Now that you have successfully installed PyQt5 in your computer, you are ready to write GUI applications in python.
Let’s start with a simple app which will display an empty window on your screen.
Fire up your python IDLE and type in the following:
Program 1
import sys
from PyQt5.QtWidgets import QApplication, QWidget
if __name__ == "__main__":
    app = QApplication(sys.argv)
    w = QWidget()
    w.resize(300,300)
    w.setWindowTitle(‘Guru99’)
    w.show()
    sys.exit(app.exec_())
Save it as app.py (the name does not matter) and hit F5 to run the program. Alternatively, just double click your saved file to launch the application. If you have done everything right, a new window will open up with the title Guru99 as shown below.

Great! It’s working. It is not much, but it’s enough to grasp the basics. Now, let’s see in detail what each of the lines in your program does.
from PyQt5.QtWidgets import QApplication, QWidget
This statement imports all the modules you need to create a GUI into the current namespace. The QtWidgets module contains all the major widgets that you will be using in this tutorial.
app = QApplication(sys.argv)
Here, you are creating an object of the QApplication class. This step is a necessity for PyQt5; every UI app must create an instance of QApplication, as a sort of entry point into the app. If you do not create it, errors will be shown.
sys.argv is the list of command-line parameters that you can pass to the application when launching it through the shell or while automating the interface.
In this example, you did not pass any arguments to QApplications. Therefore, you can also replace it with the code below and not even have to import the sys module.
app = QApplication([])
w = QWidget()
Next, we make an object of the QWidget class. QWidget is the base class of all UI objects in Qt, and virtually everything you see in an app is a widget. That includes dialogs, texts, buttons, bars, and so on. The feature that allows you to design complex user interfaces is that the widgets can be nested, i.e., you can have a widget inside a widget, which is inside yet another widget. You will see this in action in the next section.
w.resize(300,300)
The resize method of the QWidget class allows you to set the dimensions of any widget. In this case, you have resized the window to 300px by 300px.
Here, you should remember that widgets could be nested together, the outermost widget (i.e., the widget with no parent) is called a Window.
w.setWindowTitle('Guru99')
The setWindowTitle() method allows you to pass a string as an argument which will set the title of the window to the string you pass. In the example, the title bar will display Guru99.
w.show()
show() simply displays the widget on the monitor screen.
sys.exit(app.exec_())
The app.exec_() method starts the Qt/C++ event loop. As you know, PyQt is largely written in C++ and uses the event loop mechanism to implement parallel execution. app.exec_() passes the control over to Qt which will exit the application only when the user closes it from the GUI. That is why ctrl+c will not exit the application as in other python programs. Since Qt has control over the app, python events are not processed unless we set them up inside the application. Also, note that the exec method has an underscore in its name; this is because exec() was already a keyword in python and the underscore resolves naming conflict.
Beyond empty windows
In the previous section, you saw how to make a basic widget in Qt. It’s now time to make some more involved interfaces with which the users can truly interact. Again, fire up your IDLE and write the following.
import sys
from PyQt5.QtWidgets import QApplication, QWidget, QLabel, QPushButton, QMessageBox

def dialog():
    mbox = QMessageBox()

    mbox.setText("Your allegiance has been noted")
    mbox.setDetailedText("You are now a disciple and subject of the all-knowing Guru")
    mbox.setStandardButtons(QMessageBox.Ok | QMessageBox.Cancel)

    mbox.exec_()

if __name__ == "__main__":
    app = QApplication(sys.argv)
    w = QWidget()
    w.resize(300,300)
    w.setWindowTitle('Guru99')

    label = QLabel(w)
    label.setText("Behold the Guru, Guru99")
    label.move(100,130)
    label.show()

    btn = QPushButton(w)
    btn.setText('Beheld')
    btn.move(110,150)
    btn.show()
    btn.clicked.connect(dialog)


    w.show()
    sys.exit(app.exec_())
Save the file as appone.py or anything you like and press F5 to run the program. If you haven’t made any mistakes, the IDLE will open a new window with some text and a button as shown below.
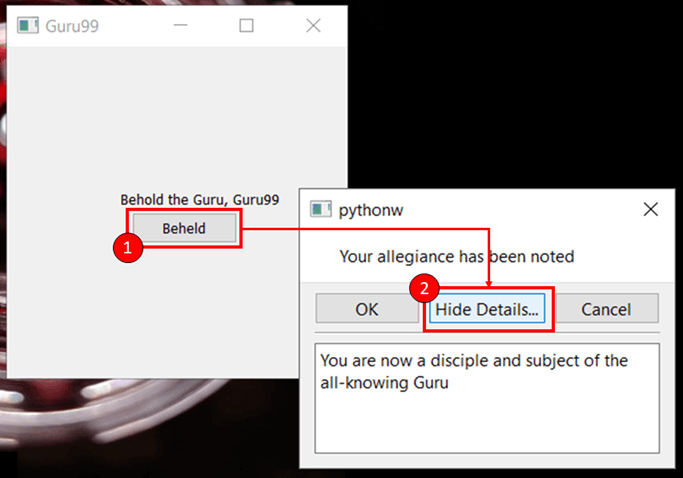
- Once you click on the button in the first window, a new message box will pop open with the text that you had written.
- You can now click on the Hide Details/Show Details button to toggle the visibility of additional text.
As you can see, since we had not set any window title in the message box, a default title was provided by python itself.
Now that it’s working let’s take a look at the extra code that you have added to the previous example.
from PyQt5.QtWidgets import QApplication, QWidget, QLabel, QPushButton, QMessageBox
This imports some more widgets that you have used in this example, namely QLabel, QPushButton, and QMessageBox.
def dialog():
    mbox = QMessageBox()

    mbox.setText("Your allegiance has been noted")
    mbox.setDetailedText("You are now a disciple and subject of the all-knowing Guru")
    mbox.setStandardButtons(QMessageBox.Ok | QMessageBox.Cancel)

    mbox.exec_()
Here, you have defined a method named dialog which creates a message box widget and sets some text to the buttons and other fields.
The dialog method is called from the main block of the program when a button is pressed in a specific widget (in this case, the btn PushButton). The click event triggered on that button causes this function to execute. Such a function is called a slot in Qt, and you will learn more about signals and slots in the upcoming paragraphs.
if __name__ == "__main__":
    app = QApplication(sys.argv)
    w = QWidget()
    w.resize(300,300)
    w.setWindowTitle('Guru99')
This is the main section of the app and as in the previous example, you start by creating an instance of QApplication followed by a simple widget, i.e. an instance of QWidget.
    label = QLabel(w)
    btn = QPushButton(w)
You have added two new widgets in this application: QLabel and QPushButton. QLabel is used to print non-editable text or placeholders inside a widget, whereas QPushButton is used to create a clickable button.
The critical thing to notice here is that when you create the label and btn objects, you are passing the window object (w) to the constructors of QLabel and QPushButton. This is how nesting works in PyQt5. To create a widget inside another widget, you pass the reference of the parent widget to the child’s constructor.
label.move(100,130)
btn.move(110,150)
move() is used to set the position of a widget with respect to its parent widget. In the first case, the label will be moved 100px from the left and 130px from the top of the window.
Similarly, the button will be placed 110px from the left and 150px from the top of the window. This example is a crude way of achieving layouts and is generally not used in production; it is only included here for learning purposes. Qt supports different layouts that you will see in detail in the upcoming sections of this tutorial.
btn.clicked.connect(dialog)
Finally, this is an example of signals and slots in Qt. In GUI based applications, functions are executed based on the actions performed by the user, like hovering over an element or clicking a button. These actions are called events. Recall that the app.exec_() method transfers control to the Qt **event-**loop. This is what the event loop is there for: to listen for events and perform actions in response.
Whenever an event occurs, like a user clicking a button, the corresponding Qt widget raises a signal. These signals can be connected to python functions (like the dialog function in this example) so that the function is executed when a signal is triggered. These functions are called slots in Qt lingo.
Subsequently, the basic syntax to trigger a slot function in response to the signal from an event is as follows
widget.signal.connect(slot)
Which means that whenever a signal is triggered by a widget, the connected slot function will be executed. In summary, signals and slots are used by Qt to communicate between objects and facilitate component reusability and interactivity.
Now that you know how to nest widgets and implement interactions using signals and slots, here is a list of useful widgets and other classes that you can use in your PyQt apps.
Components and Widgets
There is a large number of widgets available in PyQt for creating GUI apps. However, with PyQt5, there has been a reshuffling of classes into different modules and revisions in the licenses.
Therefore, it’s crucial to have a high-level view of the structure of PyQt5. In this section, you will see how PyQt5 is organized internally and learn about the different modules, libraries, and API classes provided by PyQt5.
PyQt5 Directory Structure
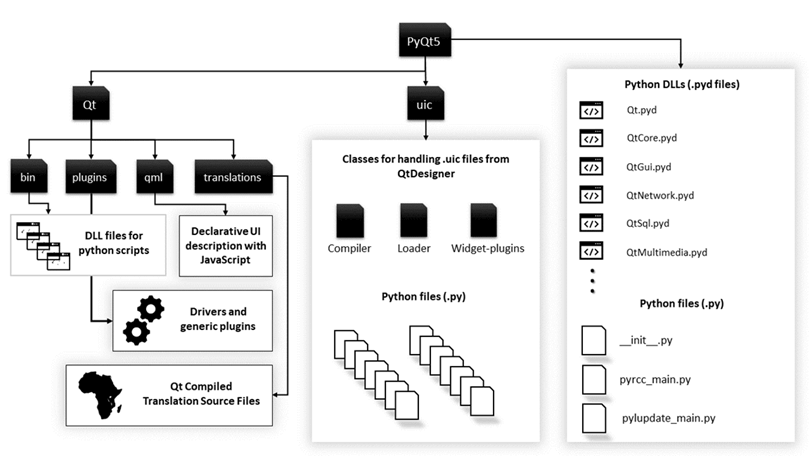
These are the fundamental modules used by Python’s Qt binding, specifically PyQt5.
- Qt: It combines all the classes/modules mentioned below into a single module. It considerably increases the memory used by the application. However, it’s easier to manage the framework by only importing one module.
- QtCore: Contains the core non-graphical classes used by other modules. This is where the Qt event loop, signals, and slot-connectivity, etc. are implemented.
- QtWidgets: Contains most of the widgets available in Pyqt5.
- QtGui: Contains GUI components and extends the QtCore module.
- QtNetwork: Contains classes used to implement network programming through Qt. It supports TCP servers, TCP sockets, UDP sockets, SSL handling, network sessions, and DNS lookups.
- QtMultimedia provides low-level multimedia functionality.
- QtSql: implements database integration for SQL databases. Supports ODBC, MySQL, Oracle, SQLite, and PostgreSQL.
PyQt5 Widgets
Here is a list of the most frequently used widgets in PyQt5
-
QLineEdit: This is an input field which allows one line of text to be entered by the user.
line = QLineEdit() ``` -
QRadioButton: This is an input field with a selectable button, similar to the radio buttons in html.
rad = QRadioButton("button title")
rad.setChecked(True)  #to select the button by default.
- QComboBox: It is used to display a dropdown menu with a list of selectable items.
drop = QComboBox(w)
drop.addItems(["item one", "item two", "item three"])
- QCheckBox: Displays a selectable square box in front of the label that is ticked if selected, similar to radio buttons.
check = QCheckBox("button title")
-
QMenuBar: it displays a horizontal menu bar at the top of a window. You can only add objects of the QMenu class to this bar. Those QMenu objects can further contain strings, QAction objects or other QMenu objects.
-
QToolBar: It is a horizontal bar or pane which can be moved within the window. It may contain buttons and other widgets.
-
QTab: it is used to break down the contents of a window into multiple pages that can be accessed through different tabs on top of the widget. It consists of two sections: the tab bar and the tab page.
-
QScrollBar: It is used to create scroll bars which allow the user to scroll up and down within a window. It consists of a movable slider, a slider track, and two buttons to scroll the slider up or down.
scroll = QScrollBar()
-
QSplitter: Splitters are used to separate the contents of a window so that the widgets are grouped properly and do not appear cluttered. QSplitter is one of the primary layout handlers available in PyQt5 and is used to split the content both horizontally and vertically.
-
QDock: A dock widget is a sub-window with two properties:
- It can be moved within the main window and
- It can be docked outside the parent window to another location on the screen.
Layouts and Themes
In the previous examples, you have only been using the move() and resize() methods to set the positions of widgets in your GUI.
However, PyQt has a robust layout management engine which can be used to create advanced user interfaces for applications. In this section, you will learn about two important classes that are used in Qt to create and manage layouts.
- QBoxLayout
- QGridLayout
QBoxLayout
QBoxLayout is used to align the child widgets of the layout in a horizontal or vertical row. The two classes of interest that inherit from QBoxLayout are:
- QHBoxLayout: used to line the child widgets horizontally.
- QVBoxLayout: used to line the child widgets vertically.
For example, this is how three buttons aligned with QHBoxLayout will look.

import sys
from PyQt5.QtWidgets import *

if __name__ == "__main__":

    app = QApplication([])
    w = QWidget()
    w.setWindowTitle("Musketeers")

    btn1 = QPushButton("Athos")
    btn2 = QPushButton("Porthos")
    btn3 = QPushButton("Aramis")

    hbox = QHBoxLayout(w)

    hbox.addWidget(btn1)
    hbox.addWidget(btn2)
    hbox.addWidget(btn3)

    w.show()

    sys.exit(app.exec_())
And this is how they will look in QVBoxLayout.

import sys
from PyQt5.QtWidgets import *

if __name__ == "__main__":

    app = QApplication([])
    w = QWidget()
    w.setWindowTitle("Musketeers")

    btn1 = QPushButton("Athos")
    btn2 = QPushButton("Porthos")
    btn3 = QPushButton("Aramis")

    vb = QVBoxLayout(w)

    vb.addWidget(btn1)
    vb.addWidget(btn2)
    vb.addWidget(btn3)

    w.show()

    sys.exit(app.exec_())
The only function that needs any explanation at this point is the addWidget() method. It is used to insert widgets into the HBox or VBox layout. It is also used in other layouts where it takes a different number of parameters as you will see in the next section. The widgets will appear inside the layout in the order in which you insert them.
QGridLayout
QGridLayout is used to create interfaces in which the widgets are laid out in the form of a grid (like a matrix or 2D array). To insert elements in a grid layout, you can use the matrix representation to define the number of rows and columns in the grid as well as the position of those elements.
For example, to create a 3*3 grid (i.e., a grid with three rows and three columns), you will write the following code:
Import sys
from PyQt5.QtWidgets import *

if __name__ == "__main__":
    app = QApplication([])

    w = QWidget()

    grid = QGridLayout(w)

    for i in range(3):
        for j in range(3):
            grid.addWidget(QPushButton("Button"),i,j)


    w.show()
    sys.exit(app.exec_())
This will be the output:

The addWidget() method In the grid layout takes these arguments:
- The widget object that you want to add to the grid
- The x-coordinate of the object
- The y-coordinate of the object
- The row-span (default =0)
- The col-span (default=0)
To understand it better, you can manually insert each widget as shown below
import sys
from PyQt5.QtWidgets import *

if __name__ == "__main__":
    app = QApplication([])

    w = QWidget()

    grid = QGridLayout(w)
    grid.addWidget(QPushButton("Button one"),0,0)
    grid.addWidget(QPushButton("Button two"),0,1)
    grid.addWidget(QPushButton("Button three"),1,0)
    grid.addWidget(QPushButton("Button four"),1,1)


    w.show()
    sys.exit(app.exec_())
This is what the grid will look like:

You can also pass the rowspan and colspan parameters to addWidget() in order to span more than one row or column.
For example,
grid.addWidget(QPushButton("Button five"),2,0,1,0)
This will create a button that stretches over both columns.

Themes
PyQt5 comes with some built-in themes that you can use in your apps. The setStyle() method called on the QApplication instance is used to set a particular theme to your application.
For example, adding the following line of code will change the theme of your application from default to Fusion
app.setStyle("Fusion")
This is how the previous example will look in Fusion Theme

Another useful function for theming your apps is the setPalette() method. Here’s the code for changing the colour of different widgets using setPalette().
import sys
from PyQt5.QtCore import Qt
from PyQt5.QtWidgets import *
from PyQt5.QtGui import QPalette

if __name__ == "__main__":
    app = QApplication([])
    app.setStyle("Fusion")

    qp = QPalette()
    qp.setColor(QPalette.ButtonText, Qt.black)
    qp.setColor(QPalette.Window, Qt.black)
    qp.setColor(QPalette.Button, Qt.gray)
    app.setPalette(qp)

    w = QWidget()

    grid = QGridLayout(w)
    grid.addWidget(QPushButton("Button one"),0,0)
    grid.addWidget(QPushButton("Button two"),0,1)
    grid.addWidget(QPushButton("Button three"),1,0)
    grid.addWidget(QPushButton("Button four"),1,1)


    w.show()
    sys.exit(app.exec_())
Here’s the result.

To use the setPalette() method, you first need to define a palette. This is done by creating an object of the QPalette class.
qp = QPalette()
Notice that the QPalette class belongs to the QtGui module and you will need to import it for this to work. Once you’ve created the QPalette object, use the setColor() method to pass the name of a widget whose colour you want to change and the colour you want to be set.
qp.setColor(QPalette.Window, Qt.black)
This will change the colour of the window to black. After you have defined your color-scheme, use the setPalette() function to apply the palette to your application.
app.setPalette(qp)
That is all you need to do if you want to create some basic themes for your app. PyQt also allows you to use stylesheets to define the look of your widgets. If you are familiar with CSS, you can easily define advanced styles for your app using Qt Style Sheets.
Summary
- PyQt is the python binding for the C++ UI framework, Qt.
- PyQt4 and PyQt5 are the two major versions developed by Riverbank Computing.
- The main modules of the PyQt framework are:
- Qt
- QtCore
- QtWidgets
- QtGui
- QtSql
- QtNetwork
- PyQt supports various widgets like:
- Buttons
- Text labels
- Text fields
- Radio buttons and Checkboxes
- Toolbars and Menu bars
- Webkit
- Tabs
- Docks
- In PyQt, interactivity is implemented using signals and slots.
- An event is an action performed by a user in the GUI (like clicking a button).
- A signal is raised by the corresponding widget when an event occurs on it.
- A slot is a function that is connected to the signal and executes when the signal is raised.
- PyQt has a robust layout engine and supports advanced layout design and management. These are two frequently used layout schemes in PyQt:
- Box Layout
- Grid Layout
- PyQt allows you to create custom themes for GUI application and has inbuilt support for style sheets.
- PyQt can be used to create user interfaces as well as standalone applications.
#python #web-development