If you are an excited geek and want to automate your home, here is an interesting application for you. In this module, we are going to build a simple automation system that allows you to control the home appliance from anywhere. We are using Blynk and IFTTT for software purposes. And we use esp8266(Node MCU) as a part of the hardware. Installing modules on our own will quite interesting.
Blynk:
Blynk is an open-source platform that allows us to quickly build interfaces for monitoring and controlling our hardware projects from our mobiles. It supports both Android and iOS mobiles. It provides an attractive interface. After downloading it, you can create your project dashboard and arrange buttons, graphs, sliders, timers, and other widgets onto the screen.
NodeMCU:
NodeMCU is an open-source firmware. It is a microcontroller. It is a development board specially targeted for IoT based applications. It includes firmware that consists of an esp8266 WiFi socket on chip(SoC).
It consists of 17 GPIO pins and a 2.4GHz antenna. It has 128 KB RAM and 4MB of Flash memory to store programs and data. It can be powered using a micro USB jack. It supports UART, SPI, and I2C interface. It supports a voltage of 3.3V.
IFTTT:
The abbreviation of IFTTT is (If This Then That) helps us connect all our different applications and devices. It is a freeware web-based service. It creates connections of simple conditional statements, called applets, which help in connecting apps together via the internet. Here it is helping in connecting Google Assistant to the Blynk app.
Implementation:
We need to control our home appliances using the Internet. So, we need a proper internet connection at our home. For this, you need Nodemcu and Wi-Fi. Initially, install Arduino-Uno on your PC. And make sure you install esp drivers. If not, install them. And include the packages by adding the following content in preferences. You can found this dialog box by clicking (CTRL+comma) in IDE.
https://dl.espressif.com/dl/package_esp32_index.json, http://arduino.esp8266.com/stable/package_esp8266com_index.json
Install Blynk applications in your mobile and registered with a valid email address. Create your project and name it. Choose NodeMCU(esp8266) as a device and make your dashboard by adding buttons. Make sure your buttons are digital. After registration, you will receive mail from blynk with code and authentication token. The authentication token is unique for every project. This authentication token useful while connecting the application to the device. It also useful while connecting the application to the IFTTT service.
Dumping Code:
As soon as you create a project, you will receive mail with code. Open the code in IDE(Arduino) and dump that code into the microcontroller(NodeMCU). Before, fill SSID and password of your Wi-Fi in code. And fill the auth[] with the authentication token which you received in your mail.
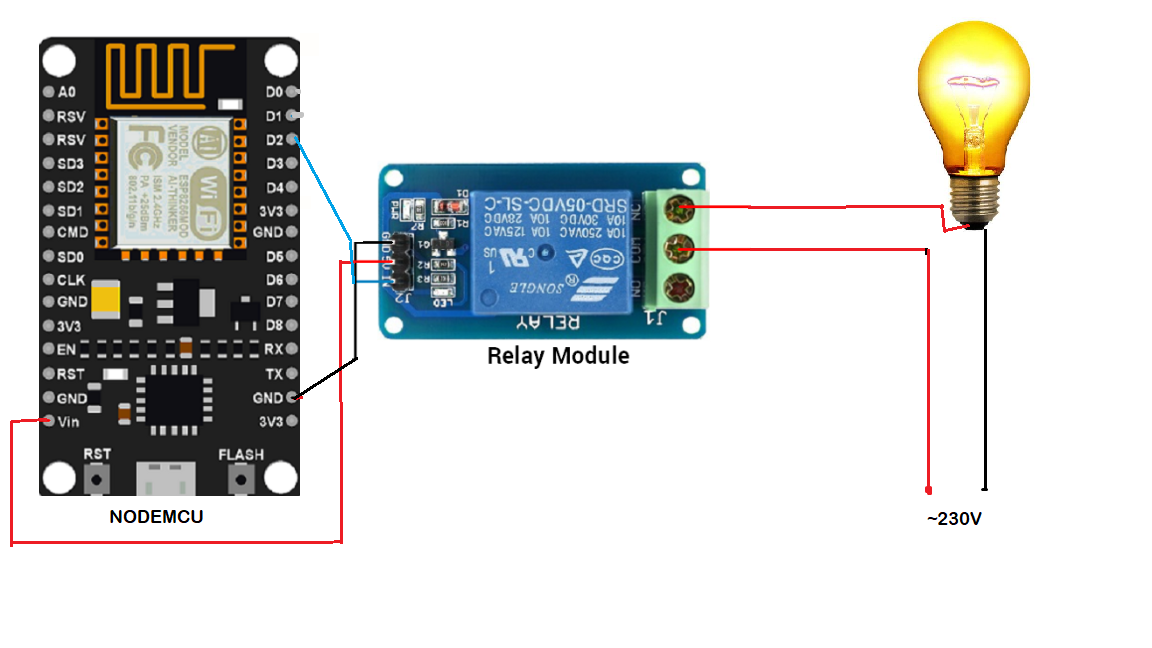
Dump the code into a microcontroller before connections are made. Be careful while connecting the connections as we are dealing with 230V. While dumping, makes sure that the board manager and baud rate are related to the microcontroller, we use i.e., nodemcu(esp8266). Dumping of code may take a couple of minutes.
Modules used:
#internet-of-things #automation #technology #iot #google-assistant