How to publish a React Native component to NPM
In this article, you’ll learn how to publish a React Native component to NPM.
So you want to contribute to the open source community? That’s awesome! Helping to grow React Native’s fairly young ecosystem is great.
When I decided to take on this task not long ago, I noticed there wasn’t much material around publishing React Native components to NPM. So I’m hoping this post will help make the process much easier for others.
Note: All sample code below is from react-native-progress-steps, my very own first NPM package.
Before we get started, make sure to register for an account on NPM. You can do that here.
Initial Setup
First, let’s create a folder where our React Native component will live.
mkdir <folder_name> && cd <folder_name>

# For example
mkdir my-component && cd my-component
Note: All sample code below is from react-native-progress-steps, my very own first NPM package.
Once inside the folder, we need to initialize a new NPM package by typingnpm init. This will create apackage.jsonfile that will hold some important metadata about the React Native component.
A series of questions will be displayed such as package name, version, description, keywords, etc.
Important: When asked for the entry point, make sure to enter index.js and press enter. This will be the file that exports your main component.
{
  "name": "react-native-progress-steps",
  "version": "1.0.0",
  "description": "A simple and fully customizable React Native component that implements a progress stepper UI.",
  "main": "index.js",
  "scripts": {
    "test": "echo \"Error: no test specified\" && exit 1"
  },
  "repository": {
    "type": "git",
    "url": "git+https://github.com/colbymillerdev/react-native-progress-steps.git"
  },
  "keywords": [
    "react-native",
    "react-component",
    "react-native-component",
    "react",
    "react native",
    "mobile",
    "ios",
    "android",
    "ui",
    "stepper",
    "progress",
    "progress-steps"
  ],
  "author": "Colby Miller",
  "license": "MIT",
  "bugs": {
    "url": "https://github.com/colbymillerdev/react-native-progress-steps/issues"
  },
  "homepage": "https://github.com/colbymillerdev/react-native-progress-steps#readme"
}
Project Structure
The next step is setting up a folder structure for your React Native component. This is really up to you, but I’ll share a simple example of mine below:
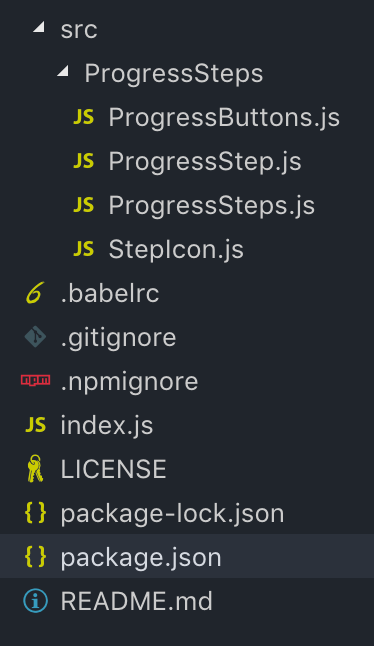
You’ll notice some files that we haven’t created yet. We will be addressing those shortly.
Let’s create the index.jsfile. This will be the most important file for properly exporting/importing your component. Navigate to the root project folder and type touch index.js.
There are a few different ways of going about the content inside this file.
- Directly writing the component class inside of the
index.jsfile and exporting it there. - Creating a separate component JavaScript file and exporting it in
index.js. - Lastly, creating many component and container JavaScript files and exporting all the necessary ones in the
index.jsfile. This is the approach I followed and can be seen in the example below.
import ProgressSteps from './src/ProgressSteps/ProgressSteps';
import ProgressStep from './src/ProgressSteps/ProgressStep';

export { ProgressSteps, ProgressStep };
No matter which approach is taken, what’s exported in this file is what the consuming app will ultimately import and render. That’s the important part to remember.
import { ProgressSteps, ProgressStep } from 'react-native-progress-steps';
Dependencies
We have to determine what dependencies need to be installed for our React Native component to work properly.
There are three different types of dependencies:
- Directly writing the component class inside of the
index.jsfile and exporting it there. - Creating a separate component JavaScript file and exporting it in
index.js. - Lastly, creating many component and container JavaScript files and exporting all the necessary ones in the
index.jsfile. This is the approach I followed and can be seen in the example below.
Installing Babel Dependency
Our next step is to hook our component up to Babel. We can simply do this by installing the following dev dependency:
npm install metro-react-native-babel-preset --save-dev
After the installation is complete, we need to create a .babelrc file and add the following to it:
{

"presets": ["module:metro-react-native-babel-preset"]

}
Creating .gitignore and .npmignore
One of the final steps is to create the standard .gitignore and .npmignore files as a best practice. This will also avoid any issues when publishing to NPM.
# Logs
*.log
npm-debug.log

# Runtime data
tmp
build
dist

# Dependency directory
node_modules
# Logs
*.log
npm-debug.log

# Dependency directory
node_modules

# Runtime data
tmp

# Examples (If applicable to your project)
examples
Testing
Normally, it’s relatively straightforward to link and install our package locally to apps, without having to publish to NPM first.
This would be done by using the npm link command inside of our packages root directory. Then, navigating to an app and typing npm link <package-name> then npm install .
However, at the time of writing this article, React Native and the npm link command don’t work nicely together.
The workaround I have found for this is to navigate to an app and directly install our package there using its directory path.
npm i <path_to_project>

# For example
npm i ../my-component
After making any changes to your package, you’ll have to revisit the app and re-install.
This is not an ideal solution, but it is one that works. Another option is to create a /examples folder inside of your NPM package and initialize a react-native project using react-native init <project-name>. Then you can directly test out the package there.
Note: All sample code below is from react-native-progress-steps, my very own first NPM package.### Publishing To NPM
Finally, we are ready to share our React Native component with the awesome open source community!
Publishing is very quick and easy. Just log into your NPM account from the terminal using npm login then publish using npm publish .
One thing to remember is NPM requires us to increment the version in package.json each time before publishing.
Conclusion
We have covered a ton of material in this post. If you run into any issues feel free to drop me a question in the comments below. Thanks for following along, I can’t wait to see what you build!
Contributions, pull requests, and recommendations are always welcome for react-native-progress-steps. Give it a try in your next project and let me know what you think!
Learn More
☞ Threads in Node 10.5.0: a practical intro
☞ 10 Node Frameworks to Use in 2019
☞ Build a Basic CRUD App with Node and React
☞ Node.js - Express Persistent Session Store with PostgreSQL + Sequelize
☞ Machine Learning In Node.js With TensorFlow.js
☞ Building A REST API With MongoDB, Mongoose, And Node.js
☞ How to Perform Web-Scraping using Node.js
☞ Build a web scraper with Node
☞ Building a mobile chat app with Nest.js and Ionic 4
☞ The Complete Node.js Developer Course (2nd Edition)
☞ Angular (Angular 2+) & NodeJS - The MEAN Stack Guide
☞ Beginner Full Stack Web Development: HTML, CSS, React & Node
#node-js #react-native