Google sign-in is a great login feature to offer to your app’s users. It makes it easier for them to create an account and sign in.
And what’s even better, Firebase makes it extremely easy for developers to add support for Google sign-in. But setting up the React Native environment can create some challenges, which are fully covered in this tutorial.
React Native and Firebase SDK make the implementation of Google login pretty straightforward. Let’s build a simple app that only has a single Google login button. Once the user successfully logs into Google, we are going to display the user info retrieved from their Google account as well as a logout button.
You can also add Facebook Login to your app if you’re interested in providing even more login options to your users. You can check out this guide to Facebook Login in React Native with Firebase if you’re looking to learn more on how to set up Facebook sign-in.
Why Use a Google Sign-in Button in Mobile Apps?
- Using Google or other third parties can make your authentication process seamless and friendly. Users don’t have to waste time in the registration process, which will improve your registration and retention rates tremendously.
- It’s safe and secure.
- Users trust Google or Facebook more than an unknown site or app on the Internet.
- It provides a good user experience. As a user, we have little patience for any actions or work that we need to do, especially in a fairly unknown app that we are trying for the first time.
Without further ado, let’s jump directly into the app development part of this tutorial.
Setting up the Firebase Project
Go to the Firebase Console and create a Firebase project:
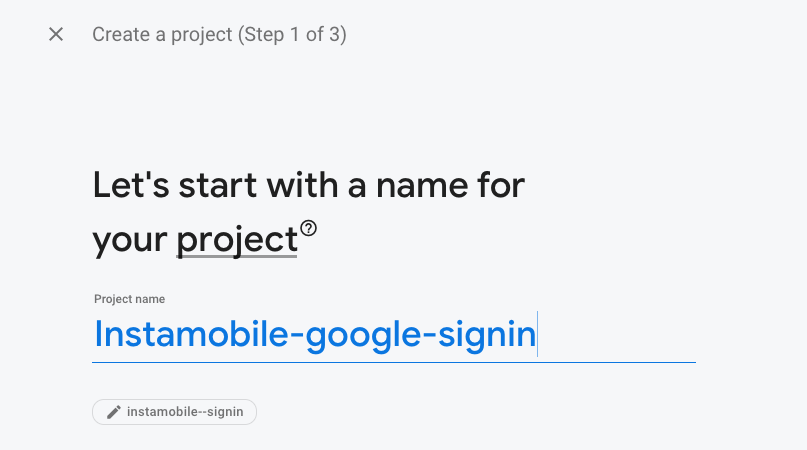
create new firebase project
Here, we will need to set up the Firebase project name and app identifier, so let’s first create the React Native app.
Creating the React Native Project
First, we need to create a React Native project by using the following command:
react-native init instamobile-google-login-demo
Here, we have given the name of the project as instamobile-google-login-demo. Now, we need to install the react-native-google-signin package using the following command:
yarn add react-native-google-singin
The react-native-google-signin package is used to implement Google auth functions in the React Native app. Now, we need to import the necessary modules and components from the respective package as shown in the code snippet below:
import {
GoogleSignin,
GoogleSigninButton,
statusCodes,
} from 'react-native-google-signin';
import google sign-in component
Next, we need to create the states in order to handle the auth state and user info. For that we use the useState module as shown in the code snippet below:
const [loggedIn, setloggedIn] = useState(false);
const [userInfo, setuserInfo] = useState([]);
add state
Now, we need to create a sign-in function to handle authentication as shown in the code snippet below:
_signIn = async () => {
  try {
    await GoogleSignin.hasPlayServices();
    const {accessToken, idToken} = await GoogleSignin.signIn();
    setloggedIn(true);
  } catch (error) {
    if (error.code === statusCodes.SIGN_IN_CANCELLED) {
      // user cancelled the login flow
      alert('Cancel');
    } else if (error.code === statusCodes.IN_PROGRESS) {
      alert('Signin in progress');
      // operation (f.e. sign in) is in progress already
    } else if (error.code === statusCodes.PLAY_SERVICES_NOT_AVAILABLE) {
      alert('PLAY_SERVICES_NOT_AVAILABLE');
      // play services not available or outdated
    } else {
      // some other error happened
    }
  }
};
add google sign-in function
Next, we need to initialize the setup of the Google login object by leveraging the useEffect function:
useEffect(() => {
   GoogleSignin.configure({
     scopes: ['email'], // what API you want to access on behalf of the user, default is email and profile
     webClientId:
       '418977770929-g9ou7r9eva1u78a3anassxxxxxxx.apps.googleusercontent.com', // client ID of type WEB for your server (needed to verify user ID and offline access)
     offlineAccess: true, // if you want to access Google API on behalf of the user FROM YOUR SERVER
   });
 }, []);
Lastly, we need a function that handles the logout action. For that, we are going to implement the signOut method as shown in the code snippet below:
signOut = async () => {
    try {
      await GoogleSignin.revokeAccess();
      await GoogleSignin.signOut();
      setloggedIn(false);
      setuserInfo([]);
    } catch (error) {
      console.error(error);
    }
  };
add Google Sign-out function
Now, we need to render the components on the screen as well. For that, we are going to make use of various components like View and Button:
return (
    <>
      <StatusBar barStyle="dark-content" />
      <SafeAreaView>
        <ScrollView
          contentInsetAdjustmentBehavior="automatic"
          style={styles.scrollView}>
          <Header />

          <View style={styles.body}>
            <View style={styles.sectionContainer}>
              <GoogleSigninButton
                style={{width: 192, height: 48}}
                size={GoogleSigninButton.Size.Wide}
                color={GoogleSigninButton.Color.Dark}
                onPress={this._signIn}
              />
            </View>
            <View style={styles.buttonContainer}>
              {!loggedIn && <Text>You are currently logged out</Text>}
              {loggedIn && (
                <Button
                  onPress={this.signOut}
                  title="LogOut"
                  color="red"></Button>
              )}
            </View>
          </View>
        </ScrollView>
      </SafeAreaView>
    </>
  );
UI code
Now, if we run our project in the emulator we will get the following results:
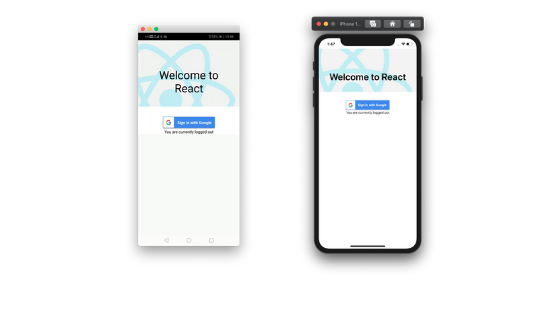
Login with Google React Native
Pretty sweet, right? We have completed the implementation (both UI and business logic) at the React Native level in our project.
As you can see, we have a “Sign in with Google” button that converts into a logout button once the login operation is successfully completed.
We are now going to set up the Google SignIn package and the Firebase app.
#firebase #react-native #mobile-apps #developer