You will need a WordPress install to work with. You will also need Node 8.3+ and the React Native CLI installed on your machine.
In this tutorial we are going to be building a simple mobile app using React Native called ‘Music News’ which will pull posts from a WordPress website via the WP REST API and display them to the user every time they tap to read more about the news. We’ll start with this and you can dig more and do more by reading and understanding the documentation.
As mobile developers, integrating a data source is a very important aspect of building mobile apps. Having an organized data source ready for integration would make development easy and also reduce the time taken to build and develop mobile apps.
WordPress as a backend can be very effective if you’re building mobile applications that have a lot of consumable content such as a mobile application for a blog, e-commerce website, and so on.
It can provide standard endpoints to return the data you need and also provides standard documentation for all the endpoints you’ll require.
Prerequisites
To follow through with this lesson, a basic understanding of the following are required:
- WordPress
- React Native
You also need to have the following installed:
- WordPress
- React Native
Getting started
What is WordPress?
WordPress is the easiest and fastest way to build your website. It’s free and open source and it’s based off two very popular technologies, PHP and MySQL.
It is stated that over 29% of websites on the internet are WordPress powered websites.
WordPress is also a content management tool. It allows you to manage content posted on your website easily without the need for you to know anything technical and that’s great because you don’t have to be a programmer to be able to create and manage your website by yourself. There’s a wide variety of websites you can build using WordPress and some of them includes:
- WordPress
- React Native
WordPress can be an excellent tool to create your website because:
- WordPress
- React Native
What is React Native?
React Native is a mobile JavaScript framework for building real native mobile applications for iOS and Android. It’s based on React made by Facebook’s engineering team which is a JavaScript library for building user interfaces.
Unlike a hybrid application that allows you to write your code in HTML and CSS and then renders it in a native web view container or component, React Native calls Objective-C and Java APIs respectively to render your JSX (a combination of JavaScript and XML-esque markup which is the standard way React applications are written) codes into user interface components on your device.
Some of the known pros of React Native:
- WordPress
- React Native
Some of the known cons of React Native:
- WordPress
- React Native
What is an API?
API stands for Application Programming Interface. It can be seen as a component that allows for interaction between two programming languages, software libraries, software tools, and so on. It also specifies a set of rules that should be followed in order to interact and communicate with underlying data.
An API could mean something else, depending on the context used and in this context, an API refers to a software component we will interact with to provide us with relevant raw data to be used inside our application.
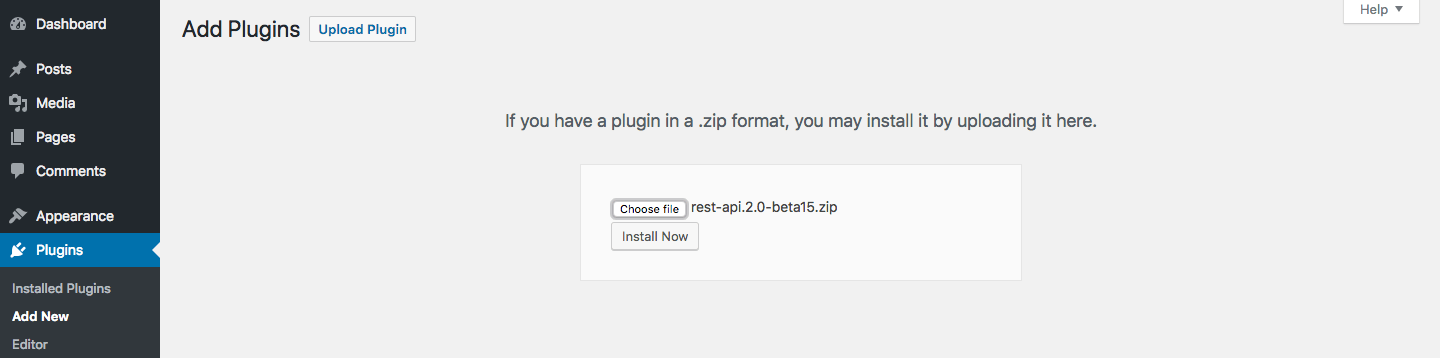
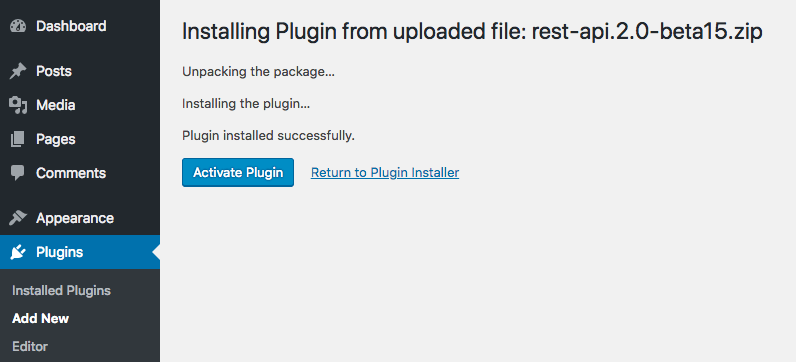
Configuring WordPress to have an API
To get started, the first step would be to install the WordPress REST API plugin to our already existing WordPress installation. My WordPress site is on my local device so I’ll be installing it there.
- WordPress
- React Native
- WordPress
- React Native
- WordPress
- React Native
- WordPress
- React Native
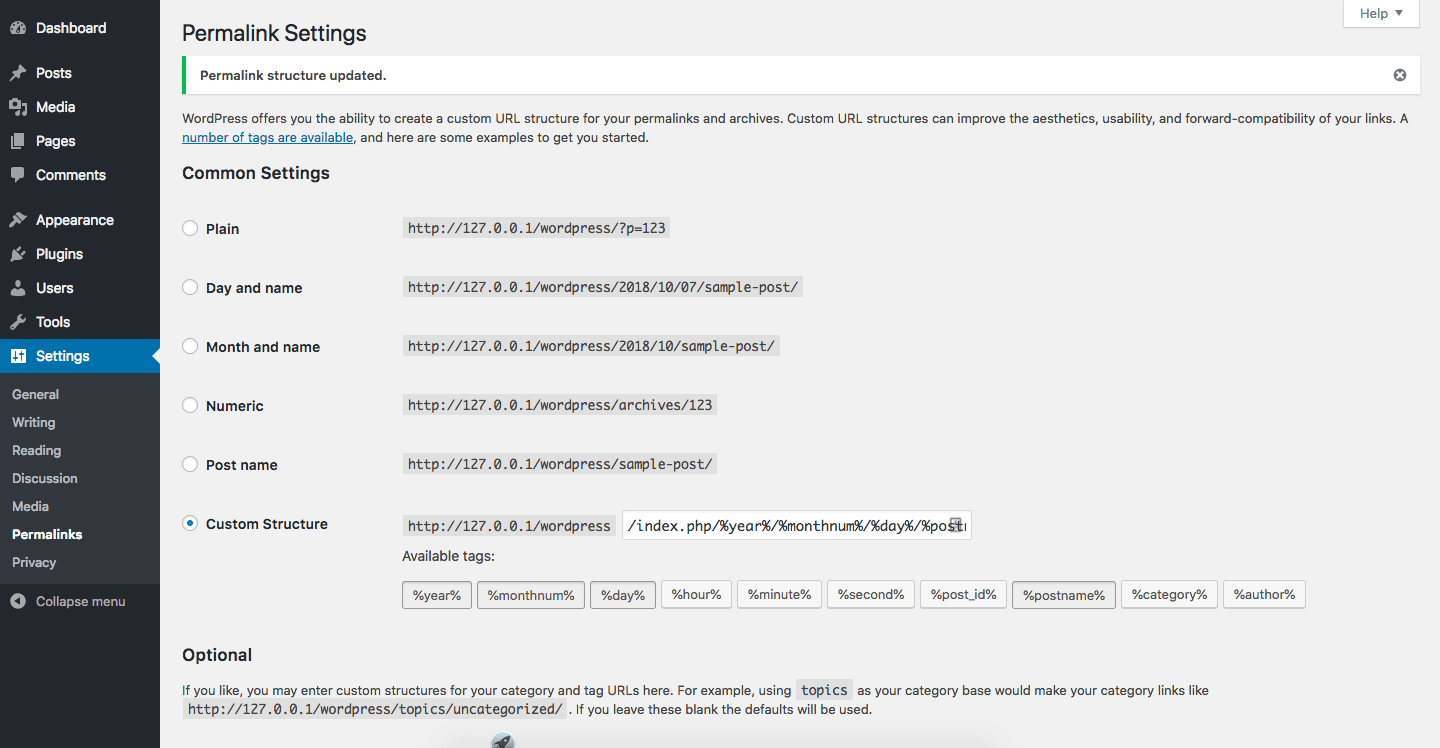
We can now proceed to make more Music News posts on our WordPress normally and then visit the endpoint to see it translated into raw data that can be used in our mobile app.

Setting up our React Native app
To get started on this, you can follow the official docs on how to set up your React Native environment on your computer.
Once that is done, we need to initiate and create our application project.
$ react-native init MusicNews
Once that is completed, we need to compile and build the application.
    $ react-native run-ios
    # if using android, you can run the command below
    $ react-native run-android
Configuring routing in our app
How our users navigate around our mobile app is important as developers, we should make navigation as easy and smooth as possible. To configure navigation in our Music News app, we’ll use the react-native-router-flux library to manage navigation between the screens of our app where all the music news posts are, to the screen where we’ll read each individual post. React-native-router-flux is an API on top of React Navigation and it allows you to define routes in one central place for easy management and configuration. To get started with react-native-router-flux
$ npm install react-native-router-flux --save
Now that we have it installed, we go ahead and create our route file and configure all application routing. In the root directory of our Music News app, create a Routes.js file and the contents would look like:
    // Routes.js
    import React, { Component } from 'react';
    import {Platform} from 'react-native';

    // import components from react-native-router-flux
    import {Router, Stack, Scene} from 'react-native-router-flux';

    // import our screens as components
    import Home from './screens/Home';
    import ViewNews from './screens/ViewNews';

    export default class Routes extends Component<{}> {

        render() {
            return(
                <Router>
                    <Stack key="root" hideNavBar={true}>
                        <Scene key="home" component={Home} title="Home" />
                        <Scene key="viewnews" component={ViewNews} title="View News"/>
                    </Stack>
                </Router>
                )
        }
    }
- WordPress
- React Native
Also, edit your App.js file to look like this:
    //App.js
    import React, { Component } from 'react';

    import {
      StyleSheet,
      View,
      StatusBar,
    } from 'react-native';

    import Routes from './Routes';

    export default class App extends Component<{}> {

      render() {
        return (
          <View style={styles.container}>
            <StatusBar
              backgroundColor="#fff"
              barStyle="dark-content"
            />
            <Routes/>
          </View>
        );
      }
    }

    const styles = StyleSheet.create({
      container : {
        flex: 1,
      }
    });
Designing screens for our app
React Native offers inbuilt UI components like the FlatList, Modal, Slider, Text, and so on. For the design of our home page, we will be using the Shoutem UI and react-native-render-html to render all the posts fetched from our WordPress backend.
Now that we’ve successfully configured routing, we need to create the screens as specified in the Routes file. We’ll create a screen folder and create the files as seen below:
    $ npm install --save react-native-render-html
    $ npm install --save @shoutem/ui
    $ react-native link
    $ mkdir screens && cd screens
    $ touch Home.js ViewNews.js
Copy the code below and paste into your /screens/Home.js
    //screens/Home.js
    import React, { Component } from 'react';
    import {
      StyleSheet,
      SafeAreaView,
    } from 'react-native';

    import {
      Subtitle,
      Screen,
      Divider,
      View,
      Row,
      ListView,
    } from '@shoutem/ui';

    import {Actions} from 'react-native-router-flux';

    export default class Home extends Component<{}> {

      home(){
        Actions.home();
      }

      viewNews(newspost){
        Actions.viewnews({newspost: newspost});
      }

      componentWillMount() {
        this.fetchMusicNews();
      }

      fetchMusicNews = async () => {
        const response = await fetch("http://localhost/wordpress/wp-json/wp/v2/posts/");
        const json = await response.json();
        this.setState({ musicNews: json, isLoadingMusicNews: false });
      };

      constructor(props) {
        super(props);
        this.renderRow = this.renderRow.bind(this);
        this.state = {
          isLoadingMusicNews: true,
          musicNews: [],
        }
      }

      renderRow(post) {
        const regex = /(<([^>]+)>)/ig;
        let newspost = {
            postId: post.id,
            postDate: post.date,
            postLink: post.guid.rendered,
            postTitle: post.title.rendered,
            postExcerpt: post.excerpt.rendered,
            postContent: post.content.rendered,
            postCategory: post.categories,
        }
        return (
          <Row style={{height: 80}}>
            <View styleName="vertical stretch space-between">
              <Subtitle
                numberOfLines={2}
                newspost={newspost}
                onPress={() => this.viewNews(newspost)}>
                {post.title.rendered.replace(regex, '').toUpperCase()}
              </Subtitle>
            </View>
          </Row>
        );
      }

      render() {
        const regex = "/(<([^>]+)>)/ig"
        const musicNews = this.state.musicNews;
        return (
          <SafeAreaView style={styles.safeArea}>
            <Screen>
              <View>
                  <ListView
                    data={musicNews}
                    renderRow={this.renderRow}
                  />
              </View>
            </Screen>
          </SafeAreaView>
        );
      }
    }

    const styles = StyleSheet.create({
      container: {
        flexDirection: 'column',
        backgroundColor: '#fff'
      },
      safeArea: {
        flex: 1,
        backgroundColor: '#fff'
      },
    });
In the Home.js file, we import all the necessary components to build our interface. We create routing functions so we can navigate from page to page. The fetchMusicNews() is an asynchronous function that allows us to fetch data from our API configured WordPress backend and the componentWillMount() allows us to fetch the async data after the screen is rendered. The fetched data is stored in the musicNews state and will be passed to our component during rendering.
In the renderRow() we define a prop that holds data fetched from our WordPress API and we pass it to the ViewNews page so we don’t have to do a network fetch to get the same data on the next screen. The data fetched is rendered as a list view using the ListView component imported from our UI library and the data is also rendered accordingly.
Our render() function renders the screen and we use the SafeAreaView component to handle the screens of newer device screen like the ones of the iPhone X and higher so the screen doesn’t overlap. Our styles are also defined for different components and the applied to style individual components based on the defined rules.
Copy the code below and paste into your /screens/ViewNews.js
    // screens/ViewNews.js
    import React, { Component } from 'react';
    import {
      StyleSheet,
      SafeAreaView,
      ScrollView,
      Dimensions,
    } from 'react-native';

    import {
      Tile,
      Title,
      Screen,
      Divider,
      View,
      Overlay
    } from '@shoutem/ui';

    import {Actions} from 'react-native-router-flux';
    import HTML from 'react-native-render-html';

    export default class ViewNews extends Component<{}> {

      home(){
        Actions.reset('home');
        Actions.home();
      }

      constructor(props) {
        super(props);
        this.state = {
          newspost: [],
        }
      }
      render() {
        const news = this.state.newspost;
        const regex = /[!@#$%^&*<>0-9;]/g;
        console.log("newspost: "+this.props.newspost);
        return (
          <SafeAreaView style={styles.safeArea}>
            <Screen style={{ flex: 1 }}>
              <ScrollView>
              {
                <View>
                  <Tile>
                      <Overlay styleName="image-overlay">
                        <Title style={{color: '#fff', fontWeight: '800'}} styleName="md-gutter-bottom">{this.props.newspost.postTitle.replace(regex, "").toUpperCase()}</Title>
                        </Overlay>
                    </Tile>
                  <Screen style={{paddingLeft: 15, paddingRight: 15, paddingTop: 15, paddingBottom: 15, width:375}} styleName="paper">
                    <HTML
                      tagsStyles={{
                        body: {fontSize: 20},
                        p: {fontSize: 20, fontWeight: "normal"},
                        strong: {fontSize: 20,},
                        blockquote: {fontSize: 20},
                        a: {fontSize: 20, color: "#000"},
                        em: {fontSize: 20,},
                        img: {height: 250, width: 350},
                      }}
                      styleName="paper md-gutter multiline"
                      html={this.props.newspost.postContent}
                      imagesMaxWidth={Dimensions.get('window').width}
                      ignoredStyles={['width', 'height', 'video']}
                      onLinkPress={(evt, href) => this.onLinkPress(href)}
                    />
                    <Divider styleName="line" />
                  </Screen>
                </View>
              }
              </ScrollView>
            </Screen>

          </SafeAreaView>
        );
      }
    };

    const styles = StyleSheet.create({
      container: {
        flex: 1, // 1:1
        flexDirection: 'column',
        backgroundColor: '#fff'
      },
      safeArea: {
        flex: 1,
        backgroundColor: '#fff'
      },
    });
In the ViewNews.js file, we also import all the necessary components to build our interface. We create routing functions so we can navigate from page to page. The regex variable is a regular expression. We use it to remove some unwanted characters and symbols from our WordPress data.
In the render() function, we go ahead to fetch the data we stored in props from our Home.js and render it using our HTML component. The HTML component is used to render the data because the news item body sent from our WordPress API is sent with an HTML format and we can perform some extra functions like setting image size and dimensions, ignore styles, etc.
Using WordPress data
To build and compile our code:
    $ react-native run-ios
    # If you want to build for android,you can use the command below
    $ react-native run-android
If you are running this on your local host, chances are that you would get a network error. This is because
localhostand127.0.0.1would refer to the internal React native app. You should replace them with the public IP of your machine or tunnel your localhost via ngrok
If you want to tunnel your WordPress app via ngrok, you can take the following steps:
- WordPress
- React Native
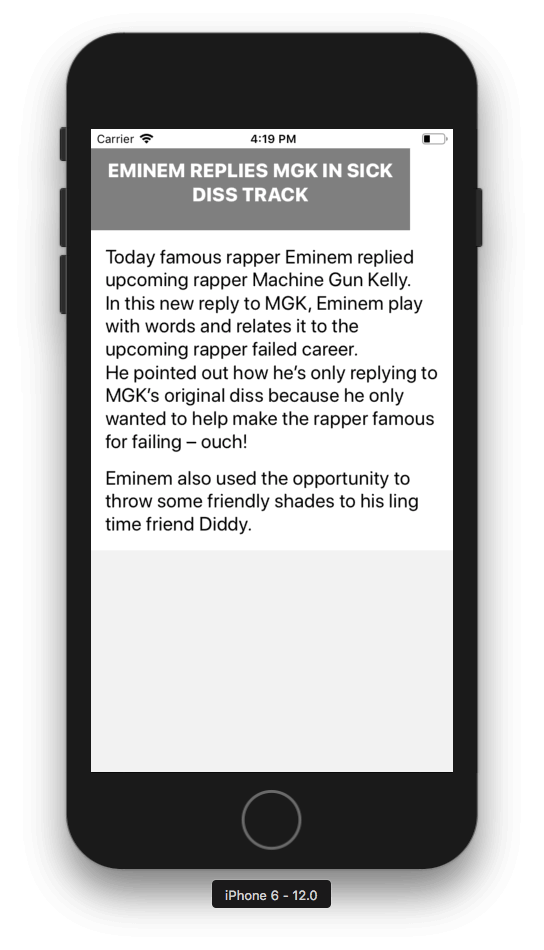
After the build is successful, your application should look like
- WordPress
- React Native

- WordPress
- React Native
Conclusion
We can see how easy it is to use our WordPress data in our mobile application using the WP REST API Plugin. Our data can be integrated with any mobile development framework and web development framework also.
Our Music News app is simple right now, but you can go ahead to add some more styling and explore the Plugin documentation more to be able to build complex and robust applications on top of your WordPress data.
The code base to this tutorial is available in a publicly hosted GitHub repository. Feel free to experiment around with it.
Originally published at https://pusher.com
Learn More
☞ React Native vs Flutter (Which is best for startup ?)
☞ Why and How to use TypeScript in your React App?
☞ The Complete WordPress Website Business Course
☞ WordPress Theme Development with Bootstrap
☞ Wordpress for Beginners - Master Wordpress Quickly
☞ Wordpress Complete Web Design :Latest Wordpress Design Techs
☞ Become a WordPress Developer: Unlocking Power With Code
☞ WordPress for Beginners: Your Guide to WordPress Websites
#react-native #wordpress