Build a REST API with Express and Sequelize
In this tutorial all steps for building a REST API with Express and Sequelize.
When I started learning Node I made the same mistake as most bootcamp graduates these days. I went straight for NoSQL databases without even considering SQL as an option and I had no idea what I had missed out on until when I was recently exposed to Ruby on Rails and SQL. I learned the difference between the two type of databases and managed to love both of them, equally. Because of my newly found knowledge I decided to write a walkthrough on how to build a REST API using Express and Sequelize.
Let’s start by installing the npm packages that we will use:
npm init
npm install express sequelize sqlite3 body-parser --save
npm install sequelize-cli -g

sequelize init
The command “sequelize init” will create the backbone of our database architecture and will allow us to easily connect to our database to insert/retrieve/delete records. Once that command is completed you will see a couple of extra folders and files in your app and your folder structure should look something like this:
|- express-sequelize
|-- config
|--- config.json
|-- migrations
|-- models
|--- index.js
|-- node_modules
|-- seeders
|-- package.json
|-- package-lock.json
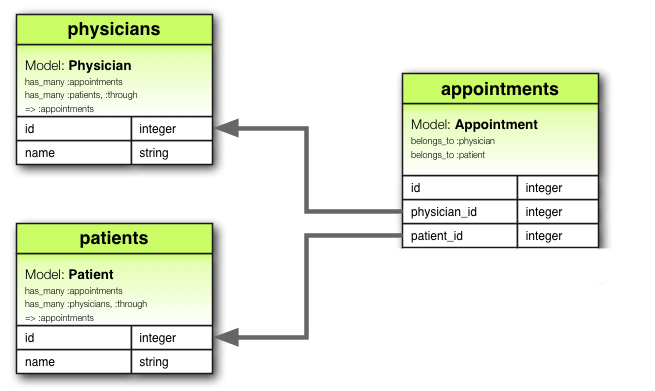
The planned database models and the relationships between them will look something like this:
For this tutorial I will use SQLite3 for the sake of simplicity; in order to use that with Sequelize we have to go into our config/config.json and replace the content of the file with the following:
{
    "development": {
    "dialect": "sqlite",
    "storage": "./database.sqlite3"
  },
    "test": {
    "dialect": "sqlite",
    "storage": ":memory"
  },
    "production": {
    "dialect": "sqlite",
    "storage": "./database.sqlite3"
  }
}
Now that our environment is all set up, it’s time to create the models for our database. Sequelize-CLI allows us to create models on the fly with no effort; we simply have to write the name of the model and the name of the columns in the database that will belong to the current model and the type of data that we will store. Just like this:
sequelize model:create --name Physician --attributes name:string
sequelize model:create --name Patient --attributes name:string
sequelize model:create --name Appointment --attributes physicianId:integer,patientId:integer
After we’re done with this, you’ll see that we have 3 new files inside our *models *folder. All we have to do now is to commit these changes to the database by migrating the changes with the following command:
sequelize db:migrate
This means that our models are created in the database (but, we still have to create the associations between them). We’ll have 2 main models: Physician and Patient. They will be connected by a join table: Appointment. A Physician can have many Patients and vice versa through an Appointment. Let’s start with the Physician. All we have to do is define the association inside the “associate’’ function. The way we do this is on line 11. We select the current model and use the belongsToMany() function that will receive the model we want to connect it to and the optional arguments. In this case we have to include our join table Appointment.
"use strict";
module.exports = (sequelize, DataTypes) => {
  const Physician = sequelize.define(
    "Physician",
    {
      name: DataTypes.STRING
    },
    {}
  );
  Physician.associate = function(models) {
    Physician.belongsToMany(models.Patient, { through: "Appointment", foreignKey: "physicianId" });
  };
  return Physician;
};
We have to do the same with our Patient model:
"use strict";
module.exports = (sequelize, DataTypes) => {
  const Patient = sequelize.define(
    "Patient",
    {
      name: DataTypes.STRING
    },
    {}
  );
  Patient.associate = function(models) {
    Patient.belongsToMany(models.Physician, { through: "Appointment", foreignKey: "patientId" });
  };
  return Patient;
};
And now it’s time to connect these two models with our join model by defining a relationship where Appointment belongs to a Patient and a Physician.
"use strict";
module.exports = (sequelize, DataTypes) => {
  const Appointment = sequelize.define(
    "Appointment",
    {
      physicianId: DataTypes.INTEGER,
      patientId: DataTypes.INTEGER
    },
    {}
  );
  Appointment.associate = function(models) {
    Appointment.belongsTo(models.Physician);
    Appointment.belongsTo(models.Patient);
  };
  return Appointment;
};
This means that our database is ready. It’s time to get started with the Node server. Nothing complicated, just a simple Express server. First of all let’s create a file called server.js and let’s paste this code inside.
const express = require("express");
const bodyparser = require("body-parser");
const port = process.env.PORT || 5000;

const app = express();

app.use(bodyparser.urlencoded({ extended: true }));
app.use(bodyparser.json());

require("./routes/appointmentRoutes")(app);
require("./routes/physicianRoutes")(app);
require("./routes/patientRoutes")(app);

app.listen(port, () => console.log(`Server started on ${port}`));
All that is left is to define the routes where our server will receive requests. For this I will create 3 files inside a folder named “routes”, one file for each model. Each file will have the following routes included:
'GET'    /name
'GET'    /name/:id
'POST'   /name
'PUT'    /name/:id
'DELETE' /name/:id
In these files we’ll import our models from the database that we’ll use and Sequelize will allow us to call methods on these models that execute specific queries in the database. The content of your files will be almost identical, but with different model names.
This is what “physicianRoutes.js” will look like:
const Physician = require("../models").Physician;
const Patient = require("../models").Patient;

module.exports = function(router) {
  router.get("/physicians", (req, res) => {
    Physician.findAll({
      include: [Patient]
    })
      .then(physicians => {
        res.json(physicians);
      })
      .catch(err => res.json(err));
  });

  router.get("/physicians/:id", (req, res) => {
    Physician.findAll({
      where: { id: req.params.id }
    })
      .then(physician => {
        res.json(physician[0]);
      })
      .catch(err => res.json(err));
  });

  router.post("/physicians", (req, res) => {
    Physician.create({
      name: req.body.name
    })
      .then(res => {
        res.json(res);
      })
      .catch(err => res.json(err));
  });

  router.put("/physicians/:id", (req, res) => {
    Physician.update({ name: req.body.name }, { where: { id: req.params.id } })
      .then(updatedPhysician => {
        res.json(updatedPhysician);
      })
      .catch(err => res.json(err));
  });

  router.delete("/physicians/:id", (req, res) => {
    Physician.destroy({
      where: { id: req.params.id }
    })
      .then(physician => {
        res.json(physician);
      })
      .catch(err => res.json(err));
  });
};
If you compare it to “patientRoutes.js”, the only main difference you will see is the model names.
const Physician = require("../models").Physician;
const Patient = require("../models").Patient;

module.exports = function(router) {
  router.get("/patients", (req, res) => {
    Patient.findAll({
      include: [Physician]
    })
      .then(patients => {
        res.json(patients);
      })
      .catch(err => res.json(err));
  });

  router.get("/patients/:id", (req, res) => {
    Patient.findAll({
      where: { id: req.params.id }
    })
      .then(patient => {
        res.json(patient[0]);
      })
      .catch(err => res.json(err));
  });

  router.post("/patients", (req, res) => {
    Patient.create({
      name: req.body.name
    })
      .then(res => {
        res.json(res);
      })
      .catch(err => res.json(err));
  });

  router.put("/patients/:id", (req, res) => {
    Patient.update({ name: req.body.name }, { where: { id: req.params.id } })
      .then(updatedPatient => {
        res.json(updatedPatient);
      })
      .catch(err => res.json(err));
  });

  router.delete("/patients/:id", (req, res) => {
    Patient.destroy({
      where: { id: req.params.id }
    })
      .then(patient => {
        res.json(patient);
      })
      .catch(err => res.json(err));
  });
};
And “appointmentRoutes.js”:
const Appointment = require("../models").Appointment;
const Physician = require("../models").Physician;
const Patient = require("../models").Patient;

module.exports = function(router) {
  router.get("/appointments", (req, res) => {
    Appointment.findAll({
      include: [Physician, Patient]
    }).then(appointments => {
      res.json(appointments);
    });
  });

  router.get("/appointments/:id", (req, res) => {
    Appointment.findAll({
      where: { id: req.params.id },
      include: [Physician, Patient]
    }).then(appointment => {
      res.json(appointment[0]);
    });
  });

  router.post("/appointments", (req, res) => {
    Appointment.create({
      physicianId: req.body.physicianId,
      patientId: req.body.patientId
    })
      .then(appointments => {
        res.json(appointments);
      })
      .catch(err => res.json(err));
  });

  router.put("/appointments/:id", (req, res) => {
    Appointment.update(
      { physicianId: req.body.physicianId, patientId: req.body.patientId },
      { where: { id: req.params.id } }
    )
      .then(updatedAppointment => {
        res.json(updatedAppointment);
      })
      .catch(err => console.log(err));
  });

  router.delete("/appointments/:id", (req, res) => {
    Appointment.destroy({
      where: { id: req.params.id }
    }).then(appointment => {
      res.json(appointment);
    });
  });
};
These three files will help us to carry out the basic CRUD functionality in our app. Of course we can create more endpoints where we can describe what to do in specific cases or what to return.
This is all for now, if you start up your server and populate your database you can Create, Read, Update and Delete your records.
#node-js #express #rest #api #sql