Originally published by Jonathan Albert M. Cunanan at freecodecamp.org
This is step by step guide on how to configure your dev and prod environments, setup scripts, and as a bonus we’ll learn how to enable server auto restart when you save changes!
Table of Contents / Summary of topics
- Prerequisites
- Installing express
- Setting up scripts
- Bonus
- TL;DR
Prerequisites
Before we begin, we need some things setup first.
- Make sure you have Node.js and npm installed. I recommend installing their latest LTS or current stable version. You can install it via Node.js Source or NVM(Node Version Manager)
- When you have Node and npm installed, next is the Express Generator cli. We need it to generate an Express app. Install it via typing this in your command-line:
npm i -g express-generator
3. Basic knowledge of terminal commands. Most of the commands are in the tutorial anyway so you don’t have to worry about them.
4. Make sure you have your terminal open and your favorite text editor installed.
That’s it, we’re good to go!
Installing Express
Using the Express generator, we will create a new project with generated code, move some files, and convert some code to ES6 syntax. We need to convert it at this early stage because we need a way to verify if our ES6 code works.
Project Setup
Run this command in your terminal. You can name your-project-name with the name you like. --no-view flag means that we won’t be using any templating engine such as handlebars, ejs, or pug, for our skeleton Express app.
express your-project-name --no-view
After creating your app, you need to go to your app directory. For Windows Powershell and Linux terminals, use:
cd your-project-name
Next, open the text editor you like. For me, I just use VSCode so I just have my terminal and text editor open at the same time. But you can use any text editor you want.
Installing Packages and Moving and Deleting Files
After we have the generated project ready, we need to install the dependencies and move some folders. Run this command to install Express and other packages.
npm install
While you’re waiting for the dependencies to install, follow these steps.
- create a
src/folder - Put
bin/,app.js, androutes/inside thesrcfolder. - Rename
www, found inbintowww.js - Leave
public/folder at your project root. - Delete
routes/users.js— we don’t need this and we need to keep it simple.
Your file structure will look like this:
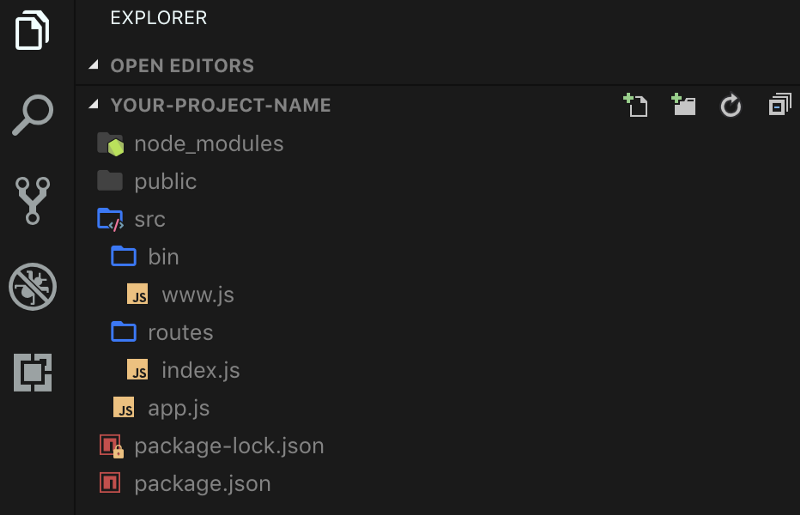
Now, because we modified the file structure, our start server script won’t work. But we’ll fix it along the way.
Converting to ES6 code
Converting the generated code to ES6 is a little bit tedious, so I’ll just post the code here and feel free to copy and paste it.
Code for bin/www.js:
// bin/www.js
/**
 * Module dependencies.
 */
import app from '../app';
import debugLib from 'debug';
import http from 'http';
const debug = debugLib('your-project-name:server');
// generated code below.
Almost all of our modifications are only at the top and bottom of the files. We are leaving other generated code as is.
Code for routes/index.js:
// routes/index.js
import express from 'express';
var router = express.Router();
/* GET home page. */
router.get('/', function(req, res, next) {
  res.render('index', { title: 'Express' });
});
export default router;
Code for app.js:
// app.js
import express from 'express';
import path from 'path';
import cookieParser from 'cookie-parser';
import logger from 'morgan';
import indexRouter from './routes/index';
const app = express();
app.use(logger('dev'));
app.use(express.json());
app.use(express.urlencoded({ extended: false }));
app.use(cookieParser());
app.use(express.static(path.join(__dirname, '../public')));
app.use('/', indexRouter);
export default app;
In app.js , because we left public/ at the project root , we need to change the Express static path. Notice that the path 'public' became '../public' .
app.use(express.static(path.join(__dirname, '../public')));
And also, since we deleted routes/users.js , we started to remove these lines from app.js:
// remove these lines var usersRouter = require('./routes/users'); app.use('/users', usersRouter);
Okay we’re done with converting the code! Let’s setup our scripts now.
Setting up Scripts
In setting up scripts, we’ll do it step by step. It’s because production script is a little bit different than the development script. We will need to use a little bit of composition of script here in so we can have reusable scripts.
Install `npm-run-all`
Since some terminal commands won’t work on windows cmd, we need to install a package called npm-run-all so this script will work for any environment. Run this command in your terminal project root.
npm install --save npm-run-all
Install babel and others
Babel is modern JavaScript transpiler. A transpiler means your modern JavaScript code will be transformed to an older format that Node.js can understand. Run this command in your terminal project root. We will be using the latest version of babel (Babel 7).
npm install -D @babel/core @babel/cli @babel/preset-env @babel/node
If you notice, I keep switching from -D and --save — these flags tell npm whether to save it as a devDependency or as a dependency. When installation finishes, we are now ready to add our dev script.
Adding dev script
Remember I told you earlier that the command in your package.json won’t work because we altered the files? Now it won’t really work because we changed the code to ES import statements. We need the package we installed earlier, a babel config file, and babel-node in order for the node server to work.
Create a file called .babelrc at the root of your project. And put this code in it:
{ "presets": ["@babel/preset-env"]}
Since you can use Babel to convert different kinds of JS syntaxes, we need to use a preset called preset-env (the one we installed earlier) in our configuration file to tell Babel which JS format to transpile.
After this setup we are now ready to test if our server runs even though the code is in ES6. Adding a dev script will look like this in your package.json:
"scripts": {
    "start": "node ./bin/www",
    "server": "babel-node ./src/bin/www",
    "dev": "NODE_ENV=development npm-run-all server"
}
Notice that we added two scripts, server , and dev . This is script composition. We used a little bit of code splitting and run all commands via npm-run-all package.
You can test the server by running this command:
npm run dev
Yay it worked! ✅
Note that the start command won’t work for now. We’ll fix it when we get to adding prod scripts, I promise!
Adding prod scripts
Now that we have dev script, prod script is a little bit different. We need a way to convert all JavaScript files in src to a code format that Node.js can understand. A new folder called dist/ that mimics the same folder structure as src . But also, every time we run a prod script, we need to delete the dist folder to make sure that we are using the fresh converted code. Here’s what are we gonna do.
- Make a build script, that converts code in
srcthat will produce a new folder calleddist/ - Install rimraf package, and make a script called clean that will remove
dist/ - Make a prod script, that will
clean,build, and start theserver
Clean script
In order to make a build script, we must first install the rimraf package that handles the folder deleting for us.
npm install rimraf --save
After installing rimraf, we’ll use it on our build script. Add this in your scripts at package.json . Your scripts section will be like this:
"scripts": {
    "start": "node ./bin/www",
    "server": "babel-node ./src/bin/www",
    "dev": "NODE_ENV=development npm-run-all server",
    "clean": "rimraf dist"
  },
Build script
Now we’ll add our build script. We’ll use babel-cli, the one we installed earlier to make this script. Your script will look like this:
"scripts": {
    "start": "node ./bin/www",
    "server": "babel-node ./src/bin/www",
    "dev": "NODE_ENV=development npm-run-all server",
    "clean": "rimraf dist",
    "build": "babel ./src --out-dir dist"
  },
Prod script
In order to run prod, we’ll use build , clean , and start , script. We’ll just edit the start script. Your prod script will look like this:
"scripts": {
    "start": "npm run prod",
    "server": "babel-node ./src/bin/www",
    "server:prod": "node ./dist/bin/www",
    "dev": "NODE_ENV=development npm-run-all server",
    "clean": "rimraf dist",
    "build": "babel ./src --out-dir dist",
    "prod": "NODE_ENV=production npm-run-all clean build server:prod"
  },
Notice that we added server:prod script. That will take care of running the node server to the babel generated dist/ folder. We also changed the start script to just point to prod because npm start is always used by hosting platforms like Heroku or AWS to start the server.
There we go! Good job for getting this far. With this configuration, we are able to use modern JS syntax with Node.
Bonus: adding server auto-restart on changes
For us to enable server auto-restart on Node.js, we need a package called nodemon and a simple config file. Run this command in your terminal at the project root:
npm i -D nodemon
And then make a config file called nodemon.json . This will contain our configuration file. Config looks like this:
{
  "exec": "npm run dev",
  "watch": ["src/*", "public/*"],
  "ext": "js, html, css, json"
}
This means that whenever a change in src/ and public/ has been detected, your server will auto restart.
After making the config file, let’s make the script called watch in our package.json . The scripts file will look like this.
"scripts": {
    "start": "npm run prod",
    "server": "babel-node ./src/bin/www",
    "server:prod": "node ./dist/bin/www",
    "dev": "NODE_ENV=development npm-run-all server",
    "clean": "rimraf dist",
    "build": "babel ./src --out-dir dist",
    "prod": "NODE_ENV=production npm-run-all clean build server:prod",
    "watch": "nodemon"
  },
You can run the command by typing this into your terminal.
npm run watch
TL;DR
Here are the simplified steps for how to enable ES6 in Node.js. I’ll also include the repo so you can copy and inspect the whole code.
- Make a new project using
express your-project-nameterminal command. - Move the
bin/,routes/andappinto a new folder calledsrc/, and convert the code into ES6. Also don’t forget to renamebin/wwwtowww.js - Install all the dependencies and devDependencies
npm i -D @babel/cli @babel/core @babel/node @babel/preset-env nodemon npm i --save rimraf npm-run-all
- Add these scripts to your package.json
"scripts": {
    "start": "npm run prod",
    "server": "babel-node ./src/bin/www",
    "server:prod": "node ./dist/bin/www",
    "dev": "NODE_ENV=development npm-run-all server",
    "clean": "rimraf dist",
    "build": "babel ./src --out-dir dist",
    "prod": "NODE_ENV=production npm-run-all clean build server:prod",
    "watch": "nodemon"
  },
- Make
nodemon.jsonand.babelrcconfiguration files
// nodemon.json
{
  "exec": "npm run dev",
  "watch": ["src/*", "public/*"],
  "ext": "js, html, css, json"
}
// .babelrc
{
  "presets": ["@babel/preset-env"]
}
- Test your scripts by running
npm run devornpm run prodornpm run watch - You’ll see the complete repo at my github
Conclusion
All right! I hope you learned a lot. Thank you for reading this far.
Happy Coding!
Originally published by Jonathan Albert M. Cunanan at freecodecamp.org
===========================================
Thanks for reading :heart: If you liked this post, share it with all of your programming buddies! Follow me on Facebook | Twitter
Learn More
☞ Svelte.js - The Complete Guide
☞ The Complete JavaScript Course 2019: Build Real Projects!
☞ Become a JavaScript developer - Learn (React, Node,Angular)
☞ JavaScript: Understanding the Weird Parts
☞ JavaScript: Coding Challenges Bootcamp - 2019
☞ The Complete Node.js Developer Course (3rd Edition)
☞ Angular & NodeJS - The MEAN Stack Guide
☞ NodeJS - The Complete Guide (incl. MVC, REST APIs, GraphQL)
☞ Node.js Absolute Beginners Guide - Learn Node From Scratch
#javascript #es6 #node-js #web-development
