How to Build a REST APIs using Nodejs and TypeScript
In this tutorial, we are going to be building a REST APIs using both Nodejs and TypeScript!
TypeScript has become one of the most popular programming languages for developers. Using TypeScript with Node.js can enhance the way you build REST APIs with several benefits out-of-the-box:
- There is optional static typing.
- TypeScript IntelliSense provides great coding hints and tooling for your IDE.
- JavaScript becomes much more readable and debuggable.
When trying to create a REST API with Node.js and TypeScript, it can become very difficult to figure out how to set up your environment. With the power of Express, I will demonstrate the benefit of TypeScript with the creation of a simple shop API.
For this tutorial, we will also use a framework available to all called Liftr. Liftr is a stress-free way of creating Express APIs with TypeScript. Let’s take a deeper dive into Liftr and its benefits.
- Liftr sets up a basic API structure that you canfollow. There are benefits to staying in this structure but you can always customize it to make it your own.
- Liftr can generate routes for you as well as add a controller for you to link to that route.
- Liftr routes can have joi schema’s added to provide extra clarification and documentation while developing.
- Liftr can generate basic middleware.
- Liftr will tie it all together for you! (Making sure everything is wired correctly.)
- Liftr has testing built-in with Mocha and code coverage with Nyc.
- The Liftr framework has a number of supporting packages that will help buildings APIs much more sustainable, such as the liftr-tscov package that can help check your type coverage.
As an example, we will set up a shop API together. First of all, make sure you have the liftr-cli installed as a global CLI.
npm i -g @liftr/cli
This will allow us to use Liftr across our machine. Once that is done, cd into a folder or mkdir a parent folder you would like to set up your API in, and run:
liftr -s ShopApi
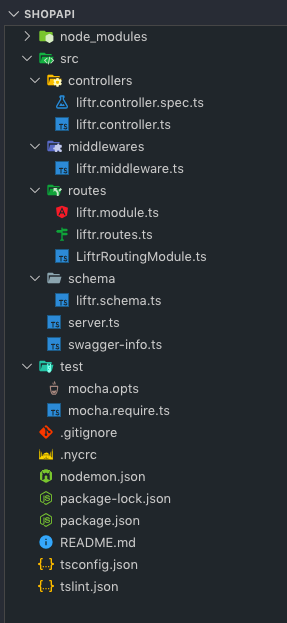
Liftr will now create the necessary files for us to start building and scaling our very own Node.js API built with TypeScript. Once that command has finished, you can run cd ShopApi and you will be inside your project folder.
Your project layout should look something like this:
There are a number of commands you can run from your project with Liftr that will help you quickly build your API structure.
Right now, in our shop API, we have no routes or modules besides the one created as part of the setup, so let’s create a module to house our shop.
liftr --module shop
This will create a shop.module.ts and a shop.routes.ts.
The module will act as a layout and documentation of all the routes provided to it in Swagger. Along with this, it’s possible to pass middleware and joi schema to get a complete look at what your route entails.
A shop has products, so a /products endpoint should be created where the products can be served up. Using Liftr, a route can be created quickly in the module where we want it to be located.
By running the following command, the route will automatically be added to the module and to the coherent .routes.ts of that module.
liftr --route products --target shop
If we look at the code, we should have a working GET route, /products, in the shop.module.ts. Let’s add some products to our endpoint’s controller to get a sense of what a real shop API would look like.
import { Request, Response, NextFunction } from 'express';

interface Products {
    name: string;
    amount: number;
}

export const shopController = (req: Request, res: Response, next: NextFunction) => {
    const products: Products[] = [
        {
            name: 'Apple',
            amount: 4,
        },
        {
            name: 'Lettuce',
            amount: 1,
        },
        {
            name: 'Bread',
            amount: 2
        },
        {
            name: 'Cheese',
            amount: 5,
        }
    ];
    res.send(products);
};
Here, I created a simple interface, so that more complex types can be defined. With this, we aim to identify that a product must have a name, which is of type string, and an amount of type number.
Another great feature of Liftr is that, under the hood, we can provide some information to automatically create documentation for our endpoints.
Generally speaking, when working with Swagger, we would have to create large Swagger documents with all the information to show. With Liftr, once a route is created and registered it will automatically display within Swagger!
Let’s create another endpoint with some documentation for it. Since we have done this through the CLI, let’s add it manually to see where the connections are made.
A shop should be able to add products to its inventory, therefore, there should be an endpoint for adding products. Since we are trying to comply with REST standards, we will make another /products route which will be a POST endpoint.
This is what the endpoints will look like:
import { Route } from '@liftr/core';
import { productsController } from '@controllers/products/products.controller';
import { shopController } from '@controllers/shop/shop.controller';
import { addProductsController } from '@controllers/addProducts.controller';

export const shopRoute = Route.get('/', shopController);
export const productsRoute = Route.get('/products', productsController);
export const addProductsRoute = Route.post('/products', addProductsController);
As you can see, in the addProductsRoute I have added an addProducts controller. Since we did not create the route via the CLI, we will have to create a basic controller called addProducts with the liftr-cli, using the following command:
liftr --controller addProducts --flat
With the--flat flag we are able to specify that we would like to have the CLI create a controller file and not create a subfolder within the controllersfolder.
Now we can also create a joi schema to be able to add a request-body to the POST route documentation as well as validate our route.
For our POST route, we want to be able to add products to our store, so in order to do so, we will need to send the product and the amount of that product.
import { Joi } from '@liftr/core';

export const productSchema = Joi.object().keys({
    product: Joi.string().required(),
    amount: Joi.number().required(),
});
We can now add this schema to the shop.module.ts as well as our addProducts.controller.ts to make sure our route registers that schema in our documentation and checks the route for the correct request-body.
Here, you can see another Liftr feature with the method req.validate. We pass in our body as well as the joi schema we just created to check the incoming data.
import { Request, Response, NextFunction } from 'express';
import { productsSchema } from '../schema/products.schema';

export const addProductsController = async(req: Request, res: Response, next: NextFunction) => {
	try {
		await req.validate(req.body, productsSchema);
		res.send(`Added a new product: ${req.body.product} with the amount - ${req.body.amount}`);
	} catch(error) {
		console.error(`An error has occure when adding a product`, error);
		res.send(error)
	}
};
import { Module, ModuleComponent } from '@liftr/core';
import { productsRoute, addProductsRoute } from './shop.routes';
import { shopRoute } from './shop.routes';
import { productsSchema } from '../../schema/products.schema';


export const shopModule: ModuleComponent = Module([
    {
        route: productsRoute,
        middleware: [],
    },
    {
        route: addProductsRoute,
        middleware: [],
        schema: productsSchema
    },
    {
        route: shopRoute,
        middleware: [],
    },
])
We can now spin up the dev server to test our endpoints:
npm start
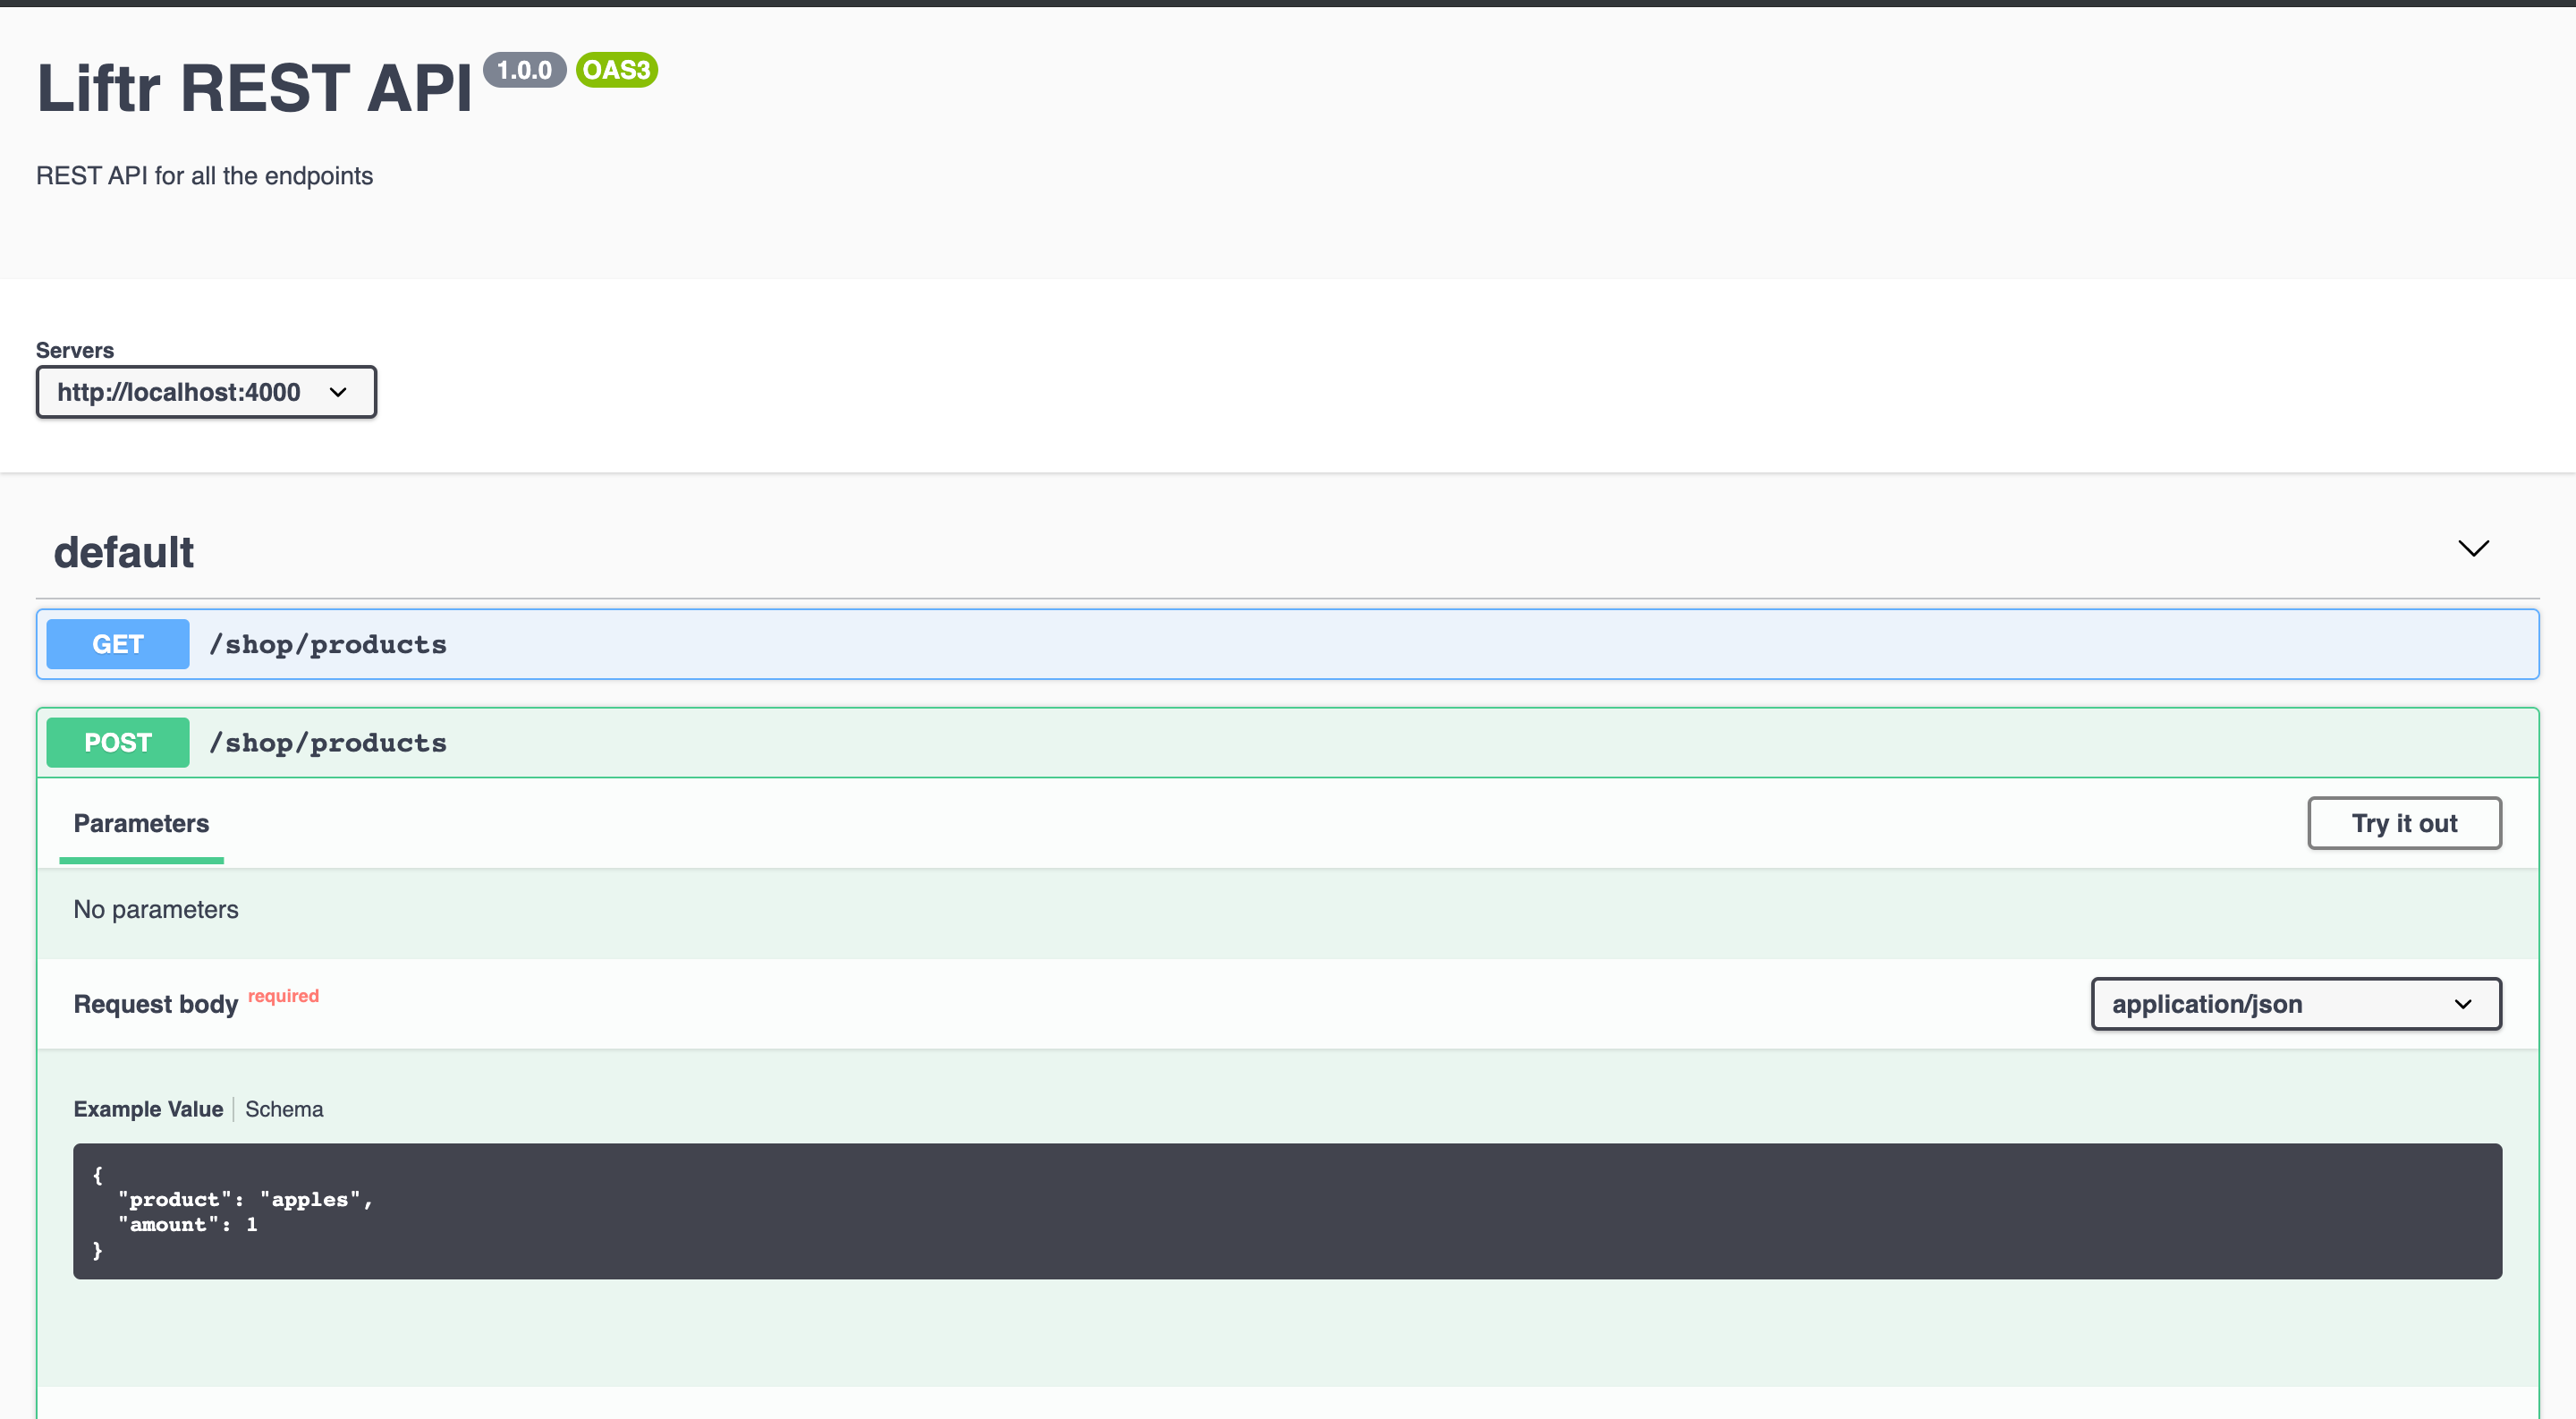
Behold! Our very own shop API, running with two product endpoints.
If we go to http://localhost:4000/docs, we can see that we have documentation for our endpoints (name and type).
However, with the POST endpoint, we also have the necessary POST body added in the documentation and we can even test the endpoint!
Liftr also provides a way to check the types in your project and which types you have missed, which can give you more insight into the code.
If you run npm run test:types you will get a detailed summary of types available and uncovered.
The TypeScript CLI to calculate type coverage
------------- uncovered types ---------------
/Users/ftangastani/develop/liftr/src/controllers/liftr.controller.spec.ts: 8:9 - req
/Users/ftangastani/develop/liftr/src/controllers/liftr.controller.spec.ts: 19:25 - req
----------------- coverage ------------------
148 - max reachable type coverage
146 - types covered
2 - types uncovered
This was a very short guide on how to set up a REST API with TypeScript and Node.js.
Thank you for getting this far. It would be really cool if anyone could contribute to the Liftr framework and any of its packages. There is no skill requirement to contribute, and it can be as little as a documentation update or small bug fix. Anything is highly appreciated!
Thank you for reading !
#Nodejs #JavaScript #Typescript #Front End Development #node-js