Cross Stitch App with HTML, CSS and JavaScript
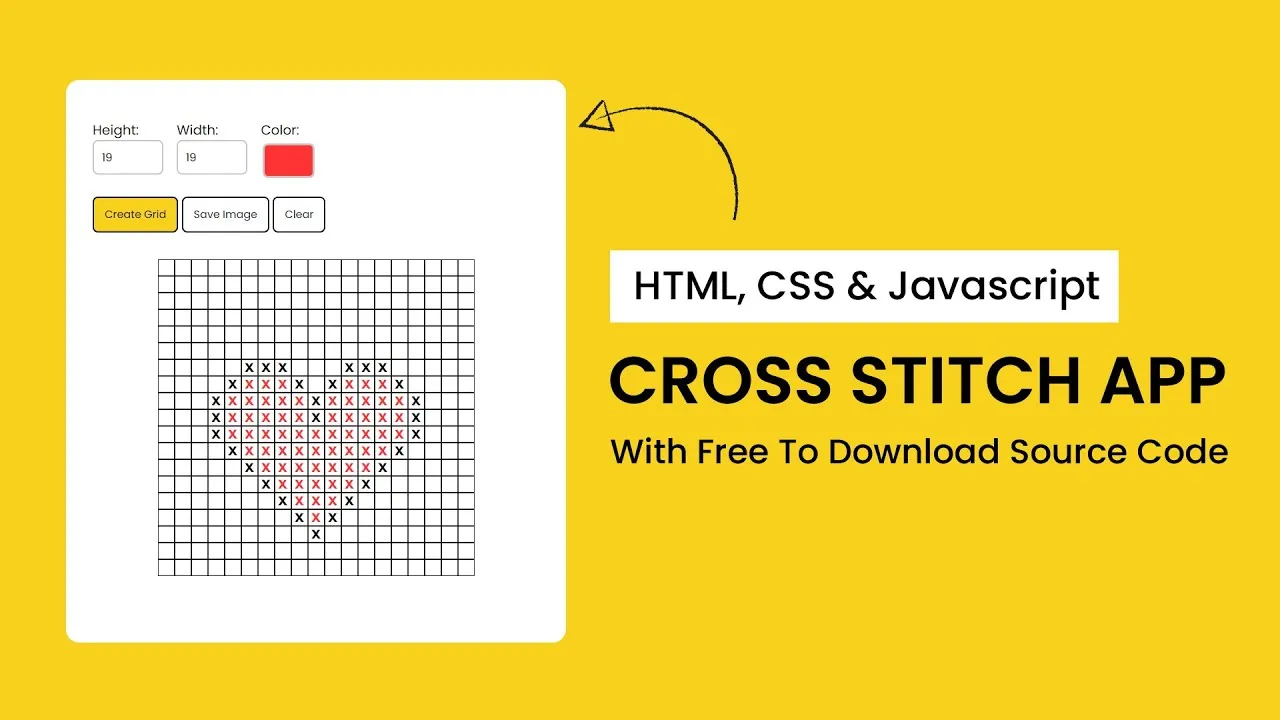
Learn how to create a fun cross stitch app project with HTML, CSS and Javascript. This code tutorial will explore how to build a Cross Stitch App using HTML, CSS, and JavaScript. The app allows users to specify the dimensions and color, create and clear tiles, and even save the grid as an image. Join me as we dive into the steps required to implement this app!
Things You Will Learn:
- Handling user input using HTML form elements
- Manipulating the DOM to dynamically create and update grid elements
- Adding interactivity to the grid through event listeners
- Saving the grid as an image.
Project Folder Structure:
To begin, let’s organize our project folder structure as follows:
- index.html: The main HTML file containing the structure of our webpage.
- style.css: The CSS file where we will define the styles for our grid and input elements.
- script.js: The JavaScript file where we will implement the functionality of the interactive grid.
HTML:
In the index.html file, we need to create the necessary HTML elements for our grid and input controls. Here’s a basic structure to get started:
<!DOCTYPE html>
<html lang="en">
  <head>
    <meta name="viewport" content="width=device-width, initial-scale=1.0" />
    <title>Cross Stitch App</title>
    <!-- Google Fonts -->
    <link
      href="https://fonts.googleapis.com/css2?family=Karla:wght@800&family=Poppins&display=swap"
      rel="stylesheet"
    />
    <!-- Stylesheet-->
    <link rel="stylesheet" href="style.css" />
  </head>
  <body>
    <div class="wrapper">
      <div class="inputs">
        <div class="inp-wrapper">
          <label for="height-input">Height:</label>
          <input type="number" id="height-input" min="1" max="20" value="10" />
        </div>
        <div class="inp-wrapper">
          <label foir="width-input">Width:</label>
          <input type="number" id="width-input" min="1" max="20" value="10" />
        </div>
        <div class="inp-wrwapper">
          <label for="color-input">Color:</label>
          <input type="color" id="color-input" value="#000000" />
        </div>
      </div>
      <div class="buttons">
        <button id="create-grid">Create Grid</button>
        <button id="save-button">Save Image</button>
        <button id="clear-button">Clear</button>
      </div>
      <p id="err-message"></p>
      <div class="container">
        <div id="grid"></div>
      </div>
    </div>
    <script src="https://cdnjs.cloudflare.com/ajax/libs/html2canvas/1.4.1/html2canvas.min.js"></script>
    <!-- Script -->
    <script src="script.js"></script>
  </body>
</html>
CSS:
In the style.css file, let’s define the styles for our grid and input elements. Add the following CSS rules:
* {
  padding: 0;
  margin: 0;
  box-sizing: border-box;
  font-family: "Poppins", sans-serif;
}
body {
  background-color: #f8d11d;
}
.wrapper {
  width: 37.5em;
  background-color: #ffffff;
  position: absolute;
  transform: translate(-50%, -50%);
  top: 50%;
  left: 50%;
  padding: 3em 2em;
  border-radius: 1em;
}
.container {
  margin: 2em auto;
  width: 100%;
  display: grid;
  place-items: center;
}
.inputs {
  display: flex;
  gap: 1em;
}
label {
  display: block;
}
input[type="color"] {
  -webkit-appearance: none;
  -moz-appearance: none;
  appearance: none;
  background-color: transparent;
  width: 5em;
  height: 3.7em;
  border: none;
}
input[type="color"]::-webkit-color-swatch {
  border-radius: 0.5em;
  border: 0.2em solid #c7c7c7;
}
input[type="color"]::-moz-color-swatch {
  border-radius: 0.5em;
  border: 0.2em solid #c7c7c7;
}
input[type="number"] {
  padding: 0.7em;
  border-radius: 0.5em;
  border: 2px solid #c7c7c7;
}
.buttons {
  margin-top: 1em;
}
#create-grid {
  background-color: #f8d11d;
  color: #020125;
}
button,
a {
  font-size: 0.8em;
  padding: 0.8em 1em;
  border-radius: 0.5em;
  background-color: #ffffff;
  border: 2px solid #020125;
  color: #020125;
  overflow: none;
}
#grid {
  grid-gap: 0;
  display: inline-grid;
  vertical-align: top;
}
.tile {
  height: 20px;
  width: 20px;
  border: 1px solid #000000;
  font-family: "Karla", cursive;
  font-weight: 700;
  text-align: center;
  display: flex;
  align-items: center;
  justify-content: center;
  font-size: 1em;
  cursor: pointer;
}
#err-message {
  color: #ff0000;
}
JS:
Now, let’s implement the functionality of the interactive grid in the script.js file. Add the following code snippet:
const heightInput = document.getElementById("height-input");
const colorInput = document.getElementById("color-input");
const clearButton = document.getElementById("clear-button");
const createButton = document.getElementById("create-grid");
const grid = document.getElementById("grid");
const inputContainer = document.querySelector(".input-container");
const widthInput = document.getElementById("width-input");
const saveButton = document.getElementById("save-button");
const errMessage = document.getElementById("err-message");
let currentColor;
colorInput.addEventListener("input", () => {
  currentColor = colorInput.value;
});

const createGrid = () => {
  errMessage.innerText = "";
  grid.innerHTML = "";
  const height = parseInt(heightInput.value) || 10;
  const width = parseInt(widthInput.value) || 10;
  if (height > 20 || width > 20) {
    errMessage.innerText = "Height and width cannot be more than 20";
    return false;
  }

  grid.style.gridTemplateColumns = `repeat(${width},1fr)`;

  for (let i = 0; i < height * width; i++) {
    const tile = document.createElement("div");
    tile.classList.add("tile");
    tile.addEventListener("click", (e) => {
      e.target.style.color = currentColor;
      if (e.target.innerText == "X") {
        e.target.innerText = "";
      } else {
        e.target.innerText = "X";
      }
    });
    grid.appendChild(tile);
  }
};

const clearGrid = () => {
  const tiles = document.querySelectorAll(".tile");
  tiles.forEach((element) => {
    element.innerText = "";
  });
};

saveButton.addEventListener("click", () => {
  html2canvas(grid).then((canvas) => {
    const imageURL = canvas.toDataURL();
    const downloadButton = document.createElement("a");
    downloadButton.setAttribute("href", imageURL);
    downloadButton.setAttribute("download", "image.png");
    downloadButton.click();
    downloadButton.remove();
  });
});

clearButton.addEventListener("click", clearGrid);
createButton.addEventListener("click", createGrid);
window.onload = () => {
  errMessage.innerText = "";
  heightInput = 10;
  widthInput = 10;
  currentColor = "#000000";
  colorInput.value = currentColor;
  createGrid();
};
#html #css #js #javascript