Validate Street Addresses With Vue.js and API
When it comes to geocoding, being able to convert addresses to latitude and longitude coordinates so they can be displayed on a map is not the only use-case. A lot of times being able to geocode an address makes for great address validation to see if an address actually exists.
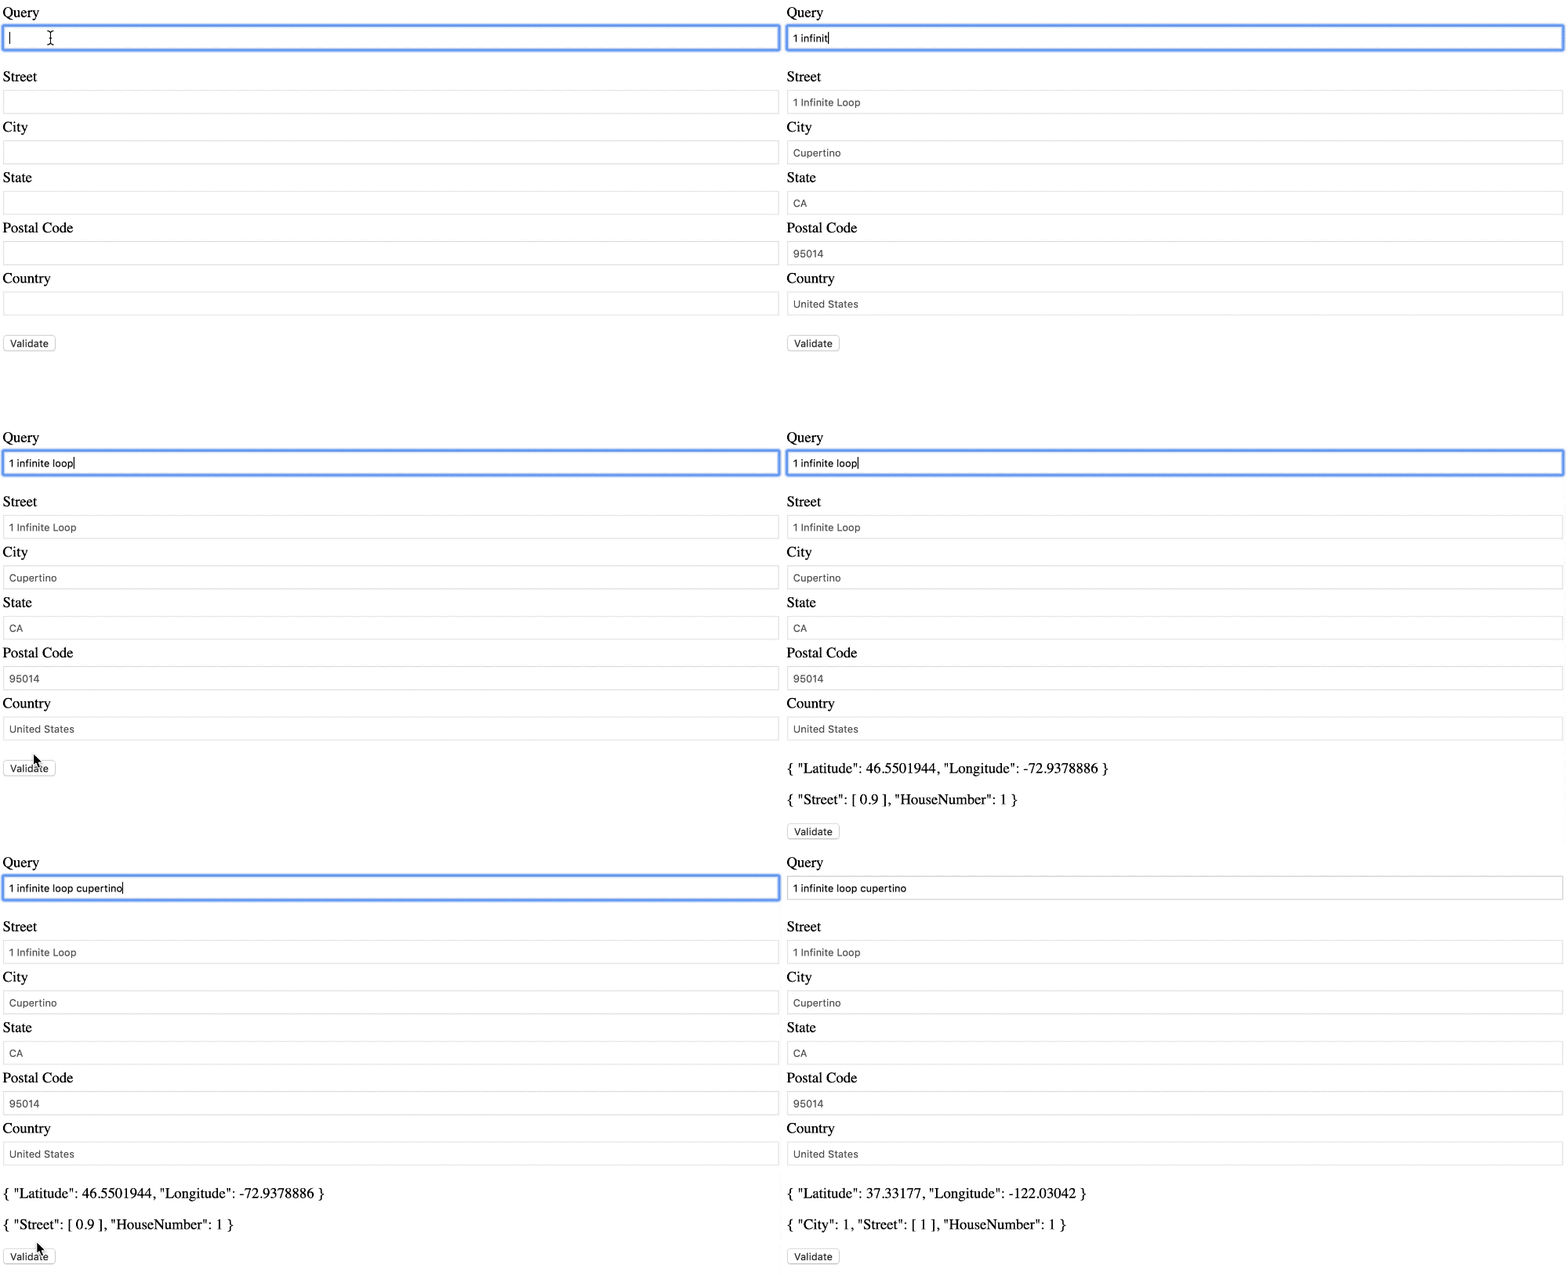
To get a sense of what we're going to accomplish, take a look at the following animated image:

When we enter a query of any complexity, the HERE Autocomplete API starts to return suggestions which we use to populate the read-only form below the query box. These suggestions are valid addresses. However, we go a step further and use the HERE Geocoder API to see if what we've actually typed as a query is valid. We don't have to use one of the suggestions.
We need to make note of something before continuing. While the HERE Geocoder API does a good job at validating street addresses, it is probably not suitable for validating shipping addresses. For example, it might not be able to determine a specific unit in an apartment complex or business. That unit information is kind of important when it comes to shipping. What we're validating is street addresses.
Creating a New Project With the Vue CLI
Assuming you have the Vue CLI installed and configured, we can start by creating a new project with the following command:
vue create address-validation
When prompted, choose the defaults. We're not doing anything too complex so we won't need Vuex, or routing, or anything fancy like that. We're also not going to be using any external JavaScript dependencies because we'll be using HTTP requests against a RESTful API.
Before we start adding core logic, we need to configure our component and get a basic form showing on the screen. When creating a project, we're given a src/components/HelloWorld.vue file, but we're going to rename it to src/components/HereAddressLookup.vue instead. This file should include the following to start:
<template>
    <div class="information">
        <div>
            <label for="street">Street</label><br />
            <input type="text" v-model="street" disabled />
        </div>
        <div>
            <label for="city">City</label><br />
            <input type="text" v-model="city" disabled />
        </div>
        <div>
            <label for="state">State</label><br />
            <input type="text" v-model="state" disabled />
        </div>
        <div>
            <label for="postcode">Postal Code</label><br />
            <input type="text" v-model="postcode" disabled />
        </div>
        <div>
            <label for="country">Country</label><br />
            <input type="text" v-model="country" disabled />
        </div>
    </div>
</template>
<script>

export default {

name: “HereAddressLookup”,

data() {

return {

street: “”,

city: “”,

state: “”,

postcode: “”,

country: “”

};

},

props: {

query: String

},

watch: { },

methods: { }

}

</script>
<style scoped>

.information {

width: 50%;

margin: 15px 0px;

}

.information input {

width: 100%;

padding: 5px;

margin: 5px 0px;

}

</style>
You’ll notice the above code is a little more than the basic code that you get when creating a project. We’ve created a simple form in the <template> block, styled that form int he <style> block, and assigned variables to each form element through the v-model properties. These variables are found in the datamethod of the class. Also take note that this particular component will have one user defined HTML property, which is for search query information.
To make this component active, we need to make some modifications to the src/App.vue file:
<template>
<div id=“app”>
<div>
<label for=“query”>Query</label><br />
<input type=“text” v-model=“query” />
</div>
<HereAddressLookup :query=“query”/>
<button type=“button”>Validate</button>
</div>
</template><script>
import HereAddressLookup from ‘./components/HereAddressLookup.vue’
export default {
name: ‘app’,
components: {
HereAddressLookup
},
data() {
return {
query: “”
};
},
methods: { }
}
</script><style>
input[type=“text”] {
width: 50%;
padding: 5px;
margin: 5px 0px;
}
</style>
Just like with the previous file, this file has a little more than the basics. We are adding the HereAddressLookup component tag to the <template> block along with other form information. Our actual component doesn’t accept queries through a form, so we’re going to be doing that in the App component. The text field is bound to a query variable and that query variable is being used in the HereAddressLookup tag on the query property that we defined. It is coincidence that we named the variable and the property the same, it is not a requirement.
We have the foundation of our application in place, so now we can start to accomplish what we set out to do.
Watching for Changes to a Search Query
The first thing that we want to accomplish is address suggestions. When a user enters address information into the box, we want suggestions to appear in our component to help the user. This will be accomplished by watching the box for changes and using the HERE Autocomplete API.
Open the project’s src/components/HereAddressLookup.vue file and include the following watchobject to the class:
watch: {

query: function(value) {

fetch(https://autocomplete.geocoder.api.here.com/6.2/suggest.json?app_id=APP_ID_HERE&app_code=APP_CODE_HERE&maxresults=1&query=${value})

.then(result => result.json())

.then(result => {

if(result.suggestions && result.suggestions.length > 0) {

if(result.suggestions[0].address.houseNumber && result.suggestions[0].address.street) {

this.street = result.suggestions[0].address.houseNumber + " " + result.suggestions[0].address.street;

} else {

this.street = “”;

}

this.city = result.suggestions[0].address.city ? result.suggestions[0].address.city : “”;

this.state = result.suggestions[0].address.state ? result.suggestions[0].address.state : “”;

this.postcode = result.suggestions[0].address.postalCode ? result.suggestions[0].address.postalCode : “”;

this.country = result.suggestions[0].address.country ? result.suggestions[0].address.country : “”;

} else {

this.street = “”;

this.city = “”;

this.state = “”;

this.postalCode = “”;

this.country = “”;

}

}, error => {

console.error(error);

});

}

}
The watch object is where you define functions that trigger when certain variables change. For example, we have a query function, which, based on its name, is mapped to the query variable. In this application, the query variable is declared through the props object. So every time that query property changes, this function will trigger.
Let’s dig a little deeper into this query function.
When executed we make use of an HTTP request through the fetch function in JavaScript. In the above code, make sure you swap the app id and app code with your own tokens found in the HERE Developer Portal.
When we get our results, we do some checks to see if certain fields were left undefined. For example, if we have Cupertino, CA as our query, the street information will most certainly not be available in the suggestion. If the fields are available, we set the bound variables so they appear in our form.
Because the component property is already bound in the App component, we could run this and we’d receive suggestions based on the keyboard input. To throttle the requests, you could enforce at least X amount of characters are present before making a suggestion.
Validating an Address and Analyzing the Match Quality
Suggestions are not really validations, because, at the end of the day, we want to validate the query that the user provides. To do this, we need to make some additions to our HereAddressLookup component.
Take the following function in the methods object:
methods: {

validate: function(query) {

return fetch(https://geocoder.api.here.com/6.2/geocode.json?app_id=APP_ID_HERE&app_code=APP_CODE_HERE&searchtext=${query})

.then(result => result.json())

.then(result => {

if(result.Response.View.length > 0 && result.Response.View[0].Result.length > 0) {

let data = result.Response.View[0].Result[0];

return data;

}

}, error => {

console.error(error);

});

}

}
We’re following a similar strategy with our validate function as we saw in the query function. We are doing a fetch, but this time to the HERE Geocoder API. Make sure you swap the app id and app code tokens with your own, which are found in the HERE Developer Portal.
The data we get back from our request will be similar to the Autocomplete API. However, along with address information, and latitude and longitude information, we’re also getting match quality information. In most circumstances, if you provide a query to the Geocode API you’ll get an address and coordinates back, but that doesn’t necessarily mean your query is accurate because it will search on a threshold.
Take a look at the following information in the response:
{

“State”: 1,

“City”: 1,

“Street”: [ 1 ],

“Country”: 1

}
A value of 1 means there was an exact match. Any number less than 1 means it wasn’t an exact match. If fields are missing, it means that information wasn’t provided, which we can also translate to a non-match.
Let’s add some more logic to our application. Open the project’s src/App.vue file and include the following in the data function:
data() {

return {

query: “”,

position: null,

quality: null,

};

},
We’re adding two more variables which we’ll use to display data after a validation request is made. We can add them to the <template> block like so:
<div v-if=“position && quality”>

<p>{{ position }}</p>

<p>{{ quality }}</p>

</div>
The last thing we need to do is execute the validation request. We can do this by creating another method in our App component and slightly changing what we’re doing in the <template> block. Our final <template>should look like the following:
<template>

<div id=“app”>

<div>

<label for=“query”>Query</label><br />

<input type=“text” v-model=“query” />

</div>

<HereAddressLookup ref=“validator” :query=“query”/>

<div v-if=“position && quality”>

<p>{{ position }}</p>

<p>{{ quality }}</p>

</div>

<button type=“button” @click=“validate()”>Validate</button>

</div>

</template>
Notice that we’ve now added a ref property to the <HereAddressLookup> tag. We need to gain reference to our component so we can call functions within it. We’ve also added a validate function to our button based on a click event. Our validate function would exist in our App component and it would look like this:
methods: {

validate: function() {

this.$refs.validator.validate(this.query).then(result => {

this.quality = result.MatchQuality;

this.position = result.Location.DisplayPosition;

}, error => {

console.error(error);

});

}

}
We can gain access to the component reference and take the data in our query variable to run validation. In our example, we’re not actually doing anything with the match quality data. In your example, you may want to perform logic based on that information.
Conclusion
You just saw how to validate street addresses using Vue.js, the HERE Autocomplete API, and the HERE Geocoder API. This tutorial was inspired by Jayson DeLancey’s tutorial which focused on React instead of Vue.js.
Like I mentioned earlier, while this is great for street address validation, it should be used with caution for shipping validation. Remember, you have to account for businesses sharing a building or apartment units.
Thanks for reading. Originally published on https://developer.here.com
#vue-js #api #javascript #codeigniter #reactjs #google-maps
