Learn full about Crash course on REST, GraphQL and Graphback
1. Introduction
I don't think you really need to much except for some basic Javascript knowledge, be familiar with how arrays work and how to interact with arrays, build basic object and we will cover the rest!
- Basic understanding of client-server architecture (Client-Server Architecture)
- JavaScript - basic knowledge
- NodeJS - basic understanding of Node but not necessary (NodeJS tutorial)
- Command line - basic understanding
Setting up!
First, we need to get our code editor, I highly recommend using Visual Studio Code due to its simplicity and lightweight. This is what I'll be using and it will be much easier to follow if what you will see on the screen is going to match screenshots!
Next, as we are going to use Node.js please download it from here
We are going to use npm as a package manager which consists of a command-line client, also called npm, and an online database of public and paid-for private packages called the npm registry. As our project will require dependencies to be installed we need something to manage it - npm will do it for us! Npm is also a default package manager of Node so we don't have to do anything with it just yet.
2. REST in 10 minutes!
On a very high level, REST or Representational State Transfer is an architectural style that separates the client and a server. A client sends requests to a server, and the server responds while their concerns are separated, which means a client has no idea how a server works, all it needs to know is that from a given URL, certain data is accessed.
The server, on the other hand, does not care how many clients are going to request the data from it.
The client uses HTTP methods to access the server, the most common of which are: GET, POST, PUT, DELETE and PATCH.
The tutorial below will give you a glimpse of how to build a typical REST API. We will do that by writing a simple Node.js server with Express. Let's give it a go! You can find a finished version of the tutorial in my Github repo.
Requirements
- Node.js installed
- Visual Studio Code
Let's get started
- Open your Visual Studio Code (VSC) and hit ctrl + ` to open up the terminal
- Create a folder called
serverand navigate to it - Type the following into the terminal:
$ npm init
This will start the npm package creator, feel free to fill in some details but if you want, you can just leave it empty by hitting "Enter" a few times!
Add an index.js file and enter the following code in:
console.log("hello world")
Note: Don't forget to save your work in Visual Studio Code after each code input by clicking ctrl + s
In your package.json file add a start script and if there is an echo script, you can delete it:
 "scripts": {
    "start": "node index.js"
  }
It should look like this:
{
  "name": "server",
  "version": "1.0.0",
  "main": "index.js",
  "license": "MIT",
  "scripts": {
    "start": "node index.js"
  }
}
In your command line type:
$ npm start
You should see the "hello world" output in the terminal! Npm looks through scripts specified in package.json and executes them. Package.json can contain a lot of settings and scripts for your projects, for example, license - MIT means it is a "free software" and anyone can use it. There's a lot of useful stuff you can learn about package.json but let's not go into that now;) Without our "start" script we would have to execute:
$ node index.js
If you are interested you can find more information about scripts here.
Next, we are going to use Express which is massively popular and easy to use framework for building HTTP servers in Node.js. So let's add express dependencies to our project:
$ npm install express
What this command does is simply add express to our dependencies. One of the reasons why we need express installed is because it allows us to use GET, POST, PUT, DELETE and other HTTP methods in a very easy way!
Once that's done, we can finally start up our very first express server! Edit your index.js to look like this:
const express = require('express');
const app = express();
app.get(‘/_ping’, (req, res) => {

res.send(‘pong’);

});
const port = 4000;

app.listen(port, () => {

console.log(Server is listening on port ${port});

});
const express = require(‘express’)- we are simply importing express from express dependencies that we have downloadedconst app = express()- we are creating an express appapp.get(‘/_ping’)- this is our very first used HTTP method - GET - which simply expects to GET something once the server is accessed from given URLres.send(‘pong’)- once our app is accessed on ‘/_ping’ let’s send “pong” back to the client!const port- setting up a port variable to 4000app.listen(port…)- using the set variable to enable the server to listen for requests on a given port
To summarize, we have set up a Node.js server that is using express. Our server listens on localhost:4000, accepts requests from /_ping and responds with pong.
To test it, in your terminal run:
$ npm start
Next, open your browser, go to http://localhost:4000/_ping and enjoy the power of Node.js and express! Pong should be displayed in your browser! If you want to stay in the terminal:
$ curl localhost:4000/_ping
Note: To use curl start up the server as mentioned above, open another terminal window and then run your curl commands in this window.
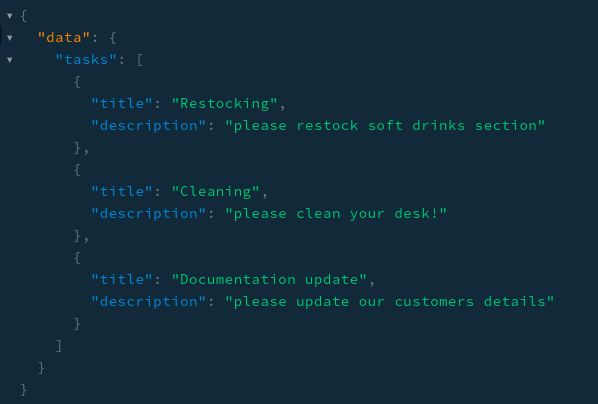
Our next step is to add some kind of data. For this purpose, lets mock a database connection. In a typical situation our server would communicate with a database like PostgreSQL, MySQL or Mongo, but for the purpose of this tutorial, let’s use a mock database. Create a db.js file and copy following code:
const users = [
{
id: ‘1’,
firstName: ‘Michael’,
lastName: ‘Stone’,
title: ‘Mr’,
email: ‘michael@example.com’,
},
{
id: ‘2’,
firstName: ‘John’,
lastName: ‘Barry’,
title: ‘Mr’,
email: ‘john@example.com’,
},
{
id: ‘3’,
firstName: ‘Mary’,
lastName: ‘Savage’,
title: ‘Mrs’,
email: ‘mary@example.com’,
},
];const tasks = [
{
id: ‘20’,
title: ‘Restocking’,
description: ‘please restock soft drinks section’,
status: ‘to be completed’,
assignedTo: ‘1’,
},
{
id: ‘21’,
title: ‘Cleaning’,
description: ‘please clean your desk!’,
status: ‘to be completed’,
assignedTo: ‘2’,
},
{
id: ‘22’,
title: ‘Documentation update’,
description: ‘please update our customers details’,
status: ‘to be completed’,
assignedTo: ‘3’,
},
];module.exports = { users, tasks };
This is a very simple database with only a few users and tasks and each task is assigned to a certain user.
- As we want to send the actual data to our client now and not just “pong”, add the following lines to our
index.js:
const { users, tasks } = require(‘./db’);
- Which allows us to access tasks and users objects from db file, and also, add other routes to our
index.js:
app.get(‘/tasks’, (req, res) => {

res.json(tasks);

});
app.get(‘/users’, (req, res) => {

res.json(users);

});
After adding new routes and restarting the server, visit localhost:4000/users or localhost:4000/tasks from your browser! Or in the terminal, simply type:
$ curl localhost:4000/users

$ curl localhost:4000/tasks
Let’s imagine we would like to get a specific user by their name. We can do this by passing in parameters. Let’s assume we know the first names of our users and this is how we would like to find them. Add the following GET method to our index.js:
app.get(‘/users/:userName’, (req, res) => {

res.send(users[users.findIndex(u => u.firstName === req.params.userName)]);

});
Restart the server and give it a try by using curl or visiting localhost:4000/users/Michael.
$ curl localhost:4000/users/Michael
In your response you should have received details concerning Michael only. As this GET request takes in a parameter, you can just change the URL to any other name that is in our database to pull the record of the required user! Try this in your command line:
$ curl localhost:4000/users/John
Now, let’s go through another HTTP method - DELETE! To do that add another method to our index.js:
app.delete(‘/users/:userName’, (req, res) => {

const indexOfUserToBeDeleted = users.findIndex(u => u.firstName === req.params.userName);

users.splice(indexOfUserToBeDeleted, 1);

res.json(users);

});
Restart your server and in the terminal type:
$ curl -X “DELETE” localhost:4000/users/Michael
With DELETE and a very short JavaScript code we are able to delete an item from our array of users!
One last method I would like to go through is POST. POST can be used to input a new object into our array or update the existing one. Let’s use it to add a new user object to our users array!
Add a POST method to index.js:
app.post(‘/users’, (req, res) => {

const user = req.body;

users.push(user);

res.json(users);

});
- Before we can use the POST method in our API we need to add a JSON body parser to our express app as the POST methods will contain JSON objects that need to be accessed. To do this install:
$ npm install body-parser
- Then we have to add body parser to our app in
index.js:
const express = require(‘express’);
const { users, tasks } = require(‘./db’);
const bodyParser = require(‘body-parser’); <------------------const app = express();
app.use(bodyParser.json()); <------------------
…
- Restart the server and run the following curl command:
$ curl -d ‘{“id”:“4”, “firstName”:“Anne”, “lastName”:“OBrien”, “title”:“Ms”, “email":"anne@example.com”}’ -H “Content-Type: application/json” -X POST http://localhost:4000/users
You should see our newly added user in the response.
Your index.js should look like this:
const express = require(‘express’);
const { users, tasks } = require(‘./db’);
const bodyParser = require(‘body-parser’);const app = express();
app.use(bodyParser.json());app.get(‘/_ping’, (req, res) => {
res.send(‘pong’);
});app.get(‘/tasks’, (req, res) => {
res.json(tasks);
});app.get(‘/users’, (req, res) => {
res.json(users);
});app.get(‘/users/:userName’, (req, res) => {
res.send(users[users.findIndex(u => u.firstName === req.params.userName)]);
});app.post(‘/users’, (req, res) => {
const user = req.body;
users.push(user);
res.json(users);
});app.delete(‘/users/:userName’, (req, res) => {
const indexOfUserToBeDeleted = users.findIndex(u => u.firstName === req.params.userName);
return res.json(users.splice(indexOfUserToBeDeleted, 1));
});const port = 4000;
app.listen(port, () => {
console.log(Server is listening on port ${port});
});
There you go! Your very first Node.js server that uses Express with REST endpoints. It is very easy and there’s a lot more you can do with REST, but I guess my target here was to give you a basic understanding of REST. What you just completed is similar to what I was exposed at the beginning of my adventure in becoming a Software Developer, which is still ongoing
It was also a huge eye-opener for me to help me understand client-server architecture! However, as I’m sure you can imagine now, you need to expose a different endpoint for each data you want to send. Our project has only 2 entities, users and tasks, which is plain and simple but imagine how complex REST could be if you add another 10, 20 or even more entities which need to somehow interact with each other!
Imagine that everything we did so far would need to be accessing the database through, for example, SQL statements. These statements would need to be placed in a different layer of our server to hide business logic! Imagine writing all those REST endpoints for your “dream” application! Not that easy anymore, is it?!
3. GraphQL
GraphQL is a query language invented by Facebook and is an alternative approach to REST for designing and building APIs. Schema is at the center of any GraphQL server and describes functionality available to clients. Schema has types which define:
- Relationships between entities - in our case it would be a relationship between users and tasks
- Data manipulation and operation that can be executed by the client, in our project those will be for example queries to fetch all users or all tasks, and mutations to delete and add a user or a task.
To build our GraphQL server we are going to use the “Schema First” approach, which basically prioritizes building schema in development. It allows me to visualize the data flow between entities and queries/mutations that I might require! We are also going to use Apollo framework for GraphQL server, a library that helps us connect our GraphQL schema to a node server, which is same as express framework for REST.
Requirements
- Rest in 10 minutes completed or downloaded from my REST tutorial github repository.
Let’s get started
First, think about the schema, what are our entities going to be? What data are we planning to return? What does the client need? Imagine our project, with tasks and users, our GraphQL types will look something like this:
type User {

id: ID!

firstName: String!

lastName: String!

title: String!

email: String

}
type Task {

id: ID!

title: String!

description: String!

status: String!

assignedTo: [User!]!

}
We are defining two entities, a User and Task entity. Both have different attributes and return types. A client can access a User object or Task object and from there he can access any of the attributes given, however, assignedTo from Task returns a User object. Exclamation mark simply means Required so in our example of assignedTo - the return type is required to be of type an array of Users.
- In your existing server project, use npm to add the following dependencies:
$ npm install apollo-server-express graphql graphql-import
- Next, edit our
index.jsfile.
const express = require(‘express’);
const { ApolloServer } = require(‘apollo-server-express’);
const schema = require(‘./schema’);const app = express();
app.use(express.json());
const server = new ApolloServer({ schema });
server.applyMiddleware({
app,
path: ‘/graphql’,
});const port = 4000;
app.listen(port, () => {
console.log(Server is running at: http://localhost:${port}/graphql);
});
We no longer need the REST methods so you can delete them. Next, we are adding Apollo Server to our project. Then, applying a schema ( that is yet to be implemented ) to our Apollo Server, finally, we can apply middleware to it, which is express and path - also called - endpoint.
- Create a new folder within our
serverfolder, calledschema - In
schemafolder create a file calledtypeDefs.graphqlwhich is going to hold types that we have specified above. Paste the following code:
type User {

id: ID!

firstName: String!

lastName: String!

title: String!

email: String

}
type Task {

id: ID!

title: String!

description: String!

status: String!

assignedTo: [User!]!

}
- Next, we are adding type Query - which enables query support for given queries, for now, let’s keep it simple and stick to our basic two queries,
tasks, which allows a client to access a list of all tasks, andusers, which allows accessing an entire array of users.
type Query {

tasks: [Task!]!

users: [User!]!

}
- Next, add another file called
resolvers.jsintoschemafolder and paste the following code:
const { tasks, users } = require(‘…/db’);
const resolvers = {

Query: {

tasks() {

return tasks;

},
users() {
  return users;
},

},

};
module.exports = resolvers;
Resolvers are simply functions resolving value for a type from typeDefs. They can return values like Strings, Numbers, Booleans etc. For example, the users resolver must return an array of Users. They are similar to HTTP handler functions that we saw in express, they implement the business logic and return a result.
- Create
index.jsinschemafolder and paste following code:
const { importSchema } = require(‘graphql-import’);

const { makeExecutableSchema } = require(‘graphql-tools’);

const resolvers = require(‘./resolvers’);

const typeDefs = importSchema(‘schema/typeDefs.graphql’);
module.exports = makeExecutableSchema({ resolvers, typeDefs });
In this step we have made an executable schema that contains both, our resolvers and typeDefs so it can be used in our index.js
const express = require(‘express’);
const { ApolloServer } = require(‘apollo-server-express’);
const schema = require(‘./schema’); <-----------------------------const app = express();
app.use(express.json());
const server = new ApolloServer({ schema });<---------------------
server.applyMiddleware({
app,
path: ‘/graphql’,
});const port = 4000;
app.listen(port, () => {
console.log(Server is running at: http://localhost:${port}/graphql);
});
- You can now save all your changes, run
npm startand navigate tohttp://localhost:4000/graphql. You should see the following:

You have just launched GraphQL playground from your very first GraphQL server! In the left window, you can write your queries and mutations while responses will be displayed on the right-hand side! Let’s give it a go and write our very first query:

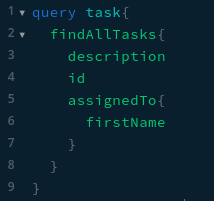
- Line#2
query AnyNameOfQuery- in here you simply specify whether you are about to use query or mutation and you are naming your query/mutation. - Line#3
tasks{this is the name of our query specified intypeDefsfile:
tasks: [Task!]!
- Line#4 & 5 specifies what are we interested in. We have specified in our typeDefs that query task is going to return an array of
taskobjects. - Hit the play button in the middle of the playground and you should get the following response:
If you type in more than one query or mutation in the left window, play button should give you an option to choose which query/mutation you would like to execute.
When we execute the query task we have access to the full object, but we might only want a certain part of it! So in our example above, we have requested only title and description from an array of tasks. You might think, why would we set a name of our query if we are using the pre-named query from our typeDefs.
The answer is - we don’t have to! But imagine you are working on a client and you want to access tasks twice, once where you are only interested in titles, and other time when you are interested in descriptions only! Naming queries can be very helpful.
- Now, let’s add
assignedToto our existing query, which is not going to work for now but I would like you to try it anyway to give you a better understanding the duty of the resolvers.
Add assignedTo{ and hit ctrl + space. You should see all the available data that GraphQL can fetch for you, all that information comes from types specified in typeDefs.
- Let’s say we are interested in
firstNameandlastNameof our users.

Hit play and…an error! Think of our resolvers and typeDefs now:
const { tasks, users } = require(‘…/db’);
const resolvers = {

Query: {

tasks() {

return tasks;

},
users() {
  return users;
},

},

};
module.exports = resolvers;
The reason why it is not working is that we must implement a new resolver to return the user that the task is assigned to.
- Let’s specify what our assignedTo should do by adding the following code to the resolvers:
const resolvers = {
Task: {
    assignedTo(task) {
        return users.filter(u => u.id === task.assignedTo);
    },
},

Query: {
    tasks() {
        return tasks;
    },

    users() {
        return users;
    },
},

};
So, when assignedTo is accessed, we are going to filter through an array of users and return a user that has the id of matching assignedTo.
Now our query should work just fine and I recommend you to play a little bit with queries in the playground to get a better understanding of GraphQL.
- Next, let’s add one more query to our server - let’s say we would like our server to accept a user name and return with a
Userobject of that name. First, we need to edit ourtypeDefs.graphql:
type Query {

tasks: [Task!]!

users: [User!]!

userByName(firstName: String!): User!

}
So our new userByName query is going to take in a string and is going to return a User object to us.
- Now into resolvers:
Query: {

tasks() {

return tasks;

},
    users() {
        return users;
    },

    userByName(parent, args, context,){
        return users.filter(u => u.firstName === args.firstName)
    },
},
What we are doing is equivalent to REST params!
- Now restart the server and test our new query in a playground:

I think it would be a great practice for you to enable another query, let’s say findUserById - give it a go yourself!
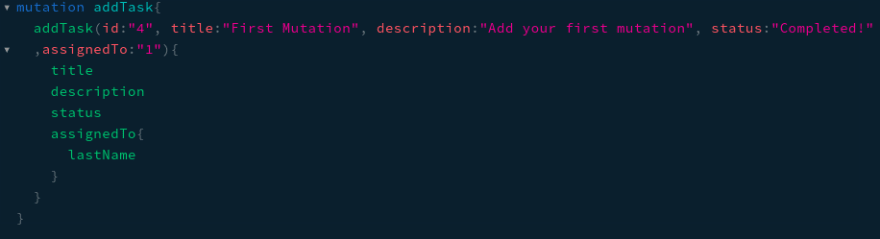
- Next, we are going to add our first mutation type! It would be useful if we could add tasks to our database, to start it we need to edit our typeDefs first:
type Mutation {

addTask(id: ID!, title: String!, description: String!, status: String!, assignedTo: ID!): Task!

}
Our addTask mutation takes in an id, title, description, status, and assignedTo, all fields are required and we want to return new task.
- Now to resolvers:
const { tasks, users } = require(‘…/db’);
const resolvers = {
Task: {
    assignedTo(task) {
        return users.filter(u => u.id === task.assignedTo);
    },
},

Query: {
    tasks() {
        return tasks;
    },

    users() {
        return users;
    },

    userByName(parent, args, context,){
        return users.filter(u => u.firstName === args.firstName)
    }
},
Mutation: {
    addTask(parent, args, context) {
      const newTask = {
        id: args.id,
        title: args.title,
        description: args.description,
        status: args.status,
        assignedTo: args.assignedTo,
      };

        tasks.push(newTask);

        return newTask;
    },
};

};
module.exports = resolvers;
What we are doing in addTask mutation is:
- Creating a new
taskbased on passed in parameters - Push new
taskto thetaskarray - Return the newly created
task
You can view our newly created mutation in action by visiting the playground:
- Our second mutation is going to be
deleteTaskmutation, again we start withtypeDefs.graphqlfile:
removeTask(id: ID!): [Task!]!
- Next our resolvers:
const resolvers = {
Task: {
    assignedTo(task) {
        return users.filter(u => u.id === task.assignedTo);
    },
},

Query: {
    tasks() {
        return tasks;
    },

    users() {
        return users;
    },

    userByName(parent, args, context,){
        return users.filter(u => u.firstName === args.firstName)
    }
},
Mutation: {
    addTask(parent, args, context) {
      const newTask = {
        id: args.id,
        title: args.title,
        description: args.description,
        status: args.status,
        assignedTo: args.assignedTo,
      };

        tasks.push(newTask);

        return newTask;
    },

    removeTask(parent, args, context) {
        const taskIndex = tasks.findIndex(t => t.id === args.id);

        tasks.splice(taskIndex, 1);

        return tasks;
      },
}

};
And just like with the first mutation give it a try in the playground!
I think by now you should have a good idea what you can do with GraphQL and what is the difference between GraphQL and REST - all those queries and mutations we went through used one endpoint and the client dictates what he wants from the server which can hugely improve the speed of our responses! Another huge success of GraphQL is that it allows receiving many resources in a single request! Imagine that on one of your pages you need access to both tasks and user - you can do it by sending one query! To me, understanding GraphQL changed the way I look at client-server architecture - simply because I’m finding it so amazing and easy to work with that I regret I only got to know it now! I really do hope you will enjoy it as well!
4. Graphback
Building software can be sometimes overwhelming. As junior developers, we are often looking for a sample application that can guide us thru complex server and client architectures. However, as a junior dev, we are often facing problems of templates being too complex or too simple, making the learning process more convoluted.
As a software engineer, I always wanted to learn more by building things, while having some form of standard I can base on when building an end to end solutions.
Graphback in a CLI tool that can help build an entire GraphQL server and a client within seconds! It is an open-source project that is currently being available as beta with lots of amazing features to come!
Graphback will generate schema and resolvers along with generating a database structure. It also addresses the difficulty of configuring a GraphQL server from scratch, and I know that our GraphQL server wasn’t particularly difficult to set, but imagine how much work we would have if only we had more types in our server! All graphback needs from you is your schema and it will do everything else for you. However, there’s a little bit more that you need to know in order to use full graphback potential.
Requirements
We are not going to go deep in everything that Graphback has to offer but it would be handy if you could make yourself familiar with:
- Docker
- Subscriptions
- TypeScript
- Knex
However, if you only would like to see how easy it can be to create a GraphQL server, I will explain everything you need to know in this tutorial.
Let’s start!
- Our very first step is going to be installing Docker. To give you a brief on Docker, it is a platform that allows building containers that can contain libraries that are required for an application to start. For example, we are going to use Docker as our PostgreSQL provider. Without Docker, you would need to install entire Postgre SQL server on your local machine and then set it up. With docker, all you do is downloading an image of ready to go, out of the box - Postgres!
- Once done, to double-check if your docker was installed correctly type:
$ docker -v
- Next, create a new folder called
graphback - Navigate to that folder and in command line type:
$ npm install -g graphback-cli
- To start graphback run following command:
$ graphback init YOUR_PROJECT_NAME
Where YOUR_PROJECT_NAME is your own name of the project.
- Choose “apollo-starter-ts”.
- “No” for example model and PostgreSQL for your database.
- Once it’s generated, navigate to your newly created project. It is going to be right in your
graphbackfolder. - In new folder navigate to
src/resolvers/, there should be only one file here calledindex.tsand as you can see in this file, there are no resolvers generated just yet. - Now navigate to
model/Default.graphql, delete what’s in there and paste our own types that we are well used to:
type User {

id: ID!

firstName: String!

lastName: String!

title: String!

email: String

}
type Task {

id: ID!

title: String!

description: String!

status: String!

assignedTo: [User!]!

}
- Now type in your terminal:
$ graphback generate
- Next, open your
./src/resolvers/generated/and witness the power of Graphback!
Open your task.ts and user.ts and look through all the hard work Graphback did for you! I know that the code behind the resolvers might not be understandable to you at the moment but I’m sure with a bit of hard work you will be able to write your resolvers the very same way!
- Our next step is to test it out! In your terminal type:
$ docker-compose up
This will launch a docker image that has Postgre SQL and Redis set up. We are not going to worry about it too much, however, docker is a very powerful tool and I’m sure understanding it will give you a huge advantage in the future.
- Type in your console:
$ graphback db
This command is going to build a database structure in Postgre SQL database based on your schema.
- Next, because Graphback is using Typescript it needs to be compiled before we can run it on our machine. To do that run:
$ npm run build
Build is going to use the build script from package.json which simply
compiles TypeScript code into JavaScript.
- Finally, we can run:
$ npm run start
And our server is ready at localhost:4000/graphql! From now on you got access to all of the generated resolvers. You can view all available queries and mutation in the playground by clicking “Schema” sidebar on the right-hand side of the playground!
- Graphback also allows for the use of so-called “Directives” which are extensions that can be attached to types and can affect the execution of a query. Let’s re-construct our GraphQL server so that we can delete
Task, but we can not deleteUser. To do that just add@deleteto ourTasktype inmodel/Default.graphql:
type User {

id: ID!

firstName: String!

lastName: String!

title: String!

email: String

}
type Task @delete {

id: ID!

title: String!

description: String!

status: String!

assignedTo: [User!]!

}
- Now let’s regenerate our resolvers with:
$ graphback generate
- Navigate again to
./src/resolvers/generatedand you will have a newdeletemutation intask, but not inuser. To test it rebuild our database:
$ graphback db
- Recompile our code:
$ npm run build
- Launch the server and give it a go!
$ npm run start
- If you would like a resolver ‘Delete’ to be created for all your types, navigate to
./config.jsonfile and changedeletefield value totrue:
{

“dbConfig”: {

“user”: “postgresql”,

“password”: “postgres”,

“database”: “users”,

“host”: “127.0.0.1”,

“port”: 55432

},

“generation”: {

“create”: true,

“update”: true,

“findAll”: true,

“find”: true,

“delete”: false, <----------------------------------------

“subCreate”: false,

“subUpdate”: false,

“subDelete”: false,

“disableGen”: false

},

“database”: “pg”

}
Treat this file like a settings file for Graphback generator. By default deletegeneration is disabled hence the need for enabling it one by one in our types specification. However, you can change the value of delete to true and it will be autogenerated for all your types! If your familliar with subscriptions try changing subCreate field to true or use @subCreate directive, regenerate server and enjoy subscription resolvers being written for you!
- Graphack also allows for inserting your own resolvers! Let’s give it a go! Go to
./model/Default.graphqland add our own queryuserByName:
type User {

id: ID!

firstName: String!

lastName: String!

title: String!

email: String

}
type Task @delete {

id: ID!

title: String!

description: String!

status: String!

assignedTo: [User!]!

}
type Query {

userByName(firstName: String!): User!

}
- Now we need to regenerate with:
$ graphback generate
And if you navigate to ./src/resolvers/custom you will see userByName.tsfile. As it is custom resolver we need to implement it ourselves. Change it to:
import { GraphQLContext } from ‘…/…/context’
export const userByName = {

Query: {

userByName: (_: any, args: any, context: GraphQLContext) => {

return context.db.select().from(‘user’).where(‘firstName’, ‘=’, args.firstName)

}

}

}
Resolver looks different then the ones we did in previous tutorials as it is written in TypeScript and uses knex to communicate with a database, but the idea is generally the same as in previous GraphQL tutorial.
- Next, we need to repeat our 3-step process:
$ graphback db

$ npm run build

$ npm run start
And navigate to localhost:4000/graphql to test it!
- Let’s test its functionality and execute the following queries and mutations:
Our task query should return all tasks:
However, as our database is empty it will simply return an empty array!
- Let’s add some data to our database:

As you can see, Grapback generates mutation in a slightly different way than what we have done, but if you think about, it simply takes in another type called taskInput which consists of title description and statuswhile our ID is auto-generate increment!
- Now we can add our first
user:

Our database consists of a single user and a single task from now on!
- We can now check if our queries are working the way they should:

Summary
Graphback offers a lot of features out of the box. This easy to use, amazing, technology - helped me realize how powerful and life-changing software development can be. Writing an entire GraphQL server line by line which can be very time consuming, setting up subscriptions and using directives can take days or weeks to do! While Graphback can generate it for you within seconds! Imagine how powerful this tool can be in the world where developers are doing their best to provide a working prototype of an application as soon as possible, imagine the time saved that will come from typing graphback generate after populating your typeDefs instead of all the planning, coding and testing your back end. You will still need to
implement your custom business logic yourself, but the core functionality will be provided saving you time from writing a lot of boilerplate.
I hope that you have found this series of tutorials interesting and learned a few things about REST, GraphQL and Graphback. When I was exposed to these technologies for the first time, I had to rethink what I’m doing and reevaluate what I want to learn next in my journey to become a software developer!
Thanks For Visiting, Keep Visiting. If you liked this post, share it with all of your programming buddies!
Originally published on dev.to
#node-js #graphql #rest #web-development
