Creating an iOS app with user presence using Node.js and Swift
We will create a sample chat application to demonstrate this feature. However, because we are focusing on just user presence, we will not implement the actual chat feature.
If you are building an application that has a user base, you might need to show your users when their friends are currently online. This comes in handy especially in messenger applications where the current user would like to know which of their friends are available for instant messaging.
Here is a screen recording on how we want the application to work:
If you want a tutorial on how to create a messenger application on iOS, check out this article.
Prerequisites
To follow along you need the following requirements:
- Xcode installed on your machine. Download here.
- Knowledge of the Swift programming language.
- Knowledge of the Xcode IDE.
- A Pusher Channels app. Create one here.
- Cocoapods installed on your machine. Installation guide.
- Node.js and npm installed on your machine. Installation guide.
- Basic knowledge of JavaScript and Node.js.
Let’s get started.
Creating the backend of the application
Before creating the iOS application, let’s create the backend application in Node.js. This application will have the necessary endpoints the application will need to function properly. To get started, create a new directory for the project.
Installing the dependencies
In the root of the project, create a new package.json file and paste the following contents into it:
    {
      "name": "presensesample",
      "version": "1.0.0",
      "main": "index.js",
      "dependencies": {
        "body-parser": "^1.18.3",
        "express": "^4.16.4",
        "pusher": "^2.1.3"
      }
    }
Above, we have defined some npm dependencies that the backend application will need to function. Amongst the dependencies, we can see the pusher library. This is the Pusher JavaScript server SDK.
Next, open your terminal application and cd to the root of the project you just created and run the following command:
$ npm install
This command will install all the dependencies we defined above in the package.json file.
Creating the main application
Next, create a new file called index.js and paste the following code into the file:
// File: ./index.js
const express = require(‘express’);
const bodyParser = require(‘body-parser’);
const Pusher = require(‘pusher’);
const app = express();let users = {}; let currentUser = {}; let pusher = new Pusher({ appId: 'PUSHER_APP_ID', key: 'PUSHER_APP_KEY', secret: 'PUSHER_APP_SECRET', cluster: 'PUSHER_APP_CLUSTER' }); app.use(bodyParser.json()); app.use(bodyParser.urlencoded({ extended: false })); // TODO: Add routes here app.listen(process.env.PORT || 5000);
In the code above, we imported the libraries we need for the backend application. We then instantiated two new variables: users and currentUser. We will be using these variables as a temporary in-memory store for the data since we are not using a database.
Next, we instantiated the Pusher library using the credentials for our application. We will be using this instance to communicate with the Pusher API. Next, we add the listen method which instructs the Express application to start the application on port 5000.
Next, let’s add some routes to the application. In the code above, we added a comment to signify where we will be adding the route definitions. Replace the comment with the following code:
// File: ./index.js// [...] app.post('/users', (req, res) => { const name = req.body.name; const matchedUsers = Object.keys(users).filter(id => users[id].name === name); if (matchedUsers.length === 0) { const id = generate_random_id(); users[id] = currentUser = { id, name }; } else { currentUser = users[matchedUsers[0]]; } res.json({ currentUser, users }); }); // [...]
Above, we have the first route. The route is a POST route that creates a new user. It first checks the users object to see if a user already exists with the specified name. If a user does not exist, it generates a new user ID using the generate_random_id method (we will create this later) and adds it to the users object. If a user exists, it skips all of that logic.
Regardless of the outcome of the user check, it sets the currentUser as the user that was created or matched and then returns the currentUser and users object as a response.
Next, let’s define the second route. Because we are using presence channels, and presence channels are private channels, we need an endpoint that will authenticate the current user. Below the route above, add the following code:
// File: ./index.js// [...] app.post('/pusher/auth/presence', (req, res) => { let socketId = req.body.socket_id; let channel = req.body.channel_name; let presenceData = { user_id: currentUser.id, user_info: { name: currentUser.name } }; let auth = pusher.authenticate(socketId, channel, presenceData); res.send(auth); }); // [...]
Above, we have the Pusher authentication route. This route gets the expected socket_id and channel_name and uses that to generate an authentication token. We also supply a presenceData object that contains all the information about the user we are authenticating. We then return the token as a response to the client.
Finally, in the first route, we referenced a function generate_random_id. Below the route we just defined, paste the following code:
// File: ./index.js// [...] function generate_random_id() { let s4 = () => (((1 + Math.random()) * 0x10000) | 0).toString(16).substring(1); return s4() + s4() + '-' + s4() + '-' + s4() + '-' + s4() + s4() + s4(); } // [...]
The function above just generates a random ID that we can then use as the user ID when creating new users.
Let’s add a final default route. This will catch visits to the backend home. In the same file, add the following:
// […]app.get('/', (req, res) => res.send('It works!')); // [...]
With this, we are done with the Node.js backend. You can run your application using the command below:
$ node index.js
Your app will be available here: http://localhost:5000.
Building the iOS application
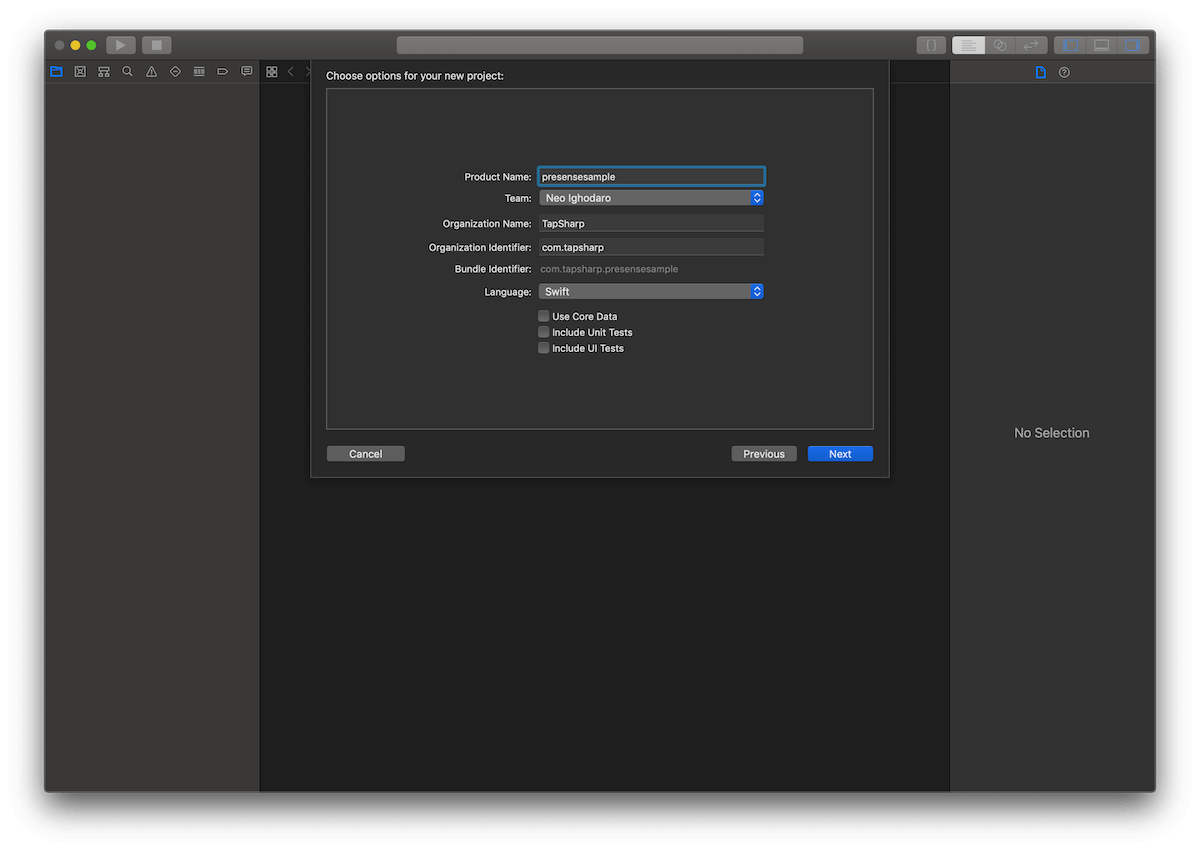
Launch Xcode and create a new sample Single View App project. We will call ours presensesample.
When you are done creating the application, close Xcode. Open your terminal application and cd to the root directory of the iOS application and run the following command:
$ pod init
This will create a new Podfile file in the root directory of your application. Open the file and replace the contents with the following:
# File: ./Podfile
target ‘presensesample’ do
platform :ios, ‘12.0’use_frameworks! pod 'Alamofire', '~> 4.7.3' pod 'PusherSwift', '~> 5.0' pod 'NotificationBannerSwift', '~> 1.7.3' end
Above, we have defined the application’s dependencies. To install the dependencies, run the following command:
$ pod install
The command above will install all the dependencies in the Podfile and also create a new .xcworkspace file in the root of the project. Open this file in Xcode to launch the project and not the .xcodeproj file.
Creating the scenes
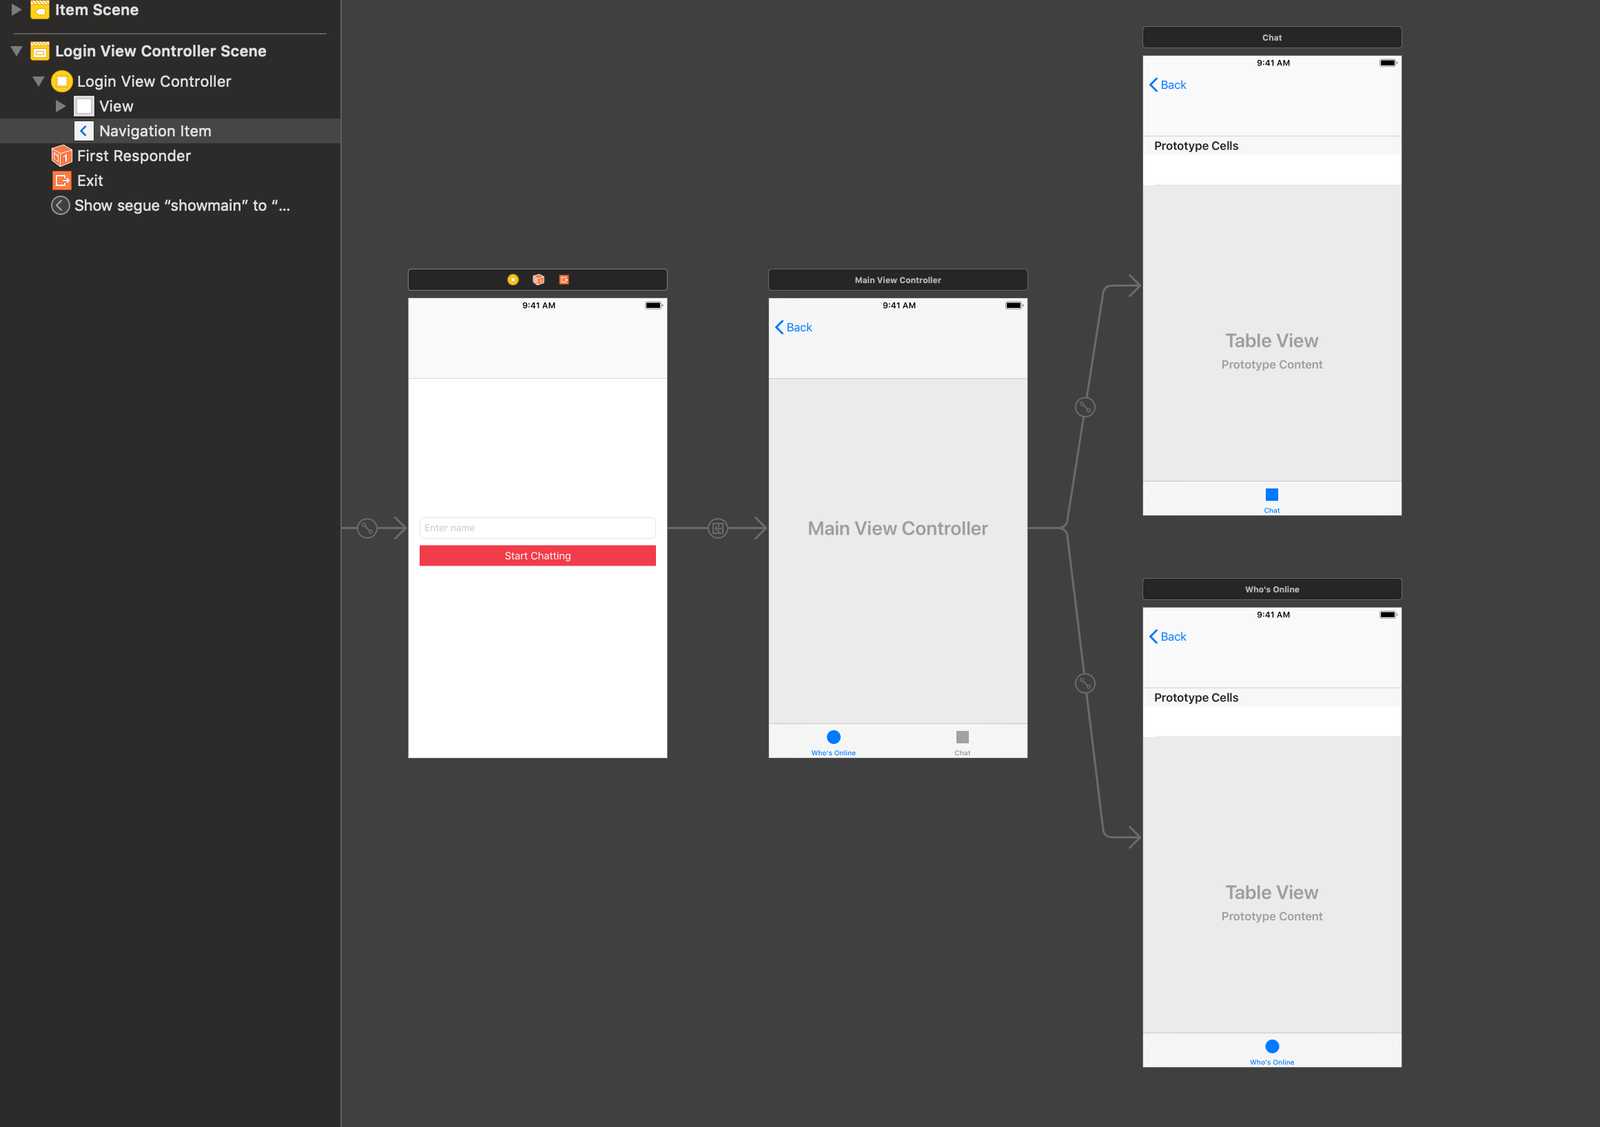
The first thing we will do is create the storyboard scenes we need for the application to work. We want the storyboard to look like this:

Open the main storyboard file and delete all the scenes in the file so it is empty. Next, add a view controller to the scene.
TIP: You can use the command + shift + L shortcut to bring the objects library.
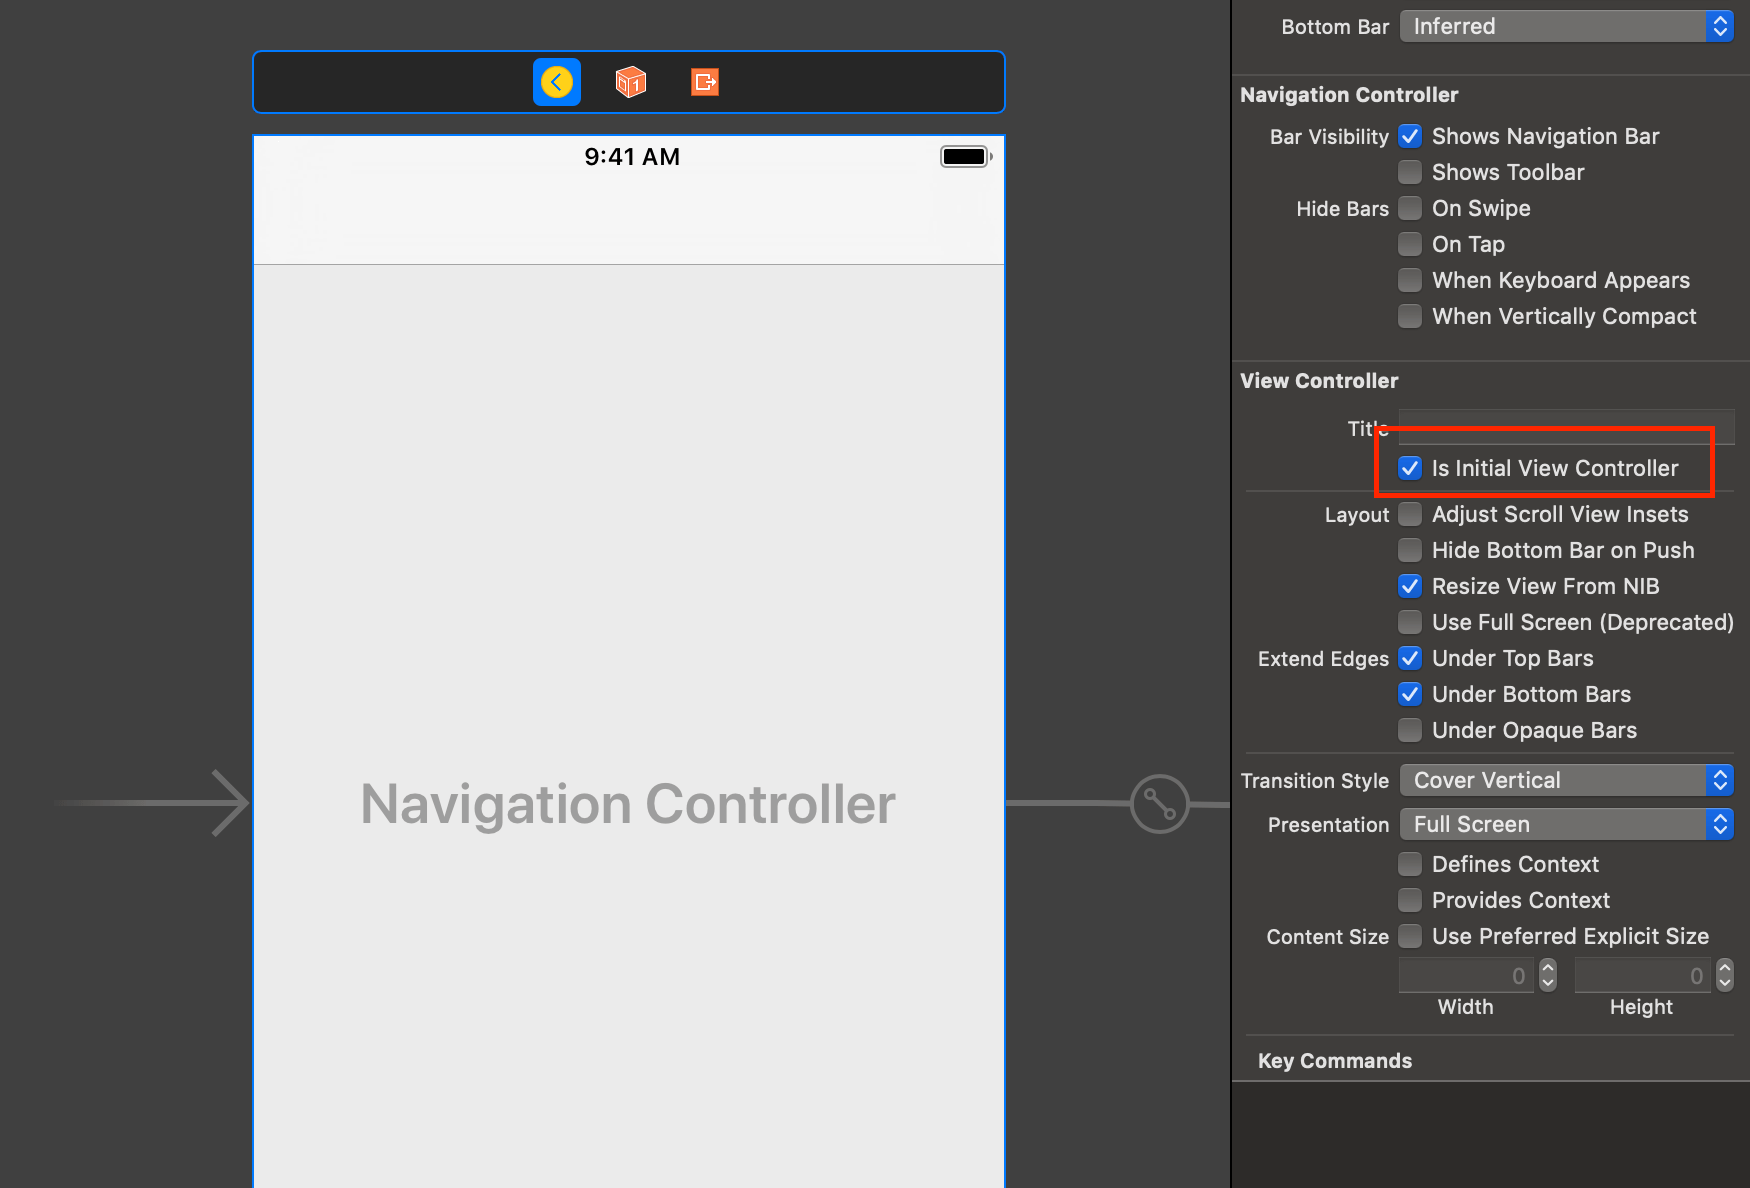
With the view controller selected, click on Editor > Embed In > Navigation Controller. This will embed the current view controller in a navigation controller. Next, with the navigation view controller selected, open the attributes inspector and select the Is Initial View Controller option to set the navigation view controller as the entry point for the storyboard.
Next, design the view controller as seen in the screenshot below. Later on in the article, we will be connecting the text field and button to the code using an @IBOutlet and an @IBAction.

Next, add the tab bar controller and connect it to the view controller using a manual segue. Since tab bar controllers come with two regular view controllers, delete them and add two table view controllers instead as seen below:
When you are done creating the scenes, let’s start adding the necessary code.
Adding code to the created scenes
Create a new controller class called LoginViewController and set it as the custom class for the first view controller attached to the navigation controller. Paste the following code into the file:
// File: ./presensesample/LoginViewController.swift
import UIKit
import Alamofire
import PusherSwift
import NotificationBannerSwiftclass LoginViewController: UIViewController { var user: User? = nil var users: [User] = [] @IBOutlet weak var nameTextField: UITextField! override func viewWillAppear(_ animated: Bool) { super.viewWillAppear(animated) user = nil users = [] navigationController?.isNavigationBarHidden = true } @IBAction func startChattingButtonPressed(_ sender: Any) { if nameTextField.text?.isEmpty == false, let name = nameTextField.text { registerUser(["name": name.lowercased()]) { successful in guard successful else { return StatusBarNotificationBanner(title: "Failed to login.", style: .danger).show() } self.performSegue(withIdentifier: "showmain", sender: self) } } } func registerUser(_ params: [String : String], handler: @escaping(Bool) -> Void) { let url = "http://127.0.0.1:5000/users" Alamofire.request(url, method: .post, parameters: params) .validate() .responseJSON { resp in if resp.result.isSuccess, let data = resp.result.value as? [String: Any], let user = data["currentUser"] as? [String: String], let users = data["users"] as? [String: [String: String]], let id = user["id"], let name = user["name"] { for (uid, user) in users { if let name = user["name"], id != uid { self.users.append(User(id: uid, name: name)) } } self.user = User(id: id, name: name) self.nameTextField.text = nil return handler(true) } handler(false) } } override func prepare(for segue: UIStoryboardSegue, sender: Any?) { if let vc = segue.destination as? MainViewController { vc.viewControllers?.forEach { if let onlineVc = $0 as? OnlineTableViewController { onlineVc.users = self.users onlineVc.user = self.user } } } } }
In the controller above, we have defined the users and user properties which will hold the available users and the current user when the user is logged in. We also have the nameTextField which is an @IBOutlet to the text field in the storyboard view controller, so make sure you connect the outlet if you hadn’t previously done so.
In the same controller, we have the startChattingButtonPressed method which is an @IBAction so make sure you connect it to the submit button in the storyboard view controller if you have not already done so. In this method, we call the registerUser method to register the user using the API. If the registration is successful, we direct the user to the showmain segue.
The segue between the login view controller and the tab bar controller should be set with an identifier of showmain.In the registerUser method, we send the name to the API and receive a JSON response. We parse it to see if the registration was successful or not.
The final method in the class is the prepare method. This method is automatically called by iOS when a new segue is being loaded. We use this to preset some data to the view controller we are about to load.
Next, create a new file called MainViewController and set this as the custom class for the tab bar view controller. In the file, paste the following code:
// File: ./presensesample/MainViewController.swift
import UIKitclass MainViewController: UITabBarController { override func viewDidLoad() { super.viewDidLoad() navigationItem.title = "Who's Online" navigationItem.hidesBackButton = true navigationController?.isNavigationBarHidden = false // Logout button navigationItem.rightBarButtonItem = UIBarButtonItem( title: "Logout", style: .plain, target: self, action: #selector(logoutButtonPressed) ) } override func tabBar(_ tabBar: UITabBar, didSelect item: UITabBarItem) { navigationItem.title = item.title } @objc fileprivate func logoutButtonPressed() { viewControllers?.forEach { if let vc = $0 as? OnlineTableViewController { vc.users = [] vc.pusher.disconnect() } } navigationController?.popViewController(animated: true) } }
In the controller above, we have a few methods defined. The viewDidLoad method sets the title of the controller and other navigation controller specific things. We also define a Logout button in this method. The button will trigger the logoutButtonPressed method.
In the logoutButtonPressed method, we try to log the user out by resetting the users property in the view controller and also we disconnect the user from the Pusher connection.
Next, create a new controller class named ChatTableViewController. Set this class as the custom class for one of the tab bar controllers child controllers. Paste the following code into the file:
// File: ./presensesample/ChatTableViewController.swift
import UIKitclass ChatTableViewController: UITableViewController { override func viewDidLoad() { super.viewDidLoad() } override func numberOfSections(in tableView: UITableView) -> Int { return 0 } override func tableView(_ tableView: UITableView, numberOfRowsInSection section: Int) -> Int { return 0 } }
The controller above is just a base controller and we do not intend to add any chat logic to this controller.
Create a new controller class called OnlineTableViewController. Set this controller as the custom class for the second tab bar controller child controller. Paste the following code to the controller class:
// File: ./presensesample/OnlineTableViewController.swift
import UIKit
import PusherSwiftstruct User { let id: String var name: String var online: Bool = false init(id: String, name: String, online: Bool? = false) { self.id = id self.name = name self.online = online! } } class OnlineTableViewController: UITableViewController { var pusher: Pusher! var user: User? = nil var users: [User] = [] override func numberOfSections(in tableView: UITableView) -> Int { return 1 } override func tableView(_ tableView: UITableView, numberOfRowsInSection section: Int) -> Int { return users.count } override func tableView(_ tableView: UITableView, cellForRowAt indexPath: IndexPath) -> UITableViewCell { let cell = tableView.dequeueReusableCell(withIdentifier: "onlineuser", for: indexPath) let user = users[indexPath.row] cell.textLabel?.text = "\(user.name) \(user.online ? "[Online]" : "")" return cell } }
In the code above, we first defined a User struct. We will use this to represent the user resource. We have already referenced this struct in previous controllers we created earlier.
Next, we defined the OnlineTableViewController class which is extends the UITableViewController class. In this class, we override the usual table view controller methods to provide the table with data.
You have to set the cell reuse identifier of this table to onlineuser in the storyboard.Above we also defined some properties:
pusher- this will hold the Pusher SDK instance that we will use to subscribe to Pusher Channels.users- this will hold an array ofUserstructs.user- this is the user struct of the current user.
Next, in the same class, add the following method:
// File: ./presensesample/OnlineTableViewController.swift// [...] override func viewDidLoad() { super.viewDidLoad() tableView.allowsSelection = false // Create the Pusher instance... pusher = Pusher( key: "PUSHER_APP_KEY", options: PusherClientOptions( authMethod: .endpoint(authEndpoint: "http://127.0.0.1:5000/pusher/auth/presence"), host: .cluster("PUSHER_APP_CLUSTER") ) ) // Subscribe to a presence channel... let channel = pusher.subscribeToPresenceChannel( channelName: "presence-chat", onMemberAdded: { member in if let info = member.userInfo as? [String: String], let name = info["name"] { if let index = self.users.firstIndex(where: { $0.id == member.userId }) { let userModel = self.users[index] self.users[index] = User(id: userModel.id, name: userModel.name, online: true) } else { self.users.append(User(id: member.userId, name: name, online: true)) } self.tableView.reloadData() } }, onMemberRemoved: { member in if let index = self.users.firstIndex(where: { $0.id == member.userId }) { let userModel = self.users[index] self.users[index] = User(id: userModel.id, name: userModel.name, online: false) self.tableView.reloadData() } } ) // Bind to the subscription succeeded event... channel.bind(eventName: "pusher:subscription_succeeded") { data in guard let deets = data as? [String: AnyObject], let presence = deets["presence"] as? [String: AnyObject], let ids = presence["ids"] as? NSArray else { return } for userid in ids { guard let uid = userid as? String else { return } if let index = self.users.firstIndex(where: { $0.id == uid }) { let userModel = self.users[index] self.users[index] = User(id: uid, name: userModel.name, online: true) } } self.tableView.reloadData() } // Connect to Pusher pusher.connect() } // [...]
In the viewDidLoad method above, we are doing several things. First, we instantiate the Pusher instance. In the options, we specify the authorize endpoint. We use the same URL as the backend we created earlier.
The next thing we do is subscribe to a presence channel called presence-chat. When working with presence channels, the channel name must be prefixed with presence-. The subscribeToPresenceChannel method has two callbacks that we can add logic to:
onMemberAdded- this event is called when a new user joins thepresence-chatchannel. In this callback, we check for the user that was added and mark them as online in theusersarray.onMemberRemoved- this event is called when a user leaves thepresence-chatchannel. In this callback, we check for the user that left the channel and mark them as offline.
Next, we bind to the pusher:subscription_succeeded event. This event is called when a user successfully subscribes to updates on a channel. The callback on this event returns all the currently subscribed users. In the callback, we use this list of subscribed users to mark them online in the application.
Finally, we use the connect method on the pusher instance to connect to Pusher.
Allowing local connections on the iOS app
One last thing we need to do before we are done with the iOS application is allowing the application load data from arbitrary URLs. By default, iOS does not allow this, and it should not. However, since we are going to be testing locally, we need this turned on temporarily. Open the info.plist file and update it as seen below:
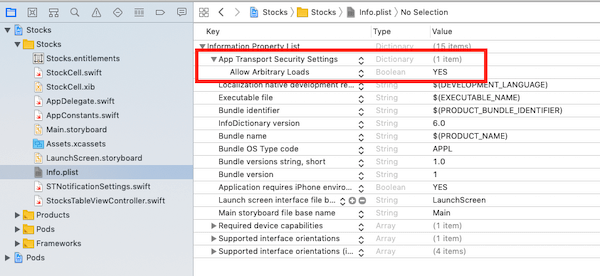
Now, our app is ready. You can run the application and you should see the online presence status of other users when they log in.
Conclusion
In this tutorial, we learned how to use presence channels in your iOS application using Pusher Channels.
The source code for the application created in this tutorial is available on GitHub.
Learn More
☞ Learn Swift 4: From Beginner to Advanced
☞ Machine Learning In Node.js With TensorFlow.js
☞ Express.js & Node.js Course for Beginners - Full Tutorial
☞ How to Perform Web-Scraping using Node.js
☞ Build a web scraper with Node
☞ Getting started with Flutter
☞ Android Studio for beginners
☞ Building a mobile chat app with Nest.js and Ionic 4
Originally published by Neo Ighodaro at https://pusher.com/
#mobile-apps #node-js #swift #ios