Learn how to use the Michelson programming language and write smart contracts on Tezos
(Please check first Part 1 and Part 2)
In this new installment of our series about Michelson language, we are going to crank it up a notch!
In the last parts, we were having a quite simple stack and doing some basic manipulations, adding elements, removing them, duplicating them, etc. However, one of the powers of smart contracts is access-control: you can request your smart contract to verify if the person sending a request is allowed to modify the storage. If they are allowed, they can continue performing their operation. If they are not, the execution of the smart contract stops and all subsequent code is ignored.
Unlike Ethereum smart contracts, smart contracts on Tezos do not modify the storage at any point in the execution of the transaction. The new storage is returned at the end of the execution if everything went well. This makes smart contracts on Tezos extremely secure: Michelson will make sure that everything is executed as it should before modifying the storage. Solidity will modify the storage and hope there will be no problem down the road 😊
In this article, we are going to write a smart contract that verifies that the sender of the transaction is allowed to modify the storage. If they are, we are going to concatenate the string they provide with the string in the storage. If they are not, the contract will just stop executing and return an error.
The Michelson code
The whole code of the smart contract is available in the Jupyter notebook binder. After navigating to the page and waiting a minute for the Michelson kernel to load, select _MichelsonTutorial-Demo4.ipynb _to see the code. As for the last lesson, you can see the inline code or run the code step-by-step.
Let’s have a look at the inline code:
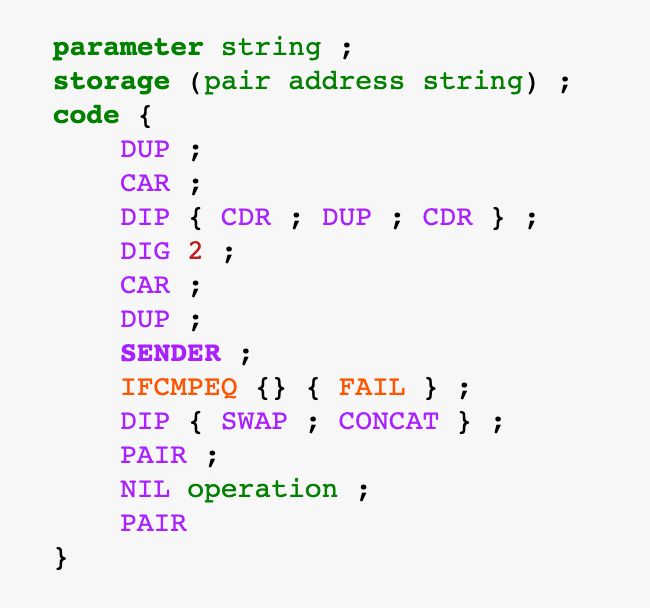
It is amazing how much power such a small piece of code packs 😅
The storage looks different this time: it contains a pair with an address on the left side and a string on the right side. We are going to use the address in the storage to compare it to the sender’s address and give/refuse access.
You probably recognized a few opcodes that were introduced in the previous lessons: DUP, CAR, PAIR, NIL, etc. There are also new instructions: DIG, SENDER, IFCMPEQ, FAIL, etc. No worries, we are about to see what they do.
As usual, you are free to play with the step-by-step code in the Jupyter notebook so you can get a better understanding of what the code does and how it modifies the stack at each step.
Step-by-step execution
Now let’s go line by line and see what the code does!
First, a pair containing the provided parameter and the storage is pushed onto the stack:

DUP
We want to duplicate the first element of the storage. As you are probably beginning to understand, this is a normal step to separate the parameter from the storage when you need both in two different elements:
CAR
Remember CAR? It takes the pair at the top of the stack and extracts its left value:
DIP { CDR ; DUP ; CDR }
This one is a very interesting and useful instruction! You can see that the instruction is made of two parts: the DIP part and the part between curly braces.
The DIP instruction “protects” the element of the stack that it refers to. If there is no number after DIP, it will protect the first element on the top of the stack. You can also use DIP 2 or DIP 10 according to the number of elements. The DIP instruction is followed by some code between curly braces that will affect the element below the element protected by the instruction. As such, if you write DIP 0 { code }, it would be as if you wrote code and if you write DIP 1 { code }, as if you wrote DIP { code }:
#tezos #blockchain #michelson #programming #smart-contracts #smart-contracts-top-story #blockchain-top-story #hackernoon-top-story
