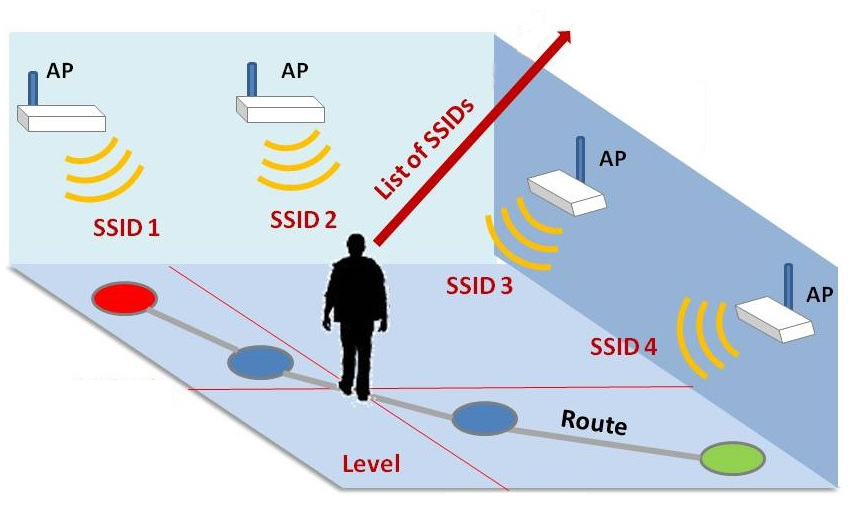
The task of detecting where you are when GPS or satellite localization is not an option is called indoor positioning: it could be in a building, an airport, a parking garage. I opted for WiFi because it is widely available, but the same project could be re-purposed to use Bluetooth, if there are enough devices in your location.
This tutorial is part of a series of tutorials about Machine learning on Arduino and all follow the same outline:
- define the features
- record sample data: run a few scans for each location to be predicted and record the RSSI (signal strength) of each visible network
- train an SVM classifier with Python’s scikit-learn and export it to optimized C code using micromlgen
- copy and paste the generated code in a model.h file in the Arduino project and call predict() from it
1. Features definition
The features for this project are going to be the RSSIs (Received signal strength indication) of the known WiFi networks. If a network is out of range, it will have an RSSI equal to 0.
2. Record sample data
2.1 Enumerate the access points
First of all we need to enumerate all the networks we will encounter during the inference process. This is because not all networks will be visible all the time: we have to work, however, with a fixed number of features.
To begin, we take a “reconnaissance tour” of the locations we want to predict and log all the networks we detect. Load the following sketch and take note of all the networks that appear on the Serial monitor.
#include <WiFi.h>

void setup() {
	Serial.begin(115200);
	WiFi.mode(WIFI_STA);
	WiFi.disconnect();
}

void loop() {
  int numNetworks = WiFi.scanNetworks();

  for (int i = 0; i < numNetworks; i++) {
      Serial.println(WiFi.SSID(i));

  delay(3000);
}
2.2 Create an access point array
Now that we have a bunch of SSIDs, we need to assign each SSID to a fixed index, from 0 to MAX_NETWORKS.
You can implement this part as you like, but in this demo I’ll make use of a class I wrote called Array (you can see the source code and example on Github), which implements 2 useful functions:
push()to add an element to the arrayindexOf()to get the index of an element.
See how to install the Eloquent library if you don’t have it already installed.
At this point we populate the array with all the networks we saved from the reconnaissance tour.
#include <eDataStructures.h>

#define MAX_NETWORKS 10

using namespace Eloquent::DataStructures;

double features[MAX_NETWORKS];
Array<String, MAX_NETWORKS> knownNetworks("");


void setup() {
	Serial.begin(115200);
	WiFi.mode(WIFI_STA);
	WiFi.disconnect();

	knownNetworks.push("Put your SSID #0");
	knownNetworks.push("Put your SSID #1");
	knownNetworks.push("Put your SSID #2");
	knownNetworks.push("Put your SSID #3");
	// and so on
}
2.3 Convert to features vector
The second step is to convert the scan results into a features vector. Each feature will be the RSSI of the given SSID, in the exact order we populated the knownNetworks array.
In practice:
features[0] == RSSI of "Put your SSID #0";
features[1] == RSSI of "Put your SSID #1";
features[2] == RSSI of "Put your SSID #2";
features[3] == RSSI of "Put your SSID #3";
// and so on
The code below will do the job.
void loop() {
	scan();
	printFeatures();
	delay(3000);
}

void scan() {
    int numNetworks = WiFi.scanNetworks();

	resetFeatures();

    // assign RSSIs to feature vector
    for (int i = 0; i < numNetworks; i++) {
        String ssid = WiFi.SSID(i);
        uint16_t networkIndex = knownNetworks.indexOf(ssid);

        // only create feature if the current SSID is a known one
        if (!isnan(networkIndex))
            features[networkIndex] = WiFi.RSSI(i);
    }
}

// reset all features to 0
void resetFeatures() {
    const uint16_t numFeatures = sizeof(features) / sizeof(double);

    for (int i = 0; i < numFeatues; i++)
        features[i] = 0;
}
Grab some recordings just staying in a location for a few seconds and save the serial output to a file; then move to the next location and repeat: 10-15 samples for each location will suffice.
Continue reading the full post
#arduino #machine #learning #ai #ml
