How to build a pre-rendered, SEO-friendly Vue.js app
“I can’t take it anymore. Our in-house reporting panel sucks!”
Our product manager was pissed. The crumbling app he was trying to pull data from was… disastrous.
“Max, we need better reporting. Can you fix it?”
“Honestly, I’d much rather build a brand new app,” I answered, grinning.
“Sure, go ahead. Carte blanche, buddy.”
I rubbed my hands, grinning still. FINALLY, an occasion to use the JS framework everyone’s been raving about: Vue.js.
I’ve just finished coding that app, and I loved it.
Inspired by my recent experience, I took some time to craft a Vue.js tutorial for our community. Now, I’ll be covering mostly two topics in here:
- How to build a lean web app with Vue.js
- How to handle Vue.js SEO & prerendering with
[prerender-spa-plugin]([https://github.com/chrisvfritz/prerender-spa-plugin)](https://github.com/chrisvfritz/prerender-spa-plugin) "https://github.com/chrisvfritz/prerender-spa-plugin)")
More specifically, I’ll walk you through creating a small shop with SEO-friendly product pages.
I’ve slightly touched on Vue in my latest headless CMS post, but this one will go much deeper, so I’m excited.
GitHub repo and live Vue demo
Before we get started, everything we’ll discuss here is open source, and I have a live example up as well.
What is Vue.js exactly?
Let’s start by dropping a little knowledge for those not familiar with the progressive framework.

Vue is a lightweight, progressive JavaScript framework that helps you create web interfaces.
Don’t be fooled by the “JS framework” part of the definition just yet. For Vue is quite different from its trendy counterparts — React.js & Angular.js. For starters, it’s not an open source by-product of commercial tech giants like Google and Facebook.
Evan You first released it in 2014, with the intention of creating an “incrementally adoptable,” modern JS library. That’s one of the most powerful features of Vue: creating pluggable components you can add to any project without undergoing major refactors. Any developer can try out Vue in a project without jeopardizing or burdening its existing code base.
Pattern terminology apart, I feel like the premises of Vue are:
1. You can’t know the entire state architecture of your app from the start.
2. Your data will surely change on the runtime.
It’s around these constraints that the library shapes itself: it’s incremental, component-based, and reactive. The granular architecture of the components lets you easily separate your logic concerns while maintaining reusability for them. On top of that, it natively binds your data to the views so they magically update when necessary (through watchers). Although the same definition could be said of many reactive front-end frameworks, I found Vue just achieved it more elegantly, and, for the majority of my use cases, in a better way.
Vue also has a softer learning curve than, say, React, which requires JSX templating knowledge. One could even say Vue is React minus the awkward parts.
_For more in-depth comparisons with other JS frameworks — React, Angular, Ember, Knockout, Polymer, Riot — _check out the official docs on the subject.
Last but not least, the performance & insightful dev tools Vue offers make for a great coding experience. No wonder its adoption is skyrocketing.
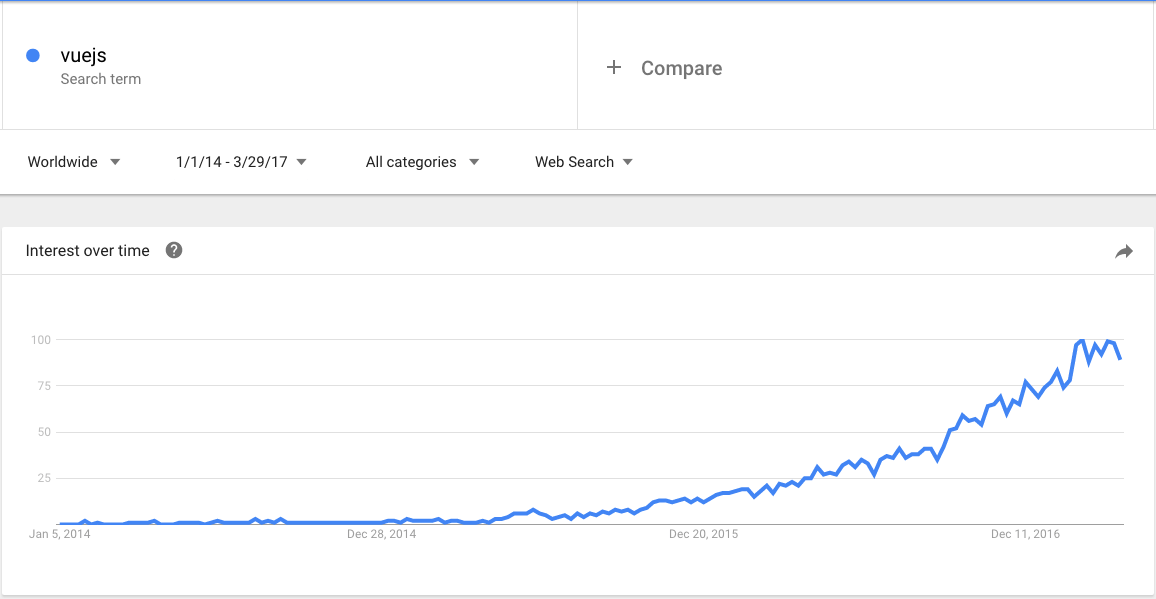
From open source projects like Laravel & PageKit to enterprise ones like Gitlab & Codeship (not to mention the Alibaba & Baidu giants), lots of organizations are using Vue.
Now, however, it’s time to see how you’re going to use it here.
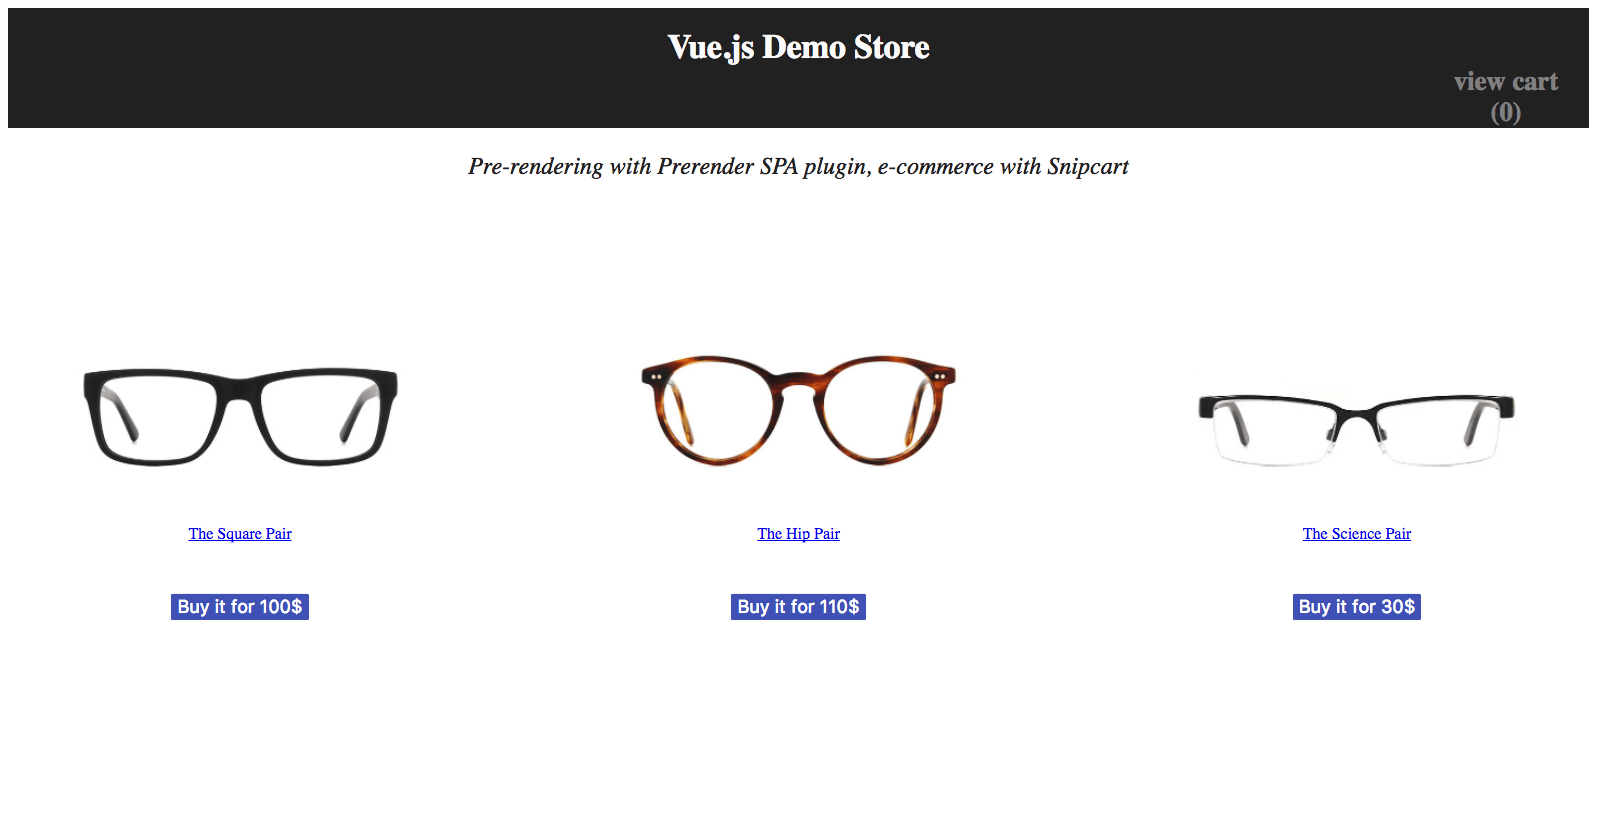
Our Vue.js example: a quick, SEO-friendly e-commerce app
In this section, I’ll show you how to build a small e-commerce app using Vue 2.0 & Snipcart, our HTML/JS cart platform for devs. You’ll also see how to make sure product pages are properly “crawlable” for search engine bots.
Pre-requisites
- Minimal knowledge of Vue.js — start here.
- Basic understanding of
[vuex]([https://vuex.vuejs.org/en/intro.html)](https://vuex.vuejs.org/en/intro.html) "https://vuex.vuejs.org/en/intro.html)")&[vue-router]([https://router.vuejs.org/en/)](https://router.vuejs.org/en/) "https://router.vuejs.org/en/)"). - A Snipcart account (forever free in Test mode).
If you want to dive deeper into all things Vue 2.0, Laracasts’ got you covered with this series.
1. Setting up the environment
First, use the vue-cli to scaffold a basic Vue app. In your favorite terminal, input:
npm install -g vue-cli vue init webpack-simple vue-snipcart
This will create a new vue-snipcart folder containing a basic configuration using vue-loader. It will also enable you to write a single file component (template/js/css in the same .vue file).
I want this demo to feel as real as possible, so let’s add two more modules widely used in Vue SPA for large applications: vuex and vue-router.
- Minimal knowledge of Vue.js — start here.
- Basic understanding of
[vuex]([https://vuex.vuejs.org/en/intro.html)](https://vuex.vuejs.org/en/intro.html) "https://vuex.vuejs.org/en/intro.html)")&[vue-router]([https://router.vuejs.org/en/)](https://router.vuejs.org/en/) "https://router.vuejs.org/en/)"). - A Snipcart account (forever free in Test mode).
To install these, go in your new vue-snipcart project folder and run the following commands:
npm install --save vue-router npm intsall --save vuex
Another thing to install now is the prerender-spa-plugin, which will allow you to prerender crawlable routes:
npm install --save prerender-spa-plugin
Almost there. The last four packages are:
- Minimal knowledge of Vue.js — start here.
- Basic understanding of
[vuex]([https://vuex.vuejs.org/en/intro.html)](https://vuex.vuejs.org/en/intro.html) "https://vuex.vuejs.org/en/intro.html)")&[vue-router]([https://router.vuejs.org/en/)](https://router.vuejs.org/en/) "https://router.vuejs.org/en/)"). - A Snipcart account (forever free in Test mode).
Run these:
npm install --save pug npm install --save vuex-router-sync npm
install --save copy-webpack-plugin npm install --save babel-polyfill
2. Assembling the architecture
Installs: check. Time to set everything so it can handle the store’s data.
Let’s start with vuex store. You’ll use this to store/access our products info.
For this demo, I’ll use static data, although this would still work if you were to fetch it instead.
Note*: with Snipcart, we inject the cart with* a basic JS snippet, and define products in the markup with simple HTML attributes.
2.1 Building the store
Create a store folder in the src one, along with 3 files:
- Minimal knowledge of Vue.js — start here.
- Basic understanding of
[vuex]([https://vuex.vuejs.org/en/intro.html)](https://vuex.vuejs.org/en/intro.html) "https://vuex.vuejs.org/en/intro.html)")&[vue-router]([https://router.vuejs.org/en/)](https://router.vuejs.org/en/) "https://router.vuejs.org/en/)"). - A Snipcart account (forever free in Test mode).
//state.js
export const state = {
    products: [
        {
            id: 1,
            name: 'The Square Pair',
            price: 100.00,
            description: 'Bold & solid.',
            image: 'https://snipcart.com/media/10171/glasses1.jpeg'
        },
        {
            id: 2,
            name: 'The Hip Pair',
            price: 110.00,
            description: 'Stylish & fancy.',
            image: 'https://snipcart.com/media/10172/glasses2.jpeg'
        },
        {
            id: 3,
            name: 'The Science Pair',
            price: 30,
            description: 'Discreet & lightweight.',
            image: 'https://snipcart.com/media/10173/glasses3.jpeg'
        }
    ]
}


//getters.js
    export const getters = {
        getProductById: (state, getters) => (id) => {
            return state.products.find(product => product.id == id)
        }
    }


//index.js
import Vue from 'vue'
import Vuex from 'vuex'
import { state } from './state.js'
import { getters } from './getters.js'


Vue.use(Vuex)


export default new Vuex.Store({
  state,
  getters
})
2.2 Building the router
Let’s keep the store basic: a homepage listing products + a details page for each product. You’ll need to register two routes in the router to handle these:
import VueRouter from 'vue-router'
import Vue from 'vue'
import ProductDetails from './../components/productdetails.vue'
import Home from './../components/home.vue'


Vue.use(VueRouter)


export default new VueRouter({
  mode: 'history',
  routes: [
    { path: '/products/:id', component: ProductDetails },
    { path: '/', component: Home },
  ]
})
These components haven’t been created yet, but no worries, they’re coming later. ;)
Note that I employed mode: 'history' in my VueRouter declaration. This is important, as the prerender plugin won’t work otherwise. The difference is that the router will use the history API instead of hashbangs to navigate.
2.3 Linking everything together
Now that you have both your store and your router, you’ll need to register them in the app. Hop in your src/main.js file and update it as follows:
import Vue from 'vue'
import App from './App.vue'
import router from './router'
import { sync } from 'vuex-router-sync'
import store from './store'


sync(store, router)


new Vue({
  store,
  router,
  render: h => h(App)
}).$mount('#app')
Quite simple, right? As mentioned earlier, the sync method from the vuex-router-sync package injects some of the current route information in the store state. It’ll be helpful later on.
3. Crafting the Vue components
Having data feels awesome, but showing it is even better. You can use three components to achieve that:
- Minimal knowledge of Vue.js — start here.
- Basic understanding of
[vuex]([https://vuex.vuejs.org/en/intro.html)](https://vuex.vuejs.org/en/intro.html) "https://vuex.vuejs.org/en/intro.html)")&[vue-router]([https://router.vuejs.org/en/)](https://router.vuejs.org/en/) "https://router.vuejs.org/en/)"). - A Snipcart account (forever free in Test mode).
Each of them will be in the src/components folder.
//Home.vue


<template lang="pug">
    div(class="products")
        div(v-for="product in products", class="product")
            product(:product="product")
</template>


<script>
import Product from './../components/Product.vue'


export default {
  name: 'home',
  components: { Product },
  computed: {
    products(){
      return this.$store.state.products
    }
  }
}
</script>
Above, the store state is used to get products and iterate on them to render a product component for each one.
//Product.vue
<template lang="pug">
  div(class="product")
   router-link(v-bind:to="url").product
      img(v-bind:src="product.image" v-bind:alt="product.name" class="thumbnail" height="200")
      p {{ product.name }}

    button(class="snipcart-add-item"
      v-bind:data-item-name="product.name"
      v-bind:data-item-id="product.id"
      v-bind:data-item-image="product.image"
      data-item-url="/"
      v-bind:data-item-price="product.price")
        | Buy it for {{ product.price }}$

</template>


<script>
export default {
  name: 'Product',
  props: ['product'],
  computed: {
    url(){
      return `/products/${this.product.id}`
    }
  }
}
</script>
You link to each page, handled by your router, which brings us to your last component.
//ProductDetails.vue
<template lang="pug">
  div(class="product-details")

    img(v-bind:src="product.image" v-bind:alt="product.name" class="thumbnail" height="200")

    div(class="product-description" v-bind:href="url")
      p {{ product.name }}
      p {{ product. description}}


      button(class="snipcart-add-item"
        v-bind:data-item-name="product.name"
        v-bind:data-item-id="product.id"
        v-bind:data-item-image="product.image"
        data-item-url="/"
        v-bind:data-item-price="product.price")
          | Buy it for {{ product.price }}$


</template>


<script>
export default {
  name: 'ProductDetails',
  computed: {
    id(){
      return this.$store.state.route.params.id
    },
    product(){
      return this.$store.getters.getProductById(this.id)
    }
  }
}
</script>
This one has a little more logic than the others. You get the current ID from the route and then get the associated product from the getter previously created.
4. Creating the app
Let’s use your new components, yeah?
Open the App.vue file. Content in there is still the default one generated from the vue init webpack-simple scaffolding.
Swap everything to this instead:
<template lang="pug">
  div(id="app")
    TopContext
    router-view


</template>


<script>
import TopContext from './components/TopContext.vue'


export default {
  name: 'app',
  components: { TopContext }
}
</script>
The TopContext component isn’t really important: it acts only as a header. The key part is the router-view one: it will be determined dynamically by VueRouter, and the associated component defined earlier will be injected instead.
The last view to update is the index.html. For this use case, let’s create a new static folder in the src one. There, you’ll move the index file, and update as follows:
<!DOCTYPE html>
  <html lang="en">
  <head>
    <meta charset="utf-8">
    <title>vue-snipcart</title>
  </head>


  <body>

    <div id="app">
    </div>

    <script src="/build.js"></script>
    <script src="https://ajax.googleapis.com/ajax/libs/jquery/2.2.2/jquery.min.js"></script>
    <script src="https://cdn.snipcart.com/scripts/2.0/snipcart.js" data-api-key="YjdiNWIyOTUtZTIyMy00MWMwLTkwNDUtMzI1M2M2NTgxYjE0" id="snipcart"></script>
    <link href="https://cdn.snipcart.com/themes/2.0/base/snipcart.min.css" rel="stylesheet" type="text/css" />
  </body>
</html>
You can see I added Snipcart’s necessary scripts in the default view. A small component granularly including them could have been cleaner, but since all the views need them, I did it this way.
5. Handling Vue.js SEO with the Prerender plugin
Everything in the app is rendered dynamically with JS, which isn’t super for SEO: the asynchronous content of pages can’t be optimally crawled by search engine bots. It wouldn’t be smart to have an e-commerce website missing out on all that organic traffic opportunity!
Let’s use prerendering to bring more SEO opportunities to your Vue.js app.
Compared to Vue SSR (Server-Side Rendering), prerendering is much easier to set up. And quite frankly, the former is often overkill, unless you’re dealing with lots of routes. Plus, both achieve quite similar results on an SEO level.
Prerendering will allow you to keep your front end as a fast, light static site that’s easily crawlable.
Let’s see how you can use it. Go to your webpack file and add the following declaration to your top level export:
plugins: [
  new CopyWebpackPlugin([{
    from: 'src/static'
  }]),
  new PrerenderSpaPlugin(
    path.join(__dirname, 'dist'),
    [ '/', '/products/1', '/products/2', '/products/3']
  )
]
Okay, so how does this work?
The CopyWebpackPlugin will copy your static folder (only containing the view referencing our Vue App) to your dist folder. Then, the PrerenderSpaPlugin will use PhantomJS to load the content of your pages and use the results as static assets.
And voilà! You’ve now got prerendered, SEO-friendly product pages for a Vue app.
You can test it yourself with the following command:
npm run build
This will generate a dist folder containing everything needed for production.
Other important SEO considerations
- How to build a lean web app with Vue.js
- How to handle Vue.js SEO & prerendering with
[prerender-spa-plugin]([https://github.com/chrisvfritz/prerender-spa-plugin)](https://github.com/chrisvfritz/prerender-spa-plugin) "https://github.com/chrisvfritz/prerender-spa-plugin)")
Conclusion
Since I had worked with Vue before, crafting this tutorial went rather smoothly. I must’ve spent an hour on the demo. I struggled a bit to get CopyWebpackPlugin to work, but eventually found answers in their docs.
I hope this post encourages developers to start using Vue in some projects. Like I said, you can start slowly, by developing a tiny part of an existing project with it. I think it’s definitely worth a try. Our lead developer is coding our latest merchant dashboard feature with Vue as I’m writing this, and he loves it. Plus, when set up right, a Vue app can drive good SEO results.
If you feel like getting inspired first, check out the Vue.js Awesome list, which curates loads of Vue examples & projects.
Recommended Courses:
Vue JS: From Beginner to Professional ☞ https://goo.gl/YYz6TC
Real Time Chat With Laravel Broadcast, Pusher and Vuejs ☞ https://goo.gl/yVkCnd
Vue JS 2.0 - Mastering Web Apps ☞ https://goo.gl/FMpDgr
☞ How to Creat a Task Management App Using Vue.js and a Node.js
☞ Five tools to speed the development of your Vue.js applications.
☞ How to get data attribute value in Vue.js?
☞ Vue.js Firebase Tutorial: Build Firestore CRUD Web Application
☞ Using Stateless Components in Vue.js
“I can’t take it anymore. Our in-house reporting panel sucks!”
Our product manager was pissed. The crumbling app he was trying to pull data from was… disastrous.
“Max, we need better reporting. Can you fix it?”
“Honestly, I’d much rather build a brand new app,” I answered, grinning.
“Sure, go ahead. Carte blanche, buddy.”
I rubbed my hands, grinning still. FINALLY, an occasion to use the JS framework everyone’s been raving about: Vue.js.
I’ve just finished coding that app, and I loved it.
Inspired by my recent experience, I took some time to craft a Vue.js tutorial for our community. Now, I’ll be covering mostly two topics in here:
- How to build a lean web app with Vue.js
- How to handle Vue.js SEO & prerendering with
[prerender-spa-plugin]([https://github.com/chrisvfritz/prerender-spa-plugin)](https://github.com/chrisvfritz/prerender-spa-plugin) "https://github.com/chrisvfritz/prerender-spa-plugin)")
More specifically, I’ll walk you through creating a small shop with SEO-friendly product pages.
I’ve slightly touched on Vue in my latest headless CMS post, but this one will go much deeper, so I’m excited.
GitHub repo and live Vue demo
Before we get started, everything we’ll discuss here is open source, and I have a live example up as well.
What is Vue.js exactly?
Let’s start by dropping a little knowledge for those not familiar with the progressive framework.
Vue is a lightweight, progressive JavaScript framework that helps you create web interfaces.
Don’t be fooled by the “JS framework” part of the definition just yet. For Vue is quite different from its trendy counterparts — React.js & Angular.js. For starters, it’s not an open source by-product of commercial tech giants like Google and Facebook.
Evan You first released it in 2014, with the intention of creating an “incrementally adoptable,” modern JS library. That’s one of the most powerful features of Vue: creating pluggable components you can add to any project without undergoing major refactors. Any developer can try out Vue in a project without jeopardizing or burdening its existing code base.
Pattern terminology apart, I feel like the premises of Vue are:
1. You can’t know the entire state architecture of your app from the start.
2. Your data will surely change on the runtime.
It’s around these constraints that the library shapes itself: it’s incremental, component-based, and reactive. The granular architecture of the components lets you easily separate your logic concerns while maintaining reusability for them. On top of that, it natively binds your data to the views so they magically update when necessary (through watchers). Although the same definition could be said of many reactive front-end frameworks, I found Vue just achieved it more elegantly, and, for the majority of my use cases, in a better way.
Vue also has a softer learning curve than, say, React, which requires JSX templating knowledge. One could even say Vue is React minus the awkward parts.
_For more in-depth comparisons with other JS frameworks — React, Angular, Ember, Knockout, Polymer, Riot — _check out the official docs on the subject.
Last but not least, the performance & insightful dev tools Vue offers make for a great coding experience. No wonder its adoption is skyrocketing.
From open source projects like Laravel & PageKit to enterprise ones like Gitlab & Codeship (not to mention the Alibaba & Baidu giants), lots of organizations are using Vue.
Now, however, it’s time to see how you’re going to use it here.
Our Vue.js example: a quick, SEO-friendly e-commerce app
In this section, I’ll show you how to build a small e-commerce app using Vue 2.0 & Snipcart, our HTML/JS cart platform for devs. You’ll also see how to make sure product pages are properly “crawlable” for search engine bots.
Pre-requisites
- Minimal knowledge of Vue.js — start here.
- Basic understanding of
[vuex]([https://vuex.vuejs.org/en/intro.html)](https://vuex.vuejs.org/en/intro.html) "https://vuex.vuejs.org/en/intro.html)")&[vue-router]([https://router.vuejs.org/en/)](https://router.vuejs.org/en/) "https://router.vuejs.org/en/)"). - A Snipcart account (forever free in Test mode).
If you want to dive deeper into all things Vue 2.0, Laracasts’ got you covered with this series.
1. Setting up the environment
First, use the vue-cli to scaffold a basic Vue app. In your favorite terminal, input:
npm install -g vue-cli vue init webpack-simple vue-snipcart
This will create a new vue-snipcart folder containing a basic configuration using vue-loader. It will also enable you to write a single file component (template/js/css in the same .vue file).
I want this demo to feel as real as possible, so let’s add two more modules widely used in Vue SPA for large applications: vuex and vue-router.
- Minimal knowledge of Vue.js — start here.
- Basic understanding of
[vuex]([https://vuex.vuejs.org/en/intro.html)](https://vuex.vuejs.org/en/intro.html) "https://vuex.vuejs.org/en/intro.html)")&[vue-router]([https://router.vuejs.org/en/)](https://router.vuejs.org/en/) "https://router.vuejs.org/en/)"). - A Snipcart account (forever free in Test mode).
To install these, go in your new vue-snipcart project folder and run the following commands:
npm install --save vue-router npm intsall --save vuex
Another thing to install now is the prerender-spa-plugin, which will allow you to prerender crawlable routes:
npm install --save prerender-spa-plugin
Almost there. The last four packages are:
- Minimal knowledge of Vue.js — start here.
- Basic understanding of
[vuex]([https://vuex.vuejs.org/en/intro.html)](https://vuex.vuejs.org/en/intro.html) "https://vuex.vuejs.org/en/intro.html)")&[vue-router]([https://router.vuejs.org/en/)](https://router.vuejs.org/en/) "https://router.vuejs.org/en/)"). - A Snipcart account (forever free in Test mode).
Run these:
npm install --save pug npm install --save vuex-router-sync npm
install --save copy-webpack-plugin npm install --save babel-polyfill
2. Assembling the architecture
Installs: check. Time to set everything so it can handle the store’s data.
Let’s start with vuex store. You’ll use this to store/access our products info.
For this demo, I’ll use static data, although this would still work if you were to fetch it instead.
Note*: with Snipcart, we inject the cart with* a basic JS snippet, and define products in the markup with simple HTML attributes.
2.1 Building the store
Create a store folder in the src one, along with 3 files:
- Minimal knowledge of Vue.js — start here.
- Basic understanding of
[vuex]([https://vuex.vuejs.org/en/intro.html)](https://vuex.vuejs.org/en/intro.html) "https://vuex.vuejs.org/en/intro.html)")&[vue-router]([https://router.vuejs.org/en/)](https://router.vuejs.org/en/) "https://router.vuejs.org/en/)"). - A Snipcart account (forever free in Test mode).
//state.js
export const state = {
    products: [
        {
            id: 1,
            name: 'The Square Pair',
            price: 100.00,
            description: 'Bold & solid.',
            image: 'https://snipcart.com/media/10171/glasses1.jpeg'
        },
        {
            id: 2,
            name: 'The Hip Pair',
            price: 110.00,
            description: 'Stylish & fancy.',
            image: 'https://snipcart.com/media/10172/glasses2.jpeg'
        },
        {
            id: 3,
            name: 'The Science Pair',
            price: 30,
            description: 'Discreet & lightweight.',
            image: 'https://snipcart.com/media/10173/glasses3.jpeg'
        }
    ]
}


//getters.js
    export const getters = {
        getProductById: (state, getters) => (id) => {
            return state.products.find(product => product.id == id)
        }
    }


//index.js
import Vue from 'vue'
import Vuex from 'vuex'
import { state } from './state.js'
import { getters } from './getters.js'


Vue.use(Vuex)


export default new Vuex.Store({
  state,
  getters
})
2.2 Building the router
Let’s keep the store basic: a homepage listing products + a details page for each product. You’ll need to register two routes in the router to handle these:
import VueRouter from 'vue-router'
import Vue from 'vue'
import ProductDetails from './../components/productdetails.vue'
import Home from './../components/home.vue'


Vue.use(VueRouter)


export default new VueRouter({
  mode: 'history',
  routes: [
    { path: '/products/:id', component: ProductDetails },
    { path: '/', component: Home },
  ]
})
These components haven’t been created yet, but no worries, they’re coming later. ;)
Note that I employed mode: 'history' in my VueRouter declaration. This is important, as the prerender plugin won’t work otherwise. The difference is that the router will use the history API instead of hashbangs to navigate.
2.3 Linking everything together
Now that you have both your store and your router, you’ll need to register them in the app. Hop in your src/main.js file and update it as follows:
import Vue from 'vue'
import App from './App.vue'
import router from './router'
import { sync } from 'vuex-router-sync'
import store from './store'


sync(store, router)


new Vue({
  store,
  router,
  render: h => h(App)
}).$mount('#app')
Quite simple, right? As mentioned earlier, the sync method from the vuex-router-sync package injects some of the current route information in the store state. It’ll be helpful later on.
3. Crafting the Vue components
Having data feels awesome, but showing it is even better. You can use three components to achieve that:
- Minimal knowledge of Vue.js — start here.
- Basic understanding of
[vuex]([https://vuex.vuejs.org/en/intro.html)](https://vuex.vuejs.org/en/intro.html) "https://vuex.vuejs.org/en/intro.html)")&[vue-router]([https://router.vuejs.org/en/)](https://router.vuejs.org/en/) "https://router.vuejs.org/en/)"). - A Snipcart account (forever free in Test mode).
Each of them will be in the src/components folder.
//Home.vue


<template lang="pug">
    div(class="products")
        div(v-for="product in products", class="product")
            product(:product="product")
</template>


<script>
import Product from './../components/Product.vue'


export default {
  name: 'home',
  components: { Product },
  computed: {
    products(){
      return this.$store.state.products
    }
  }
}
</script>
Above, the store state is used to get products and iterate on them to render a product component for each one.
//Product.vue
<template lang="pug">
  div(class="product")
   router-link(v-bind:to="url").product
      img(v-bind:src="product.image" v-bind:alt="product.name" class="thumbnail" height="200")
      p {{ product.name }}

    button(class="snipcart-add-item"
      v-bind:data-item-name="product.name"
      v-bind:data-item-id="product.id"
      v-bind:data-item-image="product.image"
      data-item-url="/"
      v-bind:data-item-price="product.price")
        | Buy it for {{ product.price }}$

</template>


<script>
export default {
  name: 'Product',
  props: ['product'],
  computed: {
    url(){
      return `/products/${this.product.id}`
    }
  }
}
</script>
You link to each page, handled by your router, which brings us to your last component.
//ProductDetails.vue
<template lang="pug">
  div(class="product-details")

    img(v-bind:src="product.image" v-bind:alt="product.name" class="thumbnail" height="200")

    div(class="product-description" v-bind:href="url")
      p {{ product.name }}
      p {{ product. description}}


      button(class="snipcart-add-item"
        v-bind:data-item-name="product.name"
        v-bind:data-item-id="product.id"
        v-bind:data-item-image="product.image"
        data-item-url="/"
        v-bind:data-item-price="product.price")
          | Buy it for {{ product.price }}$


</template>


<script>
export default {
  name: 'ProductDetails',
  computed: {
    id(){
      return this.$store.state.route.params.id
    },
    product(){
      return this.$store.getters.getProductById(this.id)
    }
  }
}
</script>
This one has a little more logic than the others. You get the current ID from the route and then get the associated product from the getter previously created.
4. Creating the app
Let’s use your new components, yeah?
Open the App.vue file. Content in there is still the default one generated from the vue init webpack-simple scaffolding.
Swap everything to this instead:
<template lang="pug">
  div(id="app")
    TopContext
    router-view


</template>


<script>
import TopContext from './components/TopContext.vue'


export default {
  name: 'app',
  components: { TopContext }
}
</script>
The TopContext component isn’t really important: it acts only as a header. The key part is the router-view one: it will be determined dynamically by VueRouter, and the associated component defined earlier will be injected instead.
The last view to update is the index.html. For this use case, let’s create a new static folder in the src one. There, you’ll move the index file, and update as follows:
<!DOCTYPE html>
  <html lang="en">
  <head>
    <meta charset="utf-8">
    <title>vue-snipcart</title>
  </head>


  <body>

    <div id="app">
    </div>

    <script src="/build.js"></script>
    <script src="https://ajax.googleapis.com/ajax/libs/jquery/2.2.2/jquery.min.js"></script>
    <script src="https://cdn.snipcart.com/scripts/2.0/snipcart.js" data-api-key="YjdiNWIyOTUtZTIyMy00MWMwLTkwNDUtMzI1M2M2NTgxYjE0" id="snipcart"></script>
    <link href="https://cdn.snipcart.com/themes/2.0/base/snipcart.min.css" rel="stylesheet" type="text/css" />
  </body>
</html>
You can see I added Snipcart’s necessary scripts in the default view. A small component granularly including them could have been cleaner, but since all the views need them, I did it this way.
5. Handling Vue.js SEO with the Prerender plugin
Everything in the app is rendered dynamically with JS, which isn’t super for SEO: the asynchronous content of pages can’t be optimally crawled by search engine bots. It wouldn’t be smart to have an e-commerce website missing out on all that organic traffic opportunity!
Let’s use prerendering to bring more SEO opportunities to your Vue.js app.
Compared to Vue SSR (Server-Side Rendering), prerendering is much easier to set up. And quite frankly, the former is often overkill, unless you’re dealing with lots of routes. Plus, both achieve quite similar results on an SEO level.
Prerendering will allow you to keep your front end as a fast, light static site that’s easily crawlable.
Let’s see how you can use it. Go to your webpack file and add the following declaration to your top level export:
plugins: [
  new CopyWebpackPlugin([{
    from: 'src/static'
  }]),
  new PrerenderSpaPlugin(
    path.join(__dirname, 'dist'),
    [ '/', '/products/1', '/products/2', '/products/3']
  )
]
Okay, so how does this work?
The CopyWebpackPlugin will copy your static folder (only containing the view referencing our Vue App) to your dist folder. Then, the PrerenderSpaPlugin will use PhantomJS to load the content of your pages and use the results as static assets.
And voilà! You’ve now got prerendered, SEO-friendly product pages for a Vue app.
You can test it yourself with the following command:
npm run build
This will generate a dist folder containing everything needed for production.
Other important SEO considerations
- How to build a lean web app with Vue.js
- How to handle Vue.js SEO & prerendering with
[prerender-spa-plugin]([https://github.com/chrisvfritz/prerender-spa-plugin)](https://github.com/chrisvfritz/prerender-spa-plugin) "https://github.com/chrisvfritz/prerender-spa-plugin)")
Conclusion
Since I had worked with Vue before, crafting this tutorial went rather smoothly. I must’ve spent an hour on the demo. I struggled a bit to get CopyWebpackPlugin to work, but eventually found answers in their docs.
I hope this post encourages developers to start using Vue in some projects. Like I said, you can start slowly, by developing a tiny part of an existing project with it. I think it’s definitely worth a try. Our lead developer is coding our latest merchant dashboard feature with Vue as I’m writing this, and he loves it. Plus, when set up right, a Vue app can drive good SEO results.
If you feel like getting inspired first, check out the Vue.js Awesome list, which curates loads of Vue examples & projects.
Recommended Courses:
Vue JS: From Beginner to Professional ☞ https://goo.gl/YYz6TC
Real Time Chat With Laravel Broadcast, Pusher and Vuejs ☞ https://goo.gl/yVkCnd
Vue JS 2.0 - Mastering Web Apps ☞ https://goo.gl/FMpDgr
☞ How to Creat a Task Management App Using Vue.js and a Node.js
☞ Five tools to speed the development of your Vue.js applications.
☞ How to get data attribute value in Vue.js?
☞ Vue.js Firebase Tutorial: Build Firestore CRUD Web Application
☞ Using Stateless Components in Vue.js
#vue-js #javascript