6 Ways to Import SVGs in Next.js Apps
Learn 6 ways to import SVGs in Next.js applications. This article will help you choose the right method for your needs.
Importing SVGs into Next.js apps is a common necessity with frontend projects today. With the level of support the SVG format has from a large proportion of libraries and its many benefits regarding scalability, performance, and flexibility, it’s important to know how to use them.
Though our primary focus will be on SVGs, most of the packages we will highlight in this post also apply to other image formats. We will additionally examine some common errors you may encounter when importing SVGs into your Next.js projects and how to remedy them. This article will explore the different methods you can use to import and use SVGs in a Next.js application. Let’s get started.
Contents:
- Understanding SVGs in Next.js
- Benefits of using SVGs
- How to import SVGs in Next.js
- Embed SVGs using JSX syntax in a React component
- How to load SVGs in Next.js using the
next/imagecomponent - How to import SVGs in Next.js using the next-images package
- How to import SVGs in Next.js using SVGR
- How to load SVGs in Next.js using babel-plugin-inline-react-svg
- How to use SVGs with the
imgtag
- Comparing options for importing SVGs in Next.js
Understanding SVGs in Next.js
Scalable Vector Graphics, better known as SVGs, are among the most popular image formats because they are lightweight, scalable, and capable of animating. Despite the popularity of SVG images, their usage is not straightforward, particularly with frontend frameworks like React and Next.js, which use package bundlers. Consequently, it’s not uncommon to encounter different errors while attempting to import or use an SVG image in a Next.js or React application.
Benefits of using SVGs
As hinted above, SVGs are among the most popular image formats on the web today. As opposed to their raster image equivalents, vector images have immense benefits. Before we learn how to import SVGs in a Next.js application, let’s explore some of the benefits of using SVGs:
- SVGs are lightweight: Vector-based images take less storage space and memory than bitmap images
- They are animatable: It is possible to animate and manipulate SVGs using modern CSS and JavaScript
- SVGs are scalable: SVGs are resolution independent. You can resize them without compromising image quality
- They are accessible: SVGs are XML-based. You can add content inside the markup directly to increase accessibility
- SVGs are SEO-friendly: SVGs are SEO-friendly because search engines like Google can search, index, and crawl them
With the above benefits, you must understand how to add them to your projects.
How to import SVGs in Next.js
Vercel, the company behind Next.js, provides a complete platform and a suite of software packages within its ecosystem for you to build and host full-stack applications using Next.js. For any problem you encounter while using Next.js, you will almost always find a solution within the Next.js ecosystem.
Every standard Next.js project comes with a built-in next/image component to work with images. You can use the next/image component for bitmap and vector images. Therefore, when using SVGs or other image formats in a Next.js application, the built-in next/image component will almost always be your first choice.
Though the built-in next/image component is highly performant and optimized, and is the recommended solution for SVGs and other image formats in Next.js, it is by no means the only solution. There are other methods of importing and using SVGs in Next.js if the built-in next/image component doesn’t work for you.
You can render your SVG image inline as a JSX element or import and render it using a third-party package. We will explore the different ways you can import and use SVGs in a Next.js application in this section.
Embed SVGs using JSX syntax in a React component
One of the easiest ways of using an SVG in a React component is to embed it inline. However, this requires you to convert the SVG elements to JSX syntax. There are several online tools for transforming an SVG image markup to JSX syntax — one such tool is SVGR.
SVGR converts the SVG to JSX syntax and wraps it in a React functional component, like so:
const TwitterIcon = ({ props }) => (
<svg xmlns="http://www.w3.org/2000/svg" width={48} height={48} {...props}>
<linearGradient
id="a"
x1={10.341}
x2={40.798}
y1={8.312}
y2={38.769}
gradientUnits="userSpaceOnUse"
>
<stop offset={0} stopColor="#2aa4f4" />
<stop offset={1} stopColor="#007ad9" />
</linearGradient>
<path
fill="url(#a)"
d="M46.105 ..."
/>
</svg>
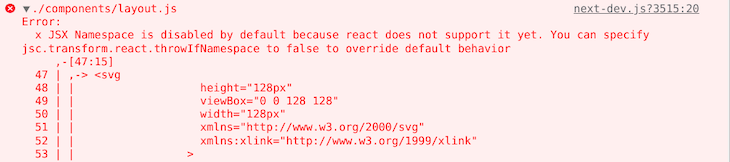
)You may encounter the following error if you don’t convert your SVG to JSX syntax before embedding it in a React component, so always be sure to use a tool like SVGR:

You may also get the error below in Next.js instead of the above error:
How to load SVGs in Next.js using the next/image component
The next/image component is the de facto component for loading and rendering images — including SVGs — in Next.js. This component efficiently loads and renders images and can optimize your images for faster page loading, performance, and visual stability. It is an extension of the HTML image element.
If you have set up a Next.js application using the Create React App command line tool, the next/image component should be available for your application. With local SVG images, you can import and use the next/image component as in the example below:
import Image from 'next/image';
import twitterIcon from "../../public/images/twitter-icon.svg";

const App = () => (
  <div>
    <Image
      priority
      src={twitterIcon}
      alt="Follow us on Twitter"
    />
  </div>
);
You don’t need to specify the width and height props because Next.js will determine their values out of the box. On the other hand, for remote images, the src property should be an absolute or relative URL string. You should set the height and width properties like in the example below:
import Image from 'next/image';

const App = () => (
  <div>
    <Image
      priority
      src="/images/twitter-icon.svg"
      height={32}
      width={32}
      alt="Follow us on Twitter"
    />
  </div>
);
As you use the next/image component, be aware that Next.js serves static assets, such as images from a public directory in your project’s root directory. Therefore, in the example above, the twitter-icon.svg file must be in the images directory in your public directory.
Next.js will import the icon and render it in the browser like the image below:
![]()
You can pass several props to the next/image component. Check the next/image component documentation for a complete list of the required and optional props. In this section, our focus is on using the next/image component to import and render SVGs in a Next.js application.
There are several features of the next/image component and image optimization techniques in Next.js that we haven’t explored in this article. Check the Next.js documentation to learn more about them.
How to import SVGs in Next.js using the next-images package
The next-images package is a third-party package for importing images in Next. You can use it instead of the built-in next/image component described above. With next-images, you can load images from your local machine or CDN. In addition, you can also use it to embed images with small bundle sizes in Base64 encoding and cache images by adding a content hash to image names. Like any other npm package, install next-images from the npm package registry using the following command:
# NPM
npm install next-images

# Yarn
yarn add next-images
After installation, create a next.config.js file at the root of your project directory and add the following basic configuration:
const withImages = require('next-images');
module.exports = withImages();
After adding the necessary configuration to the next.config.js file, as described above, you can import the SVG into your component and render it, as shown here:
import twitterIcon from "./twitter-icon.svg";

const App = () => <img src={twitterIcon} alt="Follow us on Twitter" />;
When using the next-images package, you can load images from a file in your project directory or a CDN. Unlike the built-in next/images component and other third-party packages, the next-images package doesn’t support image optimization techniques such as compression and resizing out-of-the-box.
How to import SVGs in Next.js using SVGR
As previously mentioned, SVGR is a third-party package for converting an SVG image to a React component. Several popular React project template creators, like Create React App, actually use SVGR under the hood. Install it as a development dependency to start importing SVGs as React components in your Next.js application:
# NPM
npm install --save-dev @svgr/webpack

# Yarn
yarn add --dev @svgr/webpack
After installation, create a next.config.js file at the root of your project directory and add the following basic webpack configuration:
module.exports = {
  webpack(config) {
    config.module.rules.push({
      test: /\.svg$/i,
      issuer: /\.[jt]sx?$/,
      use: ['@svgr/webpack'],
    })

    return config
  },
}
You can now import the SVG as a React component and render it in your Next.js application. Here’s how that should look:
import TwitterIcon from "./twitter-icon.svg";
const Example = () => <TwitterIcon />;
How to load SVGs in Next.js using babel-plugin-inline-react-svg
Instead of importing SVG images using the SVGR package as in the previous sub-section, it is also possible to use a Babel plugin to achieve the same effect. To start using babel-plugin-inline-react-svg, install it as a development dependency from the npm package registry using this command:
npm i -D babel-plugin-inline-react-svgAfter installation, create a .babelrc or babel.config.json configuration file at the root of your project directory. You can copy and paste the code from the block below into it. If you have a Babel configuration file, Next.js will treat it as the ultimate source of truth.
An ordinary Next.js project setup using Create React App will include the built-in next/babel preset. Because Next.js will treat a .babelrc or babel.config.json file at the root of your project directory as the primary source of information, it must have everything you will need — including those that Next.js needs. Refer to the following code:
{
  "presets": ["next/babel"],
  "plugins": ["inline-react-svg"]
}
After you’ve done this, you can import SVG images as React components and render them in your Next.js application:
import TwitterIcon from "./twitter-icon.svg"; const Example = () => <TwitterIcon />;
How to use SVGs with the img tag
The simplest way of using SVGs in a React or Next application is the img tag, as in a regular HTML file. However, as hinted above, Next.js looks for static assets like images in the public directory in your application’s root directory. Be sure all the images you want to bundle with your application are in the public directory at build time.
You can also host the image on a different server and reference it using the image URL. The usage of the <img/> tag in Next.js is similar to the usage of the HTML img element. The src and alt attributes are required, as shown below:
<img src="public/twitter-icon.svg" alt="Follow us on Twitter" />Comparing options for importing SVGs in Next.js
Next.js has excellent built-in functionality for loading and rendering several image formats, including SVGs. The next/image component is an extension of the HTML image element. It loads images efficiently while also offering inbuilt performance optimizations, and using next-image results in faster page loads and improved performance.
Therefore, the built-in next/image component has all the features you need to load and render SVGs efficiently in a Next.js application. It is part of any Next application created using the Create React App command line tool.
As mentioned above, you can also embed SVGs inline. However, embedded SVGs make React components difficult to read and maintain. They can increase the size of your React component, and you miss the benefits of the built-in next/image component.
You can also explore the third-party options I have highlighted in this article. As hinted above, when using the next-images package, it is possible to use Base64 encoding to reduce HTTP requests. However, next-images doesn’t perform inbuilt image optimization and compression like the built-in next/image component.
You should also be aware of the downsides of using third-party packages in your application. They add an extra bundle to your application, which you can avoid by using next/image. You also need to consider the long-term maintenance, security, and licensing requirements of a third-party package. Use a third-party package only if it has features that don’t exist natively.
Conclusion
I hope this article has demonstrated the various methods for importing and using SVGs and images in Next.js applications. The built-in next/image component has all the features you need to efficiently import and use images in a Next.js application.
If the built-in next/image component doesn’t meet your needs, you can also explore the third-party packages highlighted above. However, always carefully consider the maintenance, security, and licensing of third-party packages before using them in your project. Leave a comment in the comments section below if I have missed anything or about your own experiences importing and using SVGs!
Source: https://blog.logrocket.com
#svgs #nextjs