Recently, I was working on a web-based project, which was implemented using AWS, python3-serverless backend, and Angular frontend. While working on this project, I had to do a file uploading task to AWS S3 bucket. So I used presigned Urls to upload my files which was quite an easy option. So what’s behind this trick? Let’s dive in!
What is a PreSigned Url?
If you are someone who is familiar with AWS you know that by default S3 buckets are private. Pre signed URLs are coming into action in this place where we do not have credentials to access the S3 bucket. The beauty of this is that users are able to upload a specific file/object to a bucket without having AWS credentials. That means that one of the most important features of pre-signed URLs is that we do not want to keep our AWS credentials in the browser side to access the S3 bucket. But it is obvious that we need AWS credentials to generate the pre-signed URL. Okay, I think you have the idea now. To get an even better idea, let’s check out the architecture behind this technique.
Let’s observe the magic
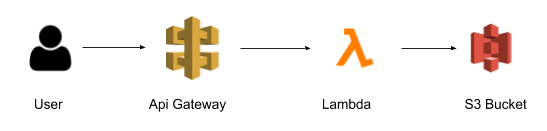
Getting preSigned url
- The user will hit the api at the AWS API gateway to get a pre-signed URL.
- Api gateway will forward the request to lambda.
- Lambda will call S3 to get pre-signed URL.
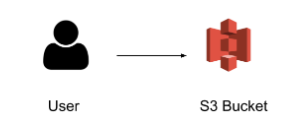
Uploading file directly using presigned url
- After the user received the URL they can upload the file directly to the S3 bucket.
#aws #s3-bucket #python3 #angular #serverless