Apache Kafka Handbook: The Complete Guide to Getting Started
Learn how to use Apache Kafka to build scalable real-time applications. This handbook provides a complete guide to getting started with Kafka, including installation, configuration, and usage.
Apache Kafka is an open-source event streaming platform that can transport huge volumes of data at very low latency.
Companies like LinkedIn, Uber, and Netflix use Kafka to process trillions of events and petabtyes of data each day.
Kafka was originally developed at LinkedIn, to help handle their real-time data feeds. It's now maintained by the Apache Software Foundation, and is widely adopted in industry (being used by 80% of Fortune 100 companies).
Why Should You Learn Apache Kafka?
Kafka lets you:
- Publish and subscribe to streams of events
- Store streams of events in the same order they happened
- Process streams of events in real time
The main thing Kafka does is help you efficiently connect diverse data sources with the many different systems that might need to use that data.
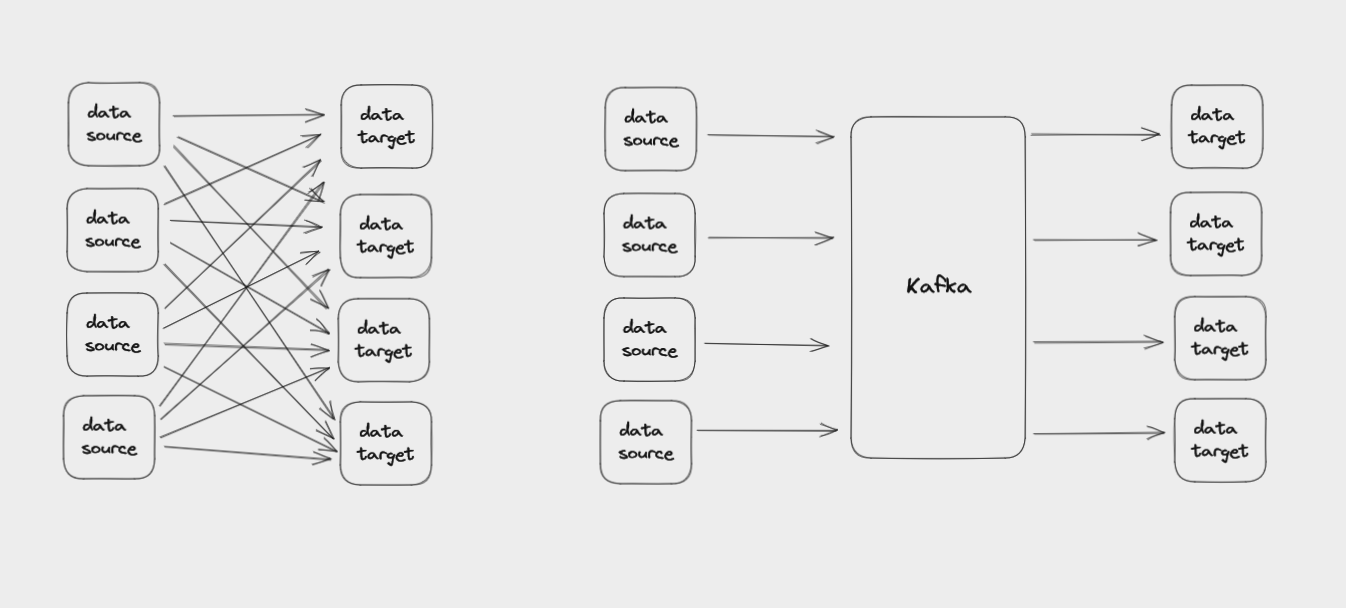
Kafka helps you connect data sources to the systems using that data
Some of the things you can use Kafka for include:
- Personalizing recommendations for customers
- Notifying passengers of flight delays
- Payment processing in banking
- Online fraud detection
- Managing inventory and supply chains
- Tracking order shipments
- Collecting telemetry data from Internet of Things (IoT) devices
What all these uses have in common is that they need to take in and process data in real time, often at huge scales. This is something Kafka excels at. To give one example, Pinterest uses Kafka to handle up to 40 million events per second.
Kafka is distributed, which means it runs as a cluster of nodes spread across multiple servers. It's also replicated, meaning that data is copied in multiple locations to protect it from a single point of failure. This makes Kafka both scalable and fault-tolerant.
Kafka is also fast. It's optimized for high throughput, making effective use of disk storage and batched network requests.
This article will:
- Introduce you to the core concepts behind Kafka
- Show you how to install Kafka on your own computer
- Get you started with the Kafka Command Line Interface (CLI)
- Help you build a simple Java application that produces and consumes events via Kafka
Things the article won't cover:
- More advanced Kafka topics, such as security, performance, and monitoring
- Deploying a Kafka cluster to a server
- Using managed Kafka services like Amazon MSK or Confluent Cloud
Table of Contents
- Event Streaming and Event-Driven Architectures
- Core Kafka Concepts
a. Event Messages in Kafka
b. Topics in Kafka
c. Partitions in Kafka
d. Offsets in Kafka
e. Brokers in Kafka
f. Replication in Kafka
g. Producers in Kafka
h. Consumers in Kafka
i. Consumer Groups in Kafka
j. Kafka Zookeeper - How to Install Kafka on Your Computer
- How to Start Zookeeper and Kafka
- The Kafka CLI
a. How to List Topics
b. How to Create a Topic
c. How to Describe Topics
d. How to Partition a Topic
e. How to Set a Replication Factor
f. How to Delete a Topic
g. How to usekafka-console-producer
h. How to usekafka-console-consumer
i. How to usekafka-consumer-groups - How to Build a Kafka Client App with Java
a. How to Set Up the Project
b. How to Install the Dependencies
c. How to Create a Kafka Producer
d. How to Send Multiple Messages and Use Callbacks
e. How to Create a Kafka Consumer
f. How to Shut Down the Consumer - Where to Take it From Here
Before we dive into Kafka, we need some context on event streaming and event-driven architectures.
Event Streaming and Event-Driven Architectures
An event is a record that something happened, as well as information about what happened. For example: a customer placed an order, a bank approved a transaction, inventory management updated stock levels.
Events can triggers one or more processes to respond to them. For example: sending an email receipt, transmitting funds to an account, updating a real-time dashboard.
Event streaming is the process of capturing events in real-time from sources (such as web applications, databases, or sensors) to create streams of events. These streams are potentially unending sequences of records.
The event stream can be stored, processed, and sent to different destinations, also called sinks. The destinations that consume the streams could be other applications, databases, or data pipelines for further processing.
As applications have become more complex, often being broken up into different microservices distributed across multiple data centers, many organizations have adopted an event-driven architecture for their applications.
This means that instead of parts of your application directly asking each other for updates about what happened, they each publish events to event streams. Other parts of the application continuously subscribe to these streams and only act when they receive an event that they are interested in.
This architecture helps ensure that if part of your application goes down, other parts won't also fail. Additionally, you can add new features by adding new subscribers to the event stream, without having to rewrite the existing codebase.
Core Kafka Concepts
Kafka has become one of the most popular ways to implement event streaming and event-driven architectures. But it does have a bit of a learning curve and you need to understand a couple of concepts before you can make effective use of it.
These core concepts are:
- event messages
- topics
- partitions
- offsets
- brokers
- producers
- consumers
- consumer groups
- Zookeeper
Event Messages in Kafka
When you write data to Kafka, or read data from it, you do this in the form of messages. You'll also see them called events or records.
A message consists of:
- a key
- a value
- a timestamp
- a compression type
- headers for metadata (optional)
- partition and offset id (once the message is written to a topic)
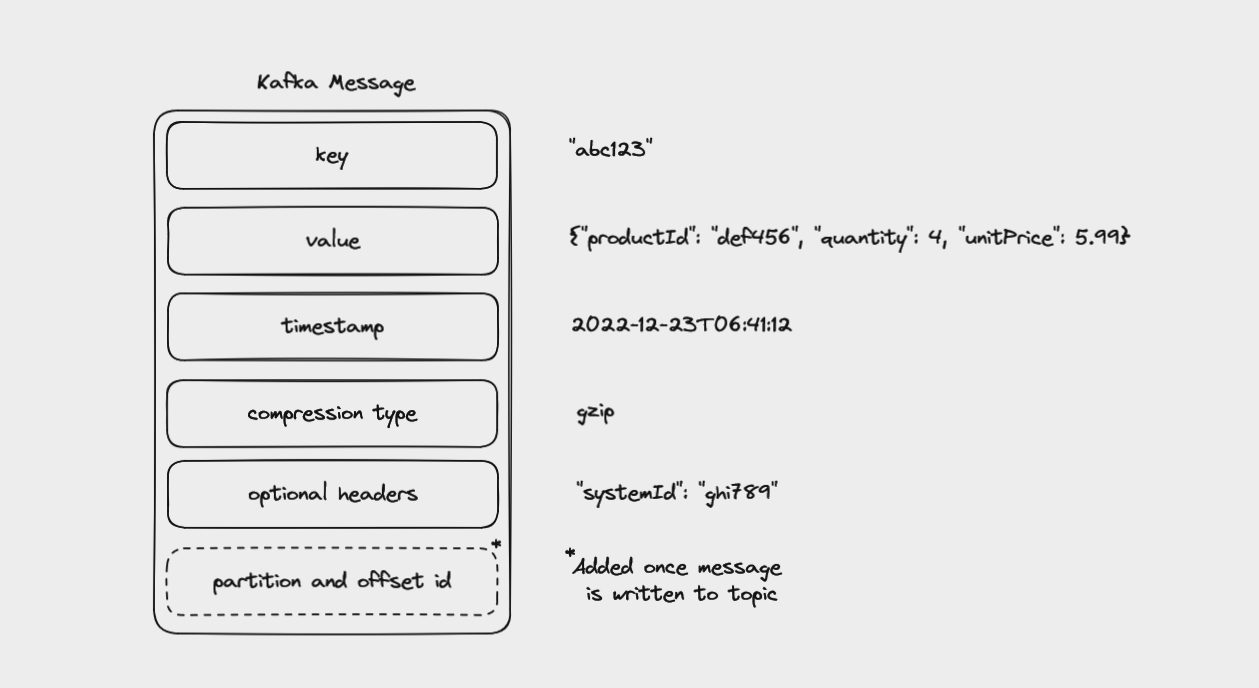
A Kafka message consisting of key, value, timestamp, compression type, and headers
Every event in Kafka is, at its simplest, a key-value pair. These are serialized into binary, since Kafka itself handles arrays of bytes rather than complex language-specific objects.
Keys are usually strings or integers and aren't unique for every message. Instead, they point to a particular entity in the system, such as a specific user, order, or device. Keys can be null, but when they are included they are used for dividing topics into partitions (more on partitions below).
The message value contains details about the event that happened. This could be as simple as a string or as complex as an object with many nested properties. Values can be null, but usually aren't.
By default, the timestamp records when the message was created. You can overwrite this if your event actually occurred earlier and you want to record that time instead.
Messages are usually small (less than 1 MB) and sent in a standard data format, such as JSON, Avro, or Protobuf. Even so, they can be compressed to save on data. The compression type can be set to gzip, lz4, snappy, zstd, or none.
Events can also optionally have headers, which are key-value pairs of strings containing metadata, such as where the event originated from or where you want it routed to.
Once a message is sent into a Kafka topic, it also receives a partition number and offset id (more about these later).
Topics in Kafka
Kafka stores messages in a topic, an ordered sequence of events, also called an event log.
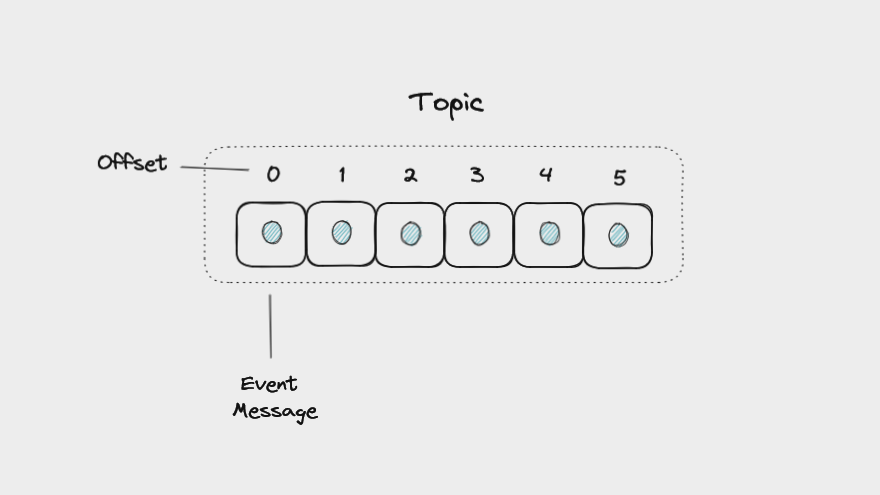
A Kafka topic containing messages, each with a unique offset
Different topics are identified by their names and will store different kinds of events. For example a social media application might have posts, likes, and comments topics to record every time a user creates a post, likes a post, or leaves a comment.
Multiple applications can write to and read from the same topic. An application might also read messages from one topic, filter or transform the data, and then write the result to another topic.
One important feature of topics is that they are append-only. When you write a message to a topic, it's added to the end of the log. Events in a topic are immutable. Once they're written to a topic, you can't change them.
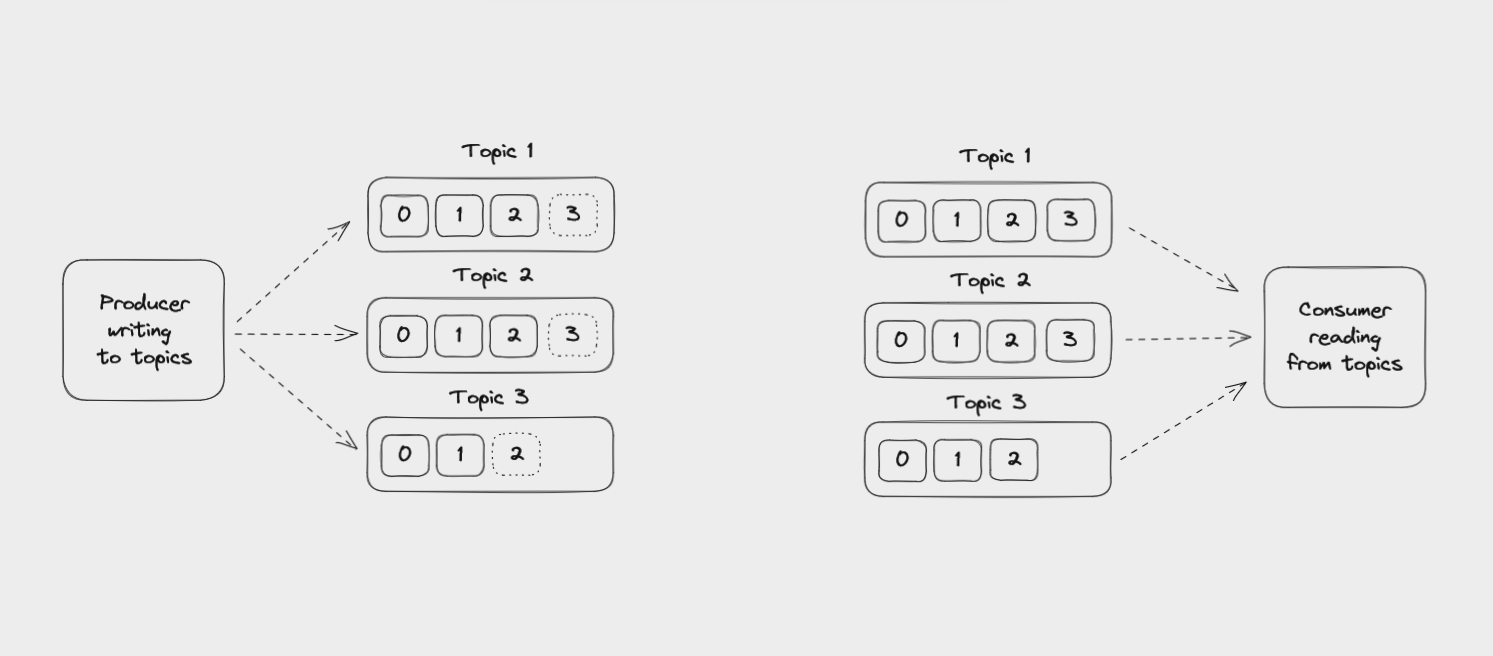
A Producer writing events to topics and a Consumer reading events from topics
Unlike with messaging queues, reading an event from a topic doesn't delete it. Events can be read as often as needed, perhaps several times by multiple different applications.
Topics are also durable, holding onto messages for a specific period (by default 7 days) by saving them to physical storage on disk.
You can configure topics so that messages expire after a certain amount of time, or when a certain amount of storage is exceeded. You can even store messages indefinitely as long as you can pay for the storage costs.
Partitions in Kafka
In order to help Kafka to scale, topics can be divided into partitions. This breaks up the event log into multiple logs, each of which lives on a separate node in the Kafka cluster. This means that the work of writing and storing messages can be spread across multiple machines.
When you create a topic, you specify the amount of partitions it has. The partitions are themselves numbered, starting at 0. When a new event is written to a topic, it's appended to one of the topic's partitions.
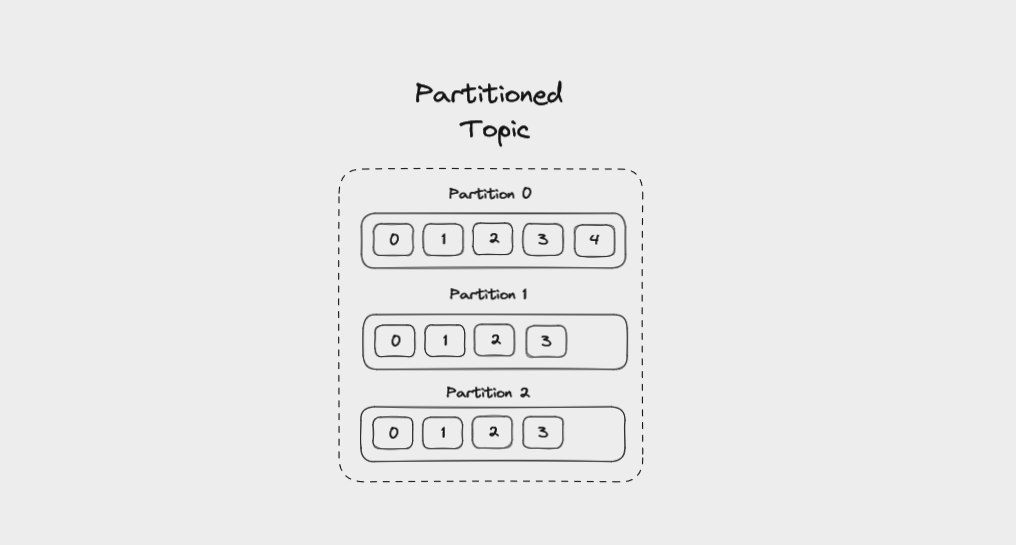
A topic divided into three partitions
If messages have no key, they will be evenly distributed among partitions in a round robin manner: partition 0, then partition 1, then partition 2, and so on. This way, all partitions get an even share of the data but there's no guarantee about the ordering of messages.
Messages that have the same key will always be sent to the same partition, and in the same order. The key is run through a hashing function which turns it into an integer. This output is then used to select a partition.
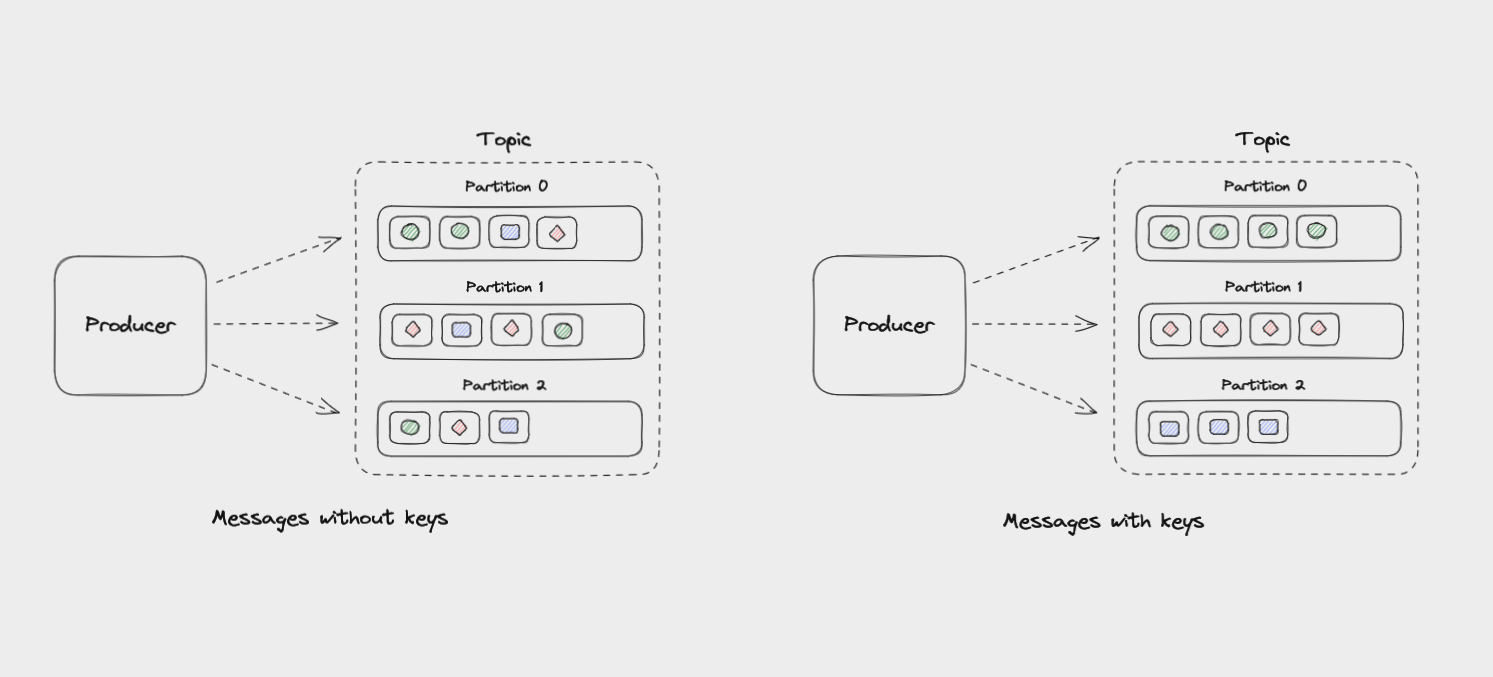
Messages without keys are sent across partitions, while messages with the same keys are sent to the same partition
Messages within each partition are guaranteed to be ordered. For example, all messages with the same customer_id as their key will be sent to the same partition in the order in which Kafka received them.
Offsets in Kafka
Each message in a partition gets an id that is an incrementing integer, called an offset. Offsets start at 0 and are incremented every time Kafka writes a message to a partition. This means that each message in a given partition has a unique offset.
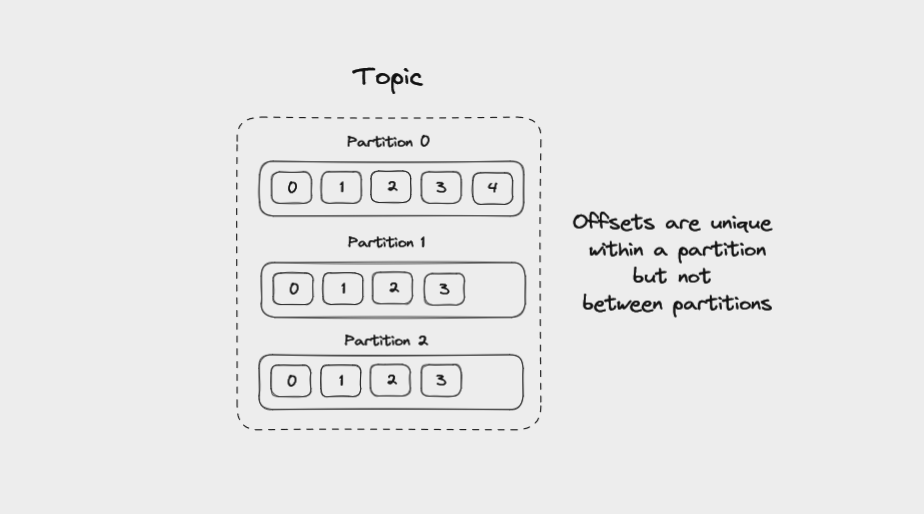
Offsets are unique within a partition but not between partitions
Offsets are not reused, even when older messages get deleted. They continue to increment, giving each new message in the partition a unique id.
When data is read from a partition, it is read in order from the lowest existing offset upwards. We'll see more about offsets when we cover Kafka consumers.
Brokers in Kafka
A single "server" running Kafka is called a broker. In reality, this might be a Docker container running in a virtual machine. But it can be a helpful mental image to think of brokers as individual servers.
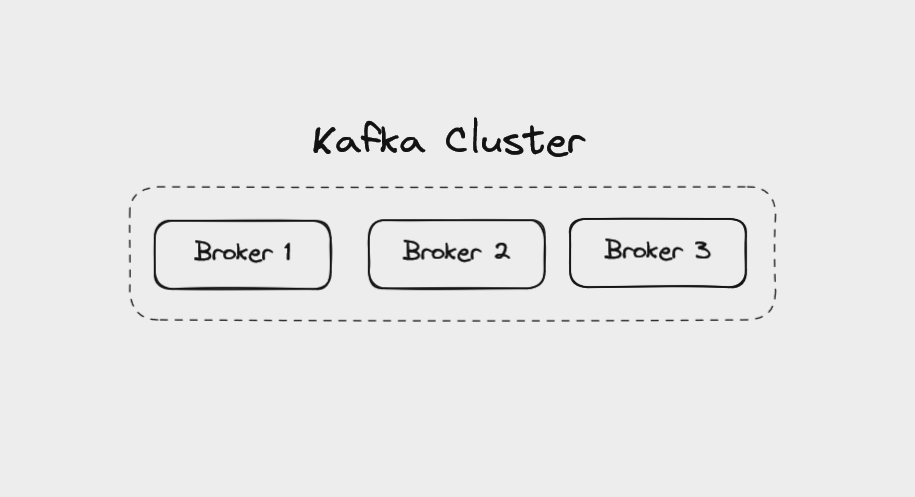
A Kafka cluster made up of three brokers
Multiple brokers working together make up a Kafka cluster. There might be a handful of brokers in a cluster, or more than 100. When a client application connects to one broker, Kafka automatically connects it to every broker in the cluster.
By running as a cluster, Kafka becomes more scalable and fault-tolerant. If one broker fails, the others will take over its work to ensure there is no downtime or data loss.
Each broker manages a set of partitions and handles requests to write data to or read data from these partitions. Partitions for a given topic will be spread evenly across the brokers in a cluster to help with load balancing. Brokers also manage replicating partitions to keep their data backed up.
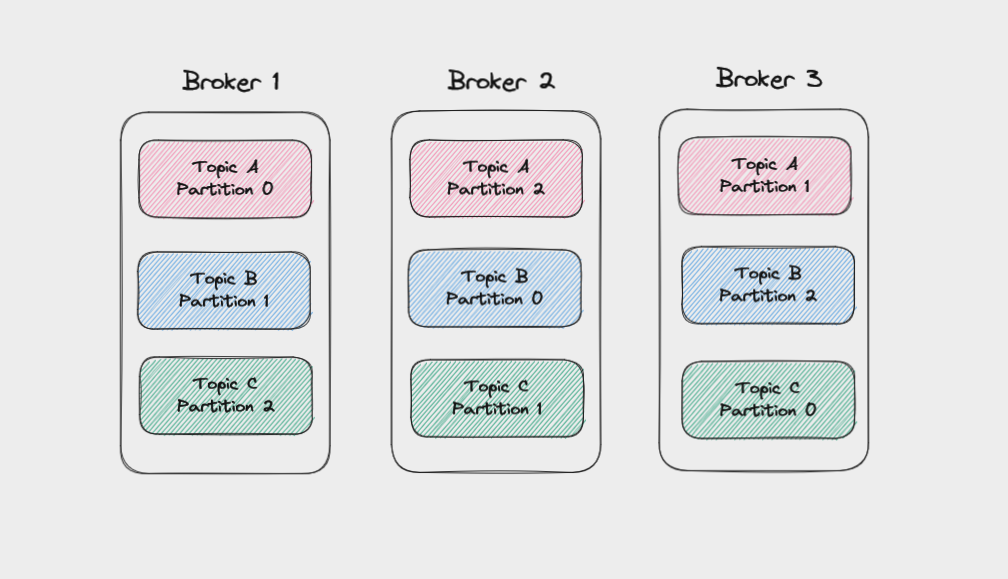
Partitions spread across brokers
Replication in Kafka
To protect against data loss if a broker fails, Kafka writes the same data to copies of a partition on multiple brokers. This is called replication.
The main copy of a partition is called the leader, while the replicas are called followers.
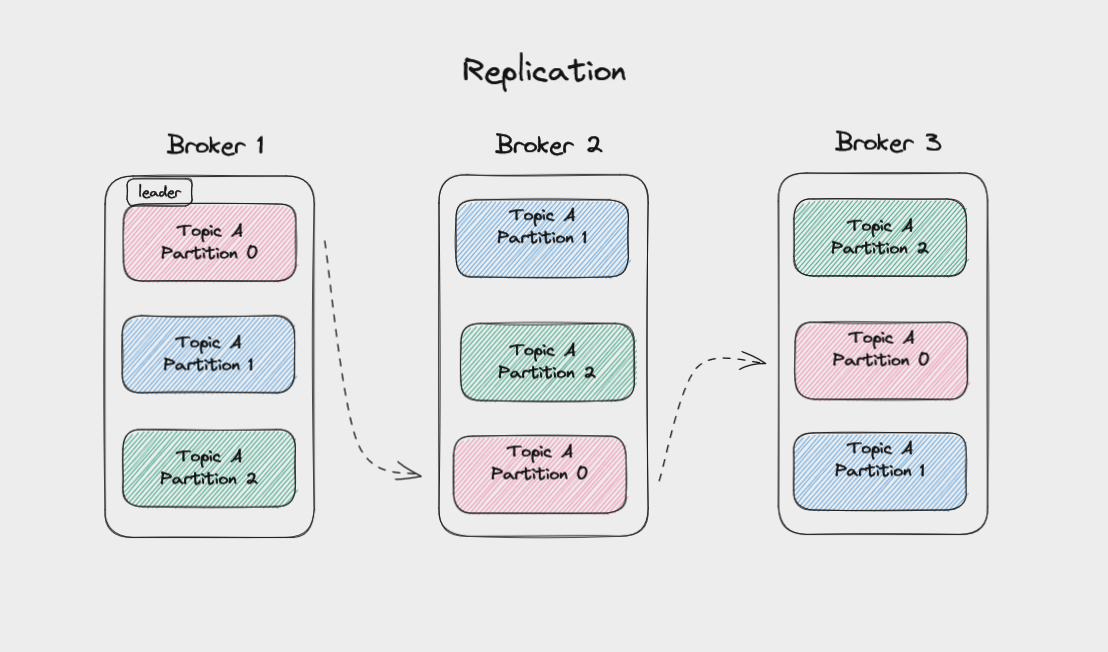
The data from the leader partition is copied to follower partitions on different brokers
When a topic is created, you set a replication factor for it. This controls how many replicas get written to. A replication factor of three is common, meaning data gets written to one leader and replicated to two followers. So even if two brokers failed, your data would still be safe.
Whenever you write messages to a partition, you're writing to the leader partition. Kafka then automatically copies these messages to the followers. As such, the logs on the followers will have the same messages and offsets as on the leader.
Followers that are up to date with the leader are called In-Sync Replicas (ISRs). Kafka considers a message to be committed once a minimum number of replicas have saved it to their logs. You can configure this to get higher throughput at the expense of less certainty that a message has been backed up.
Producers in Kafka
Producers are client applications that write events to Kafka topics. These apps aren't themselves part of Kafka – you write them.
Usually you will use a library to help manage writing events to Kafka. There is an official client library for Java as well as dozens of community-supported libraries for languages such as Scala, JavaScript, Go, Rust, Python, C#, and C++.
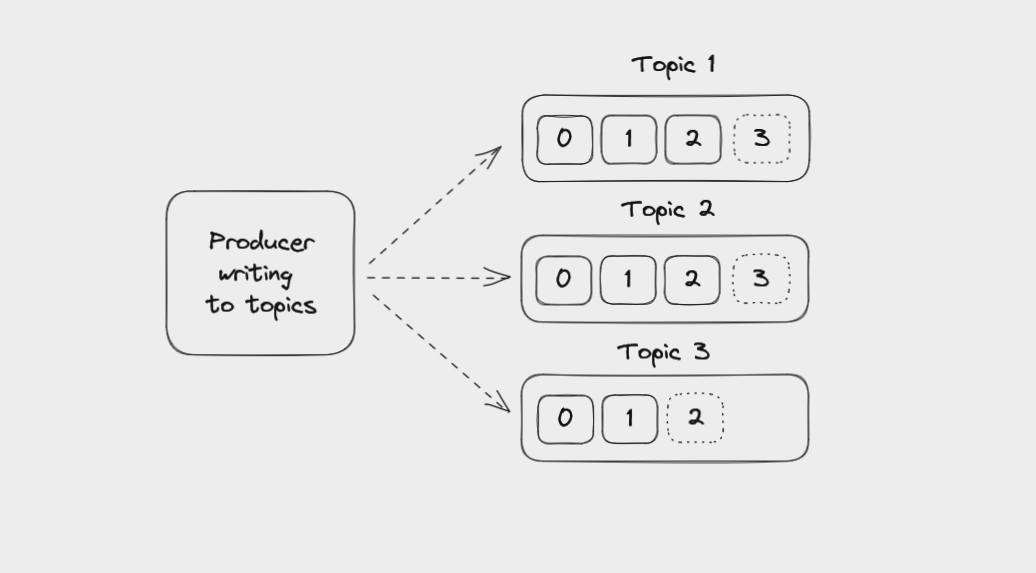
A Producer application writing to multiple topics
Producers are totally decoupled from consumers, which read from Kafka. They don't know about each other and their speed doesn't affect each other. Producers aren't affected if consumers fail, and the same is true for consumers.
If you need to, you could write an application that writes certain events to Kafka and reads other events from Kafka, making it both a producer and a consumer.
Producers take a key-value pair, generate a Kafka message, and then serialize it into binary for transmission across the network. You can adjust the configuration of producers to batch messages together based on their size or some fixed time limit to optimize writing messages to the Kafka brokers.
It's the producer that decides which partition of a topic to send each message to. Again, messages without keys will be distributed evenly among partitions, while messages with keys are all sent to the same partition.
Consumers in Kafka
Consumers are client applications that read messages from topics in a Kafka cluster. Like with producers, you write these applications yourself and can make use of client libraries to support the programming language your application is built with.
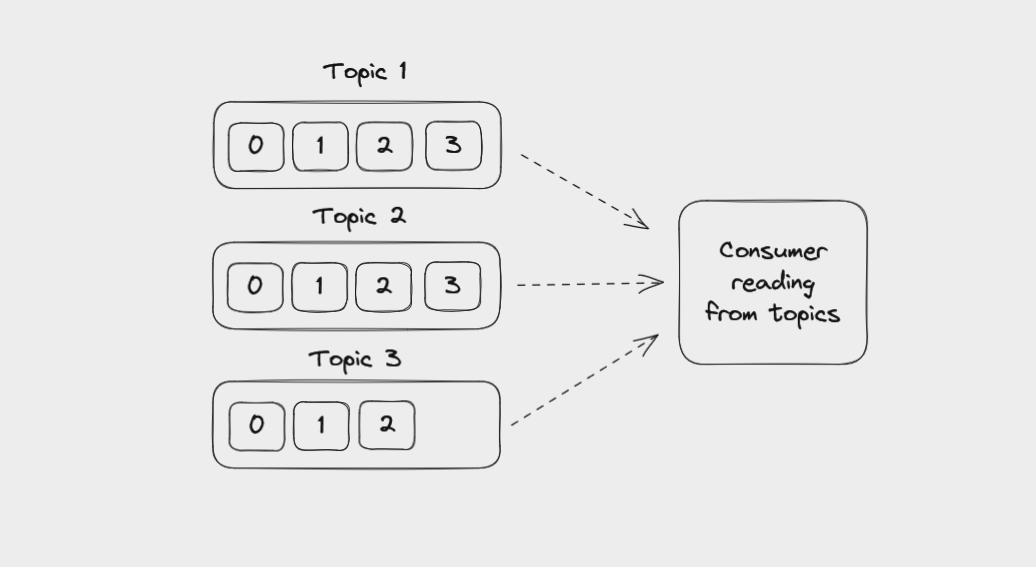
A Consumer reading messages from multiple topics
Consumers can read from one or more partitions within a topic, and from one or more topics. Messages are read in order within a partition, from the lowest available offset to the highest. But if a consumer reads data from several partitions in the same topic, the message order between these partitions is not guaranteed.
For example, a consumer might read messages from partition 0, then partition 2, then partition 1, then back to partition 0. The messages from partition 0 will be read in order, but there might be messages from the other partitions mixed among them.
It's important to remember that reading a message does not delete it. The message is still available to be read by any other consumer that needs to access it. It's normal for multiple consumers to read from the same topic if they each have uses for the data in it.
By default, when a consumer starts up it will read from the current offset in a partition. But consumers can also be configured to go back and read from the oldest existing offset.
Consumers deserialize messages, converting them from binary into a collection of key-value pairs that your application can then work with. The format of a message should not change during a topic's lifetime or your producers and consumers won't be able to serialize and deserialize it correctly.
One thing to be aware of is that consumers request messages from Kafka, it doesn't push messages to them. This protects consumers from becoming overwhelmed if Kafka is handling a high volume of messages. If you want to scale consumers, you can run multiple instances of a consumer together in a consumer group.
Consumer Groups in Kafka
An application that reads from Kafka can create multiple instances of the same consumer to split up the work of reading from different partitions in a topic. These consumers work together as a consumer group.
When you create a consumer, you can assign it a group id. All consumers in a group will have the same group id.
You can create consumer instances in a group up to the number of partitions in a topic. So if you have a topic with 5 partitions, you can create up to 5 instances of the same consumer in a consumer group. If you ever have more consumers in a group than partitions, the extra consumer will remain idle.
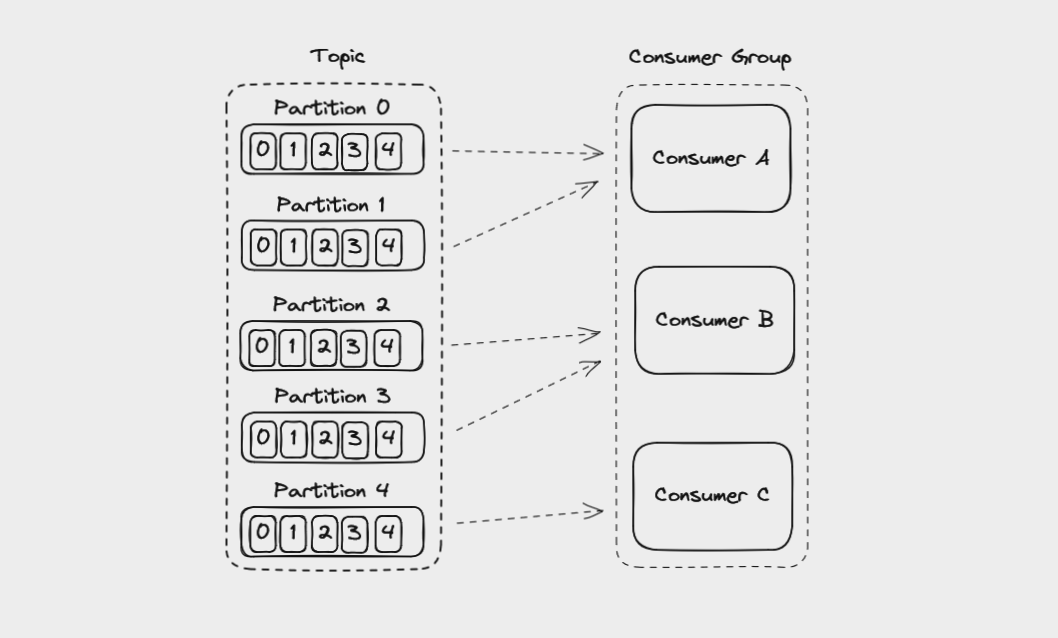
Consumers in a consumer group reading messages from a topic's partitions
If you add another consumer instance to a consumer group, Kafka will automatically redistribute the partitions among the consumers in a process called rebalancing.
Each partition is only assigned to one consumer in a group, but a consumer can read from multiple partitions. Also, multiple different consumer groups (meaning different applications) can read from the same topic at the same time.
Kafka brokers use an internal topic called __consumer_offsets to keep track of which messages a specific consumer group has successfully processed.
As a consumer reads from a partition, it regularly saves the offset it has read up to and sends this data to the broker it is reading from. This is called the consumer offset and is handled automatically by most client libraries.
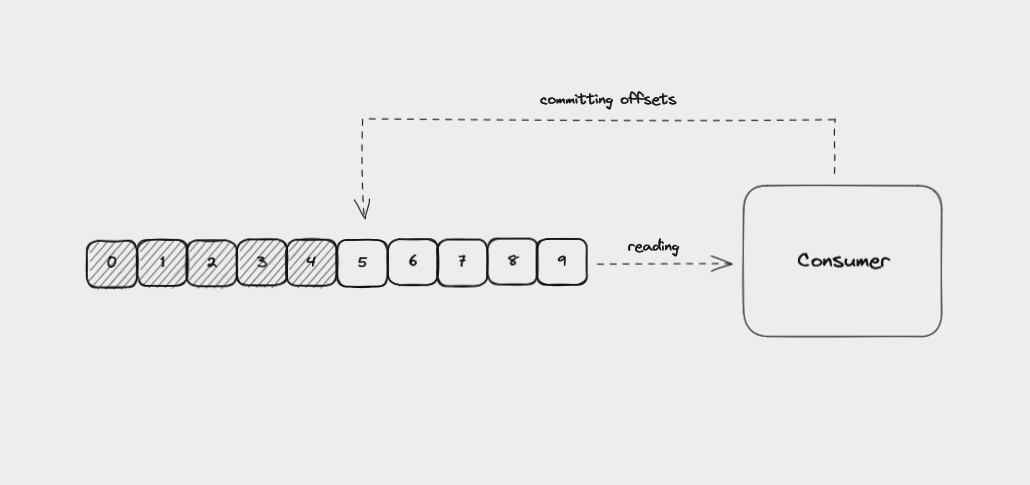
A Consumer committing the offsets it has read up to
If a consumer crashes, the consumer offset helps the remaining consumers to know where to start from when they take over reading from the partition.
The same thing happens if a new consumer is added to the group. The consumer group rebalances, the new consumer is assigned a partition, and it picks up reading from the consumer offset of that partition.
Kafka Zookeeper
One other topic that we briefly need to cover here is how Kafka clusters are managed. Currently this is usually done using Zookeeper, a service for managing and synchronizing distributed systems. Like Kafka, it's maintained by the Apache Foundation.
Kafka uses Zookeeper to manage the brokers in a cluster, and requires Zookeeper even if you're running a Kafka cluster with only one broker.
Recently, a proposal has been accepted to remove Zookeeper and have Kafka manage itself (KIP-500), but this is not yet widely used in production.
Zookeeper keeps track of things like:
- Which brokers are part of a Kafka cluster
- Which broker is the leader for a given partition
- How topics are configured, such as the number of partitions and the location of replicas
- Consumer groups and their members
- Access Control Lists – who is allowed to write to and read from each topic
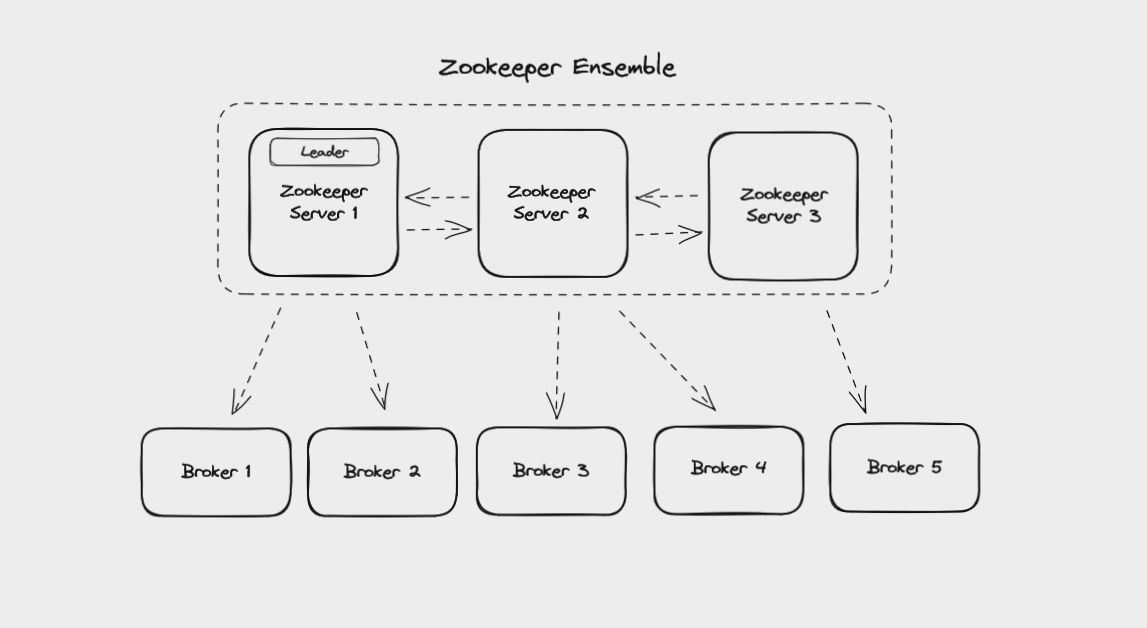
A Zookeeper ensemble managing the brokers in a Kafka cluster
Zookeeper itself runs as a cluster called an ensemble. This means that Zookeeper can keep working even if one node in the cluster fails. New data gets written to the ensemble's leader and replicated to the followers. Your Kafka brokers can read this data from any of the Zookeeper nodes in the ensemble.
Now that you understand the main concepts behind Kafka, let's get some hands-on practice working with Kafka.
You're going to install Kafka on your own computer, practice interacting with Kafka brokers from the command line, and then build a simple producer and consumer application with Java.
How to Install Kafka on Your Computer
At the time of writing this guide, the latest stable version of Kafka is 3.3.1. Check kafka.apache.org/downloads to see if there is a more recent stable version. If there is, you can replace "3.3.1" with the latest stable version in all of the following instructions.
Install Kafka on macOS
If you're using macOS, I recommend using Homebrew to install Kafka. It will make sure you have Java installed before it installs Kafka.
If you don't already have Homebrew installed, install it by following the instructions at brew.sh.
Next, run brew install kafka in a terminal. This will install Kafka's binaries at usr/local/bin.
Finally, run kafka-topics --version in a terminal and you should see 3.3.1. If you do, you're all set.
To make it easier to work with Kafka, you can add Kafka to the PATH environment variable. Open your ~/.bashrc (if using Bash) or ~/.zshrc (if using Zsh) and add the following line, replacing USERNAME with your username:
PATH="$PATH:/Users/USERNAME/kafka_2.13-3.3.1/bin"You'll need to close your terminal for this change to take effect.
Now, if you run echo $PATH you should see that the Kafka bin directory has been added to your path.
Install Kafka on Windows (WSL2) and Linux
Kafka isn't natively supported on Windows, so you will need to use either WSL2 or Docker. I'm going to show you WSL2 since it's the same steps as Linux.
To set up WSL2 on Widows, follow the instructions in the official docs.
From here on, the instructions are the same for both WSL2 and Linux.
First, install Java 11 by running the following commands:
wget -O- https://apt.corretto.aws/corretto.key | sudo apt-key add -

sudo add-apt-repository 'deb https://apt.corretto.aws stable main'

sudo apt-get update; sudo apt-get install -y java-11-amazon-corretto-jdk
Once this has finished, run java -version and you should see something like:
openjdk version "11.0.17" 2022-10-18 LTS
OpenJDK Runtime Environment Corretto-11.0.17.8.1 (build 11.0.17+8-LTS)
OpenJDK 64-Bit Server VM Corretto-11.0.17.8.1 (build 11.0.17+8-LTS, mixed mode)
From your root directory, download Kafka with the following command:
wget https://archive.apache.org/dist/kafka/3.3.1/kafka_2.13-3.3.1.tgz
The 2.13 means it is using version 2.13 of Scala, while 3.3.1 refers to the Kafka version.
Extract the contents of the download with:
tar xzf kafka_2.13-3.3.1.tgz
If you run ls, you'll now see kafka_2.13-3.3.1 in your root directory.
To make it easier to work with Kafka, you can add Kafka to the PATH environment variable. Open your ~/.bashrc (if using Bash) or ~/.zshrc (if using Zsh) and add the following line, replacing USERNAME with your username:
PATH="$PATH:home/USERNAME/kafka_2.13-3.3.1/bin"
You'll need to close your terminal for this change to take effect.
Now, if you run echo $PATH you should see that the Kafka bin directory has been added to your path.
Run kafka-topics.sh --version in a terminal and you should see 3.3.1. If you do, you're all set.
How to Start Zookeeper and Kafka
Since Kafka uses Zookeeper to manage clusters, you need to start Zookeeper before you start Kafka.
How to Start Kafka on macOS
In one terminal window, start Zookeeper with:
/usr/local/bin/zookeeper-server-start /usr/local/etc/zookeeper/zoo.cfg
In another terminal window, start Kafka with:
/usr/local/bin/kafka-server-start /usr/local/etc/kafka/server.properties
While using Kafka, you need to keep both these terminal windows open. Closing them will shut down Kafka.
How to Start Kafka on Windows (WSL2) and Linux
In one terminal window, start Zookeeper with:
~/kafka_2.13-3.3.1/bin/zookeeper-server-start.sh ~/kafka_2.13-3.3.1/config/zookeeper.properties
In another terminal window, start Kafka with:
~/kafka_2.13-3.3.1/bin/kafka-server-start.sh ~/kafka_2.13-3.3.1/config/server.properties
While using Kafka, you need to keep both these terminal windows open. Closing them will shut down Kafka.
Now that you have Kafka installed and running on your machine, it's time to get some hands-on practice.
The Kafka CLI
When you install Kafka, it comes with a Command Line Interface (CLI) that lets you create and manage topics, as well as produce and consume events.
First, make sure Zookeeper and Kafka are running in two terminal windows.
In a third terminal window, run kafka-topics.sh (on WSL2 or Linux) or kafka-topics (on macOS) to make sure the CLI is working. You'll see a list of all the options you can pass to the CLI.
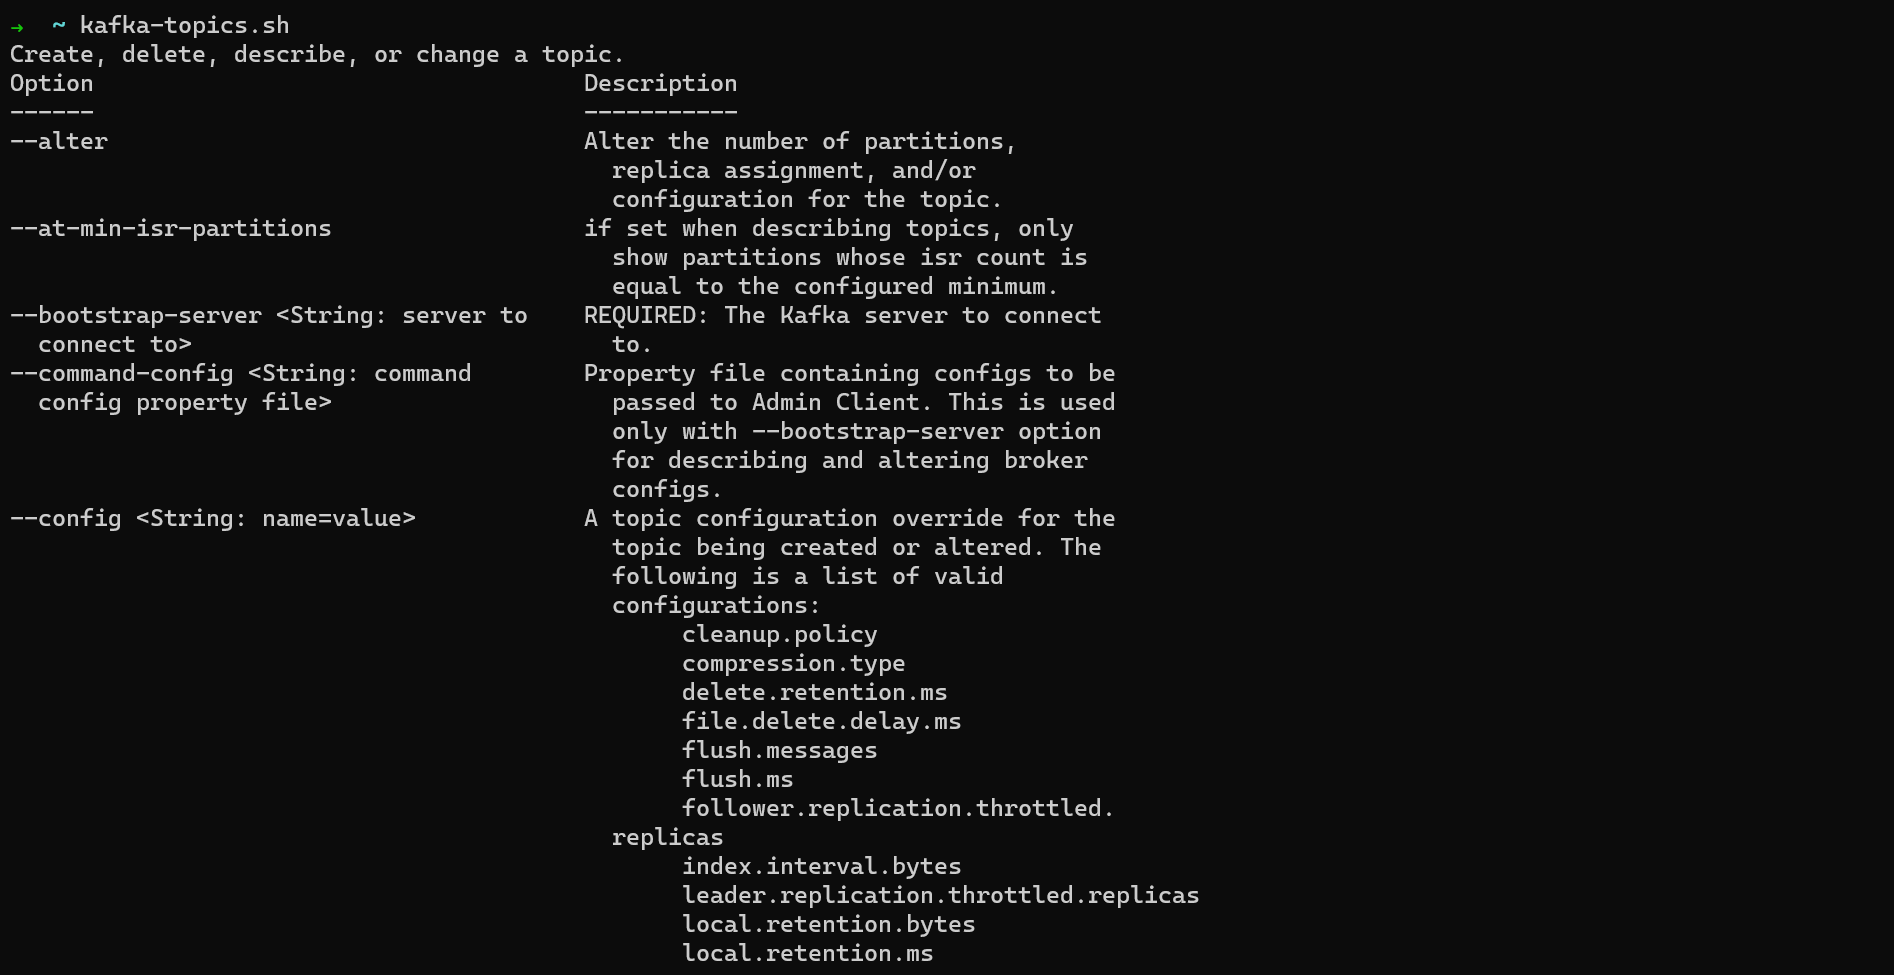
kafka-topics options
Note: When working with the Kafka CLI, the command will be kafka-topics.sh on WSL2 and Linux. It will be kafka-topics.sh on macOS if you directly installed the Kafka binaries and kafka-topics if you used Homebrew. So if you're using Homebrew, remove the .sh extension from the example commands in this section.
How to List Topics
To see the topics available on the Kafka broker on your local machine, use:
kafka-topics.sh --bootstrap-server localhost:9092 --list
This means "Connect to the Kafka broker running on localhost:9092 and list all topics there". --bootstrap-server refers to the Kafka broker you are trying to connect to and localhost:9092 is the IP address it's running at. You won't see any output since you haven't created any topics yet.
How to Create a Topic
To create a topic (with the default replication factor and number of partitions), use the --create and --topic options and pass them a topic name:
kafka-topics.sh --bootstrap-server localhost:9092 --create --topic my_first_topic
If you use an _ or . in your topic name, you will see the following warning:
WARNING: Due to limitations in metric names, topics with a period ('.') or underscore ('_') could collide. To avoid issues it is best to use either, but not both.
Since Kafka could confuse my.first.topic with my_first_topic, it's best to only use either underscores or periods when naming topics.
How to Describe Topics
To describe the topics on a broker, use the --describe option:
kafka-topics.sh --bootstrap-server localhost:9092 --describe
This will print the details of all the topics on this broker, including the number of partitions and their replication factor. By default, these will both be set to 1.
If you add the --topic option and the name of a topic, it will describe only that topic:
kafka-topics.sh --bootstrap-server localhost:9092 --describe --topic my_first_topic
How to Partition a Topic
To create a topic with multiple partitions, use the --partitions option and pass it a number:
kafka-topics.sh --bootstrap-server localhost:9092 --create --topic my_second_topic --partitions 3
How to Set a Replication Factor
To create a topic with a replication factor higher than the default, use the --replication-factor option and pass it a number:
kafka-topics.sh --bootstrap-server localhost:9092 --create --topic my_third_topic --partitions 3 --replication-factor 3
You should get the following error:
ERROR org.apache.kafka.common.errors.InvalidReplicationFactorException: Replication factor: 2 larger than available brokers: 1.
Since you're only running one Kafka broker on your machine, you can't set a replication factor higher than one. If you were running a cluster with multiple brokers, you could set a replication factor as high as the total number of brokers.
How to Delete a Topic
To delete a topic, use the --delete option and specify a topic with the --topic option:
kafka-topics.sh --bootstrap-server localhost:9092 --delete --topic my_first_topic
You won't get any output to say the topic was deleted but you can check using --list or --describe.
How to Use kafka-console-producer
You can produce messages to a topic from the command line using kafka-console-producer.
Run kafka-console-producer.sh to see the options you can pass to it.
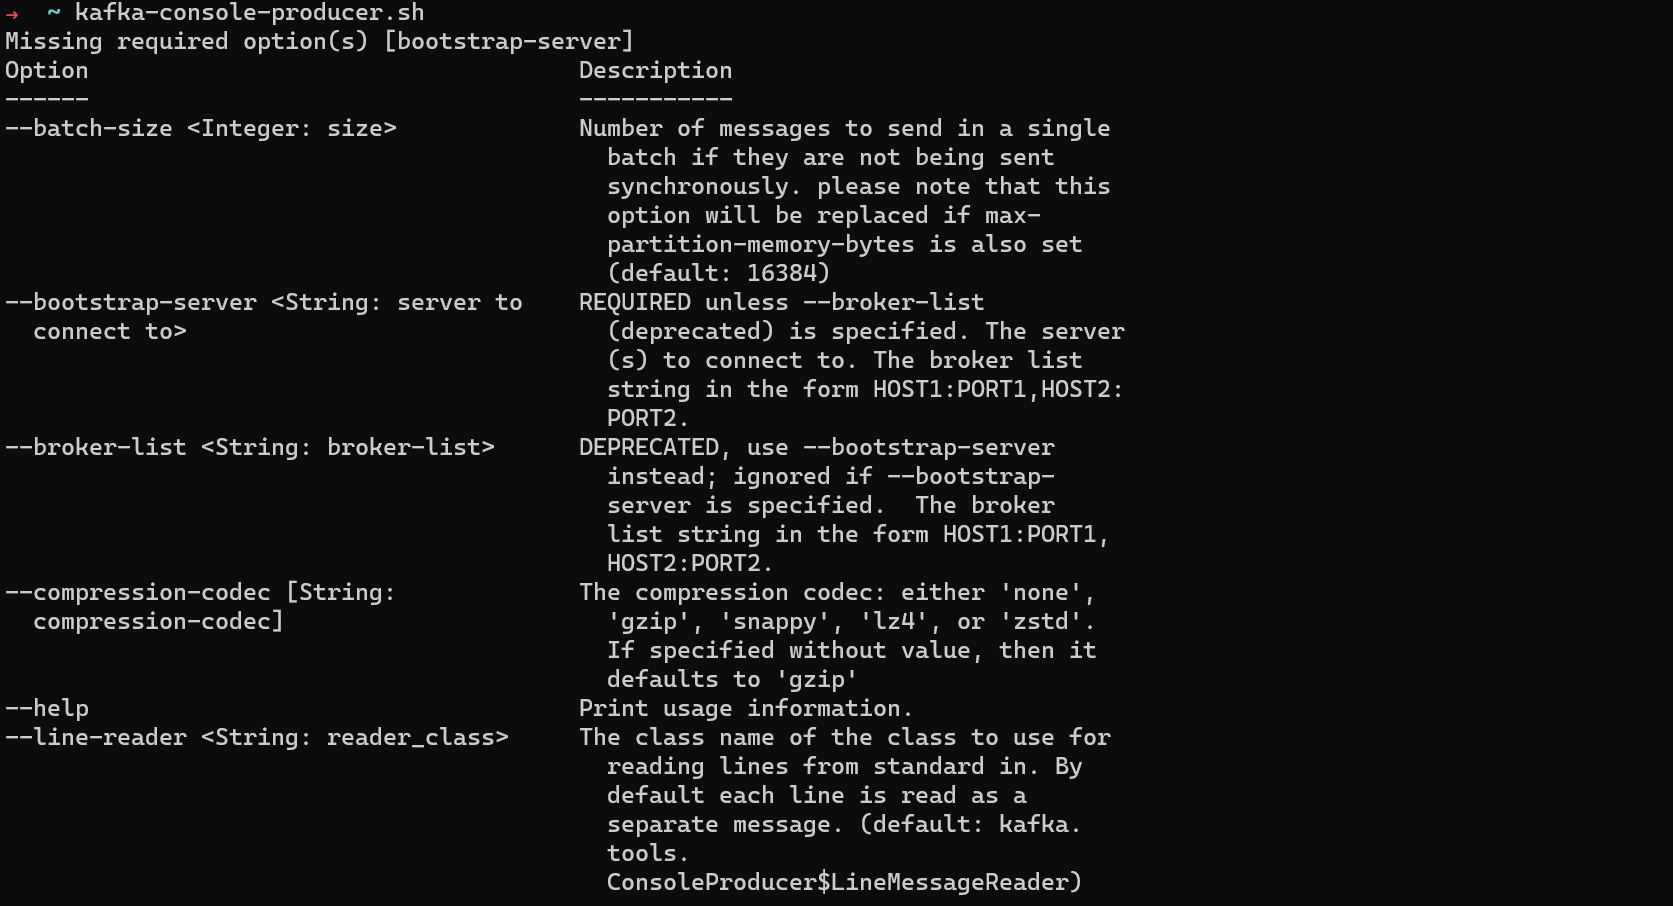
kafka-console-producer options
To create a producer connected to a specific topic, run:
kafka-console-producer.sh --bootstrap-server localhost:9092 --topic TOPIC_NAME
Let's produce messages to the my_first_topic topic.
kafka-console-producer.sh --bootstrap-server localhost:9092 --topic my_first_topic
Your prompt will change and you will be able to type text. Press enter to send that message. You can keep sending messages until you press ctrl + c.
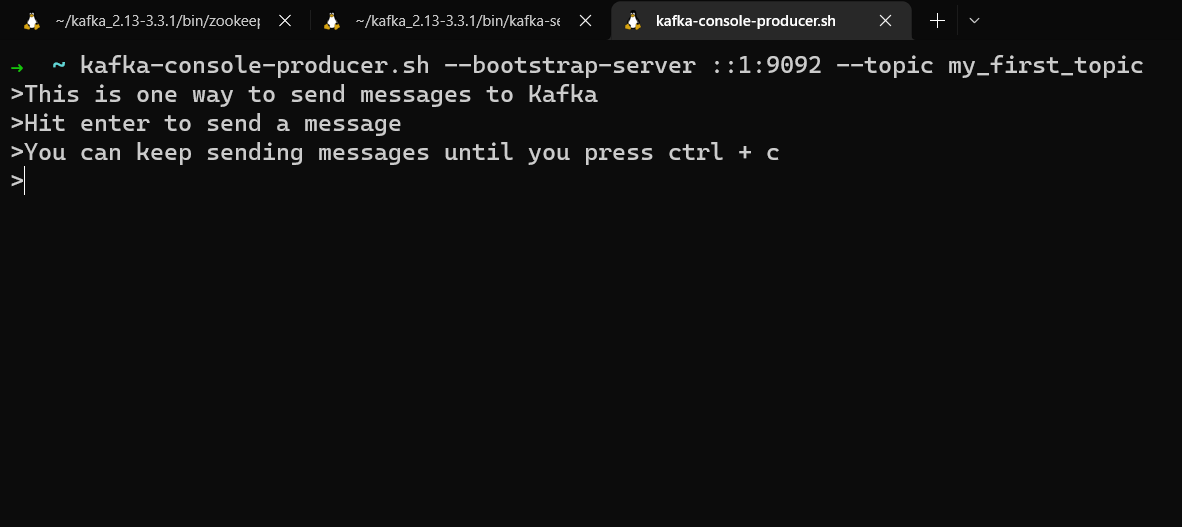
Sending messages using kafka-console-producer
If you produce messages to a topic that doesn't exist, you'll get a warning, but the topic will be created and the messages will still get sent. It's better to create a topic in advance, however, so you can specify partitions and replication.
By default, the messages sent from kafka-console-producer have their keys set to null, and so they will be evenly distributed to all partitions.
You can set a key by using the --property option to set parse.key to be true and providing a key separator, such as :
For example, we can create a books topic and use the books' genre as a key.
kafka-topics.sh --bootstrap-server localhost:9092 --topic books --create

kafka-console-producer.sh --bootstrap-server localhost:9092 --topic books --property parse.key=true --property key.separator=:
Now you can enter keys and values in the format key:value. Anything to the left of the key separator will be interpreted as a message key, anything to the right as a message value.
science_fiction:All Systems Red
fantasy:Uprooted
horror:Mexican Gothic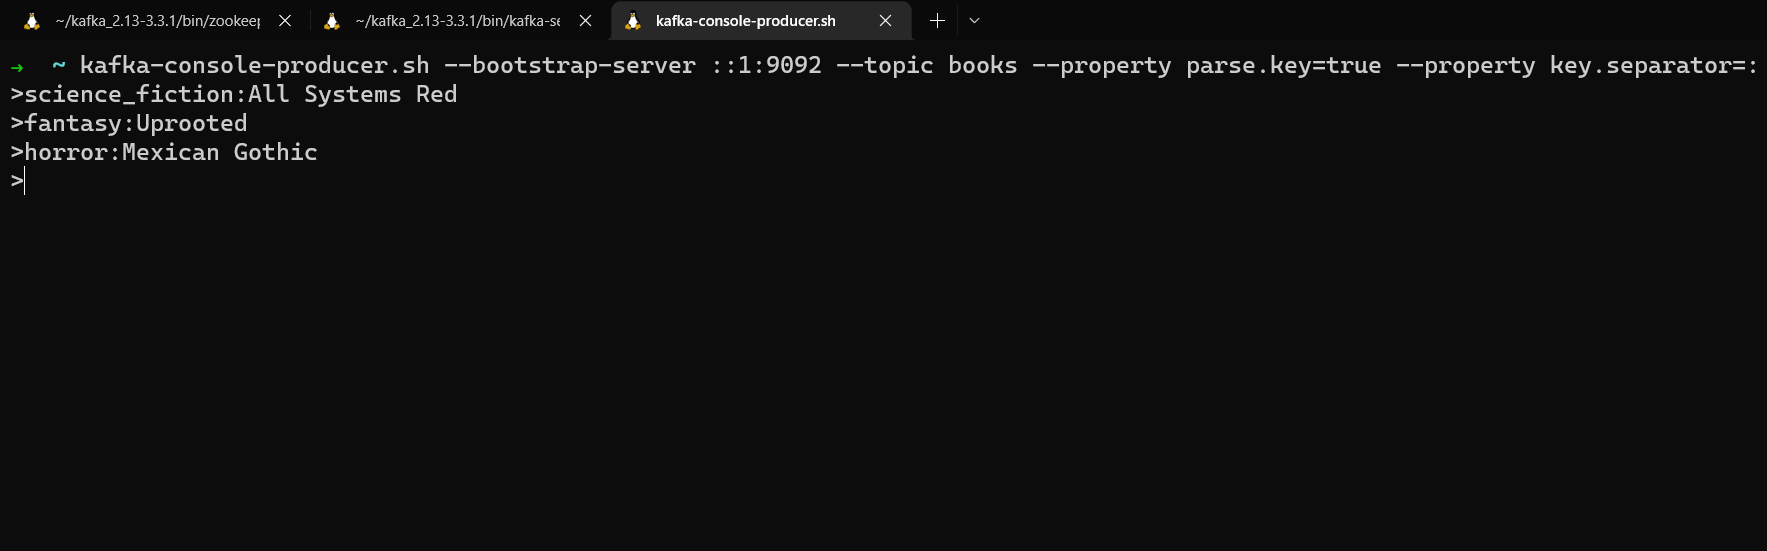
Producing messages with keys and values
Now that you've produced messages to a topic from the command line, it's time to consume those messages from the command line.
How to Use kafka-console-consumer
You can consumer messages from a topic from the command line using kafka-console-consumer.
Run kafka-console-consumer.sh to see the options you can pass to it.
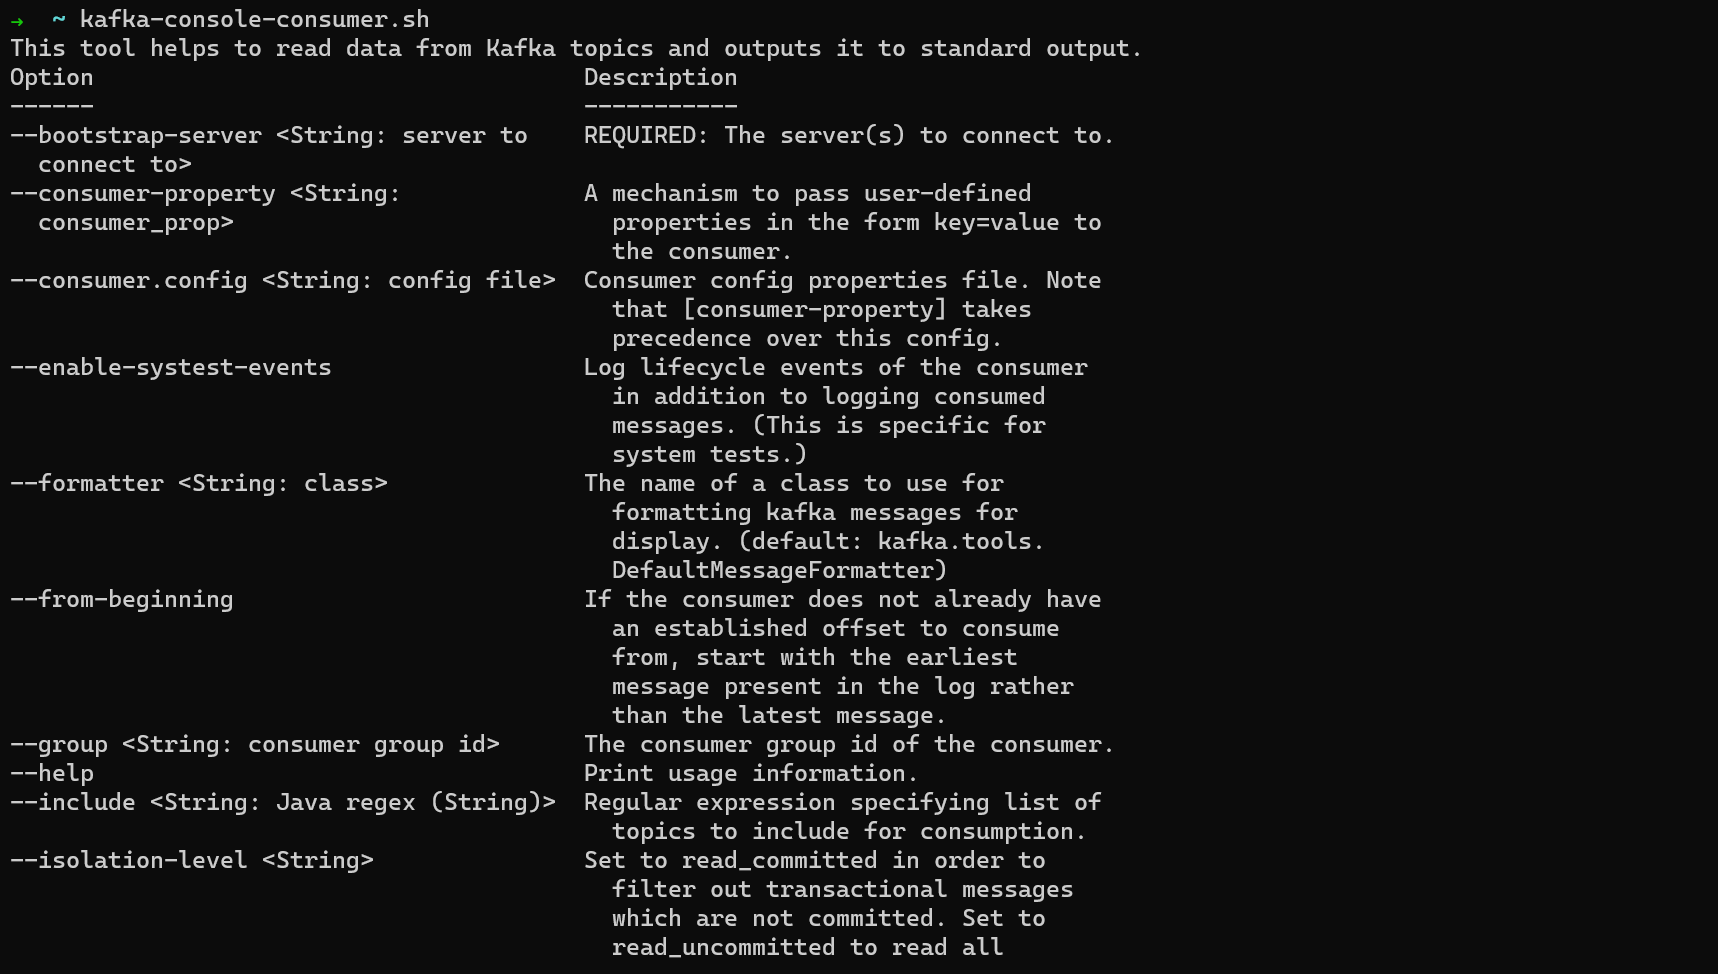
kafka-console-consumer options
To create a consumer, run:
kafka-console-consumer.sh --bootstrap-server localhost:9092 --topic TOPIC_NAME
When you start a consumer, by default it will read messages as they are written to the end of the topic. It won't read messages that were previously sent to the topic.
If you want to read the messages you already sent to a topic, use the --from-beginning option to read from the beginning of the topic:
kafka-console-consumer --bootstrap-server localhost:9092 --topic my_first_topic --from-beginning
The messages might appear "out of order". Remember, messages are ordered within a partition but ordering can't be guaranteed between partitions. If you don't set a key, they will be sent round robin between partitions and ordering isn't guaranteed.
You can display additional information about messages, such as their key and timestamp, by using the --property option and setting the print property to true.
Use the --formatter option to set the message formatter and the --property option to select which message properties to print.
kafka-console-consumer.sh --bootstrap-server localhost:9092 --topic my_first_topic --from-beginning --formatter kafka.tools.DefaultMessageFormatter --property print.timestamp=true --property print.key=true --property print.value=true
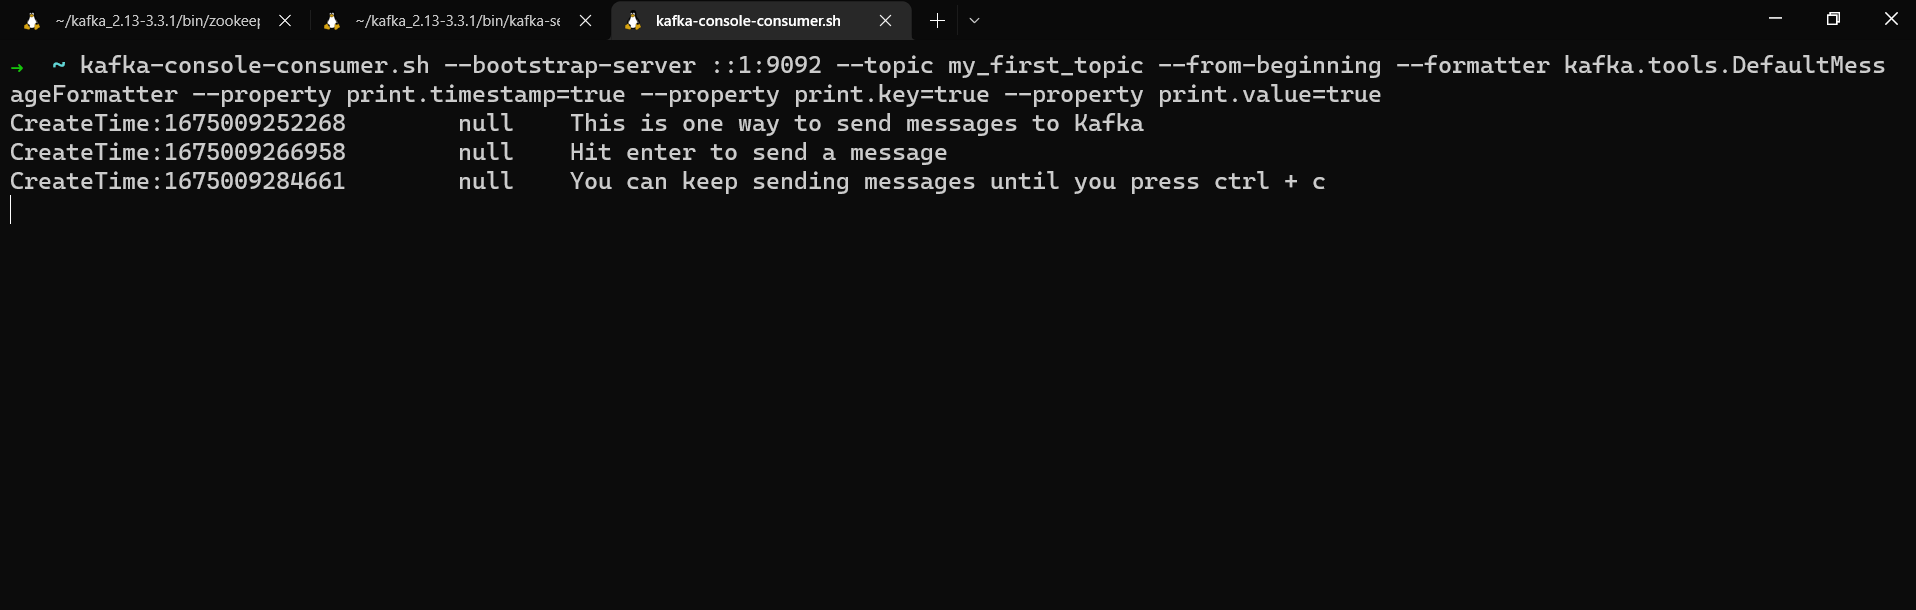
Consuming messages from a topic
We get the messages' timestamp, key, and value. Since we didn't assign any keys when we sent these messages to my_first_topic, their key is null.
How to Use kafka-consumer-groups
You can run consumers in a consumer group using the Kafka CLI. To view the documentation for this, run:
kafka-consumer-groups.sh
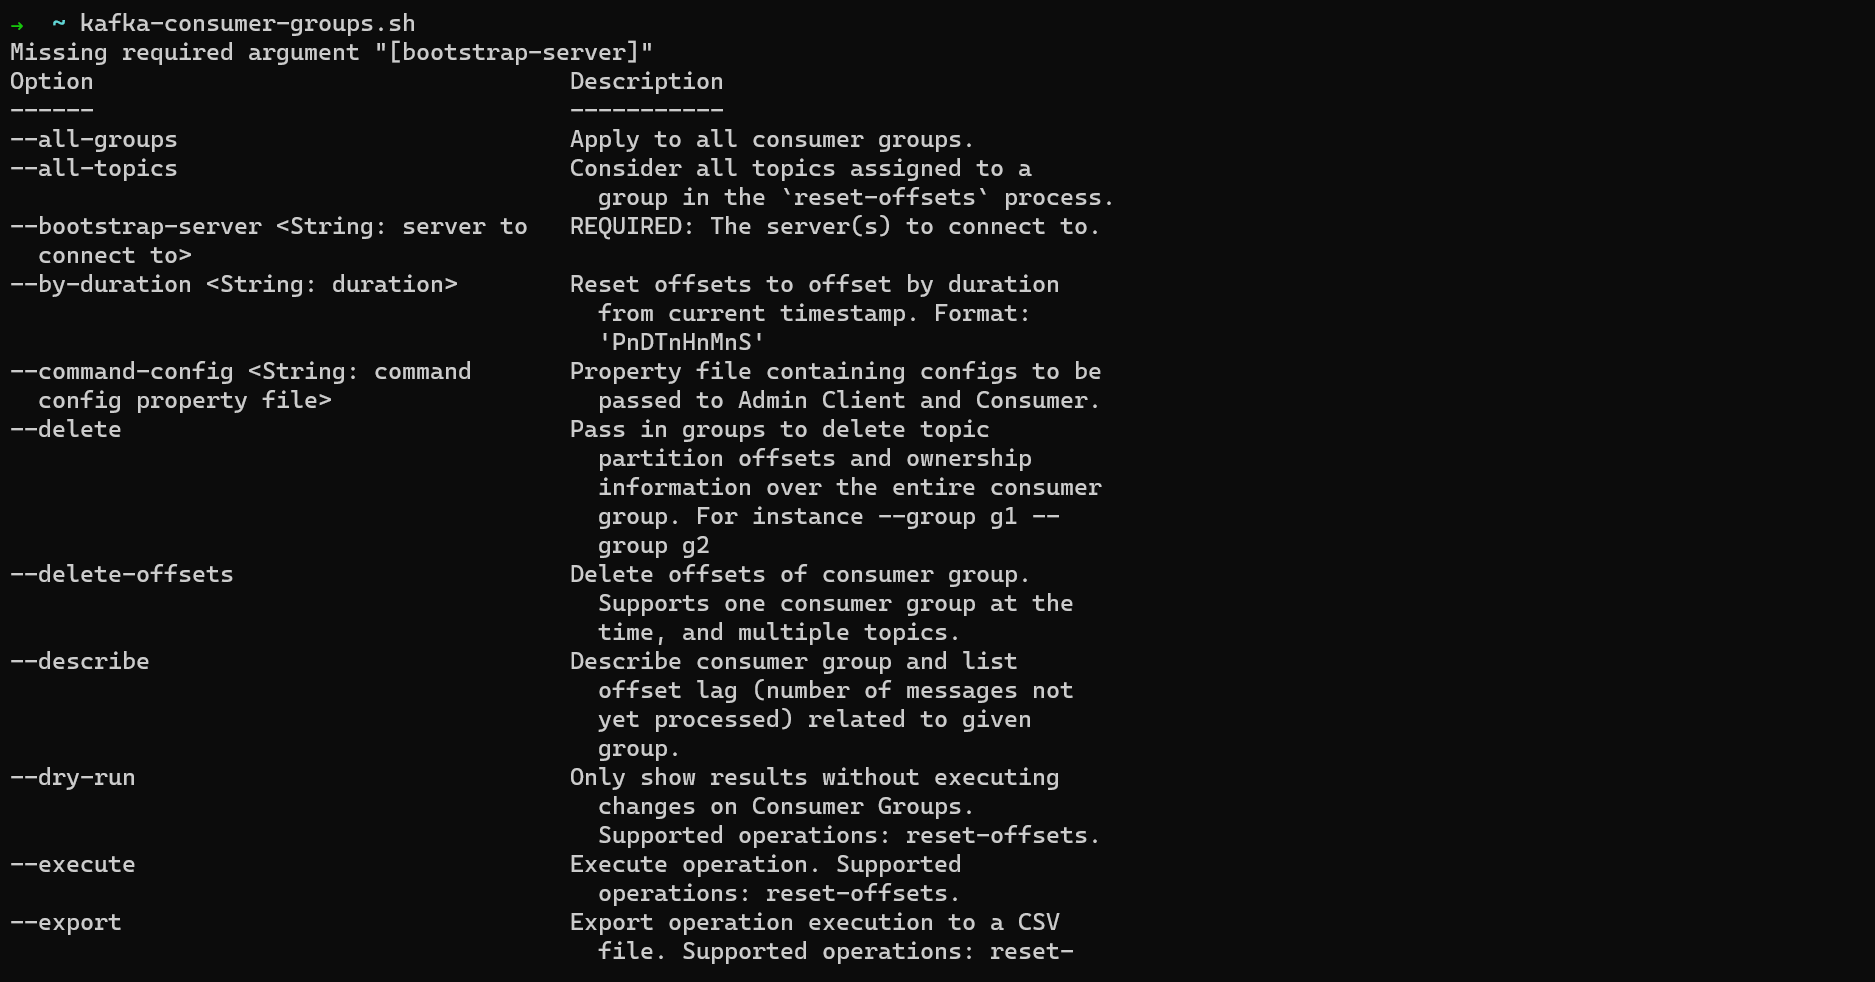
kafka-consumer-groups options
First, create a topic with three partitions. Each consumer in a group will consume from one partition. If there are more consumers than partitions, any extra consumers will be idle.
kafka-topics.sh --bootstrap-server localhost:9092 --topic fantasy_novels --create --partitions 3
You add a consumer to a group when you create it using the --group option. If you run the same command multiple times with the same group name, each new consumer will be added to the group.
To create the first consumer in your consumer group, run:
kafka-console-consumer.sh --bootstrap-server localhost:9092 --topic fantasy_novels --group fantasy_consumer_group
Next, open two new terminal windows and run the same command again to add a second and third consumer to the consumer group.
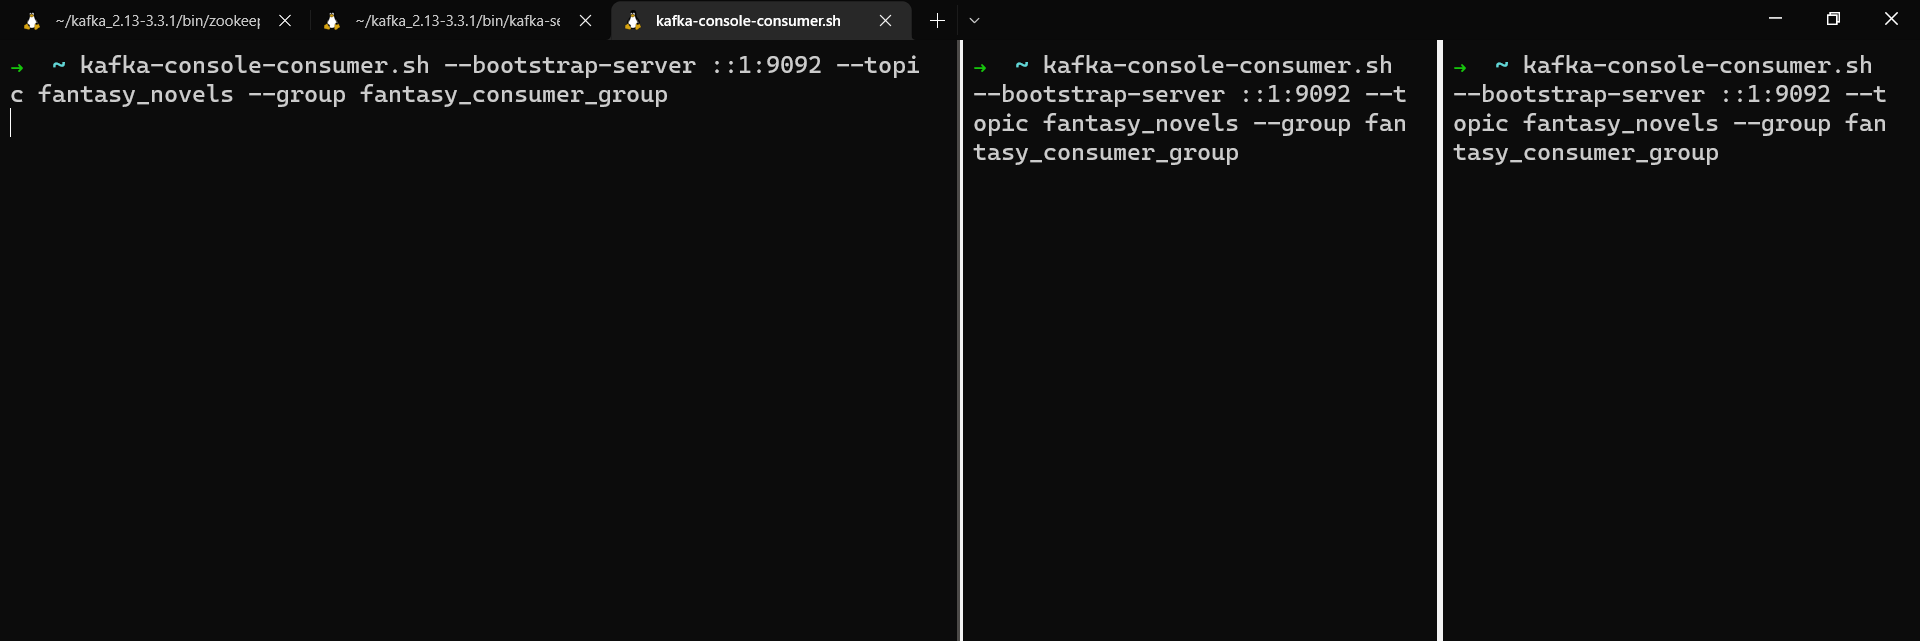
Three consumers running in a consumer group
In a different terminal window, create a producer and send a few messages with keys to the topic.
Note: Since Kafka 2.4, Kafka will send messages in batches to one "sticky" partition for better performance. In order to demonstrate messages being sent round robin between partitions (without sending a large volume of messages), we can set the partitioner to RoundRobinPartitioner.
kafka-console-producer.sh --bootstrap-server localhost:9092 --topic fantasy_novels --property parse.key=true --property key.separator=: --property partitioner.class=org.apache.kafka.clients.producer.RoundRobinPartitioner

tolkien:The Lord of the Rings
le_guin:A Wizard of Earthsea
leckie:The Raven Tower
de_bodard:The House of Shattered Wings
okorafor:Who Fears Death
liu:The Grace of Kings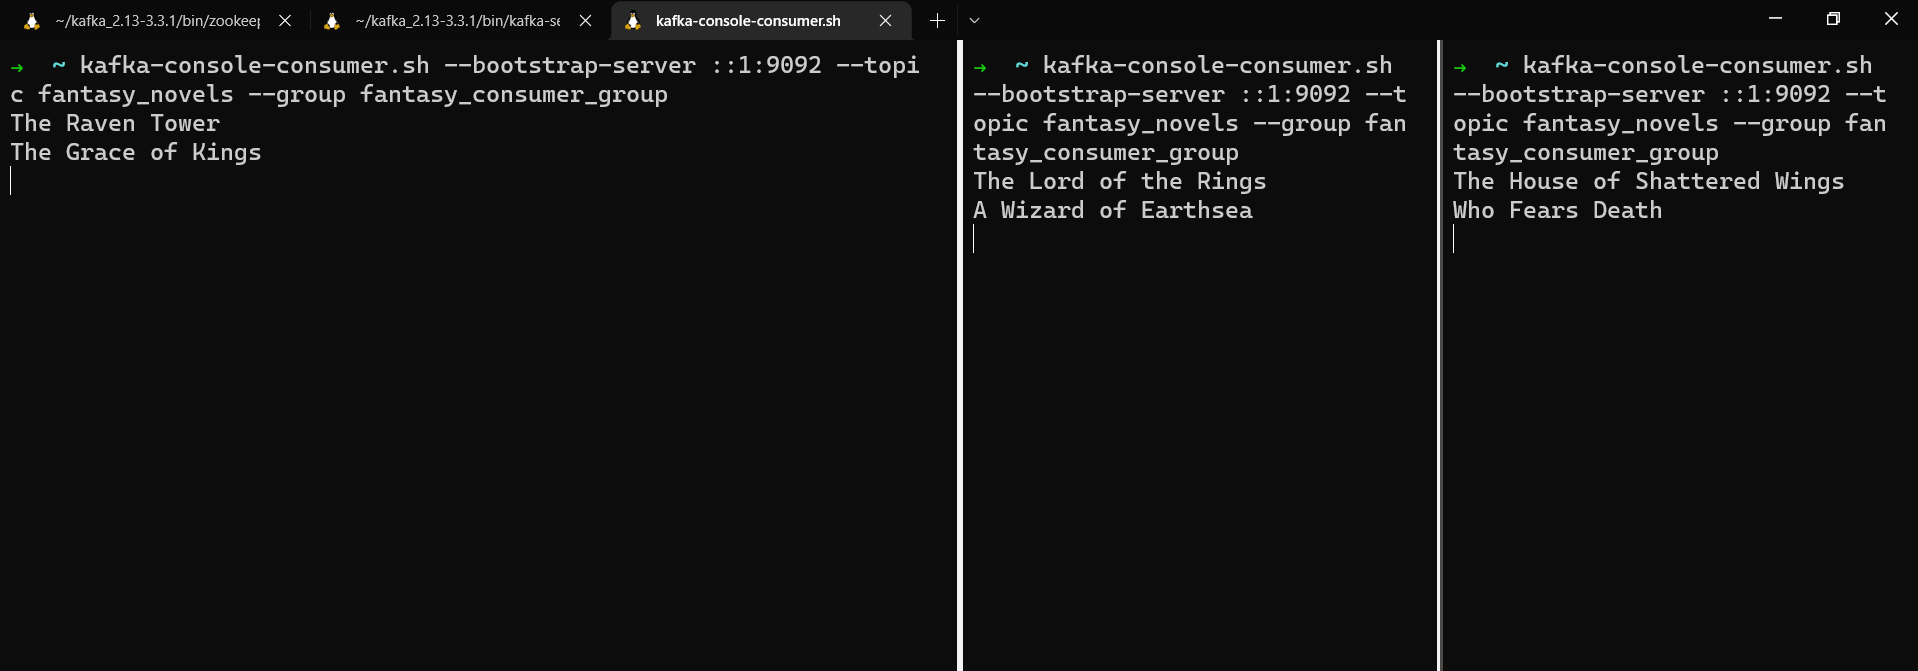
Messages spread between consumers in a consumer group
If you stop one of the consumers, the consumer group will rebalance and future messages will be sent to the remaining consumers.
Now that you have some experience working with Kafka from the command line, the next step is to build a small application that connects to Kafka.
How to Build a Kafka Client App with Java
We're going to build a simple Java app that both produces messages to and consumes messages from Kafka. For this we'll use the official Kafka Java client.
If at any point you get stuck, the full code for this project is available on GitHub.
Preliminaries
First of all, make sure you have Java (at least JDK 11) and Kafka installed.
We're going to send messages about characters from The Lord of the Rings. So let's create a topic for these messages with three partitions.
From the command line, run:
kafka-topics.sh --bootstrap-server localhost:9092 --create --topic lotr_characters --partitions 3
How to Set Up the Project
I recommend using IntelliJ for Java projects, so go ahead and install the Community Edition if you don't already have it. You can download it from jetbrains.com/idea
In Intellij, select File, New, and Project.
Give your project a name and select a location for it on your computer. Make sure you have selected Java as the language, Maven as the build system, and that the JDK is at least Java 11. Then click Create.
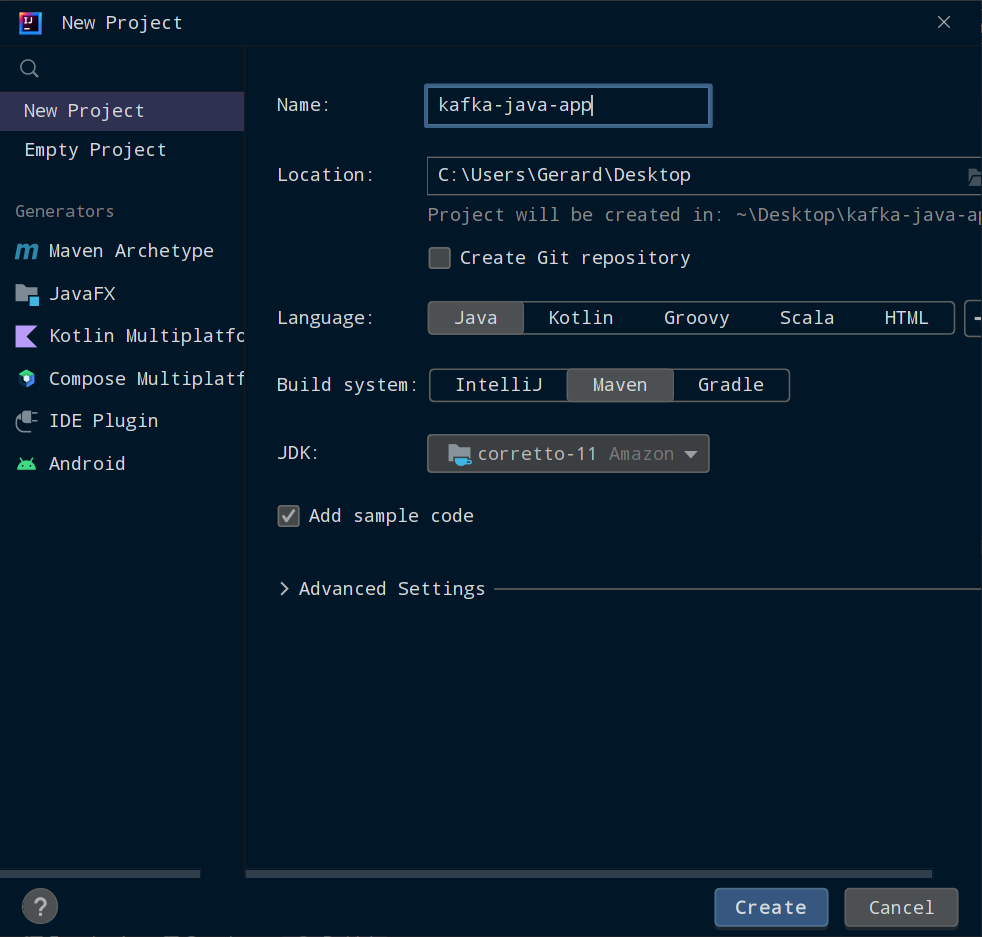
Setting up a Maven project in IntelliJ
Note: If you're on Windows, IntelliJ can't use a JDK installed on WSL. To install Java on the Windows side of things, go to docs.aws.amazon.com/corretto/latest/corretto-11-ug/downloads-list and download the Windows installer. Follow the installation steps, open a command prompt, and run java -version. You should see something like:
openjdk version "11.0.18" 2023-01-17 LTS
OpenJDK Runtime Environment Corretto-11.0.18.10.1 (build 11.0.18+10-LTS)
OpenJDK 64-Bit Server VM Corretto-11.0.18.10.1 (build 11.0.18+10-LTS, mixed mode)
Once your Maven project finishes setting up, run the Main class to see "Hello world!" and make sure everything worked.
How to Install the Dependencies
Next, we're going to install our dependencies. Open up pom.xml and inside the <project> element, create a <dependencies> element.
We're going to use the Java Kafka client for interacting with Kafka and SLF4J for logging, so add the following inside your <dependencies> element:
<!-- https://mvnrepository.com/artifact/org.apache.kafka/kafka-clients -->
<dependency>
    <groupId>org.apache.kafka</groupId>
    <artifactId>kafka-clients</artifactId>
    <version>3.3.1</version>
</dependency>
<!-- https://mvnrepository.com/artifact/org.slf4j/slf4j-api -->
<dependency>
    <groupId>org.slf4j</groupId>
    <artifactId>slf4j-api</artifactId>
    <version>2.0.6</version>
</dependency>
<!-- https://mvnrepository.com/artifact/org.slf4j/slf4j-simple -->
<dependency>
    <groupId>org.slf4j</groupId>
    <artifactId>slf4j-simple</artifactId>
    <version>2.0.6</version>
</dependency>
The package names and version numbers might be red, meaning you haven't downloaded them yet. If this happens, click on View, Tool Windows, and Maven to open the Maven menu. Click on the Reload All Maven Projects icon and Maven will install these dependencies.
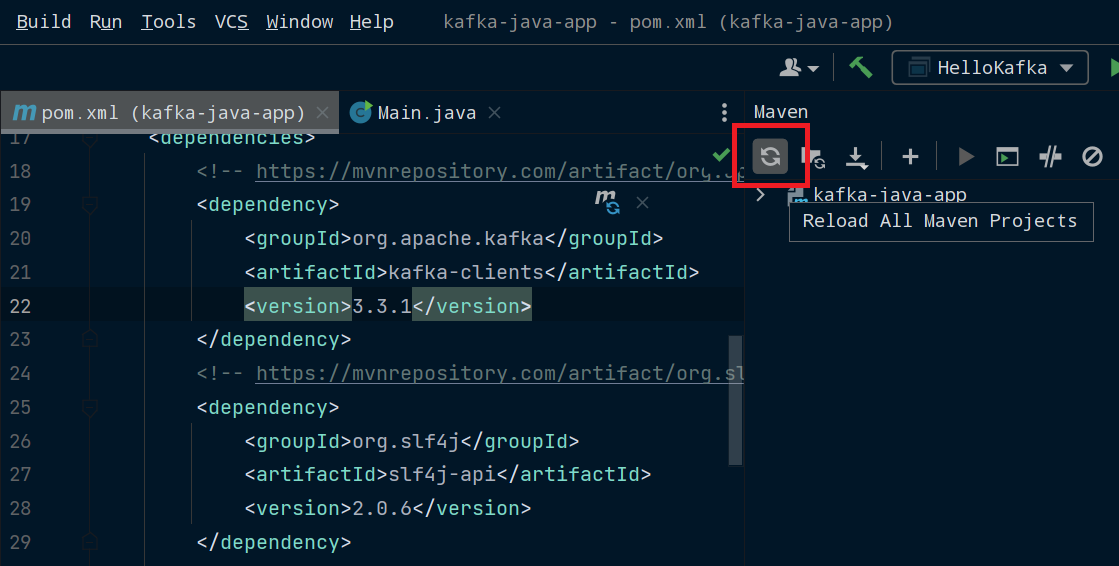
Reloading Maven dependencies in IntelliJ
Create a HelloKafka class in the same directory as your Main class and give it the following contents:
package org.example;

import org.slf4j.Logger;
import org.slf4j.LoggerFactory;

public class HelloKafka {
    private static final Logger log = LoggerFactory.getLogger(HelloKafka.class);

    public static void main(String[] args) {
        log.info("Hello Kafka");
    }
}
To make sure your dependencies are installed, run this class and you should see [main] INFO org.example.HelloKafka - Hello Kafka printed to the IntelliJ console.
How to Create a Kafka Producer
Next, we're going to create a Producer class. You can call this whatever you want as long as it doesn't clash with another class. So don't use KafkaProducer as you'll need that class in a minute.
package org.example;

import org.slf4j.Logger;
import org.slf4j.LoggerFactory;

public class Producer {
    private static final Logger log = LoggerFactory.getLogger(KafkaProducer.class);

    public static void main(String[] args) {
        log.info("This class will produce messages to Kafka");
    }
}
All of our Kafka-specific code is going to go inside this class's main() method.
The first thing we need to do is configure a few properties for the producer. Add the following inside the main() method:
Properties properties = new Properties();

properties.setProperty(ProducerConfig.BOOTSTRAP_SERVERS_CONFIG, "localhost:9092");
properties.setProperty(ProducerConfig.KEY_SERIALIZER_CLASS_CONFIG, StringSerializer.class.getName());
properties.setProperty(ProducerConfig.VALUE_SERIALIZER_CLASS_CONFIG, StringSerializer.class.getName());
Properties stores a set of properties as pairs of strings. The ones we're using are:
ProducerConfig.BOOTSTRAP_SERVERS_CONFIGwhich specifies the IP address to use to access the Kafka clusterProducerConfig.KEY_SERIALIZER_CLASS_CONFIGwhich specifies the serializer to use for message keysProducerConfig.VALUE_SERIALIZER_CLASS_CONFIGwhich specifies the serializer to use for message values
We're going to connect to our local Kafka cluster running on localhost:9092, and use the StringSerializer since both our keys and values will be strings.
Now we can create our producer and pass it the configuration properties.
KafkaProducer<String, String> producer = new KafkaProducer<>(properties);
To send a message, we need to create a ProducerRecord and pass it to our producer. ProducerRecord contains a topic name, and optionally a key, value, and partition number.
We're going to create the ProducerRecord with the topic to use, the message's key, and the message's value.
ProducerRecord<String, String> producerRecord = new ProducerRecord<>("lotr_characters", "hobbits", "Bilbo");
We can now use the producer's send() method to send the message to Kafka.
producer.send(producerRecord);
Finally, we need to call the close() method to stop the producer. This method handles any messages currently being processed by send() and then closes the producer.
producer.close();
Now it's time to run our producer. Make sure you have Zookeeper and Kafka running. Then run the main() method of the Producer class.
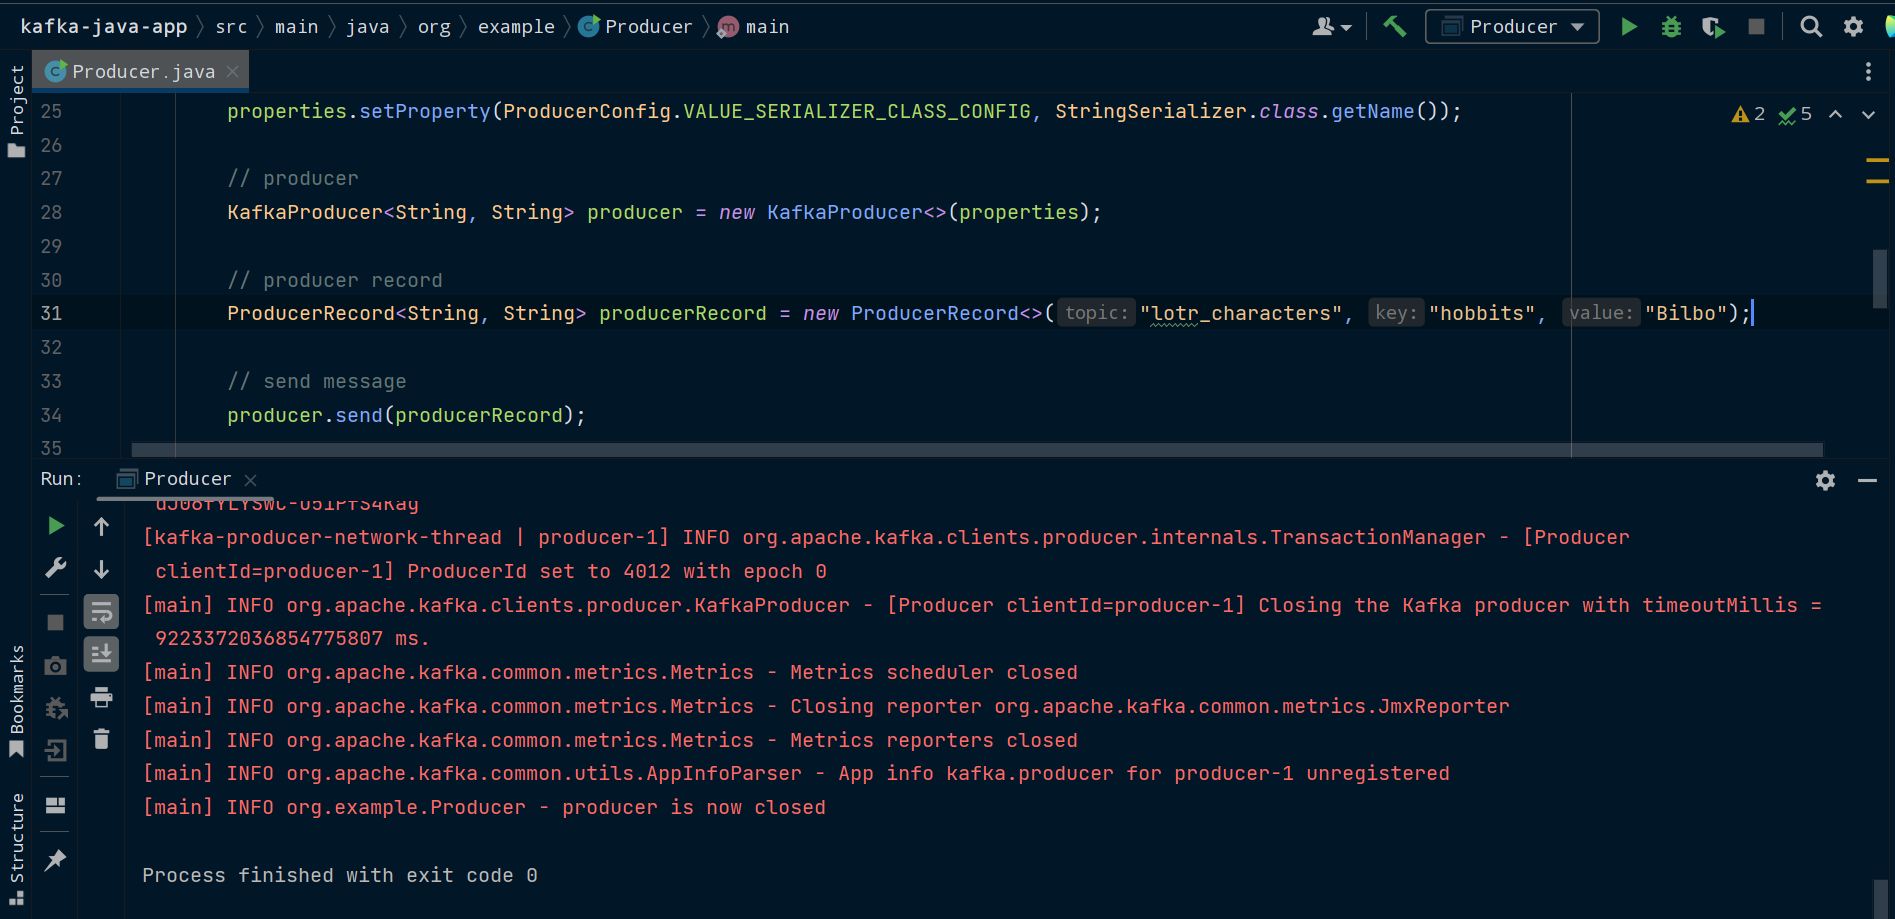
Sending a message from a producer in a Java Kafka client app
Note: On Windows, your producer might not be able to connect to a Kafka broker running on WSL. To fix this, you're going to need to do the following:
- In a WSL terminal, navigate to Kafka's config folder:
cd ~/kafka_2.13-3.3.1/config/ - Open
server.properties, for example with Nano:nano server.properties - Uncomment
#listeners=PLAINTEXT//:9092 - Replace it with
listeners=PLAINTEXT//[::1]:9092 - In your
Producerclass, replace"localhost:9092"with"[::1]:9092"
[::1], or 0:0:0:0:0:0:0:1, refers to the loopback address (or localhost) in IPv6. This is equivalent to 127.0.0.1 in IPv4.
If you change listeners, when you try to access the Kafka broker from the command line you'll also have to use the new IP address, so use --bootstrap-server ::1:9092 instead of --bootstrap-server localhost:9092 and it should work.
We can now check that Producer worked by using kafka-console-consumer in another terminal window to read from the lotr_characters topic and see the message printed to the console.
kafka-console-consumer.sh --bootstrap-server localhost:9092 --topic lotr_characters --from-beginning
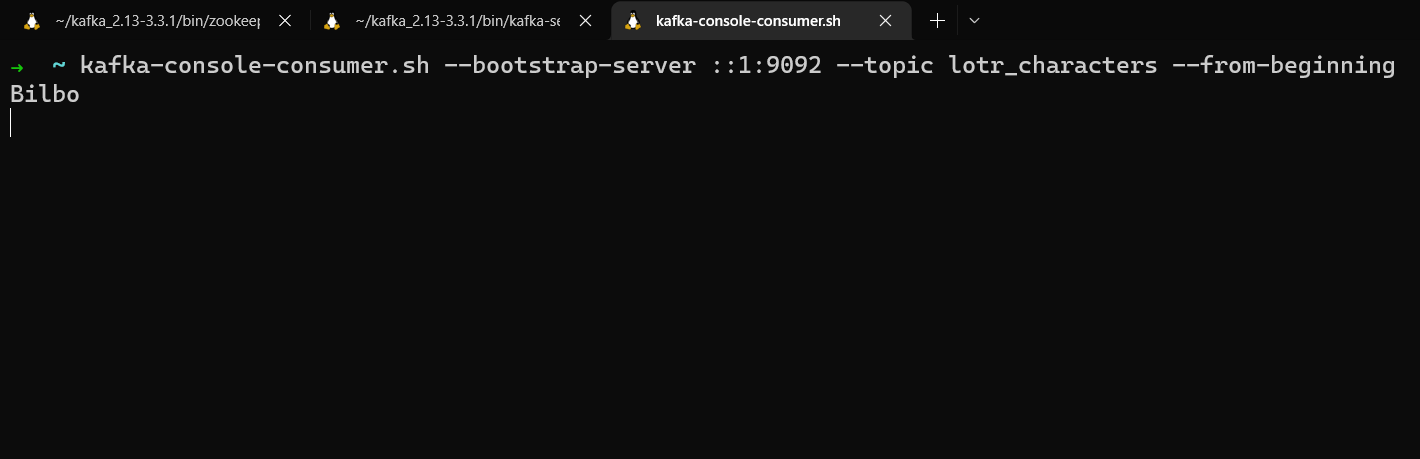
kafka-console-consumer reading the message sent by the producer in our Java app
How to Send Multiple Messages and Use Callbacks
So far we're only sending one message. If we update Producer to send multiple messages, we'll be able to see how keys are used to divide messages between partitions. We can also take this opportunity to use a callback to view the sent message's metadata.
To do this, we're going to loop over a collection of characters to generate our messages.
So replace this:
ProducerRecord<String, String> producerRecord = new ProducerRecord<>("lotr_characters", "hobbits", "Bilbo");

producer.send(producerRecord);
with this:
HashMap<String, String> characters = new HashMap<String, String>();
characters.put("hobbits", "Frodo");
characters.put("hobbits", "Sam");
characters.put("elves", "Galadriel");
characters.put("elves", "Arwen");
characters.put("humans", "Éowyn");
characters.put("humans", "Faramir");

for (HashMap.Entry<String, String> character : characters.entrySet()) {
    ProducerRecord<String, String> producerRecord = new ProducerRecord<>("lotr_characters", character.getKey(), character.getValue());

    producer.send(producerRecord, (RecordMetadata recordMetadata, Exception err) -> {
        if (err == null) {
            log.info("Message received. \n" +
                    "topic [" + recordMetadata.topic() + "]\n" +
                    "partition [" + recordMetadata.partition() + "]\n" +
                    "offset [" + recordMetadata.offset() + "]\n" +
                    "timestamp [" + recordMetadata.timestamp() + "]");
        } else {
            log.error("An error occurred while producing messages", err);
        }
    });
}
Here, we're iterating over the collection, creating a ProducerRecord for each entry, and passing the record to send(). Behind the scenes, Kafka will batch these messages together to make fewer network requests. send() can also take a callback as a second argument. We're going to pass it a lambda which will run code when the send() request completes.
If the request completed successfully, we get back a RecordMetadata object with metadata about the message, which we can use to see things such as the partition and offset the message ended up in.
If we get back an exception, we could handle it by retrying to send the message, or alerting our application. In this case, we're just going to log the exception.
Run the main() method of the Producer class and you should see the message metadata get logged.

The full code for the Producer class should now be:
package org.example;

import org.apache.kafka.clients.producer.KafkaProducer;
import org.apache.kafka.clients.producer.ProducerConfig;
import org.apache.kafka.clients.producer.ProducerRecord;
import org.apache.kafka.clients.producer.RecordMetadata;
import org.apache.kafka.common.serialization.StringSerializer;
import org.slf4j.Logger;
import org.slf4j.LoggerFactory;

import java.util.HashMap;
import java.util.Properties;

public class Producer {
    private static final Logger log = LoggerFactory.getLogger(Producer.class);

    public static void main(String[] args) {
        log.info("This class produces messages to Kafka");

        Properties properties = new Properties();
        properties.setProperty(ProducerConfig.BOOTSTRAP_SERVERS_CONFIG, "localhost:9092");
        properties.setProperty(ProducerConfig.KEY_SERIALIZER_CLASS_CONFIG, StringSerializer.class.getName());
        properties.setProperty(ProducerConfig.VALUE_SERIALIZER_CLASS_CONFIG, StringSerializer.class.getName());

        KafkaProducer<String, String> producer = new KafkaProducer<>(properties);

        HashMap<String, String> characters = new HashMap<String, String>();
        characters.put("hobbits", "Frodo");
		characters.put("hobbits", "Sam");
		characters.put("elves", "Galadriel");
		characters.put("elves", "Arwen");
		characters.put("humans", "Éowyn");
		characters.put("humans", "Faramir");

        for (HashMap.Entry<String, String> character : characters.entrySet()) {
            ProducerRecord<String, String> producerRecord = new ProducerRecord<>("lotr_characters", character.getKey(), character.getValue());

            producer.send(producerRecord, (RecordMetadata recordMetadata, Exception err) -> {
                if (err == null) {
                    log.info("Message received. \n" +
                            "topic [" + recordMetadata.topic() + "]\n" +
                            "partition [" + recordMetadata.partition() + "]\n" +
                            "offset [" + recordMetadata.offset() + "]\n" +
                            "timestamp [" + recordMetadata.timestamp() + "]");
                } else {
                    log.error("An error occurred while producing messages", err);
                }
            });
        }
        producer.close();
    }
}
Next, we're going to create a consumer to read these messages from Kafka.
How to Create a Kafka Consumer
First, create a Consumer class. Again, you can call it whatever you want, but don't call it KafkaConsumer as you will need that class in a moment.
All the Kafka-specific code will go in Consumer's main() method.
package org.example;

import org.slf4j.Logger;
import org.slf4j.LoggerFactory;

public class Consumer {
    private static final Logger log = LoggerFactory.getLogger(Consumer.class);

    public static void main(String[] args) {
        log.info("This class consumes messages from Kafka");
    }
}
Next, configure the consumer properties.
Properties properties = new Properties();
properties.setProperty(ConsumerConfig.BOOTSTRAP_SERVERS_CONFIG, "localhost:9092");
properties.setProperty(ConsumerConfig.KEY_DESERIALIZER_CLASS_CONFIG, StringDeserializer.class.getName());
properties.setProperty(ConsumerConfig.VALUE_DESERIALIZER_CLASS_CONFIG, StringDeserializer.class.getName());
properties.setProperty(ConsumerConfig.GROUP_ID_CONFIG, "lotr_consumer_group");
properties.setProperty(ConsumerConfig.AUTO_OFFSET_RESET_CONFIG, "earliest");
Just like with Producer, these properties are a set of string pairs. The ones we're using are:
ConsumerConfig.BOOTSTRAP_SERVERS_CONFIGwhich specifies the IP address to use to access the Kafka clusterConsumerConfig.KEY_DESERIALIZER_CLASS_CONFIGwhich specifies the deserializer to use for message keysConsumerConfig.VALUE_DESERIALIZER_CLASS_CONFIGwhich specifies the deserializer to use for message valuesConsumerConfig.GROUP_ID_CONFIGwhich specifies the consumer group this consumer belongs toConsumerConfig.AUTO_OFFSET_RESET_CONFIGwhich specifies the offset to start reading from
We're connecting to the Kafka cluster on localhost:9092, using string deserializers since our keys and values are strings, setting a group id for our consumer, and telling the consumer to read from the start of the topic.
Note: If you're running the consumer on Windows and accessing a Kafka broker running on WSL, you'll need to change "localhost:9091" to "[::1]:9092" or "0:0:0:0:0:0:0:1:9092", like you did in Producer.
Next, we create a KafkaConsumer and pass it the configuration properties.
KafkaConsumer<String, String> consumer = new KafkaConsumer<>(properties);
We need to tell the consumer which topic, or topics, to subscribe to. The subscribe() method takes in a collection of one or more strings, naming the topics you want to read from. Remember, consumers can subscribe to more than one topic at the same time. For this example, we'll use one topic, the lotr_characters topic.
String topic = "lotr_characters";

consumer.subscribe(Arrays.asList(topic));
The consumer is now ready to start reading messages from the topic. It does this by regularly polling for new messages.
We'll use a while loop to repeatedly call the poll() method to check for new messages.
poll() takes in a duration for how long it should read for at a time. It then batches these messages into an iterable called ConsumerRecords. We can then iterate over ConsumerRecords and do something with each individual ConsumerRecord.
In a real-world application, we would process this data or send it to some further destination, like a database or data pipeline. Here, we're just going to log the key, value, partition, and offset for each message we receive.
while(true){
    ConsumerRecords<String, String> messages = consumer.poll(Duration.ofMillis(100));

    for (ConsumerRecord<String, String> message : messages){
        log.info("key [" + message.key() + "] value [" + message.value() +"]");
        log.info("partition [" + message.partition() + "] offset [" + message.offset() + "]");
    }
}
Now it's time to run our consumer. Make sure you have Zookeeper and Kafka running. Run the Consumer class and you'll see the messages that Producer previously sent to the lotr_characters topic in Kafka.
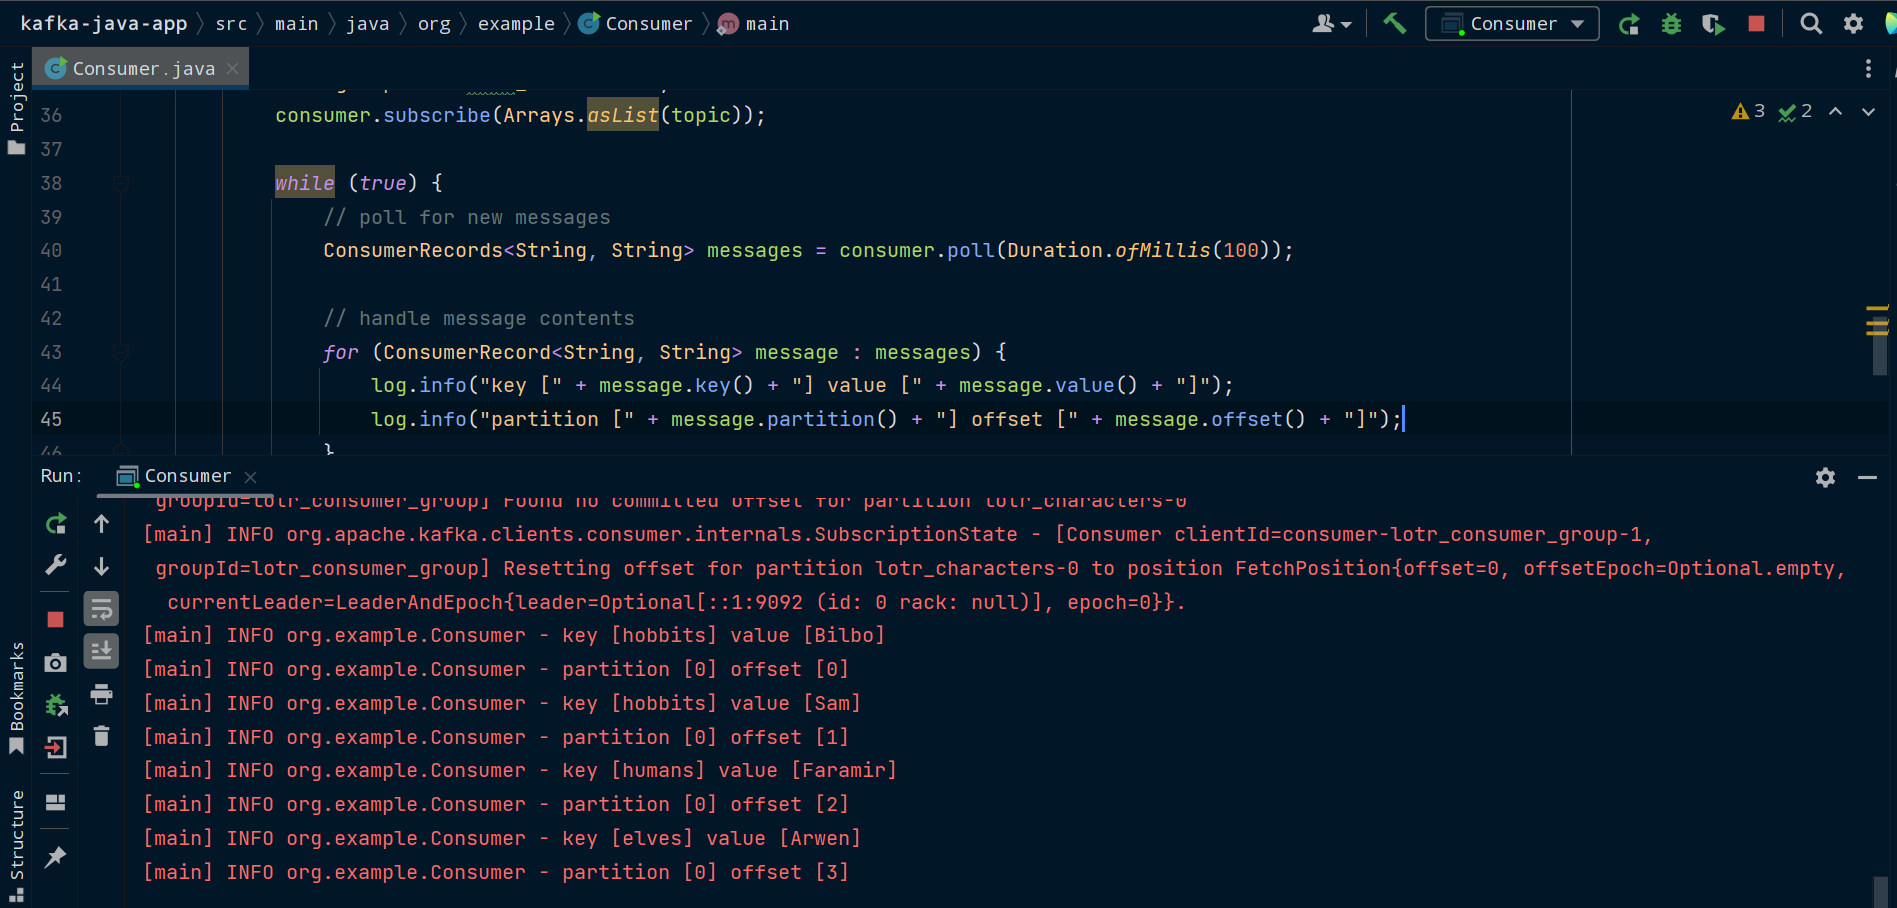
The Kafka client app consuming messages that were previously produced to Kafka
How to Shut Down the Consumer
Right now, our consumer is running in an infinite loop and polling for new messages every 100 ms. This isn't a problem, but we should add safeguards to handle shutting down the consumer if an exception occurs.
We're going to wrap our code in a try-catch-finally block. If an exception occurs, we can handle it in the catch block.
The finally block will then call the consumer's close() method. This will close the socket the consumer is using, commit the offsets it has processed, and trigger a consumer group rebalance so any other consumers in the group can take over reading the partitions this consumer was handling.
try {
            // subscribe to topic(s)
            String topic = "lotr_characters";
            consumer.subscribe(Arrays.asList(topic));

            while (true) {
                // poll for new messages
                ConsumerRecords<String, String> messages = consumer.poll(Duration.ofMillis(100));

                // handle message contents
                for (ConsumerRecord<String, String> message : messages) {
                    log.info("key [" + message.key() + "] value [" + message.value() + "]");
                    log.info("partition [" + message.partition() + "] offset [" + message.offset() + "]");
                }
            }
        } catch (Exception err) {
            // catch and handle exceptions
            log.error("Error: ", err);
        } finally {
            // close consumer and commit offsets
            consumer.close();
            log.info("consumer is now closed");
        }
Consumer will continuously poll its assigned topics for new messages and shut down safely if it experiences an exception.
The full code for the Consumer class should now be:
package org.example;

import org.apache.kafka.clients.consumer.ConsumerConfig;
import org.apache.kafka.clients.consumer.ConsumerRecord;
import org.apache.kafka.clients.consumer.ConsumerRecords;
import org.apache.kafka.clients.consumer.KafkaConsumer;
import org.apache.kafka.common.serialization.StringDeserializer;
import org.slf4j.Logger;
import org.slf4j.LoggerFactory;

import java.time.Duration;
import java.util.Arrays;
import java.util.Properties;

public class Consumer {
    private static final Logger log = LoggerFactory.getLogger(Consumer.class);

    public static void main(String[] args) {
        log.info("This class consumes messages from Kafka");

        Properties properties = new Properties();
        properties.setProperty(ConsumerConfig.BOOTSTRAP_SERVERS_CONFIG, "localhost:9092");
        properties.setProperty(ConsumerConfig.KEY_DESERIALIZER_CLASS_CONFIG, StringDeserializer.class.getName());
        properties.setProperty(ConsumerConfig.VALUE_DESERIALIZER_CLASS_CONFIG, StringDeserializer.class.getName());
        properties.setProperty(ConsumerConfig.GROUP_ID_CONFIG, "lotr_consumer_group");
        properties.setProperty(ConsumerConfig.AUTO_OFFSET_RESET_CONFIG, "earliest");

        KafkaConsumer<String, String> consumer = new KafkaConsumer<>(properties);

        try {
            String topic = "lotr_characters";
            consumer.subscribe(Arrays.asList(topic));

            while (true) {
                ConsumerRecords<String, String> messages = consumer.poll(Duration.ofMillis(100));

                for (ConsumerRecord<String, String> message : messages) {
                    log.info("key [" + message.key() + "] value [" + message.value() + "]");
                    log.info("partition [" + message.partition() + "] offset [" + message.offset() + "]");
                }
            }
        } catch (Exception err) {
            log.error("Error: ", err);
        } finally {
            consumer.close();
            log.info("The consumer is now closed");
        }
    }
}
You now have a basic Java application that can send messages to and read messages from Kafka. If you got stuck at any point, the full code is available on GitHub.
Where to Take it from Here
Congratulations on making it this far. You've learned:
- the main concepts behind Kafka
- how to communicate with Kafka from the command line
- how to build a Java app that produces to and consumes from Kafka
There's plenty more to learn about Kafka, whether that's Kafka Connect for connecting Kafka to common data systems or the Kafka Streams API for processing and transforming your data.
Some resources you might find useful as you continue your journey with Kafka are:
I hope this guide has been helpful and made you excited to learn more about Kafka, event streaming, and real-time data processing.
Source: https://www.freecodecamp.org
#apache #kafka