Demystifying the MQTT maze: clients, servers, connection, publish, subscribe and its applications.
What is MQTT?
MQTT is an ISO standard publish - subscribe based message protocol. It stands for Message Queuing Telemetry Transport and it works on top of TPC/IP protocol. MQTT is designed for connection with remote locations. Furthermore, its small size, low power usage, minimized data packets and ease of implementation make it ideal for machine-to-machine communication.
How MQTT works
Before we dive deep into publishing message to MQTT broker using IoT development board ESP8266-12 in my next article, we must understand the publish-subscribe pattern known as the pub-sub pattern.
In publish-subscribe pattern, a client that publishes a message is decoupled from the other client or clients that receive the message. The clients don't know about the existence of the other clients. A client can publish messages of a specific type “Topic” and only the clients that are interested in specific topics of messages will receive the published messages.
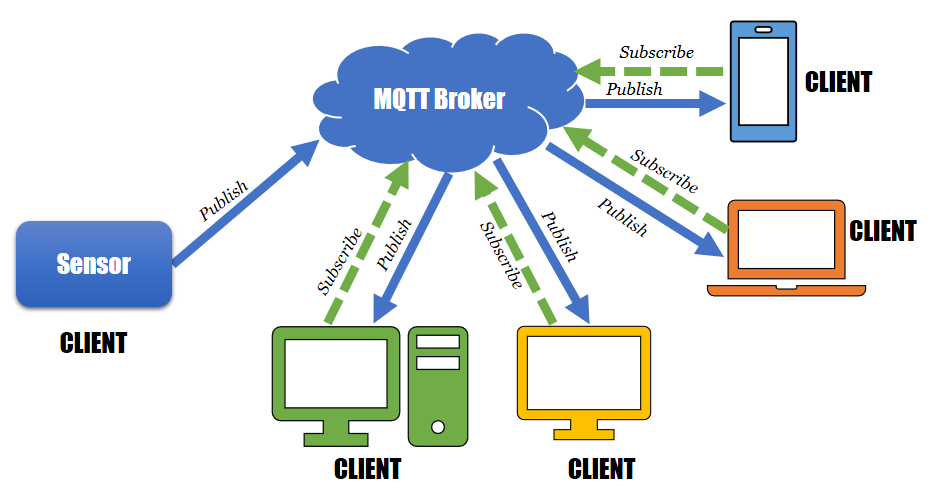
Publish-subscribe pattern requires a broker, also known as server. The MQTT broker is the central hub of the publish/subscribe model we previously analyzed. The MQTT server is responsible of the authentication and authorization of the MQTT clients that will be able to become publishers and/or subscribers after they are authenticated and authorized. So, the first thing that an MQTT client must do is to establish a connection with the MQTT server.
All the clients establish a connection with the broker. The client that sends a message through the broker is known as the publisher. The broker filters the incoming messages and distributes them to the clients that are interested in the type of received messages. The clients that register to the broker as interested in specific types of messages are known as subscribers. Hence, both publishers and subscribers establish a connection with the broker.There are many MQTT servers available for the most popular platforms, including Linux, Windows and macOS like mosquitto http://www.mosquitto.org , HiveMQ http://hivemq.com and cloudMQTT http://www.cloudmqtt.com
Why MQTT?
MQTT was designed to be suitable to support the following typical challenges in IoT, M2M, embedded, and mobile applications:
- Be lightweight to make it possible to transmit high volumes of data without huge overheads.
- Distribute minimal packets of data in huge volumes
- Support an event-oriented paradigm with asynchronous bidirectional low latency push delivery of
- messages.
- Easily emit data from one client to many clients
- Make it possible to listen for events whenever they happen (event-oriented architecture).
- Support always-connected and sometimes-connected models
- Publish information over unreliable networks and provide reliable deliveries over fragile
- connections.
- Work very well with battery-powered devices or require low power consumption.
- Provide responsiveness to make it possible to achieve near real-time delivery of information.
MQTT applications
MQTT is suitable for the following application domains in which data exchange is required:
- Asset tracking and management
- Automotive telematics
- Chemical detection
- Environment and traffic monitoring
- Field force automation
- Fire and gas testing
- Home automation
- In-Vehicle Infotainment (IVI)
- Medical
- Messaging
- Railway
- Radio-Frequency Identification (RFID)
- Supervisory Control and Data Acquisition (SCADA).
Which broker to use?
CloudMQTT is one of the best and easiest cloud-based Mosquitto broker.
CloudMQTT has a free plan that allows you to set up your own CloudMQTT broker instance that will run on their hardware servers. Hence, you can have an online broker that’s ready to use in your IoT project.
It also has a well designed GUI to monitor the publishing and subscribing processes and topics through an easy to use WebSocket UI.

How to use CloudMqtt ?
Let us figure out how CloudMQTT works:
1- Go to http://www.cloudmqtt.com , register an account and select the free option.
2- Then press on the “+ create new instance” green button to get an instance of the MQTT based mosquito cloud broker that cloudMQTT offer.

3- Just write the broker instance name, like: “maximiliano” and press “create new instance”

4- I have created a broker instance before and named it “maximiliano”, but on your account, you will find only the one you have created. Press on its name to see the details.

6- CloudMQTT offers a pretty feature which is the WebSocket UI that allows you to monitor and publish and subscribe happens within this broker.

Now you have a free broker that you can connect any devices. You won't get any messages in your websocket ui.
In my next article, I will show you how to publish and subscribe to the cloudMQTT broker.
Conclusion
We started our journey toward understanding the MQTT protocol. We understood convenient scenarios for this protocol, the details of the publish/subscribe pattern and message filtering. We learned basic concepts related to MQTT and understood the different components: clients, brokers, publish, subscribe and cloudMQTT. In my next article, we are going to learn how to publish and subscribe data to cloudMQTT broker.
#cloud
