Building a Simple Store in Angular
One of the biggest challenges I have to face when creating an app is making sure it will not crash in the case of the internet dropping out.
This can be achieved mainly by reducing API calls to the minimum thanks to some kind of local app storage. In these cases, it’s important to have a place where all the main settings and data are kept.
This part of the app, called Store, acts as a single source of truth and allows us to be independent of API calls and have a better data flow between components.
In this article, we will build a simple Store with my favorite state management library for Angular, NGXS. I will link to the full code for the example at the end of the article.
Step 1. Installing the Packages
To have all the necessary modules to create a store, we need to install the packages:
npm i @ngxs/store --save
npm i @ngxs/devtools-plugin --save-dev
packages-install.txt
npm scripts to install NGXS packages
The first package to install is the essential NGXS store library, but I consider the second one fundamental for developing.
As we will see later, thedevtools-plugin, together with the Redux DevTools Extension, will allow us to debug the store in real-time from the browser.
We can then include the downloaded NGXS modules in our app module, specifying that we are injecting them as a singleton in the application root:
import { BrowserModule } from '@angular/platform-browser';
import { NgModule } from '@angular/core';

import { AppRoutingModule } from './app-routing.module';
import { AppComponent } from './app.component';

import { NgxsModule } from '@ngxs/store';
import { NgxsReduxDevtoolsPluginModule } from '@ngxs/devtools-plugin';

@NgModule({
  declarations: [AppComponent],
  imports: [
    BrowserModule,
    AppRoutingModule,
    NgxsModule.forRoot([]),
    NgxsReduxDevtoolsPluginModule.forRoot()
  ],
  providers: [],
  bootstrap: [AppComponent]
})
export class AppModule {}
app.module.ts
Injecting the NGXS modules in app.module
Step 2. Creating a List State
The state we are about to create will store a simple to-do list. We will be able to add a new element as well as delete old ones.
We will begin defining a model for our ListState, in which we’ll declare that the state must have two properties: an array of items representing our to-do list and a variable storing the last element we added to the list.
Moreover, we will define a default set of values with which the state will be initialized. In this case, we will use an empty array for the list and null as value for the last item added:
import { State } from '@ngxs/store';

export interface ListStateModel {
  list: string[];
  lastAdded: string;
}

@State<ListStateModel>({
  name: 'ListState',
  defaults: {
    list: [],
    lastAdded: null
  }
})
export class ListState {}
list.state.ts
ListStateModel and defaults.
We can now activate the newly created state by adding it to the NgXsModule.forRoot method in the imports of app.module:
import { BrowserModule } from '@angular/platform-browser';
import { NgModule } from '@angular/core';

import { AppComponent } from './app.component';

import { NgxsModule } from '@ngxs/store';
import { NgxsReduxDevtoolsPluginModule } from '@ngxs/devtools-plugin';
import { BrowserAnimationsModule } from '@angular/platform-browser/animations';
import { ListContainerComponent } from './components/list-container/list-container.component';
import { MaterialUiModule } from './utils/material-ui/material-ui.module';
import { FormsModule, ReactiveFormsModule } from '@angular/forms';
import { ListItemInputComponent } from './components/list-item-input/list-item-input.component';
import { ListComponent } from './components/list/list.component';
import { ListState } from './store/list.state';
import { AppRoutingModule } from './app-routing.module';

@NgModule({
  declarations: [
    AppComponent,
    ListContainerComponent,
    ListItemInputComponent,
    ListComponent
  ],
  imports: [
    BrowserModule,
    MaterialUiModule,
    BrowserAnimationsModule,
    AppRoutingModule,
    FormsModule,
    ReactiveFormsModule,
    NgxsModule.forRoot([ListState]),
    NgxsReduxDevtoolsPluginModule.forRoot(),
  ],
  providers: [],
  bootstrap: [AppComponent]
})
export class AppModule {}
app.module.ts
State injection
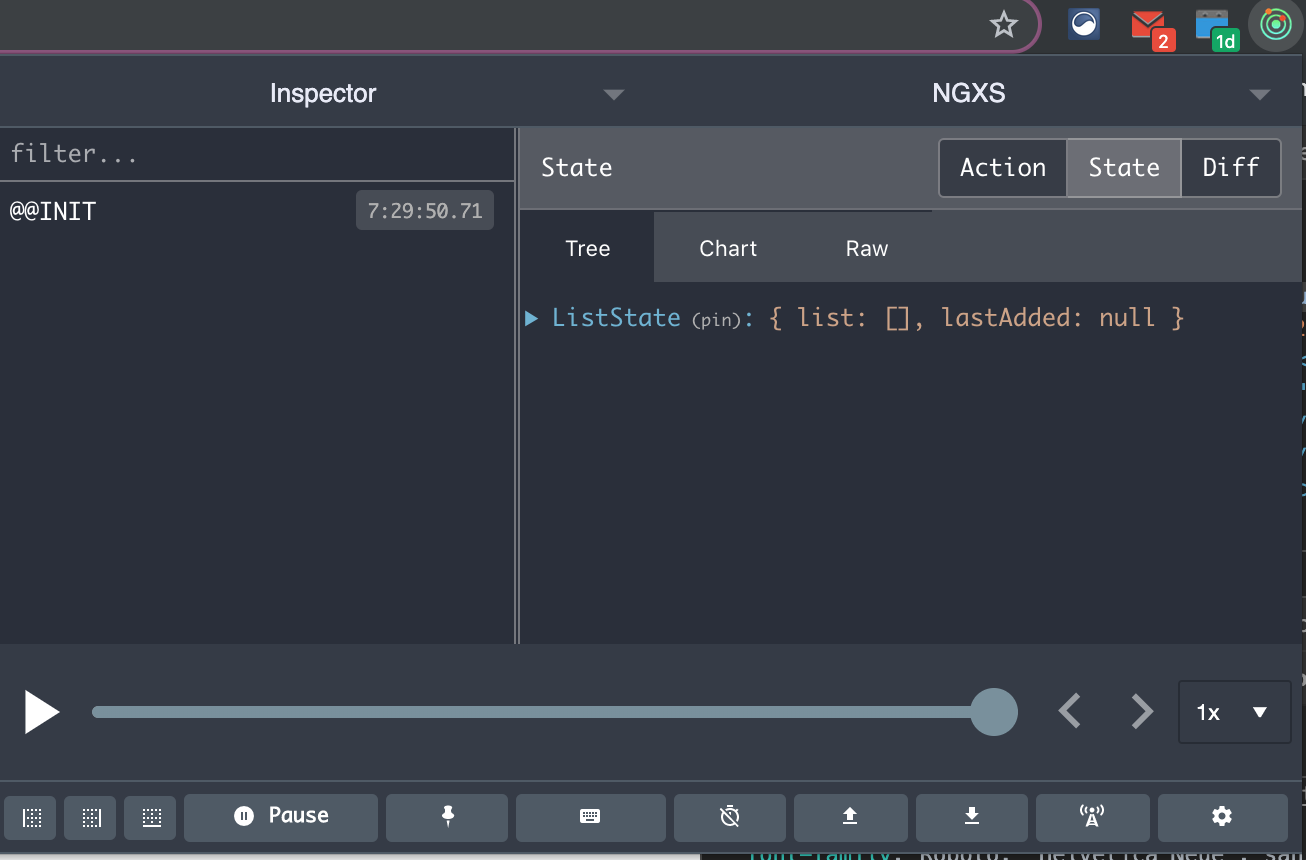
If we serve the app and then open the Redux DevTools extension, we should be able to see that the initial state of the app has been set to our default values.
Moreover, the column on the left will log a message every time an action is dispatched to the store, that is, every time we ask the store to update the values it contains.
In this case, the message @@INIT tells us that the state has been successfully initialized.

Redux DevTools Extension in Chrome
Step 3. Adding Actions to Update the State
At this point, we need to work on the methods that will allow us to edit our to-do list by changing our state.
We can start by creating a list.actions.ts file in which we will define the message we’ll see when a specific action is dispatched and also the type of payload it will take. The action’s payload is simply the data we want to use to edit the state.
export class AddListItem {
  static readonly type = '[List] Add List Item';
  constructor(public readonly payload: string) {}
}
export class DeleteListItem {
  static readonly type = '[List] Delete List Item';
  constructor(public readonly payload: string) {}
}
list.actions.ts
In this case, the action AddListItem will have as payload a string containing the new item to be added to the list. In the same way, DeleteListItem will have as payload a string containing the item to be deleted.
The next step is declaring the methods linked to the actions in list.tate.ts. The method addListItem will get the current state and then add the payload to the list array.
The method removeListItemwill get the current state and filter listto create a new array without the item to be deleted.
import { State, Selector, Action, StateContext } from '@ngxs/store';
import { AddListItem, DeleteListItem } from './list.actions';

export interface ListStateModel {
  list: string[];
  lastAdded: string;
}

@State<ListStateModel>({
  name: 'ListState',
  defaults: {
    list: [],
    lastAdded: null
  }
})
export class ListState {
  @Selector() static SelectAllItems(state: ListStateModel): string[] {
    return state.list;
  }

  @Action(AddListItem)
  addListItem(
    { getState, setState }: StateContext<ListStateModel>,
    { payload }: AddListItem
  ) {
    const state = getState();
    setState({
      list: [...state.list, payload],
      lastAdded: payload
    });
  }

  @Action(DeleteListItem)
  deleteListItem(
    { getState, setState }: StateContext<ListStateModel>,
    { payload }: DeleteListItem
  ) {
    const state = getState();
    console.log('st', state.list);
    const newList = this.arrayRemove(state.list, payload);
    console.log('nl', newList);
    setState({
      ...state,
      list: newList
    });
  }

  private arrayRemove(arr, value) {
    return arr.filter(ele => {
      return ele !== value;
    });
  }
}
list.state.ts
Methods for the Actions declared below
We also declared a method called SelectAllItems, a state selector that allows us to subscribe to listfrom anywhere in our app_._
Step 4. Dispatching an Action
At this point, everything is ready to use the state. In my example, I have set an input field on the landing page to type my new to-do. I also have an “Add Item” button and a “View List” button that will route to the list view.

Input field on the landing page
In the list-input.component, to use the state, we need to initialize it in the constructor. Then, we can call the store’s method dispatch to dispatch an action:
import { Component, OnInit, Input, Output, EventEmitter } from '@angular/core';
import { FormControl, FormGroup } from '@angular/forms';
import { Store } from '@ngxs/store';
import { Router } from '@angular/router';
import { AddListItem } from 'src/app/store/list.actions';

@Component({
  selector: 'app-list-item-input',
  templateUrl: './list-item-input.component.html',
  styleUrls: ['./list-item-input.component.scss']
})
export class ListItemInputComponent implements OnInit {
  form: any;
  showItemAdded = false;

  constructor(private store: Store, private router: Router) {
    this.form = new FormGroup({
      listItem: new FormControl('')
    });
  }

  ngOnInit() {}

  submitItem() {
    this.showItemAdded = true;
    const item = this.form.get('listItem').value;
    this.store.dispatch(new AddListItem(item));
    this.form.reset();
    setTimeout(() => {
      this.showItemAdded = false;
    }, 2000);
  }

  viewList() {
    this.router.navigate(['list']);
  }
}
list-item-input.component.ts
Dispatching an action from the list-input.component
We can also watch the store update using the Redux DevTools. In fact, if we type Buy Bread into the input field and click on Add Item, we will see the item being added to our to-do list in the store when the [List] Add List Itemaction is dispatched.

The dispatched action in the Redux DevTools
Step 5. Reading Values From the State
NGXS makes it also easy to read values from the store from any component in our application.
Let’s suppose we have added three or four to-dos to our list and we want to finally visualize it in another route. We can instantiate the state and use a Selectstatement to get an observable of our list.
Without subscribing to the observable, we can simply read its value through the asyncpipe in our HTML.
<section>
  <mat-card>
    <mat-card-title>Your To-Do List</mat-card-title>
    <mat-card-subtitle>Click on an item to delete it</mat-card-subtitle>
    <app-list
      [listItems]="listItems | async"
      (deleteItemEmt)="deleteItem($event)"
    ></app-list>
  </mat-card>
</section>
list.component.html
import { Component, OnInit } from '@angular/core';
import { FormGroup, FormControl } from '@angular/forms';
import { Store, Select } from '@ngxs/store';
import { ListState } from 'src/app/store/list.state';
import { Observable } from 'rxjs';
import { DeleteListItem } from 'src/app/store/list.actions';

@Component({
  selector: 'app-list-container',
  templateUrl: './list-container.component.html',
  styleUrls: ['./list-container.component.scss']
})
export class ListContainerComponent implements OnInit {
  @Select(ListState.SelectAllItems) listItems: Observable<string[]>;

  constructor(private store: Store) {}
  ngOnInit() {}

  deleteItem(evt: string) {
    console.log(evt);
    this.store.dispatch(new DeleteListItem(evt));
  }
}
list.component.ts
Selecting the list as an observable from the store
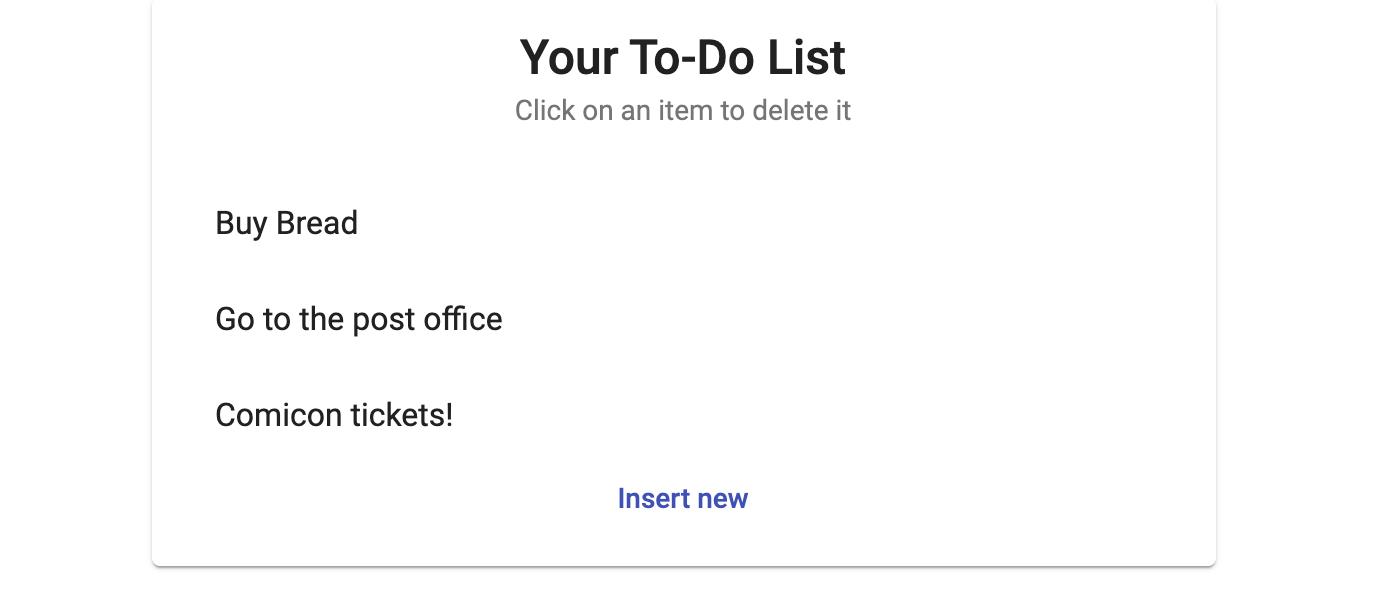
Once rendered, we’ll be able to see and interact with our list grabbed from the store:

Async pipe magic!
Conclusion
In this article, we have seen how to create a simple NGXS store from scratch.
This is a small example of what can be achieved with a state management library. There is obviously so much more you can do with NGXS to improve your apps and I would suggest you have a look at the official documentation for some amazing tips and tricks!
Also, check my NGXS demo repo on GitHub to have this code work on your PC!
Hope it is useful!
#angular #javascript #angularjs
