Building microservice applications with Kubernetes and Docker
Docker is an open source platform that’s used to build, ship and run distributed services. Kubernetes is an open source orchestration platform for automating deployment, scaling and the operations of application containers across clusters of hosts. Microservices structure an application into several modular services. Here’s a quick look at why these are so useful today.
In one of my previous posts, I described an example of continuous delivery configuration for building microservices with Docker and Jenkins. It was a simple configuration where I decided to use only Docker Pipeline Plugin for building and running containers with microservices. That solution had one big disadvantage – we had to link all containers between each other to provide communication between microservices deployed inside those containers. Today I’m going to present you one smart solution which helps us to avoid that problem – Kubernetes.
Theory
Kubernetes is an open-source platform for automating deployment, scaling, and operations of application containers across clusters of hosts, providing container-centric infrastructure. It was originally designed by Google. It has many features which are especially useful for applications running in production, like service naming and discovery, load balancing, application health checking, horizontal auto-scaling, and rolling updates. There are several important concepts around Kubernetes we should know before going into the sample.
Pod – This is the basic unit in Kubernetes. It can consist of one or more containers that are guaranteed to be co-located on the host machine and share the same resources. All containers deployed inside pod can see other containers via localhost. Each pod has a unique IP address within the cluster
Service – This is a set of pods that work together. By default, a service is exposed inside a cluster but it can also be exposed onto an external IP address outside your cluster. We can expose it using one of four available behaviors: ClusterIP, NodePort, LoadBalancer and ExternalName.
Replication Controller – This is a specific type of Kubernetes controller. It handles replication and scaling by running a specified number of copies of a pod across the cluster. It is also responsible for pod replacement if the underlying node fails.
Minikube
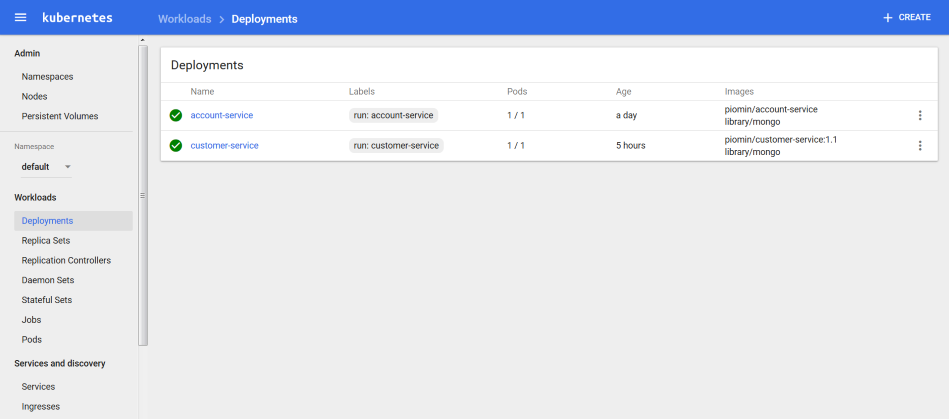
The configuration of highly available Kubernetes cluster is not an easy task to perform. Fortunately, there is a tool that makes it easy to run Kubernetes locally – Minikube. It can run a single-node cluster inside a VM, which is really important for developers who want to try it out. The beginning is really easy. For examples on Windows, you have to download minikube.exe and kubectl.exe and add them to the PATH environment variable. Then you can start it from the command line using the minikube start command and use almost all of Kubernetes features available by calling the kubectl command. An alternative for the command line option is Kubernetes Dashboard. It can be launched by calling the minikube dashboard command. We can create, update, or delete deployment from the UI dashboard, and also list and view a configuration of all pods, services, ingresses, replication controllers, etc. Here’s Kubernetes Dashboard with the list of deployments for our sample:

Application
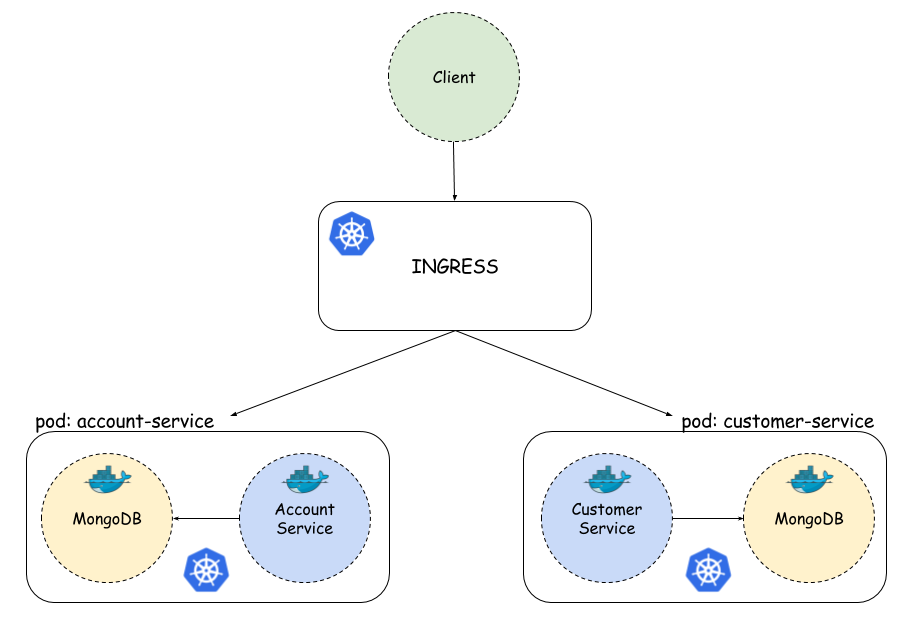
The concept of our sample microservices architecture is pretty similar to the concept from my article about continuous delivery with Docker and Jenkins, which I mentioned in the beginning of the article. We also have account and customer microservices. Customer service is interacting with account service while searching for customer accounts. We do not use gateway (Zuul) and discovery (Eureka) Spring Boot services, because we have such mechanisms available on Kubernetes out of the box. Here’s a picture illustrating the architecture of the presented solution. Each microservice’s pod consists of two containers: first with microservice application, and second with Mongo database. Account and customer microservices have their own database where all data is stored. Each pod is exposed as a service and can by searched by name on Kubernetes. We also configure Kubernetes Ingress, which acts as a gateway for our microservices.

Sample application source code is available on GitHub. It consists of two modules: account-service and customer-service. It is based on the Spring Boot framework, but doesn’t use any of Spring Cloud projects except Feign client. Here’s dockerfile from account service. We use a small openjdk image – alpine. Thanks to that, our result image will have about ~120MB instead of ~650MB when using standard openjdk as a base image.
FROM openjdk:alpine
MAINTAINER Piotr Minkowski <piotr.minkowski@gmail.com>
ADD target/account-service.jar account-service.jar
ENTRYPOINT ["java", "-jar", "/account-service.jar"]
EXPOSE 2222
To enable MongoDB support, I add spring-boot-starter-data-mongodb dependency to pom.xml. We also have to provide connection data to application.yml and annotate entity class with @Document. The last thing is to declare repository interface extending MongoRepository which has basic CRUD methods implemented. We add two custom find methods:
public interface AccountRepository extends MongoRepository<Account, String> {
    public Account findByNumber(String number);
    public List<Account> findByCustomerId(String customerId);
}
In customer service, we are going to call API method from account service. Here’s declarative REST client @FeignClient declaration. All the pods with account service are available under the account-service name and default service port – 2222. Such settings are the results of the service configuration on Kubernetes. I will describe it in the next section.
@FeignClient(name = "account-service", url = "http://account-service:2222")
public interface AccountClient {
    @RequestMapping(method = RequestMethod.GET, value = "/accounts/customer/{customerId}")
    List<Account> getAccounts(@PathVariable("customerId") String customerId);
}
The docker image of our microservices can be built with the command visible below. After the build, you should push that image to official docker hub or your private registry. In the next section, I’ll describe how to use them on Kubernetes. Docker images of the described microservices are also available on my Docker Hub public repository as piomin/account-service and piomin/customer-service.
docker build -t piomin/account-service .
docker push piomin/account-service
Deployment
You can create deployment on Kubernetes using kubectl run command, Minikube dashboard, or YAML configuration files with kubectl create command. I’m going to show you how to create all resources from YAML configuration files, because we need to create multi-containers deployments in one step. Here’s deployment configuration file for account-service. We have to provide deployment name, image name, and exposed port. In the replicas property, we are setting the requested number of created pods.
apiVersion: extensions/v1beta1
kind: Deployment
metadata:
  name: account-service
  labels:
    run: account-service
spec:
  replicas: 1
  template:
    metadata:
      labels:
        run: account-service
    spec:
      containers:
      - name: account-service
        image: piomin/account-service
        ports:
        - containerPort: 2222
          protocol: TCP
      - name: mongo
        image: library/mongo
        ports:
        - containerPort: 27017
          protocol: TCP
We are creating new deployment by running the command below. The same command is used for creating services and ingress. Only the YAML file format is different:
kubectl create -f deployment-account.yaml
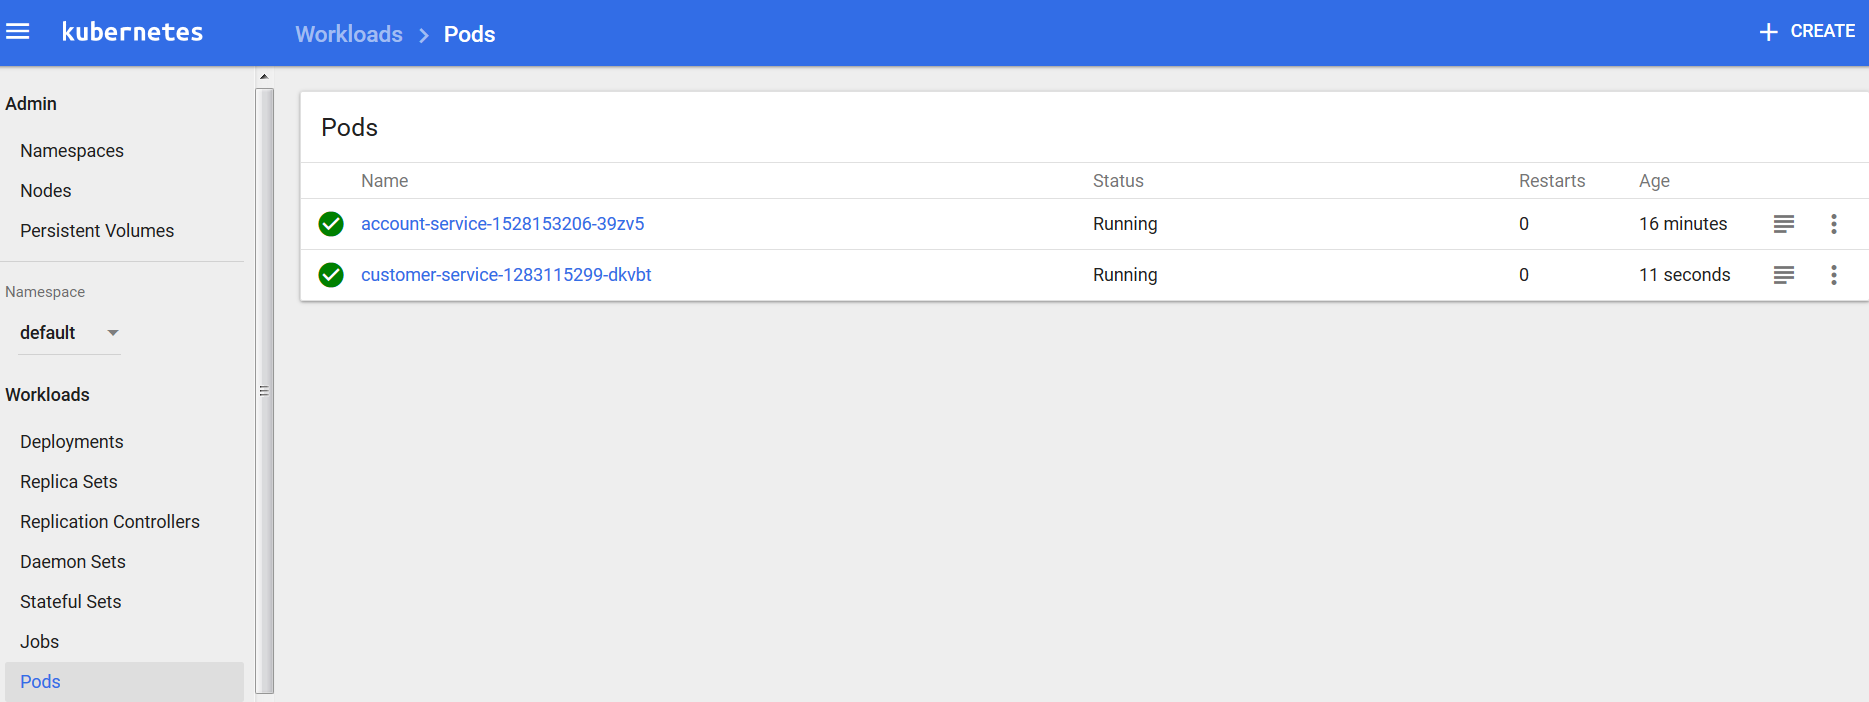
Now, let’s take a look at the service configuration file. We have already created deployment. As you could see, the dashboard image has been pulled from Docker Hub; pod and replica set has been created. Now, we would like to expose our microservice outside. That’s why service is needed. We are also exposing Mongo database on its default port, to be able to connect database and create collections from MongoDB client.
kind: Service
apiVersion: v1
metadata:
  name: account-service
spec:
  selector:
    run: account-service
  ports:
    - name: port1
      protocol: TCP
      port: 2222
      targetPort: 2222
    - name: port2
      protocol: TCP
      port: 27017
      targetPort: 27017
  type: NodePort

After creating a similar configuration for customer service, we have our microservices exposed. Inside Kubernetes, they are visible on default ports (2222 and 3333) and service name. That’s why inside the customer service REST client (@FeignClient), we declared URL http://account-service:2222. No matter how many pods have been created, service will always be available on that URL and requests are load balanced between all pods. If we would like to access each service outside Kubernetes, for example, in the web browser we need to call it with a port visible below the container default port – in that sample for account service, it is 31638 port, and for customer service, 31171 port. If you have run Minikube on Windows, your Kubernetes is probably available under the 192.168.99.100 address, so you could try to call account service using URL http://192.168.99.100:31638/accounts. Before such a test, you need to create a collection on the Mongo database and user micro/micro, which is set for that service inside application.yml.

Ok, we have our two microservices available under two different ports. It is not exactly what we need. We need some kind of gateway available on IP which proxies our requests to exact service by matching the request path. Fortunately, such an option is also available on Kubernetes. This solution is Ingress. Here’s the YAML ingress configuration file. There are two rules defined, first for account-service and second for customer service. Our gateway is available under the micro.all host name and default HTTP port.
apiVersion: extensions/v1beta1
kind: Ingress
metadata:
  name: gateway-ingress
spec:
  backend:
    serviceName: default-http-backend
    servicePort: 80
  rules:
  - host: micro.all
    http:
      paths:
      - path: /account
        backend:
          serviceName: account-service
          servicePort: 2222
      - path: /customer
        backend:
          serviceName: customer-service
          servicePort: 3333
The last thing that needs to be done to make the gateway work is to add the following entry to the system hosts file (/etc/hosts for linux and* C:\Windows\System32\drivers\etc\hosts for windows*). Now, you could try to call from your web browser http://micro.all/accounts or http://micro.all/customers/{id}, which also calls account service in the background.
[MINIKUBE_IP] micro.all
Kubernetes is a great tool for microservices clustering and orchestration. It is still a relatively new solution under active development. It can be used together with Spring Boot stack or as an alternative for Spring Cloud Netflix OSS, which seems to be the most popular solution for microservices now. It also has a UI dashboard where you can manage and monitor all resources. Production grade configuration is probably more complicated than single host development configuration with Minikube, but I don’t think that is a solid argument against Kubernetes
Learn More
Thanks for reading !
#microservices #kubernetes #docker
